Young Toddler Easter Basket Ideas

Today I thought I'd share what we'll be putting in our little one's Easter Basket.  My goal was to spend less than $20 and fill it with practical and fun items.  | This post contains affiliate links |

Inexpensive Easter Basket Ideas for a Young Toddler

Our little girl is only 15 months old, has more than enough toys, and doesn't eat candy yet so I was a little stumped as to what to put in her Easter basket at first.  After some thought I decided to fill it with some items she needed anyway and a few things to use outside once the warmer weather comes (someday soon, I hope).  

DIY Button Easter Basket

I started with the Easter basket I made for her last year (you can read my post on making her Button Easter Basket here).  First I filled the bottom with paper Easter grass - having a toddler and a dog, it's so important to use the paper Easter grass over plastic just in case any gets eaten.  The paper grass is also a lot more eco-friendly.  

Toddler Easter Basket Ideas:  Lunch box, snacks, chalk, book, watering can

I love what I found to put in her basket!  
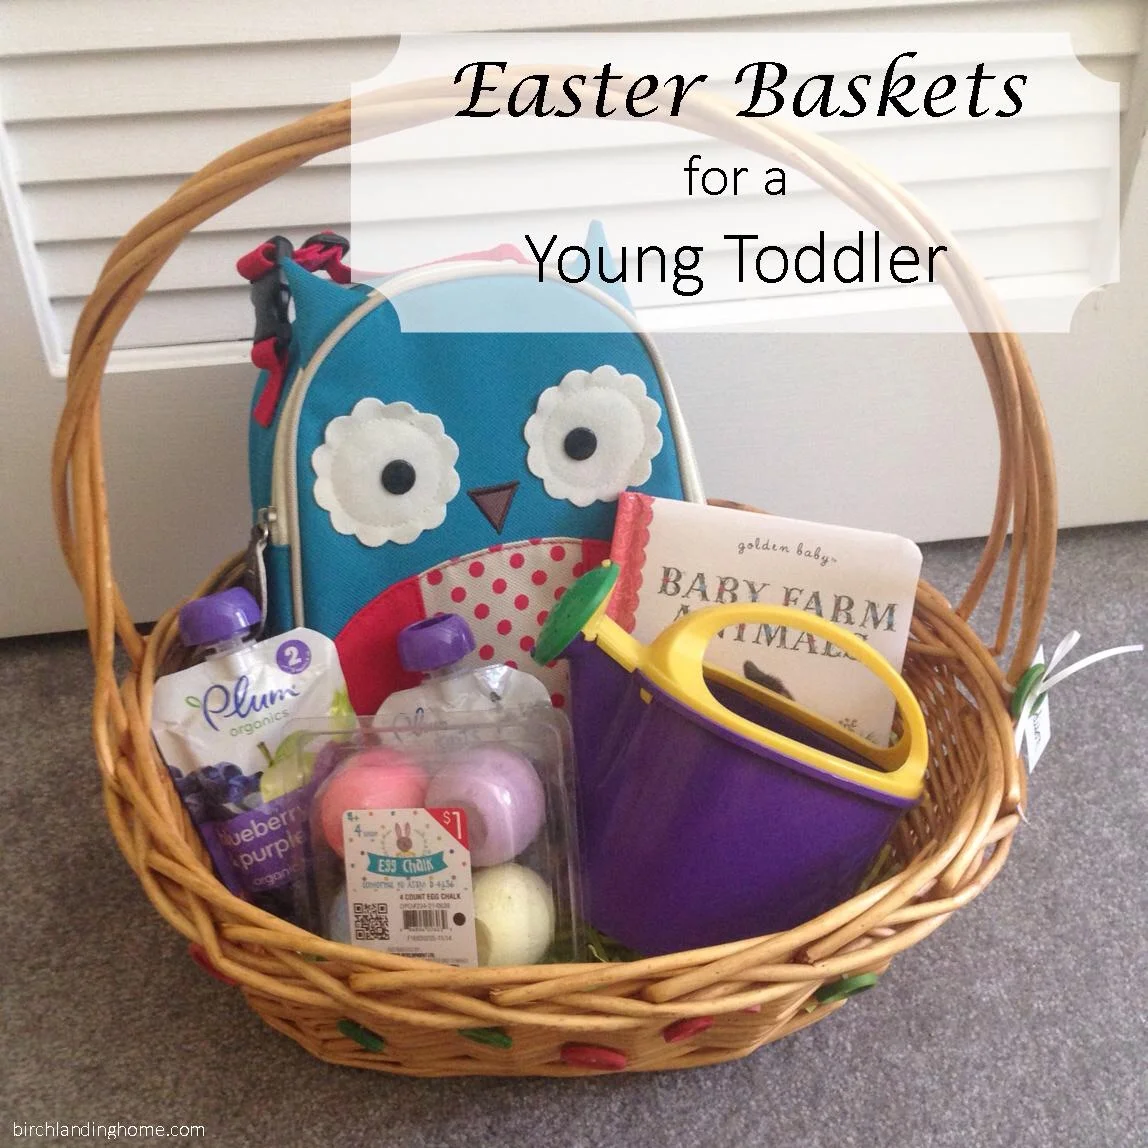
In her basket:  

  • Owl Lunchbox by SkipHop.  She desperately needed a new lunchbox (hers broke) and this owl one from Amazon was just the cutest.  There are many other animal styles to choose from too if owls aren't your thing.  
  • Purée pouches by Plum Organics.  What toddler doesn't love snacks?  We picked these up last time we were at Target but they can be found at just about any grocery store or purchased by the case from Amazon.  
  • Baby Farm Animals board book by Golden Books.  We actually got this book for free from the local library (they were clearing out duplicates) but you can usually find inexpensive board books on Amazon or on sale at your local book store.  
  • Child's Watering Can.  We got this from the Dollar Store, but these can also be found at your local pharmacy.  (Similar one here.) 
  • Egg-Shaped Chalk.  These came from the dollar bins at Target, and I love them because they're easy for little hands to hold.  (Similar ones here.)

Since I got the board book for free I spent right around $15 for everything - wahoo!  

Other basket ideas for a one-year old or young toddler:  

All of these items can be done for a girl or a boy, and are easy to tweak if you wanted to tailor it more to your own child.  I hope I've given you some ideas of what to put in your little one's Easter basket - Happy Easter!  

Cheap ideas for a cute toddler Easter Basket
Fun, practical, and cheap Easter Basket for a Toddler

Looking for more Easter ideas?  Check out our other Easter posts:  

KEEP UP WITH BIRCH LANDING HOME
|  Etsy  |  Facebook  |  Instagram  |  Pinterest  |  Bloglovin'  |  Hometalk  |

DIY No-Sew Baby Legwarmers

Baby legwarmers are huge right now, and with good reason - they're just too cute on those chubby little legs!  

DIY No-Sew Baby Legwarmers

Today I have the easiest no-sew DIY on how to make your own baby legwarmers from something you already have in the house.  In fact it's so easy that I made these this morning before I even finished my first cup of coffee - now that's saying something!  

Materials: 

  • Tall socks (preferably knee socks)
  • scissors
Simple supplies for making DIY Legwarmers

How-to: 

Just cut the foot off the sock to make baby legwarmers!

Take an old pair of tall socks (I used a pair of tall dress socks that I never wear), and cut off the feet... that's it!  (See?  I told you it was easy!)  Then use the tube portion of the socks for baby's little legwarmers.  

These would be especially cute made with tall, slouchy tube socks in fun colors or patterns.  Target always has fun socks for a dollar or two and I know I'll be picking some up next time I go to make more of these for our little one.  

You most likely won't have to hem these legwarmers but depending on the material and weave of the socks, you may want to.  

Easy no-sew baby leg warmers made from socks!

These little legwarmers would look especially cute paired with a wrap headband like those from Andy Sachs or Rascal & Roo.  I tried to put one on Miss M this morning for these pictures, but she wasn't having it.. typical toddler ;)

(Excuse the frosty toddler handprints and puppy noseprints on the glass.. it's a never-ending battle.)

(Excuse the frosty toddler handprints and puppy noseprints on the glass.. it's a never-ending battle.)

KEEP UP WITH BIRCH LANDING HOME
|  Etsy  |  Facebook  |  Instagram  |  Pinterest  |  Bloglovin'  |  Hometalk  |

Toddler Art Valentine's Cards

We decided to try our hand at making our own toddler art Valentine cards to send to family and friends - it was so easy and a lot of fun!  
| This post contains affiliate links |

Toddler Art Valentine's Cards; toddler activity / project

Materials:

Finger painting for Valentine Cards

How-to:

For our little one to make her art, I taped some big sheets of finger painting paper to our kitchen floor and let her go to town!  This was also her first painting experience, and it's safe to say that she really enjoyed it... though I think she may have been just as interested in trying to pull the tape off the floor.  

Even though I was an art education major, I'd never used special paper for finger painting and I was a bit skeptical at first.  The paper touts being "glossy and non-absorbent" and I wasn't sure how the paint would stay on the paper or if it would dry well.  Nevertheless, it worked great!  The non-absorbency and glossiness is perfect for finger painting - a little paint goes a long way since it isn't absorbed into the paper and the smooth glossy surface makes it easy for little fingers to move the paint around.  Drying time was pretty fast too and the paint stayed well on the paper, no flaking or peeling.  

Heart-shaped cookie cutter to trace

Once the paintings were dry, I used a heart-shaped cookie cutter to trace out the hearts and cut them out.  

Finished Toddler Art Valentine - simple, easy, beautiful, and fun!

I glued the hearts onto a folded piece of white stationery from C.R. Gibson, then added a little handwritten note inside and they were done.  Now to mail them off to family and friends!

Happy Valentine's Day!  

Check out our other Valentine's posts:  

KEEP UP WITH BIRCH LANDING HOME
|  Etsy  |  Facebook  |  Instagram  |  Pinterest  |  Bloglovin'  |  Hometalk  |

The *one thing* you should always do before you dress your baby.

What's the one thing you should always do before you dress your baby?  It may sound silly, but check their clothing for loose threads.  

Always do THIS Before you Dress your Baby

Infant clothing is notorious for poor workmanship.  Those adorable outfits and layettes are inexpensive to buy and not meant to last.  Long threads could potentially wrap around a baby's toe causing harm, and loose threads could become a choking hazard if baby were to pull them free and try to eat it.  

Loose threads can be dangerous for babies - always check for them before dressing your little one

You will almost always find loose threads on your little one's new outfits and after the first time they've been washed.  After that, it's a good idea to give their clothes a quick once-over before you dress them to make sure there's no new loose threads or weak seams.  

Loose threads on baby's clothes can be dangerous.

I always keep a pair of baby nail clippers handy by the changing table, that way I can easily clip any loose threads I happen to see.  

KEEP UP WITH BIRCH LANDING HOME
|  Etsy  |  Facebook  |  Instagram  |  Pinterest  |  Bloglovin'  |  Hometalk  |

First Birthday Party Details

Our little Madison turned one last month!  We had a very low-key, small party with just immediate family invited.  We decided to keep decorations to a minimum and keep it simple and fun.  
Here are some of the details from the little party.  

Madison's 1st Birthday Party Centerpiece

Her party theme was pink and green polk-a-dots (with some buttons for good measure).  For the centerpiece we used her name puzzle propped up on a plate stand with some birthday balloons added for fun:  

Simple 1st birthday decorations

I made the cake myself and kept it easy, to decorate it I added edible sugar buttons:  

Button 1st Birthday Cake

For favors we filled pink polk-a-dot paper favor bags with chocolate Hershey's Hugs and Kisses candies, so party-goers could take home "hugs and kisses" from the birthday girl:  

Hugs and Kisses from the birthday girl for party favors
Party favors are chocolate hugs and kisses from the birthday girl

KEEP UP WITH BIRCH LANDING HOME
|  Etsy  |  Facebook  |  Instagram  |  Pinterest  |  Bloglovin'  |  Hometalk  |

Pampers Rewards

File this one under "things I wish I started sooner..."

Pampers Rewards - get free rewards for the diapers you buy

So our little one is almost 11 months old, and though I'd seen the Pampers Rewards numbers on her packages of diapers and wipes I never bothered to look into it ("Ain't nobody got time for that!").  

But the other week my sister-in-law was saying how she's been doing Pampers Rewards for awhile now and has been getting rewarded with photobooks and toys for free... that got my attention.  So I checked it out and signed up, it's pretty straightforward - make an account and enter the codes printed on packages of diapers and wipes.  Once you have some points you can redeem them for all sorts of things - everything from contributions to charity, to free credits at Shutterfly, to free toys.  And to make it easier there's even an app where you can enter codes on the fly from your phone (though I wish you could just scan the code instead of entering it.. now that would be easy!).  Consistency pays off too - if you enter codes every month without skipping a beat you get rewarded every three months with little gifts.  

Now if only I had started this when she was first born, then I'd be able to order all our Christmas cards for free!  

Tip:  Make sure to like Pampers on Facebook too - they periodically post free codes to help you boost your points!  

UPDATE (May, 2015):  Pampers updated their app so now you can scan codes with the camera on your phone rather than typing them in (hooray!).  As of right now this feature is a little glitchy, but hopefully they'll work out these bugs soon.  

Want to see what we've gotten from Pampers Rewards?  Check out my other posts:  

Please note items available from Pampers Rewards are subject to change.  

KEEP UP WITH BIRCH LANDING HOME
|  Etsy  |  Facebook  |  Instagram  |  Pinterest  |  Bloglovin'  |  Hometalk  |

Our Top Baby Registry Must-Haves (many will surprise you!)

Getting ready for a new baby means.. a lot of stuff.  Like, a boatload.  Some stuff you’ll hardly ever use, and others you just couldn’t live without. 
Read on for some of our favorite baby registry must-haves - some will surprise you! 
| This post contains affiliate links |

Top Baby Registry Must-Haves you don't think of
  1. Coconut Oil - This will become your go-to every time baby has dry skin or a rash. It helps treat cradle cap, dry skin, various diaper rashes, and heat rash. It's is a natural anti-fungal and antibacterial so it heals, moisturizes, and helps keep the issue from coming back.
    (FYI - coconut oil can be expensive.. the place where we've found the best deal has been in-store at Trader Joe's.)

  2. Aden+Anais Swaddle Blankets – nearly all babies love to be swaddled, and these blankets are perfect. They’re made of very breathable muslin which helps ensure baby doesn't overheat and are also over-sized so you always have plenty of material to work with.
    When baby no longer wants to be swaddled, they make perfect lightweight stroller blankets.

  3. Sophie the Giraffe - I thought this was the most ridiculous thing at first (nearly $20 for a little rubber giraffe? Really?!), but our daughter absolutely loves it! It was one of the first toys she could hold and play with thanks to it's long neck and legs, and all of it's different parts and textures give her a lot of options for teething.
    Now that she's crawling she loves holding on to Sophie and squeaking her against the floor as she goes along. It's become one of our daughter's favorite toys, though our dog did take some convincing that it wasn't for her.

  4. Convertible Pack 'N Play (with bassinet + changing table) - In the first few weeks when you're sore and beyond exhausted, you're going to want some place close to put your baby down or change her. These convertible pack 'n plays are ideal, but don't get too carried away with them! When we were first comparing all our options we were tempted to get the most expensive one will all the bells and whistles, but instead settled for a mid-range model and I'm so glad we did. Our little baby outgrew the bassinet within weeks so if we had spent extra money on one with an extra-fancy bassinet it would have been for naught. As a whole though these pack 'n plays grow with baby, so this is a purchase you'll be using for a long time.

  5. Insulated Lunch Box or Small Cooler - Bottle feeding or breast feeding, at some point you will need to take milk or formula with you. Whether you choose a novelty lunch box that will take your little one into daycare and preschool or an ordinary small cooler, having someplace to keep milk and first foods cold on the go is essential.

  6. Baby Merlin's Magic Sleepsuit - This is another one of those things I thought was a total gimmick at first but after weeks of our little one walking up no less than 15 times a night (oh how I wish I was exaggerating) and refusing to nap during the day, I gave it a try and it certainly was magical!
    The Sleepsuit helps transition your little one when they no longer want to be swaddled, but are still being awoken by their Moro reflex. It allows them to sleep on their back in a stretched out position but the puffy padded suit helps "muffle" their startles, keeping them feeling cozy and safe and allowing them to fall back asleep on their own. The suit comes in two sizes (3-6 months and 6-9 months) and should no longer be used when baby is able to start to roll over in the suit.
    For us this suit was a sanity saver and got our little one's sleep back on track. It also was instrumental in helping us establish naps and start our daughter on a schedule when she was a few months old.

  7. Stain Removers - Babies are messy, and you don't realize just how much so until you have one.
    So far Seventh Generation Natural Stain Remover Spray has been able to take down every laundry stain we've thrown at it - even set-in stains that have already been through the wash once already are no match for this spray.
    For the instances when baby poops, pees, or spits up on things that can't go through the washing machine (like the carpet or the couch) Bi-O-Kleen Bac-Out Stain and Odor Eliminator does a great job at lifting the stains and smells out.

  8. Jogging Stroller - It doesn't matter if you're or runner or have never worked out a day in your life - get the jogging stroller over the regular stroller with the little wheels.
    After going for walks with friends that have regular strollers, it made me all the more thankful for our jogger! Our BOB stroller navigated the walking path and sidewalks with ease but for our small-wheeled stroller friends, relatively small cracks and uneven parts of the sidewalk became like hitting a brick wall with stroller, baby, and mom coming to an abrupt halt.
    And don't let price and compatibility deter you - my sister-in-law found our nearly $400 BOB stroller on Craigslist for only $40, so don't be afraid to buy used! Also most joggers have car seat adapters available so you can still use your travel system like you would with a regular stroller.

  9. The Baby Book by Dr. Sears - Ever wish babies came with directions? This is probably as close as you'll come. This easy-to-read book covers all the basics and more and is a great reference for just about everything that will come your way.
    While you're pregnant I also highly recommend reading The Pregnancy Book and The Birth Book (also of the Sears Parenting series). I read several pregnancy/labor books while expecting and these were the most thorough books hands-down. And while they were a little too "touchy-feely" for my taste at times, I felt as though they really helped me prepare for and understand my pregnancy and labor.

  10. Mattress Protection (for your mattress) - It's a given to get mattress covers for the baby's mattress, but until someone suggested one for our mattress too it never crossed my mind.
    In your last trimester get a good-quality, non-crinkly mattress cover for your own bed. That way in case your water breaks in bed, you're protected. Then even after baby is born, leave it on because at some point baby will poop, pee, or throw-up in your bed. It will happen more than once, trust me. And do you really want to ruin that $400 mattress? Didn't think so.

  11. Fan - White noise can help lull a baby to sleep and good air circulation can help reduce the risk of SIDS, so having a fan near wear your baby sleeps is a great idea. Some people swear by sound machines to help their baby to sleep, but personally the thought of whale sounds going for hours on end gives me a headache.
    Whatever you decide to do, have a little white background noise and make sure baby's room is well-ventilated.

  12. Infant Carrier – there are lots of great ones out there. I suggest going to a local Babies ‘R Us or baby boutique and try some on to see what features you like and don’t like. Some people really like a structured carrier (like an Ergo or Boba), and others prefer the ones made of stretchy material (like a Moby wrap). Personally, I prefer the structured carrier.. it’s definitely a lot easier to take on and off when you’re out and about. Just make sure not to get one that's considered a "crotch-dangler" - they're bad for baby's hips!
    Whatever you choose, baby-wearing is not only great for bonding but it’s a HUGE sanity saver. It allows you to be able to still get things done around the house when your little one won’t let you put them down.

That's our list of our top baby must-haves, but of course there are a million other things you'll need - diapers, wipes, bottles, breast pumps, diaper pail, saline drops, co-sleeper or bassinet, crib, high chair, car seat... The list goes on and on but we hope we gave you some ideas for things that you might not have thought of.  
It can be a hard and exhausting job, but motherhood is the most rewarding thing you'll ever do.  Good luck, Mama - you'll do great!  


KEEP UP WITH BIRCH LANDING HOME
|  Etsy  |  Facebook  |  Instagram  |  Pinterest  |  Bloglovin'  |  Hometalk  |

Baby's First Foods: The Basics {Free Printable Chart}

Starting solids is a huge step, especially for first-time parents like us.  So many questions, so many rules, so much to keep track of in the beginning!  Here we thought we'd share some of the basics, our go-to resources, and a handy chart to keep track of your baby's first foods.  | This post contains affiliate links |

BabysFristFoodsTitle.jpg

Disclaimer:  The info I am sharing is based on my own experiences; I am not a medical professional.  Always double check with your pediatrician before starting solids and get their professional opinion on the best way to introduce new foods to your little one.  Please also note this post was originally published in 2014 and some "best practices" may have changed.  Always check with your child's pediatrician for their recommendations and advice.  

Most pediatricians recommend starting solids between 4-6 months of age (closer to 6 months is supposed to be best).  Baby must be able to hold their head independently and ideally the baby has also started to show an interest in food.  It's important to get the okay from your pediatrician first before starting solids.  

In the past baby's first food was always rice cereal, but that's not the case anymore.  Just about any pureed food that's considered "non-allergenic" and has been thinned down sufficiently can be given.  In general, it's best to work from a pre-determined list of typical "first foods" - these are foods that are least-likely to cause allergies or reactions in your little one.  Make sure the foods are well-pureed and thin them down with breast milk, formula, or water - the thinner the better in the beginning!  Once baby gets used to swallowing their thinned food, you can add less liquid and make the food increasingly thicker.  

Follow your baby's lead when feeding.  If they turn their head or push the spoon away, they're finished - don't pressure them.  And don't worry if baby seems to hate their dinner, it's been said that a baby needs to try a food at least 10 times before they're sure if they really hate it or love it.  If baby really hates those pureed pears wait a few days or a few weeks before trying it again, you may be surprised how much he loves it the next time!  

Always introduce new foods individually at least 3 or 4 days apart to make sure your baby doesn't have any kind of reaction.  Keep track of any symptoms or side affects no matter how insignificant, as it may be a coincidence or be related to the food.  If you notice your baby is extra fussy or gassy, for example, write that down and see if she has the same reaction next time she has that particular food.  If your baby breaks out in a rash, has a change in breathing, or any other kind of severe reaction call the pediatrician immediately!  

Fresh is best when it comes to baby food!  Making your own pureed baby food is quick and easy - all you need is a steaming basket, blender, and baby food storage containers.  Steam the fruit or veggies until soft then blend until smooth, using the cooking water to thin as needed, then store in baby food storage containers.  Breast milk storage bags can also be used to store baby food, and are especially handy if you've made a big batch and have run out of baby food containers.  

When buying commercial baby food, make sure to read the labels closely!  So many have ingredients that you wouldn't expect and might not want for your baby.  Even the organic ones may have ingredients that will catch you off guard - for example one that's described as "Pumpkin & Spinach" may also have another veggie or fruit such as apricot in it.  If your baby hasn't had apricot yet, you may decide to skip this one for now until she tries that food individually first.  

Our little one started solids around 5 1/2 months and was very picky in the beginning.  It seemed as though we could never find a food she liked or a texture that was smooth enough.  After a lot of trial and error (and record keeping, hence the chart), we finally got a sense of what she liked and she started to accept eating solids.  It may be hard in the beginning, but by taking notes and letting your baby set the pace of what they're ready for it will be a success.  

Baby's First Foods Chart

A simple chart to keep track of what food has been introduced (and tally how many times they have tried it), what they thought of it, and possible reactions. This chart will also be a great record to keep for the baby book.

A simple chart to keep track of what food has been introduced (and tally how many times they have tried it), what they thought of it, and possible reactions. This chart will also be a great record to keep for the baby book.

{Download free PDF of Baby's First Foods chart here.}

Our post was just a quick overview of the basics, for more information we recommend some of our favorite resources:  

  • Wholesomebabyfood.com - a great online resource for what to introduce when, what to avoid, recipes, and more.

  • Sage Spoonfuls Cookbook - this cookbook lays out everything in an easy to read manner. I love having this in the kitchen as a quick-reference to see how long I need to steam food for, how long a particular pureed veggie will keep in the fridge, etc. (Sage Spoonfuls also has a baby food making kit, which includes the food processor, storage jars, cookbook, etc - and it's all made in the USA, which I love)

  • Homemadebabyfoodrecipes.com - another great online resource for recipes and guidelines.

  • Baby Food Ideas (Instagram) - This mom shares photos of the homemade baby food she makes for her kids - lots of creative combinations and ideas.

Disclaimer:  The info I am sharing is based on my own experiences; I am not a medical professional.  Always double check with your pediatrician before starting solids and get their professional opinion on the best way to introduce new foods to your little one.  Please also note this post was originally published in 2014 and some "best practices" may have changed.  Always check with your child's pediatrician for their recommendations and advice.  

KEEP UP WITH BIRCH LANDING HOME
|  Etsy  |  Facebook  |  Instagram  |  Pinterest  |  Bloglovin'  |  Hometalk  |