I'm a wife, stay-at-home mom, crafter, and blogger living in rural New England. As seen in Martha Stewart Living, Food Network Magazine, and more! | Tutorials, DIY, crafts, parenting tips, recipes, money saving tips, product reviews, local product features, New England living, intentional living, and more! |
As you all know by now I love finding and sharing about New England-based businesses, so I was so excited when I came across The Maineland Co. - a small business that creates seasonal subscription boxes that feature Maine-made products. Maineland Co. was kind enough to send me their August Box a little early to share with all of you. | This post contains an honest review of product provided by The Maineland Co. |
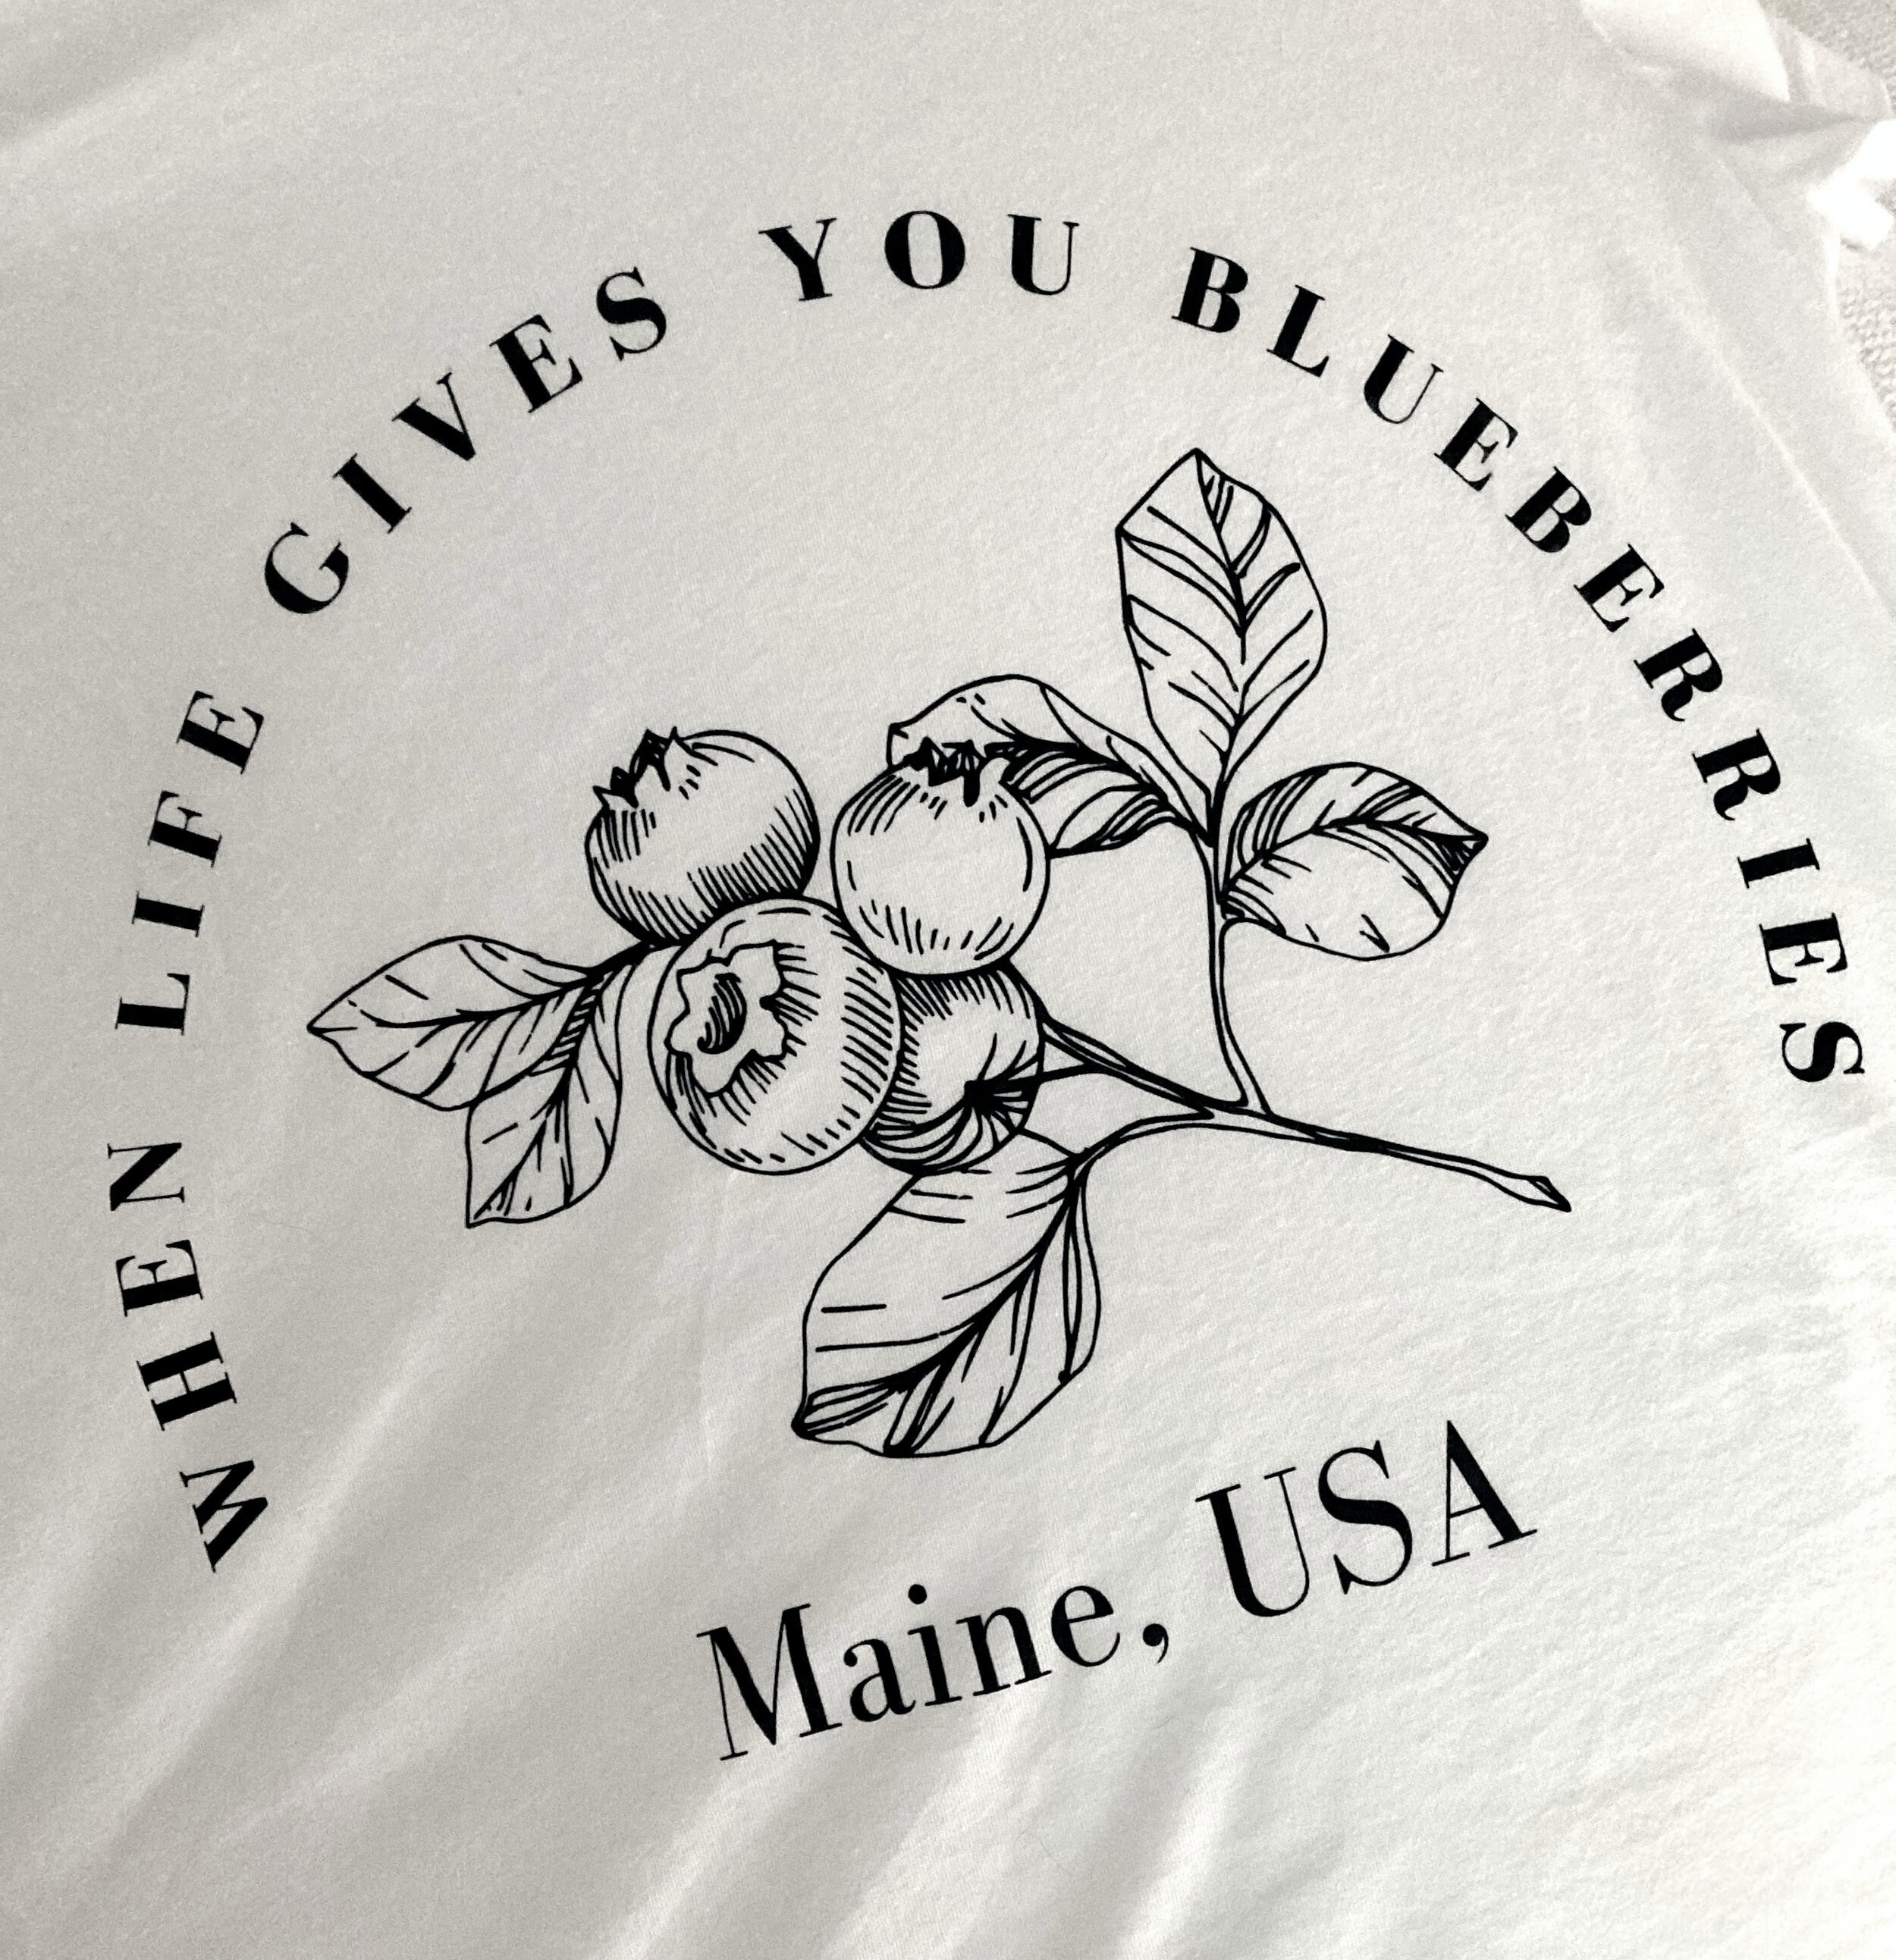
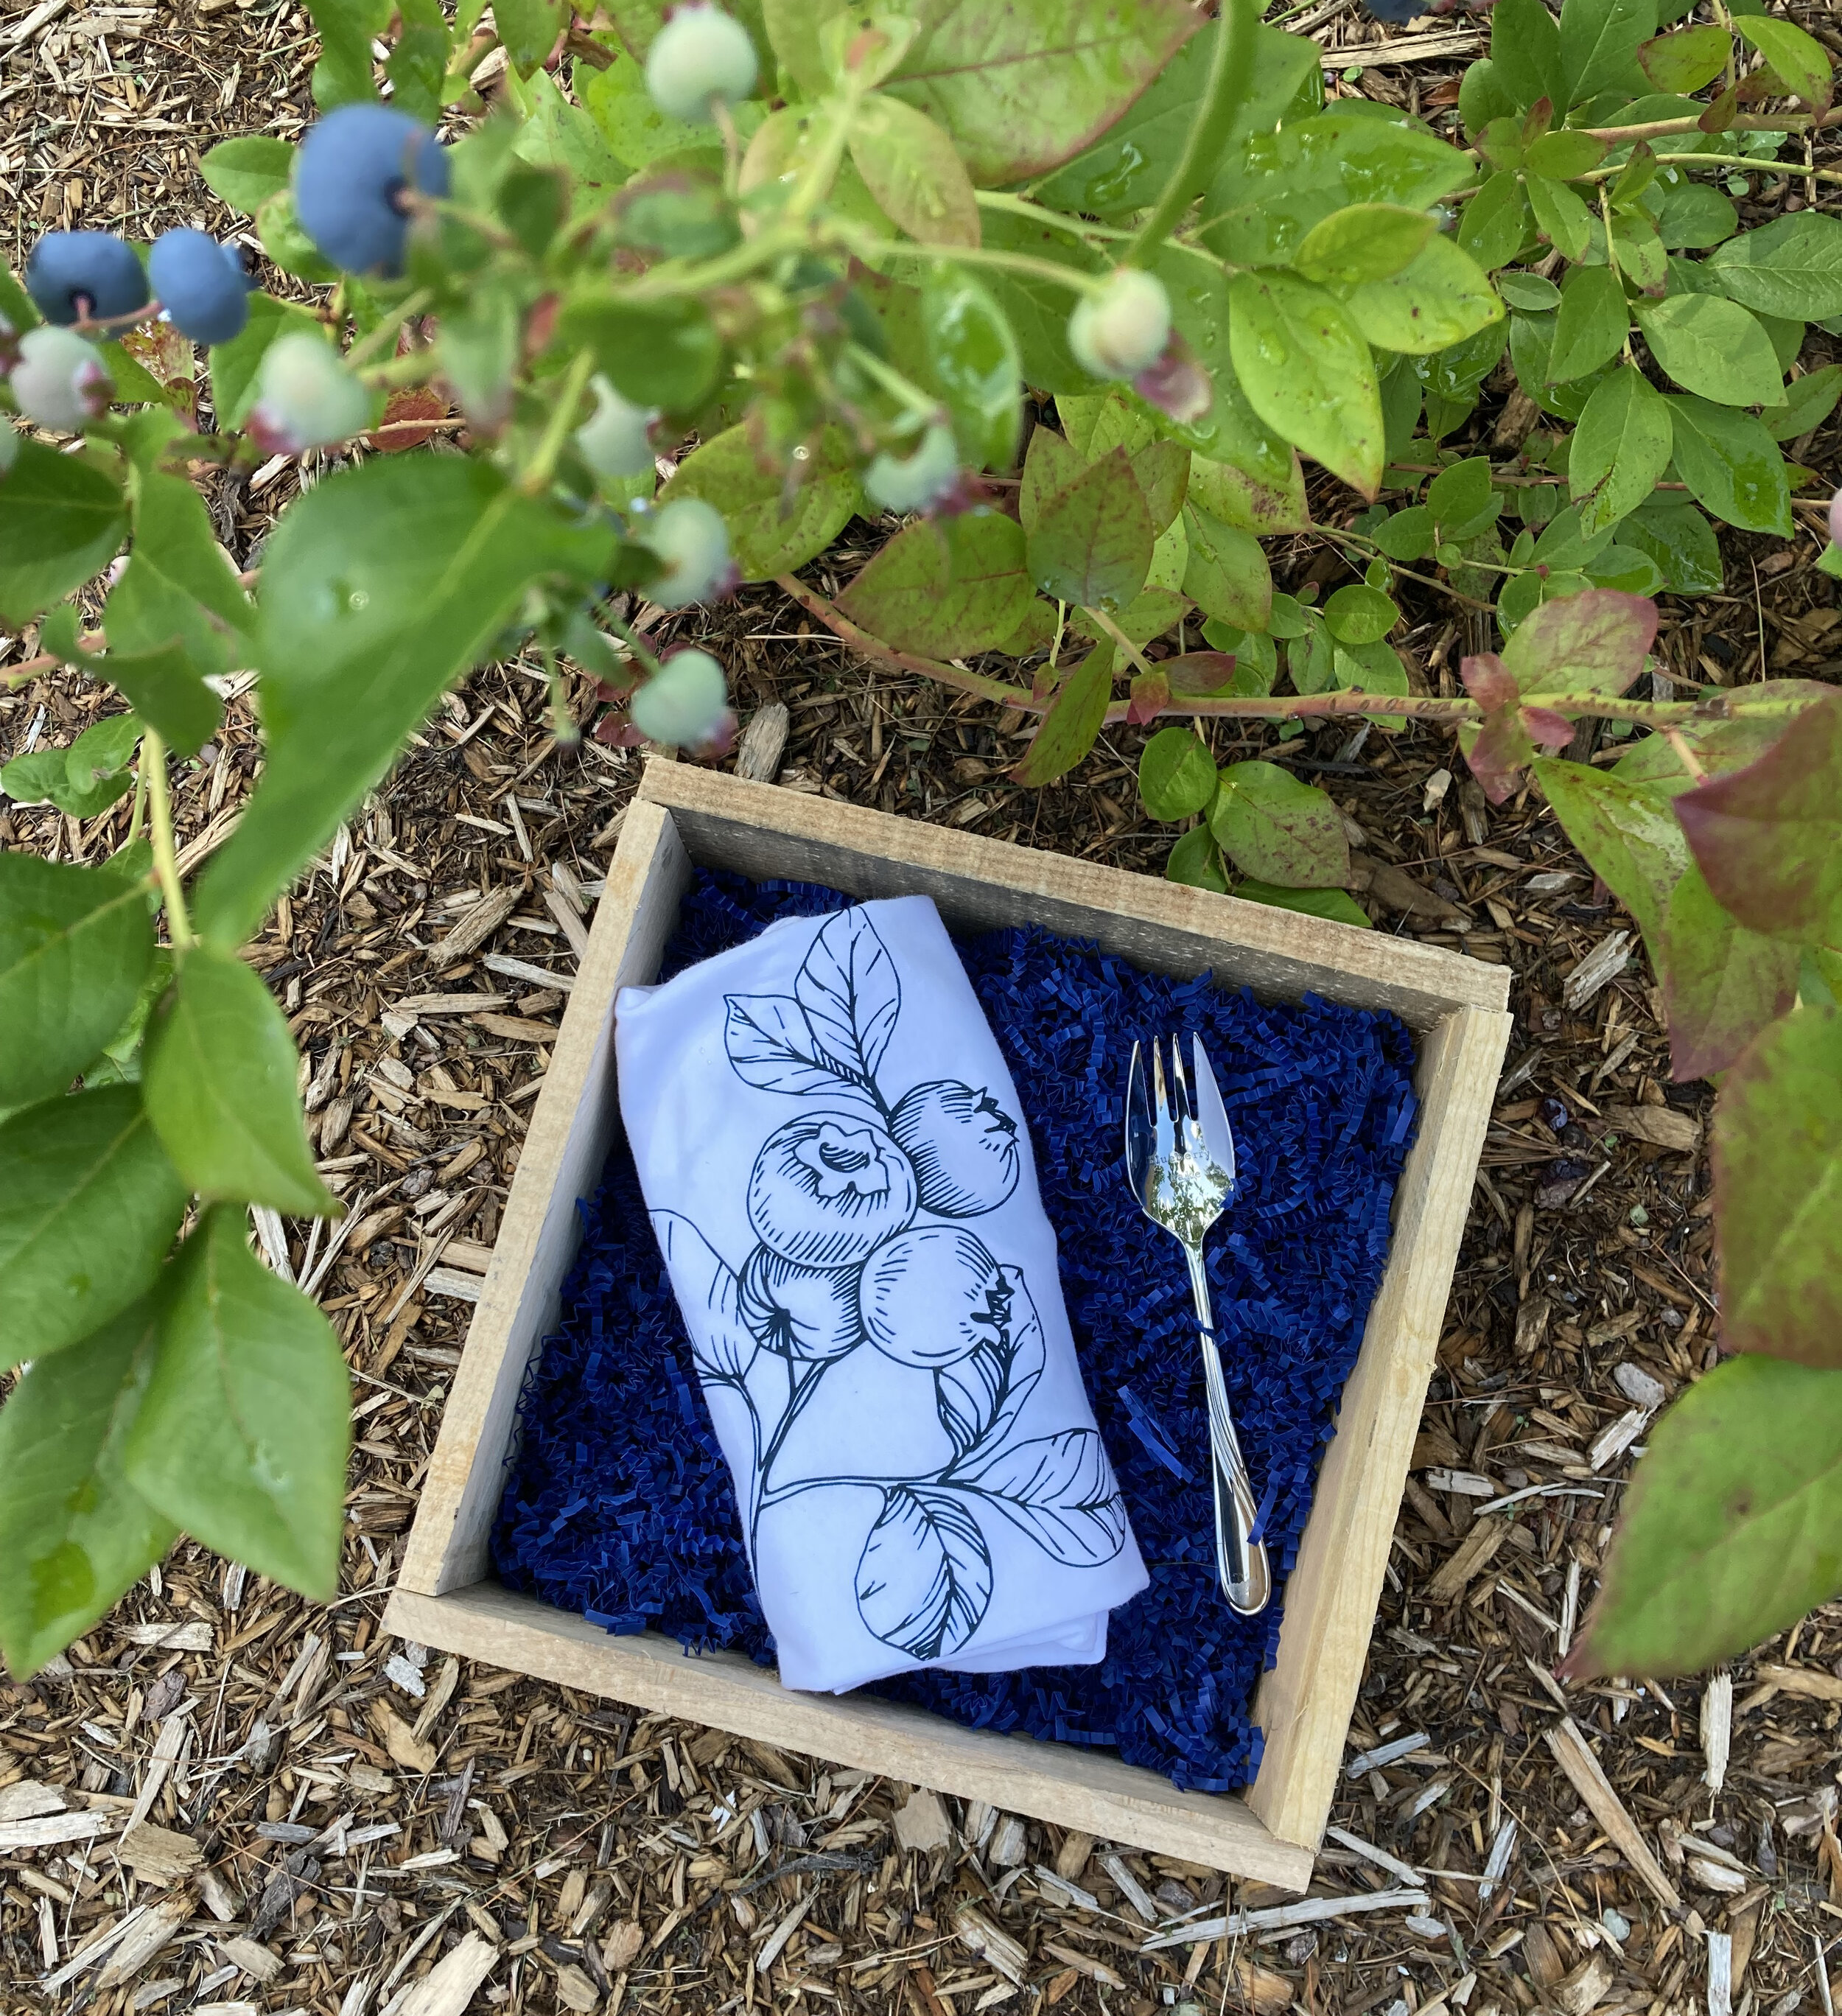
The August Box from The Maineland Co. celebrates fair season and BLUEBERRIES! The curated box comes nicely presented and includes a “When Life Gives you Blueberries” t-shirt from Creation Labs, a “Blueberry Rake” spork from Pieces of Maine Jewelry, and a rustic blueberry box from Crafted Downeast.
“When life gives you blueberries…” you make pie and eat it with your blueberry rake of course! I made sure to put the t-shirt and blueberry rake spork to good use to help me enjoy this big ‘ol plate of blueberry pie ;)
And the rustic blueberry crate has so many possibilities! For now I put some hydrangeas in it to dry (it will make such a cute centerpiece on the dining room table), but it would make a great item for kitchen decor or as a catch-all by the door for your keys, wallet, etc.
Maine is well known for it’s blueberries, so what better gift for the blueberry-lover in your life than these fun items that can be enjoyed for many more blueberry seasons to come? But the best thing about Maineland Co. boxes is they bring a little piece of Maine to the recipient and every season there is a new curated box full of different Maine-made products to enjoy.
- I received this item for review from The Maineland Co. but all opinions expressed are my own. Please see our full Disclosure Policy for more information -
In preparation of re-opening my Etsy Shop next month, I am giving away FIVE Birch Landing Home Stickers between Instagram and Facebook. Just hop over to one (or both!) of those platforms and look for this photo to enter - Good Luck!
When I reopen my Etsy Shop I’m planning on having this logo sticker available, along with another New England-themed sticker design, some unique vintage pieces, and of course my handmade crafts. Thank you all for being so patient these last few months.
We make this super easy Flag Cake every year on the Fourth of July - it’s a little cheesy but it’s fun, delicious, and a tradition our kids look forward to. It’s never picture-perfect but it doesn’t have to be, just enjoy and have a Happy Fourth :) | This post contains affiliate links |
Really this “recipe” couldn’t be any easier! You just need a few very basic ingredients/pre-made items and you’re good to go!
Ingredients:
box of lemon cake mix and whatever you need to make it according to package directions (eggs, oil, etc). If you don’t like lemon you can use white or yellow cake mix too.
Cool Whip or other whipped topping
blueberries
sliced strawberries
How To:
First bake your cake mix according to package directions in a rectangular baking dish/sheet pan.
Once it has cooled completely, add your whipped topping. We always use Cool Whip but you could use homemade or store bought whipped cream too.
Once the cake is covered in your whipped topping, it’s time to make the flag! In the upper left corner, lay out the blueberries in a square shape. Then arrange sliced strawberries in lines to make the stripes. We use a strawberry slicer to make the process go quickly (I confess when I first got this strawberry slicer as a gift I thought I would never use it, but it's actually super handy and I've used it more times than I can count! It especially came in handy with young toddlers for cutting their fruit up). Don’t worry about trying to fit in 13 stripes, we’re going for simplistic here - just fit in as many as you can that look nice.
And that’s it! Super simple, super easy, and a great dessert to make with the kids. We absolutely love that combination of lemon cake, whipped cream, and berries - yum! I hope you all have a wonderful, healthy and happy Fourth!
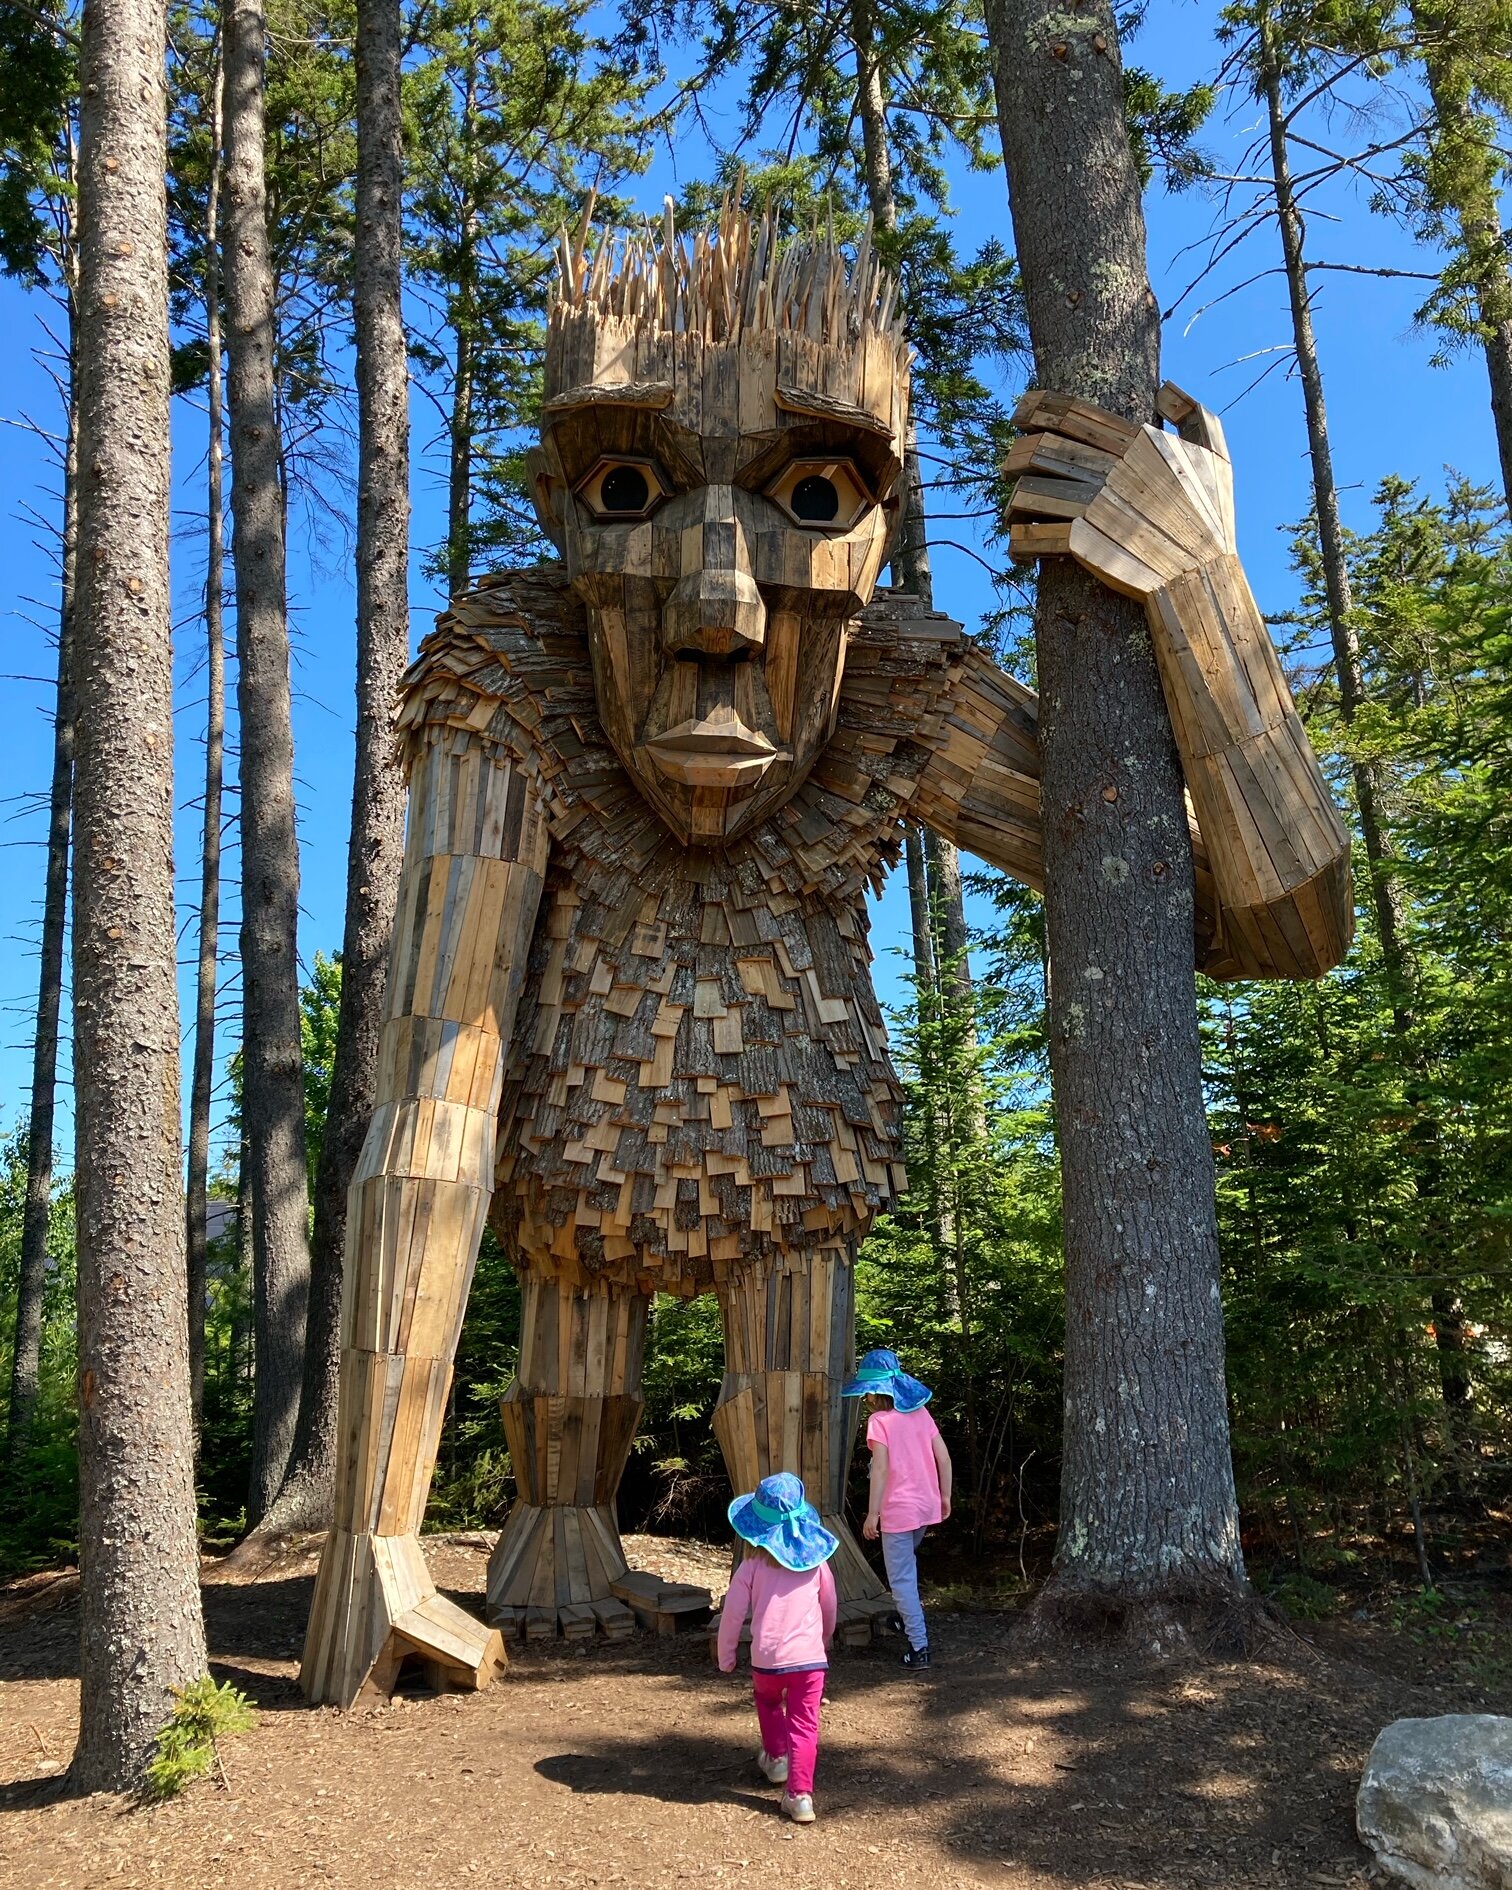
This past weekend we took a much needed day trip up to Boothbay, Maine to finally see the amazing Coastal Maine Botanical Gardens and its new art installation of giant trolls by Danish artist Thomas Dambo. The whole visit was beautiful and so fun. I’ve included a few photos here but they don’t do this magical place justice - the Gardens and the trolls must be seen in person if you ever have the chance! Here are a few tips and items of note from our trip. | This post contains affiliate links |
Tickets
Currently at this time Coastal Maine Botanical Gardens are requiring advanced purchased tickets only and your entry is timed (I believe this is for COVID precautions to help spread out visitors and limit the amount of visitors coming in at any one time to help reduce crowding). We purchased ours for one of the first time slots of the day and it was perfect. We found that the park was getting rather crowded by lunch so earlier was definitely better.
Masks
There were signs asking non-vaccinated guests to wear masks inside buildings, however we did not see that enforced. Nevertheless, we have been very COVID-cautious ourselves and made sure our kids put on their masks when we passed through the entrance building and when we left, also we had them put them on whenever we went into any other enclosed spaces.
The Trolls
There are five giant Trolls tucked away in the woods throughout the park. The map in the brochure was a bit confusing and it was difficult to tell exactly which paths some of them were on, but after a quick conversation with a very helpful gardener we had a good plan to see them all. At most of the trolls there were groups gathered to take photos but everyone was very respectful, waited their turn, and gave space so each group could take good photos with the trolls which was very nice.
So Much to Explore
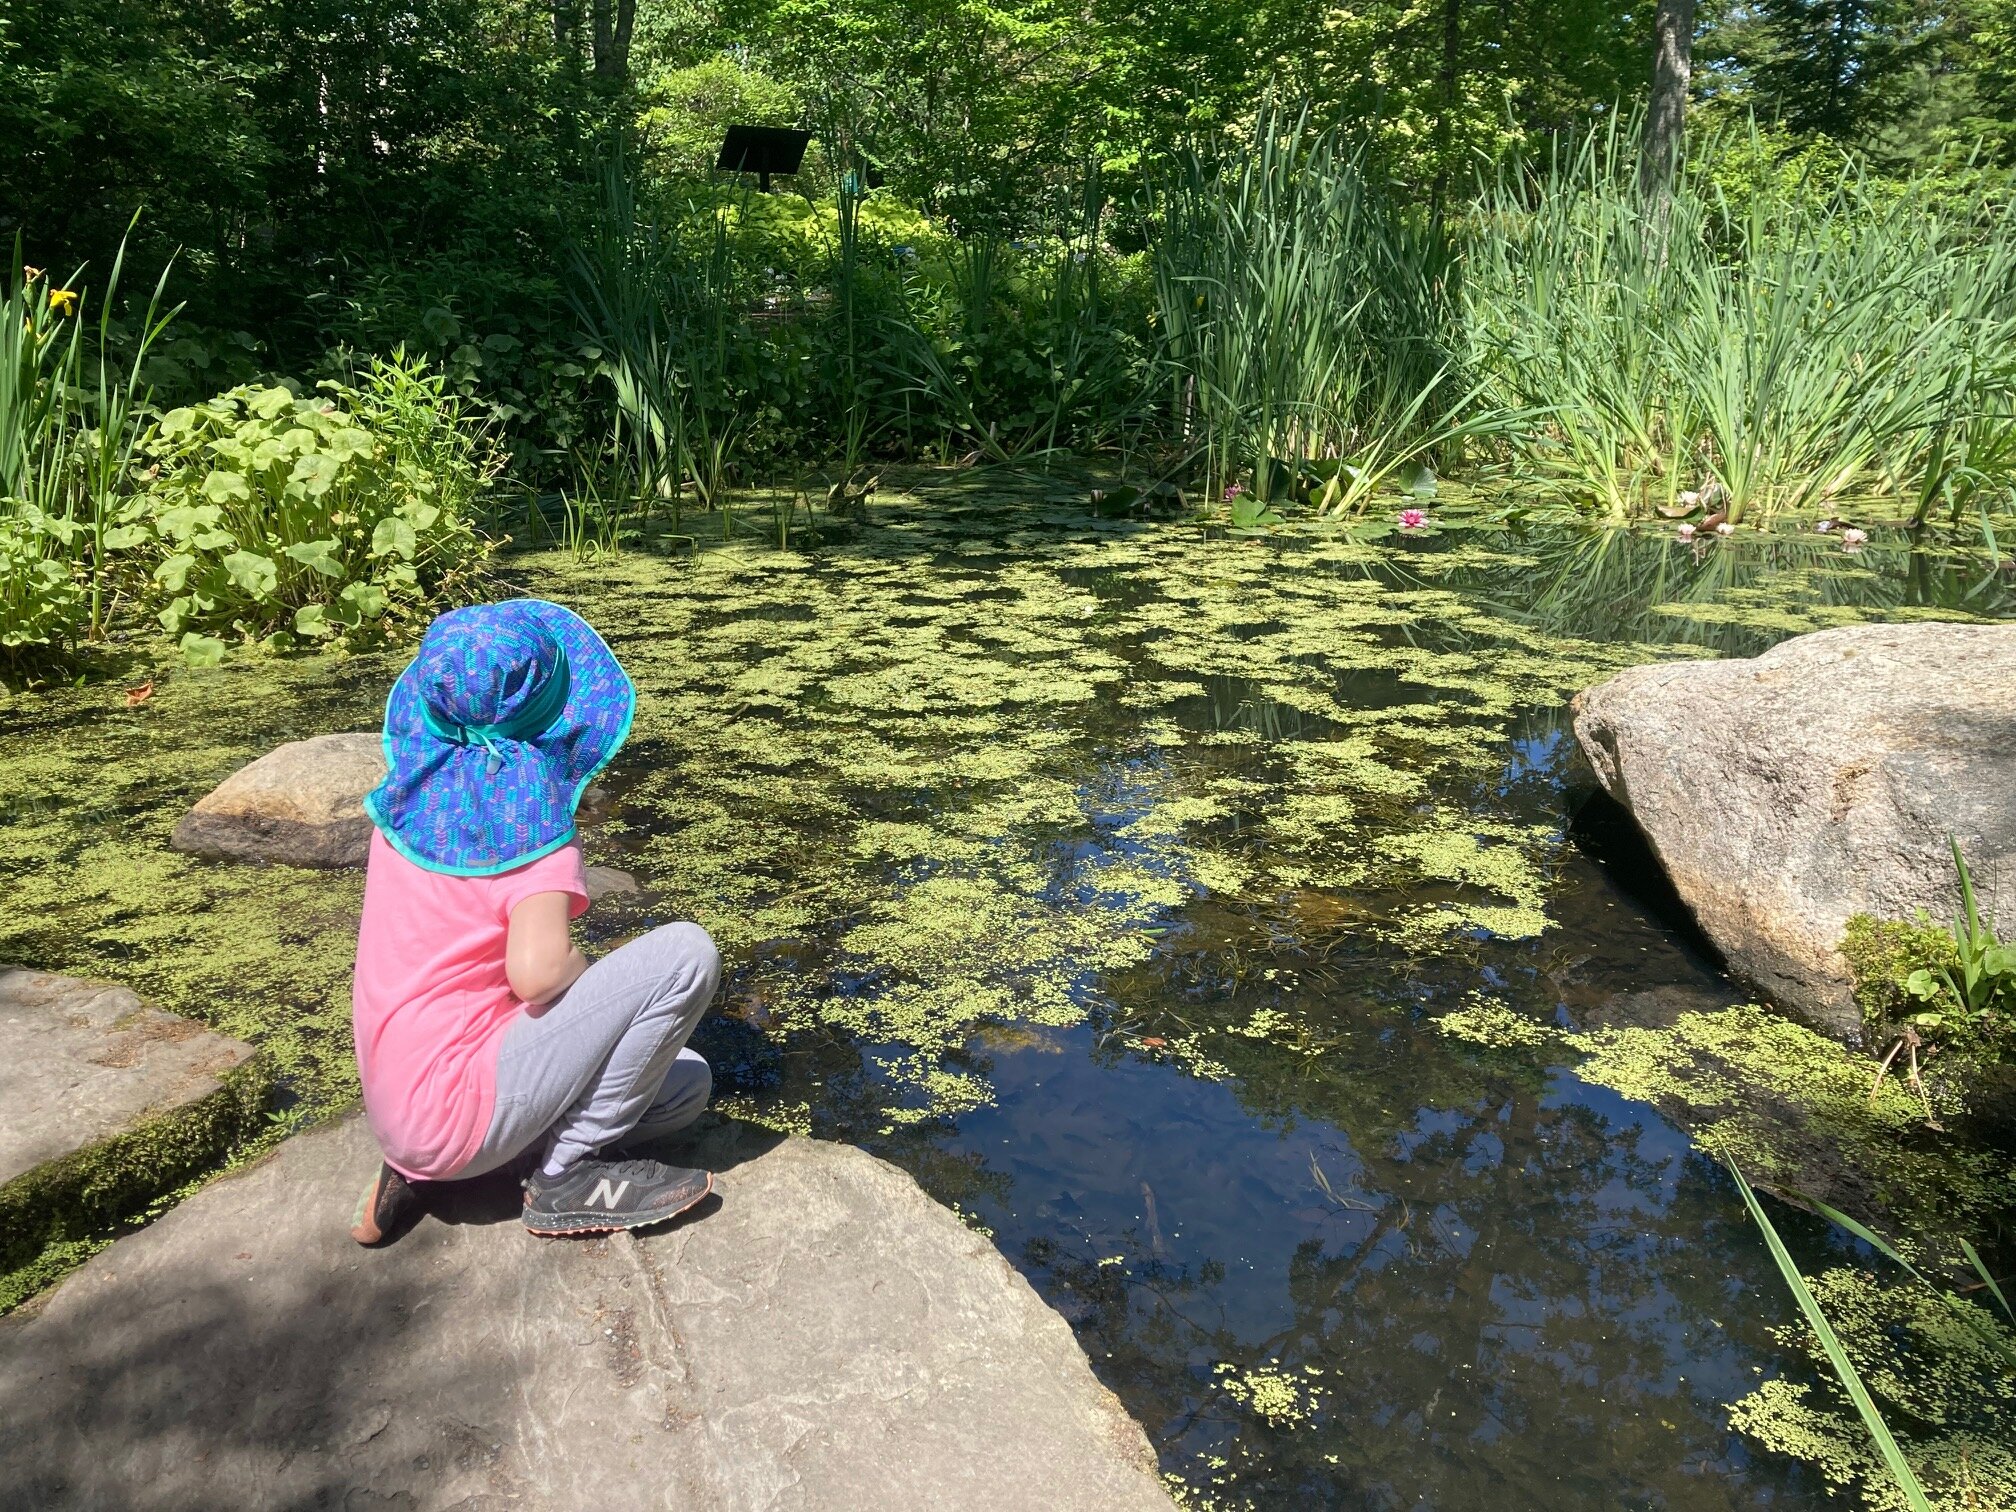
Besides the incredible trolls, there are miles of hiking trails and so many gardens to explore. We spent several hours there and didn’t even see most of them. Our favorite areas were the Children’s Gardens with its whimsical flowers, buildings, and animals, and the various ponds and fountains. Our kids especially loved watching the tadpoles (SO many tadpoles!) and turtles in the ponds.
We got lots of compliments on our kids' matching sunhats too! They are our absolute favorite ones by Sunday Afternoons.
Lunch
We headed out early afternoon when it started to get very hot and crowded but we easily could have stayed and explored longer! There was an on-site cafe that had grab-n-go food that looked great but we decided to forgo that and opt for seafood on the way home (when in Maine). We would have loved to stop at Red’s Eats in Wiscasset but the line was down the block when we went by, so we got takeout from Sea Basket instead and ate our weight in fried seafood and lobster rolls - it hit the spot.
Overall it was a beautiful day to get out and explore this beautiful place with our family - we’re already planning on coming back later in the summer to see everything with different plants in bloom.
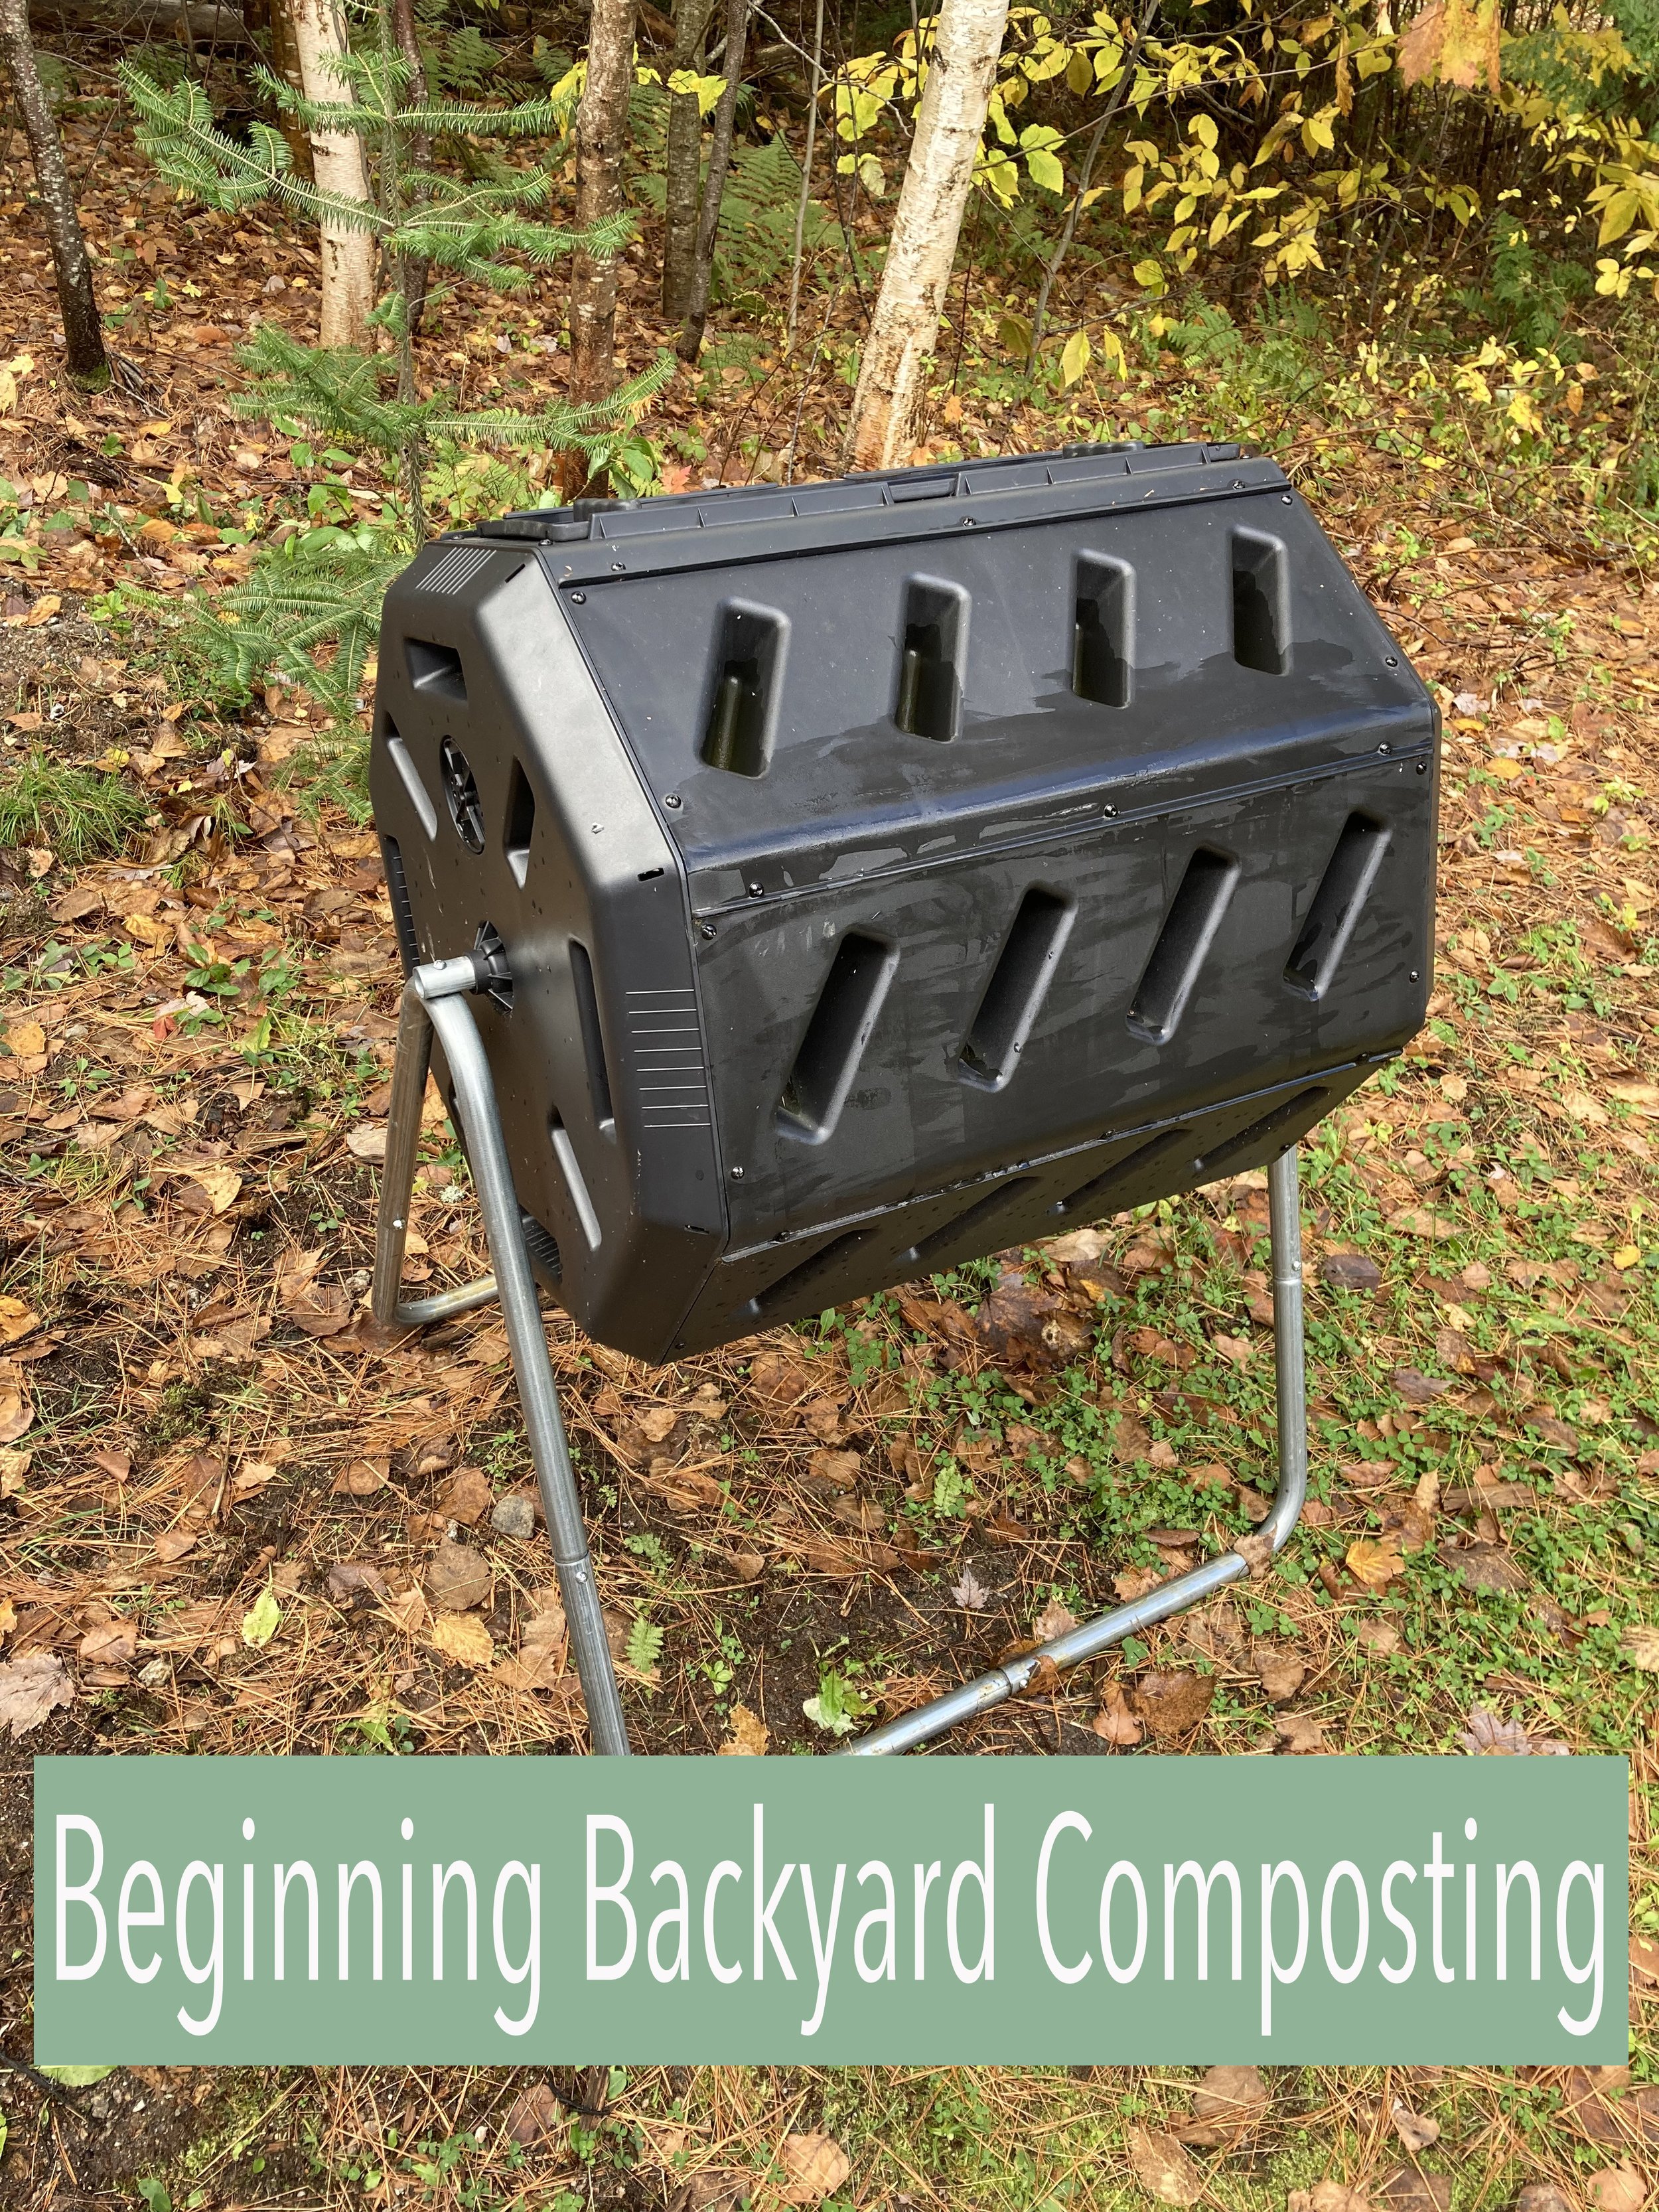
This year we finally jumped on the backyard composting bandwagon. We’ve been wanting to make more eco-friendly choices around our home and decided a big step we could make would be trying to eliminate as much food waste going into our household trash as possible. | This post contains affiliate links |
Composting has a lot of benefits. Some of which include reducing the amount of decomposing matter filling our landfills as well as producing nutrient-rich garden soil to benefit your own yard and garden.
Getting Set Up
When it comes to composting, you could just make a pile in the corner of your yard or make your own bin with some scrap wood or fence. However, we decided to opt for a tumbler-style bin since we were looking for something compact, self-contained, and efficient.
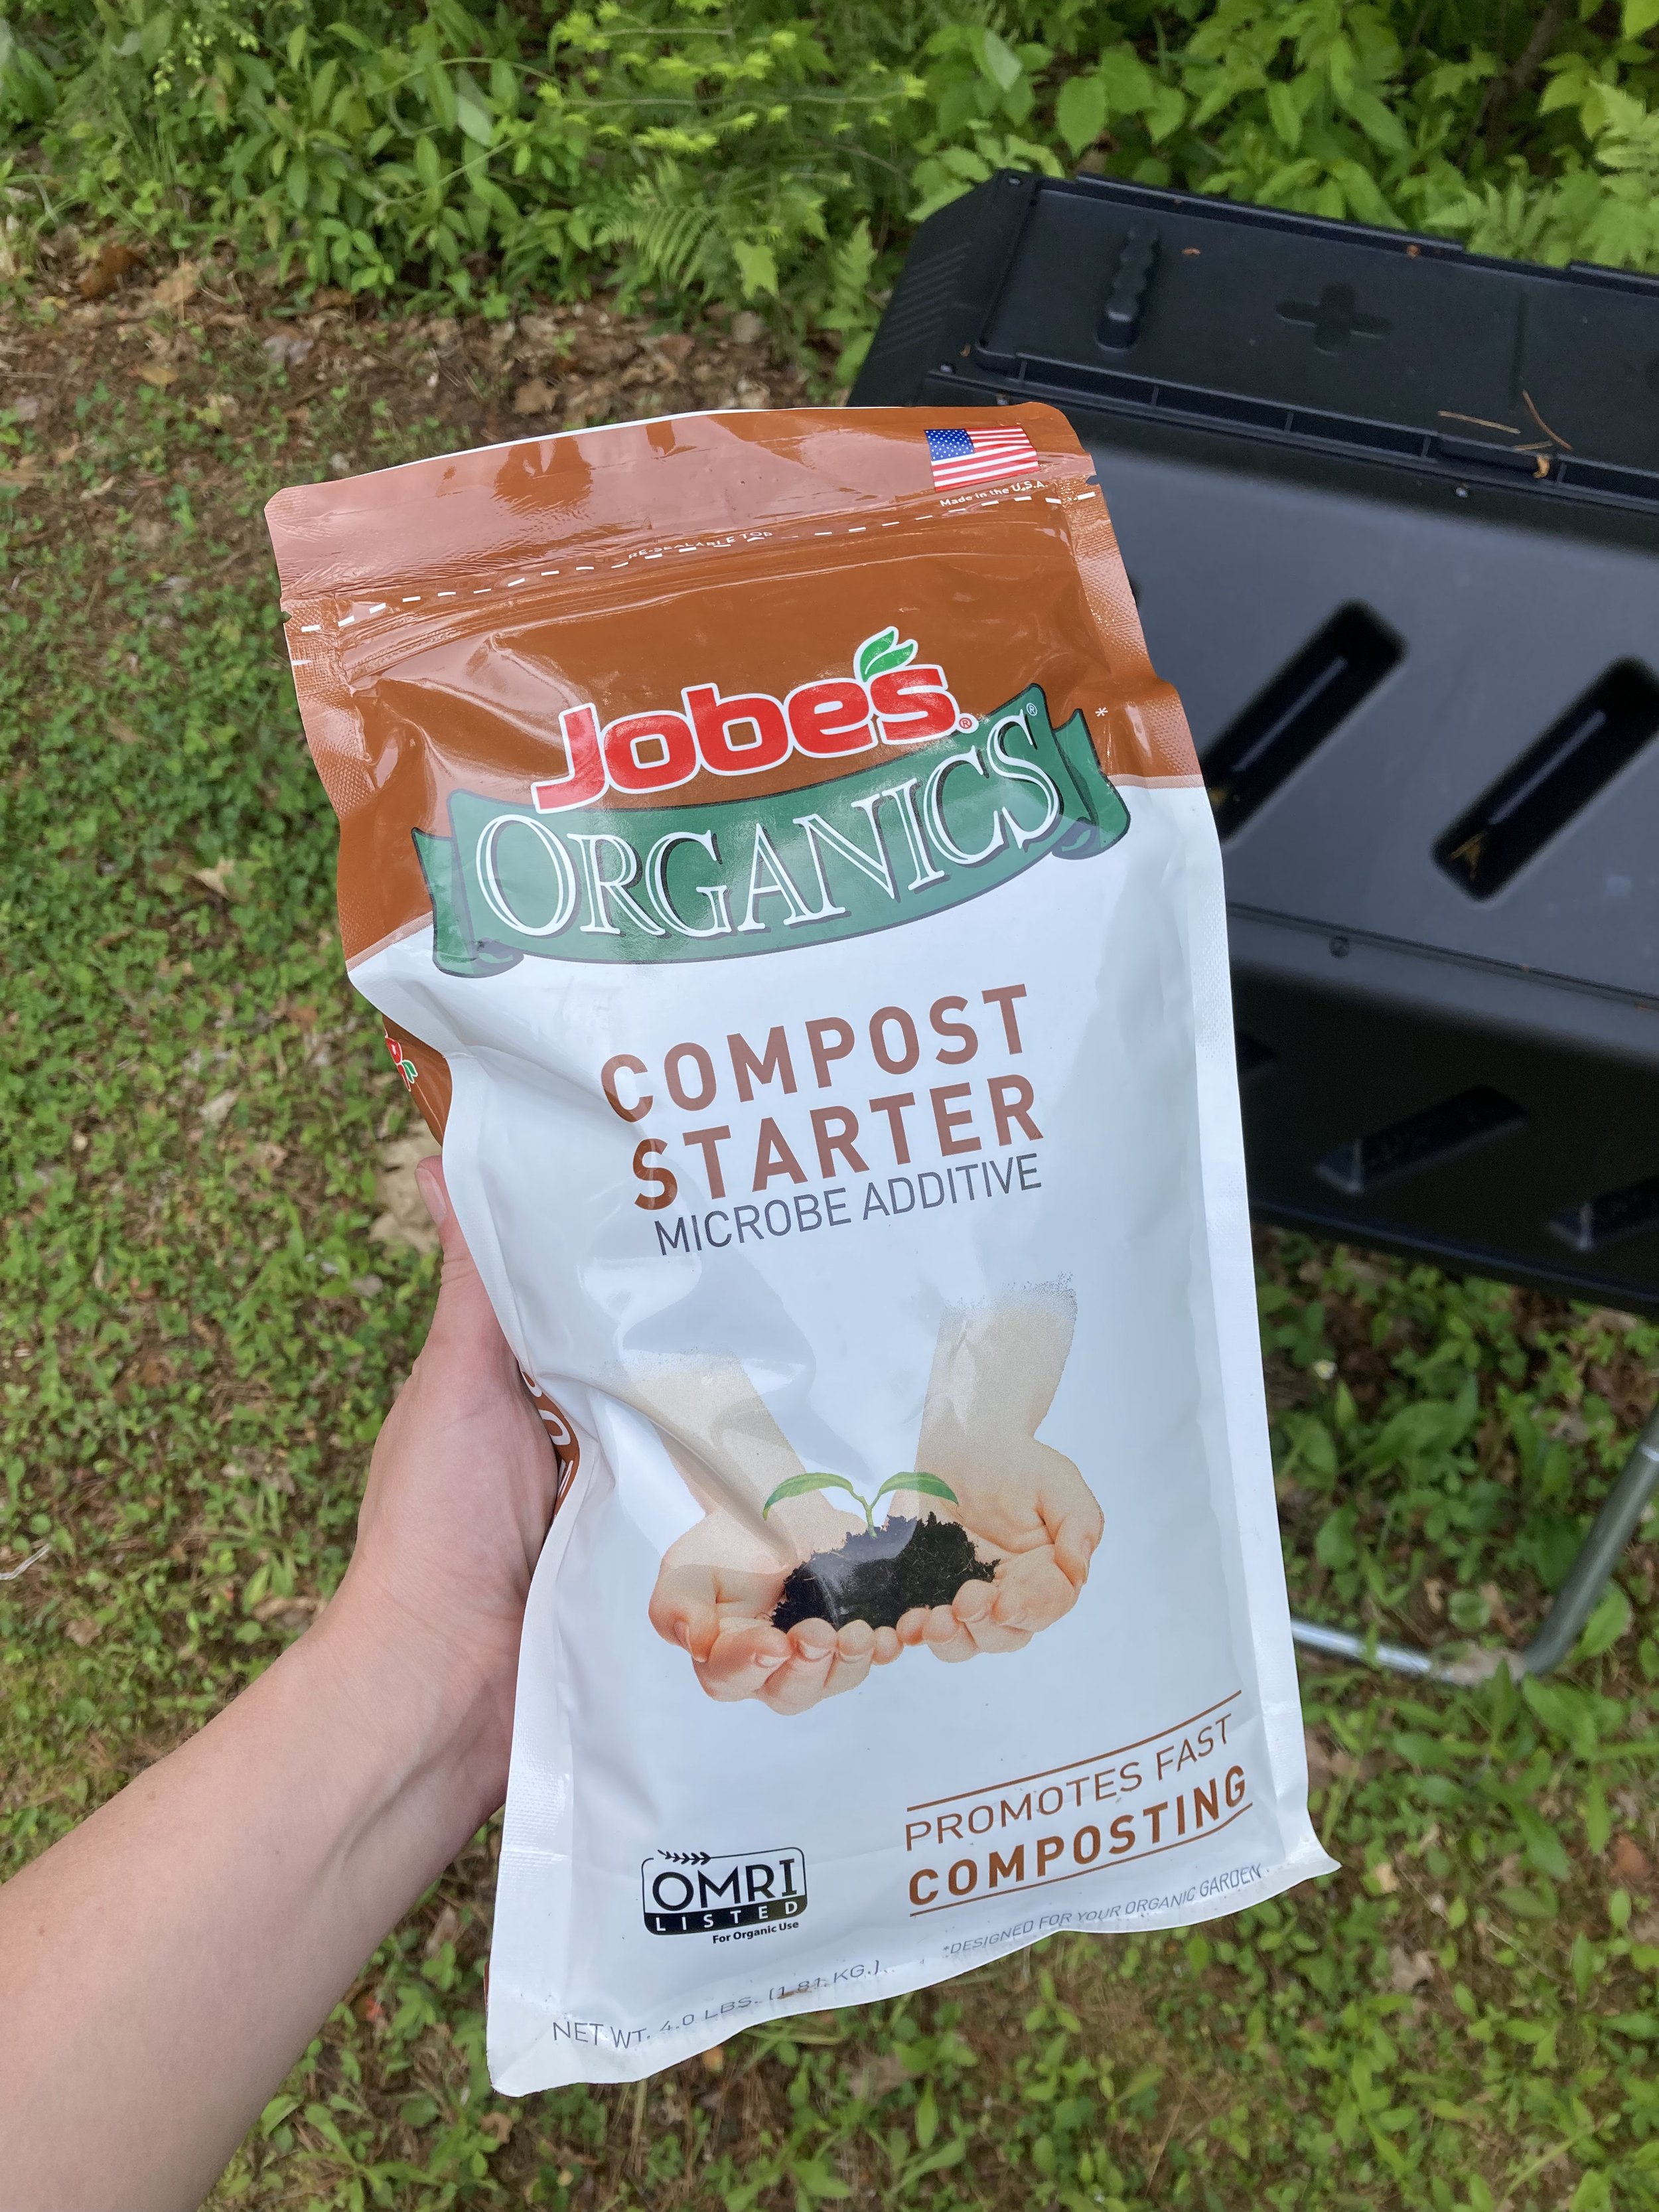
Once you decide on your compost set-up it's important to add some good microbes to "get the party started" and create a good environment for breaking down your food and yard waste. To do this you can add a shovel-full of garden dirt from your own garden to introduce some microbes, or you can buy some specialty compost starter to add to your composter (just follow the package directions).
Composting
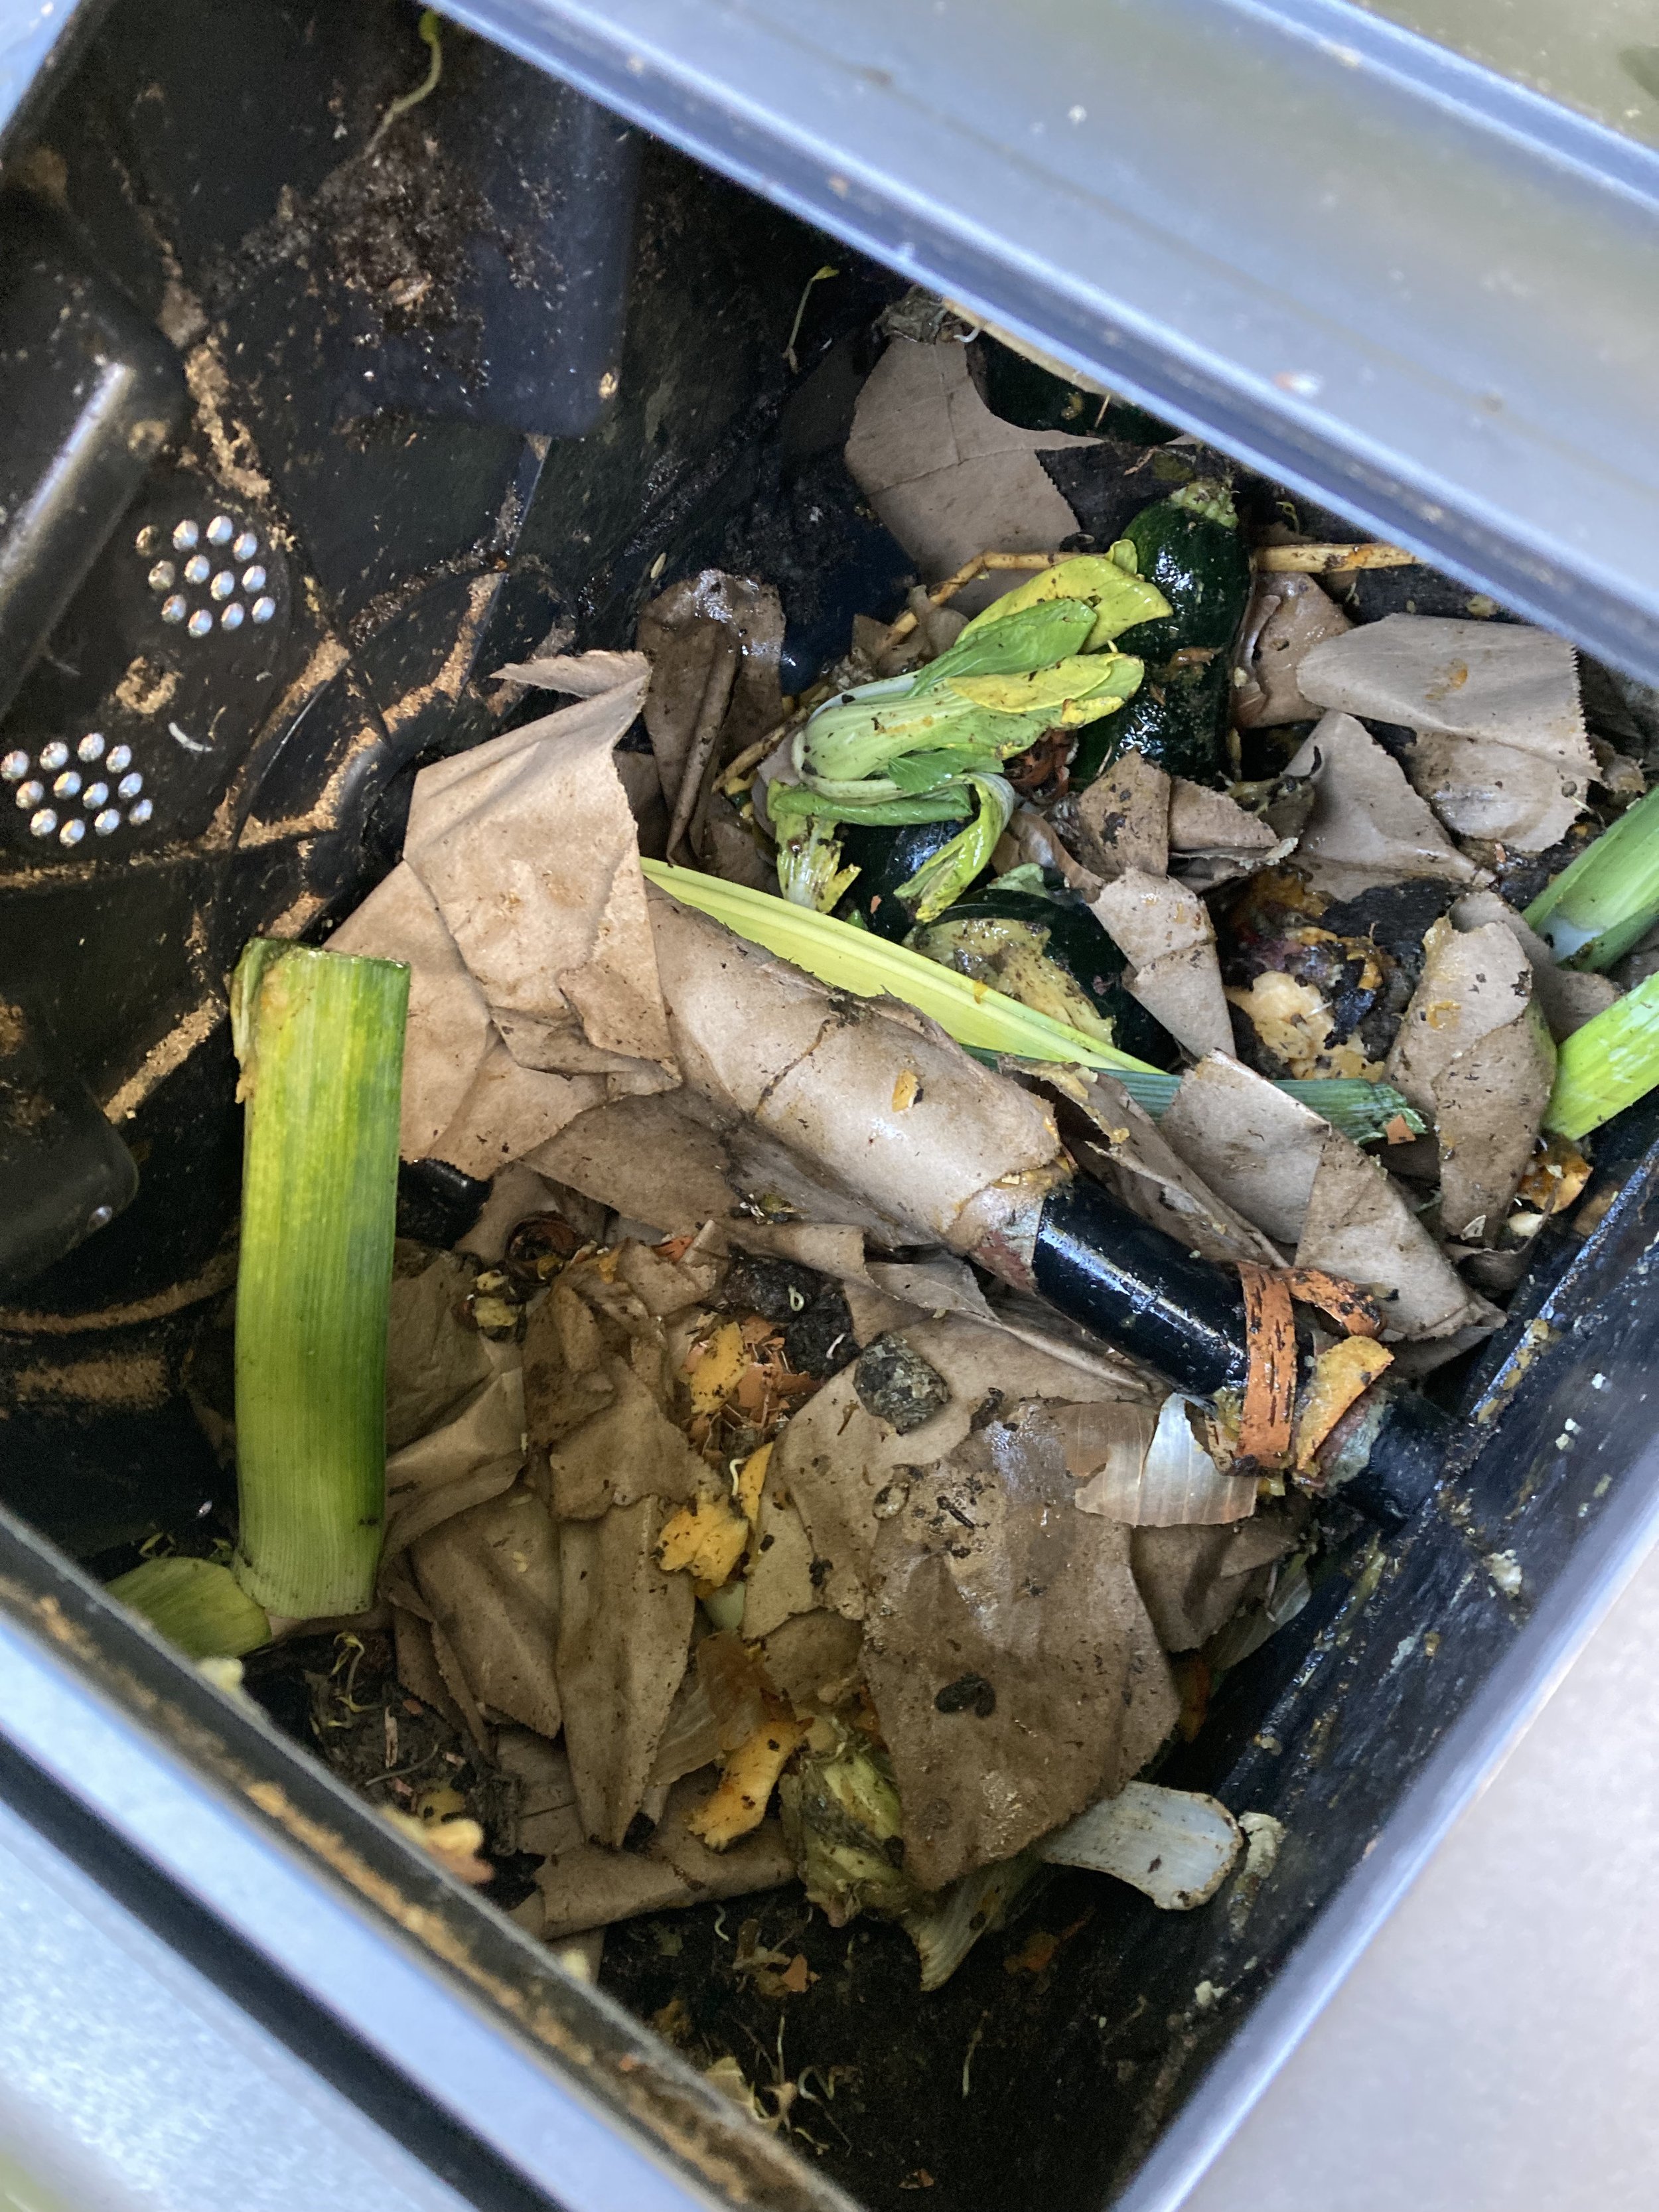
Once you have it set up, just keep on adding food/yard waste and periodically turn your compost over (by hand if yours is a pile or by spinning the drum if it’s a tumbler-style). The trickiest part for me is keeping the ratios right - ideally your compost pile should be about 1 part “greens” (these would be fruit/veggie scraps, coffee grounds, etc… I like to think of them as wet items) and 2 parts “browns” (leaves, newspaper, brown paper bags, etc… I like to think of them as dry items). We personally tend to teeter from too dry to too wet in our compost bin but it seems to average out eventually.
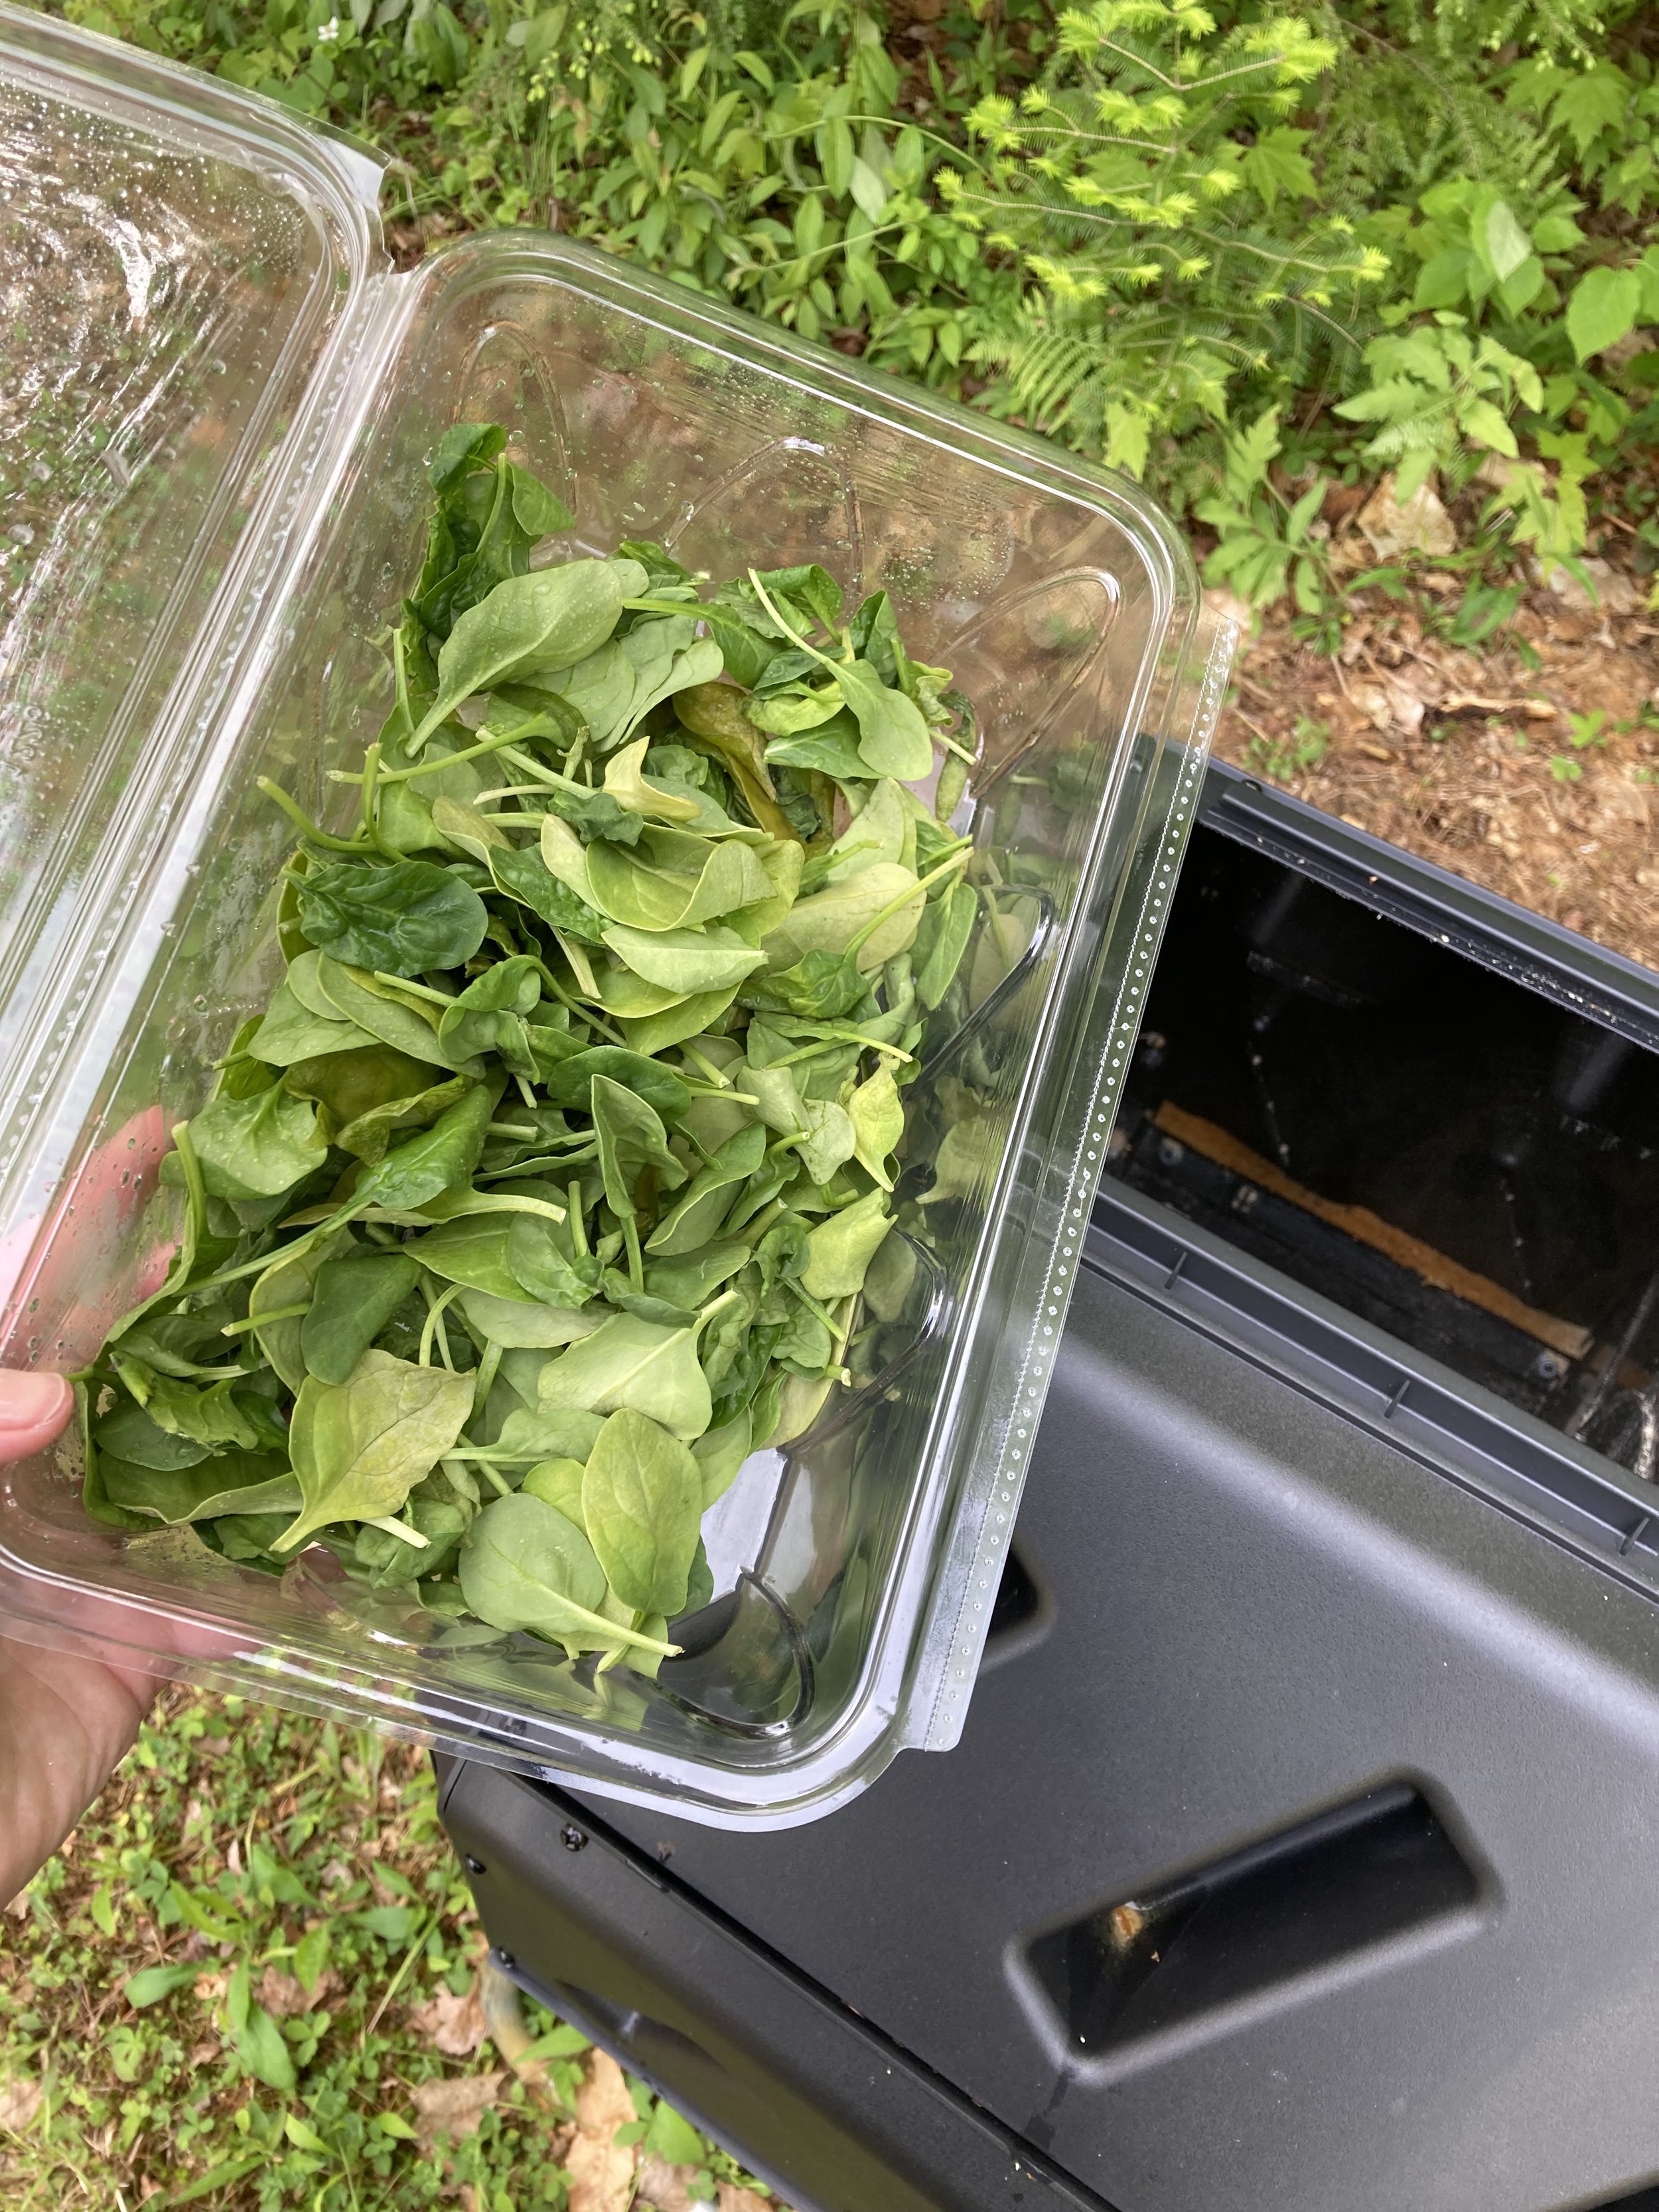
I typically toss our kitchen scraps in a bowl on the counter as I'm cooking and promptly empty it into the compost bin outside. This has worked well for us so far since the weather has been mild. Once it turns winter here I will probably invest in a kitchen countertop compost container so I don't need to walk outside across the icy/snowy yard several times a day, and instead can just empty the kitchen container into the outside compost bin periodically as it fills up.
What to Compost
Slimy spinach in your fridge? Toss it in the composter and then recycle the container!
Here’s a short list of things you can potentially compost:
fruit
vegetables
inedible portions of fruit/veggies (i.e. - rinds/cores)
coffee grounds
egg shells
disease-free, non-invasive plants
shredded newspaper
shredded brown paper bags
shredded paper (non-glossy)
untreated sawdust (I make a lot of ornaments for my Etsy shop and compost the sawdust)
toilet paper rolls
leaves, grass clippings
small sticks
The smaller you make the items in your compost bin (cut them up or shred them), the quicker they should decompose and compost.
What NOT to Compost
Do NOT Compost:
x plastic or household trash x meat x dairy x cooked food x glass or metal x animal waste or used animal bedding/shavings x invasive or diseased plant materials - compost very strong smelling fruit/veggies with caution (i.e. citrus/bananas) if you live in an area with bears or raccoons that are an issue
Good luck in your composting adventure! I hope you enjoy the process and be proud in your efforts to be a little more eco-friendly in your home.
Disclaimer: I am sharing my experiences with what we’ve learned in the composting process so far. If you’d like expert or more detailed and specific information, I’d recommend contacting your local garden center or university cooperative for more information. Your local town or city may have composting programs to join or guidelines to follow too.
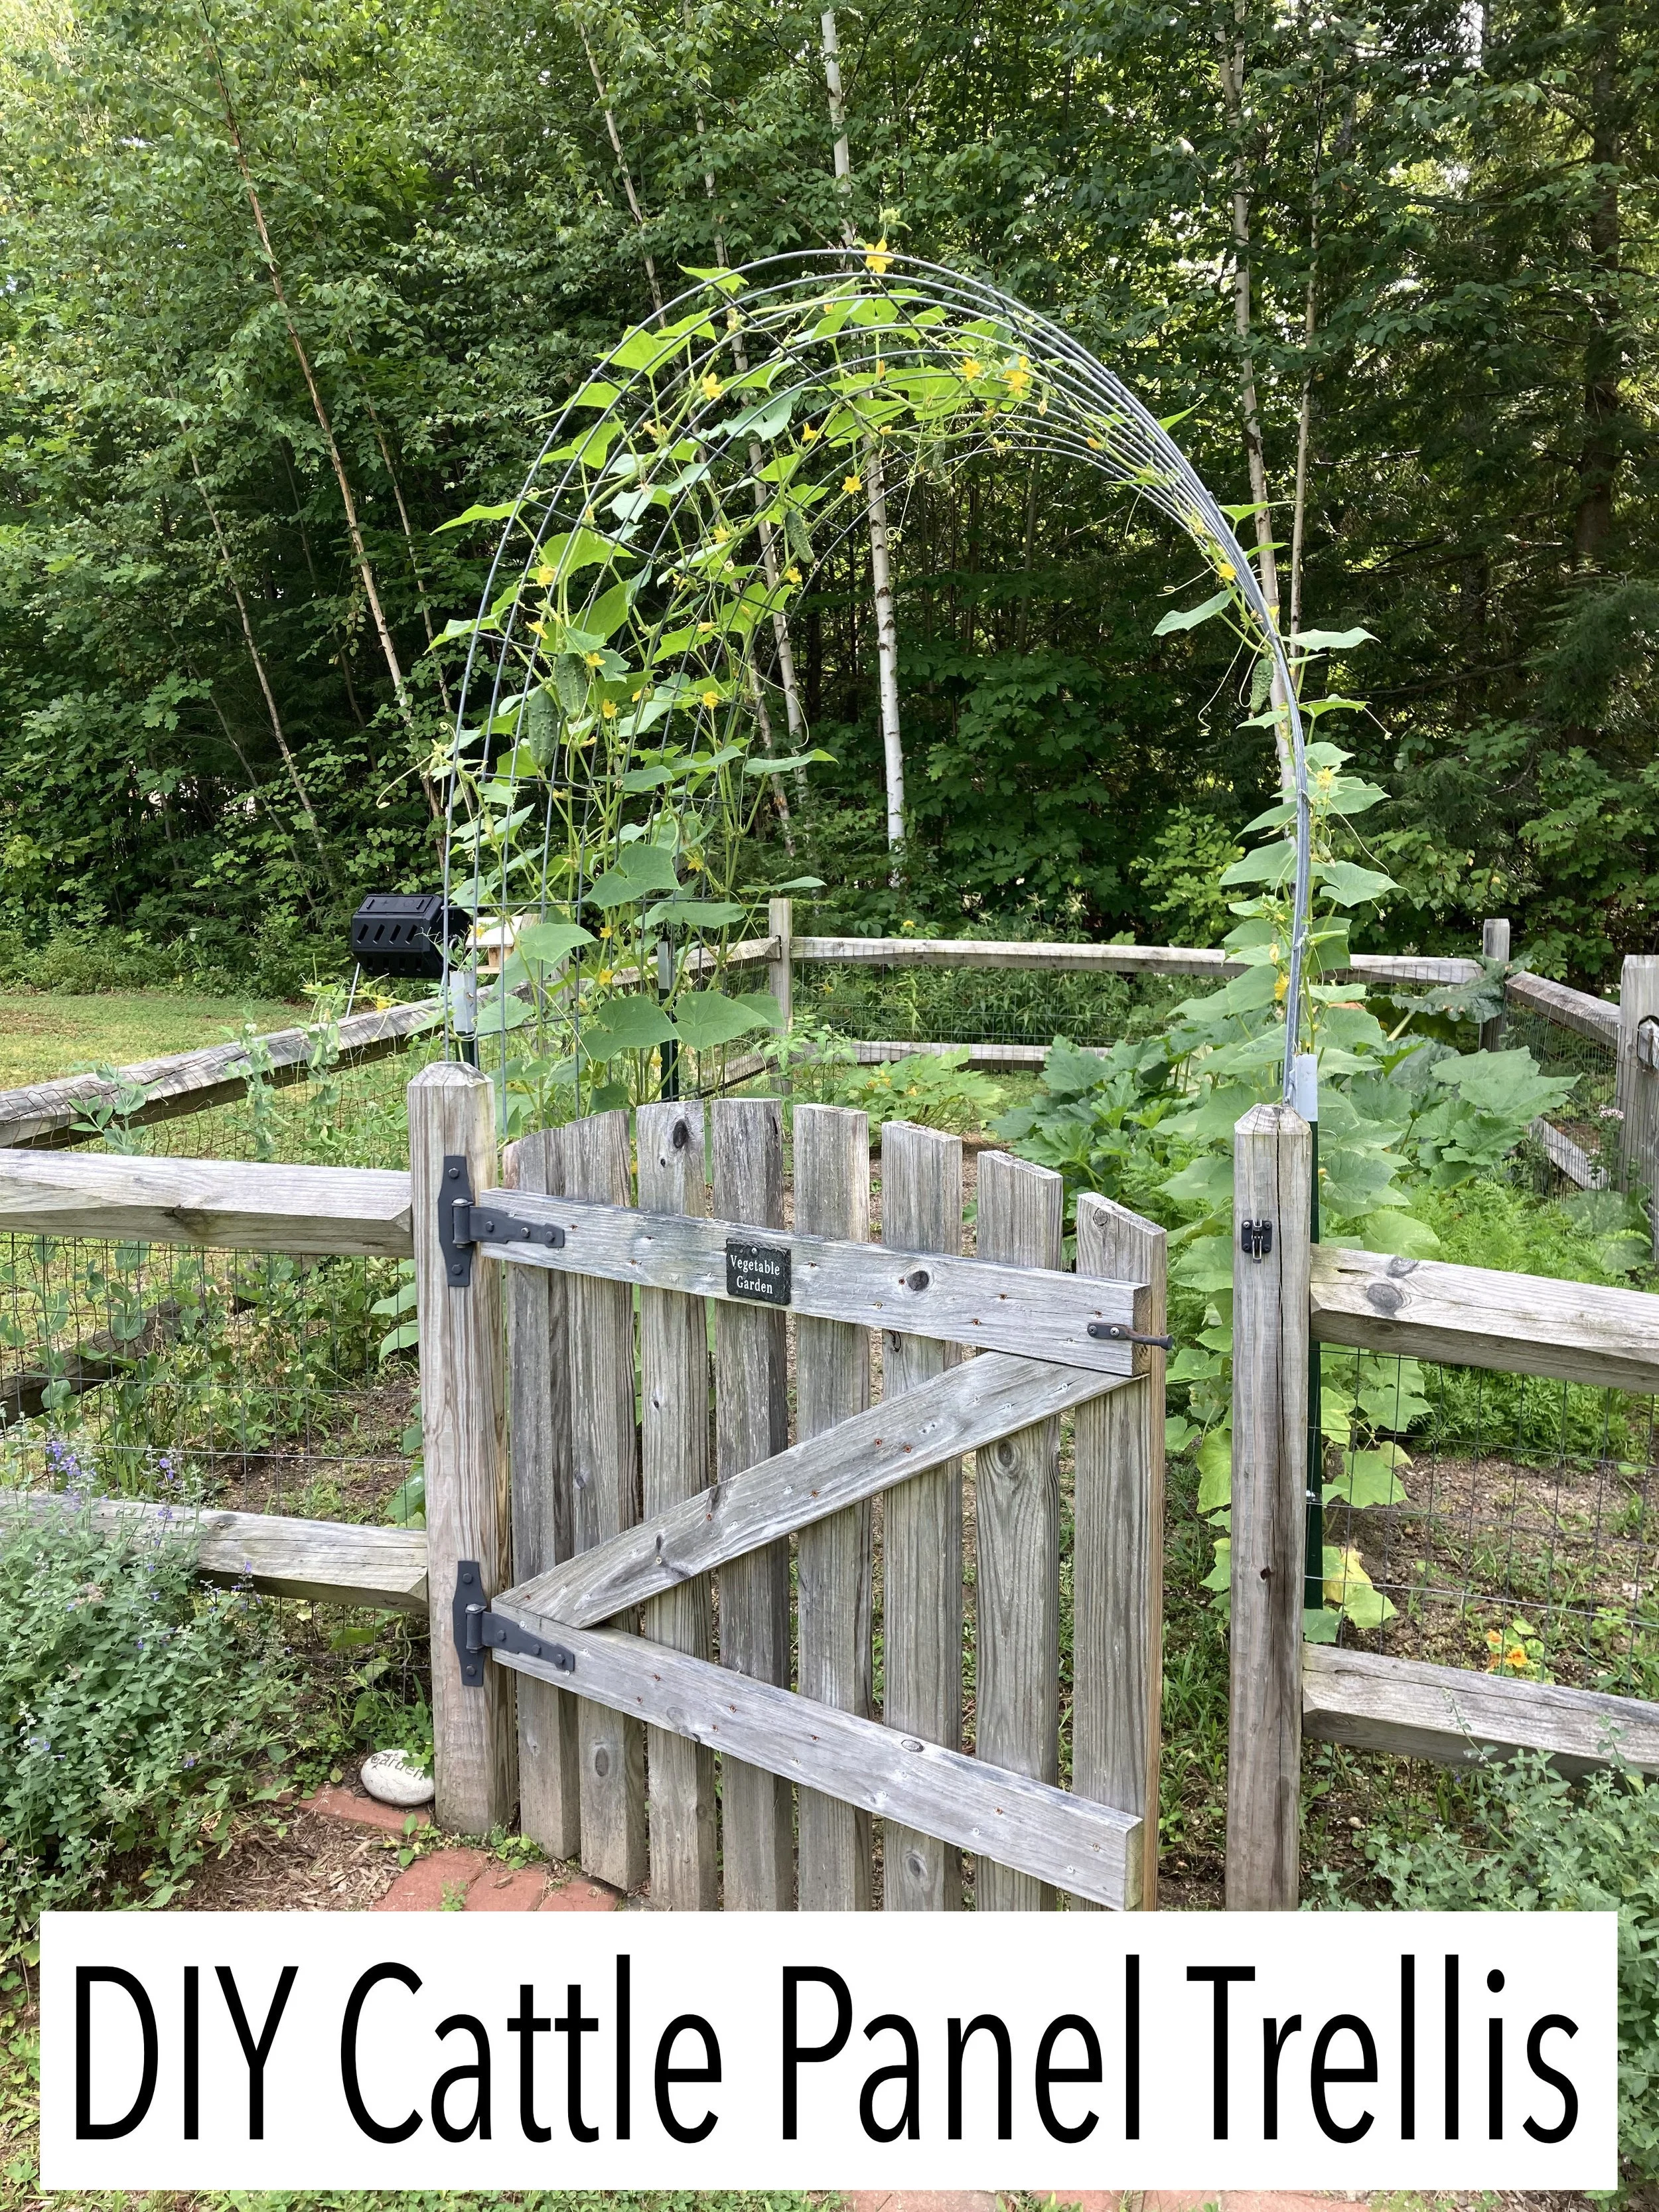
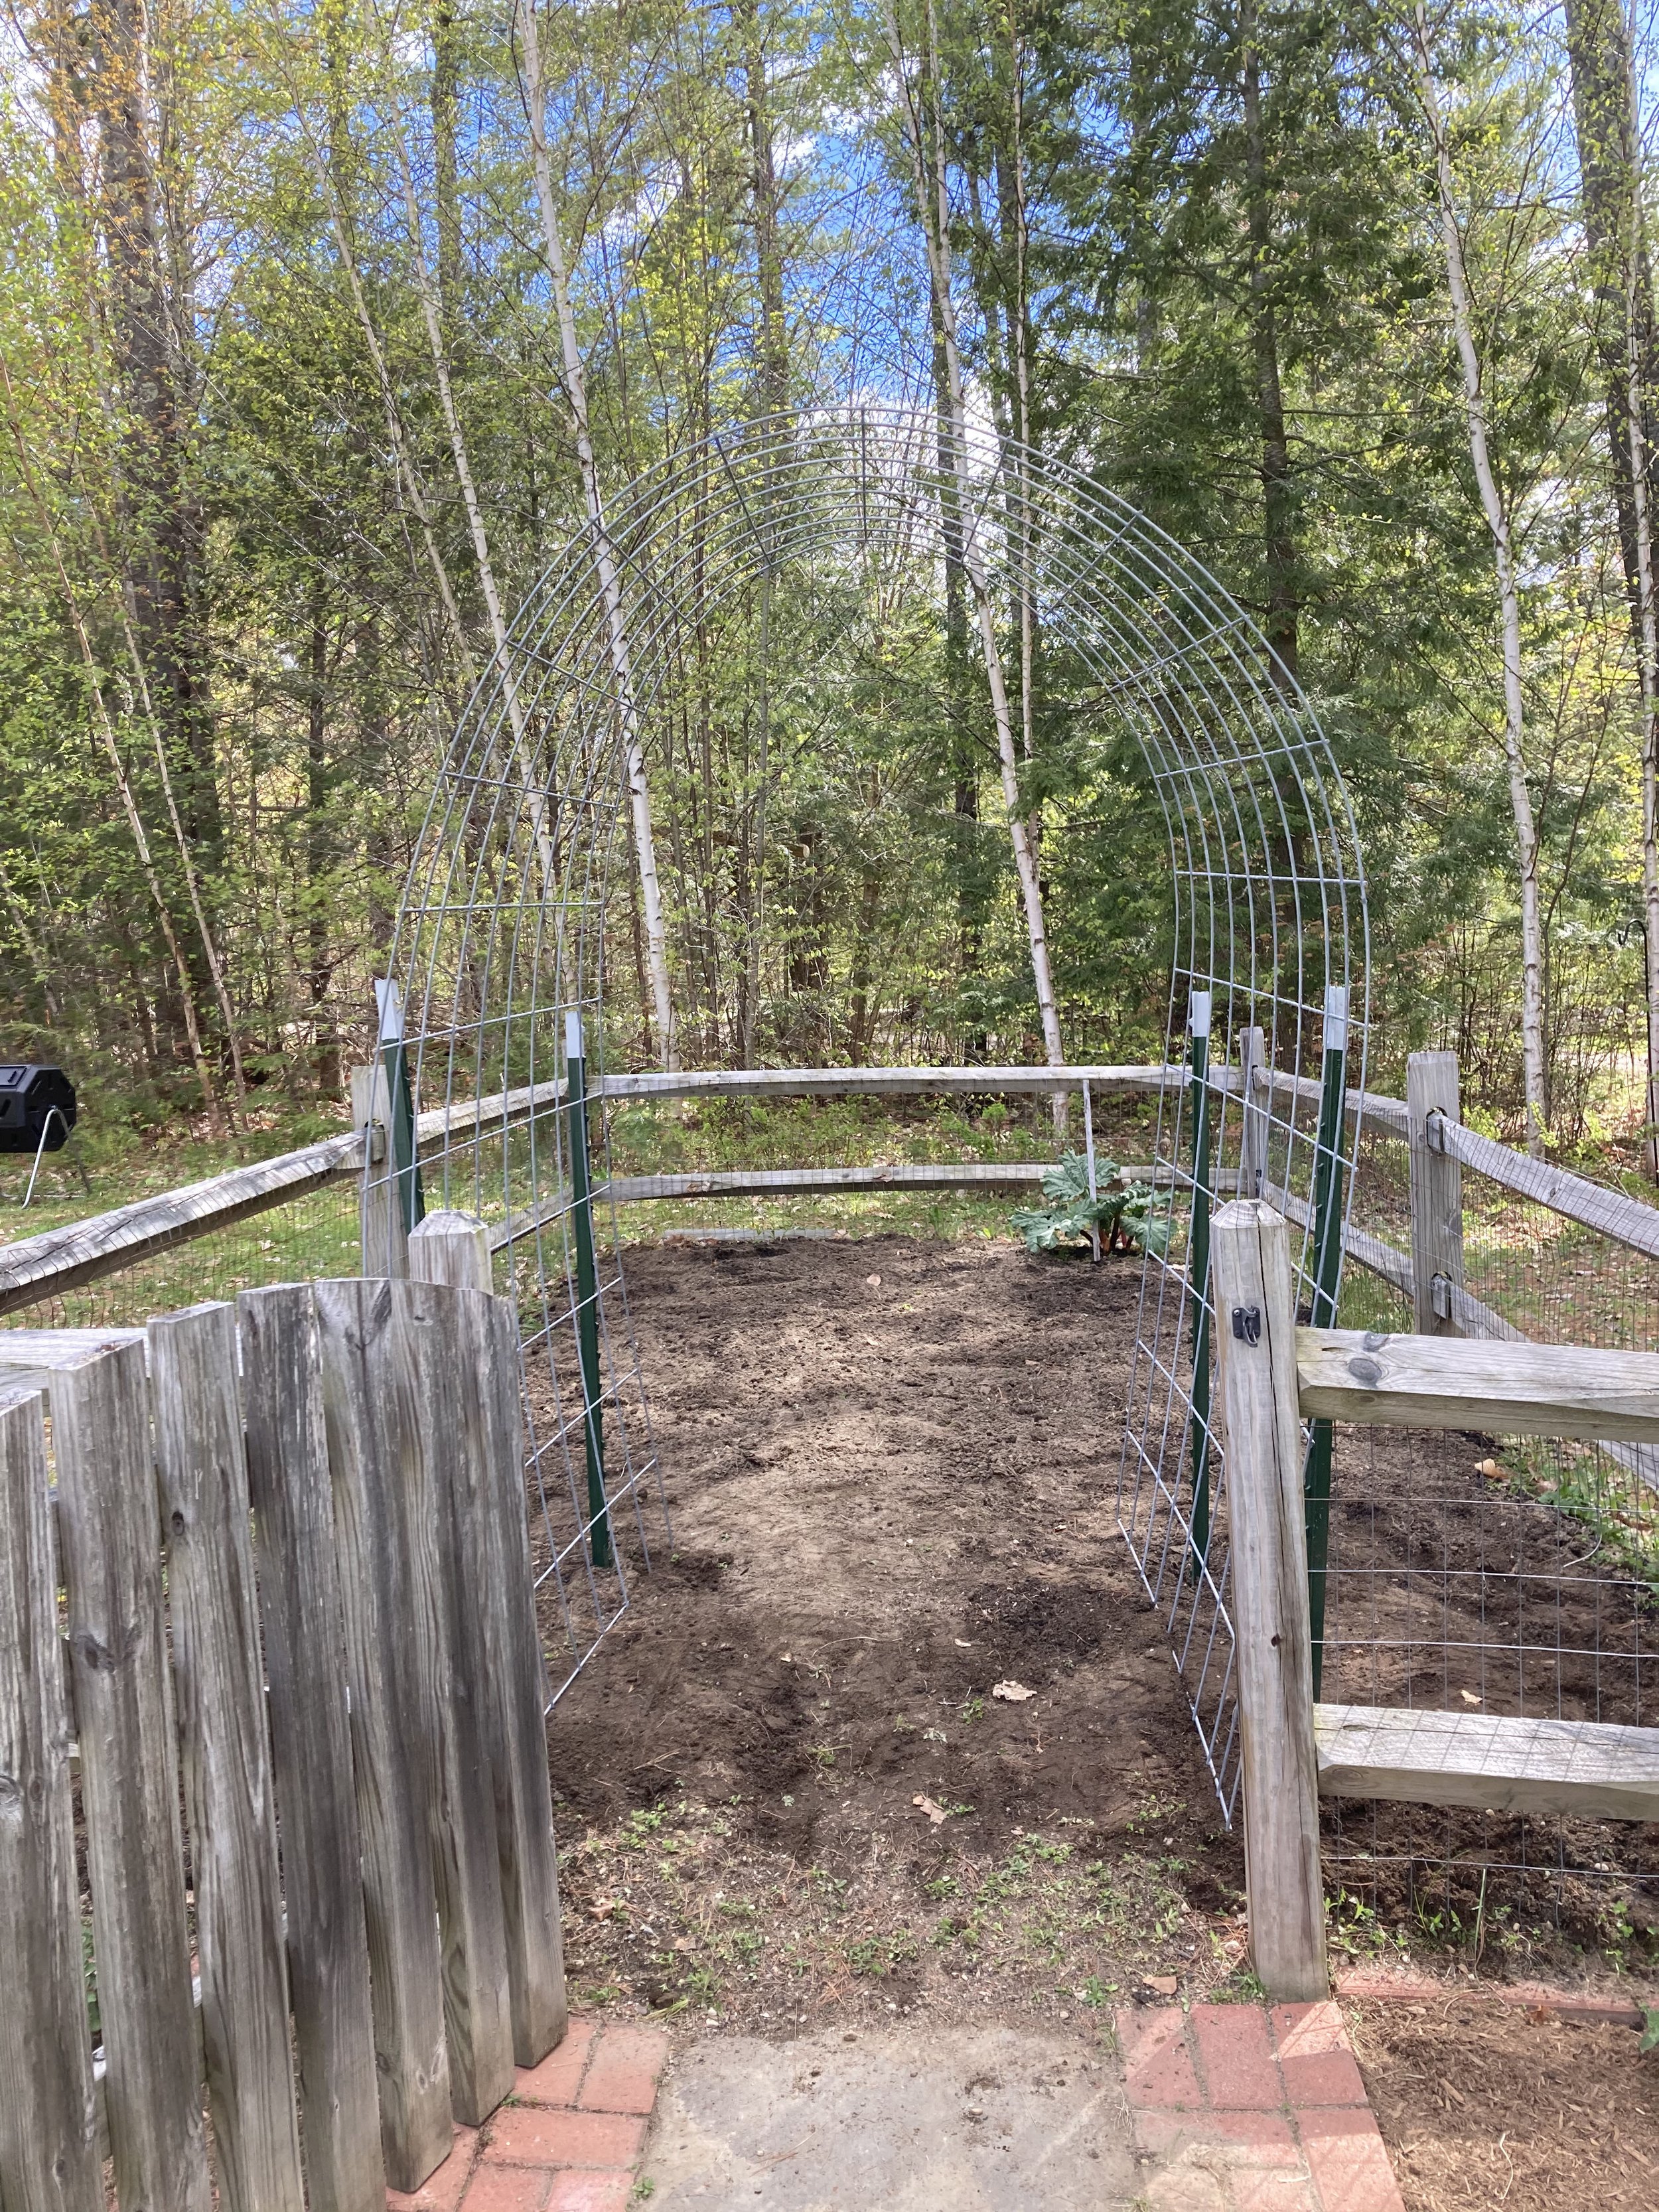
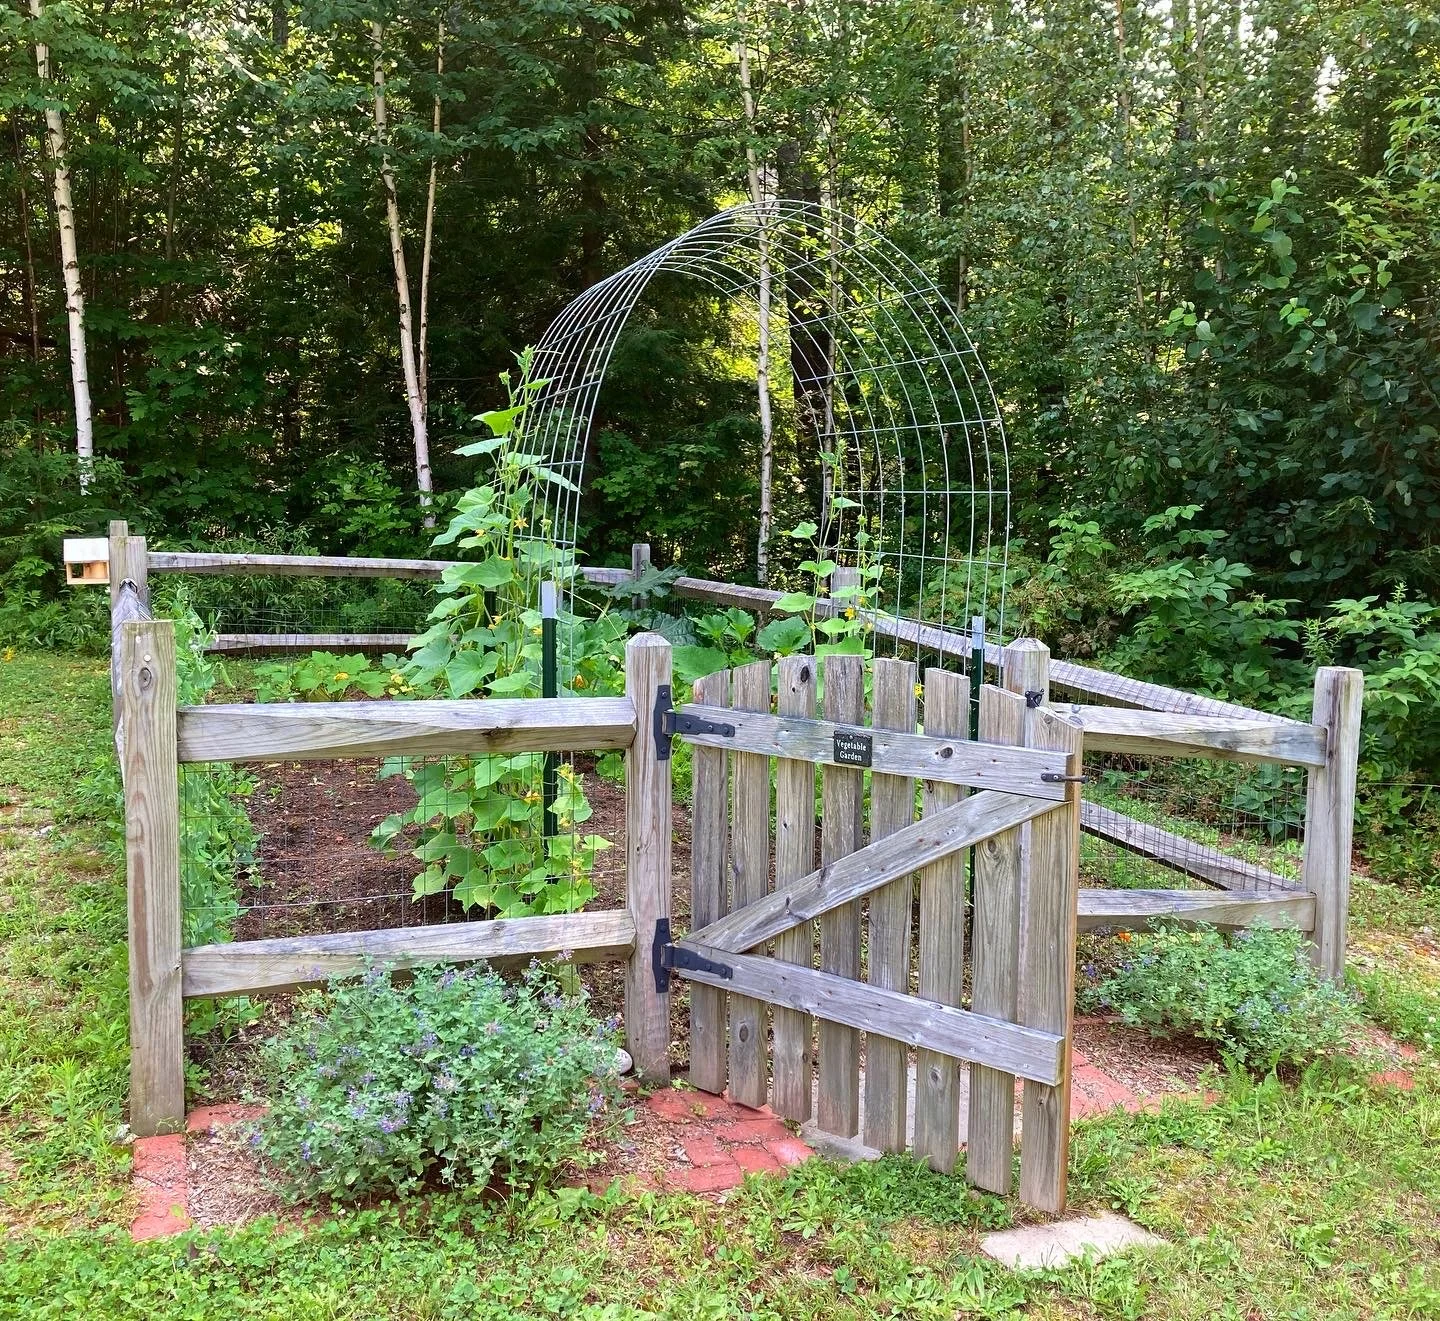
Last summer Pinterest blew up with DIY Cattle Panel Trellises and I decided I was going to jump on this bandwagon next season… And so here we are - it’s spring and I’m excited to get this set up and document my garden’s progress this year. | This post contains affiliate links |
- This post will show how we built our Cattle Panel Arch and I will also add progress photos to this post as our garden grows -
To make a Cattle Panel Trellis, you really only need a few things. We picked up most of our materials at a local Tractor Supply store but you could find these materials at other farm/garden centers too or order online. The trickiest part was getting everything home since the cattle panel is fairly large. Thankfully my father-in-law has a pickup truck and was able to pick up the items for us.
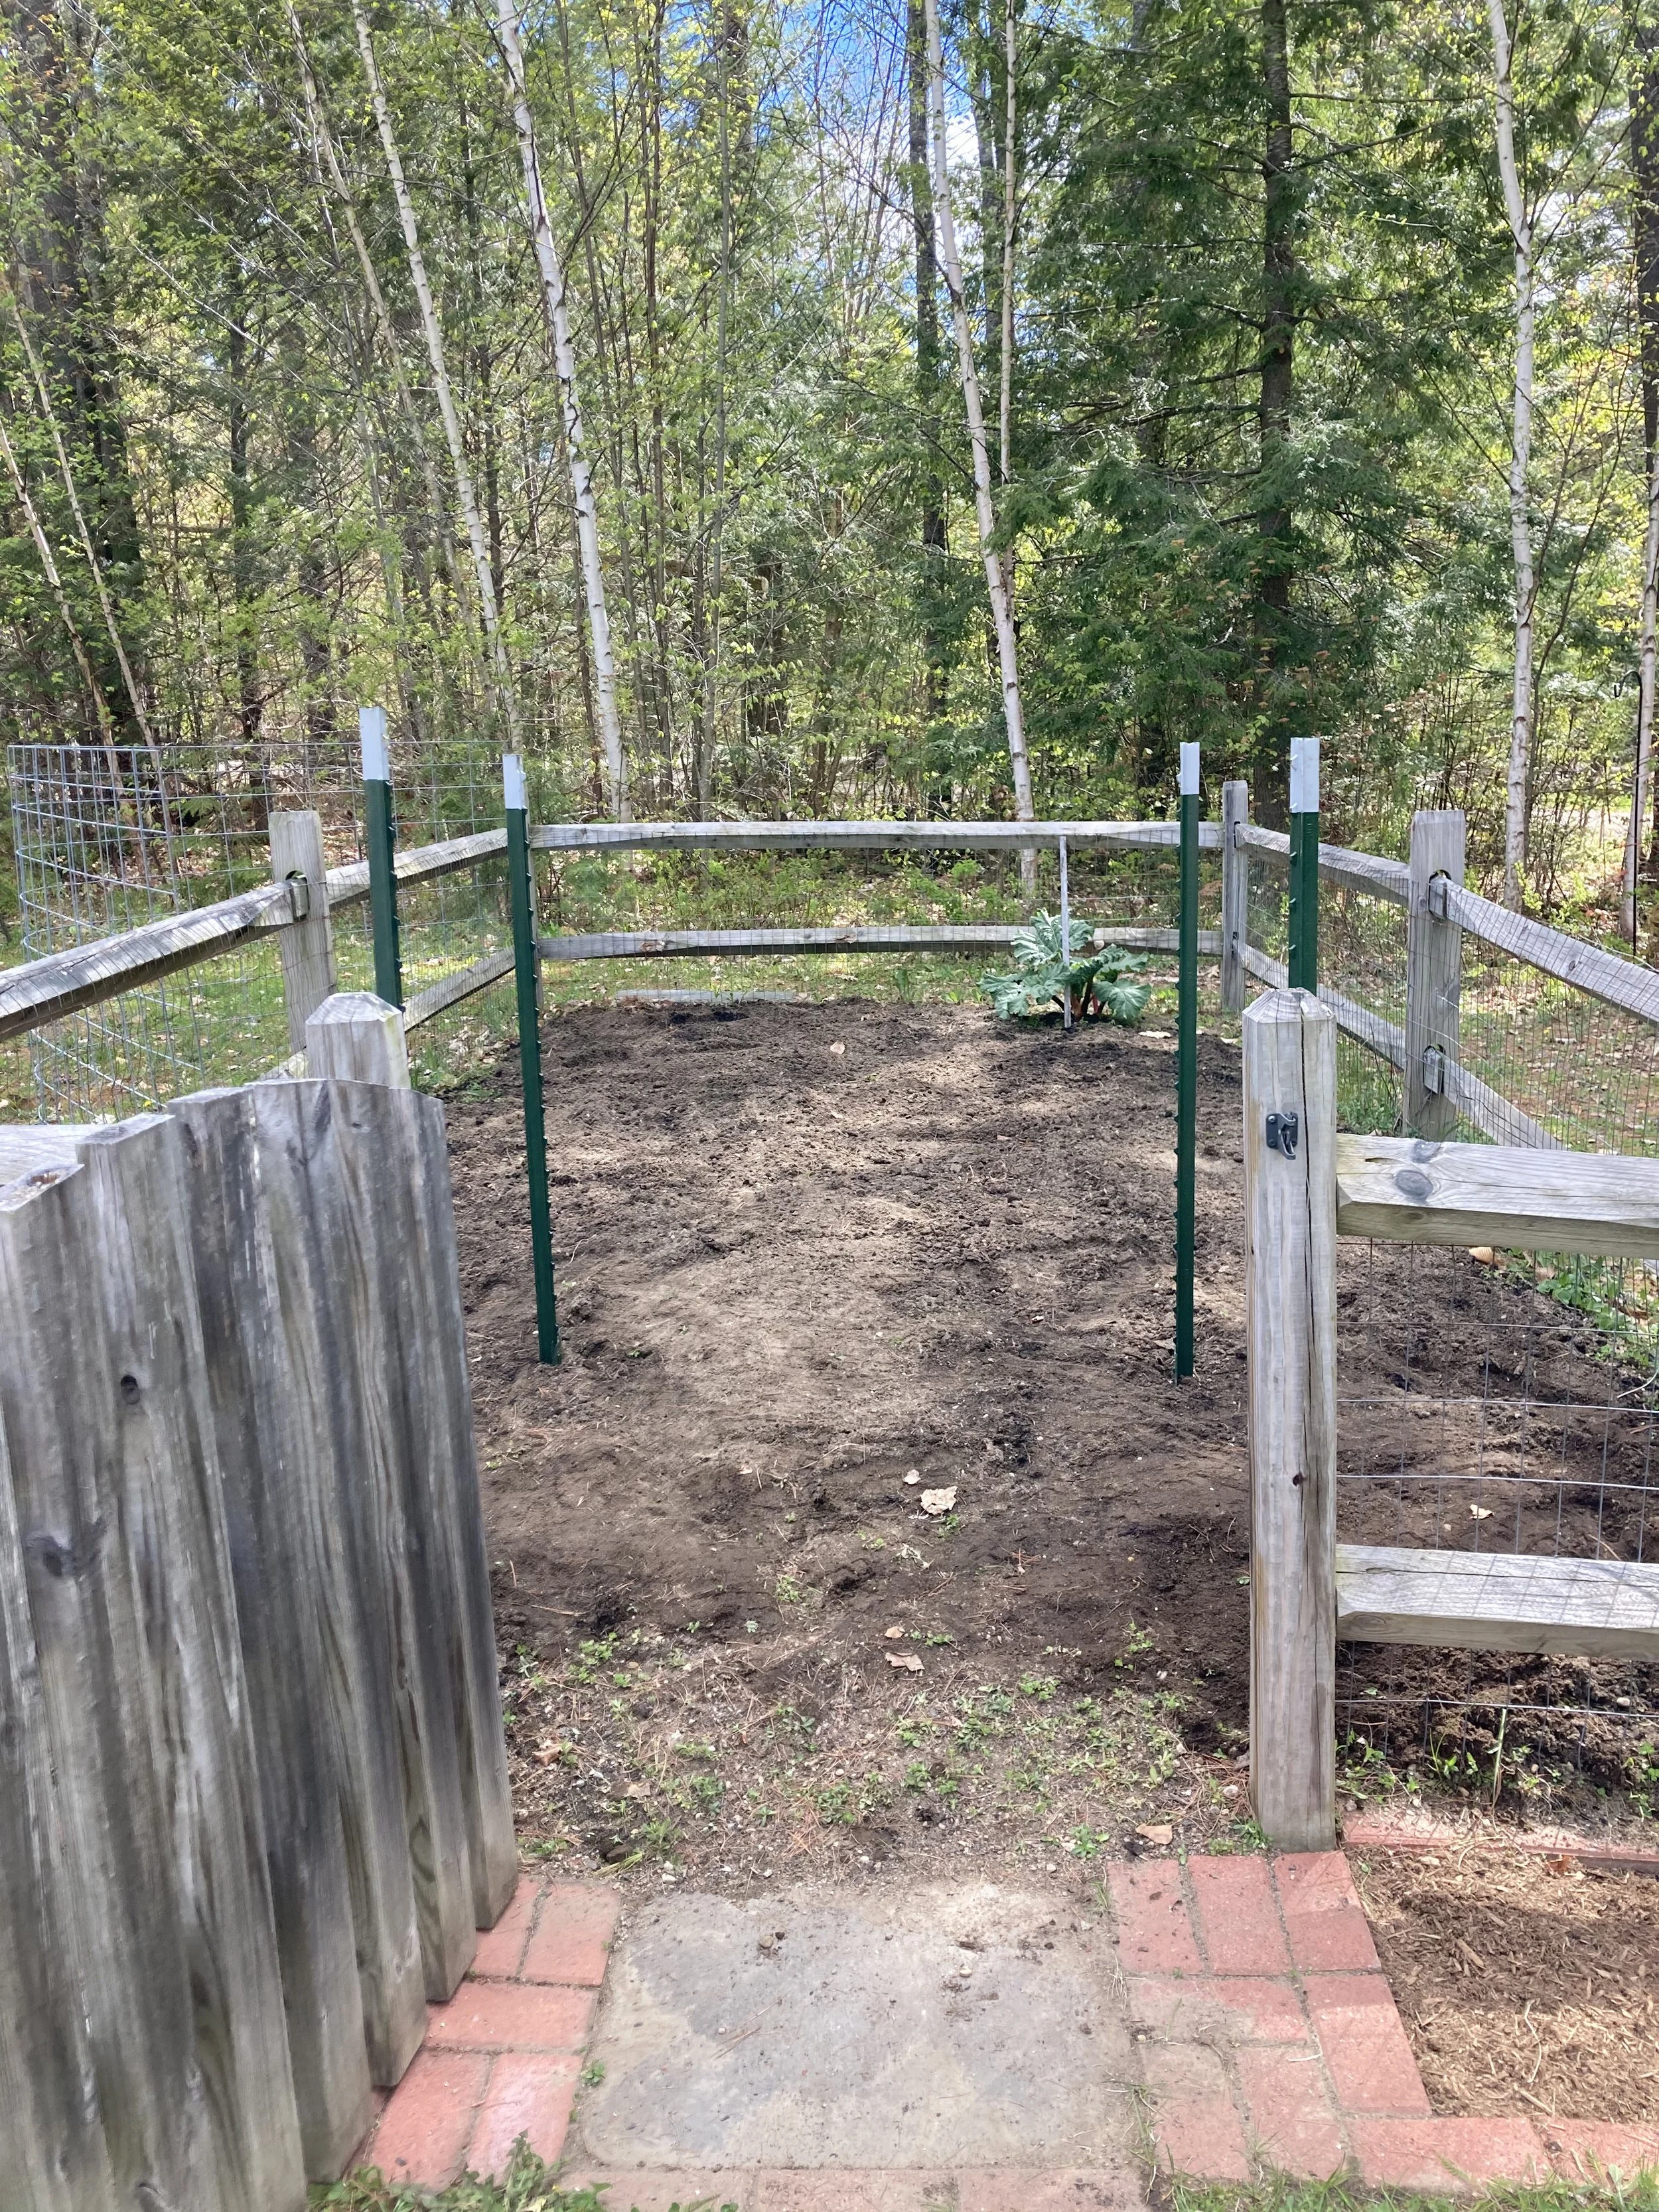
First, figure out where you want your arch to go. For us we put it just inside our garden gate to frame the entrance. It’s also on the north side of our garden so it won’t shade the other veggies too much.
Once you have it laid out and square, drive the t-posts in with a hammer or post driver until they’re deep and sturdy. This was easier-said-than-done with our rocky soil here in NH, so one post couldn’t go in quite as deep as the others but it was sturdy enough still.
Next gently bend the cattle panel into a “rainbow” and set it inside the square you made. (Next year we might move our t-posts out a little wider to get a more gentle and less-tall arch, but this worked fine for us too as-is.)
Once you get it in place, secure it with hose clamps, heavy duty wire, or some rope so it stays in place.
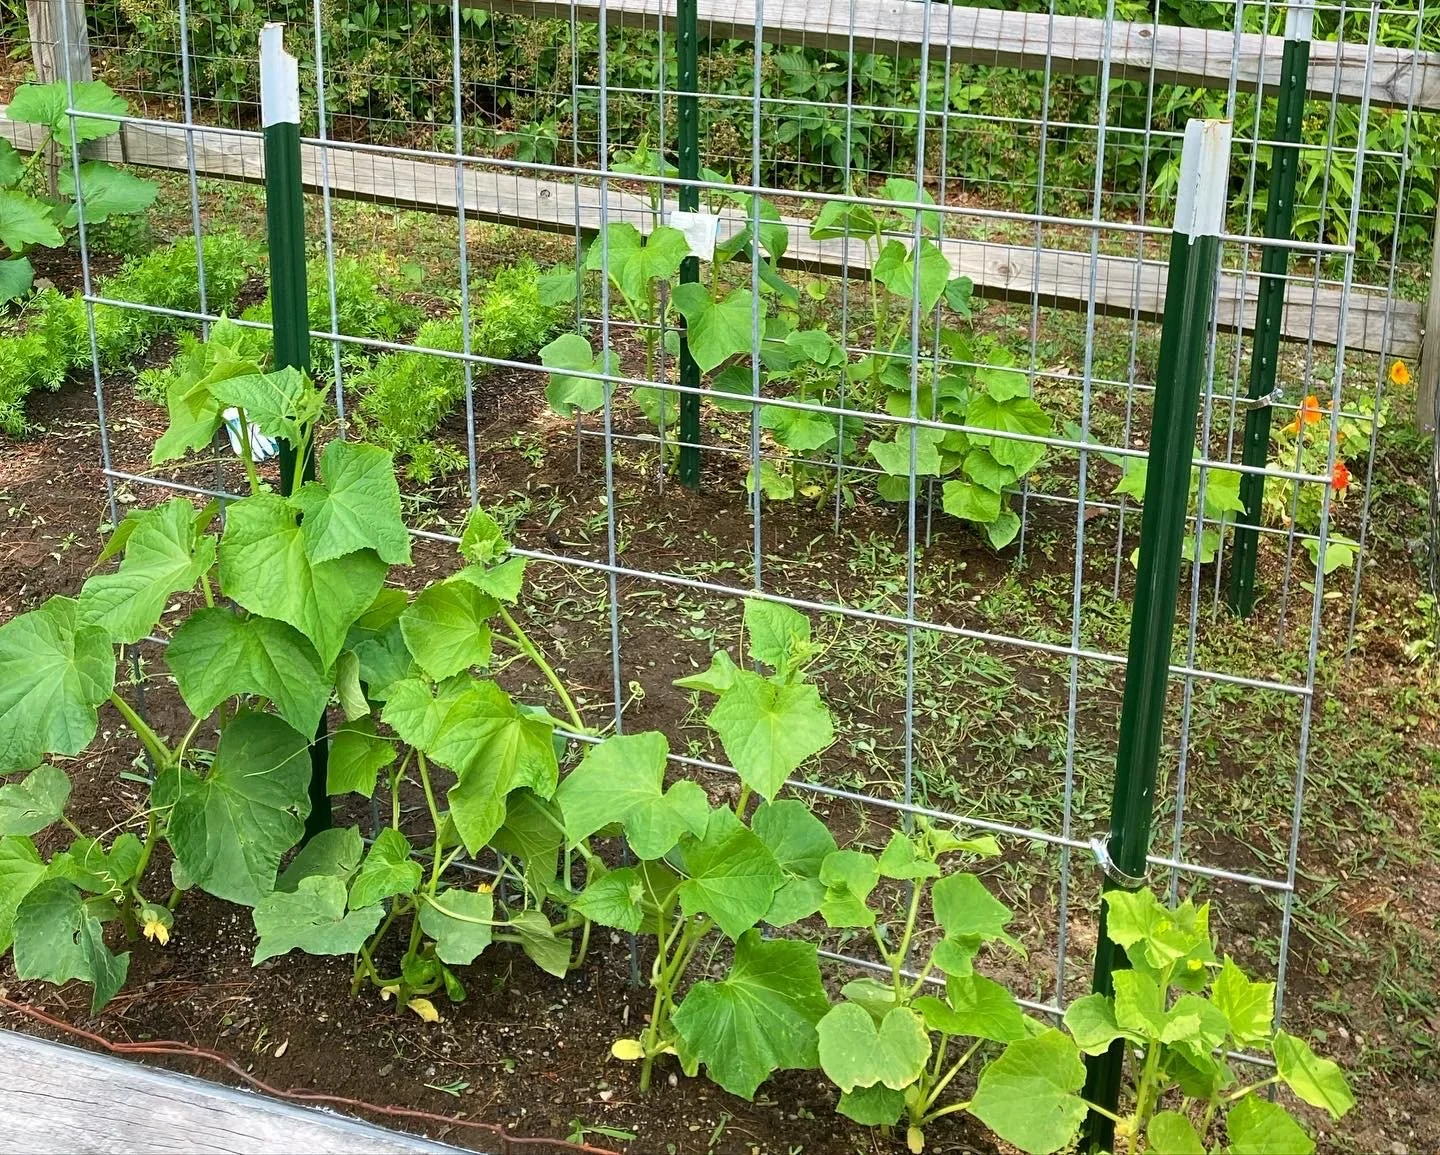
Now you can plant! We planted ours with vining cucumbers, but you could plant just about any vining plant on these - including peas, squash, ornamental gourds, flowers, etc.
The vines do a great job climbing the arch on their own, but it’s a good idea to check them daily and gently guide the vines where you want them. There’s always a rogue vine that will try to go the other way! They will especially need some help being trained to follow along the top of the arch since their natural inclination will be to continue growing straight up rather than bending around the curve at the top.
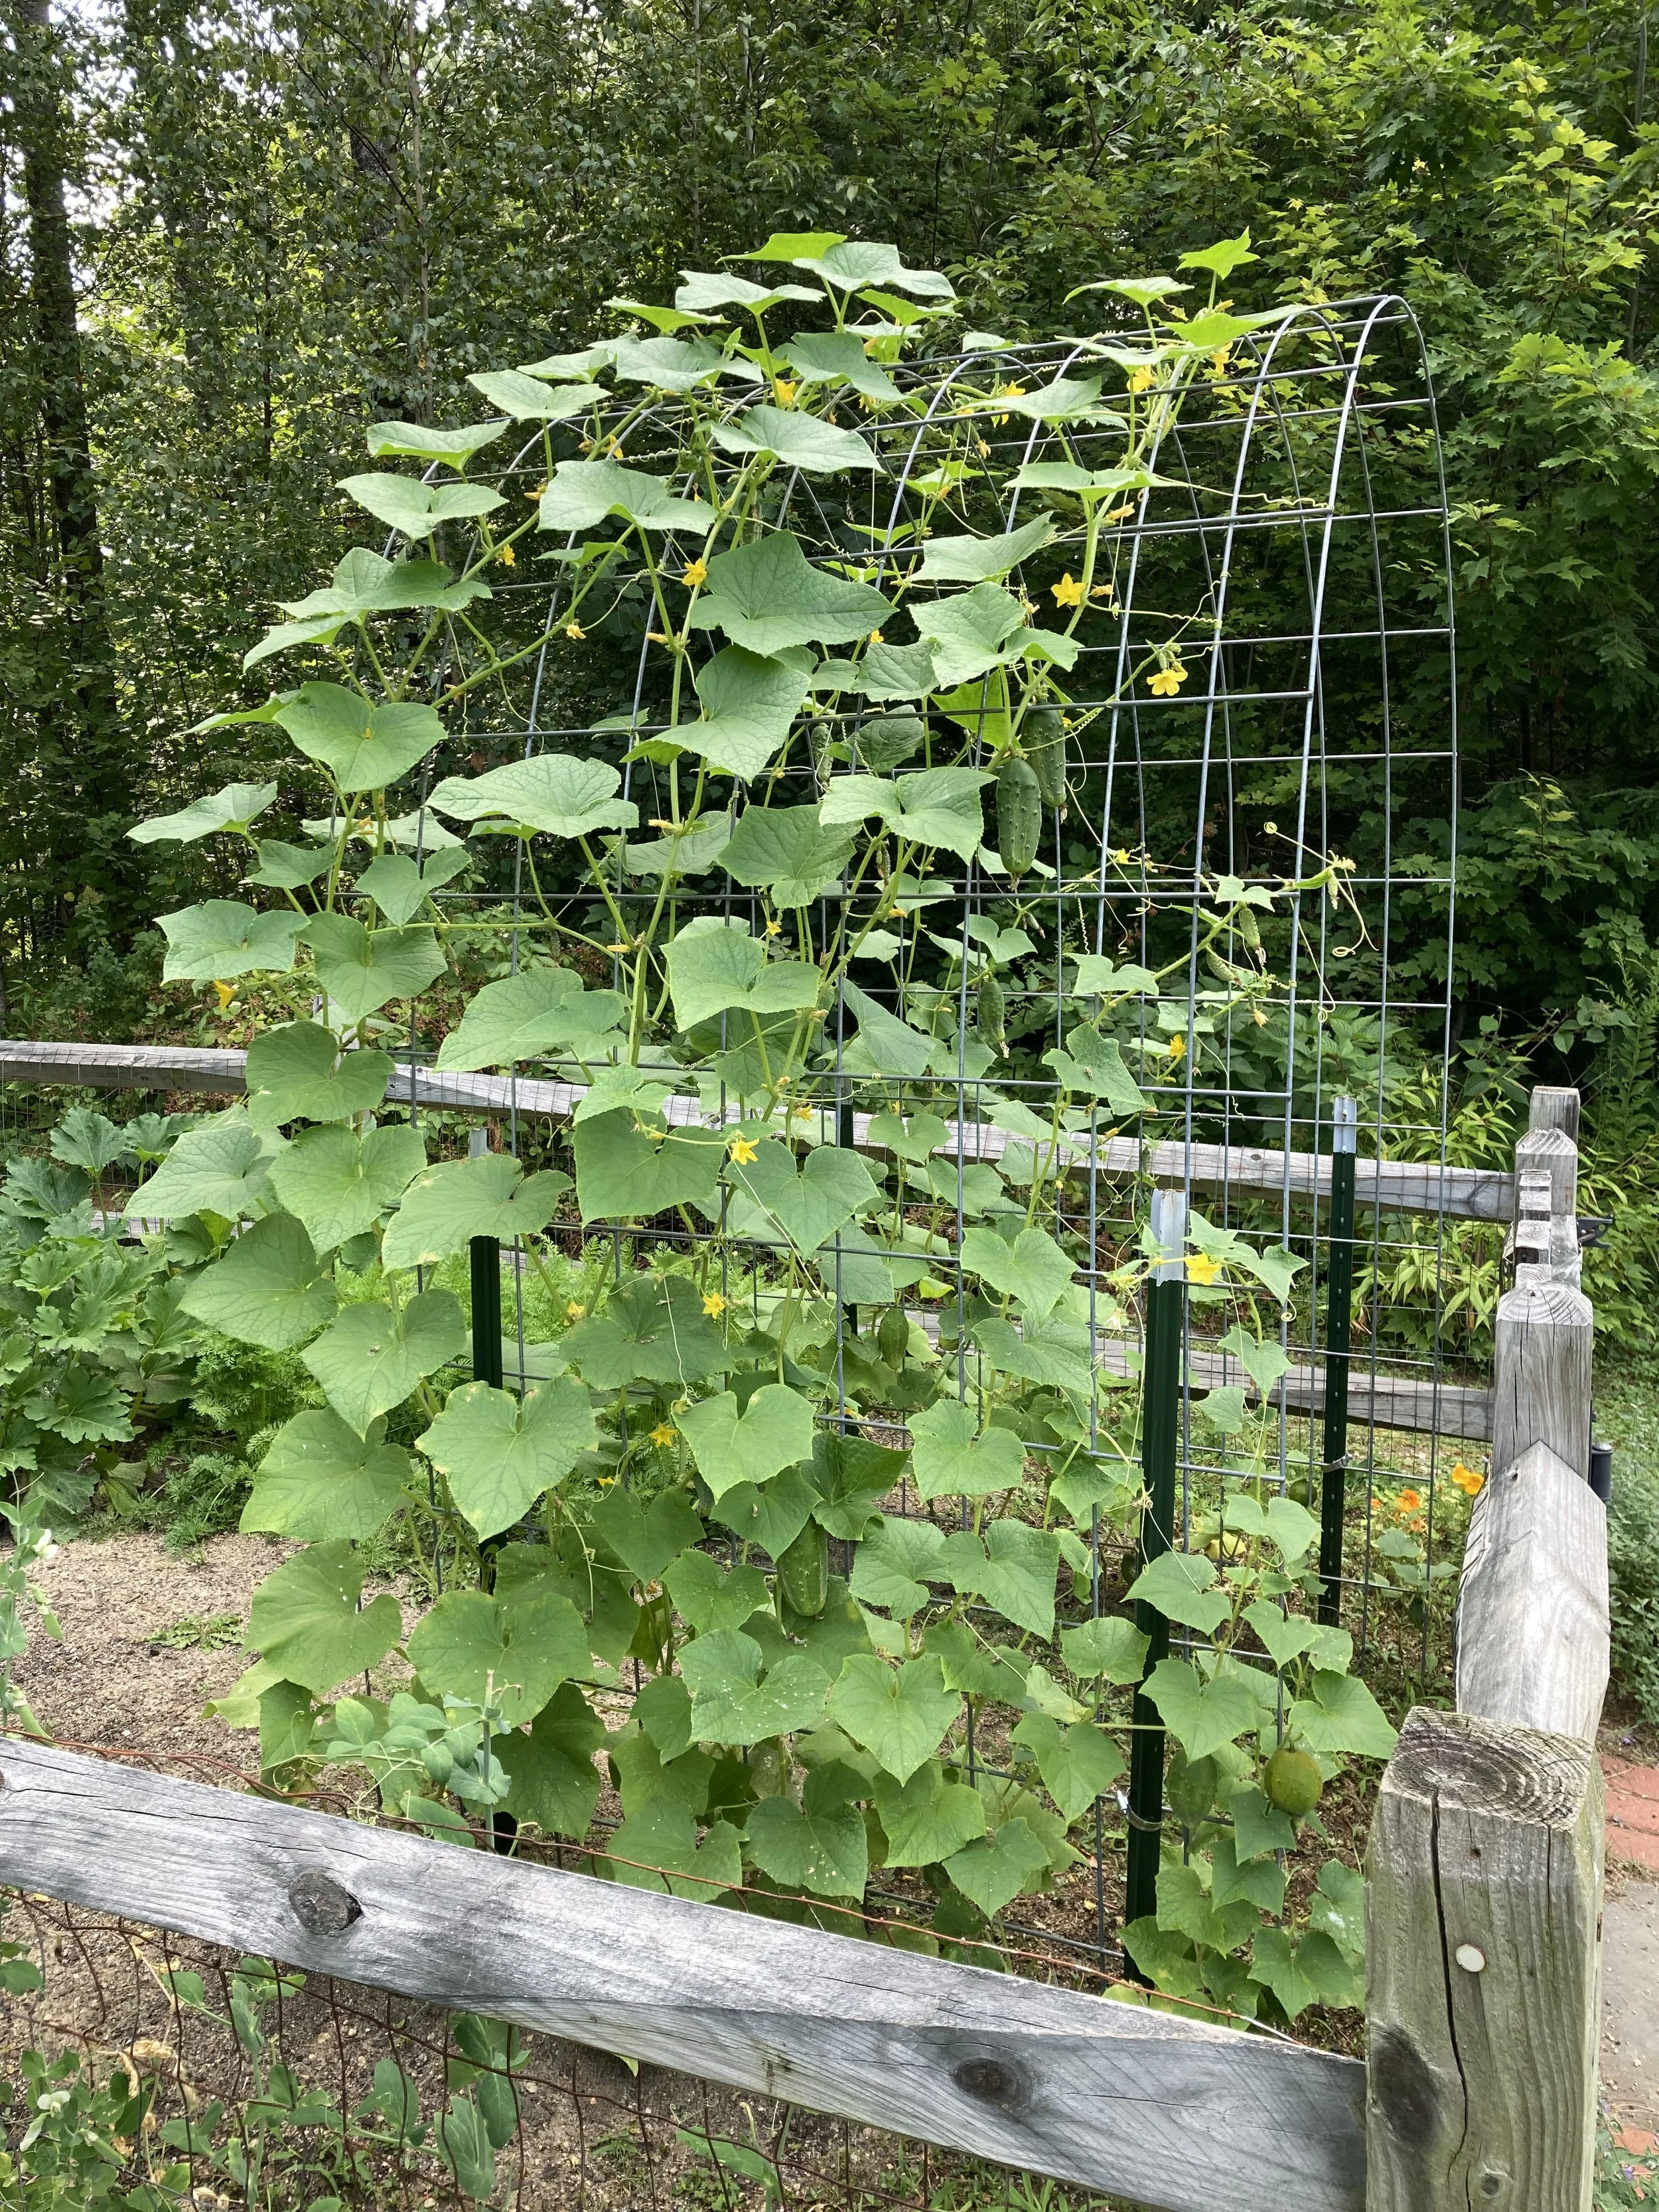
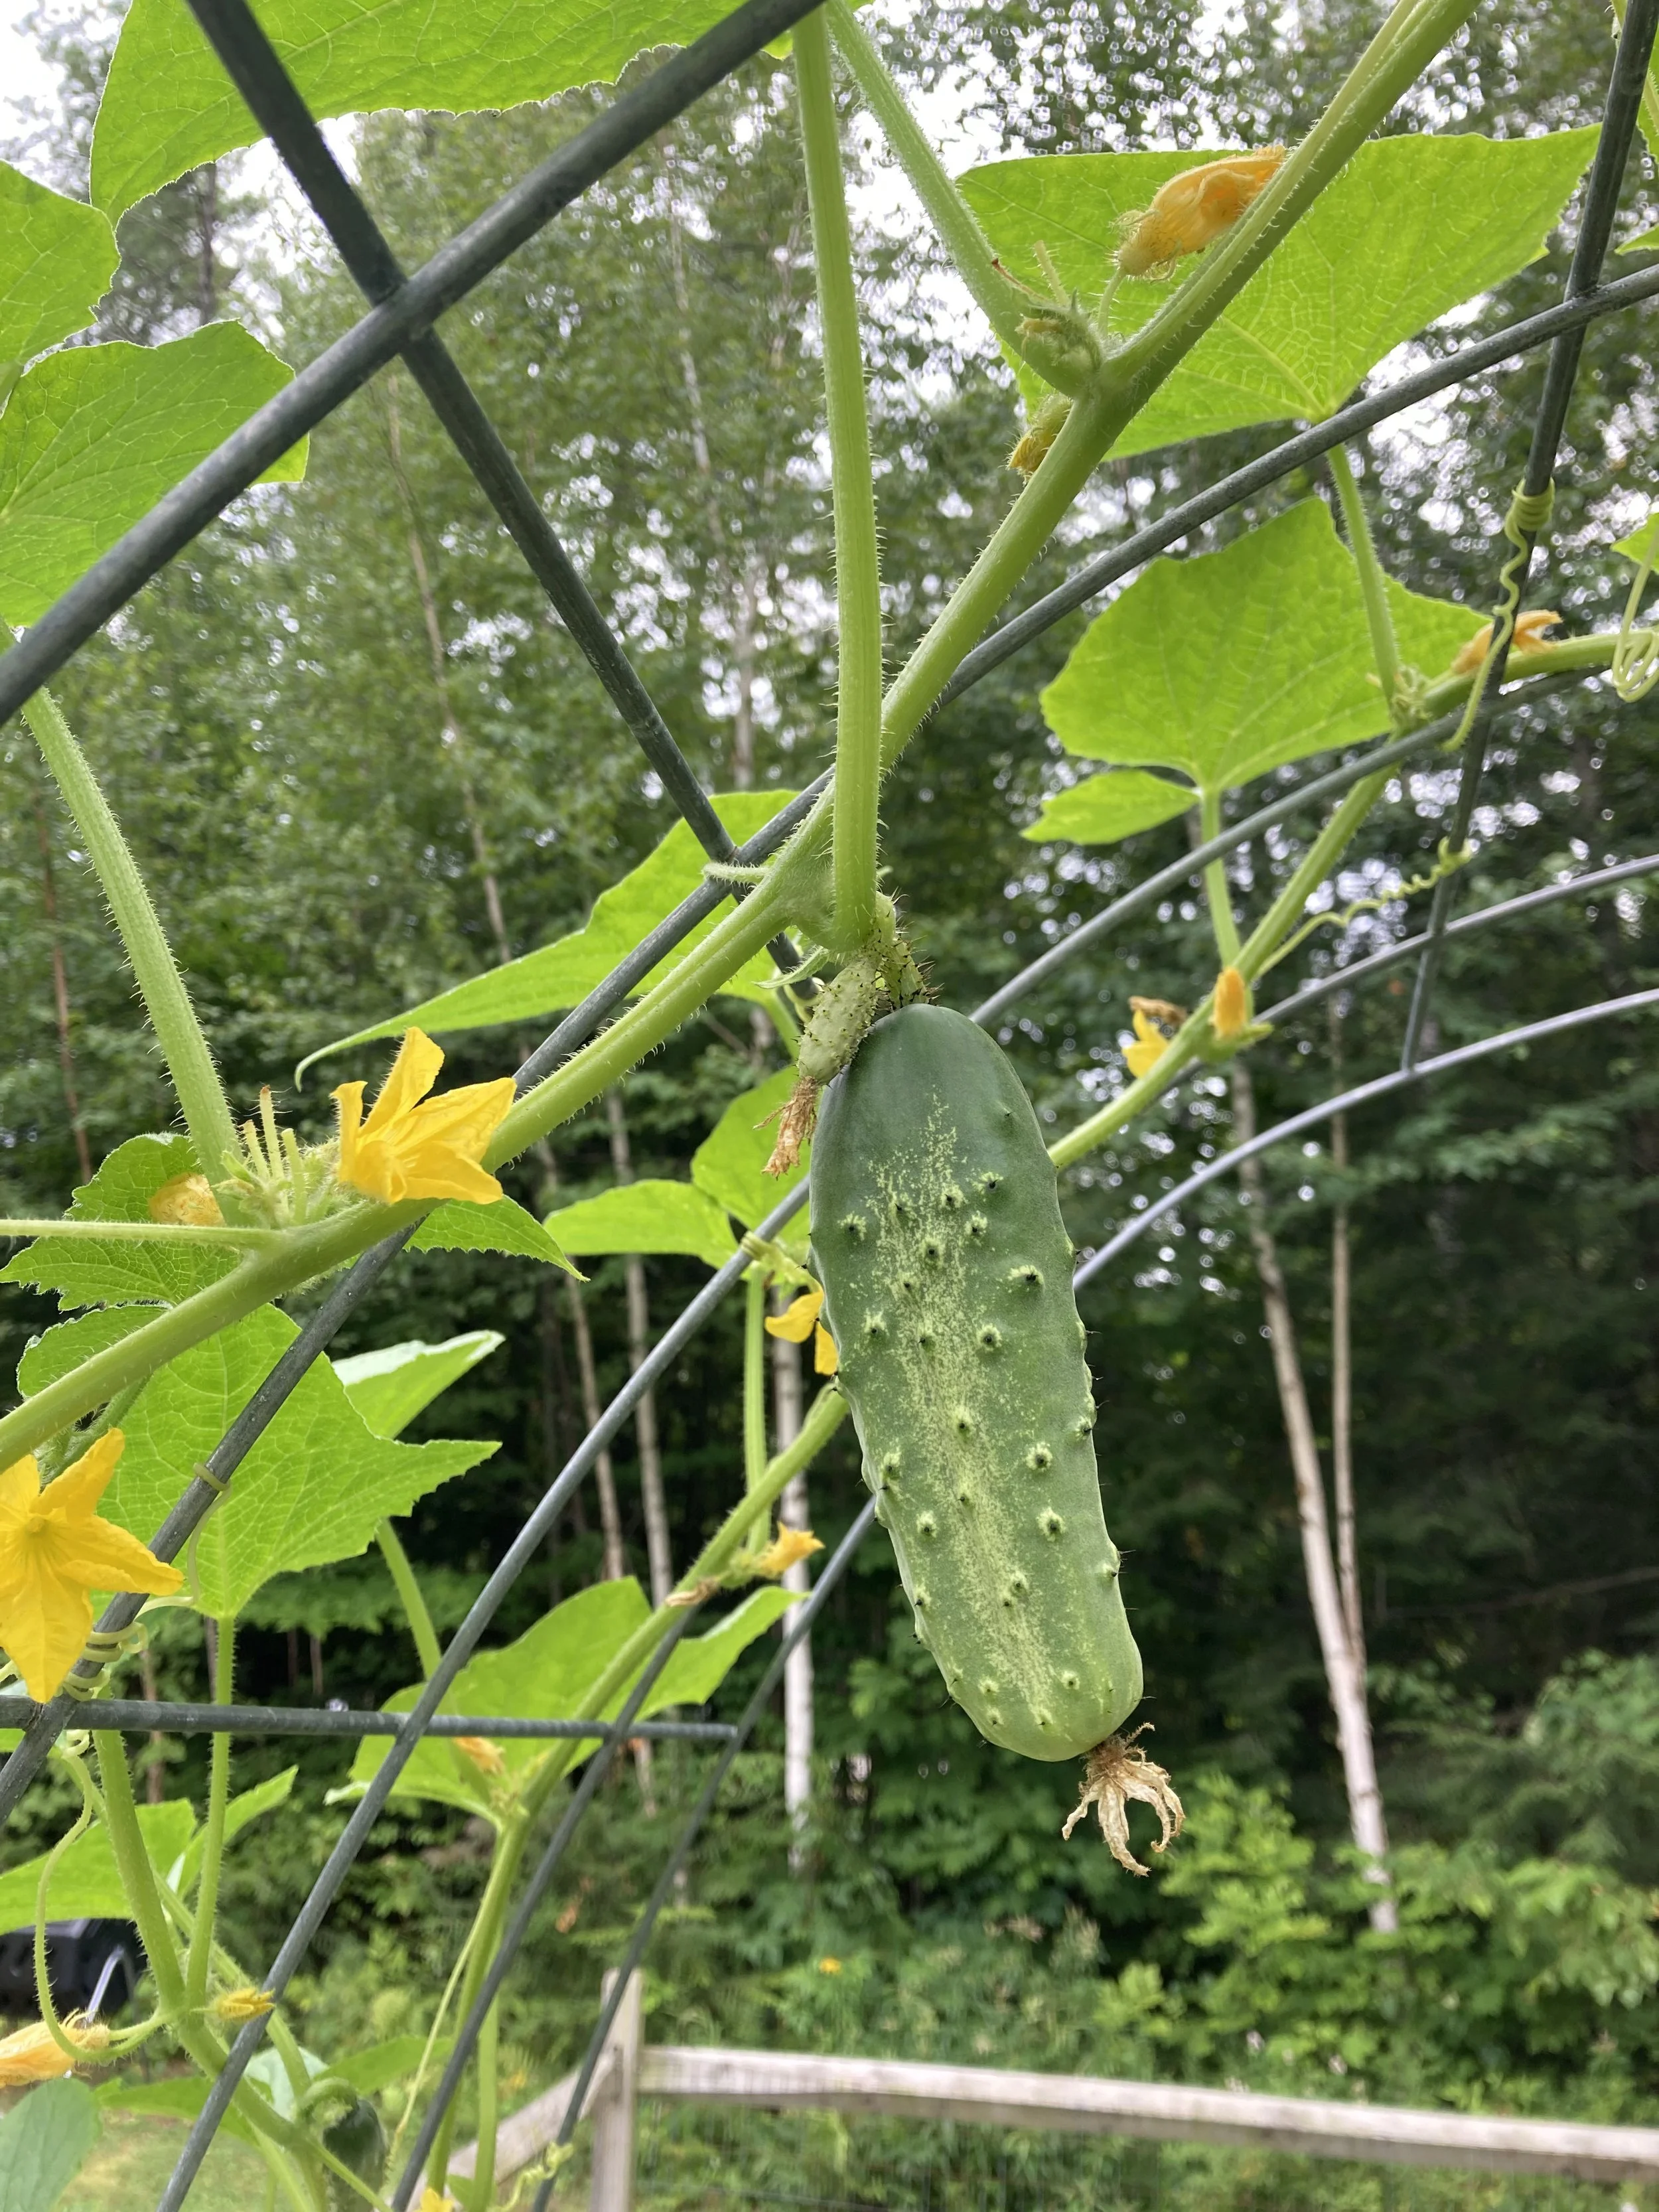
And that’s it! Overall it was a very easy project and one we will definitely continue with in the future. I also noticed a huge benefit for our pollinators too - the bees were able to reach the flowers easily and we had a bumper crop of cucumbers this year. They were also very easy to pick hanging down from the arch.
Good luck on your cattle panel trellis adventure!
From earlier in the season, before the vines reached the top.
When you have kids, the chaos of their stuff seems to follow you everywhere - including into your car. I accept that our cars will never be pristine (dirt, crumbs, and dog hair will always be present), but I make sure that despite that we have a simple system to keep our things organized and to make sure we always have our essentials at hand. | This post contains affiliate links |
Disclaimer: Use organizers and other items at own risk. Make sure they are properly installed and compatible with your vehicle.
Keeping Toys in Check
I got tired of loose books and small toys spilling all over the back seat and the floor, so I got a backseat organizer to corral the kids’ items and keep them within easy reach for long car rides. In the organizer we always have some small books, an electronic kids toy, and some puzzles like a Rubik's Cube, as well as sunglasses for each kid in the small pockets in the front. I like this organizer because it fits between the car seats and can also buckle in so it doesn't slide around. (Side note: Where's Waldo has become a favorite car read and keeps the kids entertained for a long time.)
Trunk Organizer
With young kids we always carry supplies like a first aid kit, full change of clothing for each child, trash bags for wet/dirty clothes, extra towel and blanket, etc. For awhile all those items lived in a diaper bag in the trunk, but we are past the diaper stage now and it was time to retire the diaper bag and upgrade to something sleeker and space-saving. I am really loving this sturdy SUV trunk organizer for keeping everything hidden but still within reach.
The Infamous Car Potty
If you know, you know… With small kids traveling with a potty is a must, even for awhile once they’re past potty training age. You never know when an urgent bathroom request will happen, and these days with the pandemic it’s great to have a clean personal potty for your kid to use, rather than a dirty rest stop bathroom. Pro tip: We line our car potty with an open diaper to absorb liquid and waste and reduce the risk of a spill (makes for easier clean up too!).
Registration/Insurance Holder
It’s a good idea to keep all your car paperwork handy and organized in the glove box, because if you need it you don’t want to have to go digging for it - especially if it’s of an urgent nature (if you got pulled over, fender bender, etc). I personally like the little portfolios that keep everything ready and easy to find.
Roadside Kit / First Aid Kit
Always keep a roadside emergency kit and first aid kit in your car in the event you break down or have an accident. You may be able to find a kit that covers all your bases, but often you may have to purchase these separately or at least supplement with some additional tools or first aid items. Our trunk area has a hidden compartment underneath where we store all our roadside and first aid gear.
Extra Masks
It’s a sign of the times… make sure you always keep a spare set of extra masks in your car for the whole family. That way you’re never caught without one if you need it. We made our mask case using a slim wipes container (similar container linked here).
Disclaimer: Use organizers and other items at own risk. Make sure they are properly installed and compatible with your vehicle.
As you know by now, I love sharing about companies and products we love on the blog and our Instagram - and most especially those made right here in New England. It’s been a little while since I’ve done an interview on the blog in our New England Maker Series, but I’m excited to get back into it with Heather of Mermaids + Madeleines!
Heather Auclair of Mermaids + Madeleines is best known for her coastal-inspired handmade jewelry and fun watercolors. 5% of each purchase is donated to aid in sea life rescue and rehabilitation efforts - I just love a company that gives back!
Tell me a little bit about yourself and your business.
I’m Heather, a native of Maine, currently living life in Massachusetts with my husband and two rescue kitties. I’ve always enjoyed creating art. Whether it’s drawing, painting, crafting, or designing jewelry. I’m happiest when I’m making something,. I was lucky to grow up in a creative family and community by the ocean. I don’t think I realized how special it was until moving away. Mermaids + Madeleines is inspired by the ever-changing color and light of the coast. We’re so lucky in New England to have such a fascinating coastline. From place-to-place, no location is exactly alike in looks or atmosphere. Each spot has its own little charm and I find that totally uplifting. I try to capture this mix of joy and sense of ease in my works.
How did you start Mermaids + Madeleines? Had you been making jewelry for awhile or was this a new leap for you?
Mermaids + Madeleines started at a friend’s kitchen table (Hi Dana). We were both working at our own full-time jobs and not necessarily feeling completely fulfilled by them. What started as a creative/craft night once a week slowly bloomed into our own side businesses. I had always made some kind of jewelry, I think it started with embroidery floss bracelets at recess in grade school, and slowly morphed into beaded things. I kind of ebbed and flowed back into it after I started a program for advertising design at RISD. I took an elective in jewelry design and light metals and fell in love with it all over again. I quickly changed my concentration and began learning some benchwork skills, design, and technical drawing. I was lucky enough to land a job in commercial jewelry before graduating. First, starting out in costume jewelry and working my way over to find jewelry. While it’s great being able to pursue an interest and find a job that will pay you for it, to me, it just doesn’t come with the same creative freedom, or feel as rewarding as doing your own thing.
What does a typical day look like for you?
I try my best to start each day with some kind of movement, even if it’s only for 15-20 minutes, a barre class, a quick yoga, tabata, - something to get my mind and body moving first thing helps me to be more present and engaged the rest of the day. After having way too many nearly all-nighters for someone that is no longer in their 20’s I’ve started to try to be better about balancing work days and using the time I have. Mondays I do the (for me) dreaded stuff - like filling out inventory sheets, entering receipts, and ordering materials if needed. Tuesday and Wednesday, I like to use as creative days to design and fulfill orders, Thursday is usually a catch-up day for anything that can’t wait until the next week and straightening out the usual creative explosion I’ve created Tuesday and Wednesday. I run my little micro-business out of our (still functional) spare bedroom in our apartment so Friday-Sunday I try to keep my artsplosions to a minimum so it’s presentable for guests.
What is your favorite part about owning your own company? And least favorite part?
My very favorite part is when a customer reaches out, tags me in a post, or leaves a sweet review or message that the piece they received was exactly what they had been looking for, either as a gift or a treat for themselves. Being able to bring joy and happiness to someone through something you’ve made is one of the best feelings. In general, so far, I’ve loved owning my own business a little more than I expected to. It challenges me in ways I didn’t expect, and has forced me to learn and begin developing skills in areas I would have naturally been able to avoid, continuing to only work for someone else. Having said that, there are definitely aspects that aren’t my favorite. Logging inventory, dealing with accounting, and staring at spreadsheets isn’t really my cup of tea. If that were someone else’s job it would be way more fun, but I do think there’s a lot of value in gaining understanding about these less enjoyable parts of owning a business.
What has been the most exciting moment for Mermaids + Madeleines since you started?
I don’t know if I can pick just one exciting moment. I feel like there have been several. The first sale on Etsy, first show, first wholesale order. Finally receiving official paperwork in the mail - making things seem a little more real. There really is a moment or something to be excited about every day, even when it’s something small.
What advice do you have for people just starting out?
My advice is something that everyone says, and it’s the hardest advice to take: “Just start.” It’s so intimidating to put yourself out there. You’ll want everything to be perfect before it’s in front of people, and you can live forever in the phase of “it’s almost ready,” if you’re not careful. It’s easy to hide behind “not yet” but it won’t help you or your business grow. Plus, if you launch while you’re still building it gives you space and room to iterate, and alter without being too deeply invested in something that the market may not have interest in.
What is your long-term goal? Where do you see yourself in 5 years?
I would love to continue building the brand and create an independent website, not just relying on Etsy for sales (though I’m very grateful to that platform). I’d also like to branch into more art and accessories and eventually expand into more wholesale as well - working with small boutiques up and down the coast.
Who’s one of your favorite New England Makers?
I have so many favorite makers... all for different reasons, it's hard to pick just one, so I'll have to share the two that helped my business get started. Dana of Dana Kristen Creates was instrumental in the start of my maker journey with our Thursday night hangouts and continues to be an awesome friend and creative! Alana, of A&E Stoneworks was also pivotal in getting me to make that Etsy shop go live! I met her at an event and she encouraged me to just go for it. There have been, and continue to be so many I'm grateful for, including: Mary of On The Road Again, Lynn from Love Lissy Lou, Rachel from Little Lavender Lobster, Christine from Sea Crow Company, and Marie from Pieces of Maine Jewelry, and so many more... I could probably fill your entire blog post with names!
DO YOU OWN A NEW ENGLAND-BASED BUSINESS AND WOULD LIKE TO BE FEATURED IN AN UPCOMING INTERVIEW? OR WOULD YOU BE INTERESTED IN HAVING ME STYLE, REVIEW, AND FEATURE ONE OF YOUR PRODUCTS? Please drop me a note.