I'm a wife, stay-at-home mom, crafter, and blogger living in rural New England. As seen in Martha Stewart Living, Food Network Magazine, and more! | Tutorials, DIY, crafts, parenting tips, recipes, money saving tips, product reviews, local product features, New England living, intentional living, and more! |
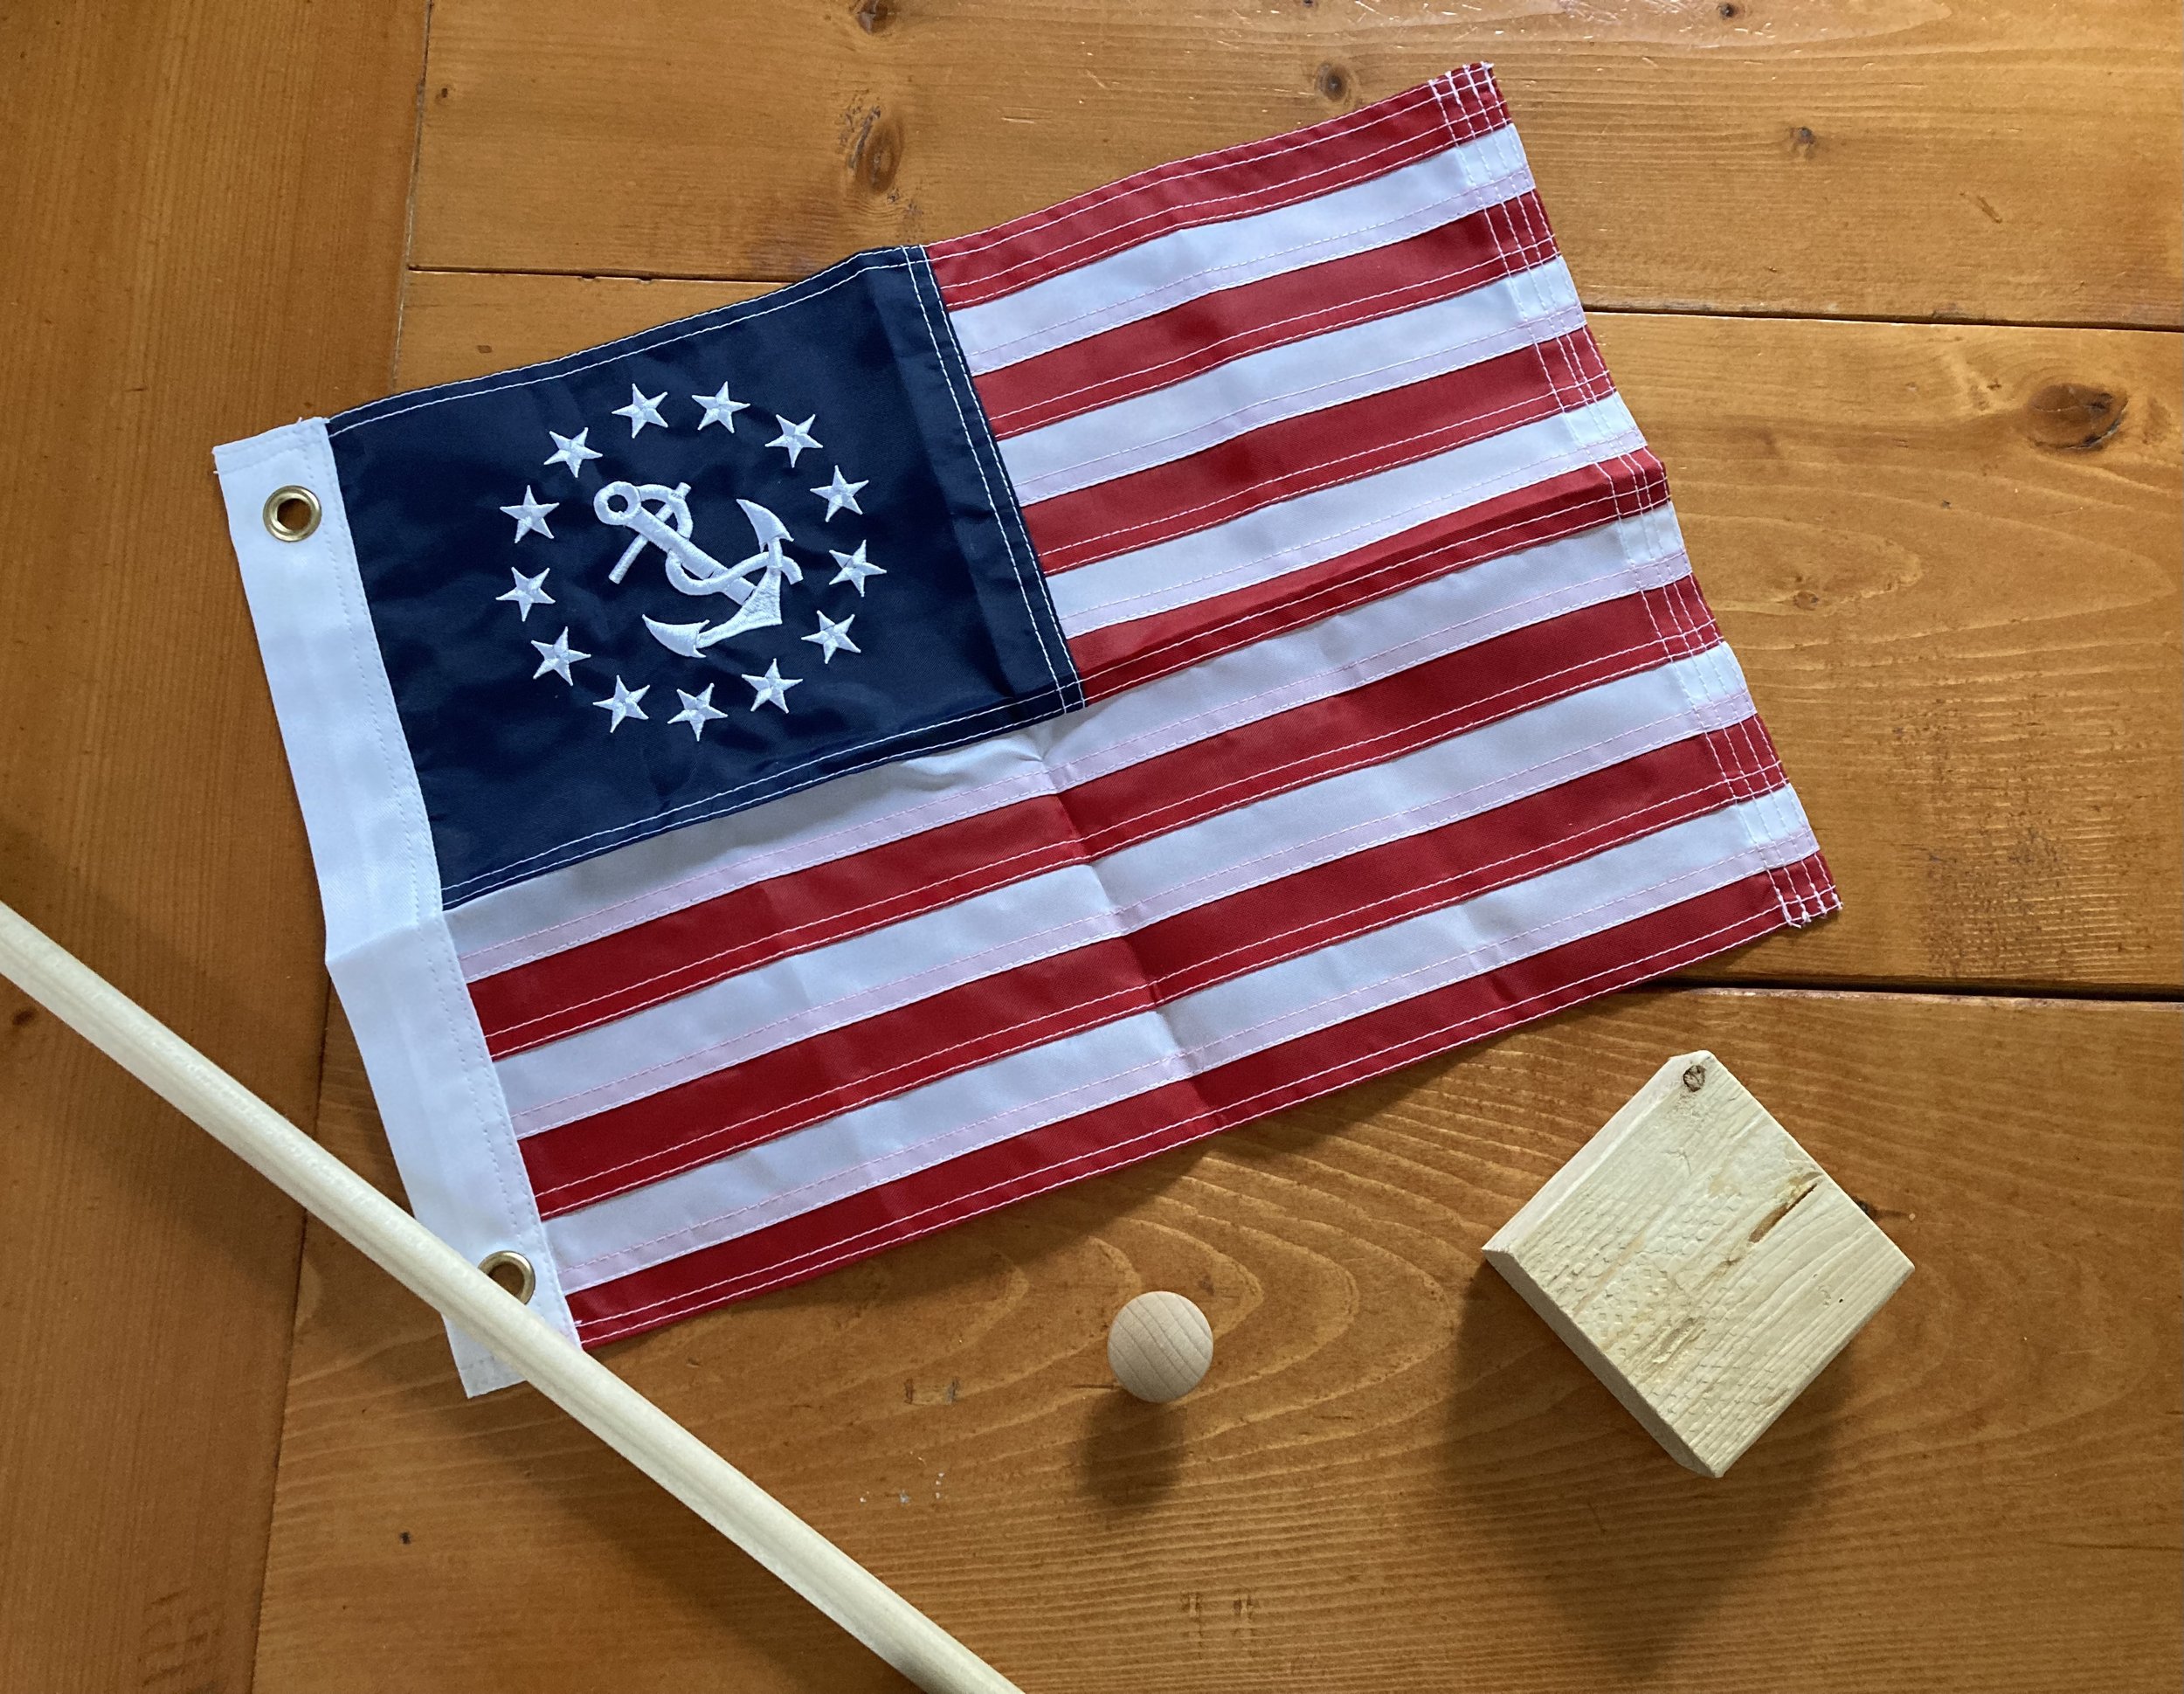
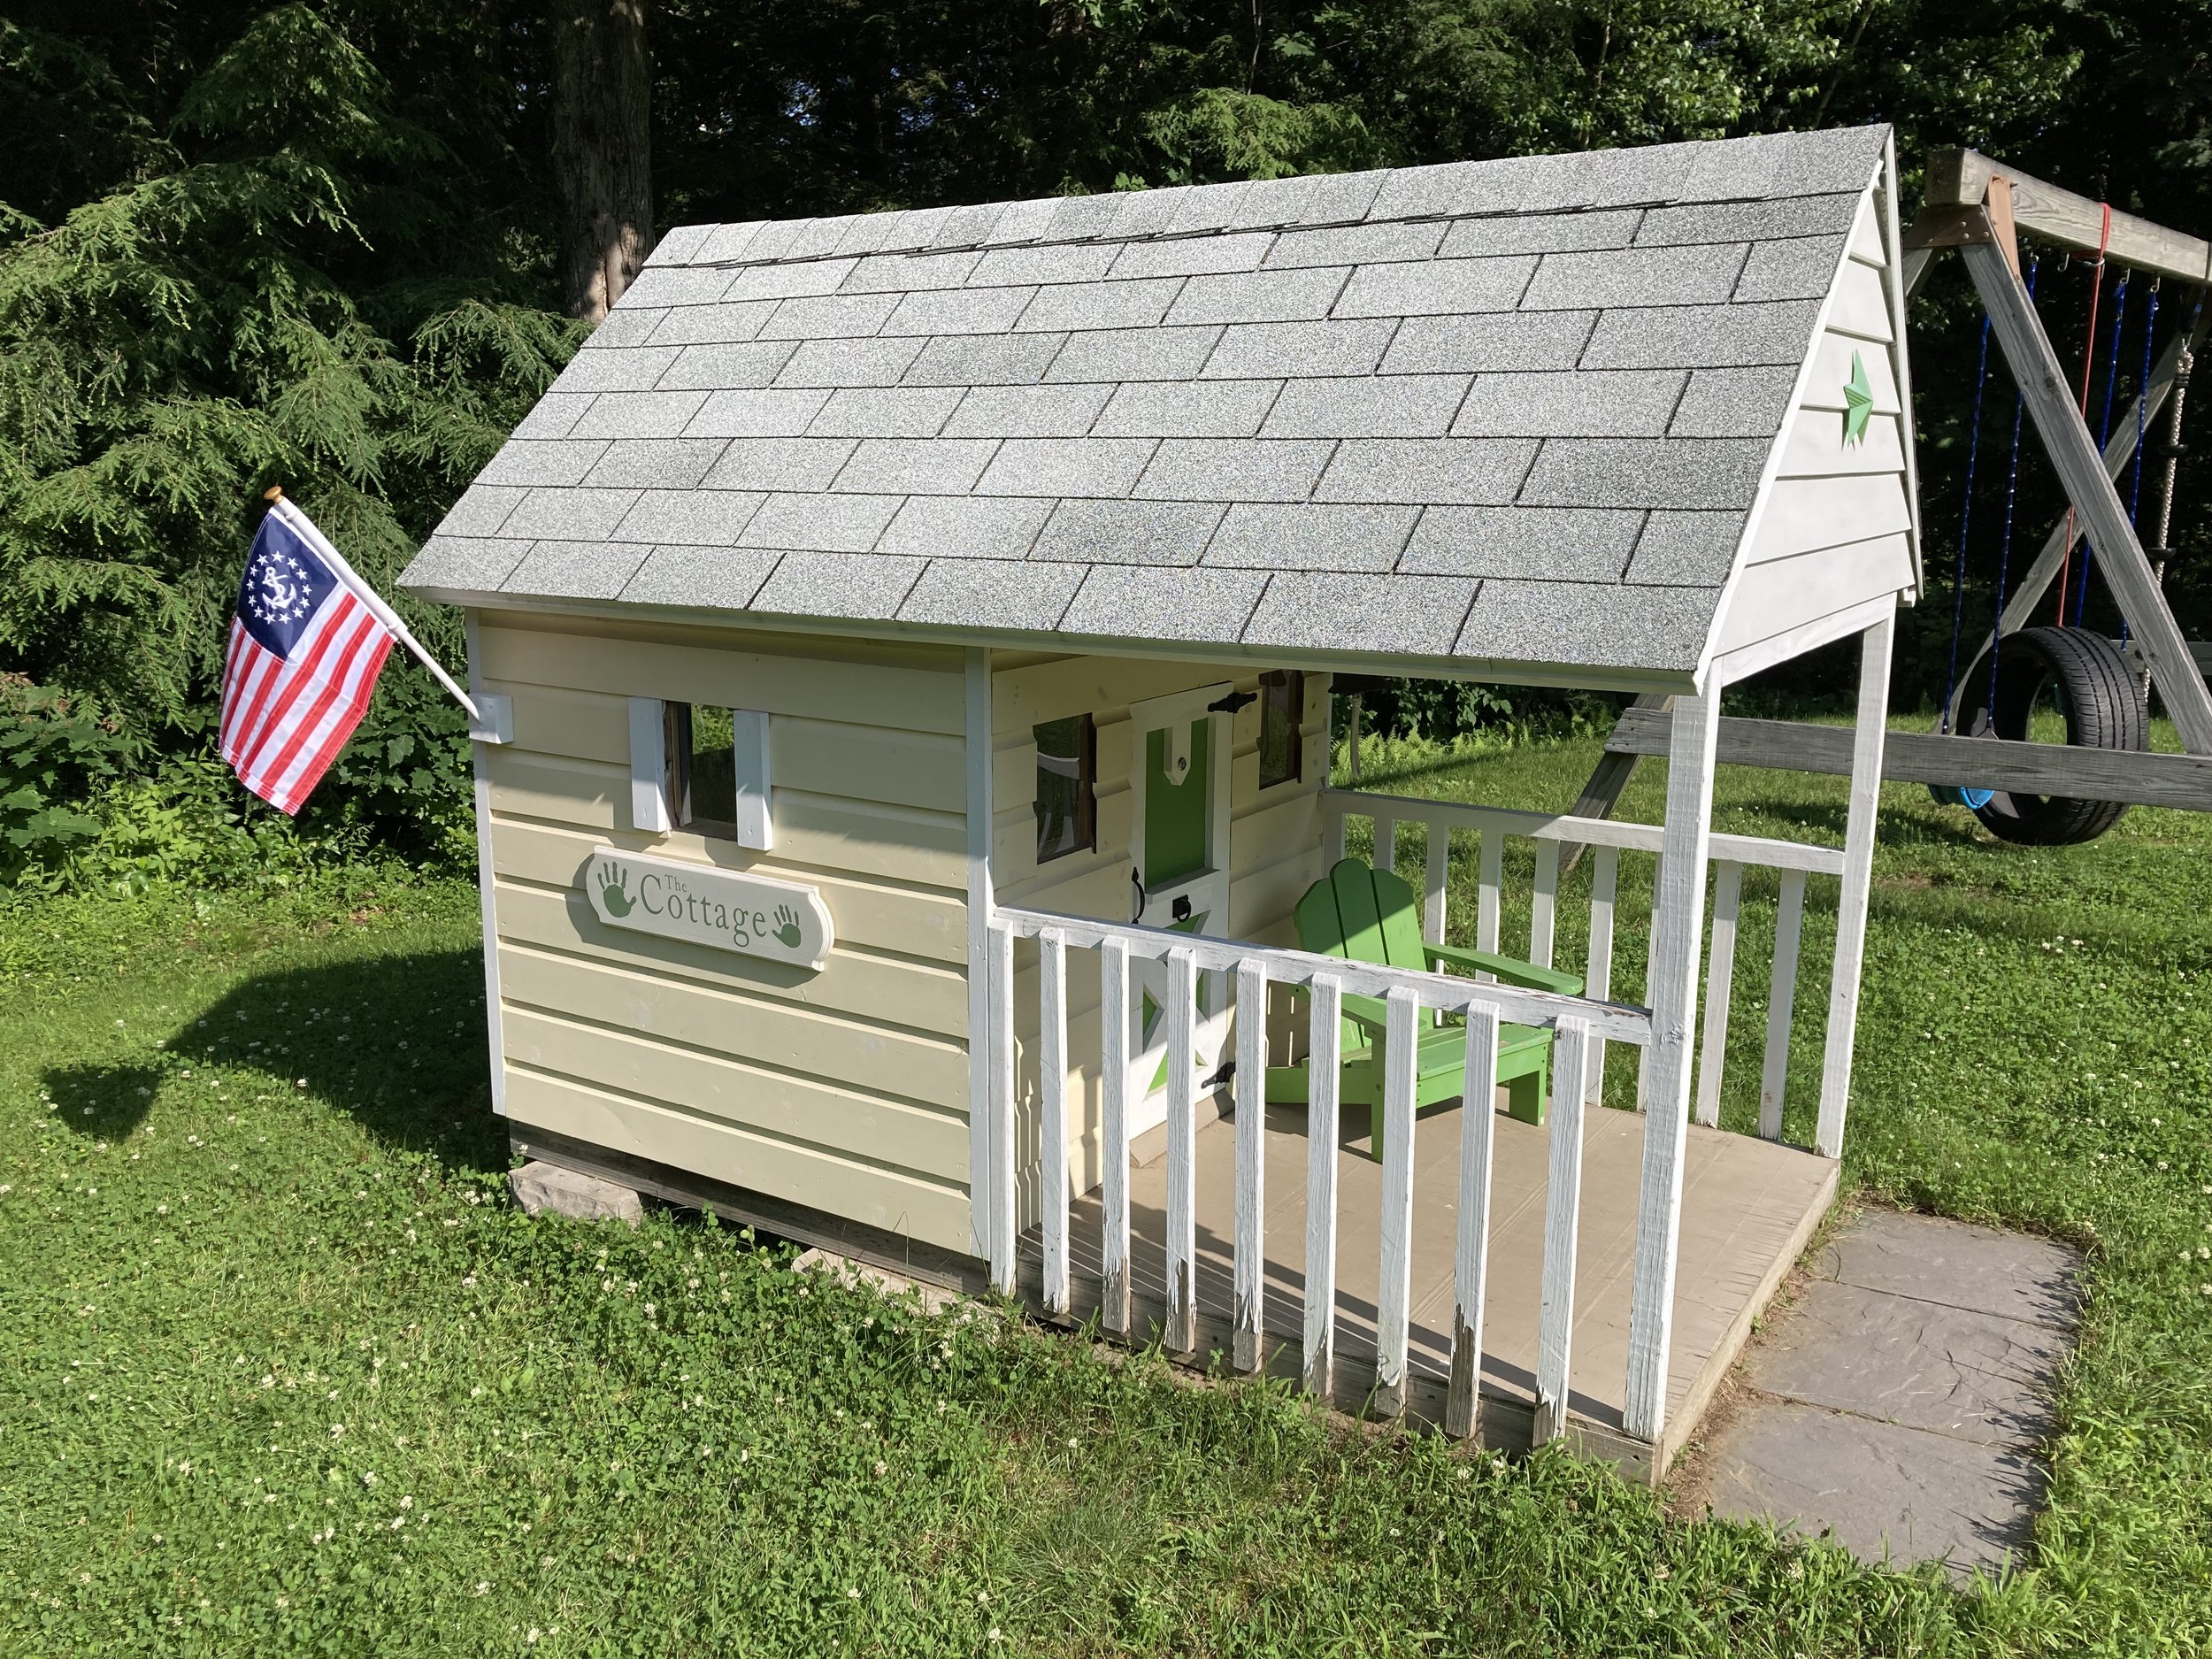
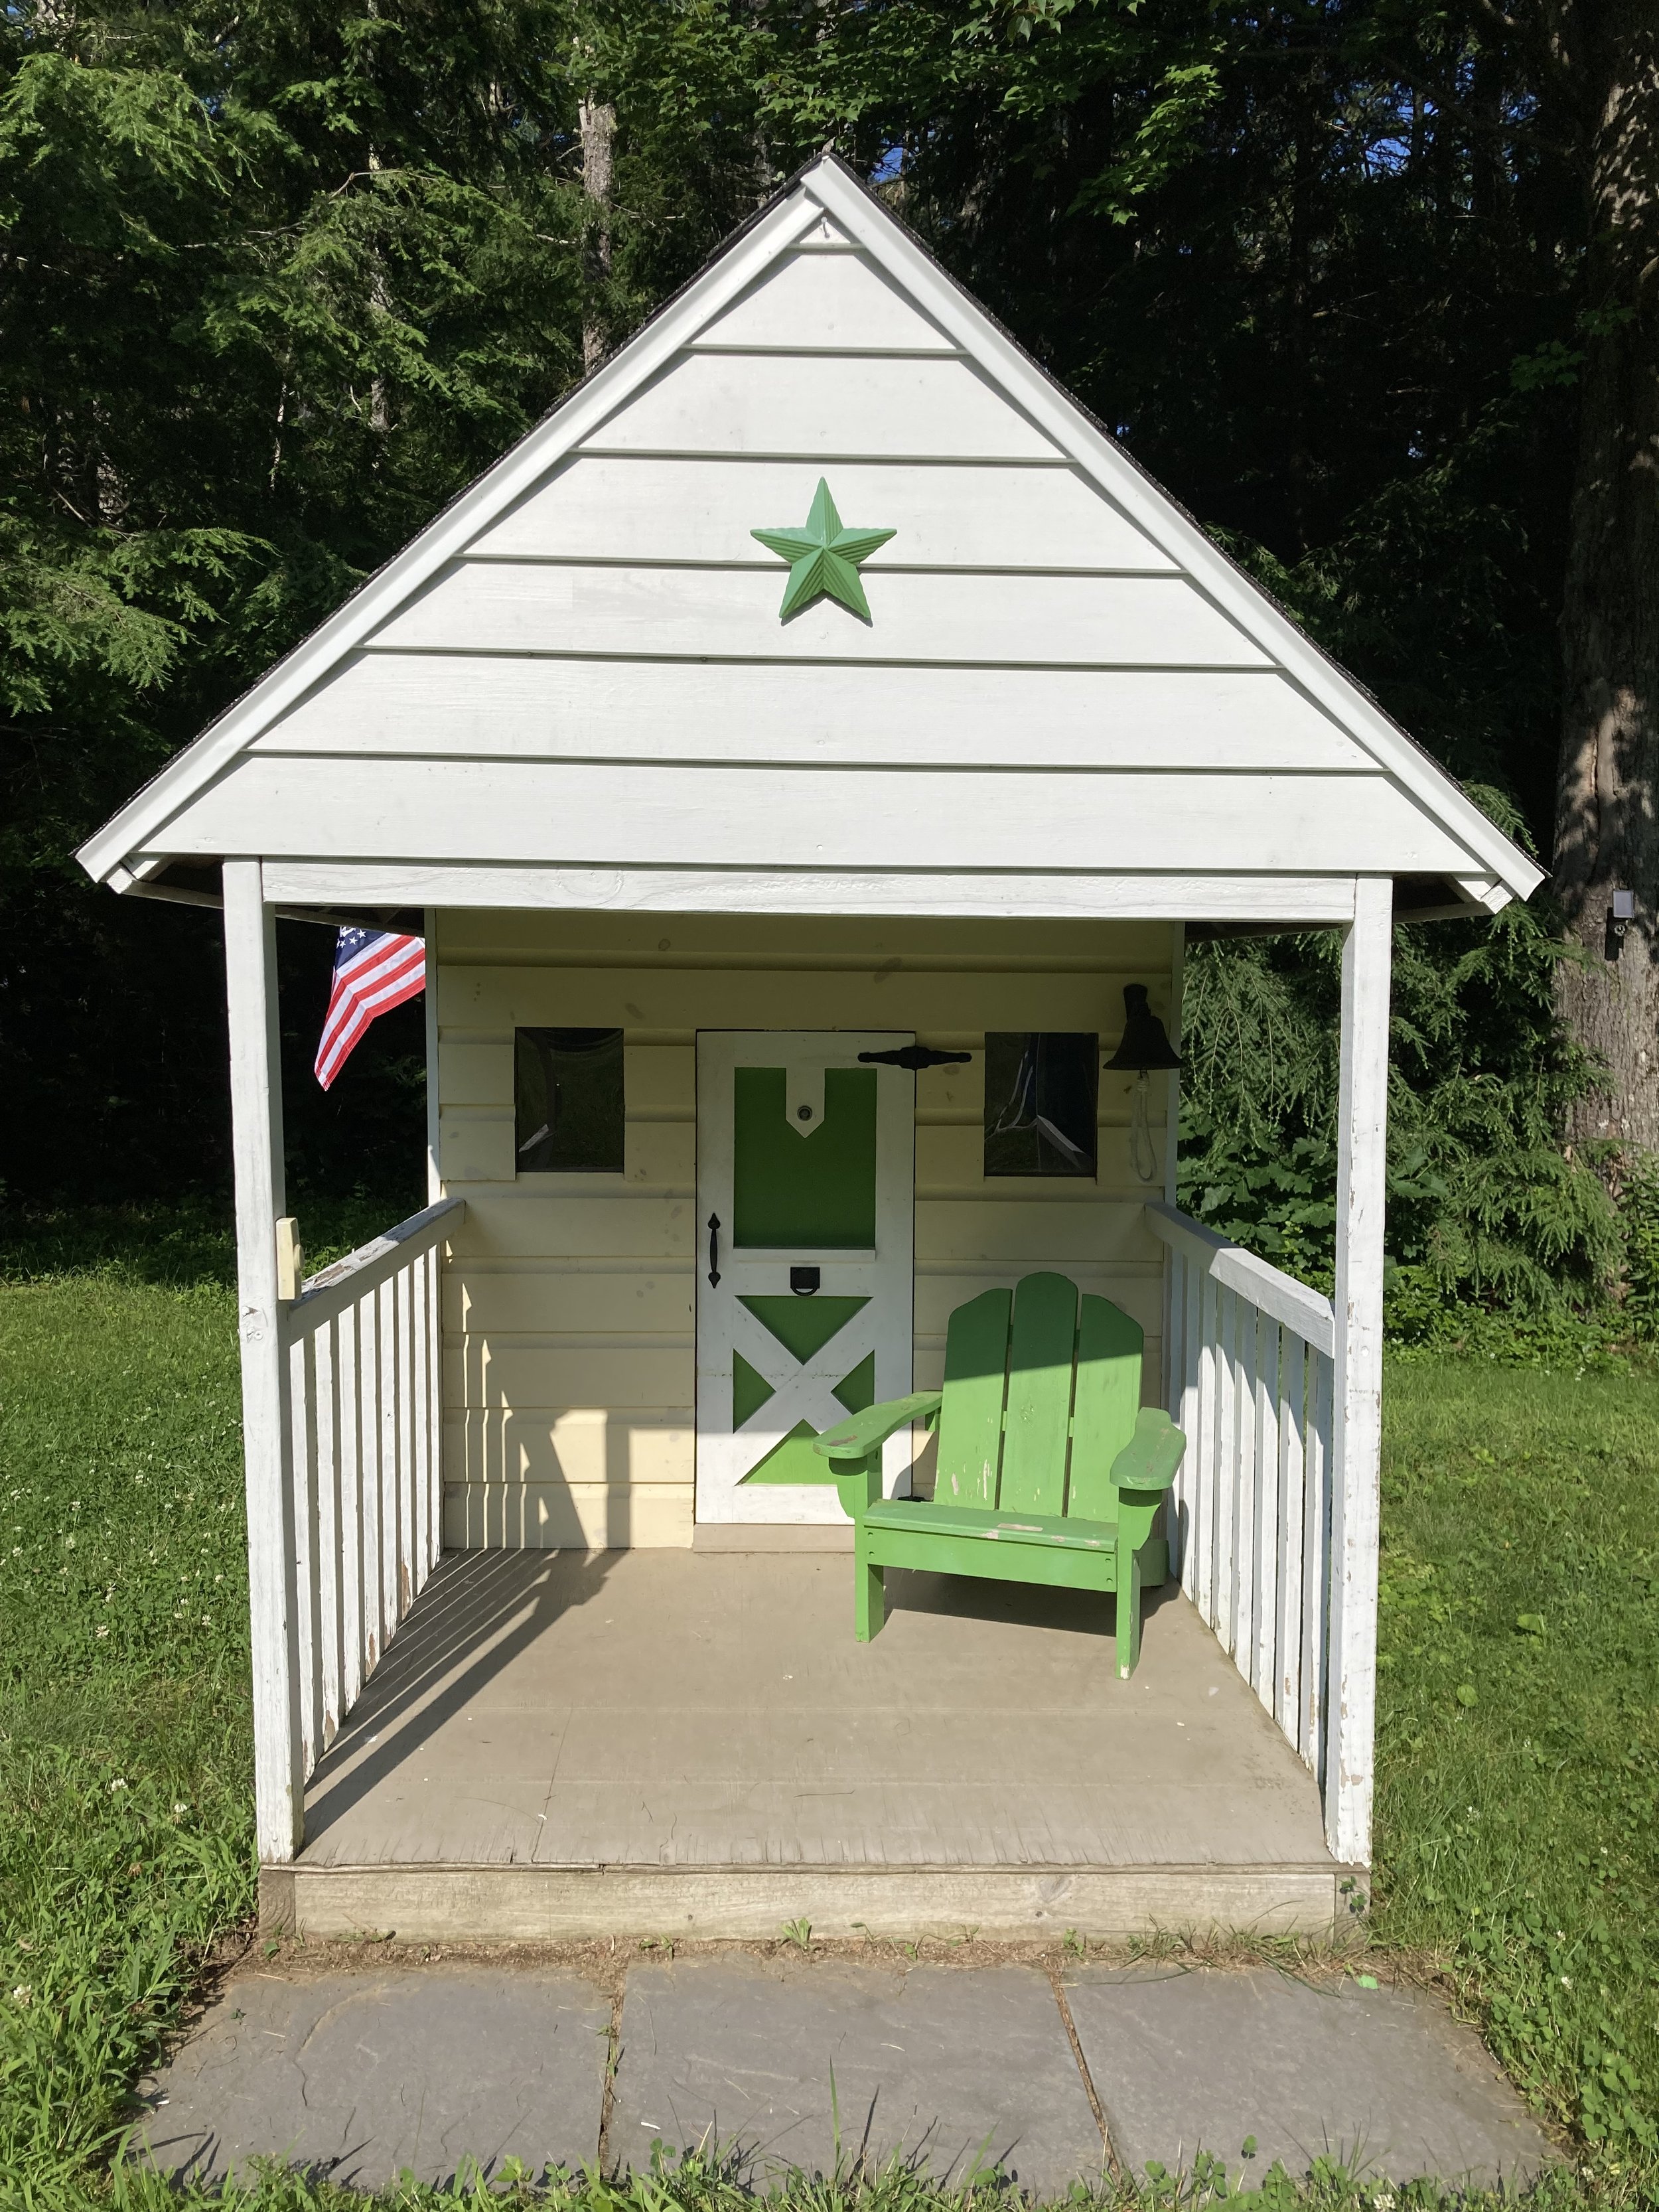
Our kids’ playhouse is pretty special - it was built for them by their Grandfather and the door was built by their Dad. It’s a special spot that has gotten a lot of use over the years and is always a hit when they have friends over. For awhile now I’ve wanted to add a little flagpole but wasn’t able to find an affordable boat flagpole in the dimensions I needed so I decided to make one myself. | This post contains affiliate links |
optional: you could use a boat flagpole and bracket kit if you wanted to make this quick and easy, but I was trying to make this project as inexpensively as possible and opted to make it myself with scrap wood we already had - I also wanted more control over the length of the pole and the angle which is another reason why I decided to make it myself.
How-To:
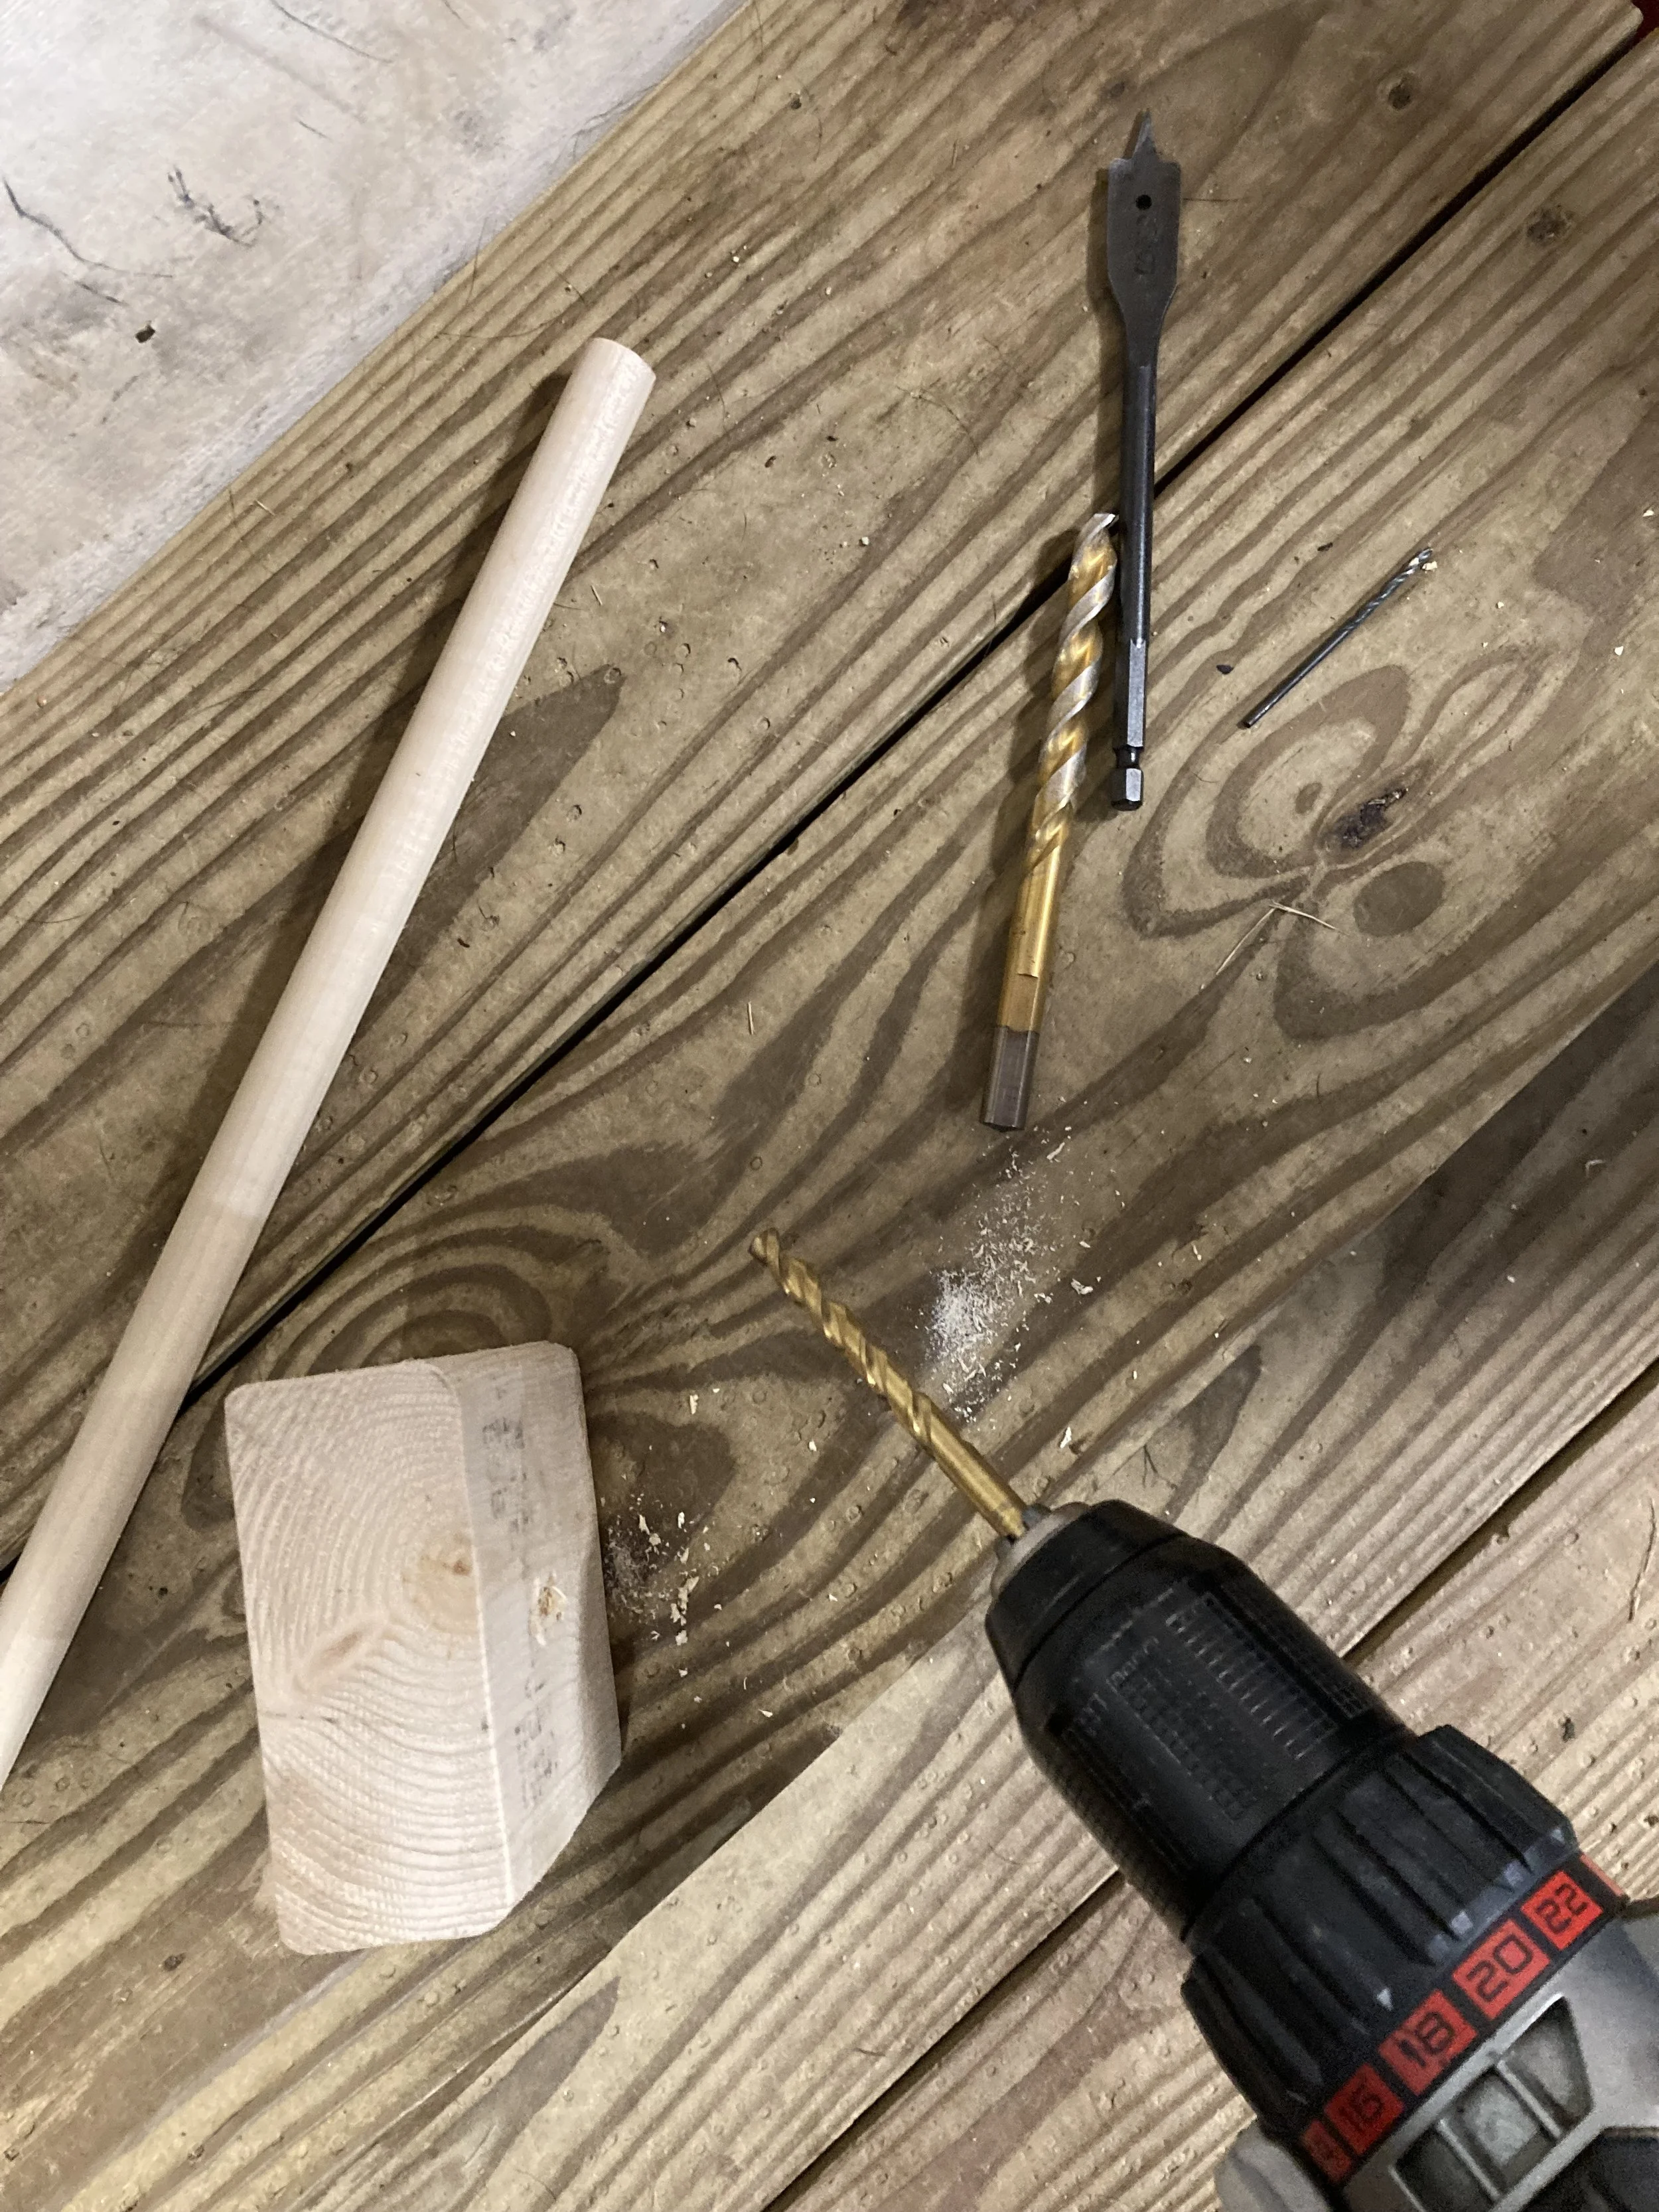
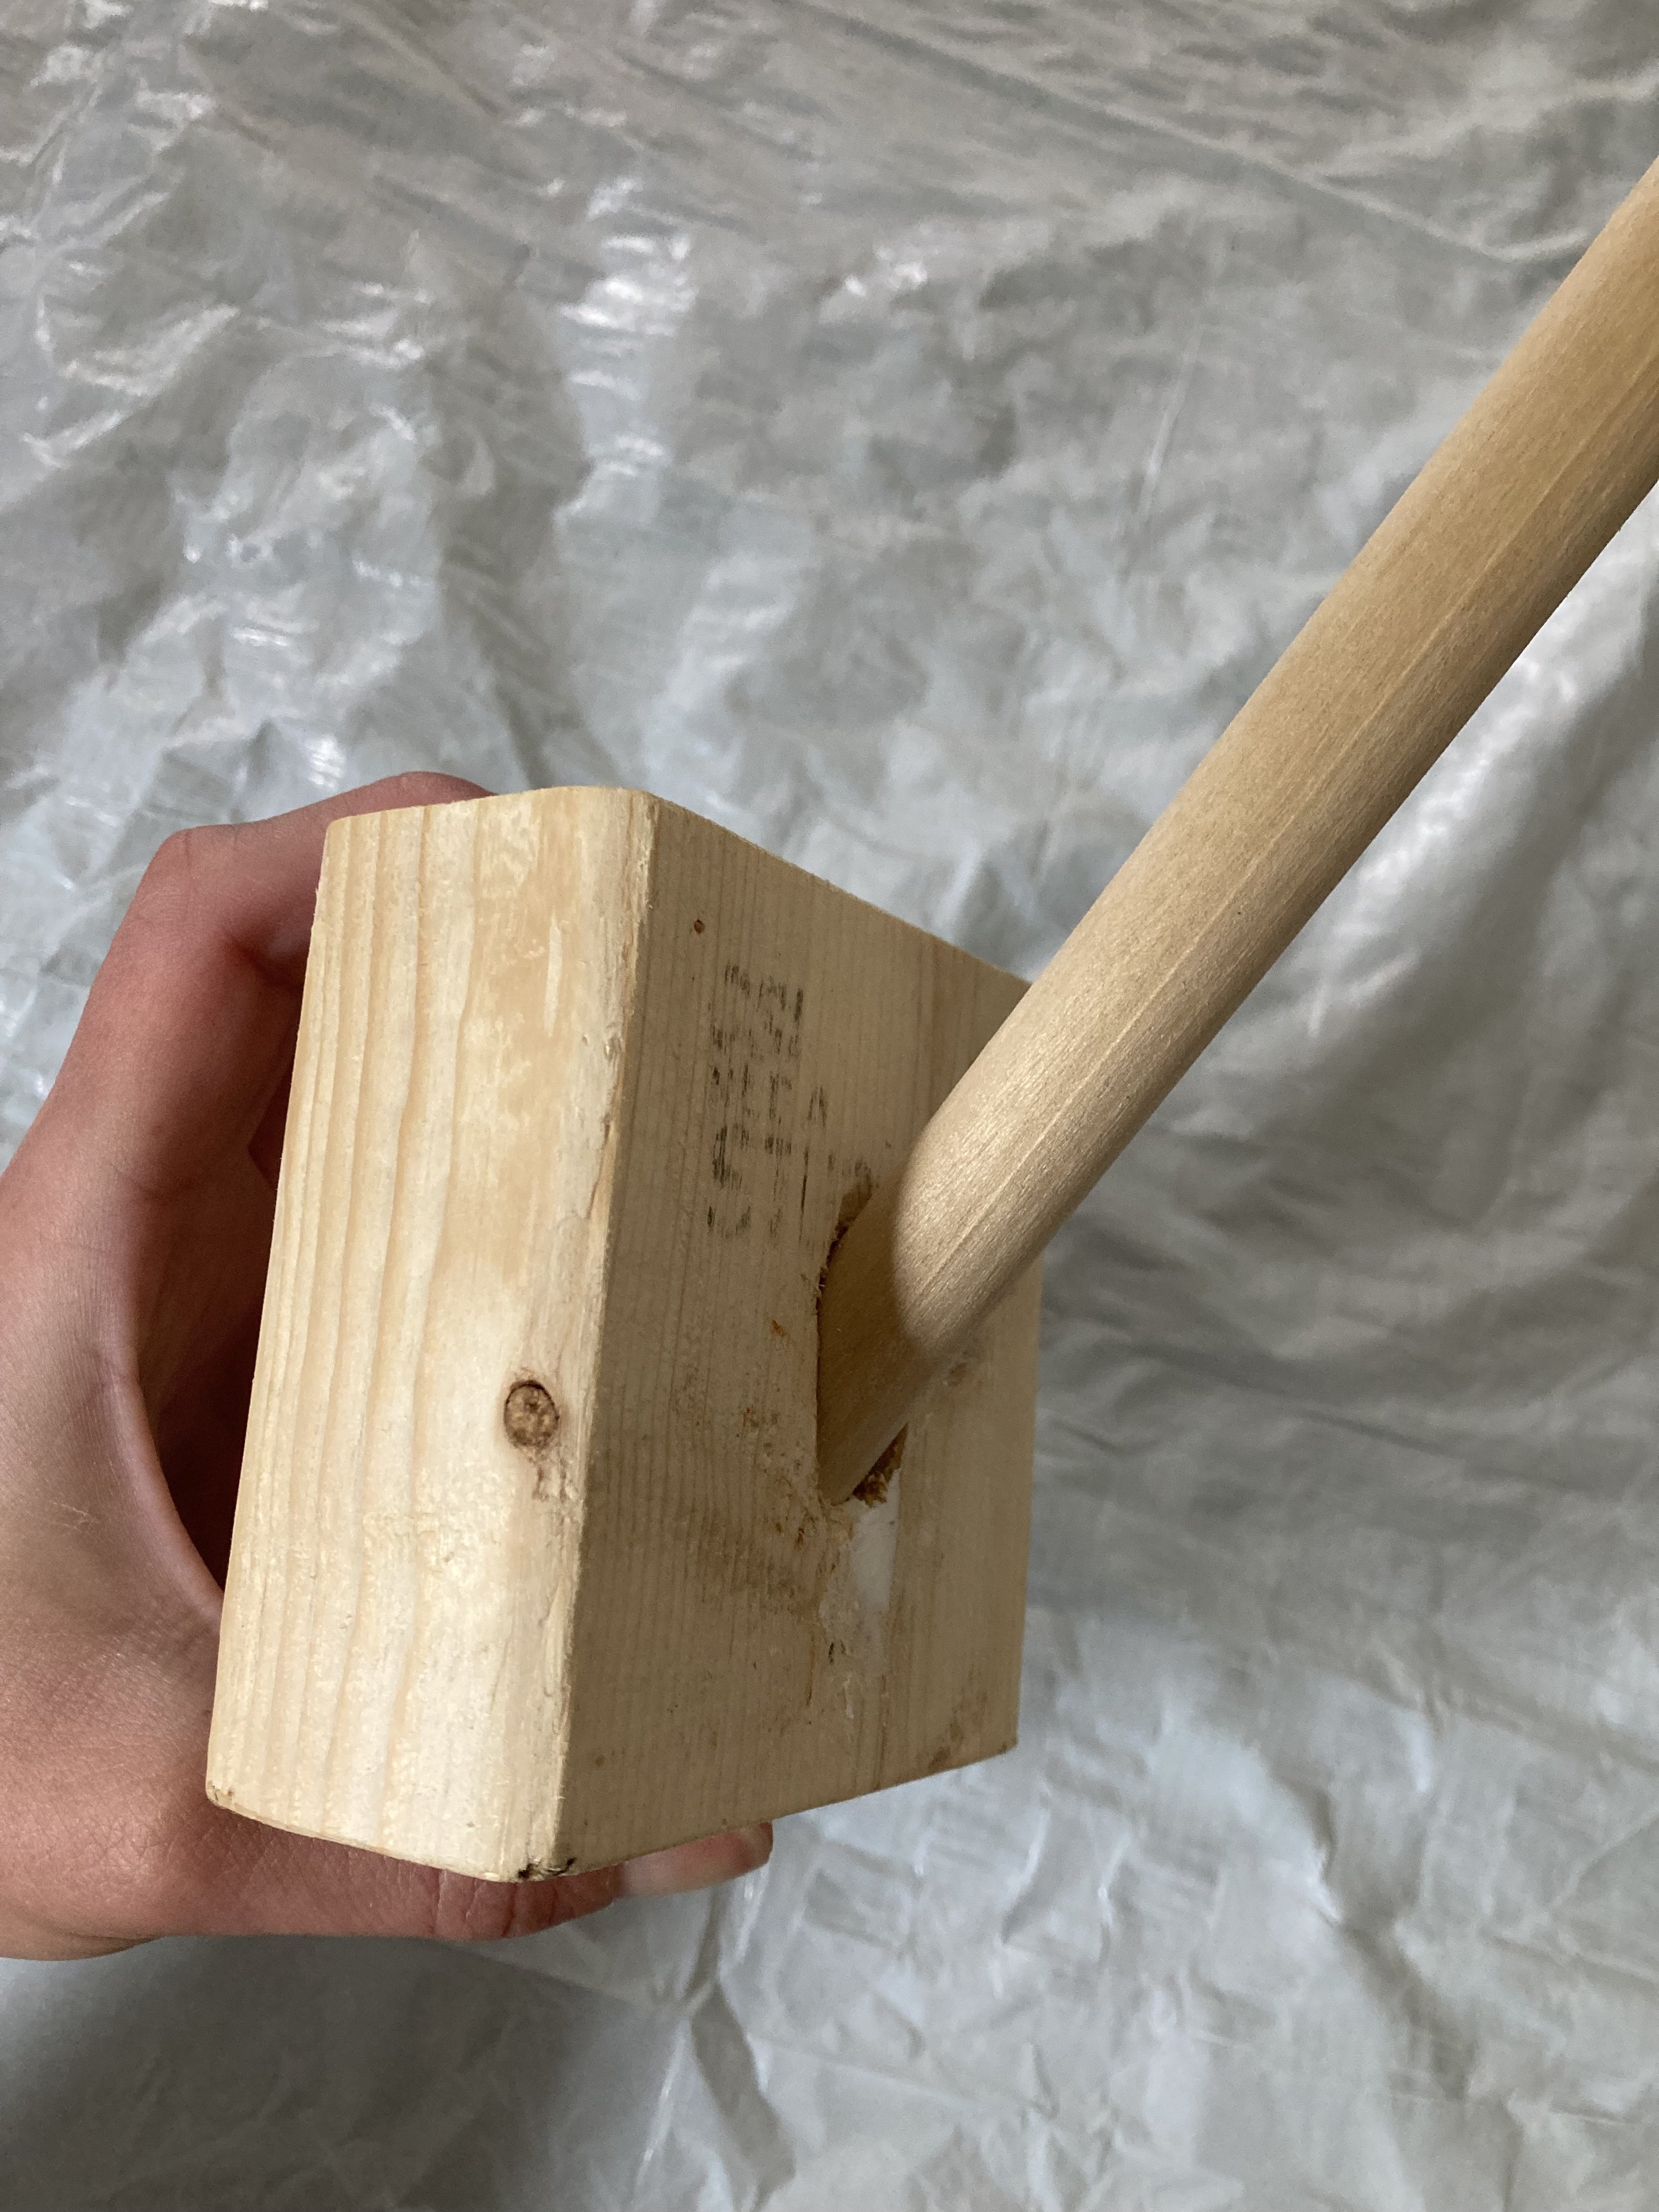
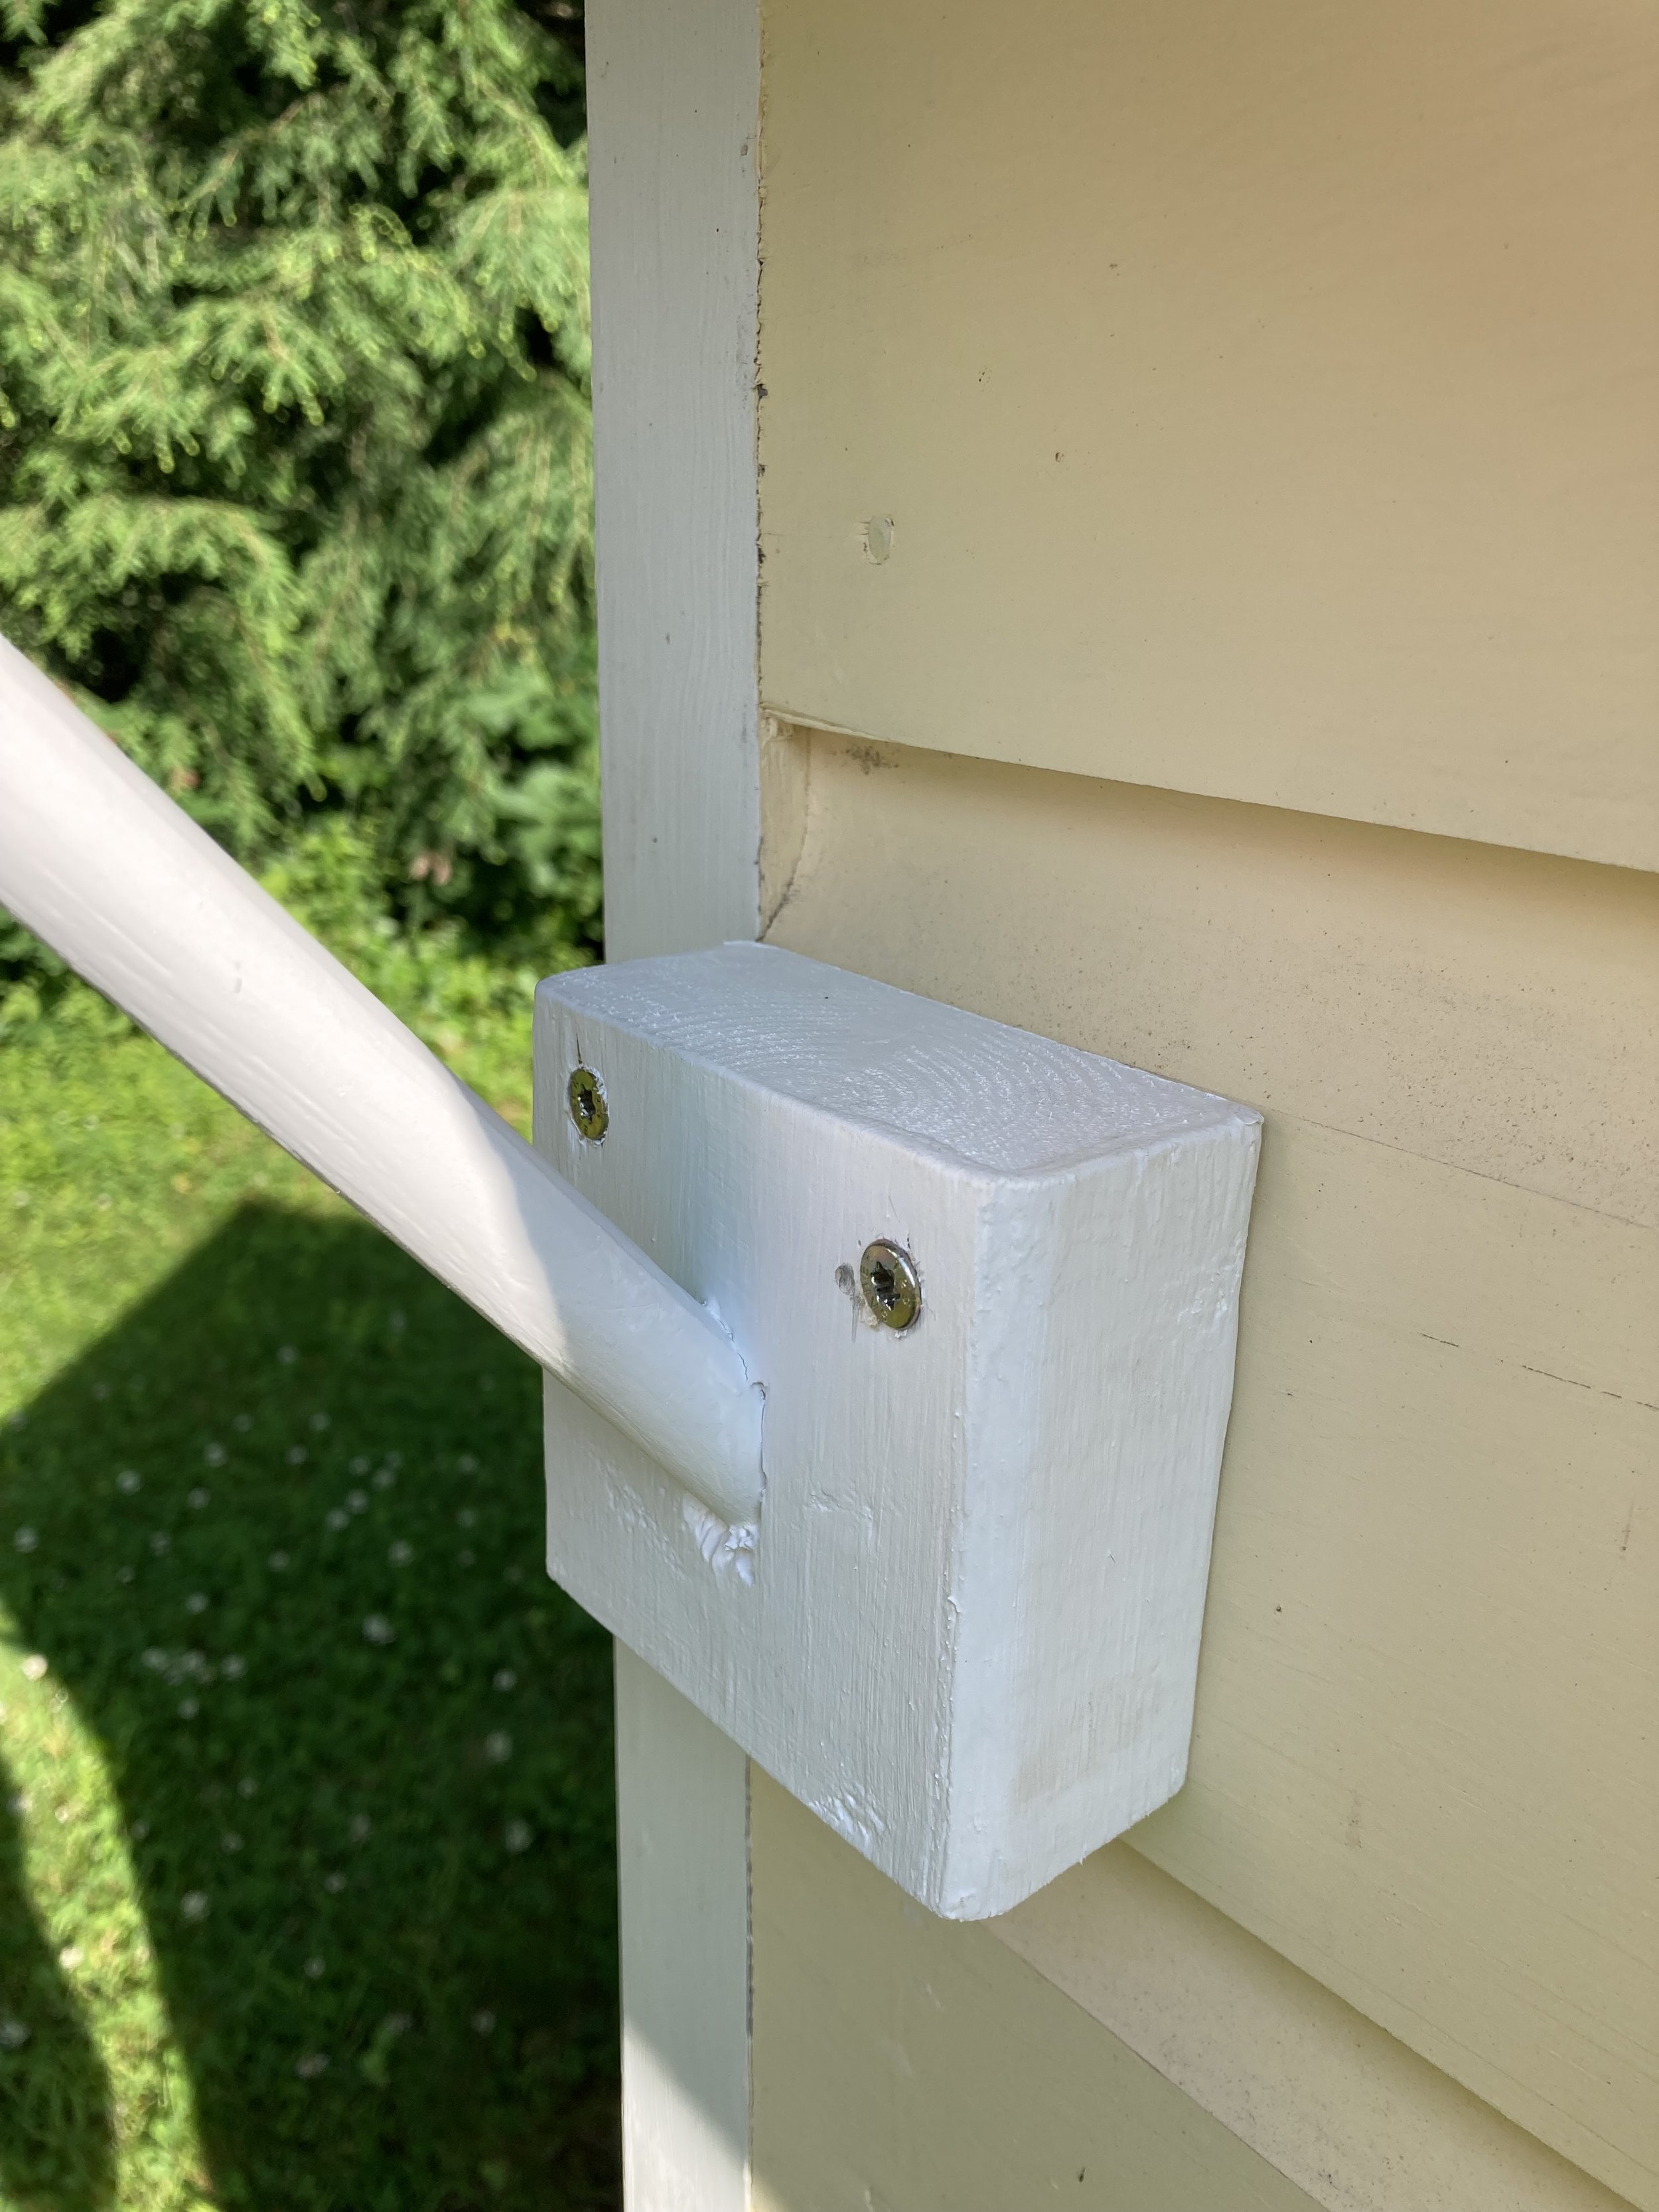
First, I decided on the angle of the dowel into the scrap piece of 2x4 and made a pilot hole at that angle with a small drill. Then I kept going up in drill sizes to make the hole the correct diameter. (Note: I do not recommend using a spade bit.. I tried that and it was terrible going in at an angle. We ended up borrowing a drill bit in correct final size to finish the hole.)
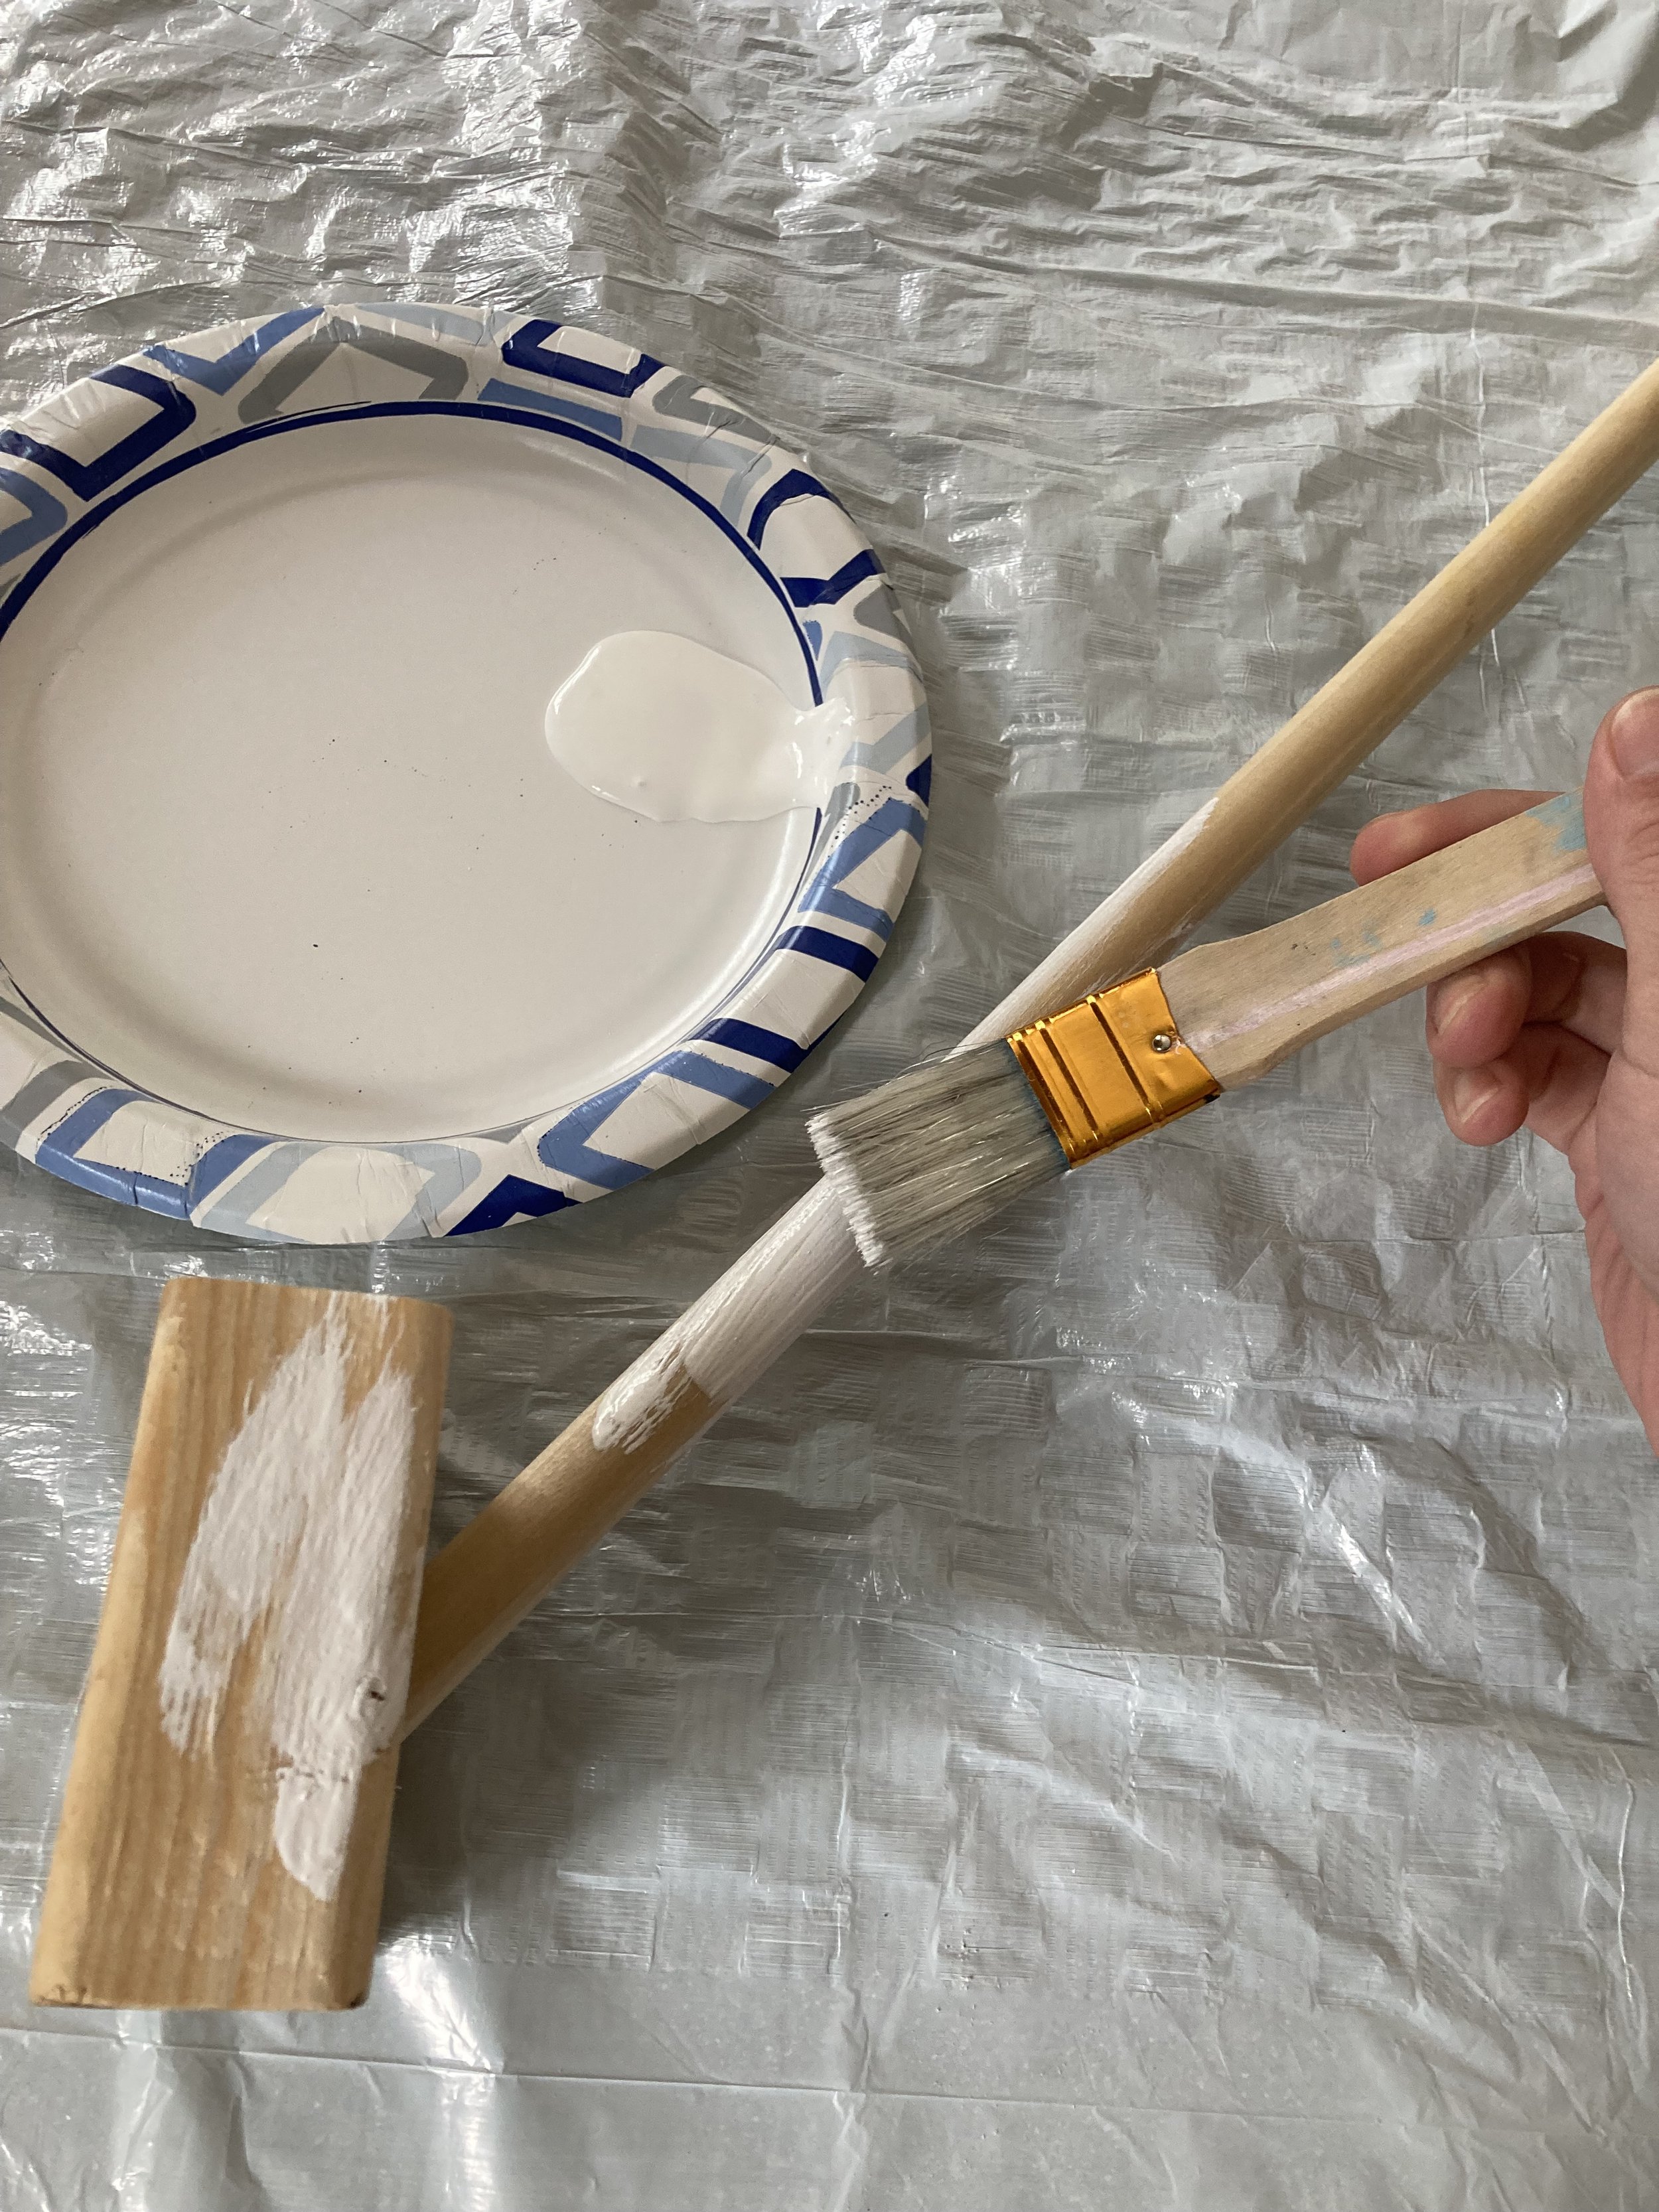
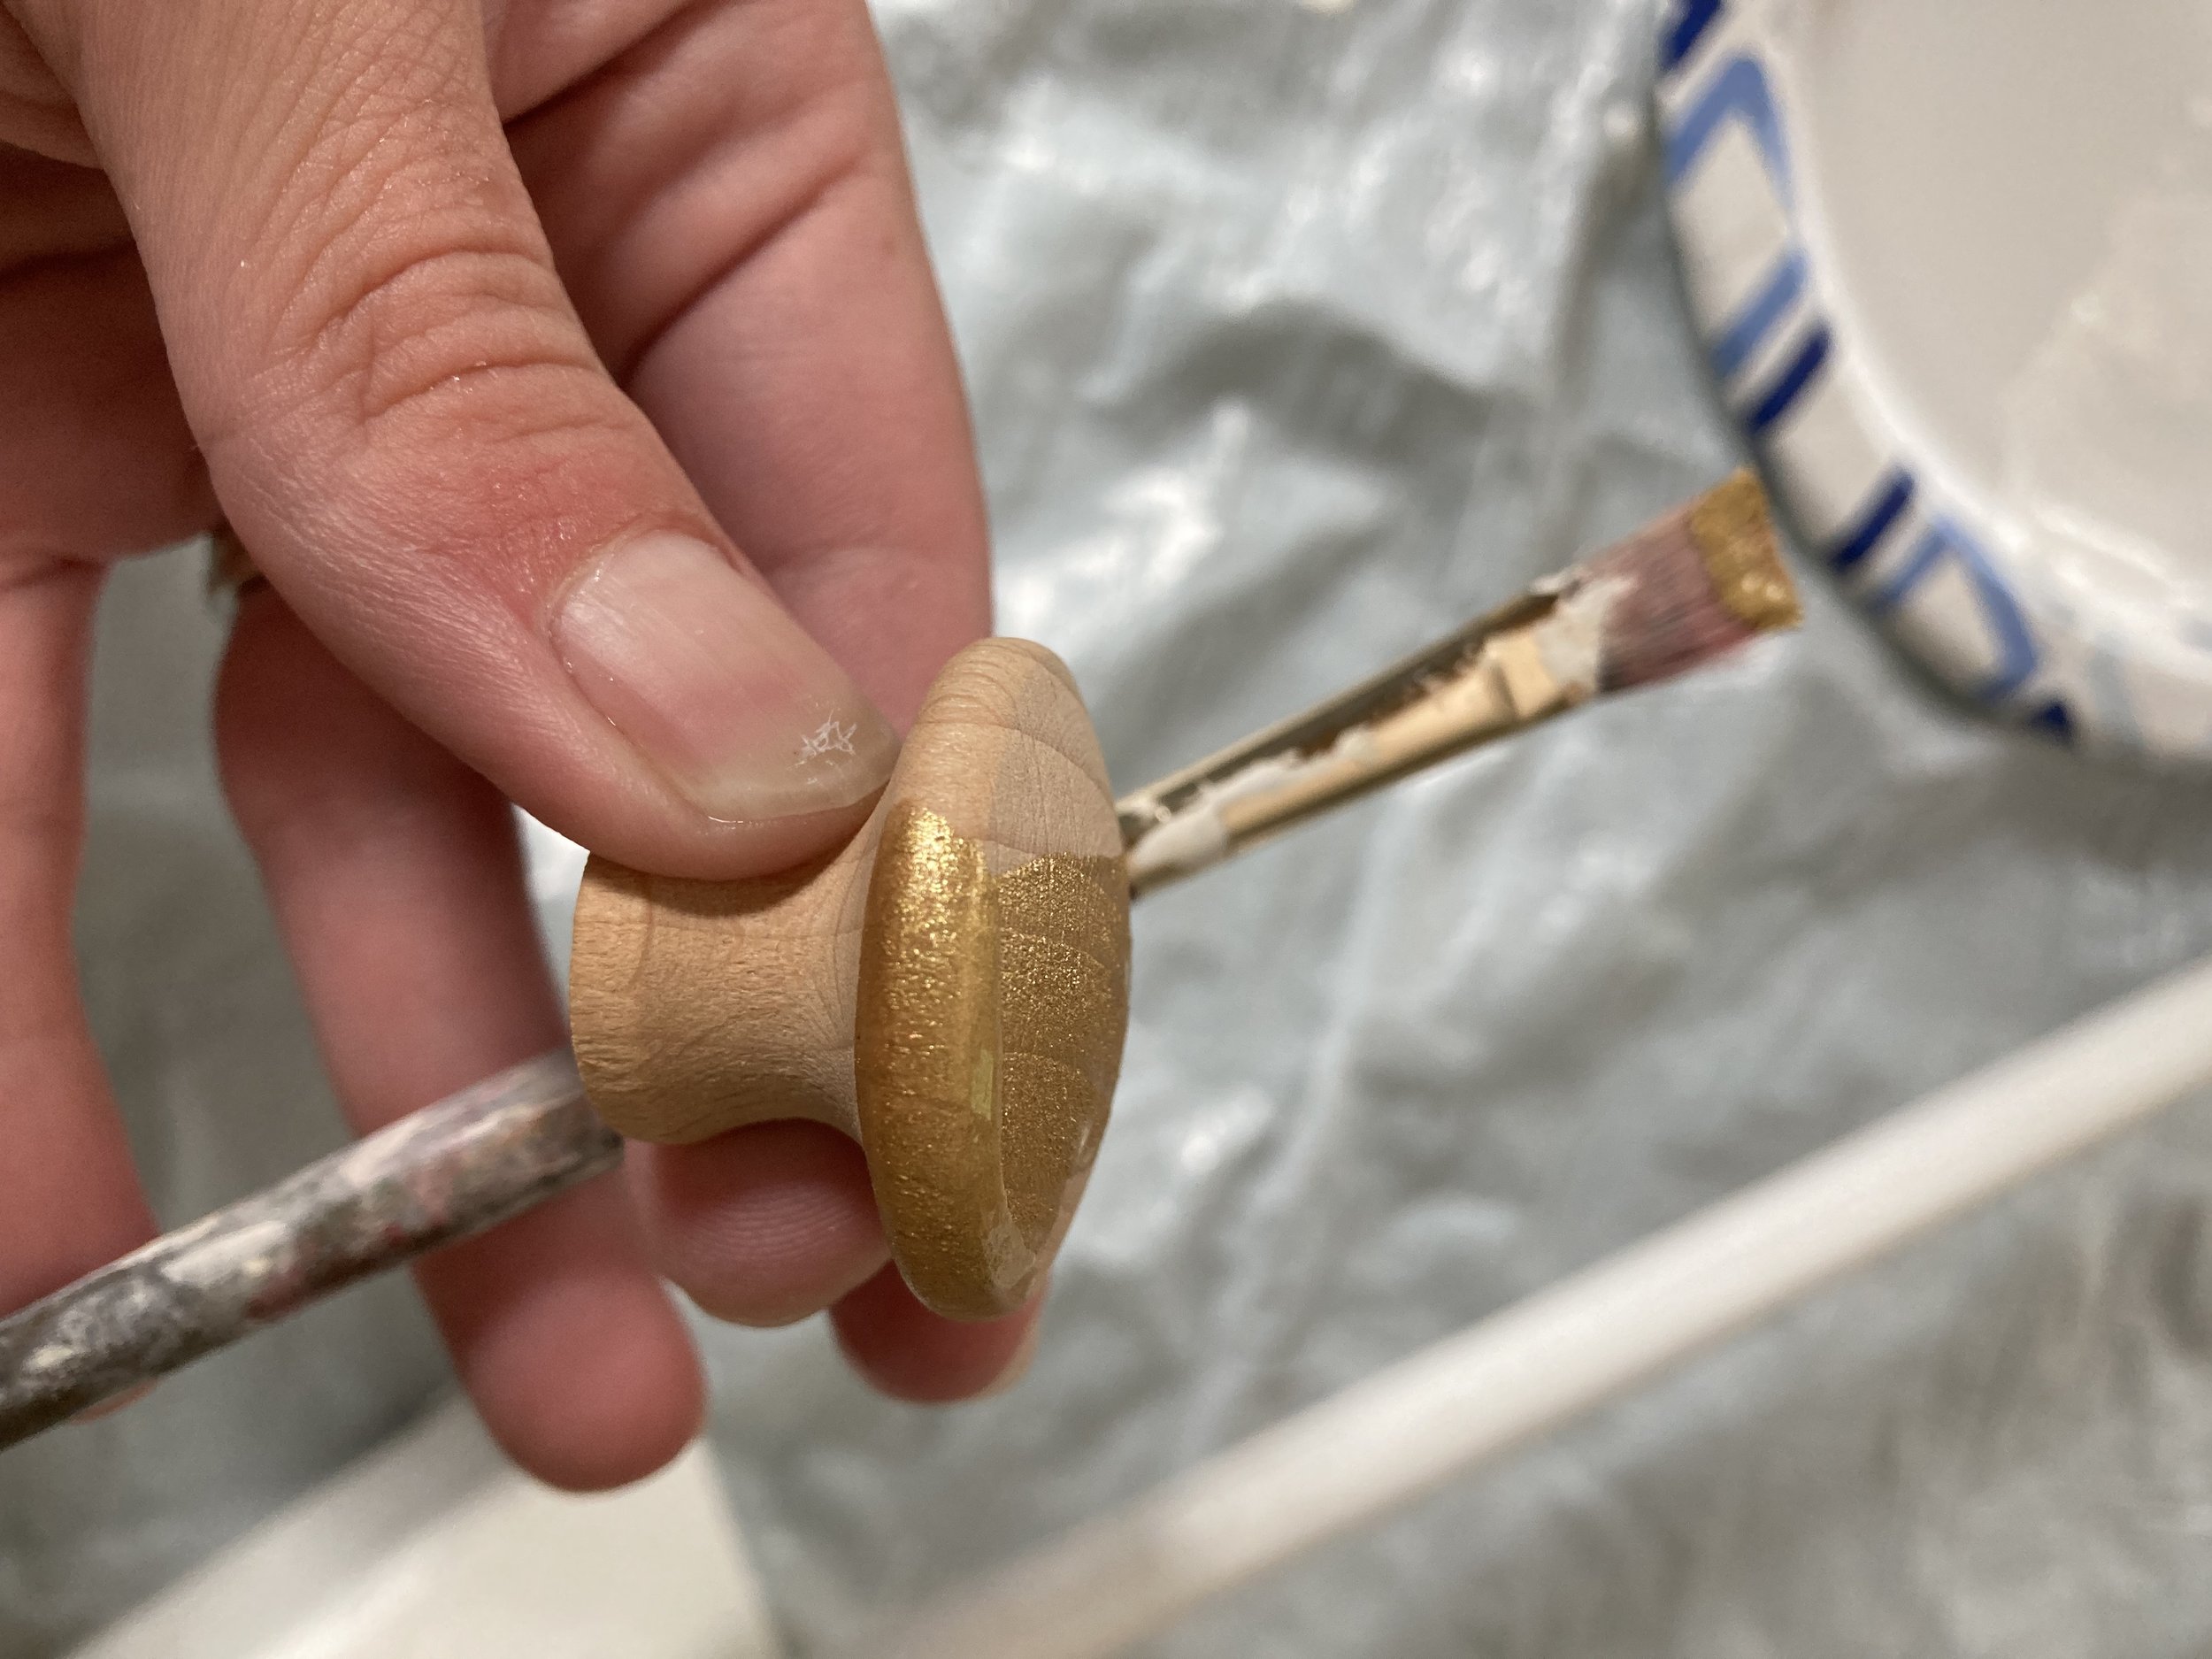
Once the hole was made I glued the dowel into it with some wood glue then painted it white with several coats of paint. While I was waiting for that to dry I moved on to painting the wooden knob with several coats of gold paint and then let that dry too.
Next I drilled a small hole into the end of the top of the flag pole and cut some toothpicks down to fit inside the hole but stick out far enough to also fit into the hole in the wooden knob. Then I added wood glue and put the knob onto the end of the flagpole. (Note: Using toothpicks to reinforce this joining is key - if just wood glue was used it would be at more risk to break off, but the toothpick reinforcement going through really helps!)
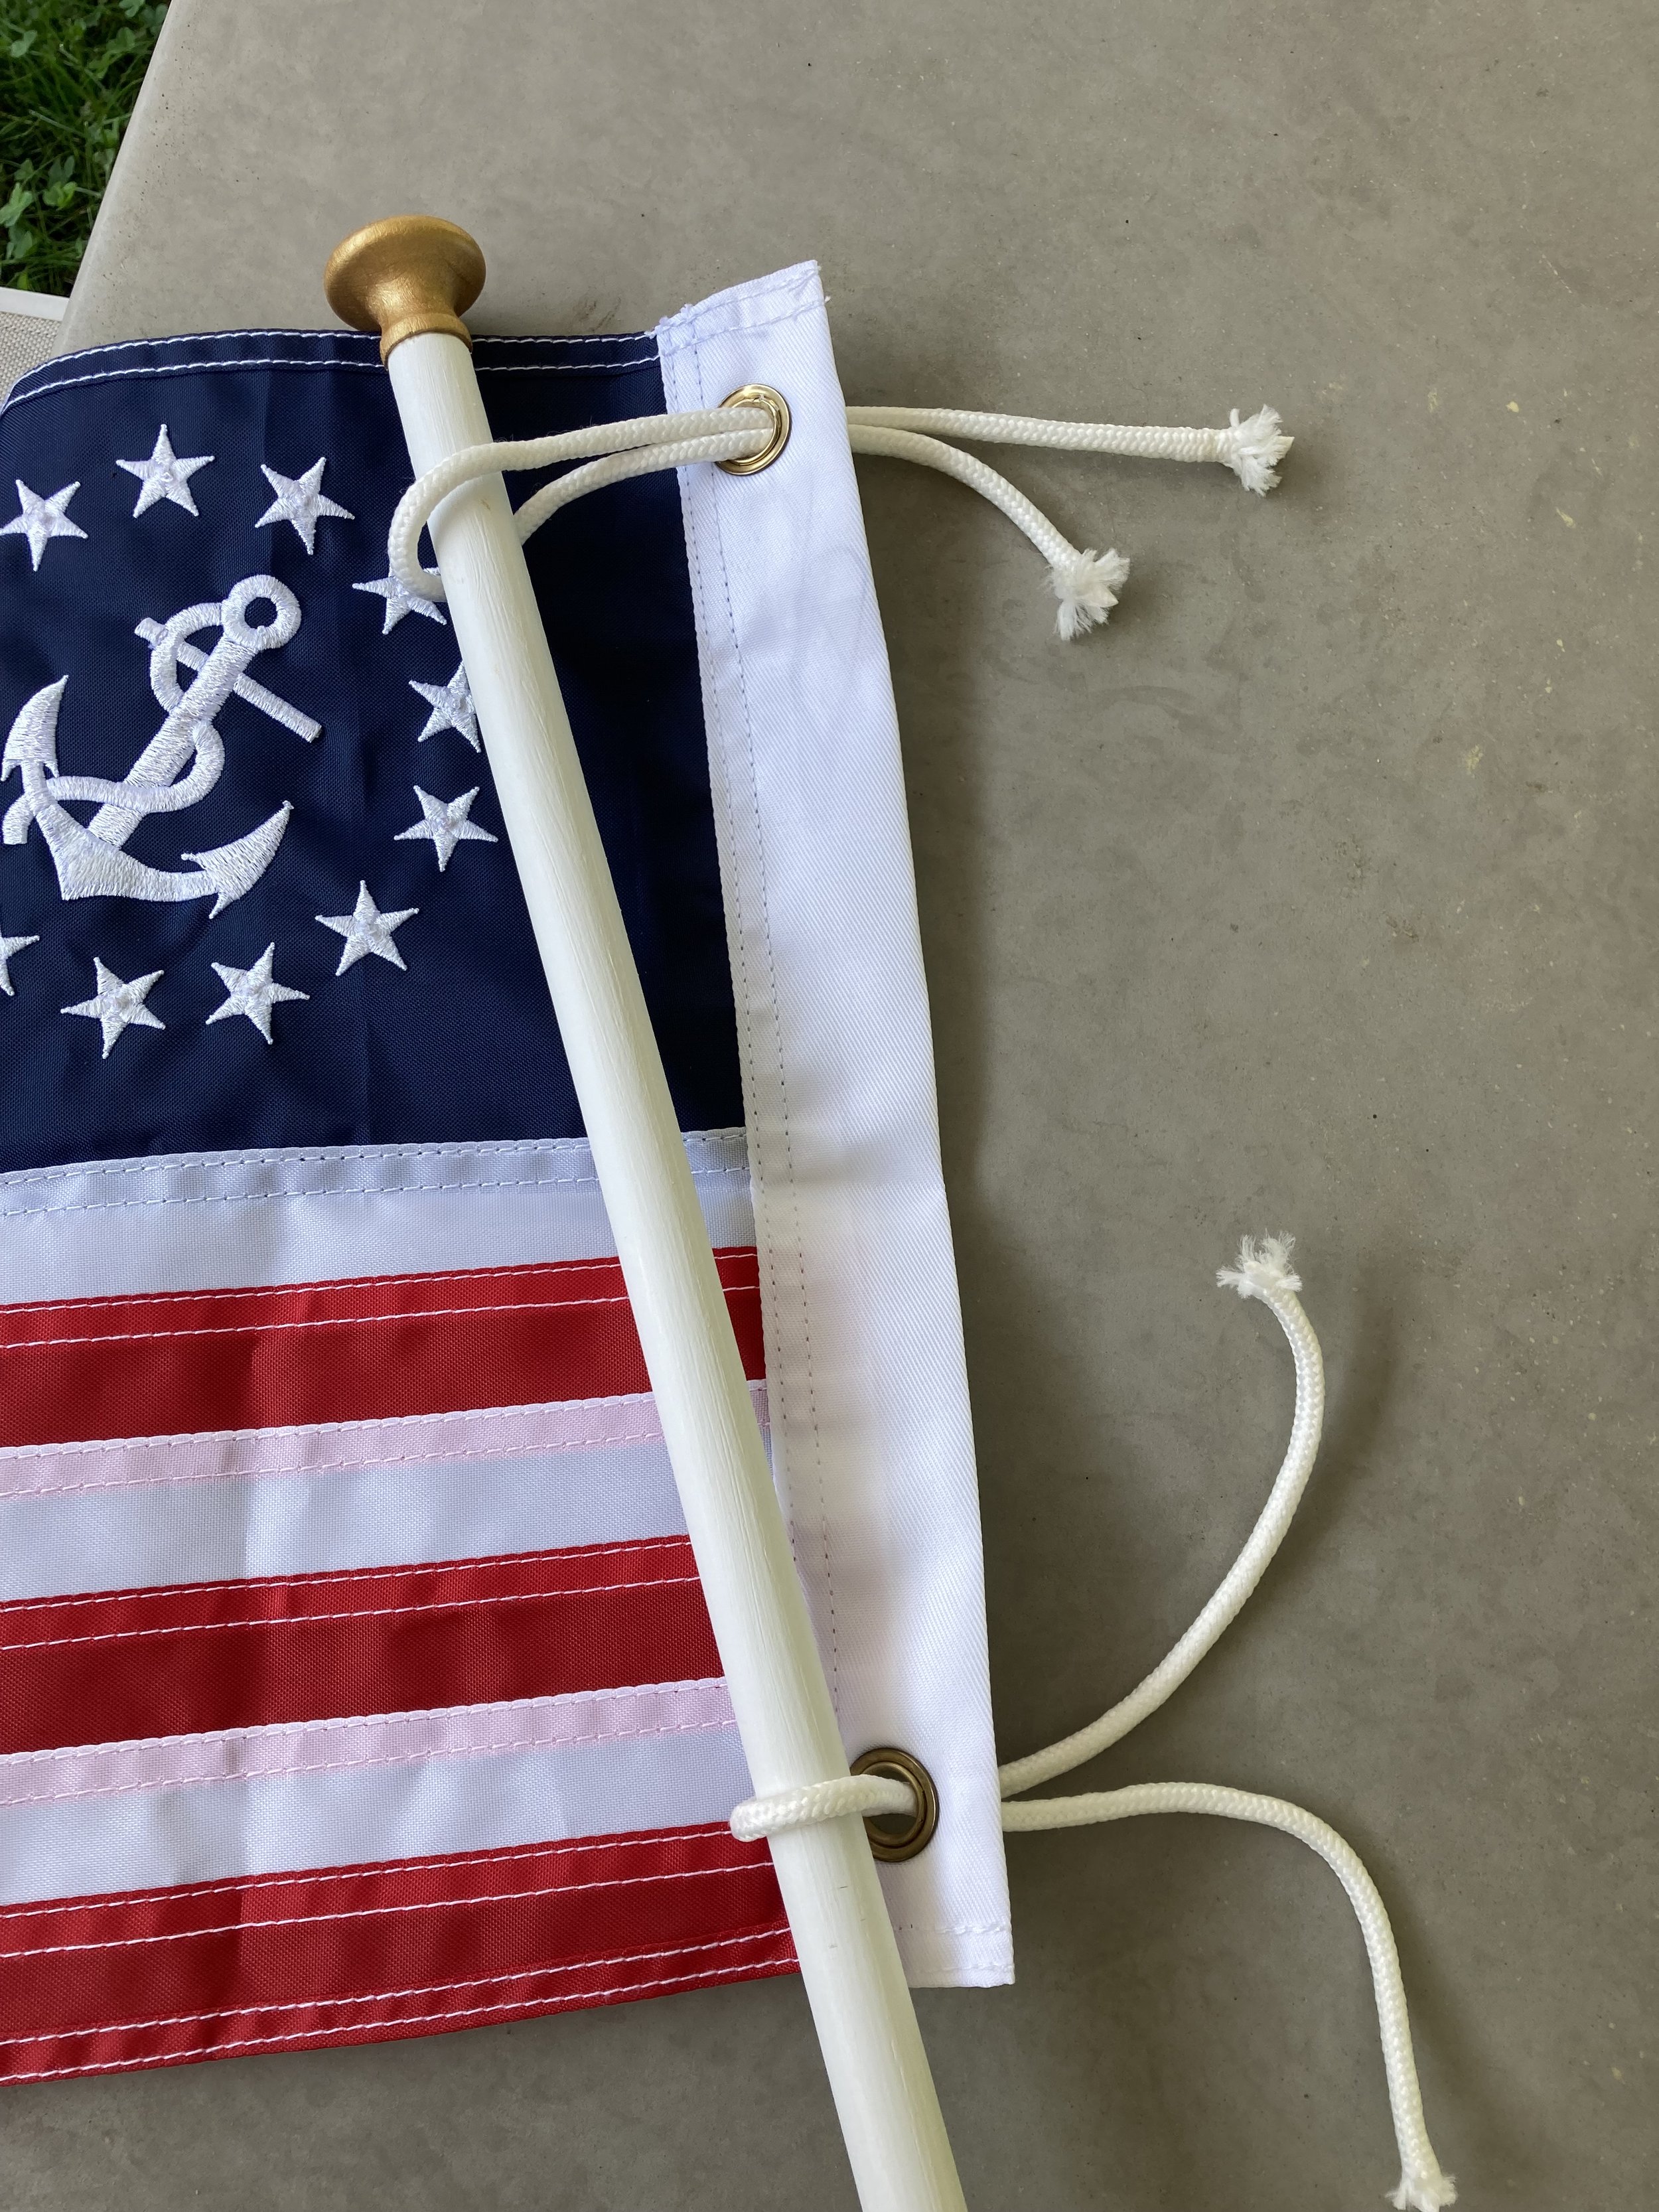
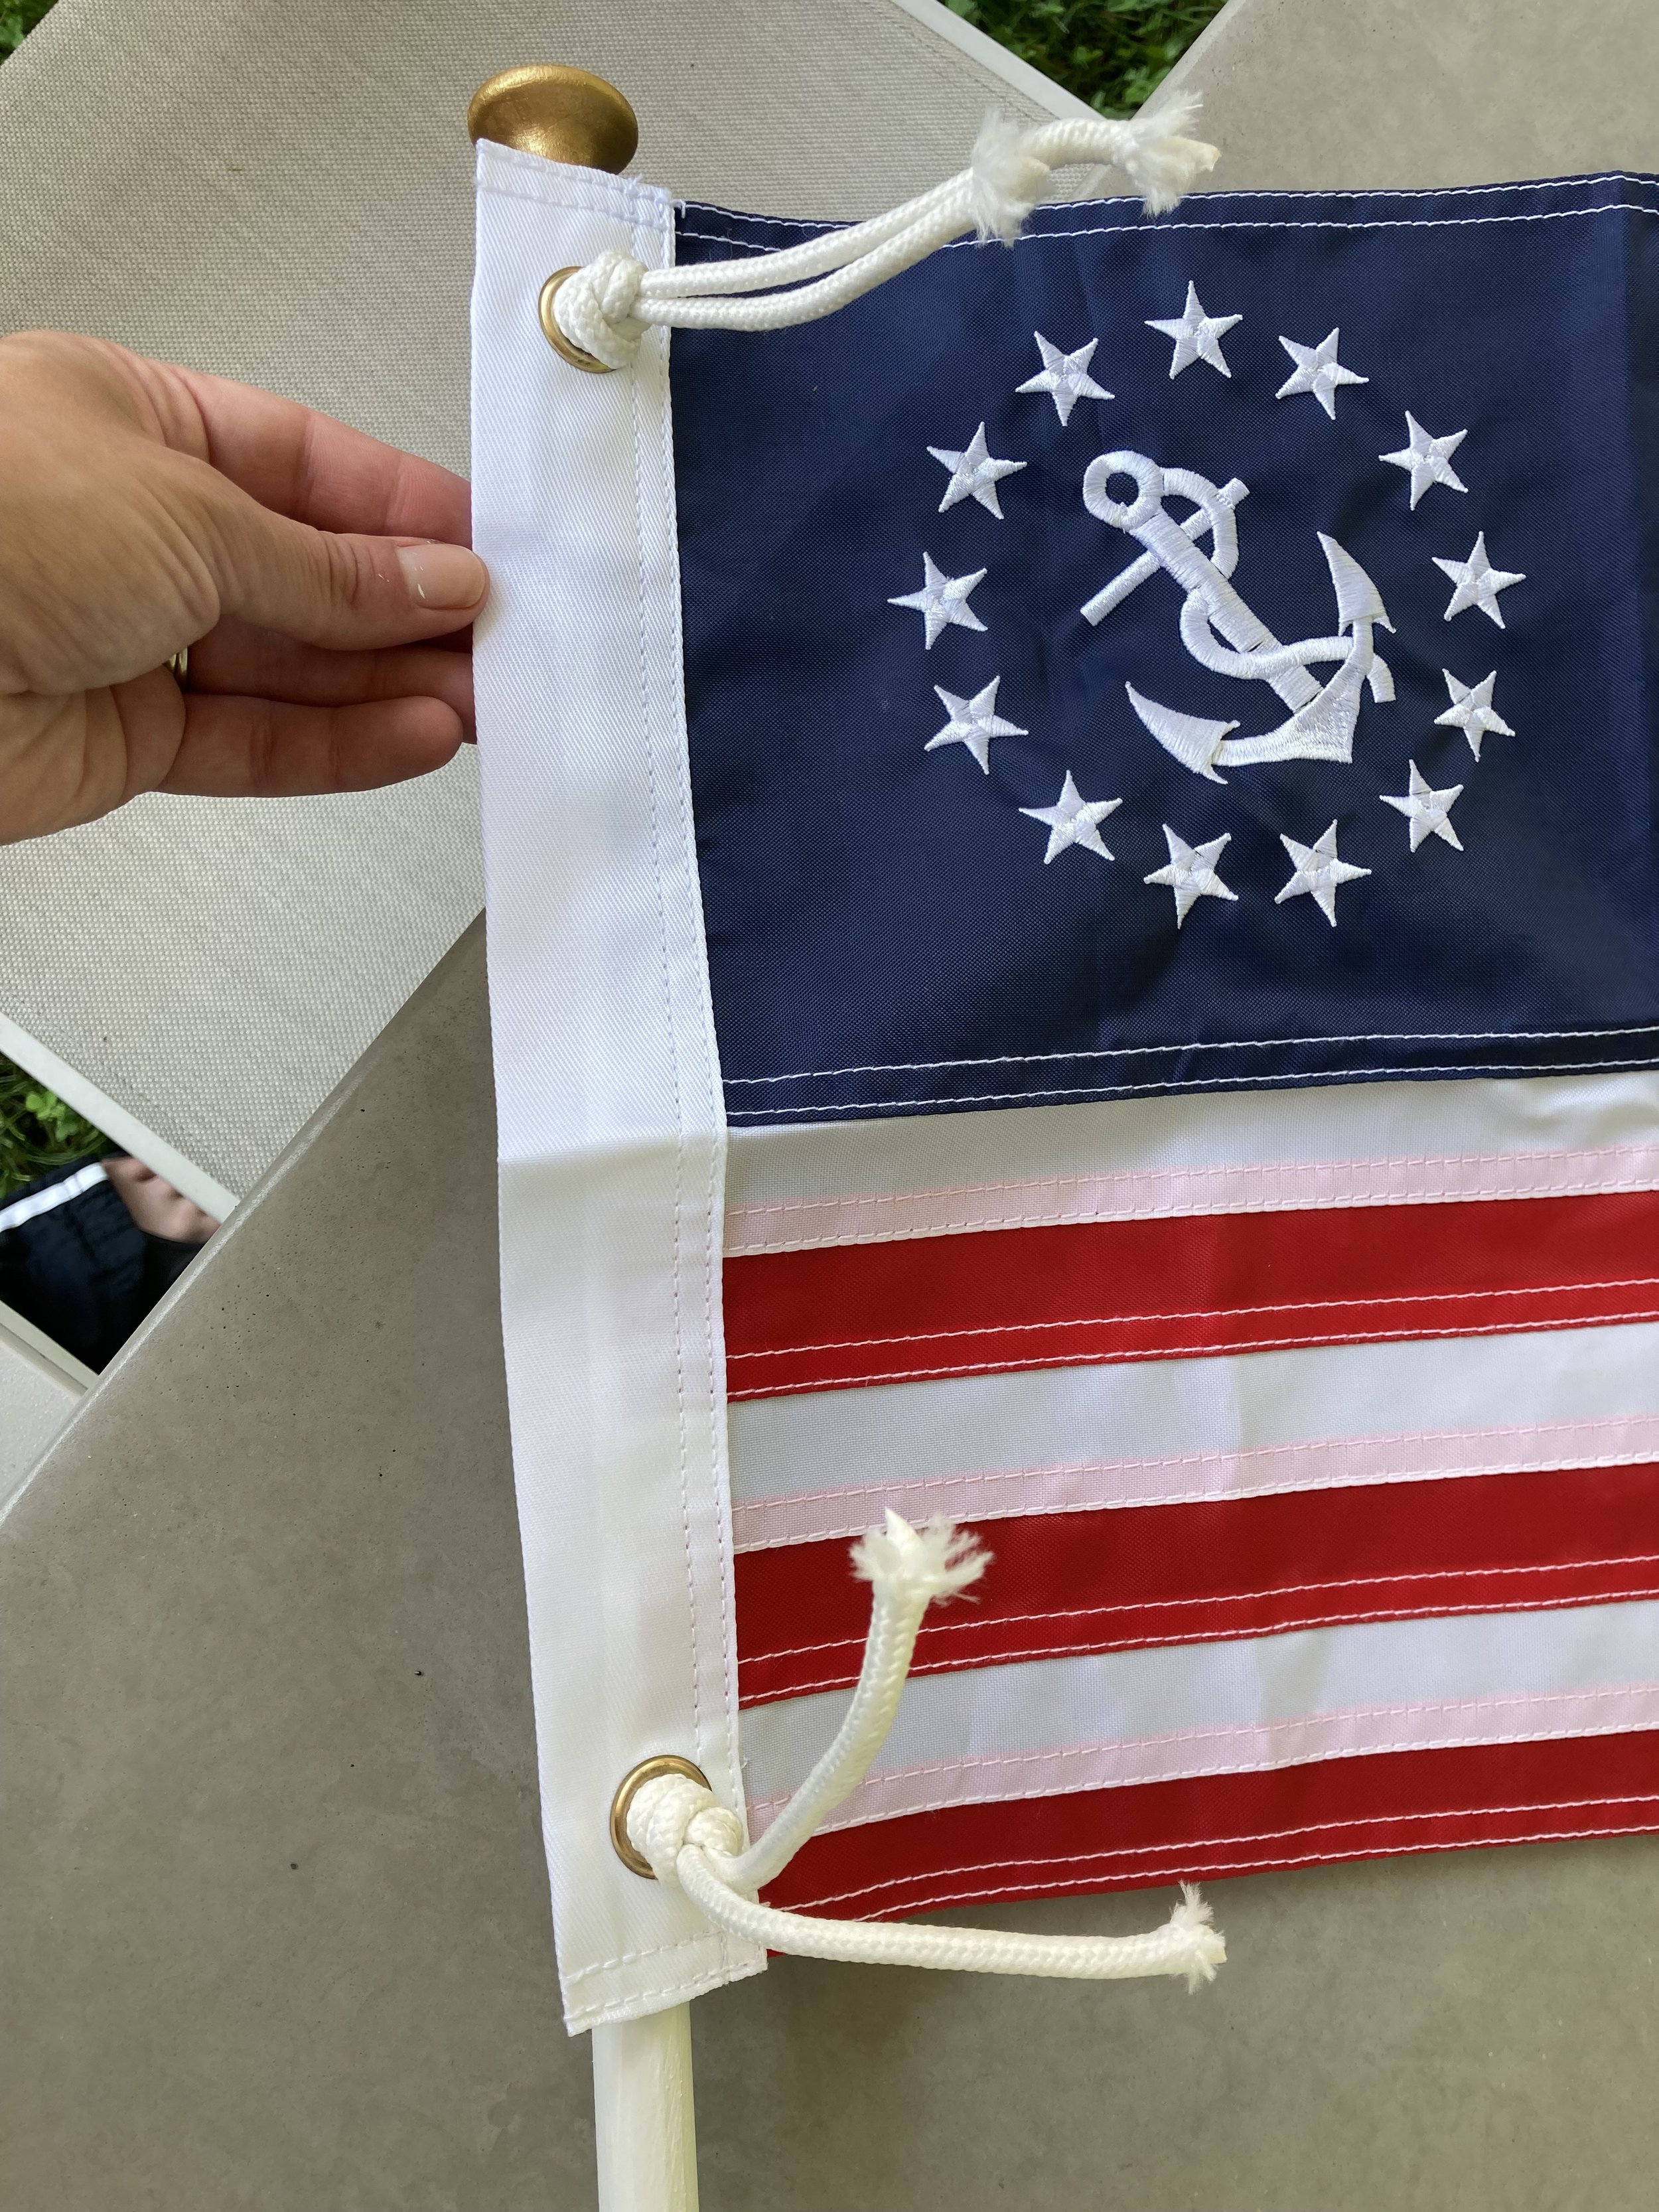
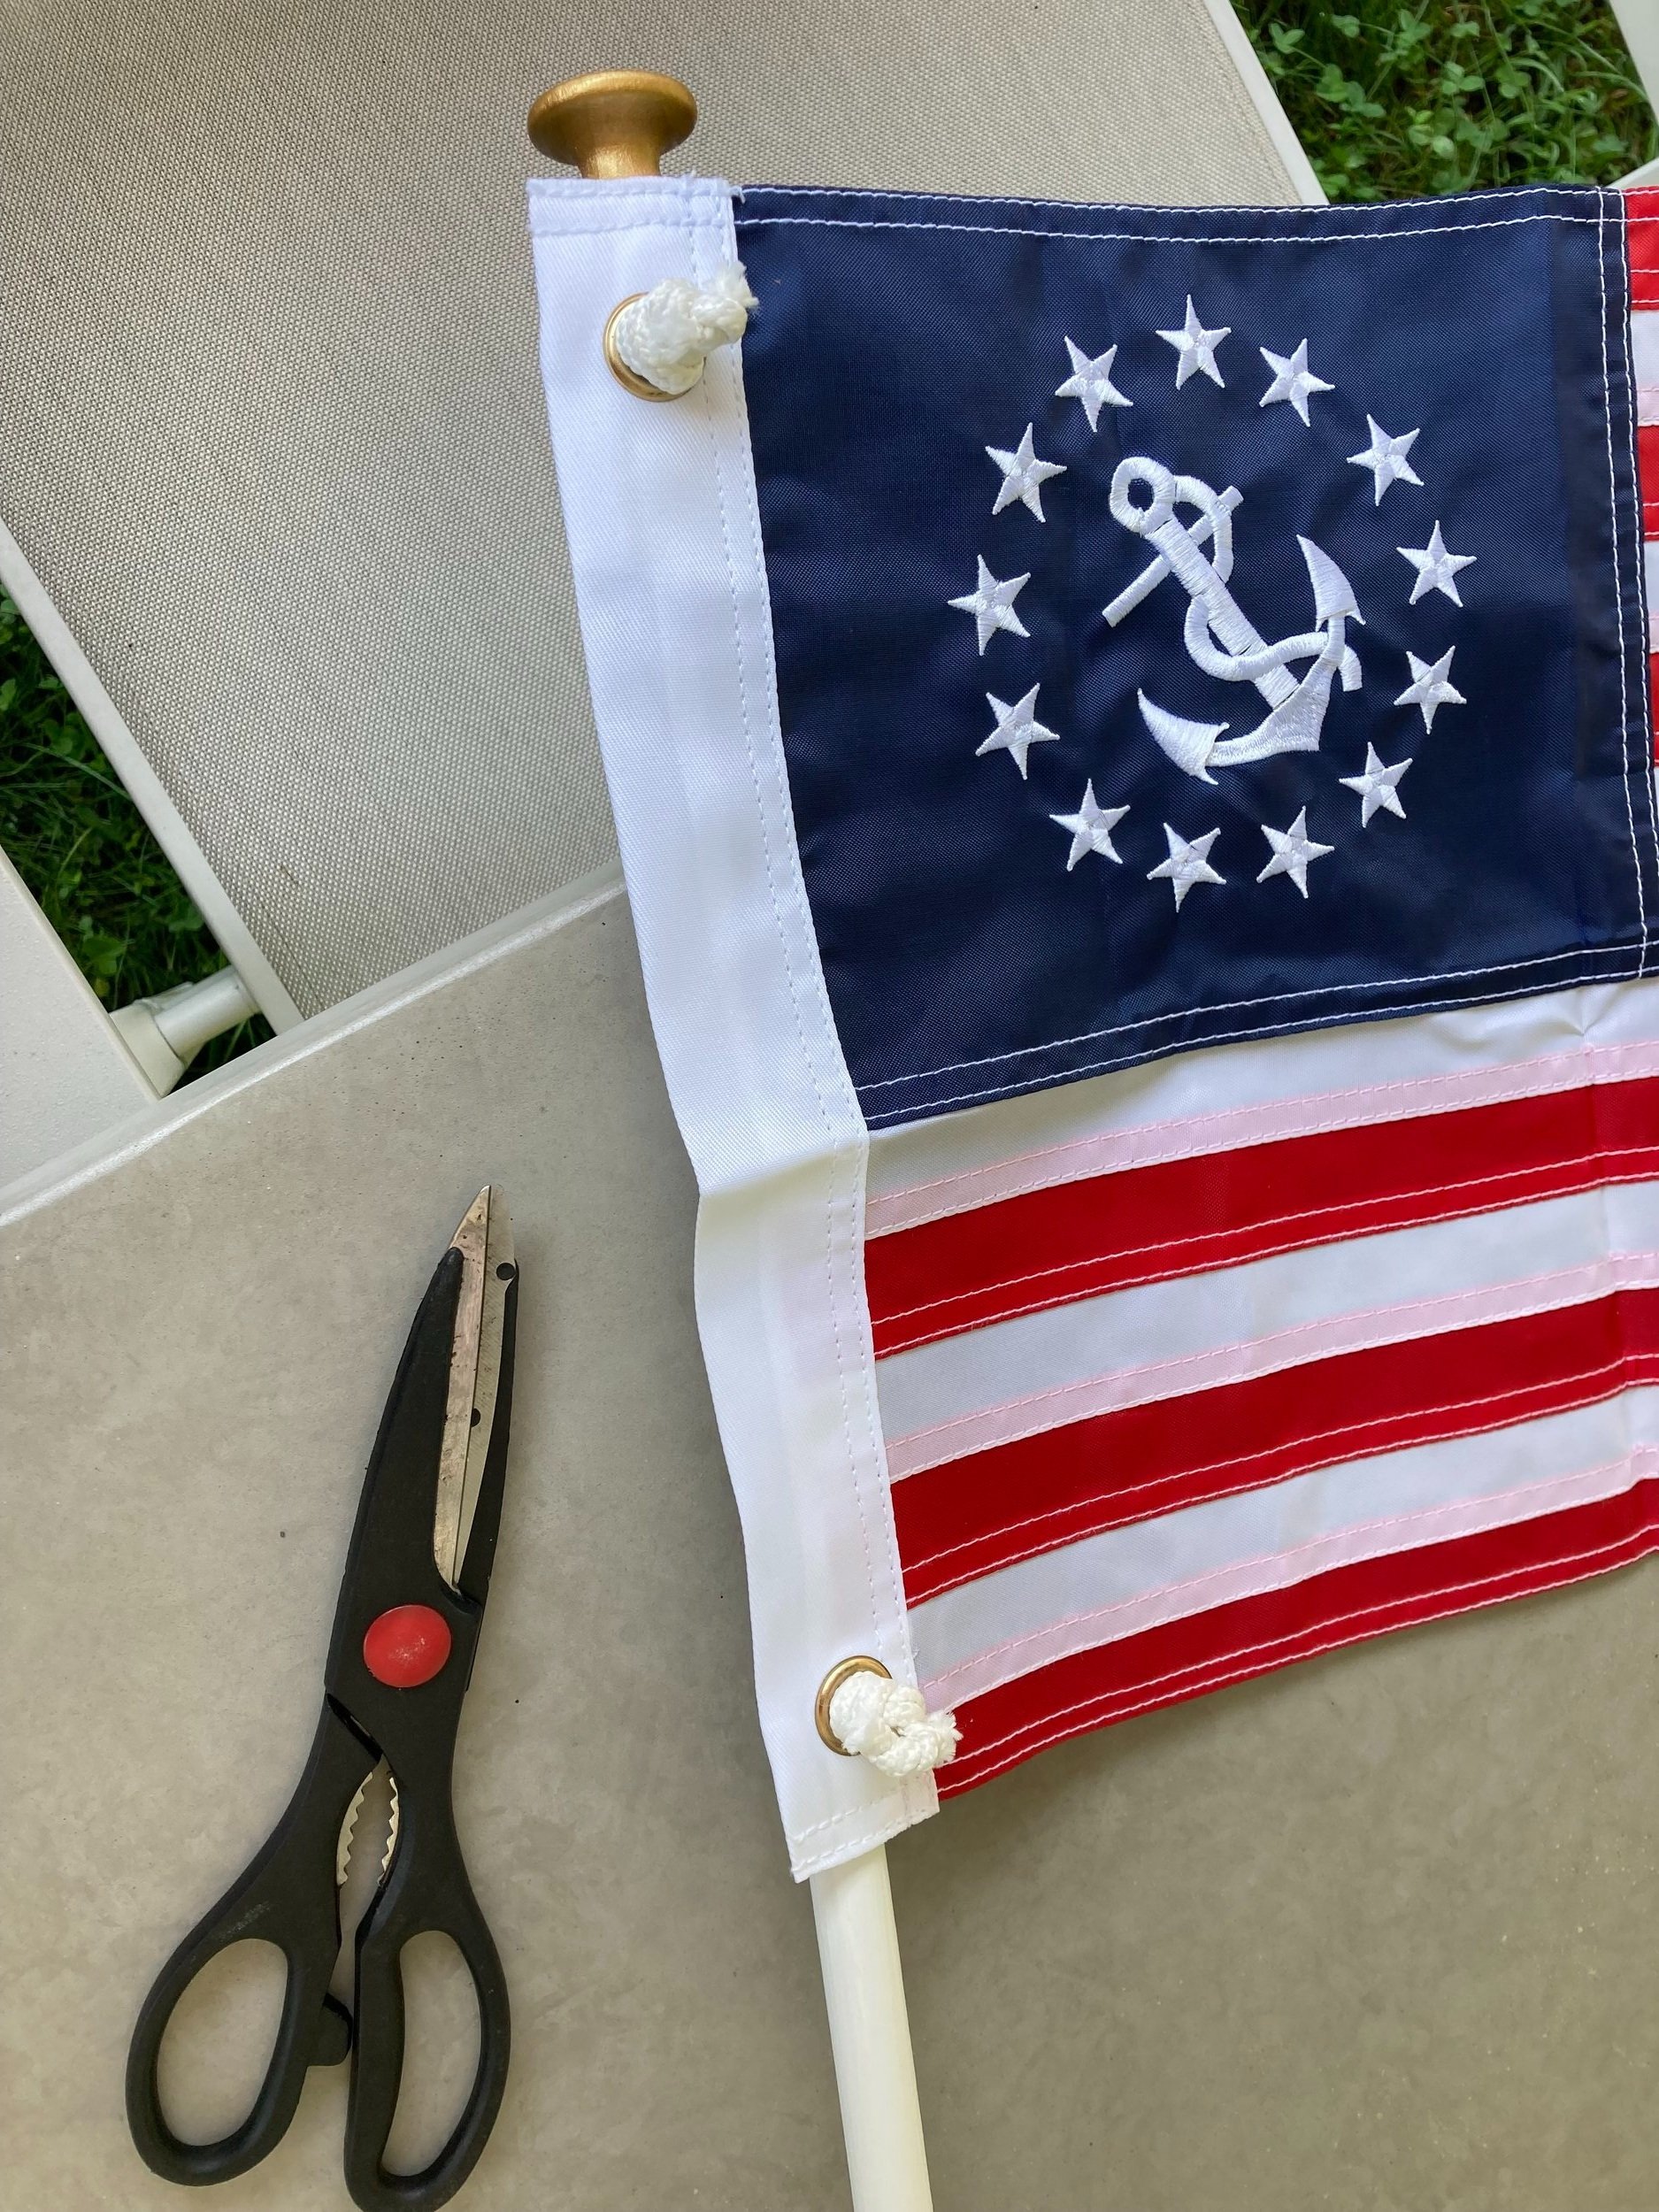
And now we can attach the flag! I just used some cotton clothes line rope to tie the flag to the flagpole. The wooden flagpole has enough grip and the flag is so small that we don’t have any issue with the flag sliding down or moving.
Now that your flag is assembled you just have to mount it. I screwed the base into the side of the playhouse then touched up the screw heads with white paint to help them blend in.
The finished product!
I will probably take the flag down come winter, as our harsh New England winters with heavy snow and ice would likely damage the pole but then I plan to put it right back up in the spring.
| "The Cottage" Sign - I made this a few years ago by making a stencil for the words using my Cricut and having the kids dip their hands in paint for the handprints. |
A few other Playhouse details…
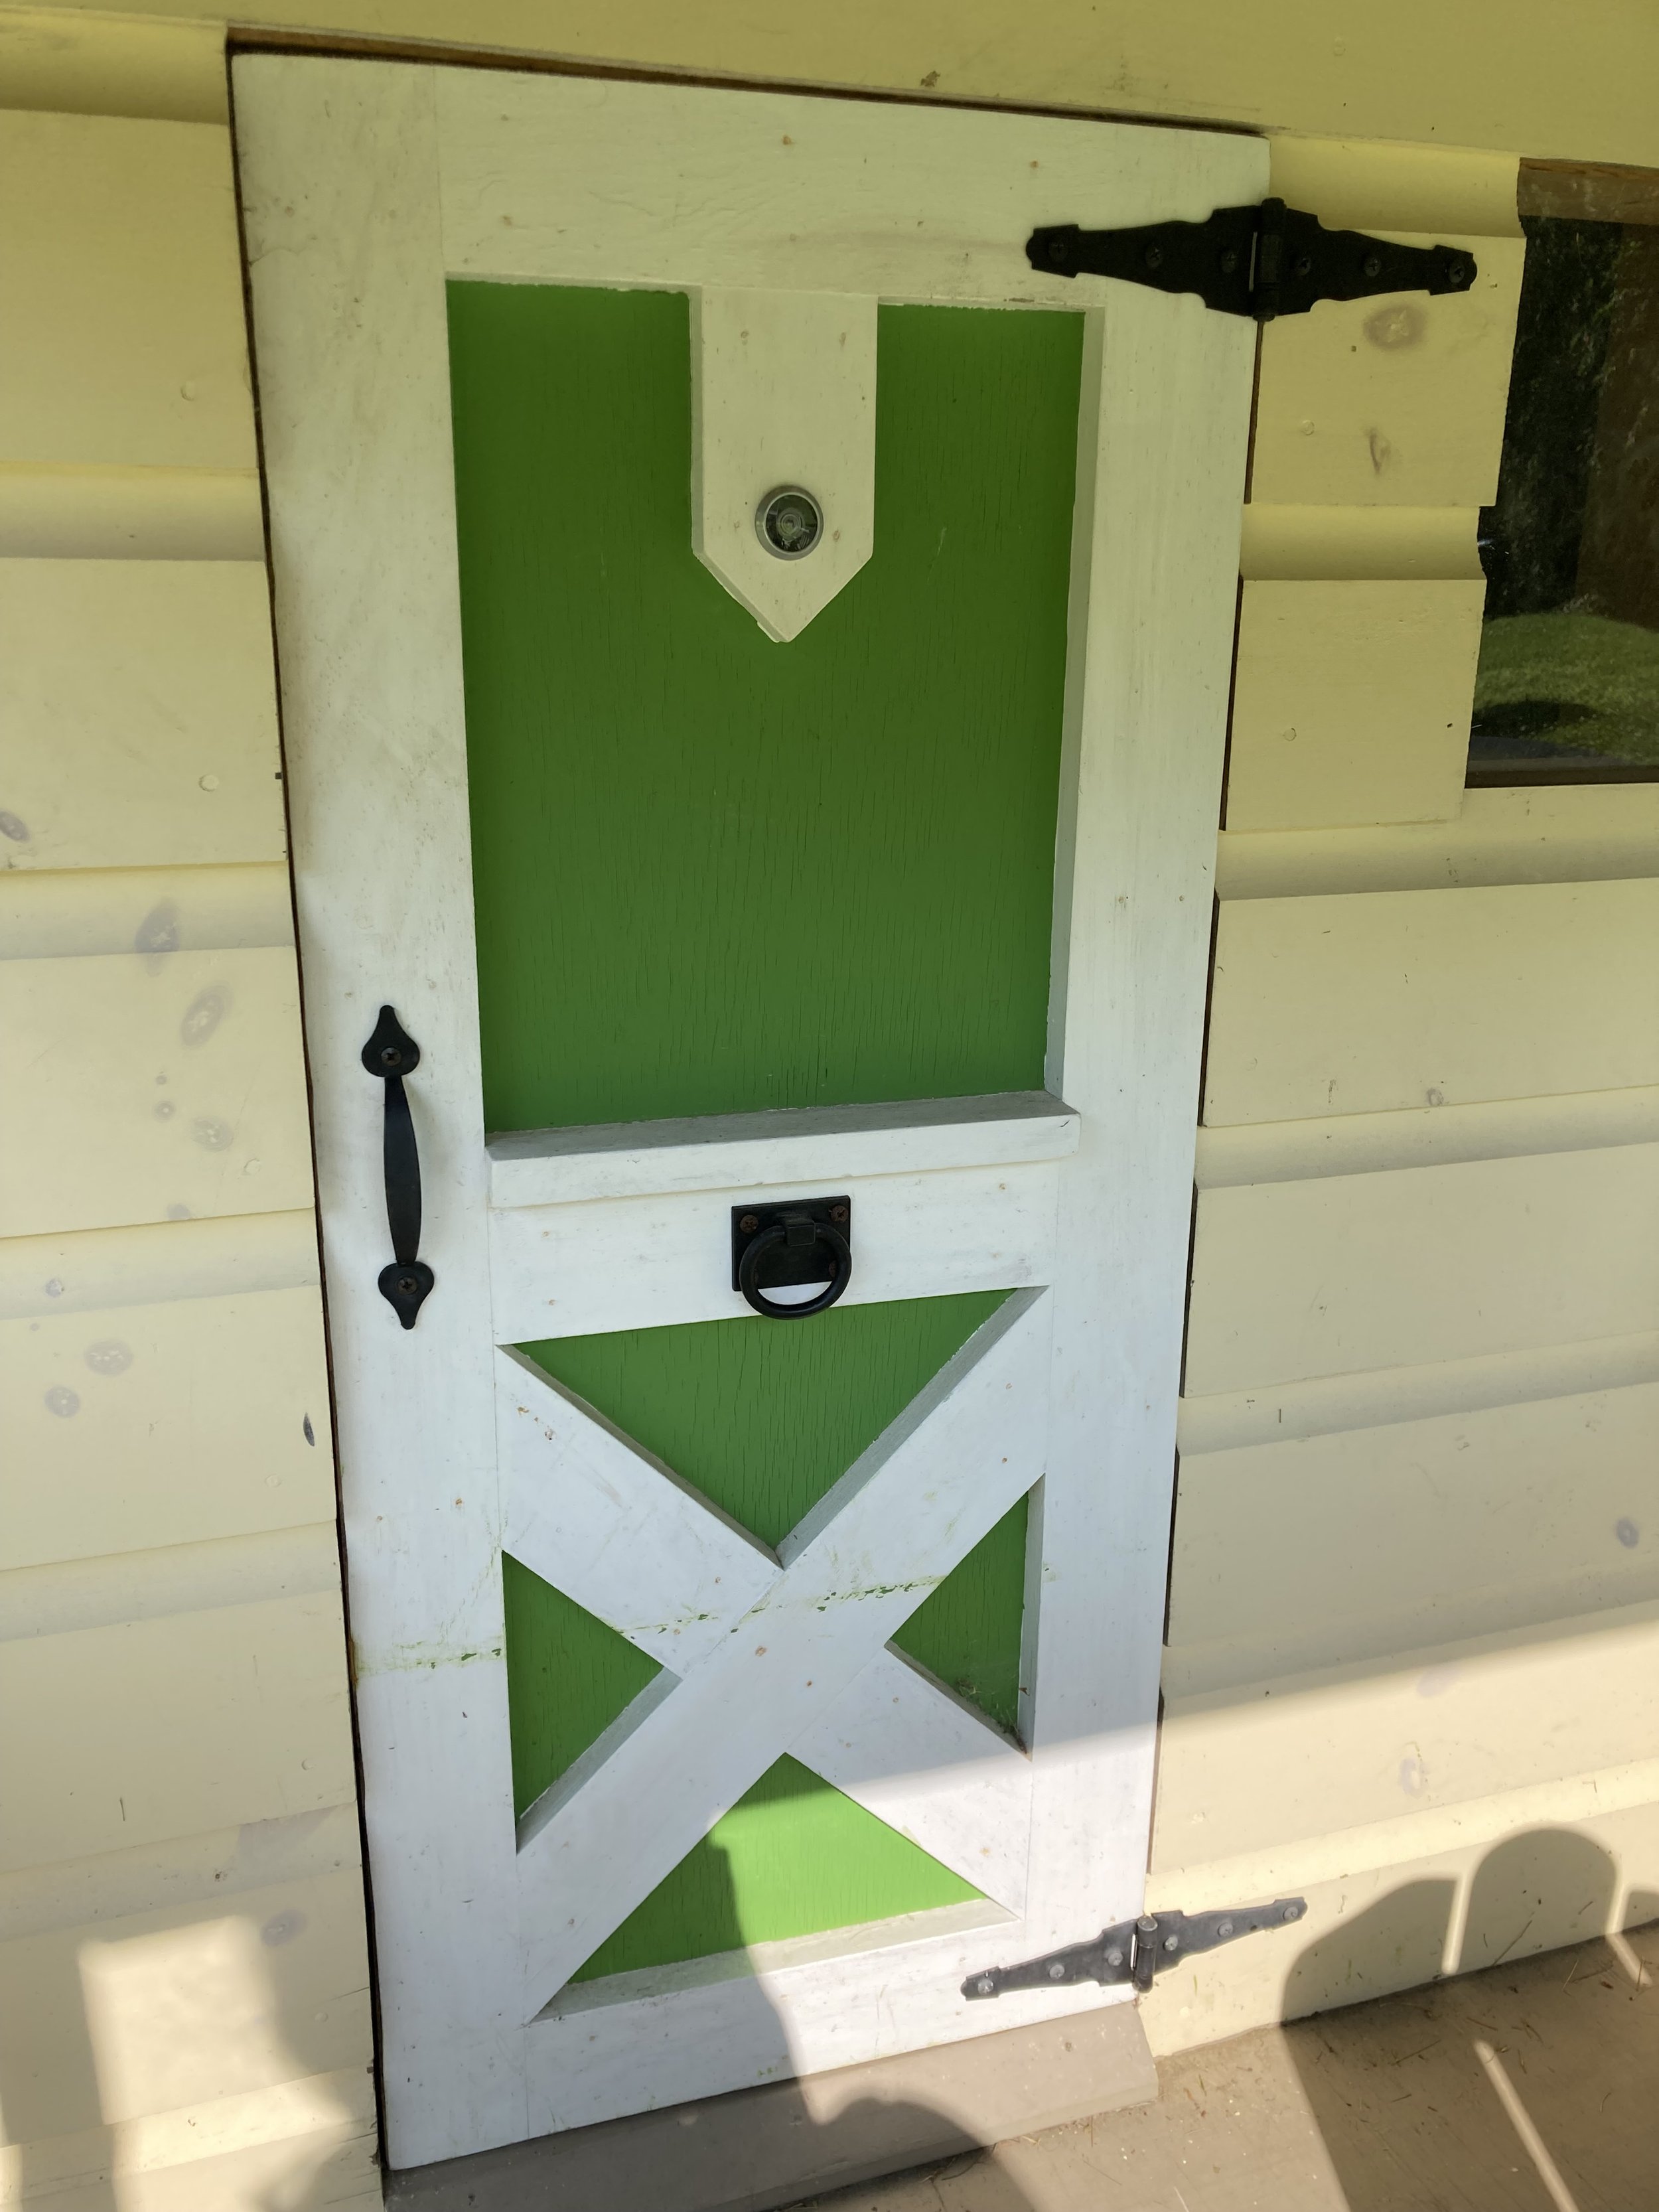
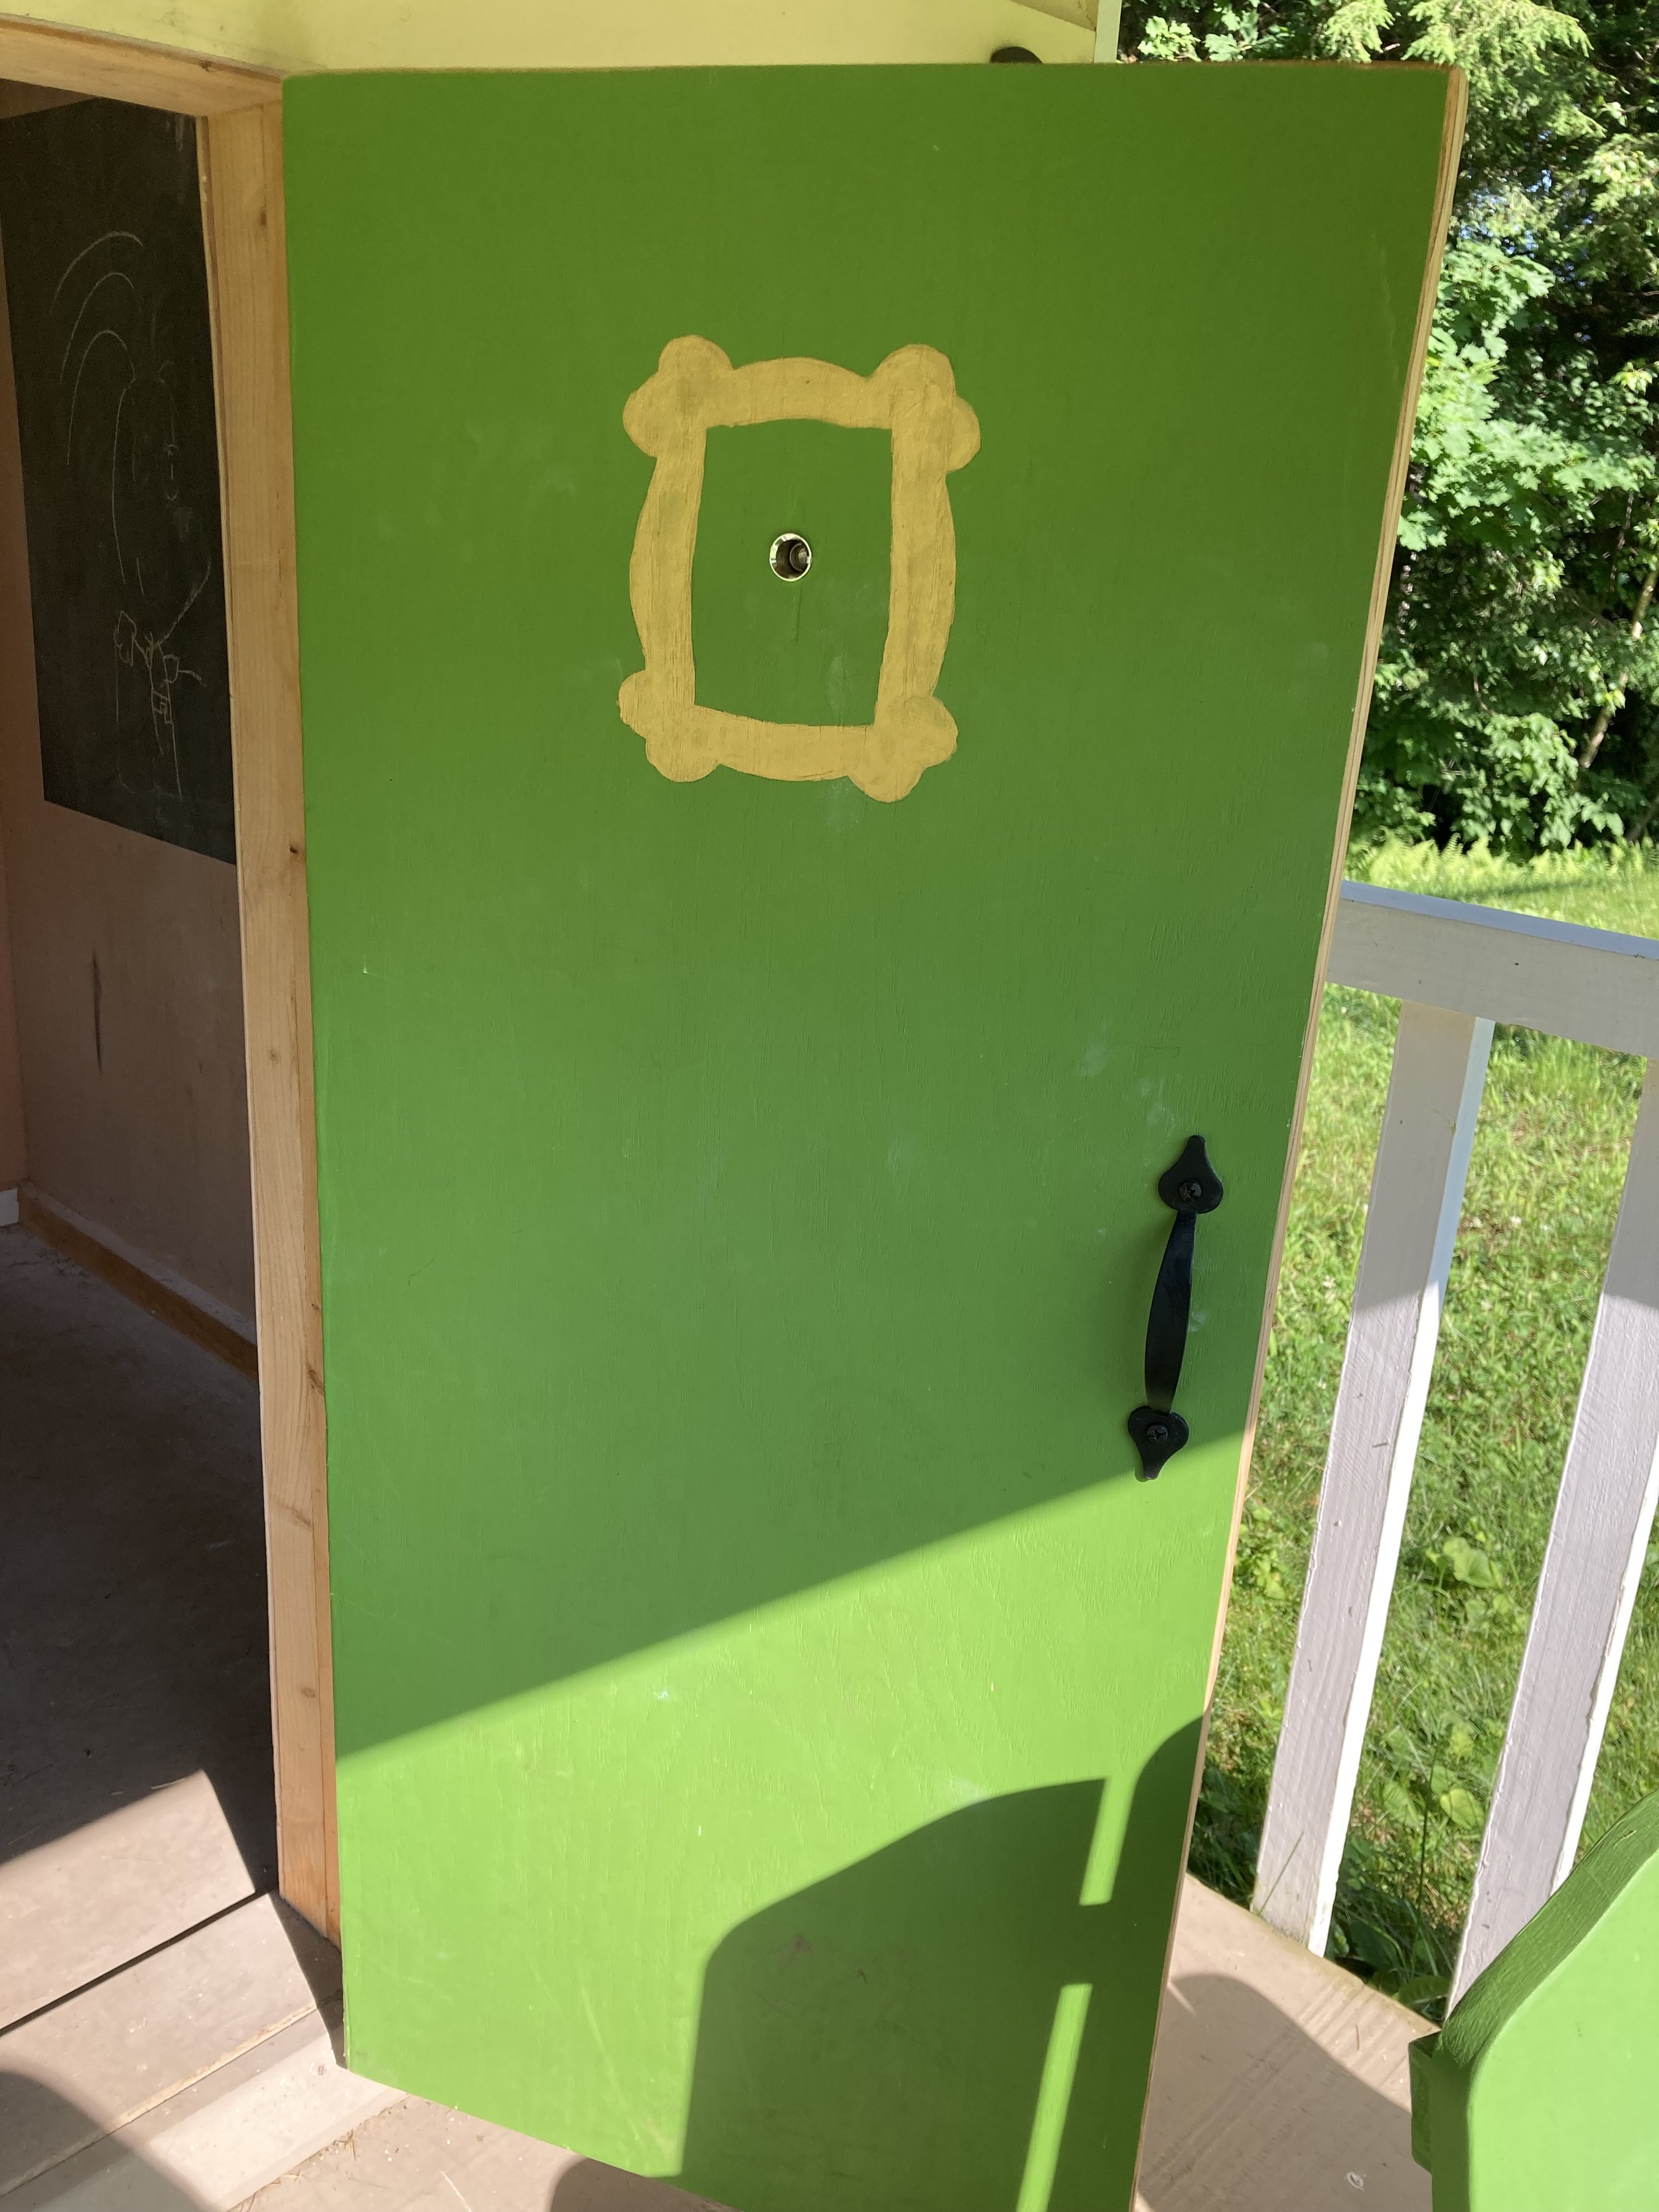
I just love the simple details of our little playhouse - my favorite being the amazing custom farm-style door my husband made for the playhouse.
| Similar Wireless Doorbell - we put the button on the porch post and hung the box inside the playhouse so the kids can ring the doorbell to be let in. | Similar Kid-Sized Adirondack Chair - we got a kid-sized adirondack chair at a yardsale and painted it the same bright green that we painted the door (the original chair was yellow!). |
| Peep Hole - We added a peep hole to the playhouse door too. The kids love looking through it to see who's ringing the doorbell. | "Friends" Reference - I just had to paint a gold frame on the back of the door around the peep hole, just like on the TV show "Friends." |
| Porch Bell - the kids always get a kick out of ringing it to call their friends in from around the yard. |
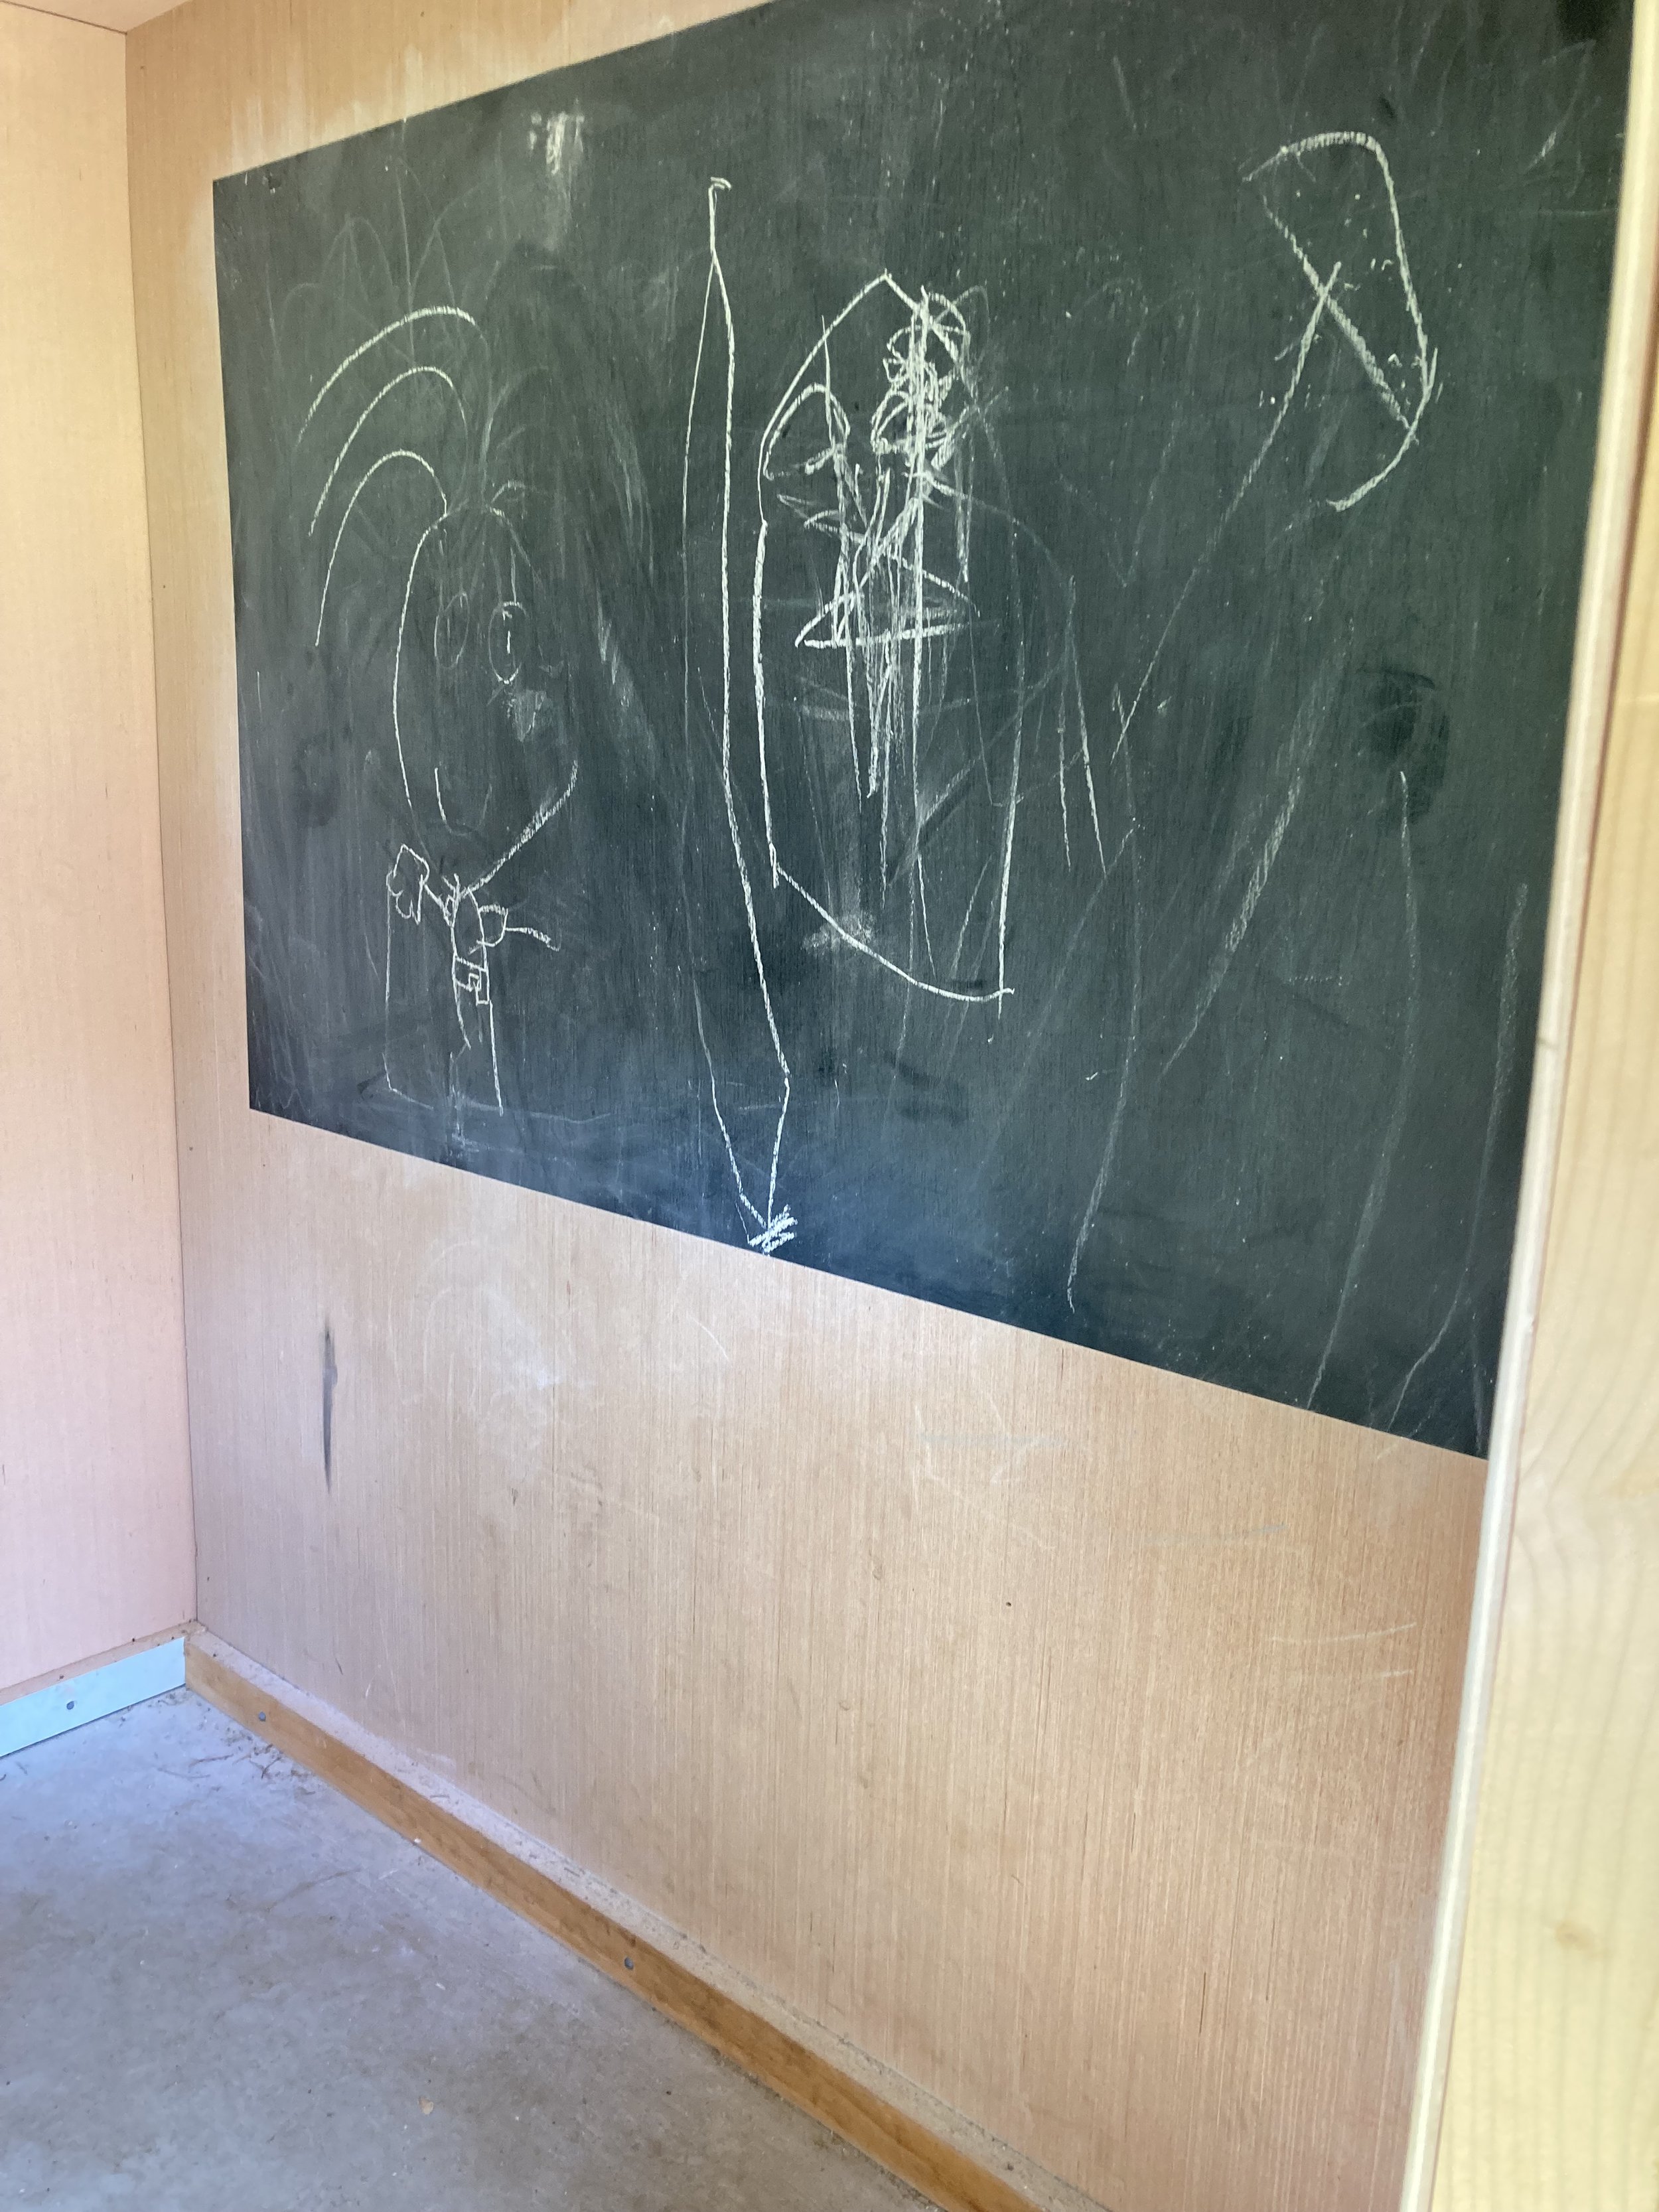
| Chalkboard - Inside the playhouse I painted one wall in chalkboard paint so the kids have a space to draw. We just keep the chalk and eraser on one of the windowsills inside the playhouse. |
PS - At Christmas we even decorate the playhouse with solar Christmas lights and a wreath!
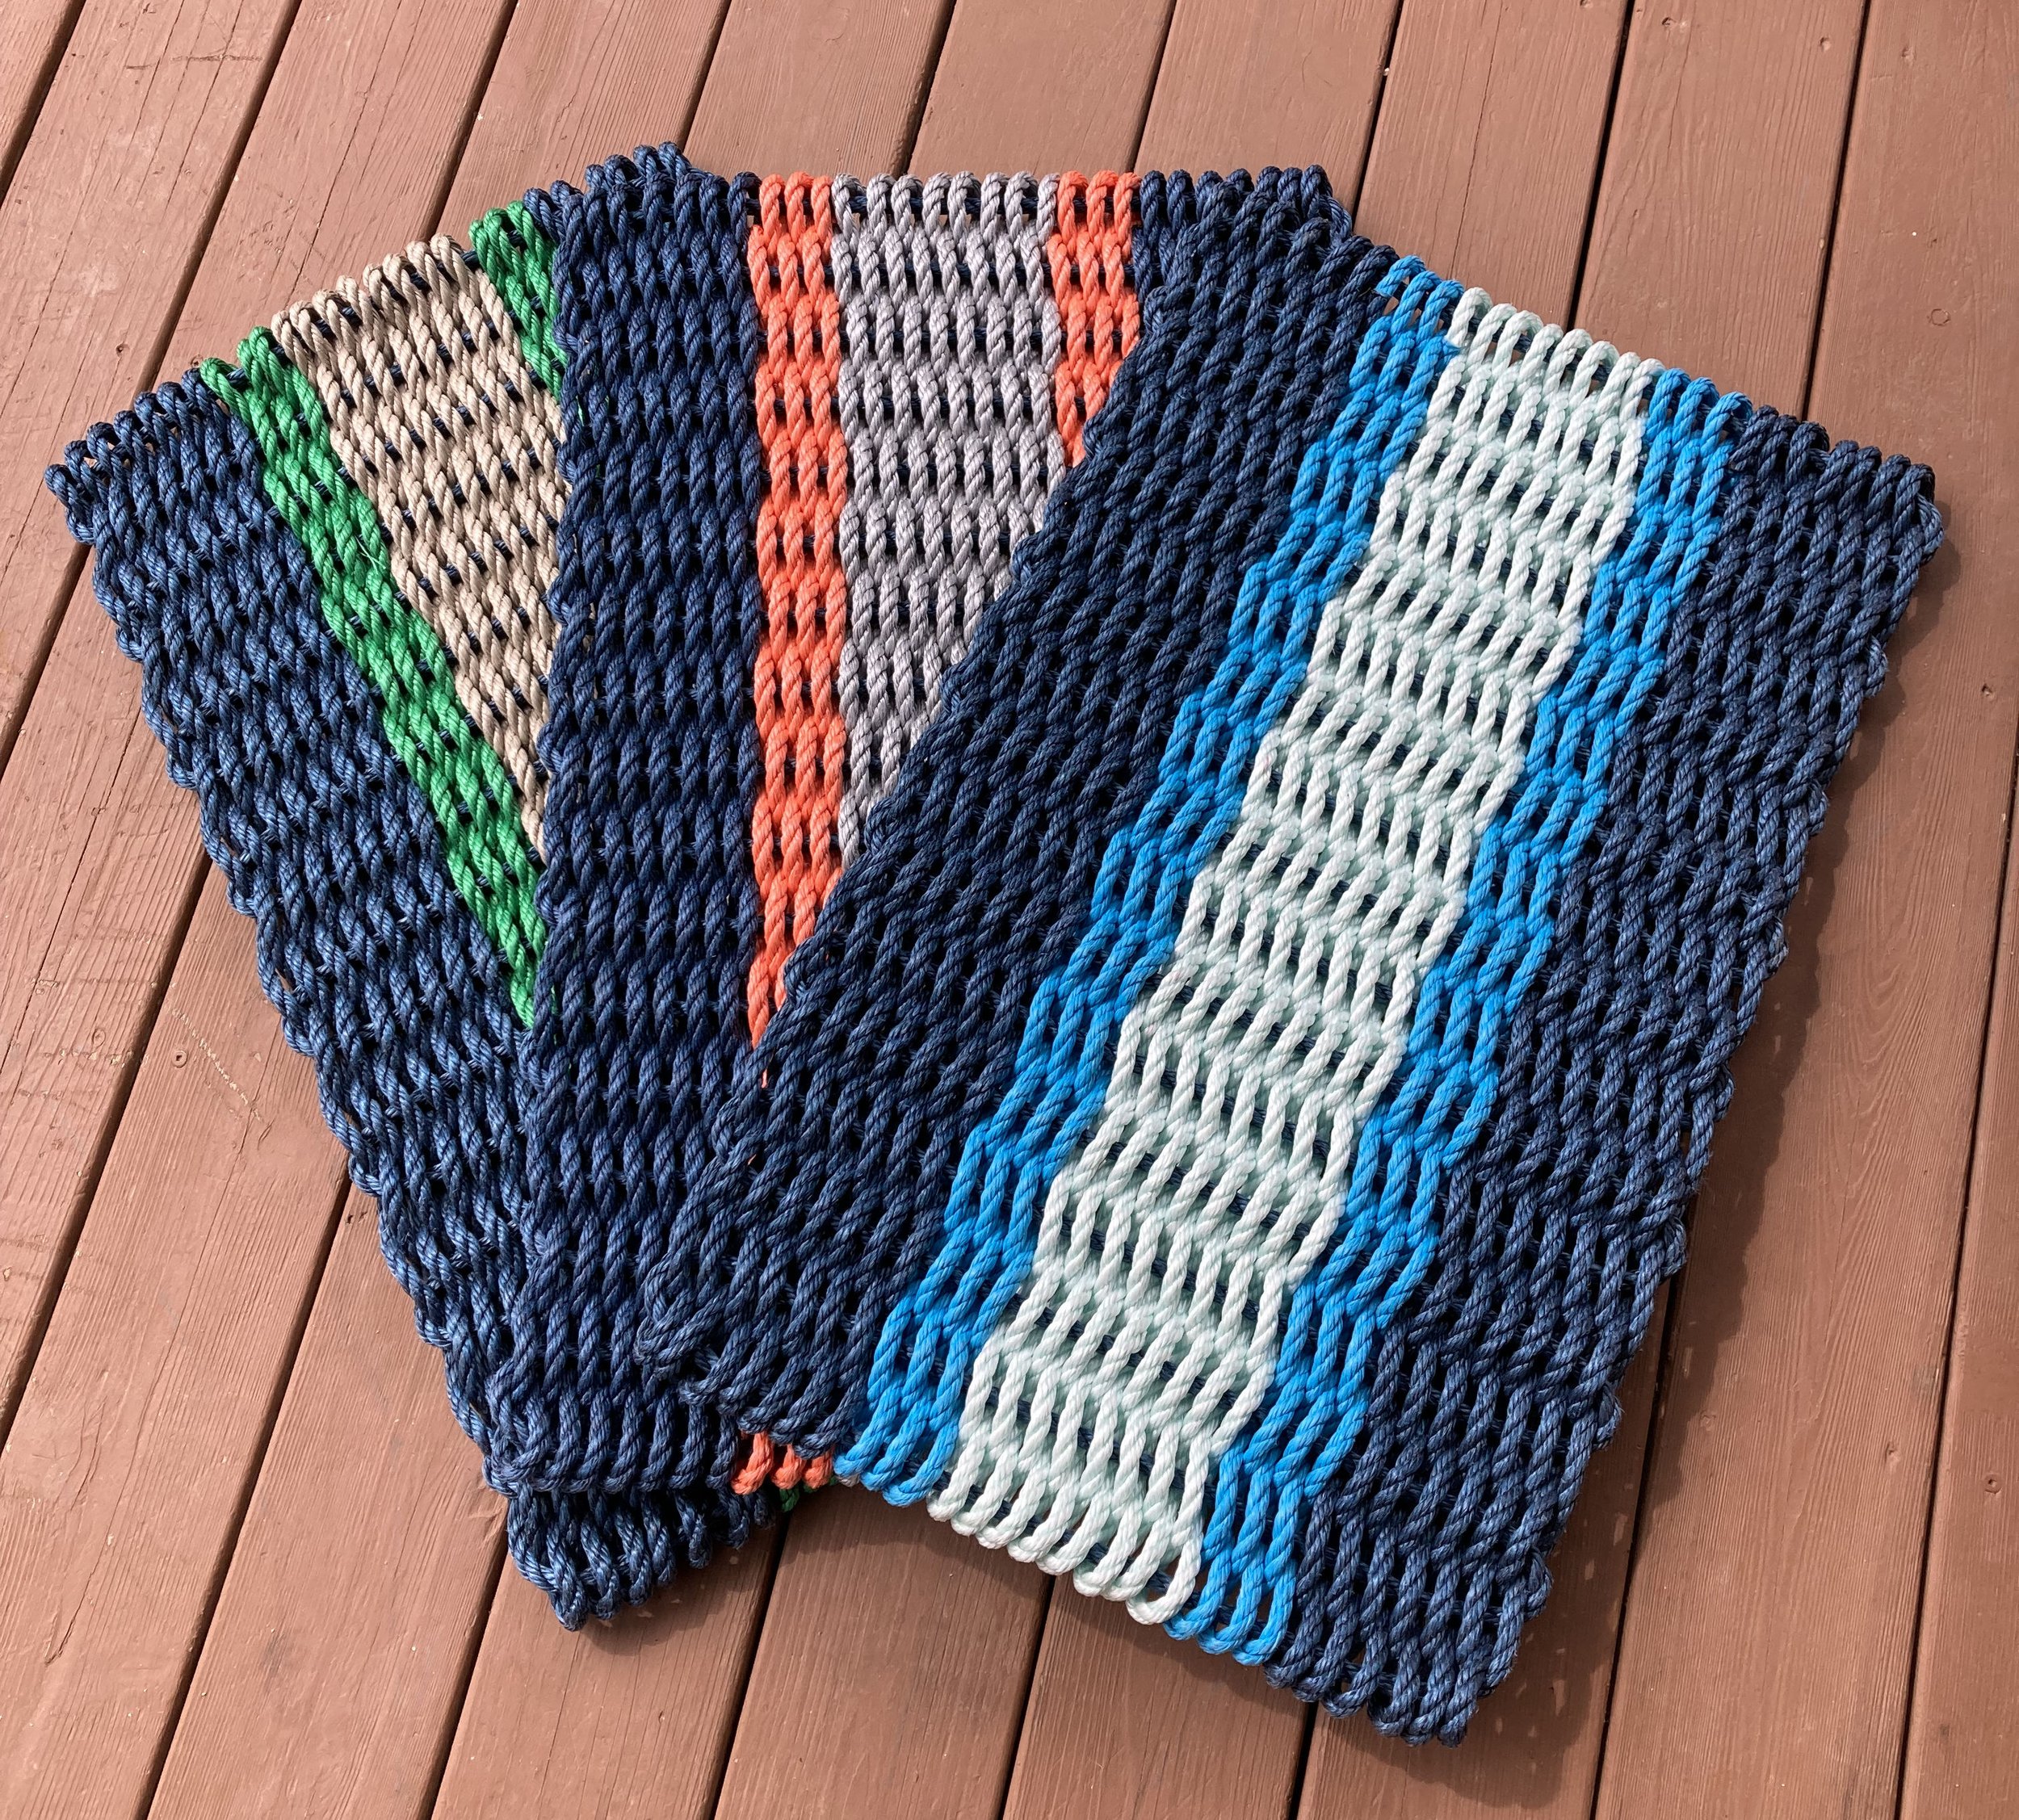
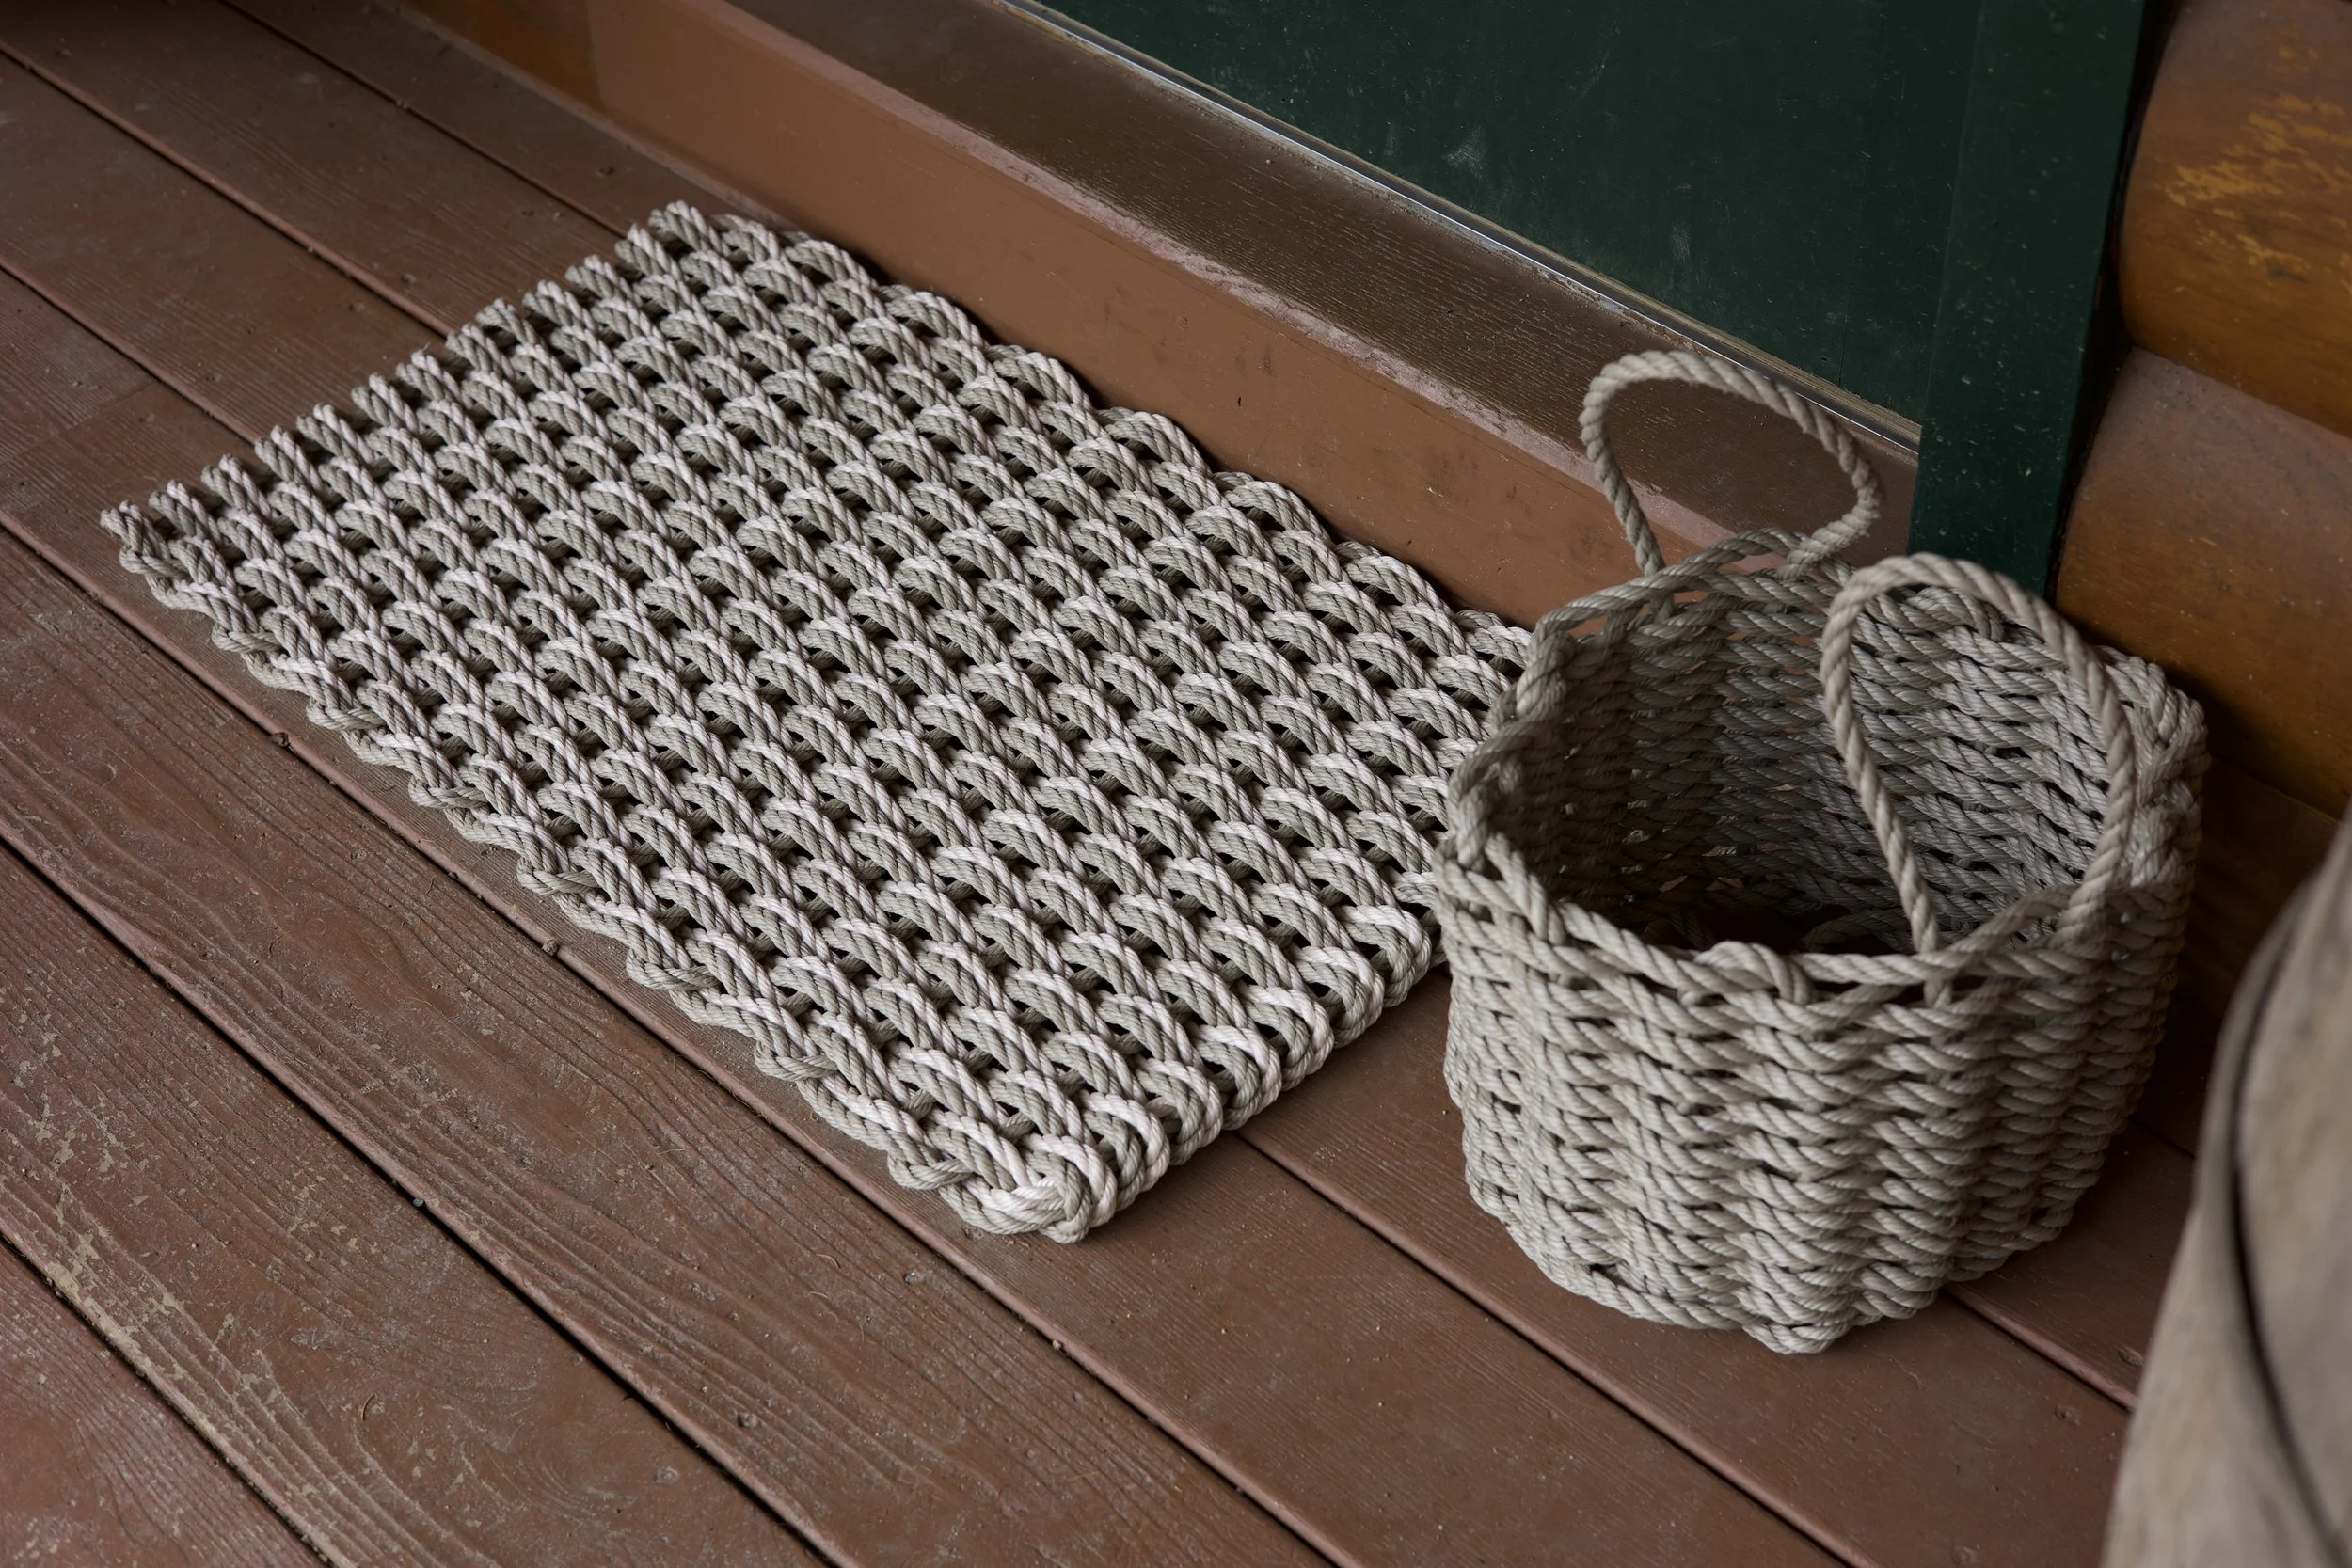
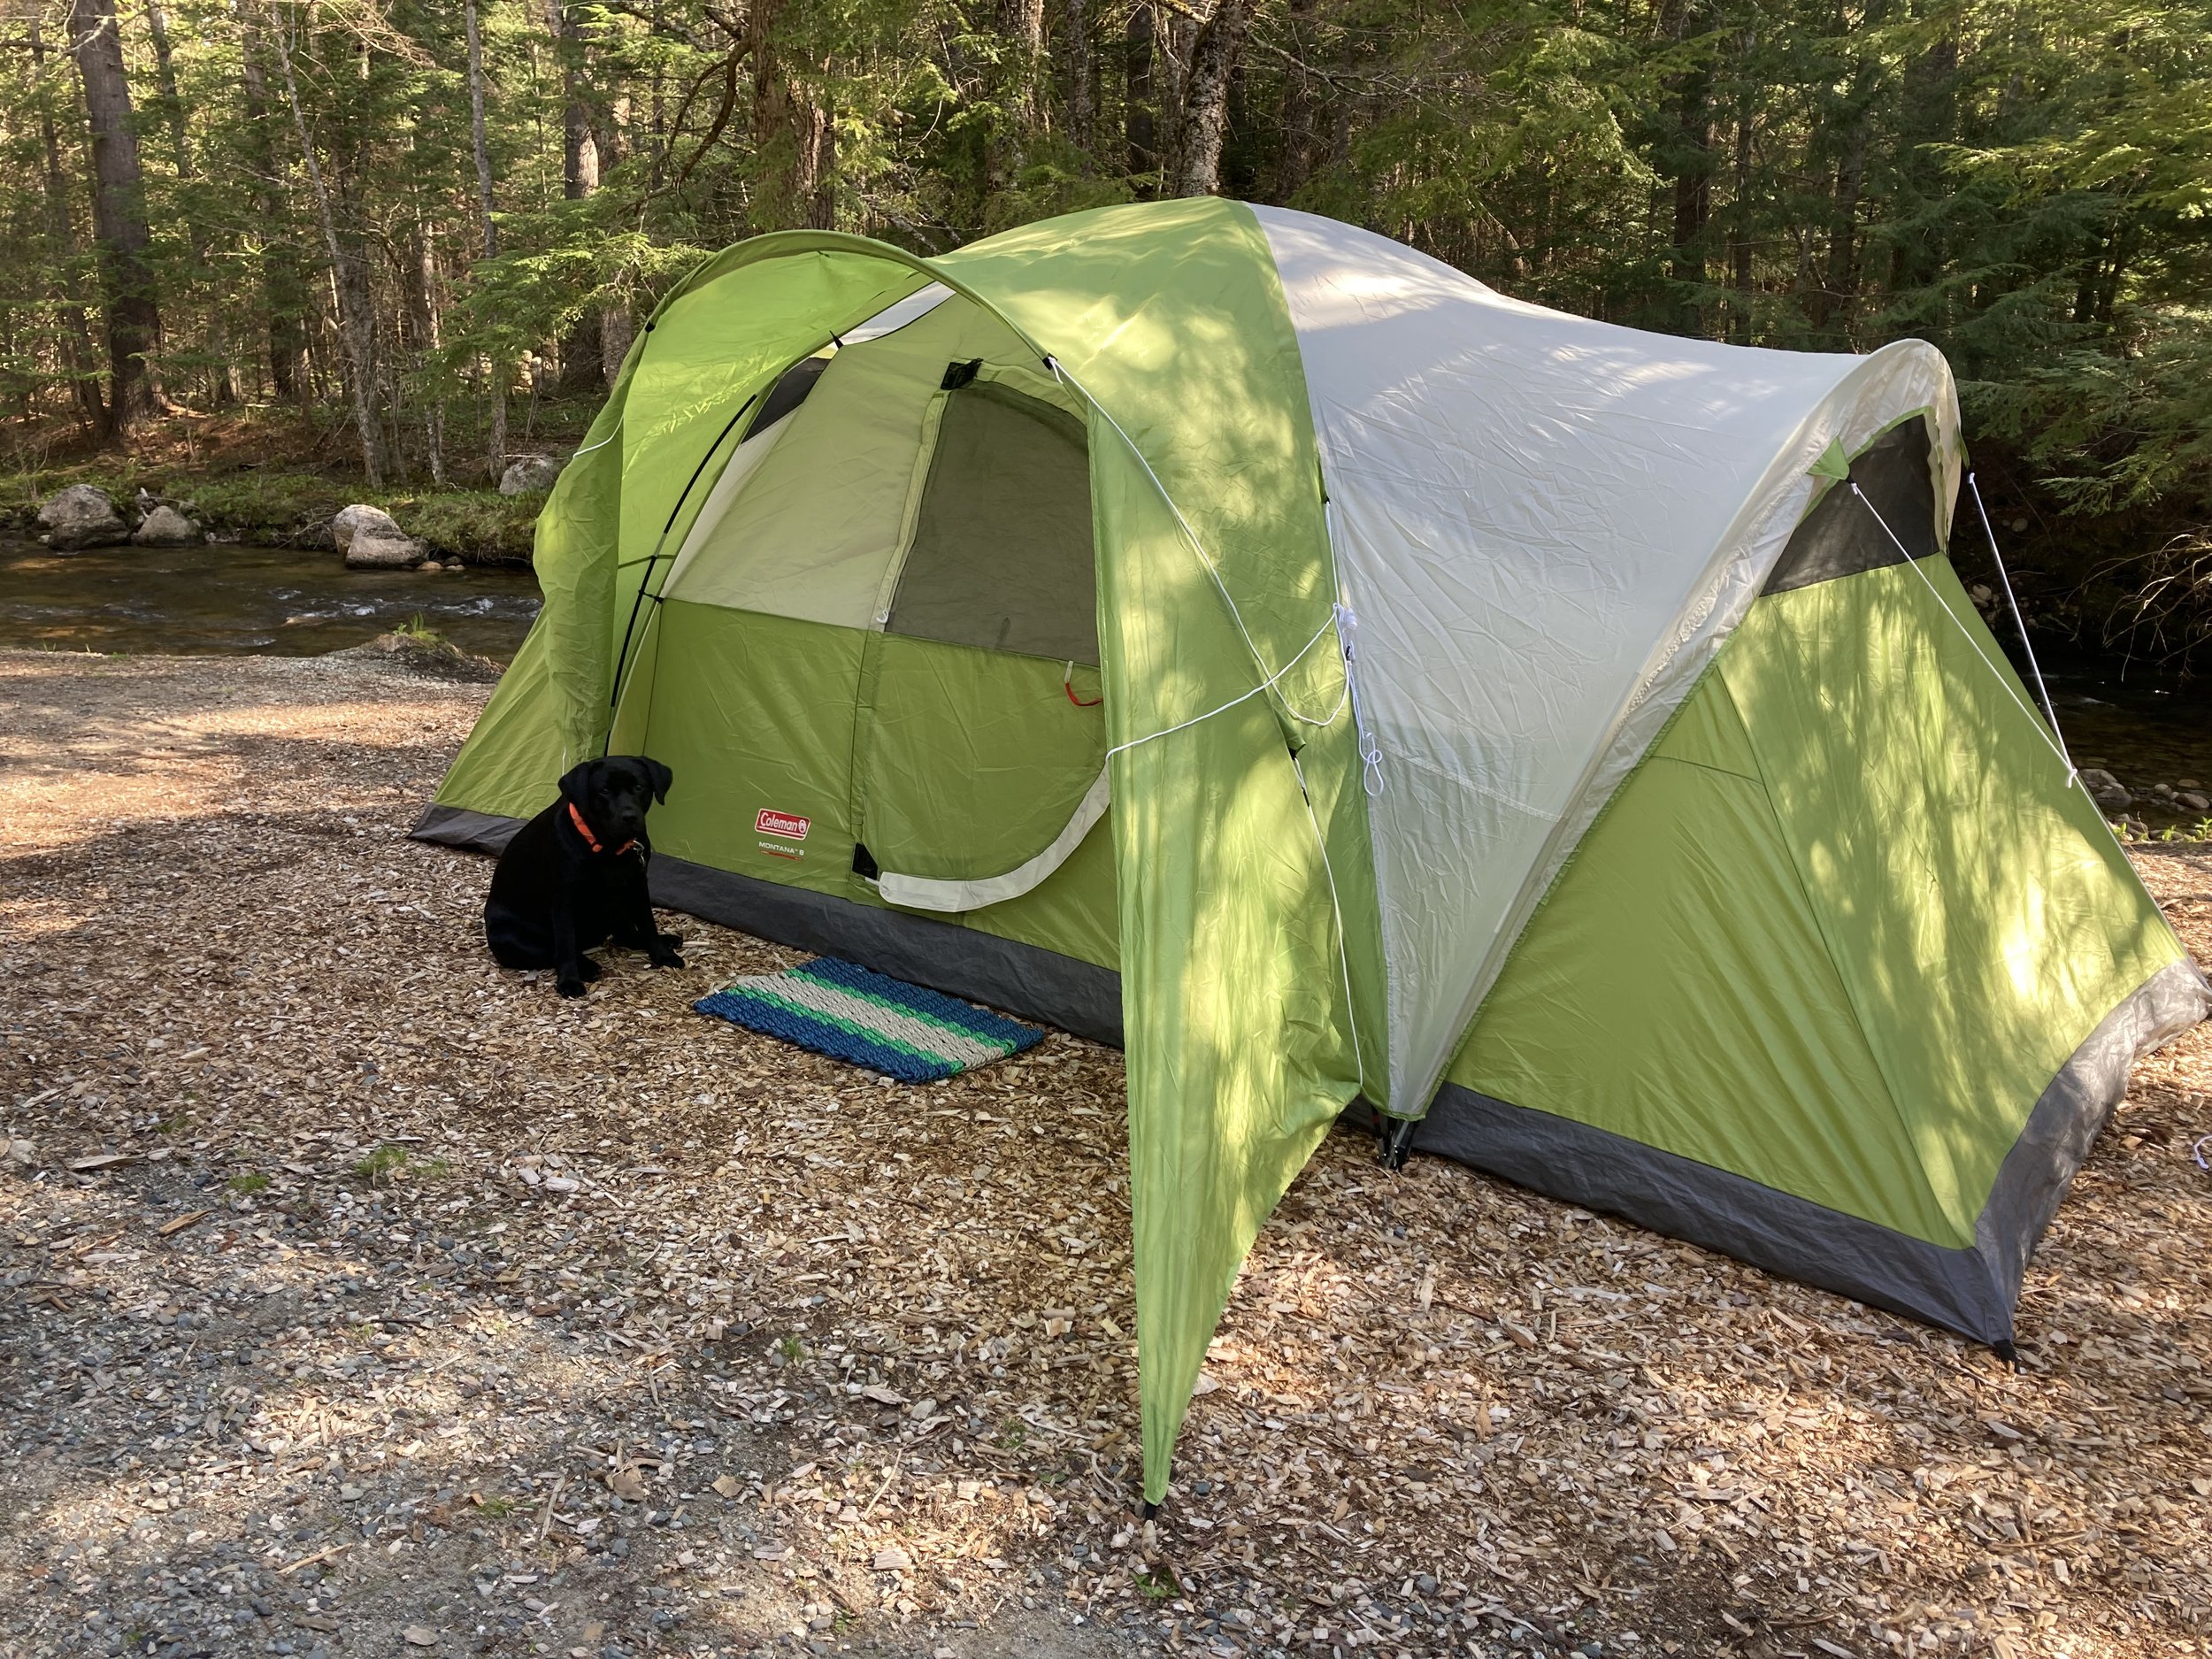
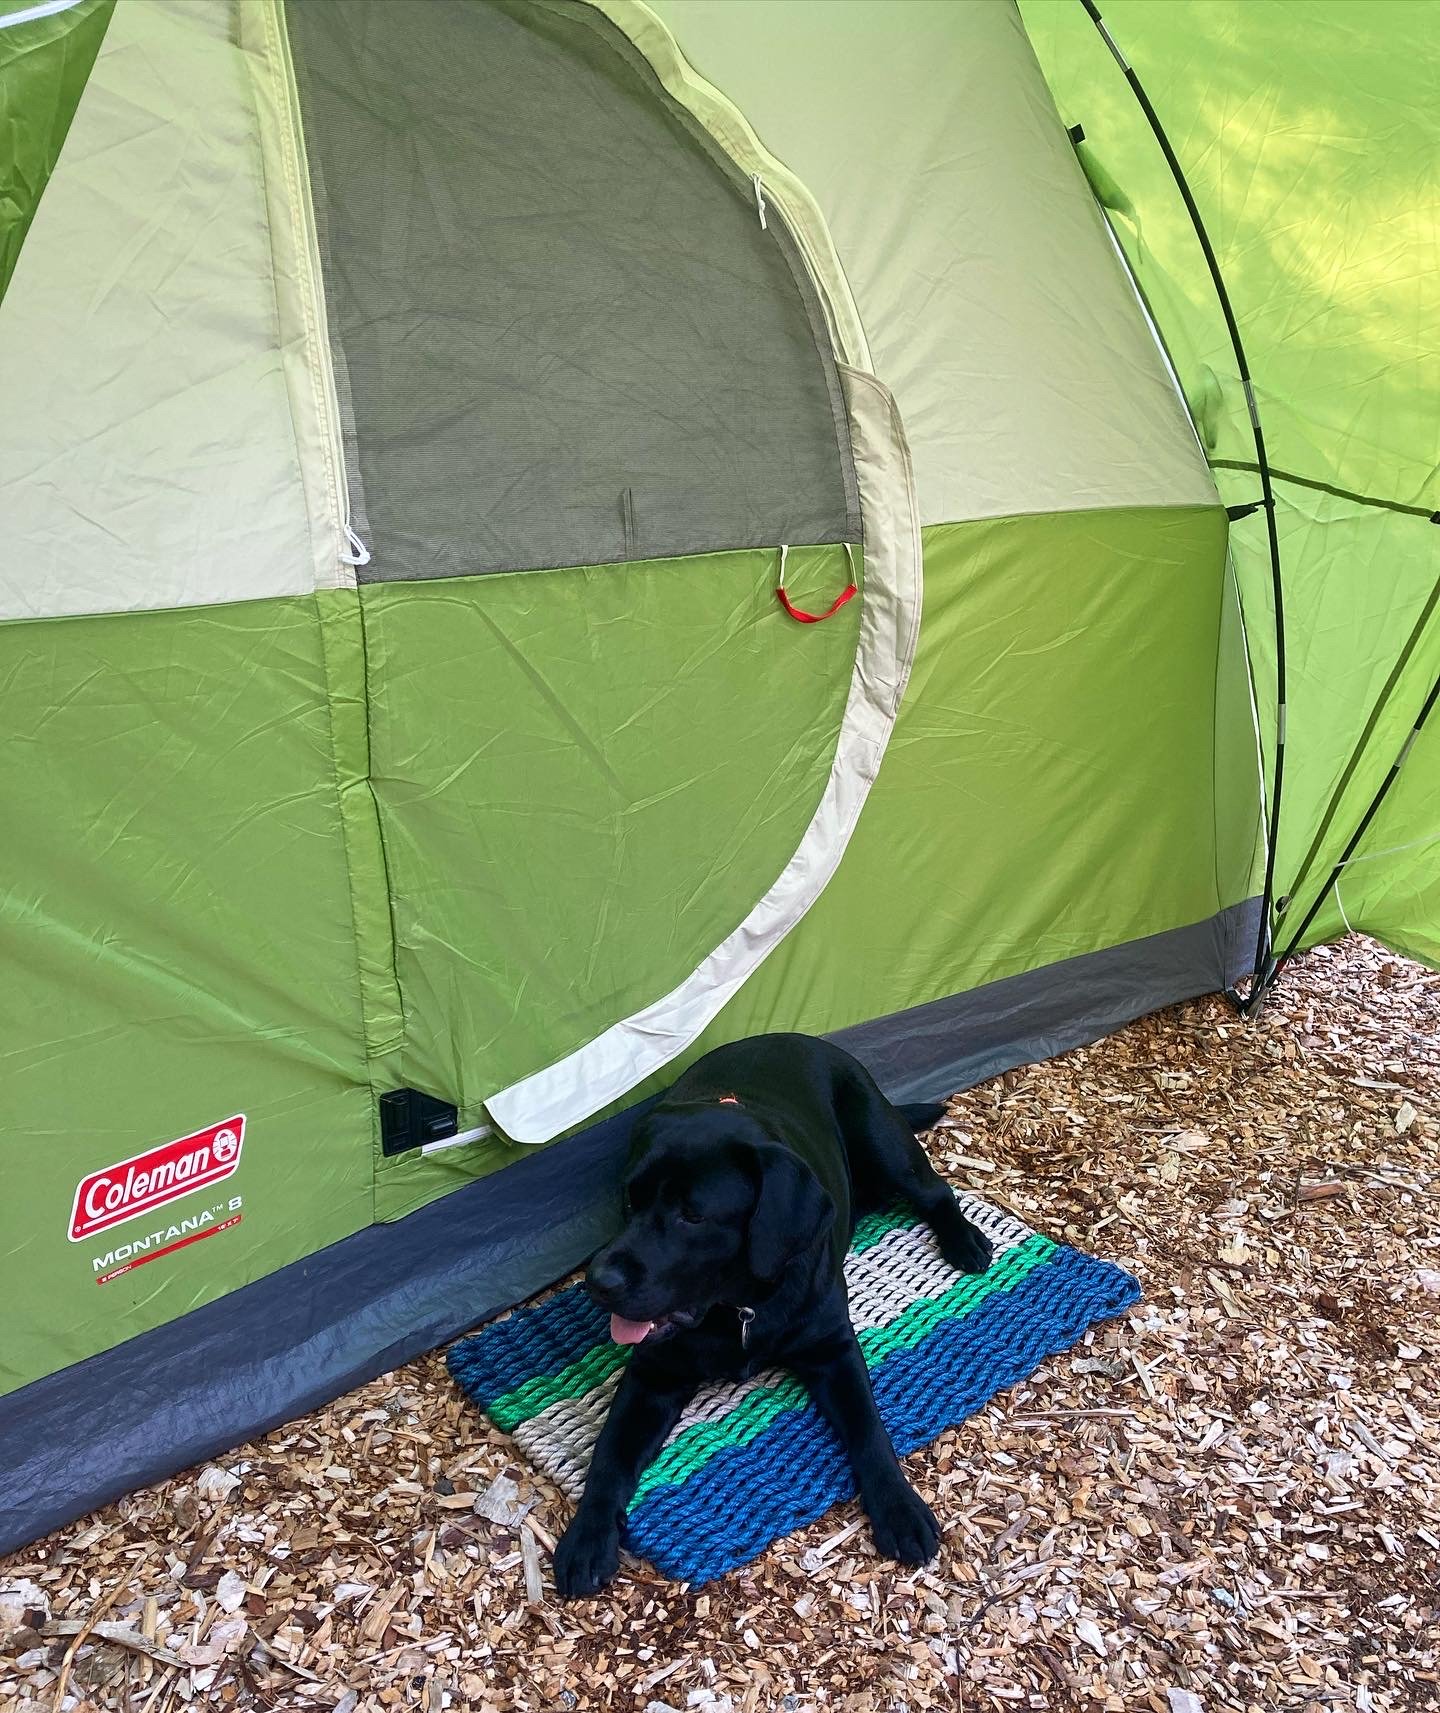
We’ve been long-time fans and customers of Maine Rope Mats - they are rugged, functional, and add some New England nautical flair to your home. Our mats have held up beautifully to years of harsh New England weather - sun, snow, and mud. Maine Rope Mats was kind enough to send us a few of their new products for us to style and share about. | This post contains an honest review of product provided by Maine Rope Mats |
At Home in the Woods as well as on the Seacoast
Maine Rope Mats definitely have a nautical vibe to them (they are made from lobster-style ropes after all), but nevertheless they fit right in at a cabin in the woods as well as at a cape on the cape.
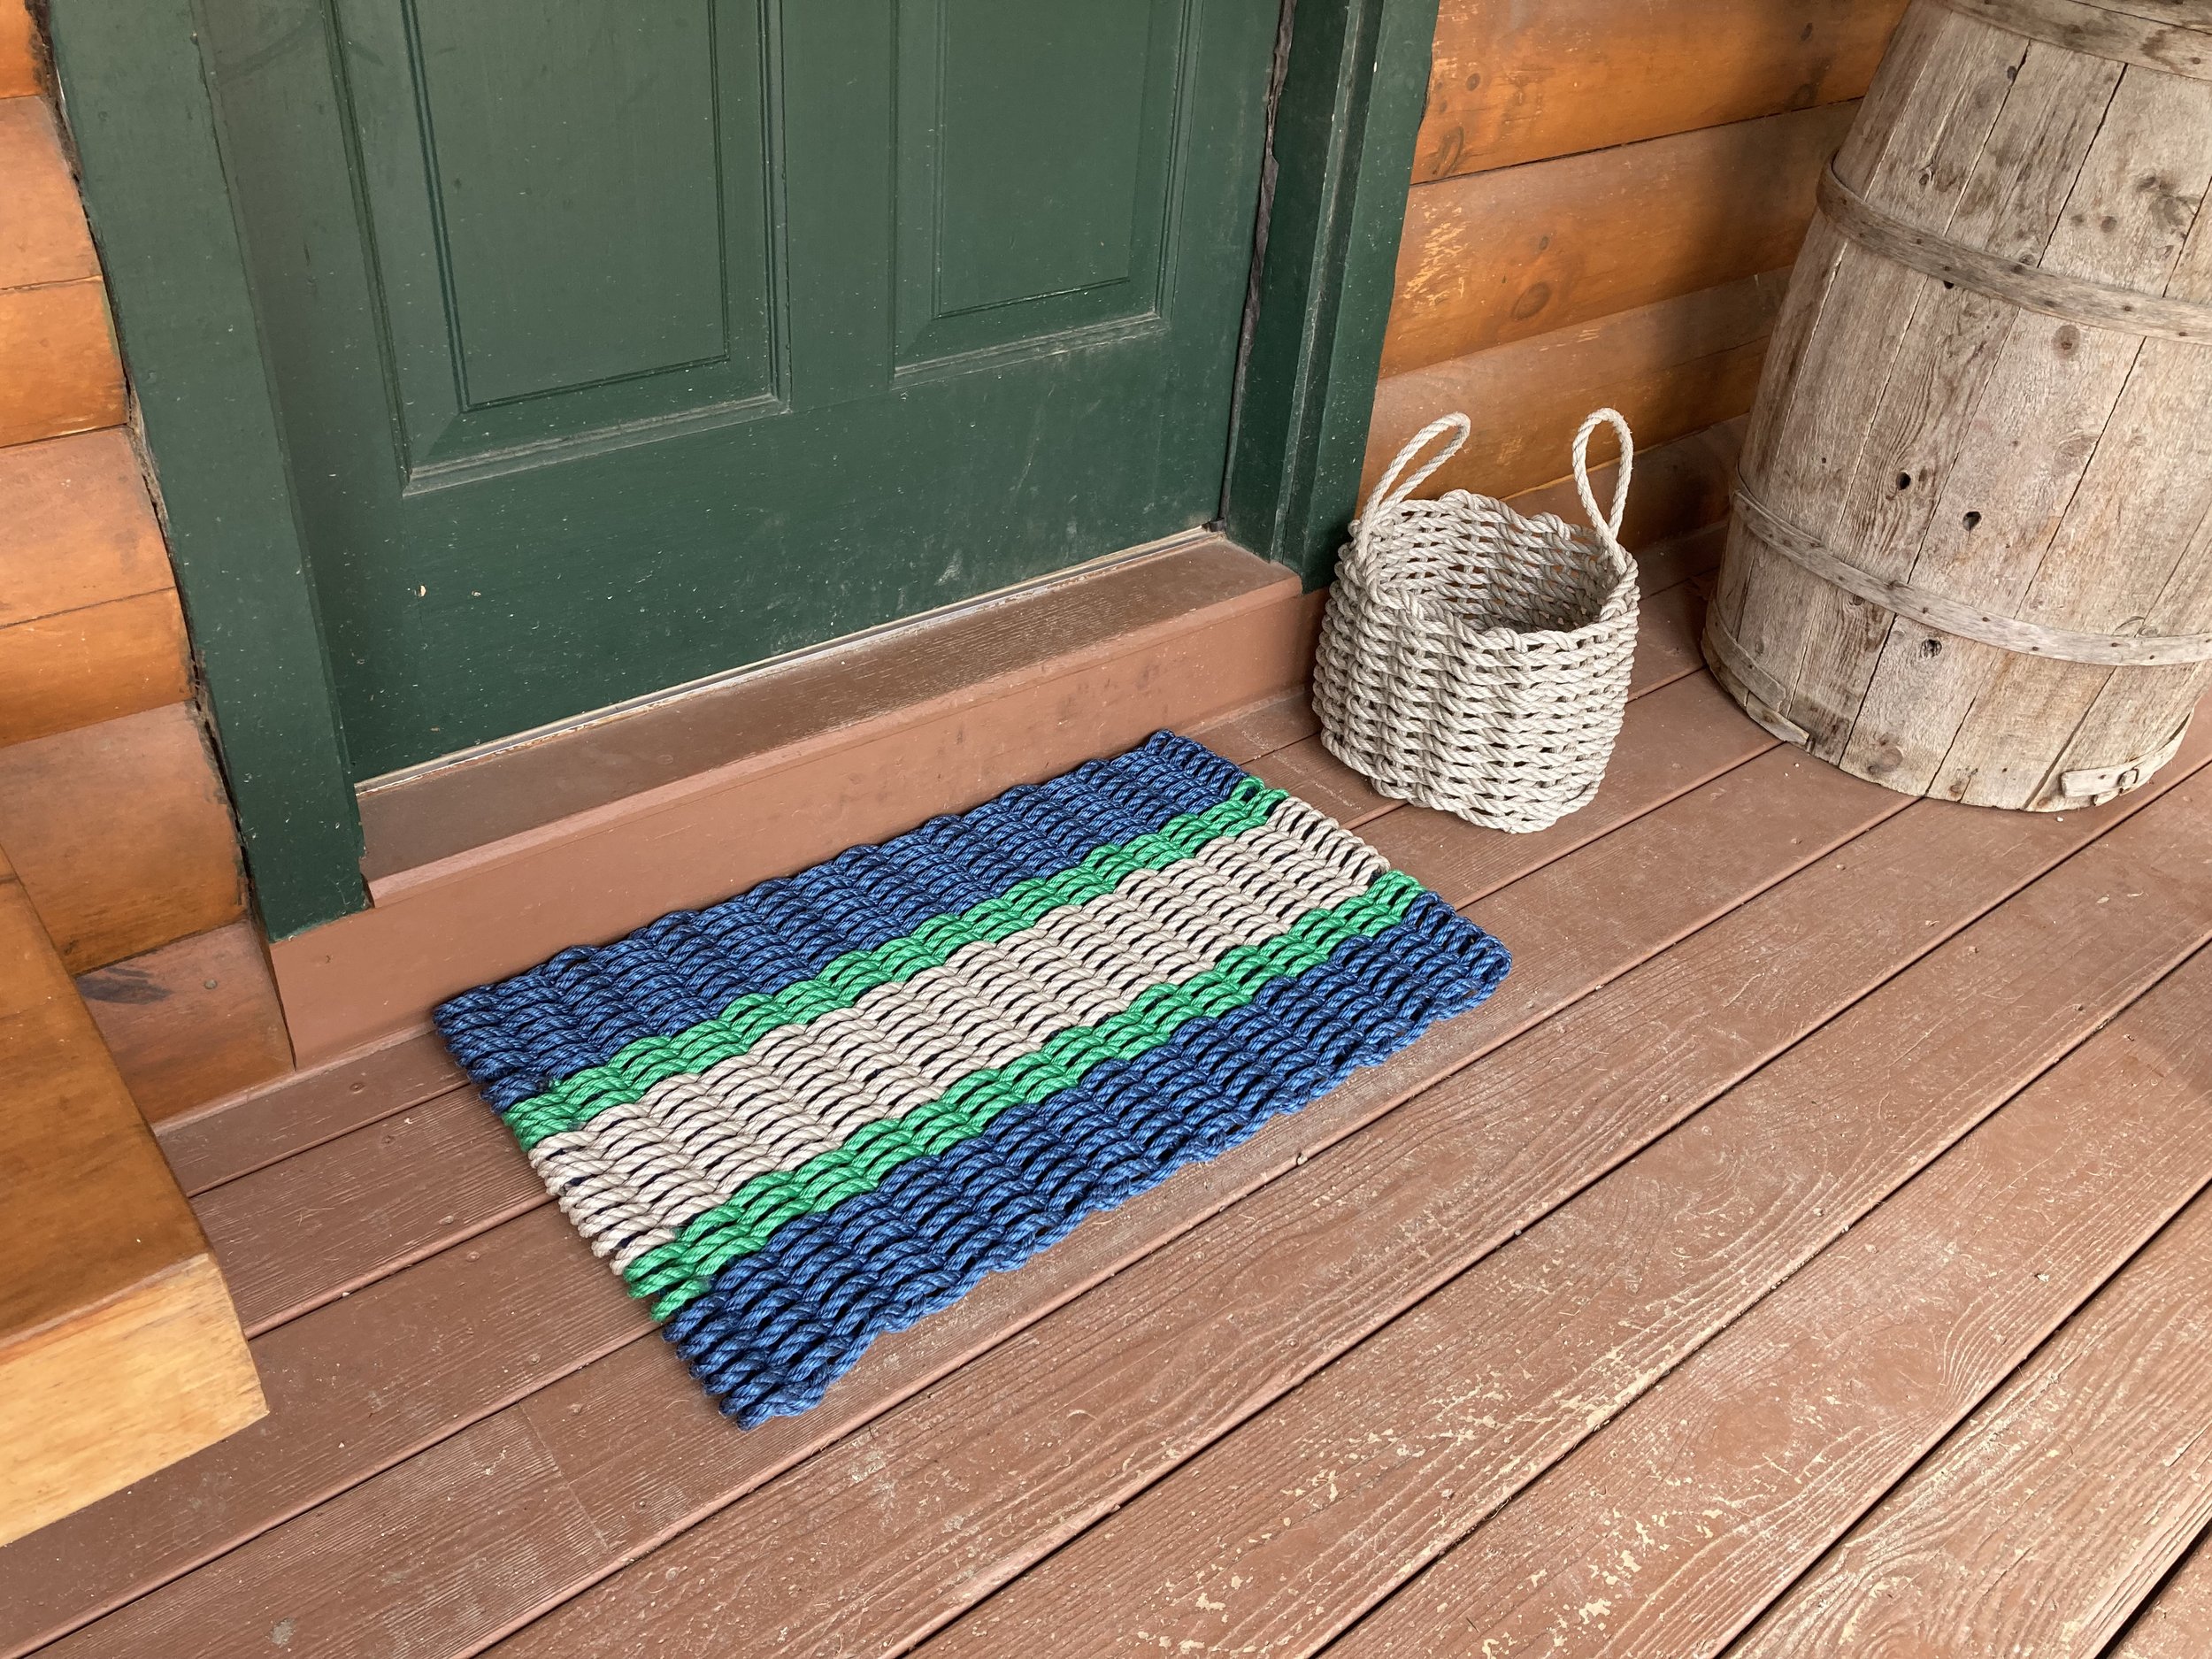
We love mixing and matching the mats with other accessories too - like their Maine Rope Baskets. These rugged baskets would be perfect for holding a potted plant, gardening tools, or flip flops and towels for a walk down to the lake.
Wipe Your Paws
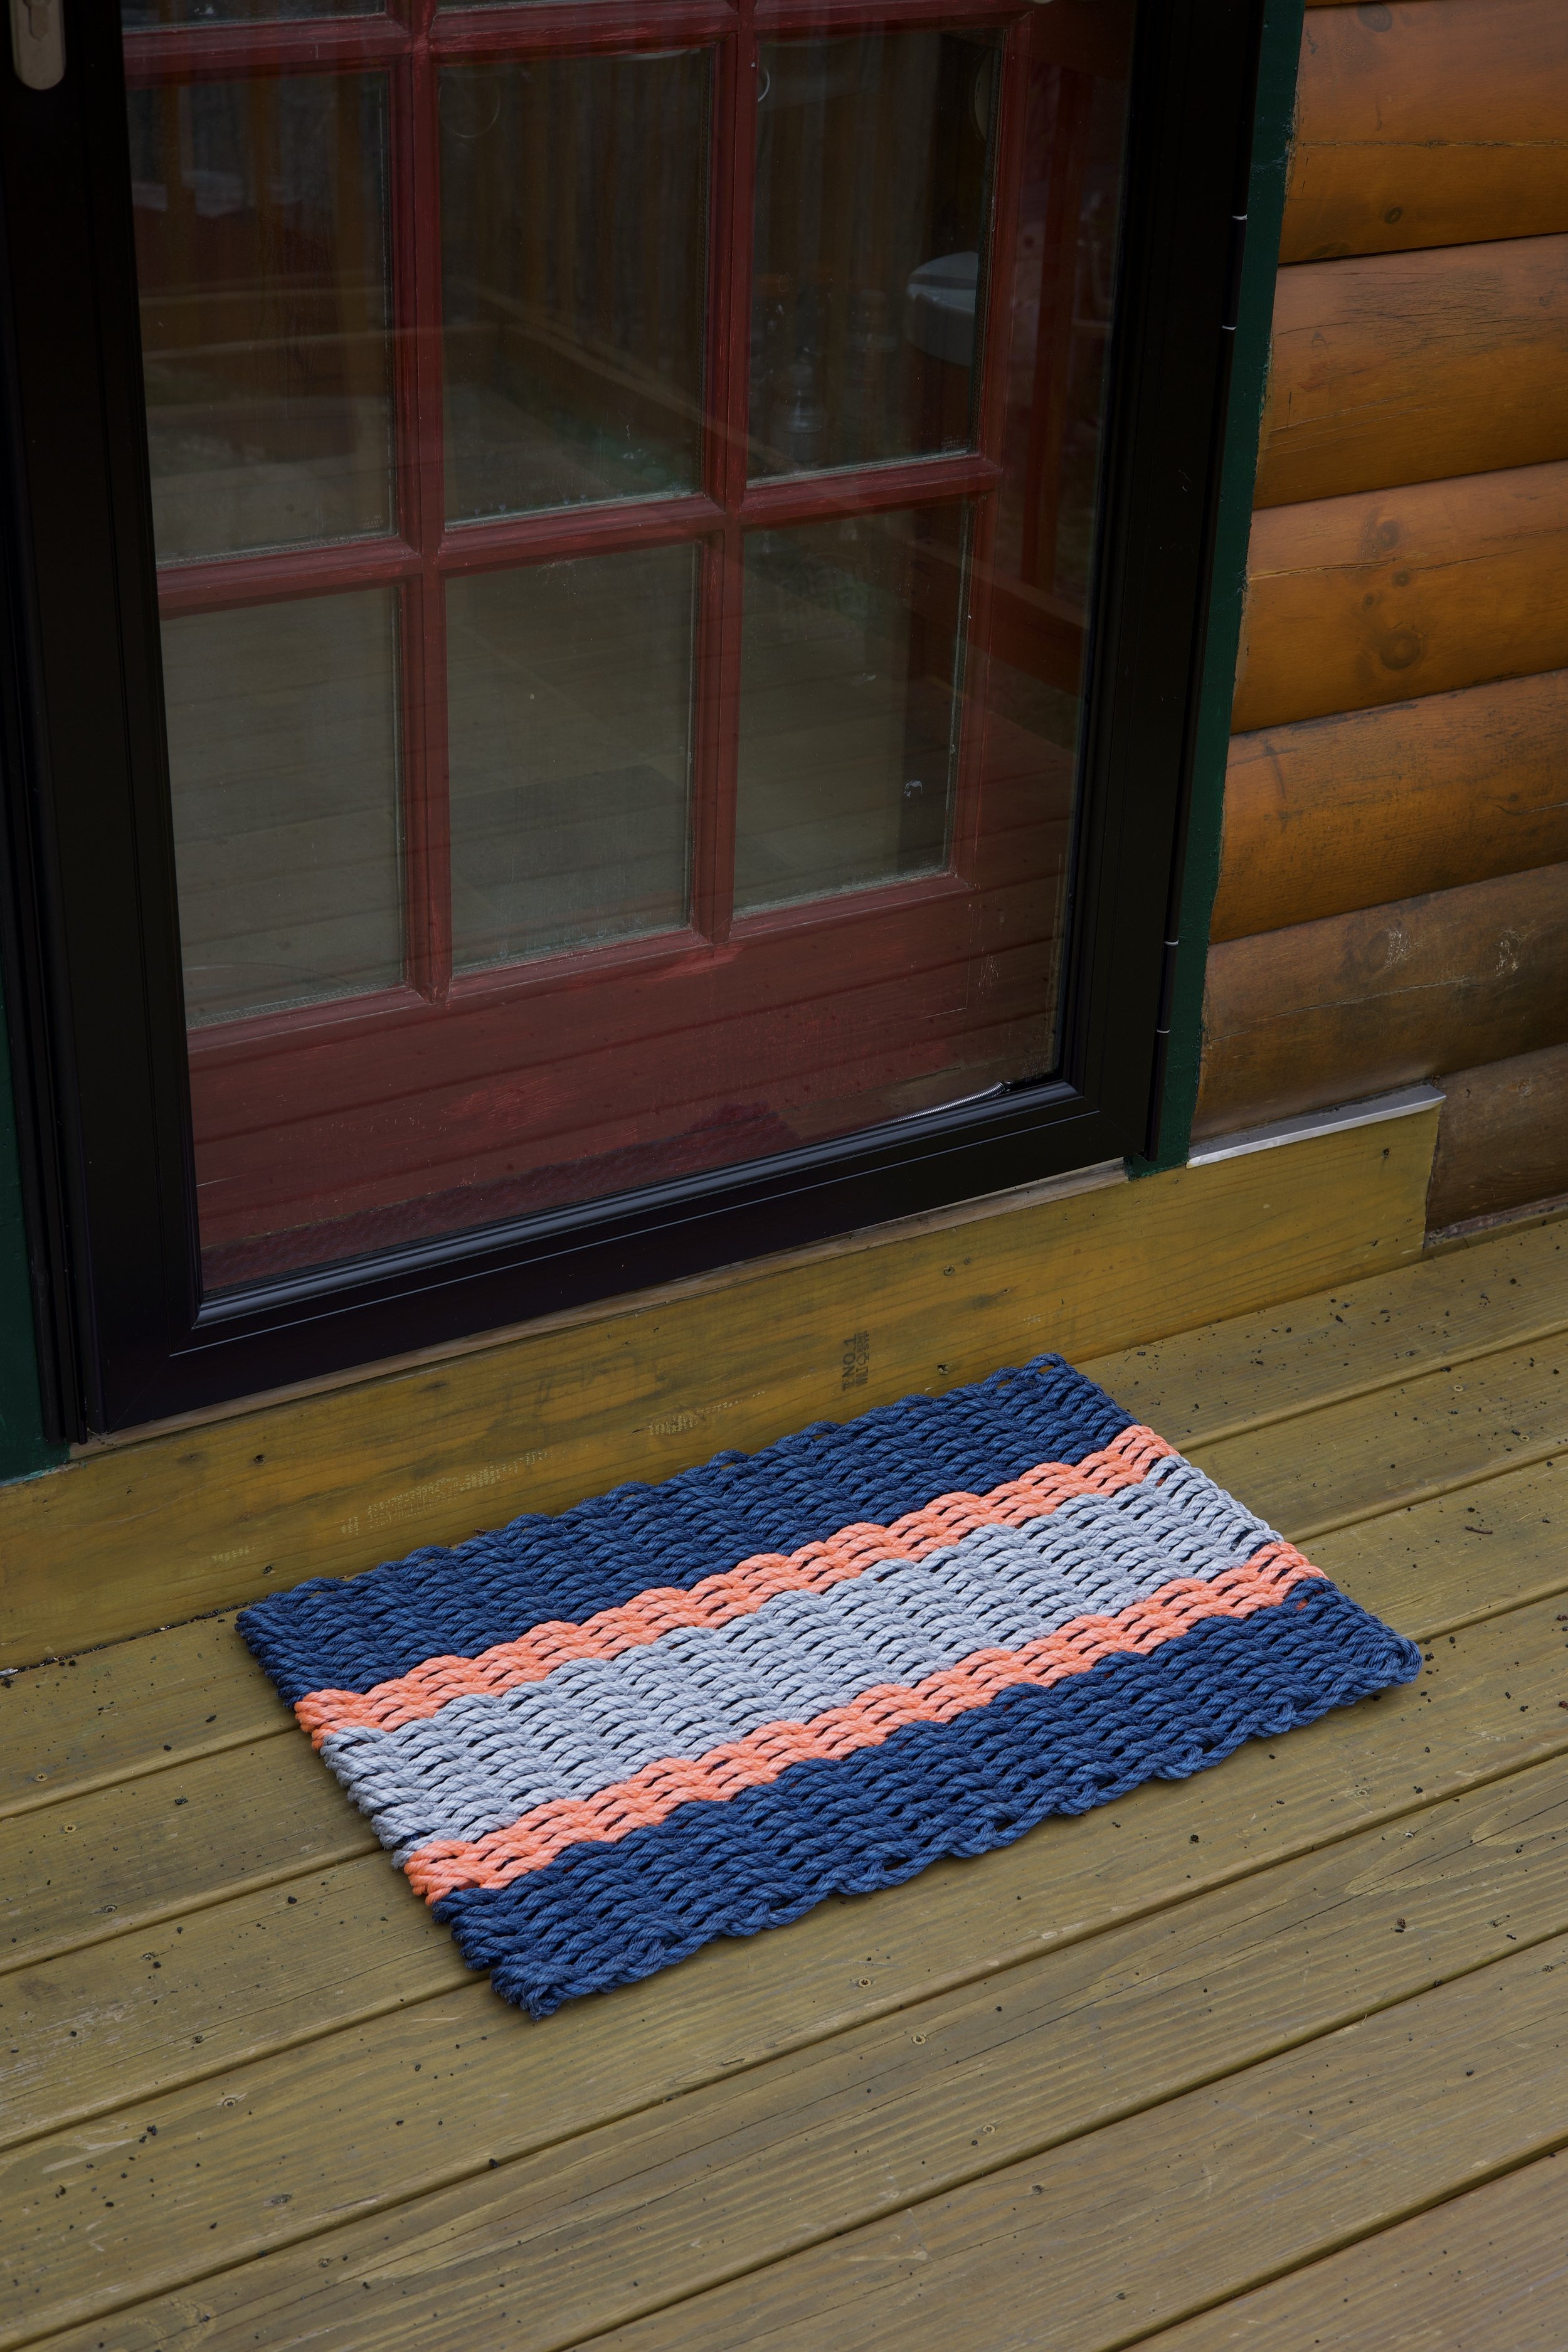
These mats also hold up well to our four-legged friends too - just make sure to wipe your paws before coming in the cabin! (PS - Maine Rope Mats also makes awesome dog leashes from soft but strong yacht braid rope. Those are definitely next on our wishlist.)
Perfect for Play Too
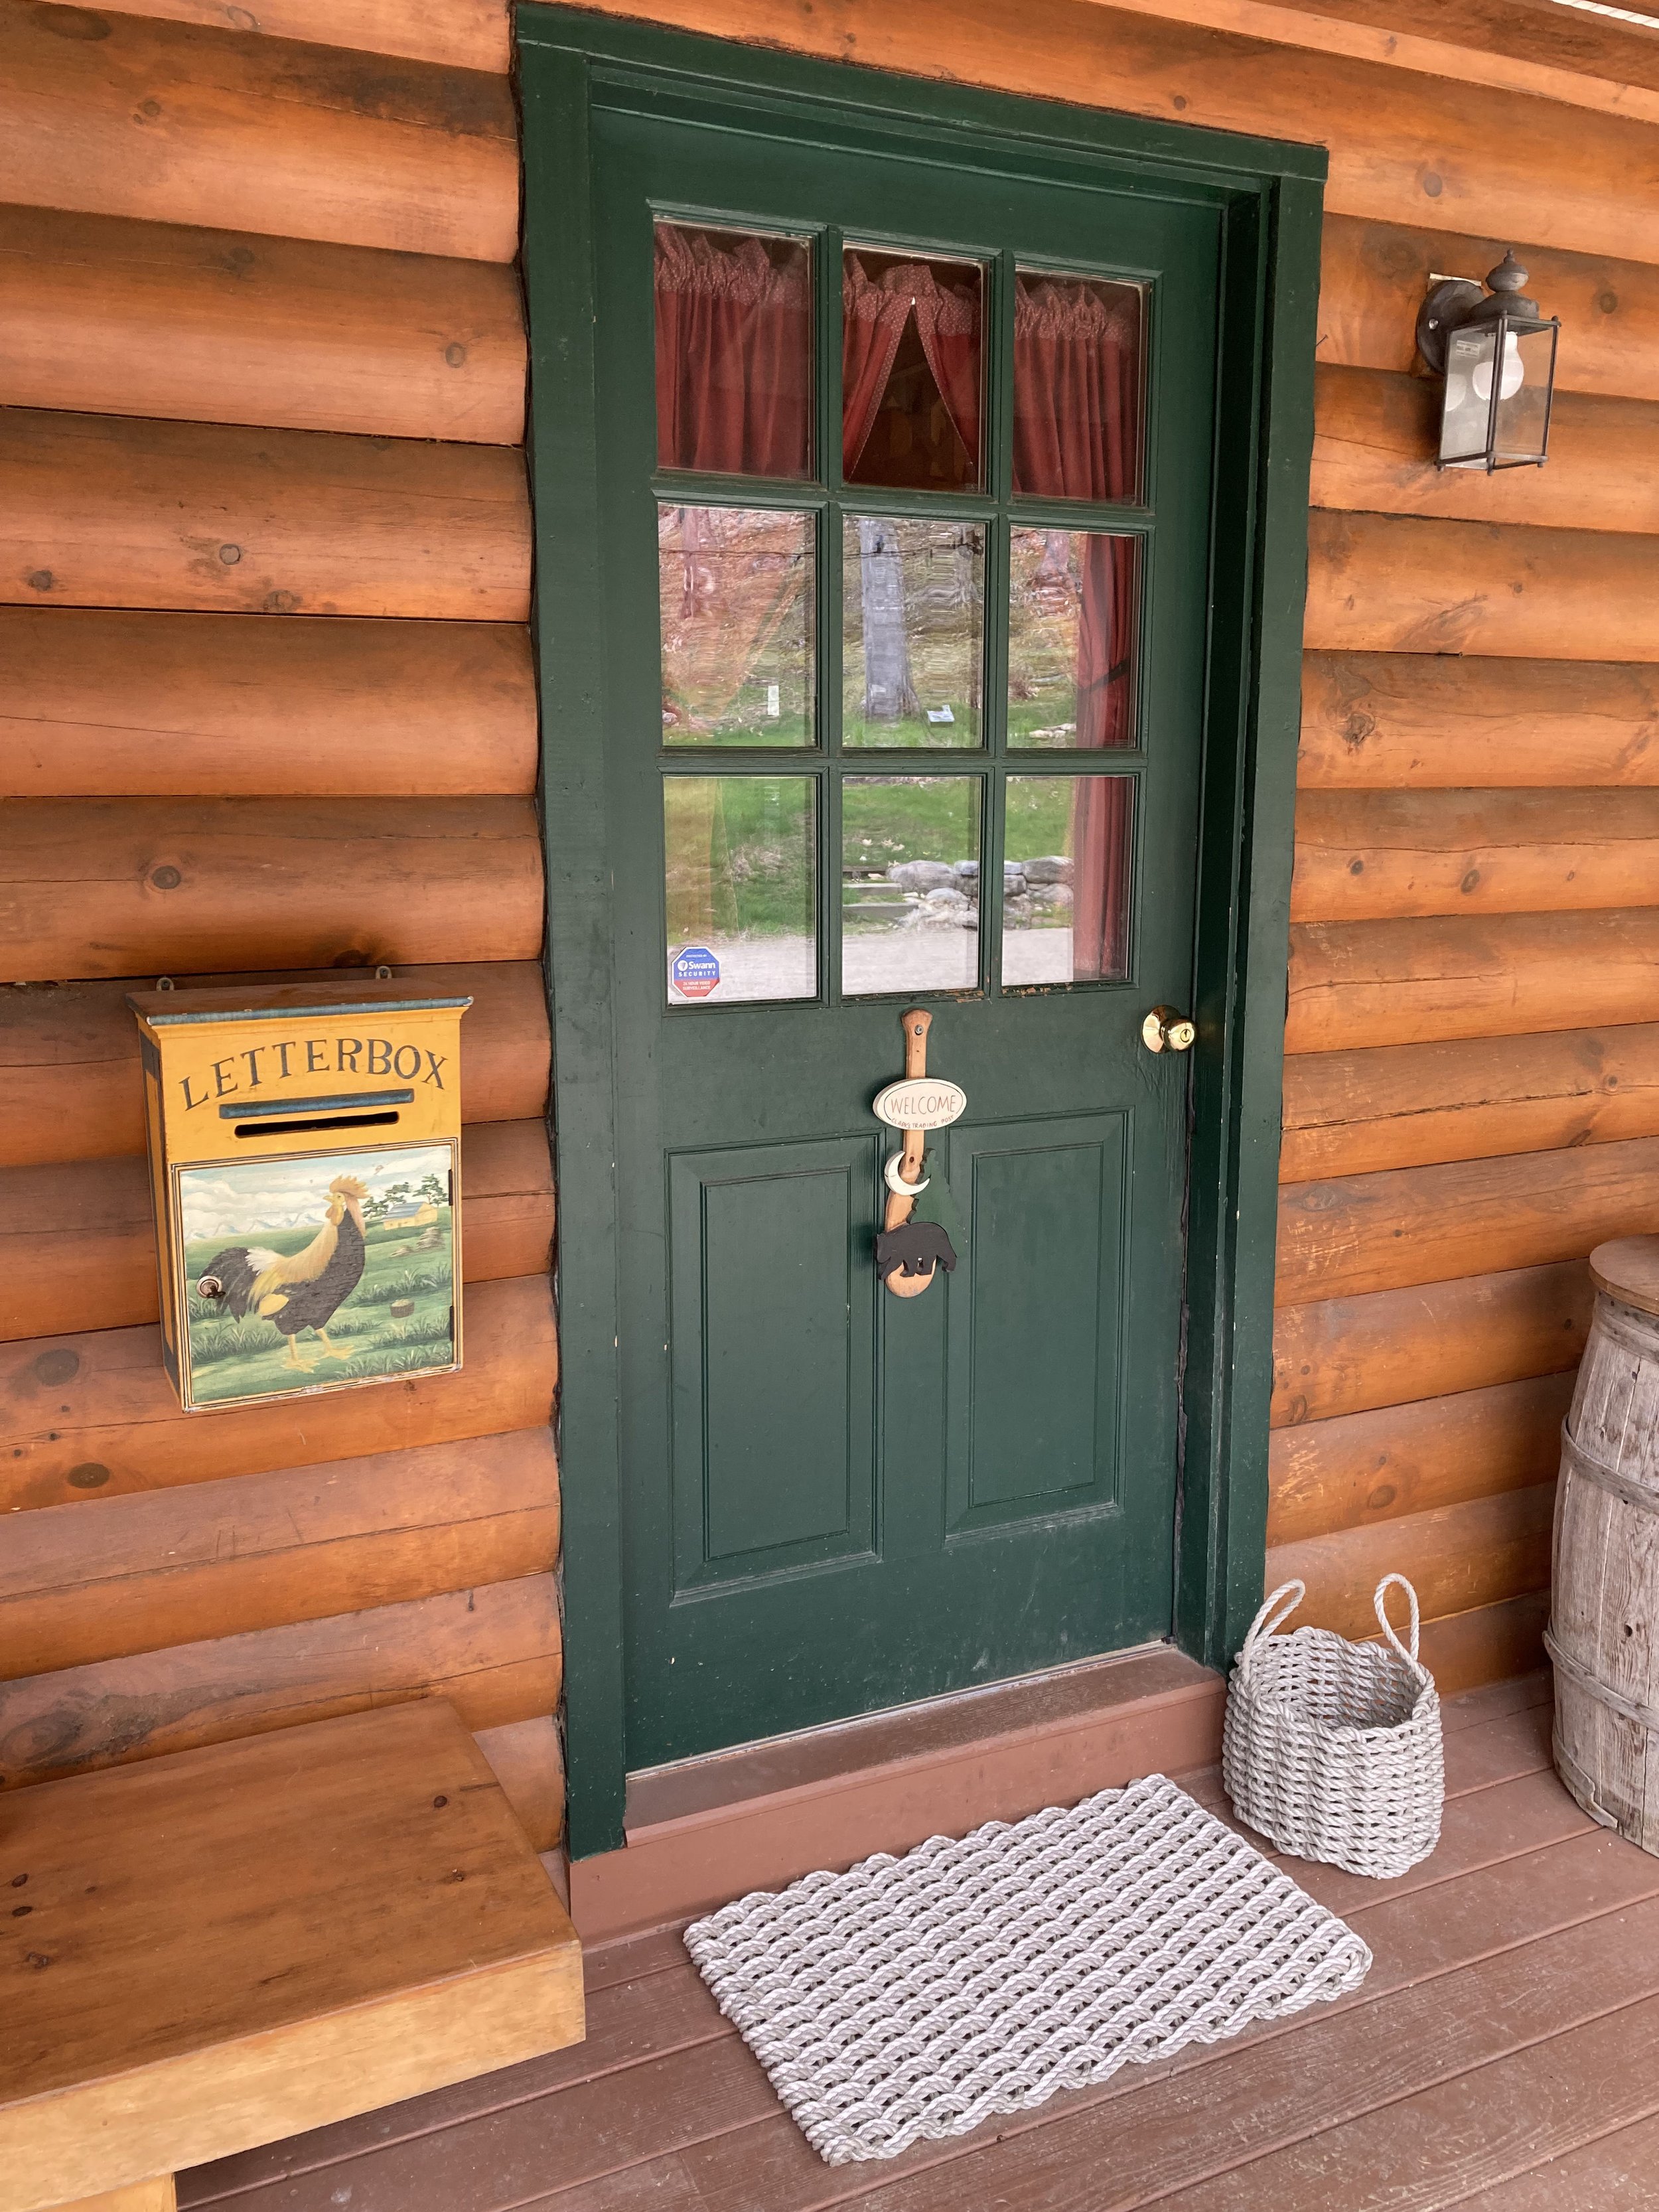
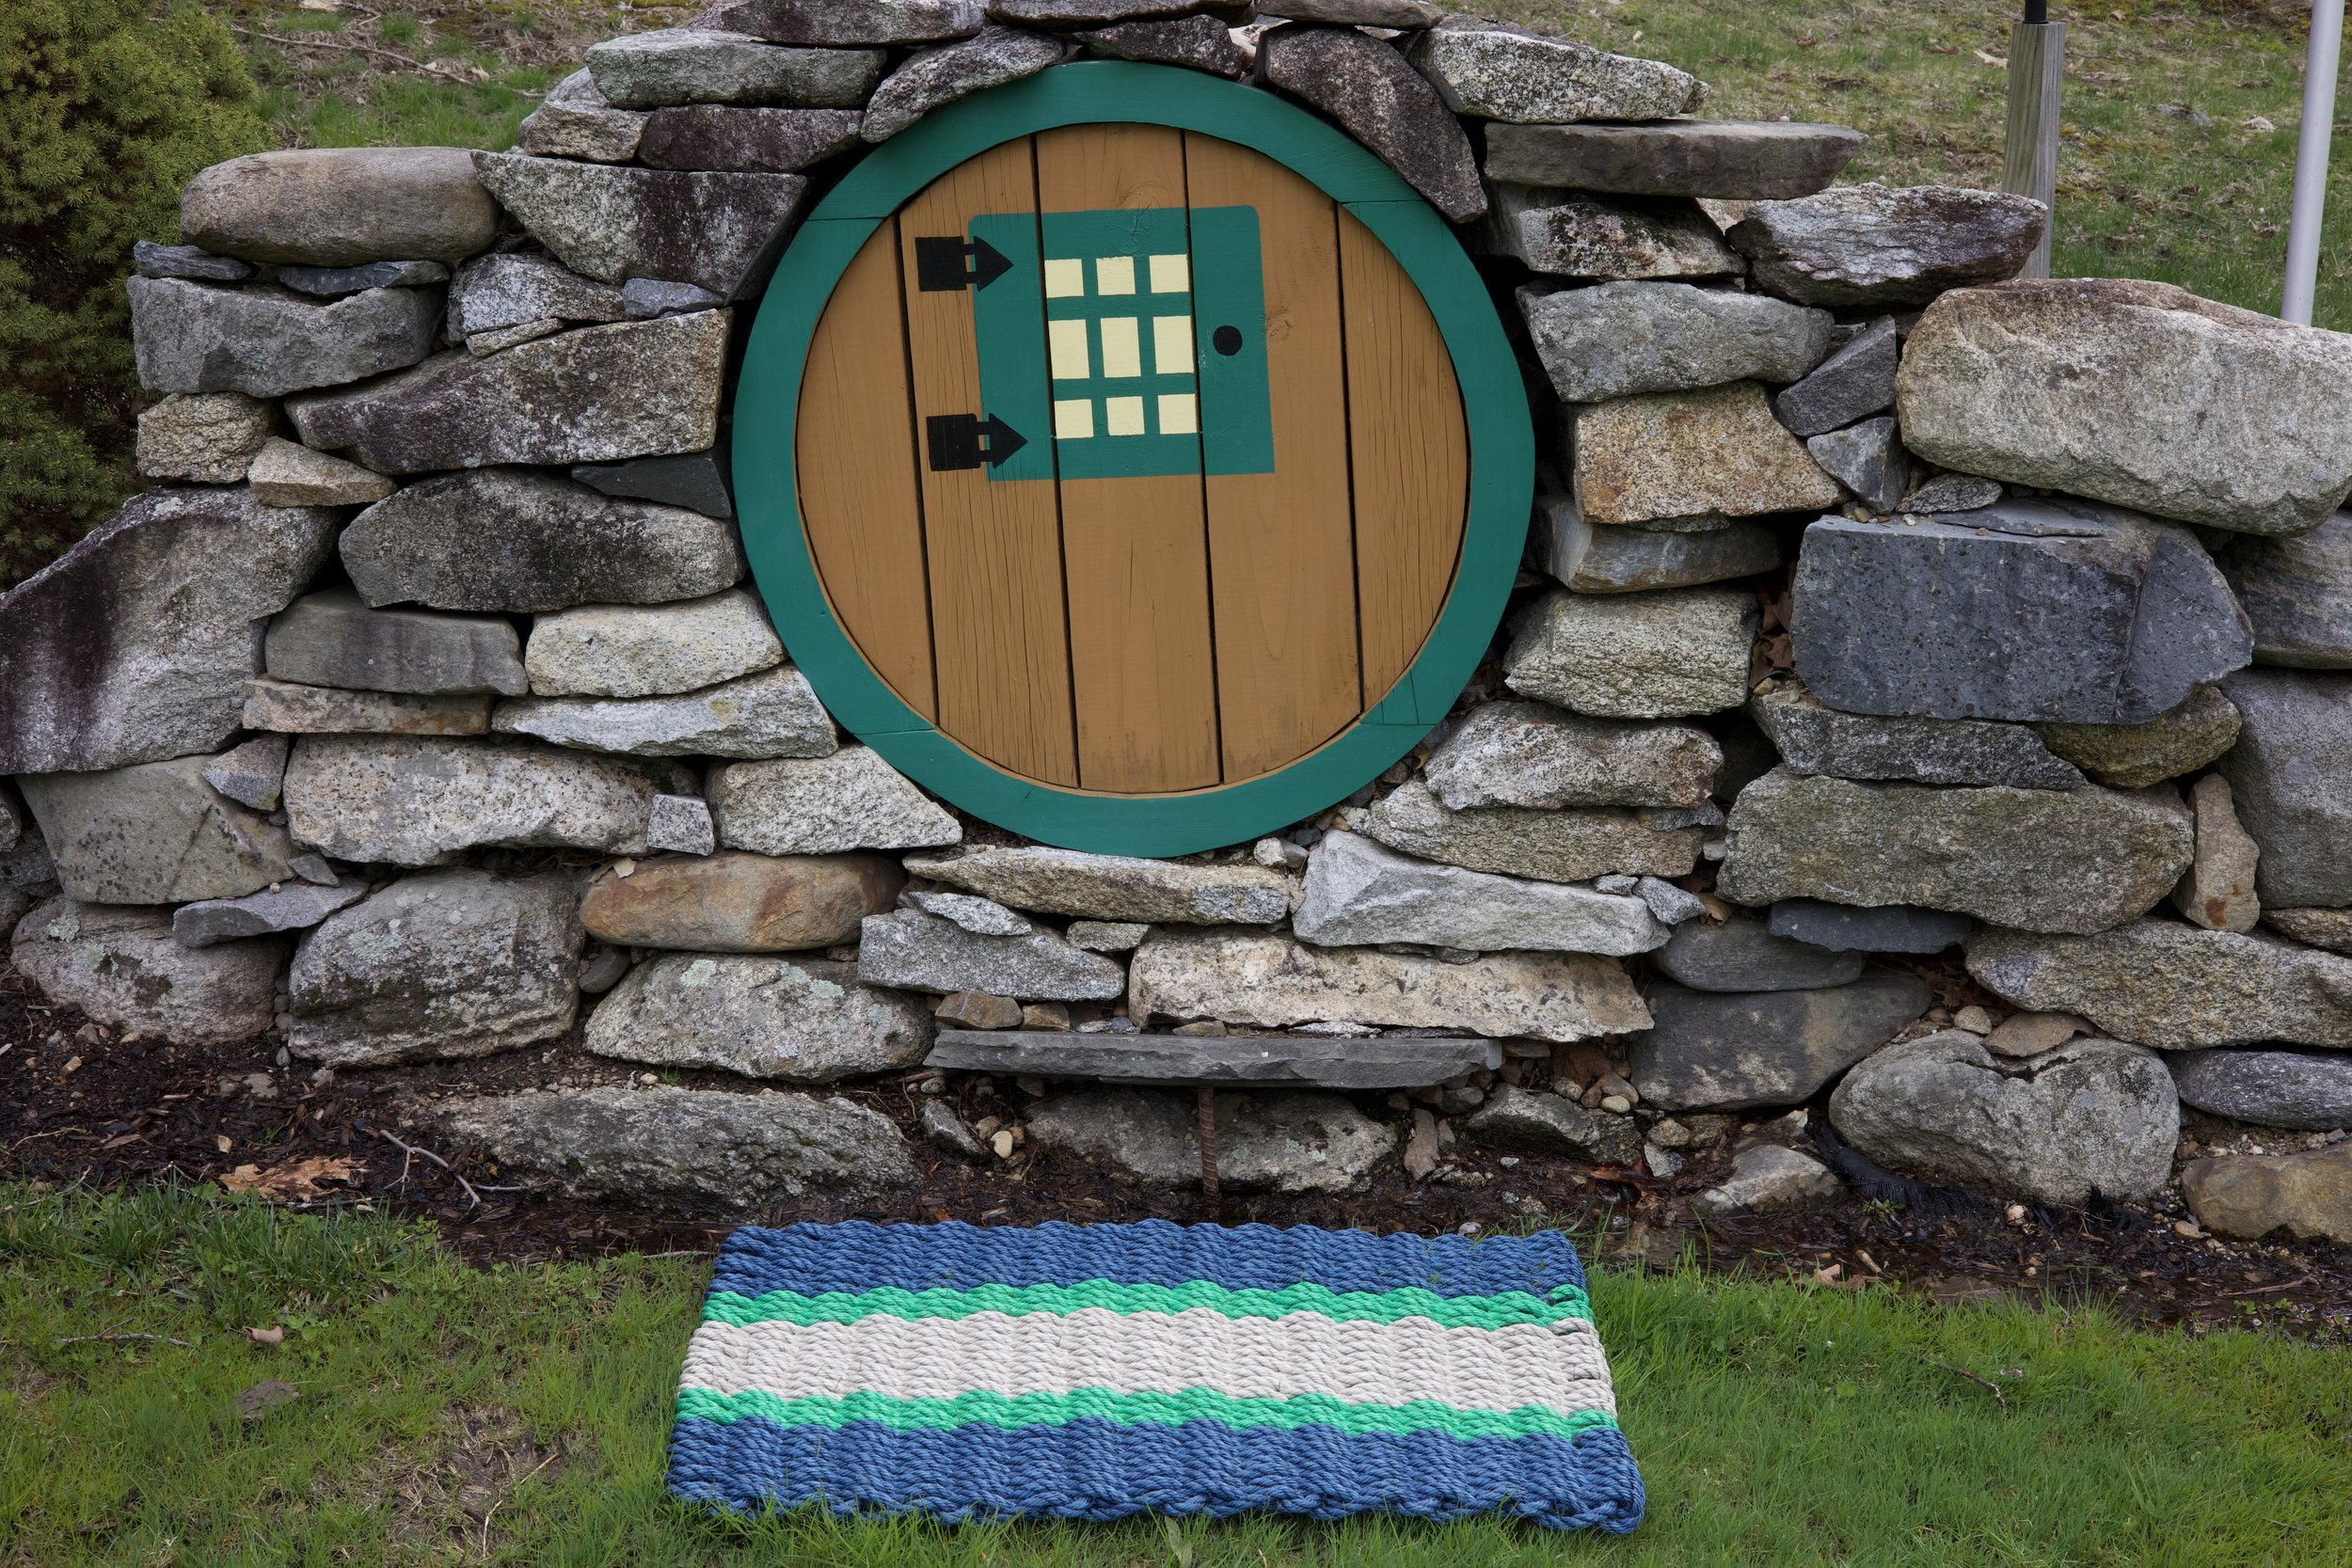
Maine Rope Mats are also the perfect addition to a child’s play house - or a Hobbit’s house ;) They add the perfect touch of whimsy and help keep sand and mud from getting tracked inside.
Here’s a pro-tip for all you campers out there: pack a Maine Rope Mat to put in front of your tent door. It really makes a huge difference in reducing the amount of mud and wood chips that get tracked into the tent. It also makes a great spot for the pup to hang out too.
We’re long-time fans of Maine Rope Mats are looking forward to many more years enjoying our rugged and stylish mats!
- I received these items for review from Maine Rope Mats but all opinions expressed are my own. Please see our full Disclosure Policy for more information -
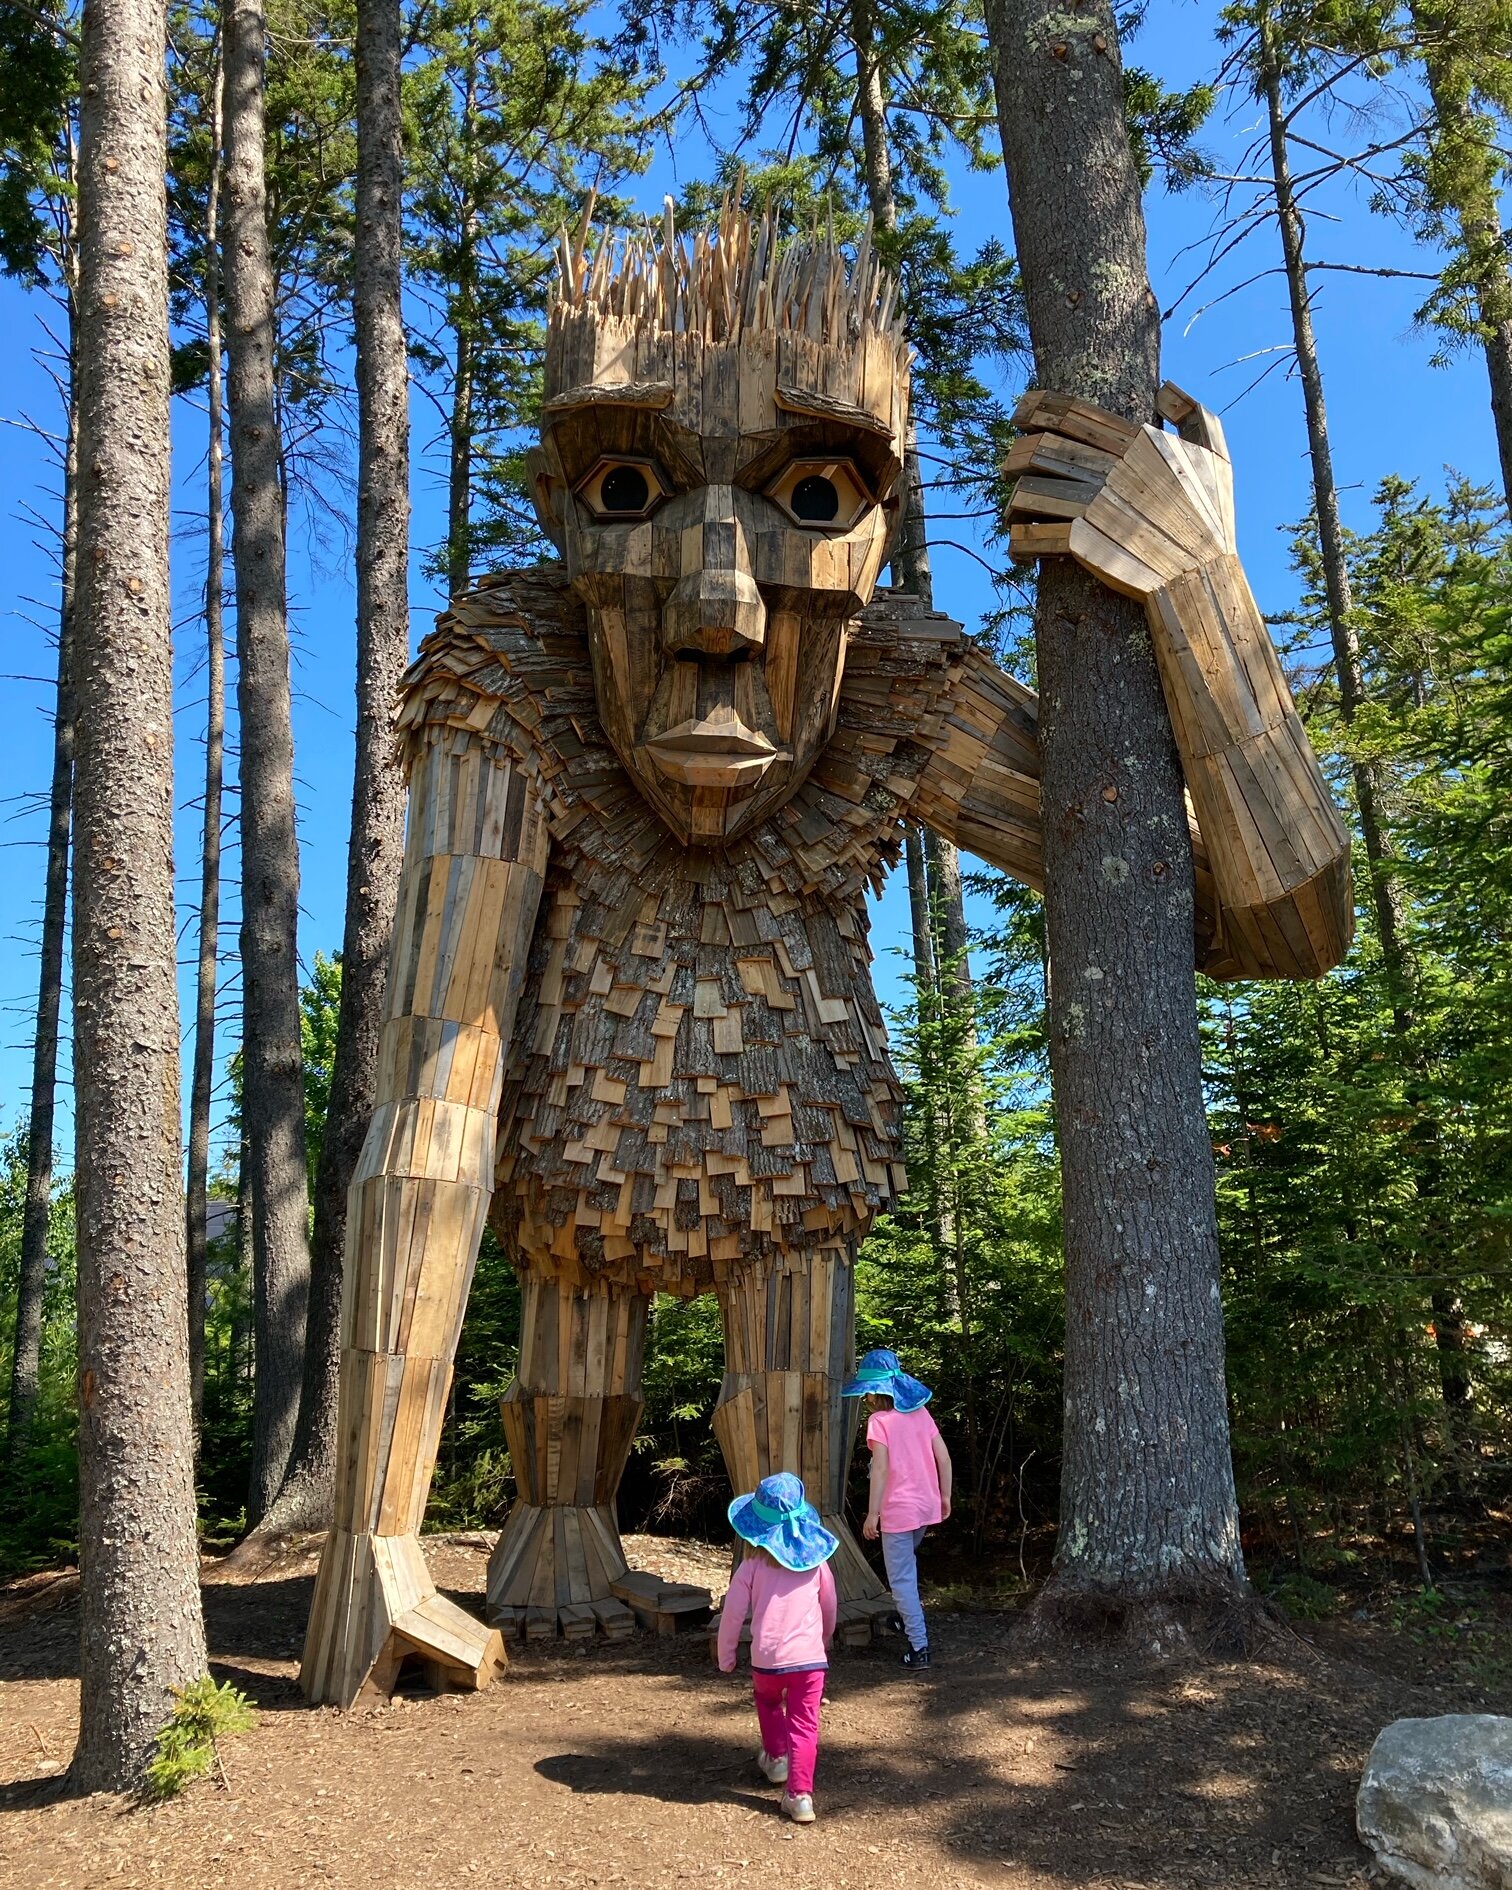
This past weekend we took a much needed day trip up to Boothbay, Maine to finally see the amazing Coastal Maine Botanical Gardens and its new art installation of giant trolls by Danish artist Thomas Dambo. The whole visit was beautiful and so fun. I’ve included a few photos here but they don’t do this magical place justice - the Gardens and the trolls must be seen in person if you ever have the chance! Here are a few tips and items of note from our trip. | This post contains affiliate links |
Tickets
Currently at this time Coastal Maine Botanical Gardens are requiring advanced purchased tickets only and your entry is timed (I believe this is for COVID precautions to help spread out visitors and limit the amount of visitors coming in at any one time to help reduce crowding). We purchased ours for one of the first time slots of the day and it was perfect. We found that the park was getting rather crowded by lunch so earlier was definitely better.
Masks
There were signs asking non-vaccinated guests to wear masks inside buildings, however we did not see that enforced. Nevertheless, we have been very COVID-cautious ourselves and made sure our kids put on their masks when we passed through the entrance building and when we left, also we had them put them on whenever we went into any other enclosed spaces.
The Trolls
There are five giant Trolls tucked away in the woods throughout the park. The map in the brochure was a bit confusing and it was difficult to tell exactly which paths some of them were on, but after a quick conversation with a very helpful gardener we had a good plan to see them all. At most of the trolls there were groups gathered to take photos but everyone was very respectful, waited their turn, and gave space so each group could take good photos with the trolls which was very nice.
So Much to Explore
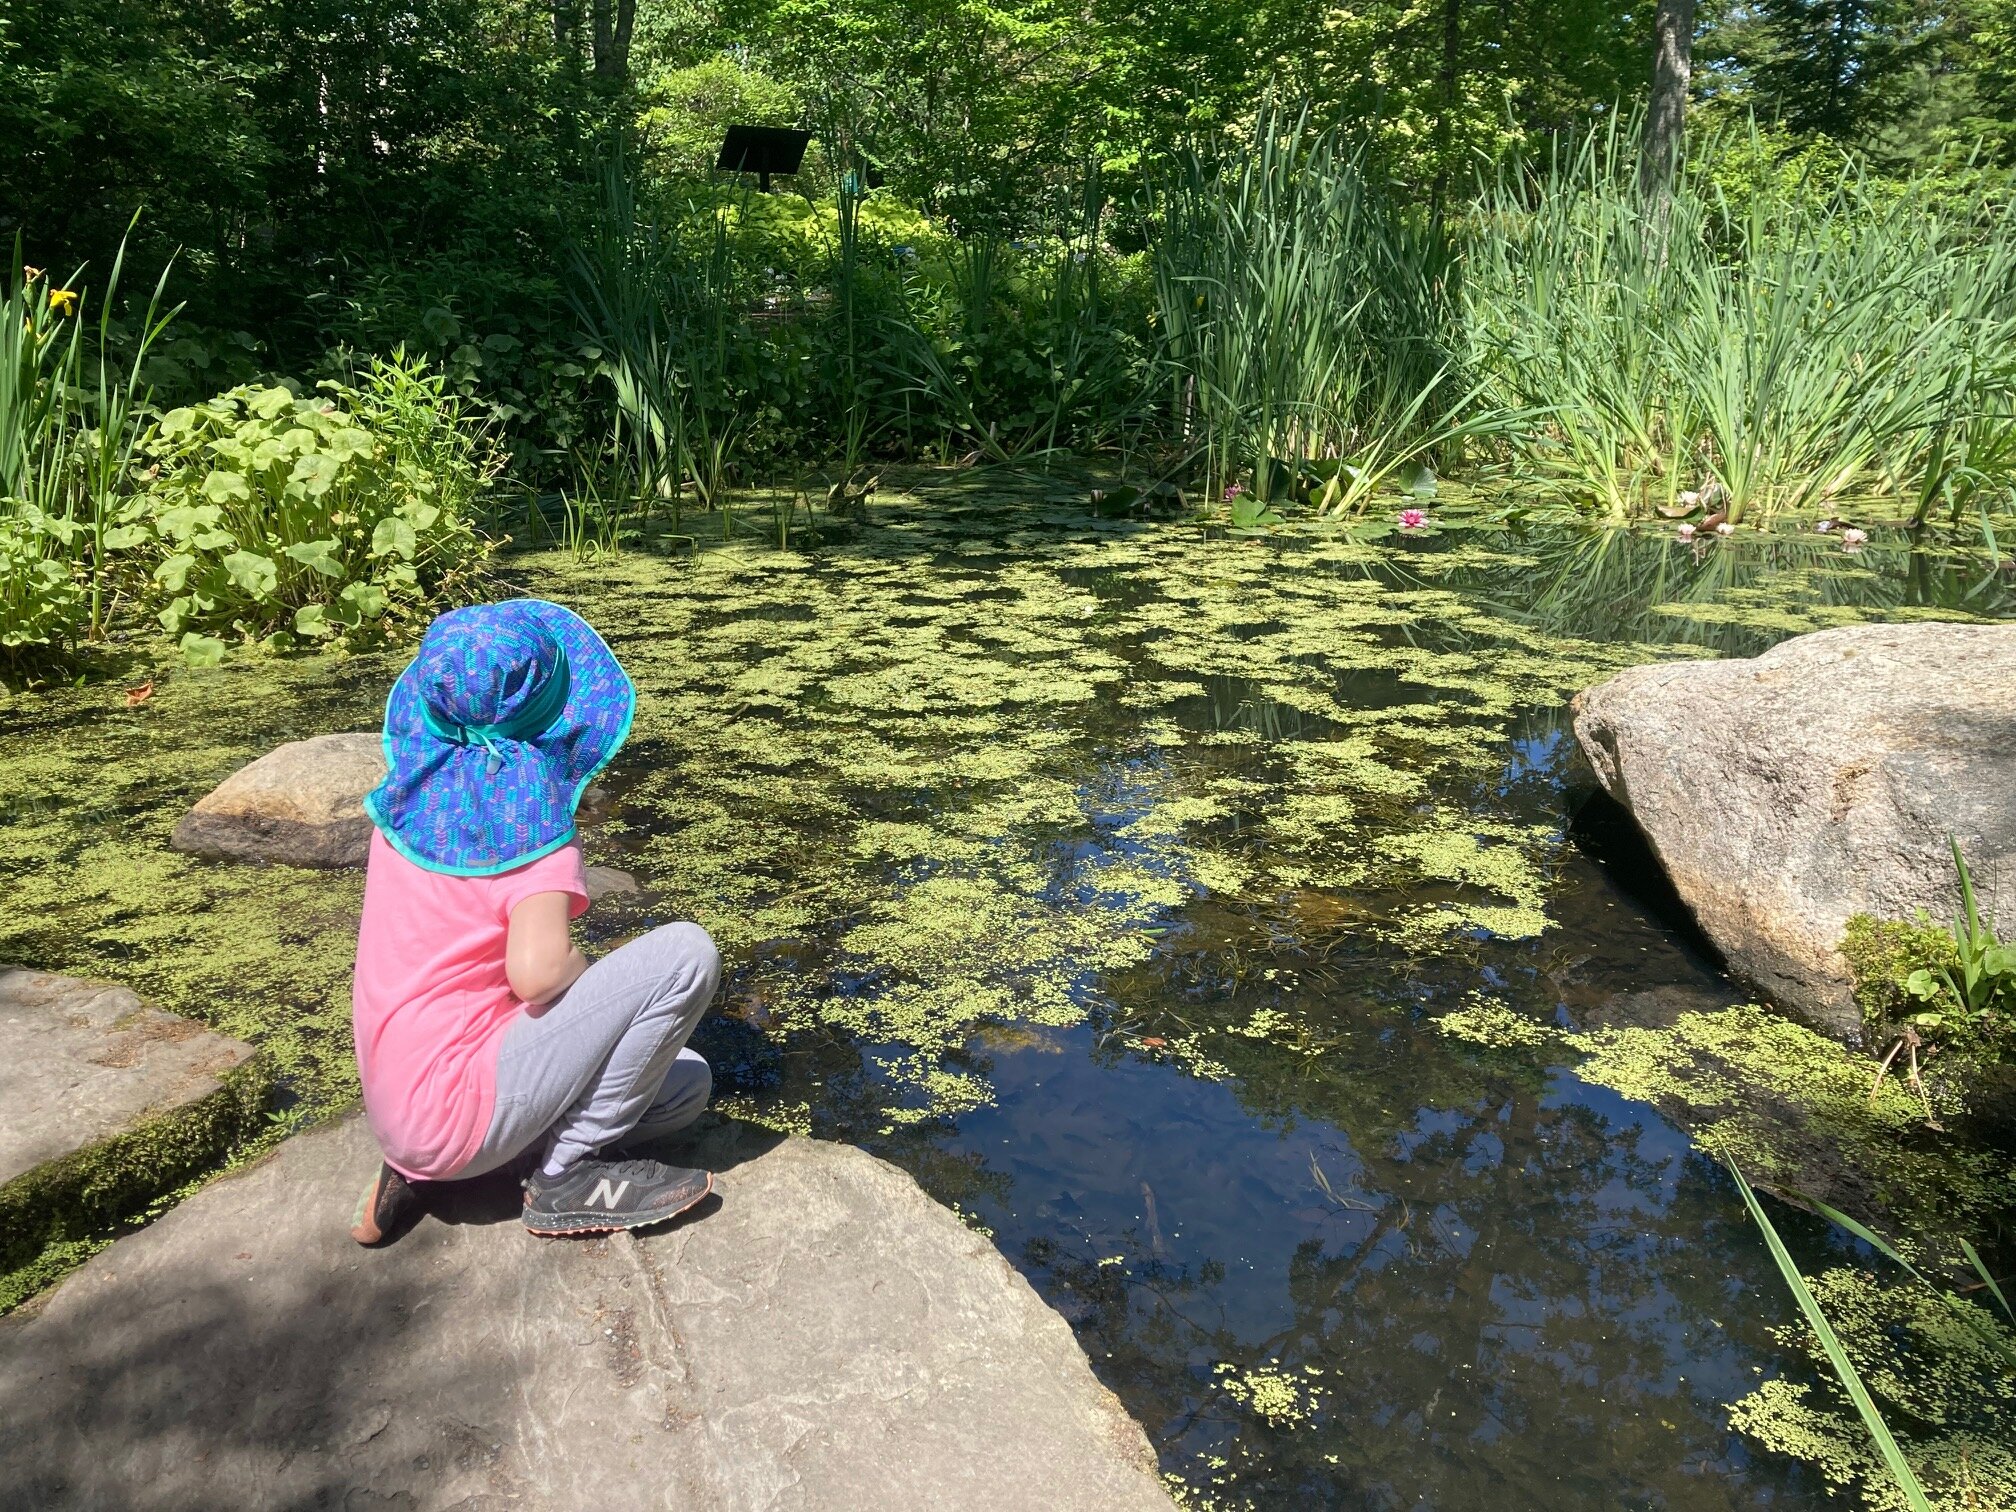
Besides the incredible trolls, there are miles of hiking trails and so many gardens to explore. We spent several hours there and didn’t even see most of them. Our favorite areas were the Children’s Gardens with its whimsical flowers, buildings, and animals, and the various ponds and fountains. Our kids especially loved watching the tadpoles (SO many tadpoles!) and turtles in the ponds.
We got lots of compliments on our kids' matching sunhats too! They are our absolute favorite ones by Sunday Afternoons.
Lunch
We headed out early afternoon when it started to get very hot and crowded but we easily could have stayed and explored longer! There was an on-site cafe that had grab-n-go food that looked great but we decided to forgo that and opt for seafood on the way home (when in Maine). We would have loved to stop at Red’s Eats in Wiscasset but the line was down the block when we went by, so we got takeout from Sea Basket instead and ate our weight in fried seafood and lobster rolls - it hit the spot.
Overall it was a beautiful day to get out and explore this beautiful place with our family - we’re already planning on coming back later in the summer to see everything with different plants in bloom.
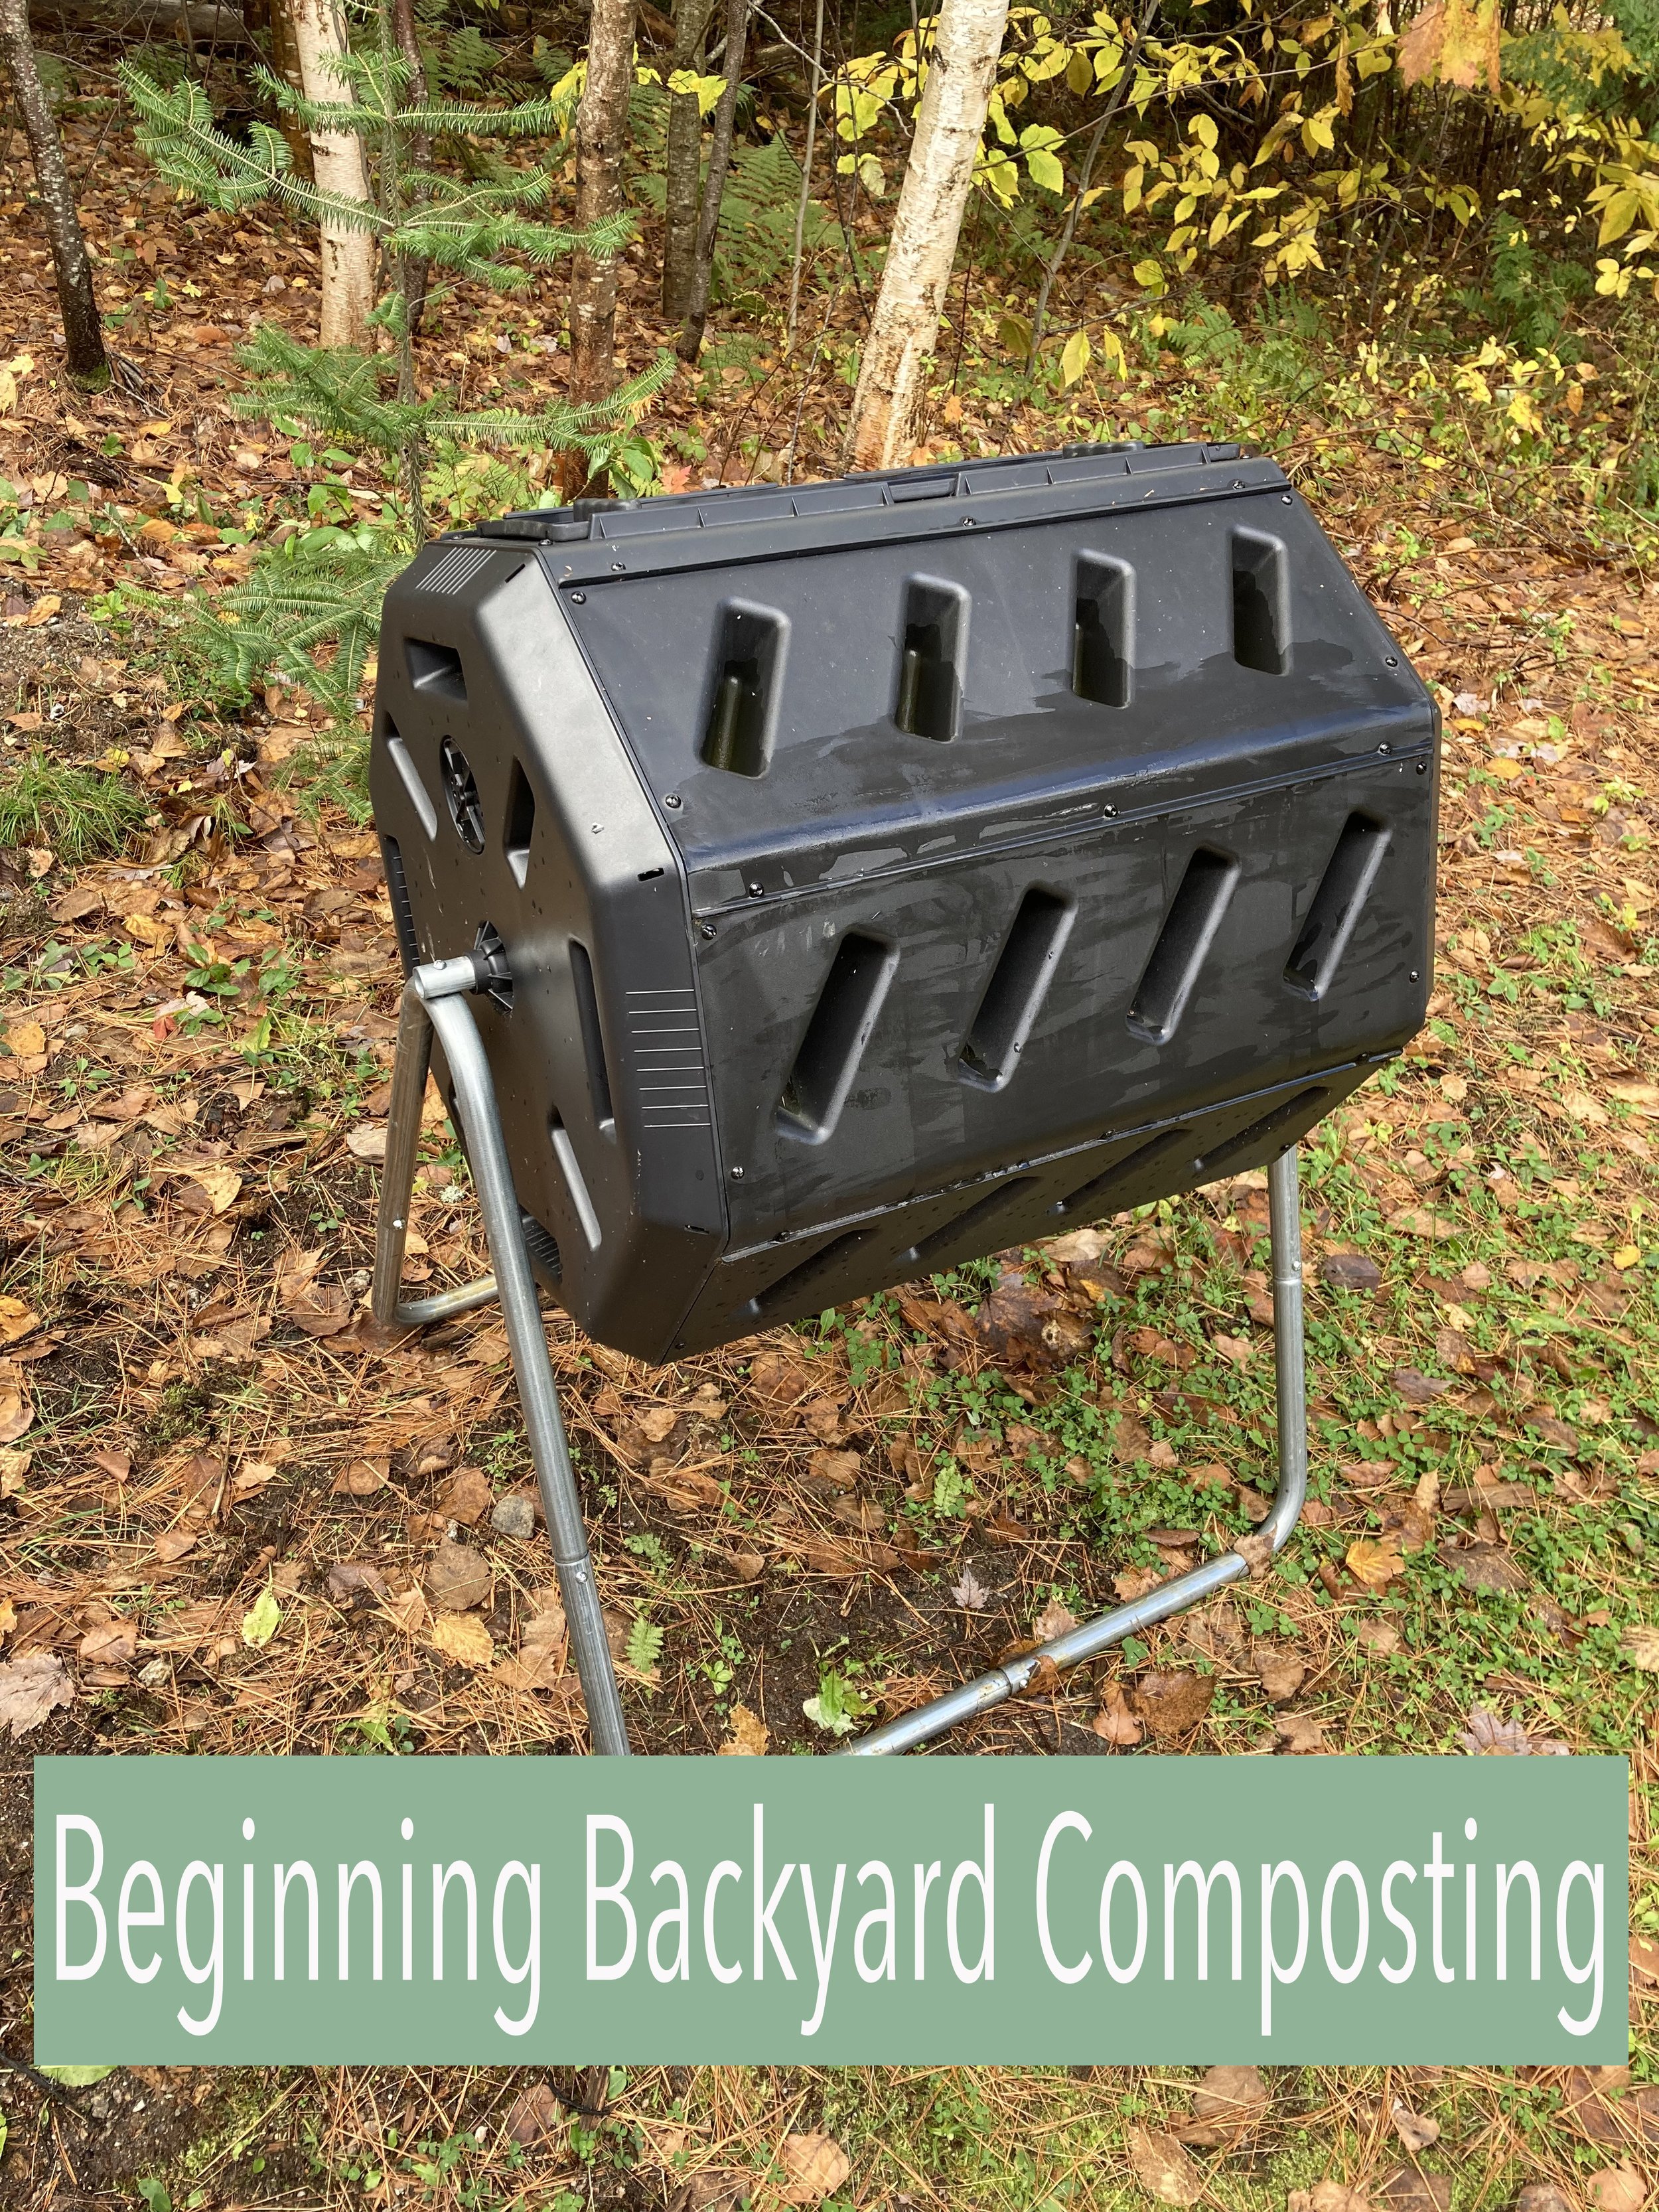
This year we finally jumped on the backyard composting bandwagon. We’ve been wanting to make more eco-friendly choices around our home and decided a big step we could make would be trying to eliminate as much food waste going into our household trash as possible. | This post contains affiliate links |
Composting has a lot of benefits. Some of which include reducing the amount of decomposing matter filling our landfills as well as producing nutrient-rich garden soil to benefit your own yard and garden.
Getting Set Up
When it comes to composting, you could just make a pile in the corner of your yard or make your own bin with some scrap wood or fence. However, we decided to opt for a tumbler-style bin since we were looking for something compact, self-contained, and efficient.
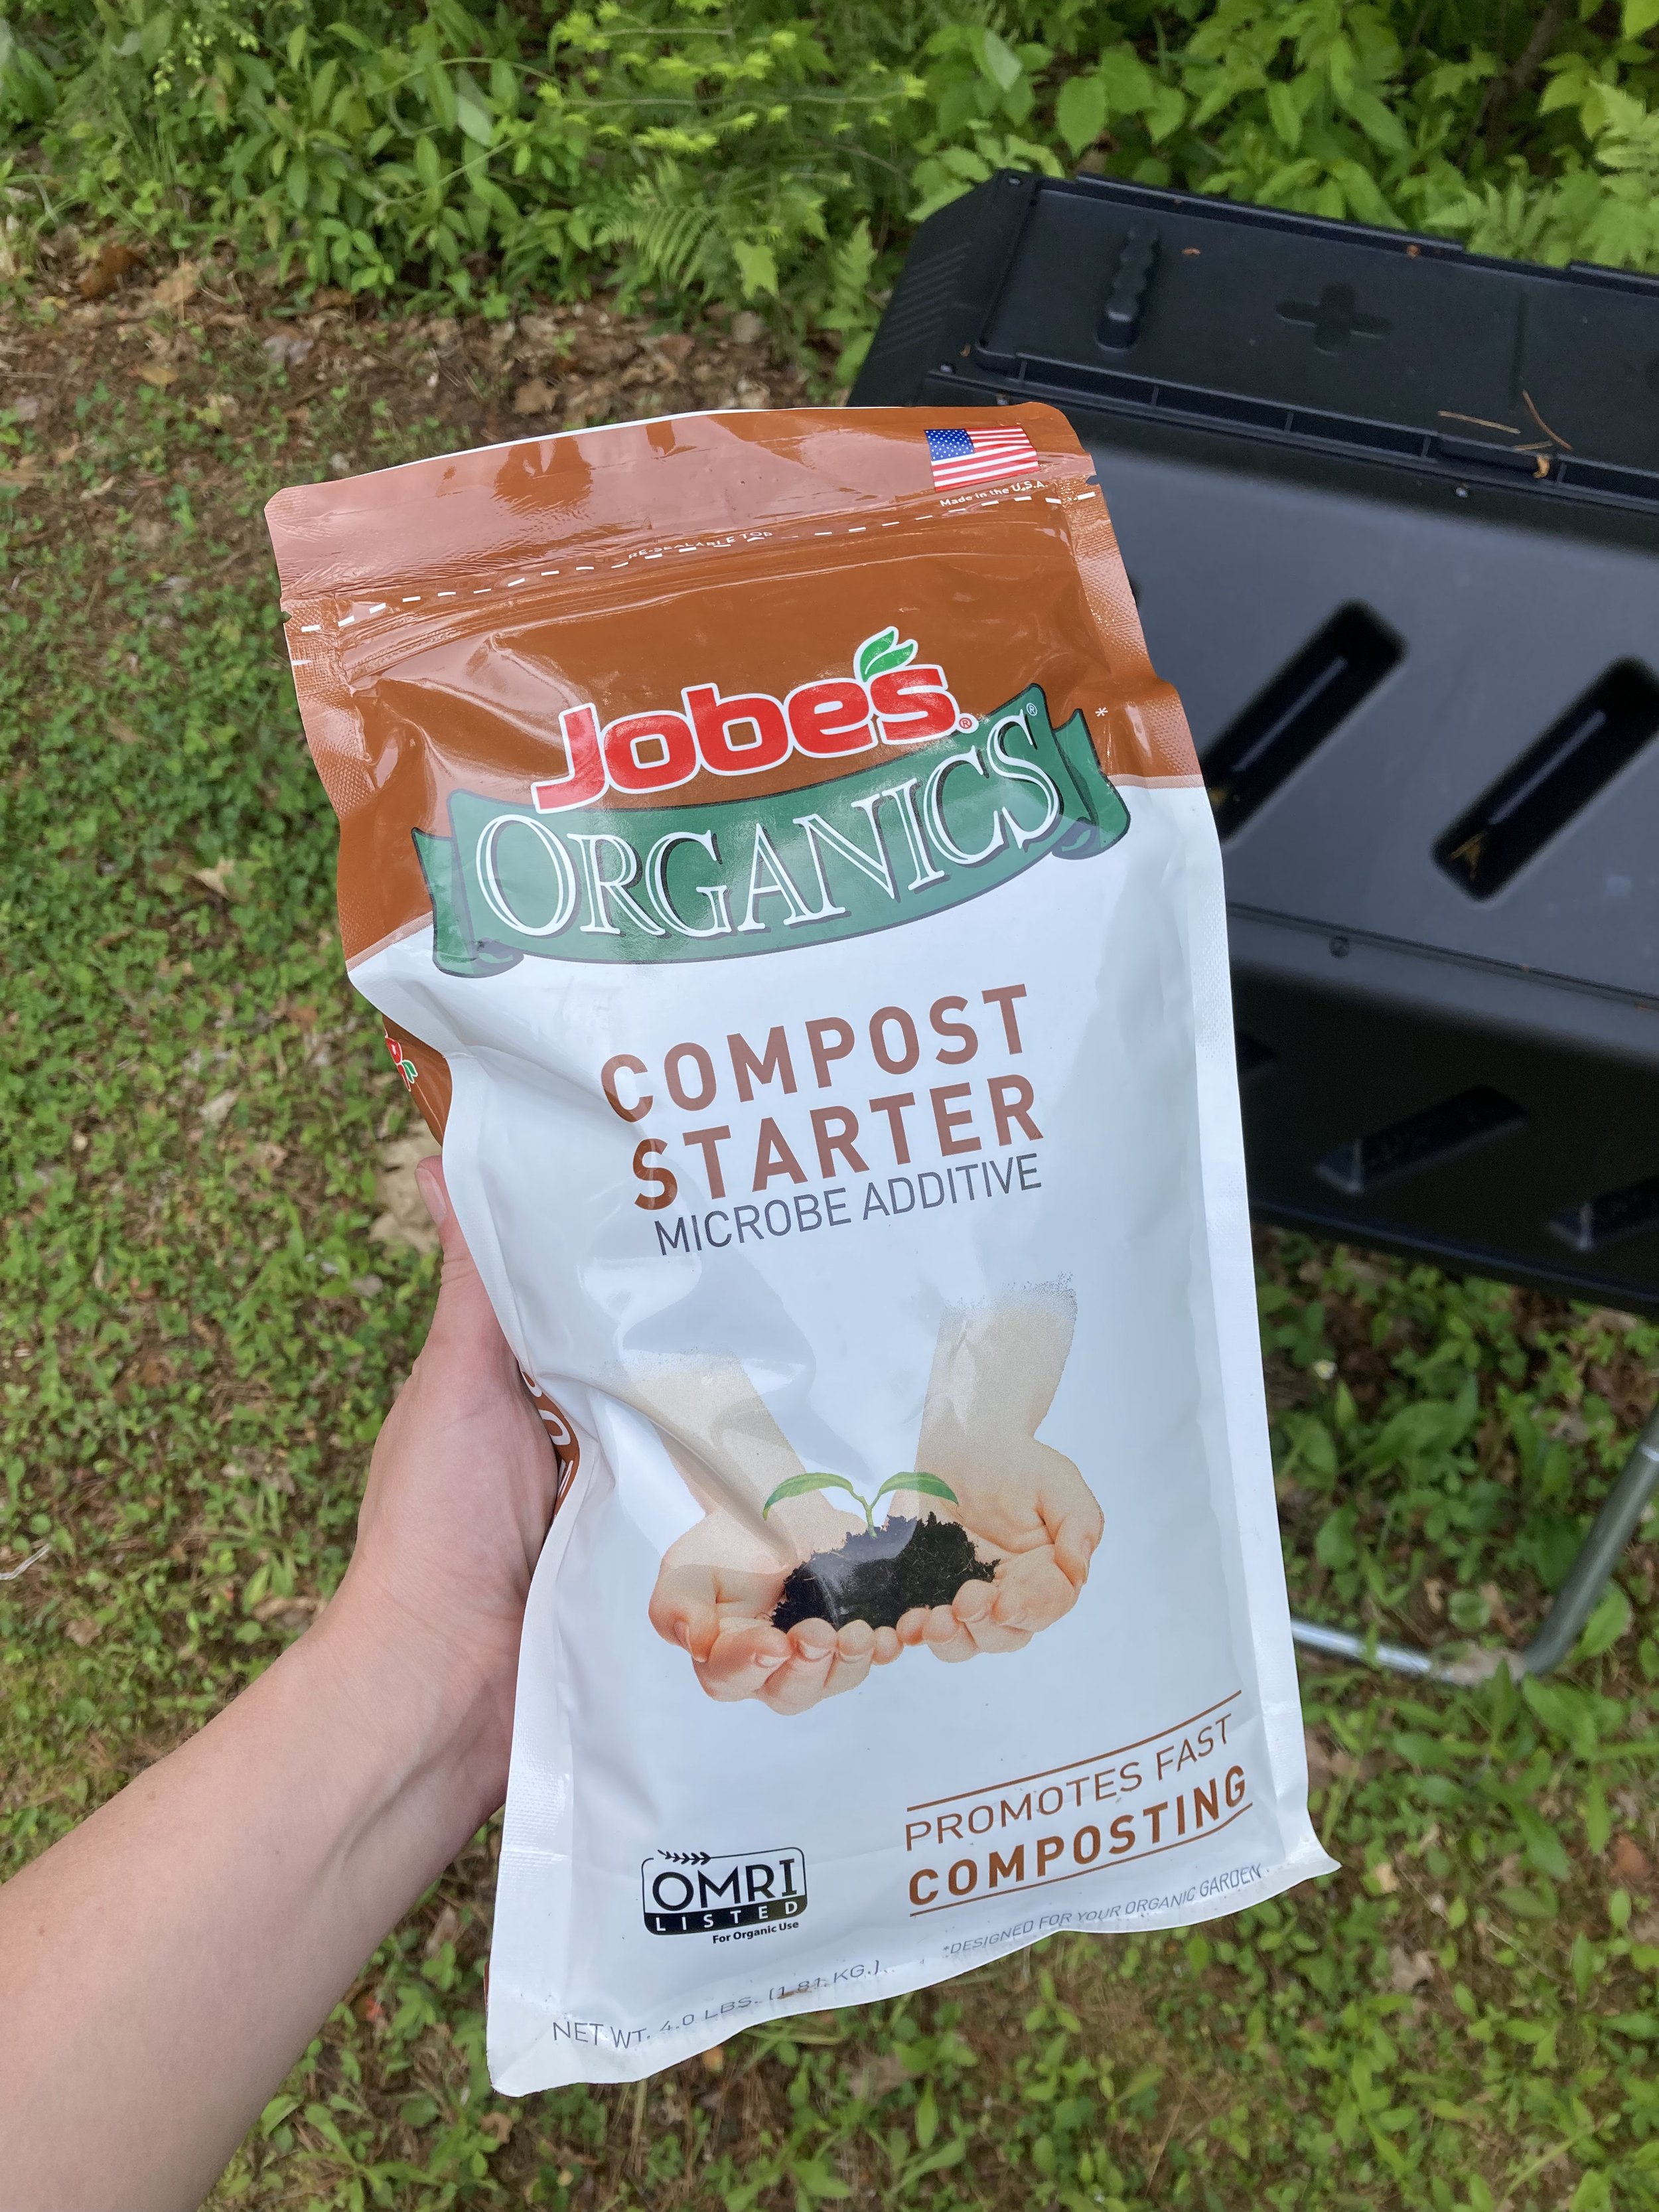
Once you decide on your compost set-up it's important to add some good microbes to "get the party started" and create a good environment for breaking down your food and yard waste. To do this you can add a shovel-full of garden dirt from your own garden to introduce some microbes, or you can buy some specialty compost starter to add to your composter (just follow the package directions).
Composting
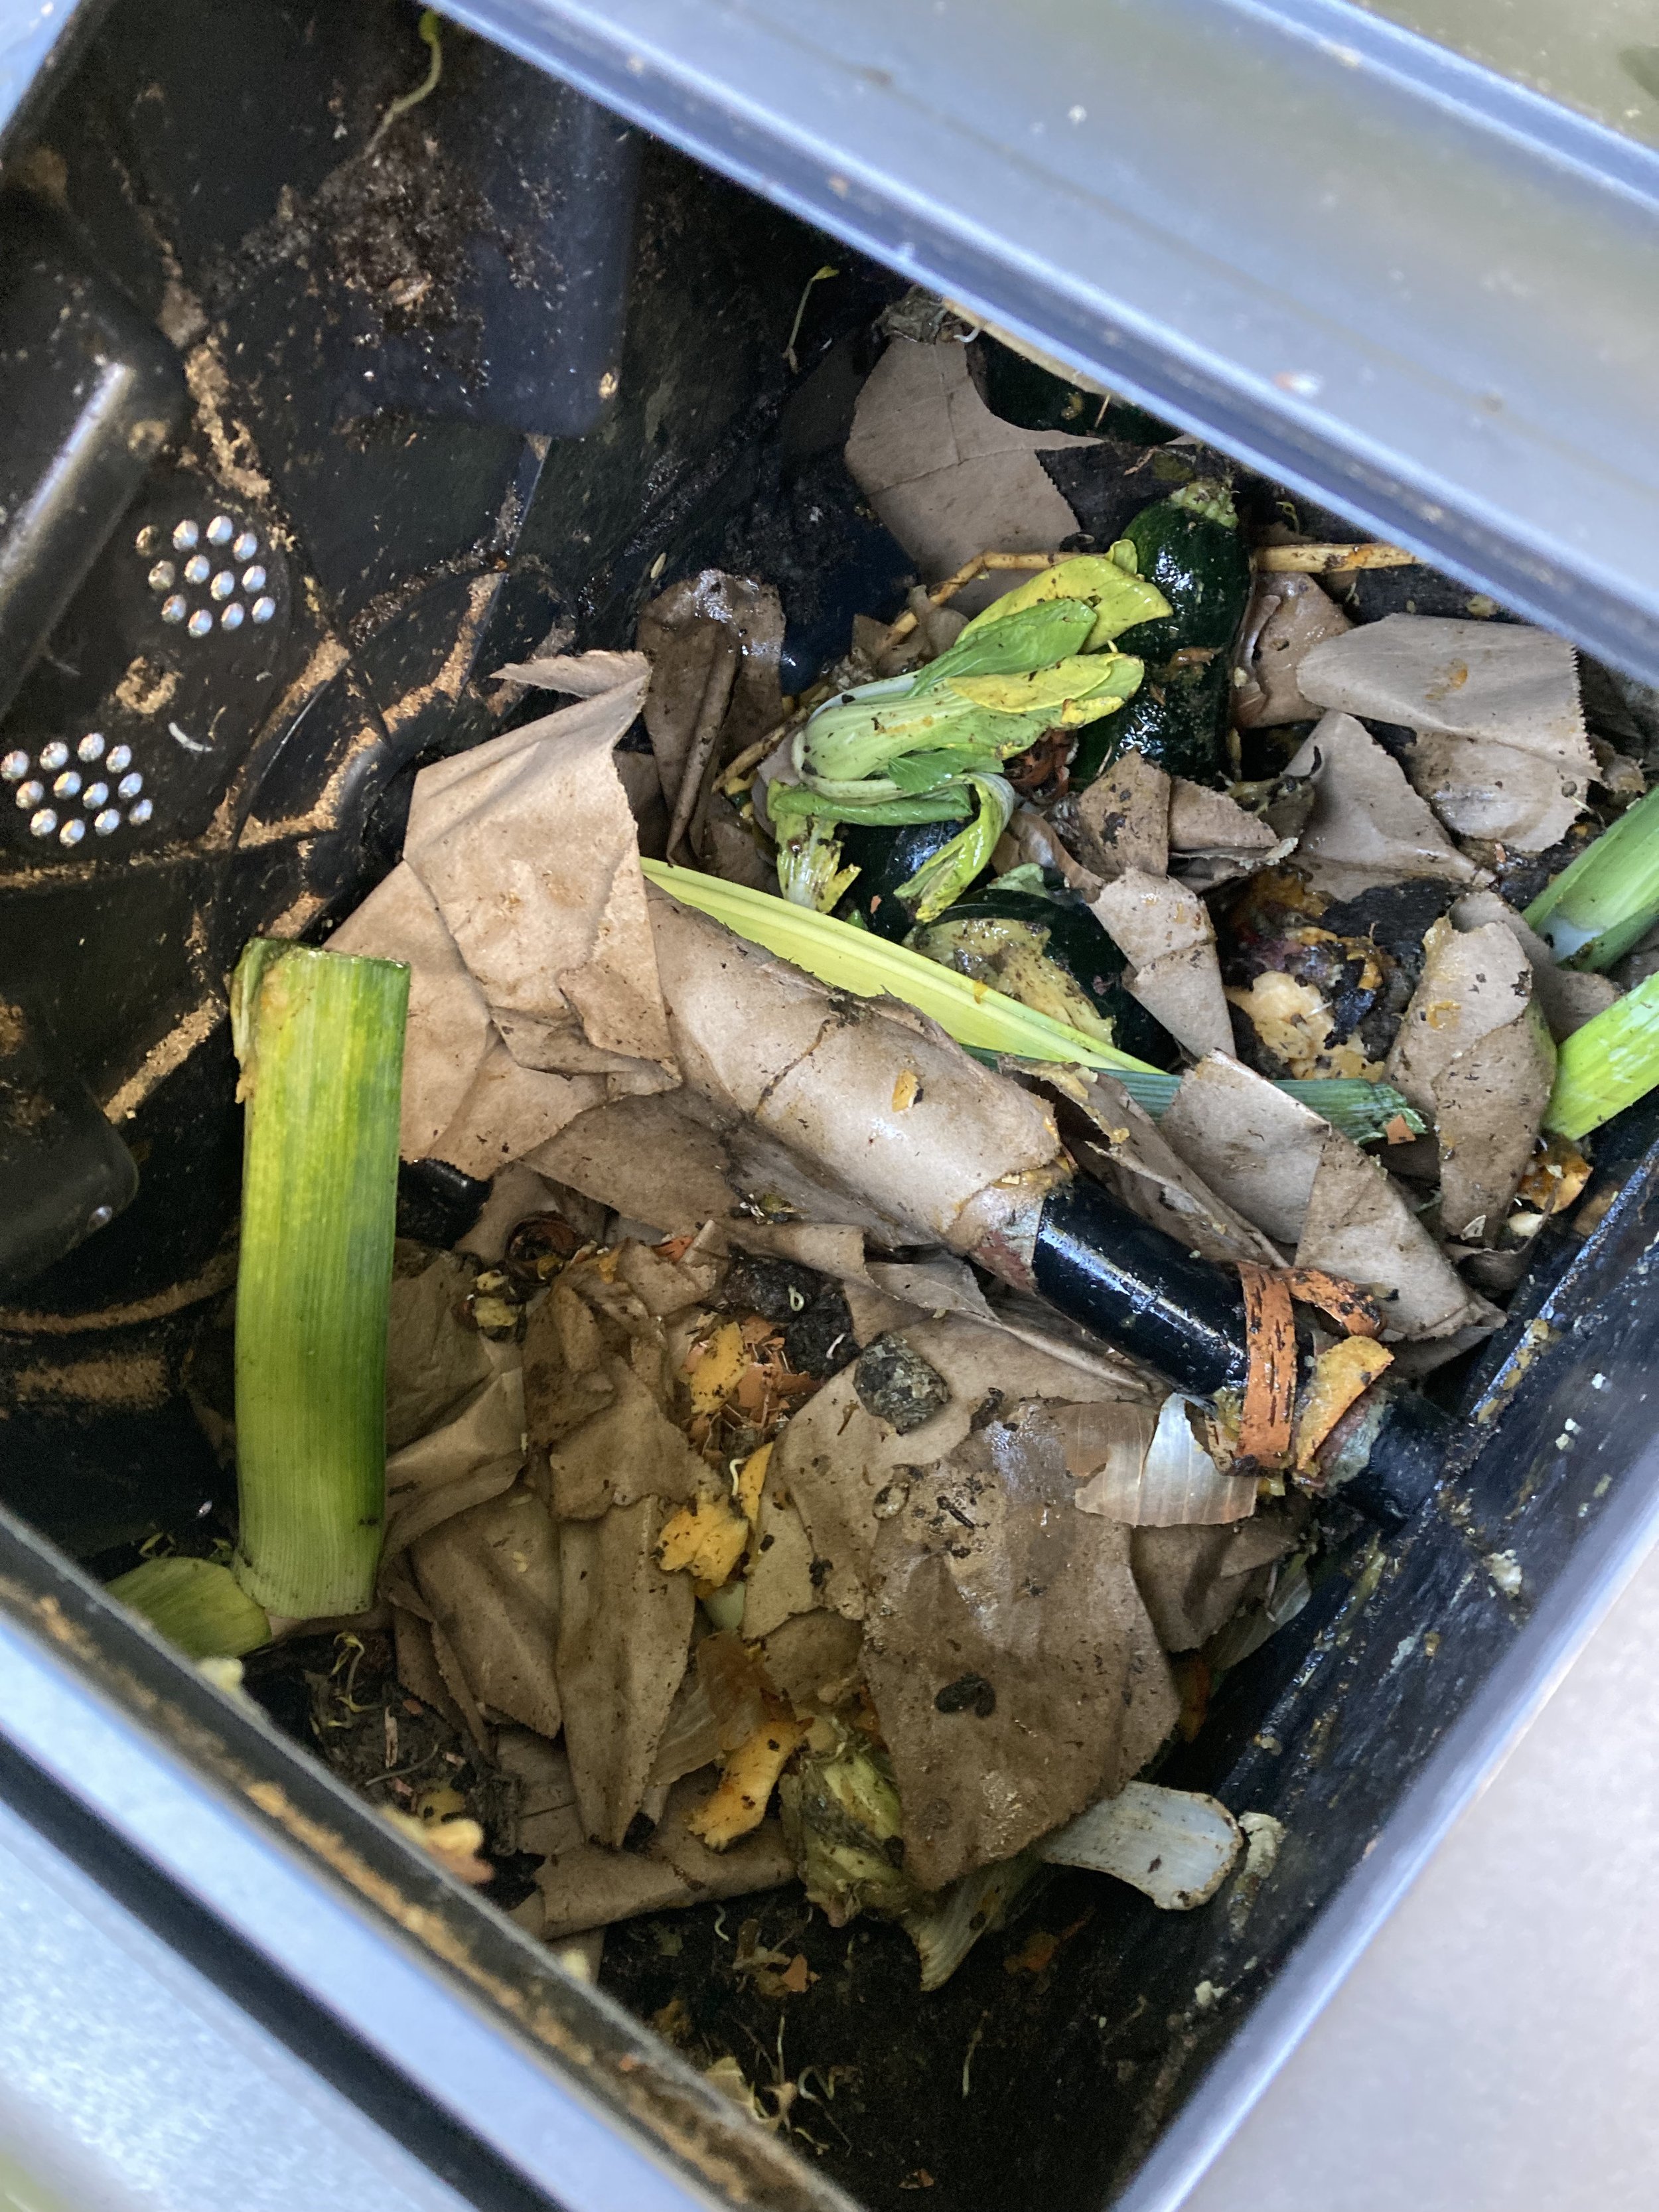
Once you have it set up, just keep on adding food/yard waste and periodically turn your compost over (by hand if yours is a pile or by spinning the drum if it’s a tumbler-style). The trickiest part for me is keeping the ratios right - ideally your compost pile should be about 1 part “greens” (these would be fruit/veggie scraps, coffee grounds, etc… I like to think of them as wet items) and 2 parts “browns” (leaves, newspaper, brown paper bags, etc… I like to think of them as dry items). We personally tend to teeter from too dry to too wet in our compost bin but it seems to average out eventually.
I typically toss our kitchen scraps in a bowl on the counter as I'm cooking and promptly empty it into the compost bin outside. This has worked well for us so far since the weather has been mild. Once it turns winter here I will probably invest in a kitchen countertop compost container so I don't need to walk outside across the icy/snowy yard several times a day, and instead can just empty the kitchen container into the outside compost bin periodically as it fills up.
What to Compost
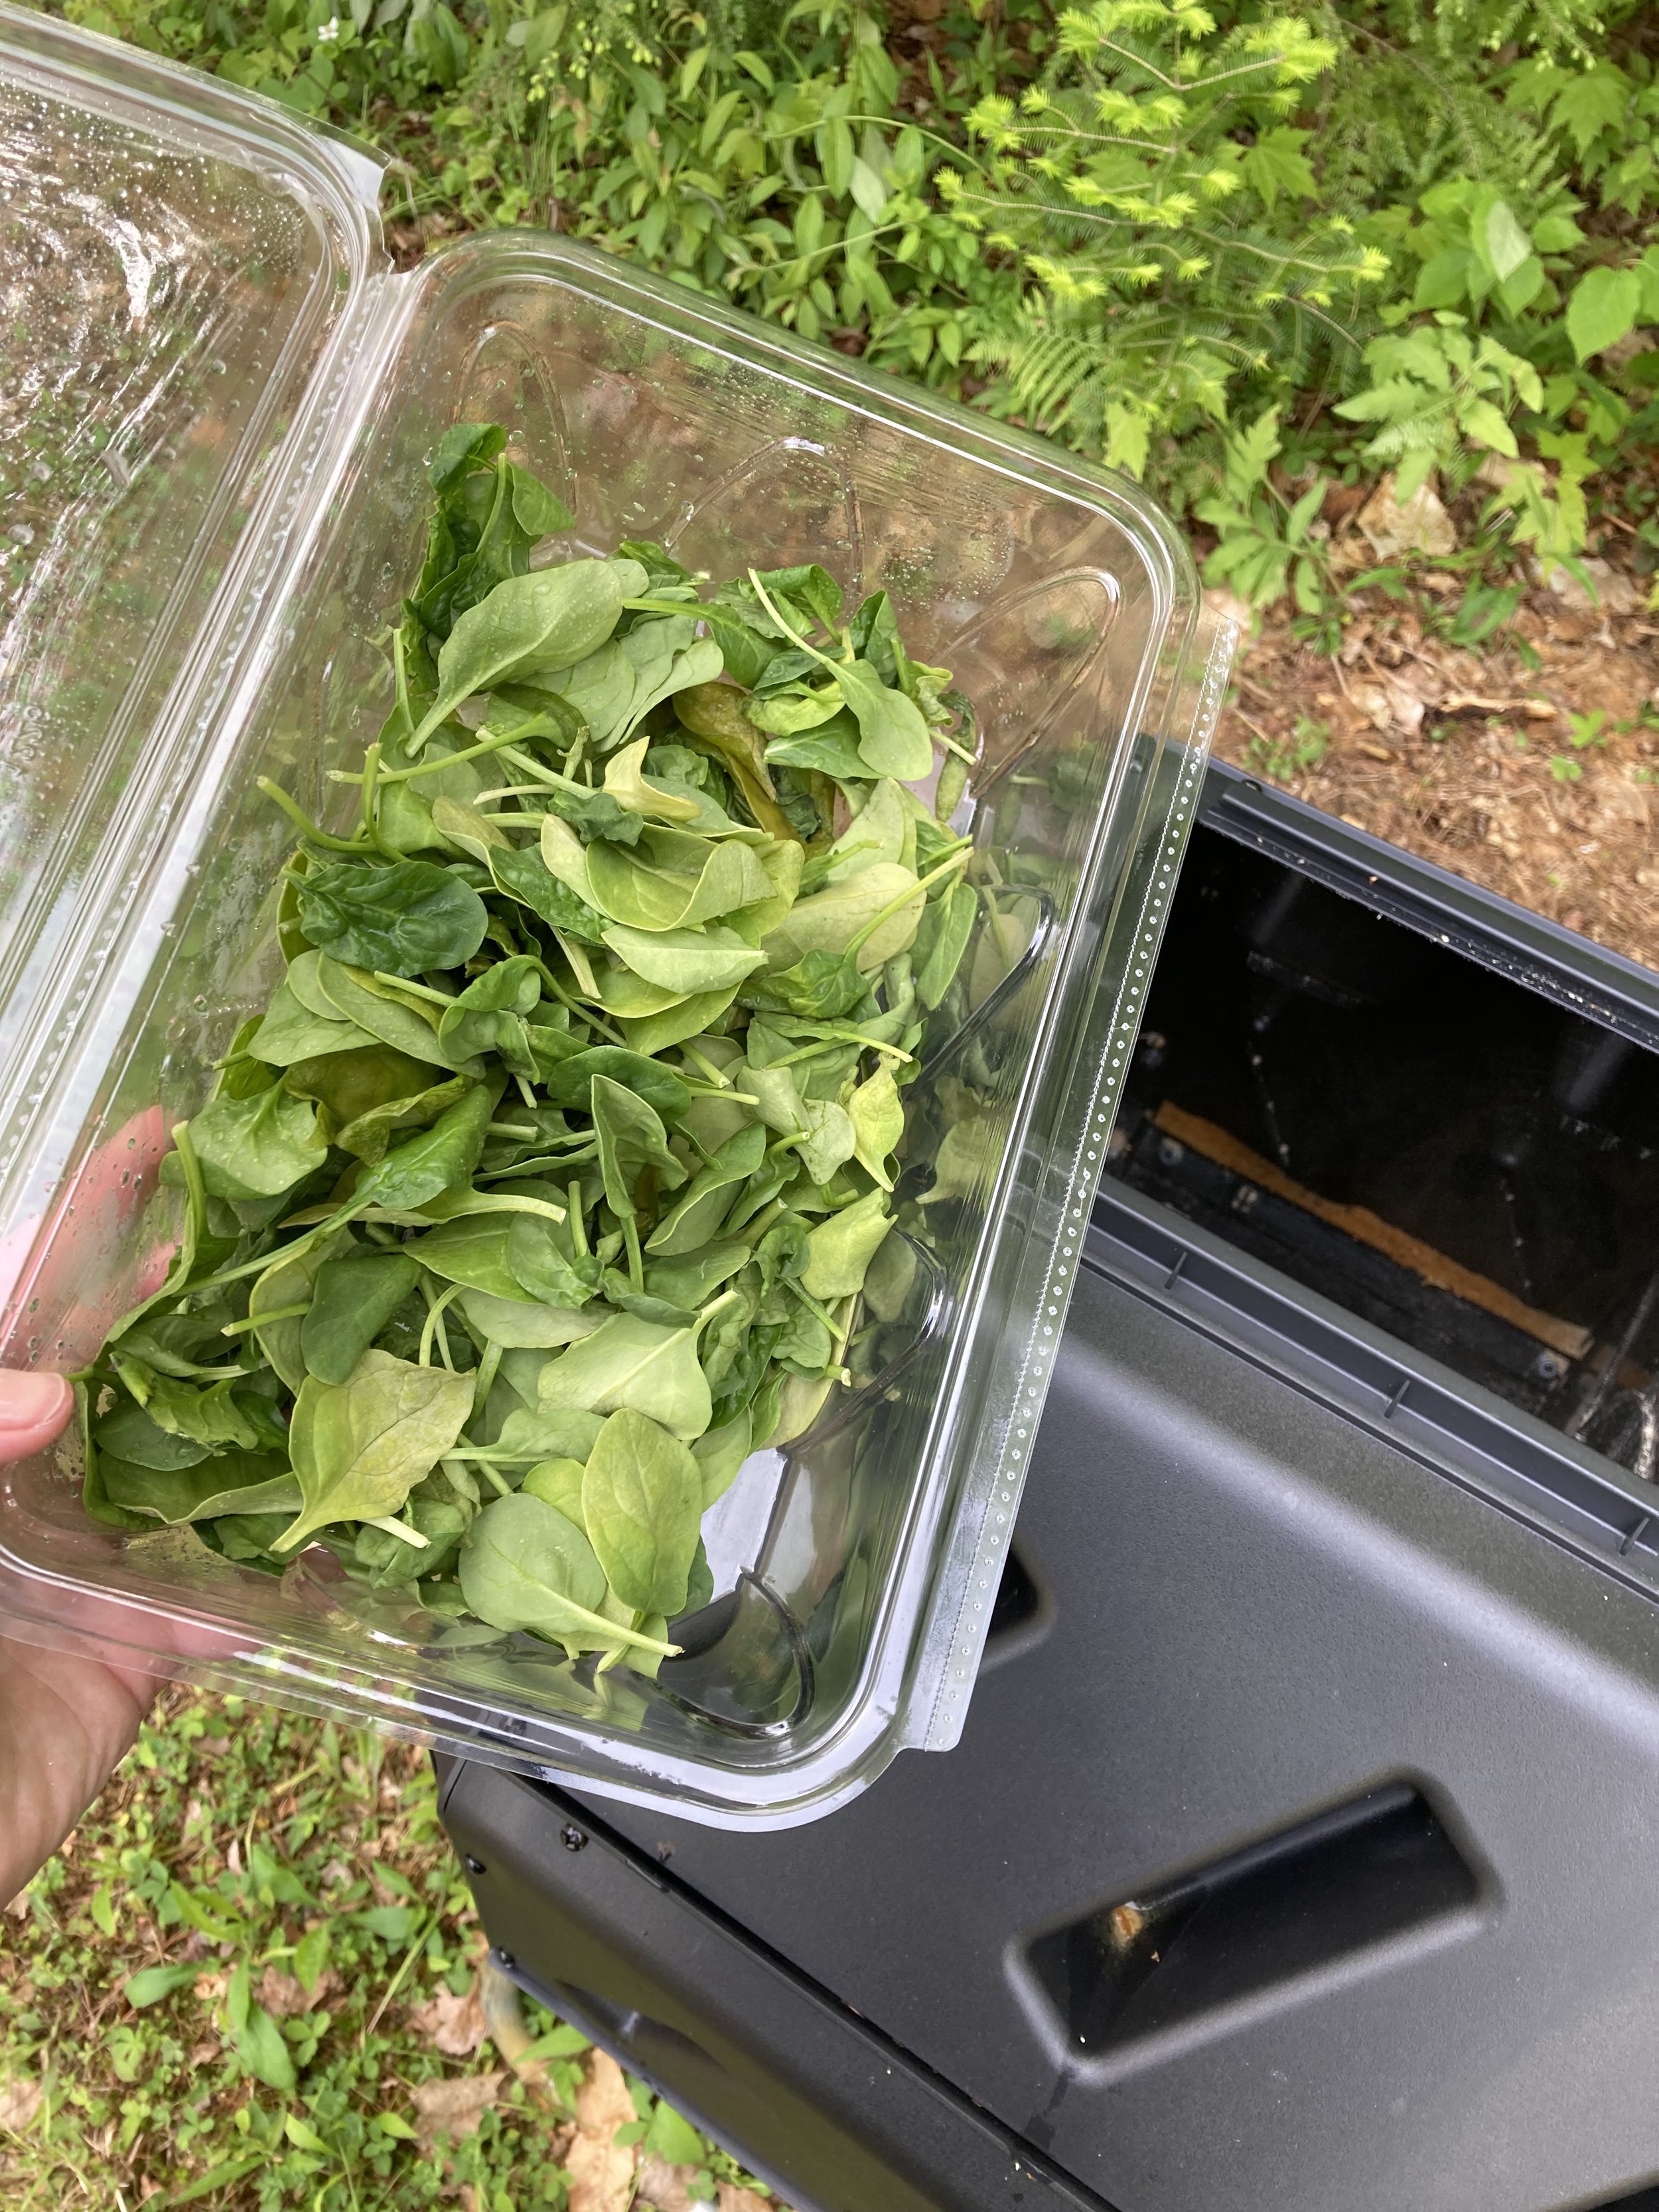
Slimy spinach in your fridge? Toss it in the composter and then recycle the container!
Here’s a short list of things you can potentially compost:
fruit
vegetables
inedible portions of fruit/veggies (i.e. - rinds/cores)
coffee grounds
egg shells
disease-free, non-invasive plants
shredded newspaper
shredded brown paper bags
shredded paper (non-glossy)
untreated sawdust (I make a lot of ornaments for my Etsy shop and compost the sawdust)
toilet paper rolls
leaves, grass clippings
small sticks
The smaller you make the items in your compost bin (cut them up or shred them), the quicker they should decompose and compost.
What NOT to Compost
Do NOT Compost:
x plastic or household trash x meat x dairy x cooked food x glass or metal x animal waste or used animal bedding/shavings x invasive or diseased plant materials - compost very strong smelling fruit/veggies with caution (i.e. citrus/bananas) if you live in an area with bears or raccoons that are an issue
Good luck in your composting adventure! I hope you enjoy the process and be proud in your efforts to be a little more eco-friendly in your home.
Disclaimer: I am sharing my experiences with what we’ve learned in the composting process so far. If you’d like expert or more detailed and specific information, I’d recommend contacting your local garden center or university cooperative for more information. Your local town or city may have composting programs to join or guidelines to follow too.
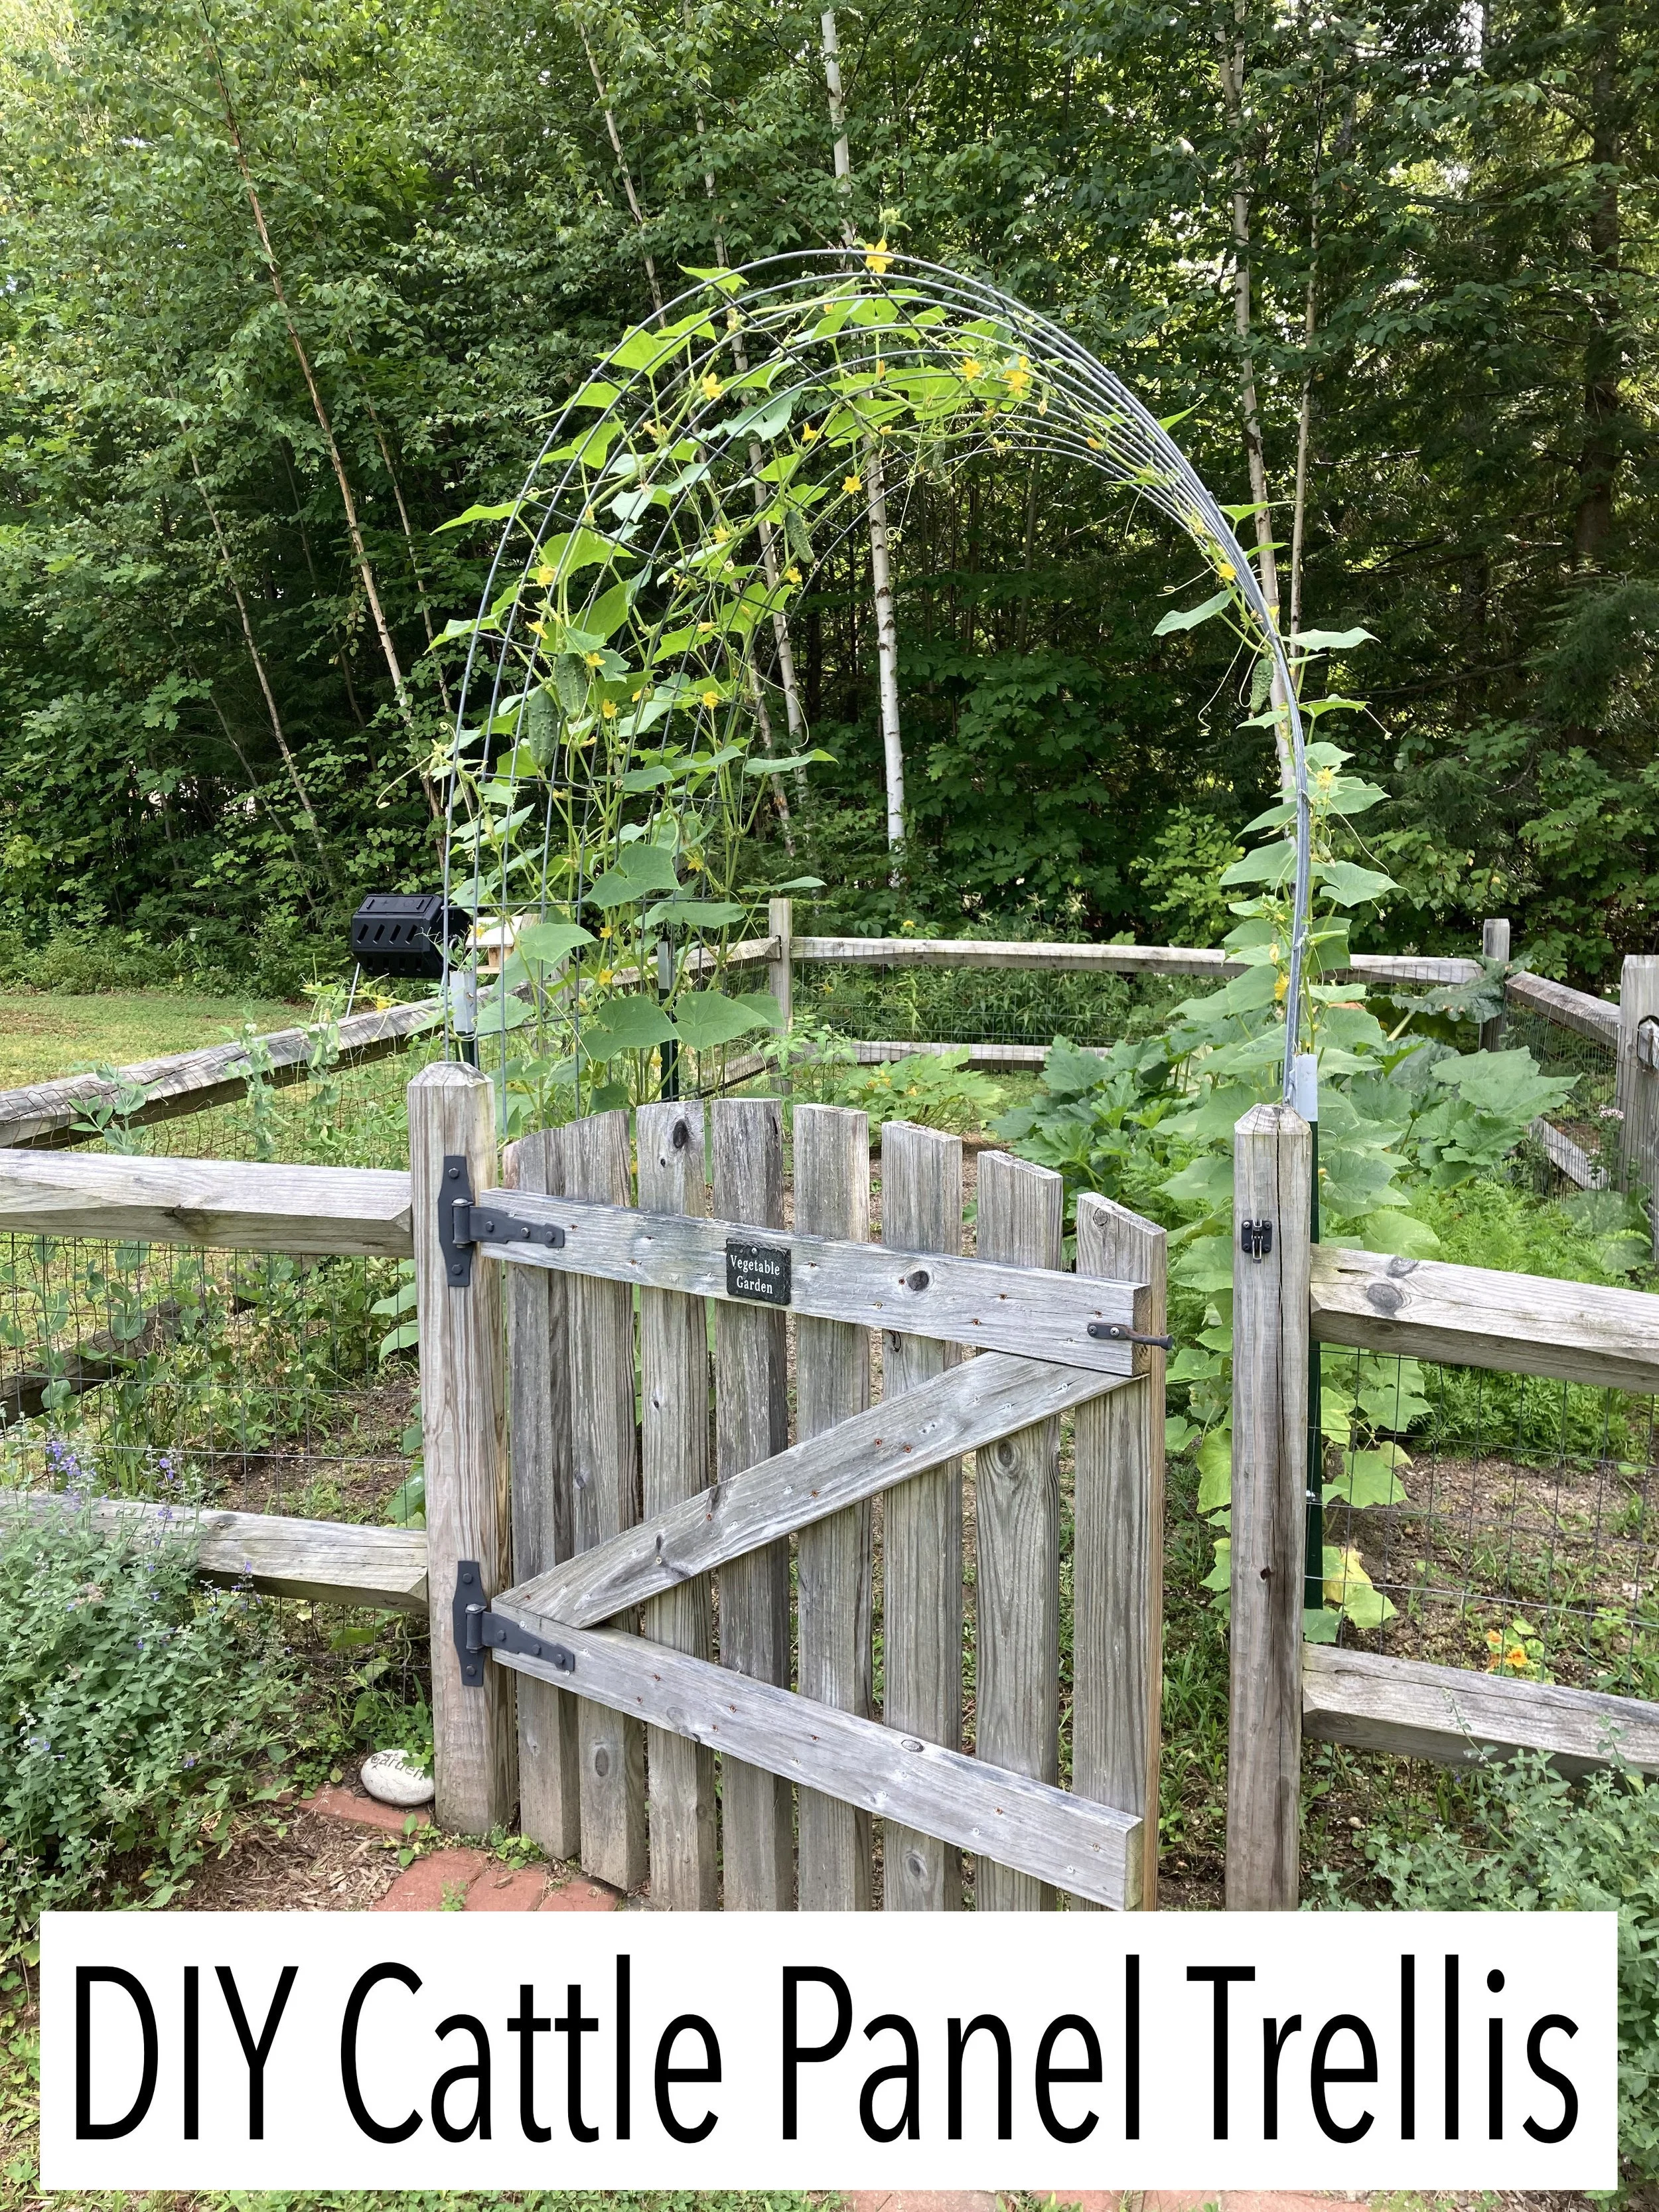
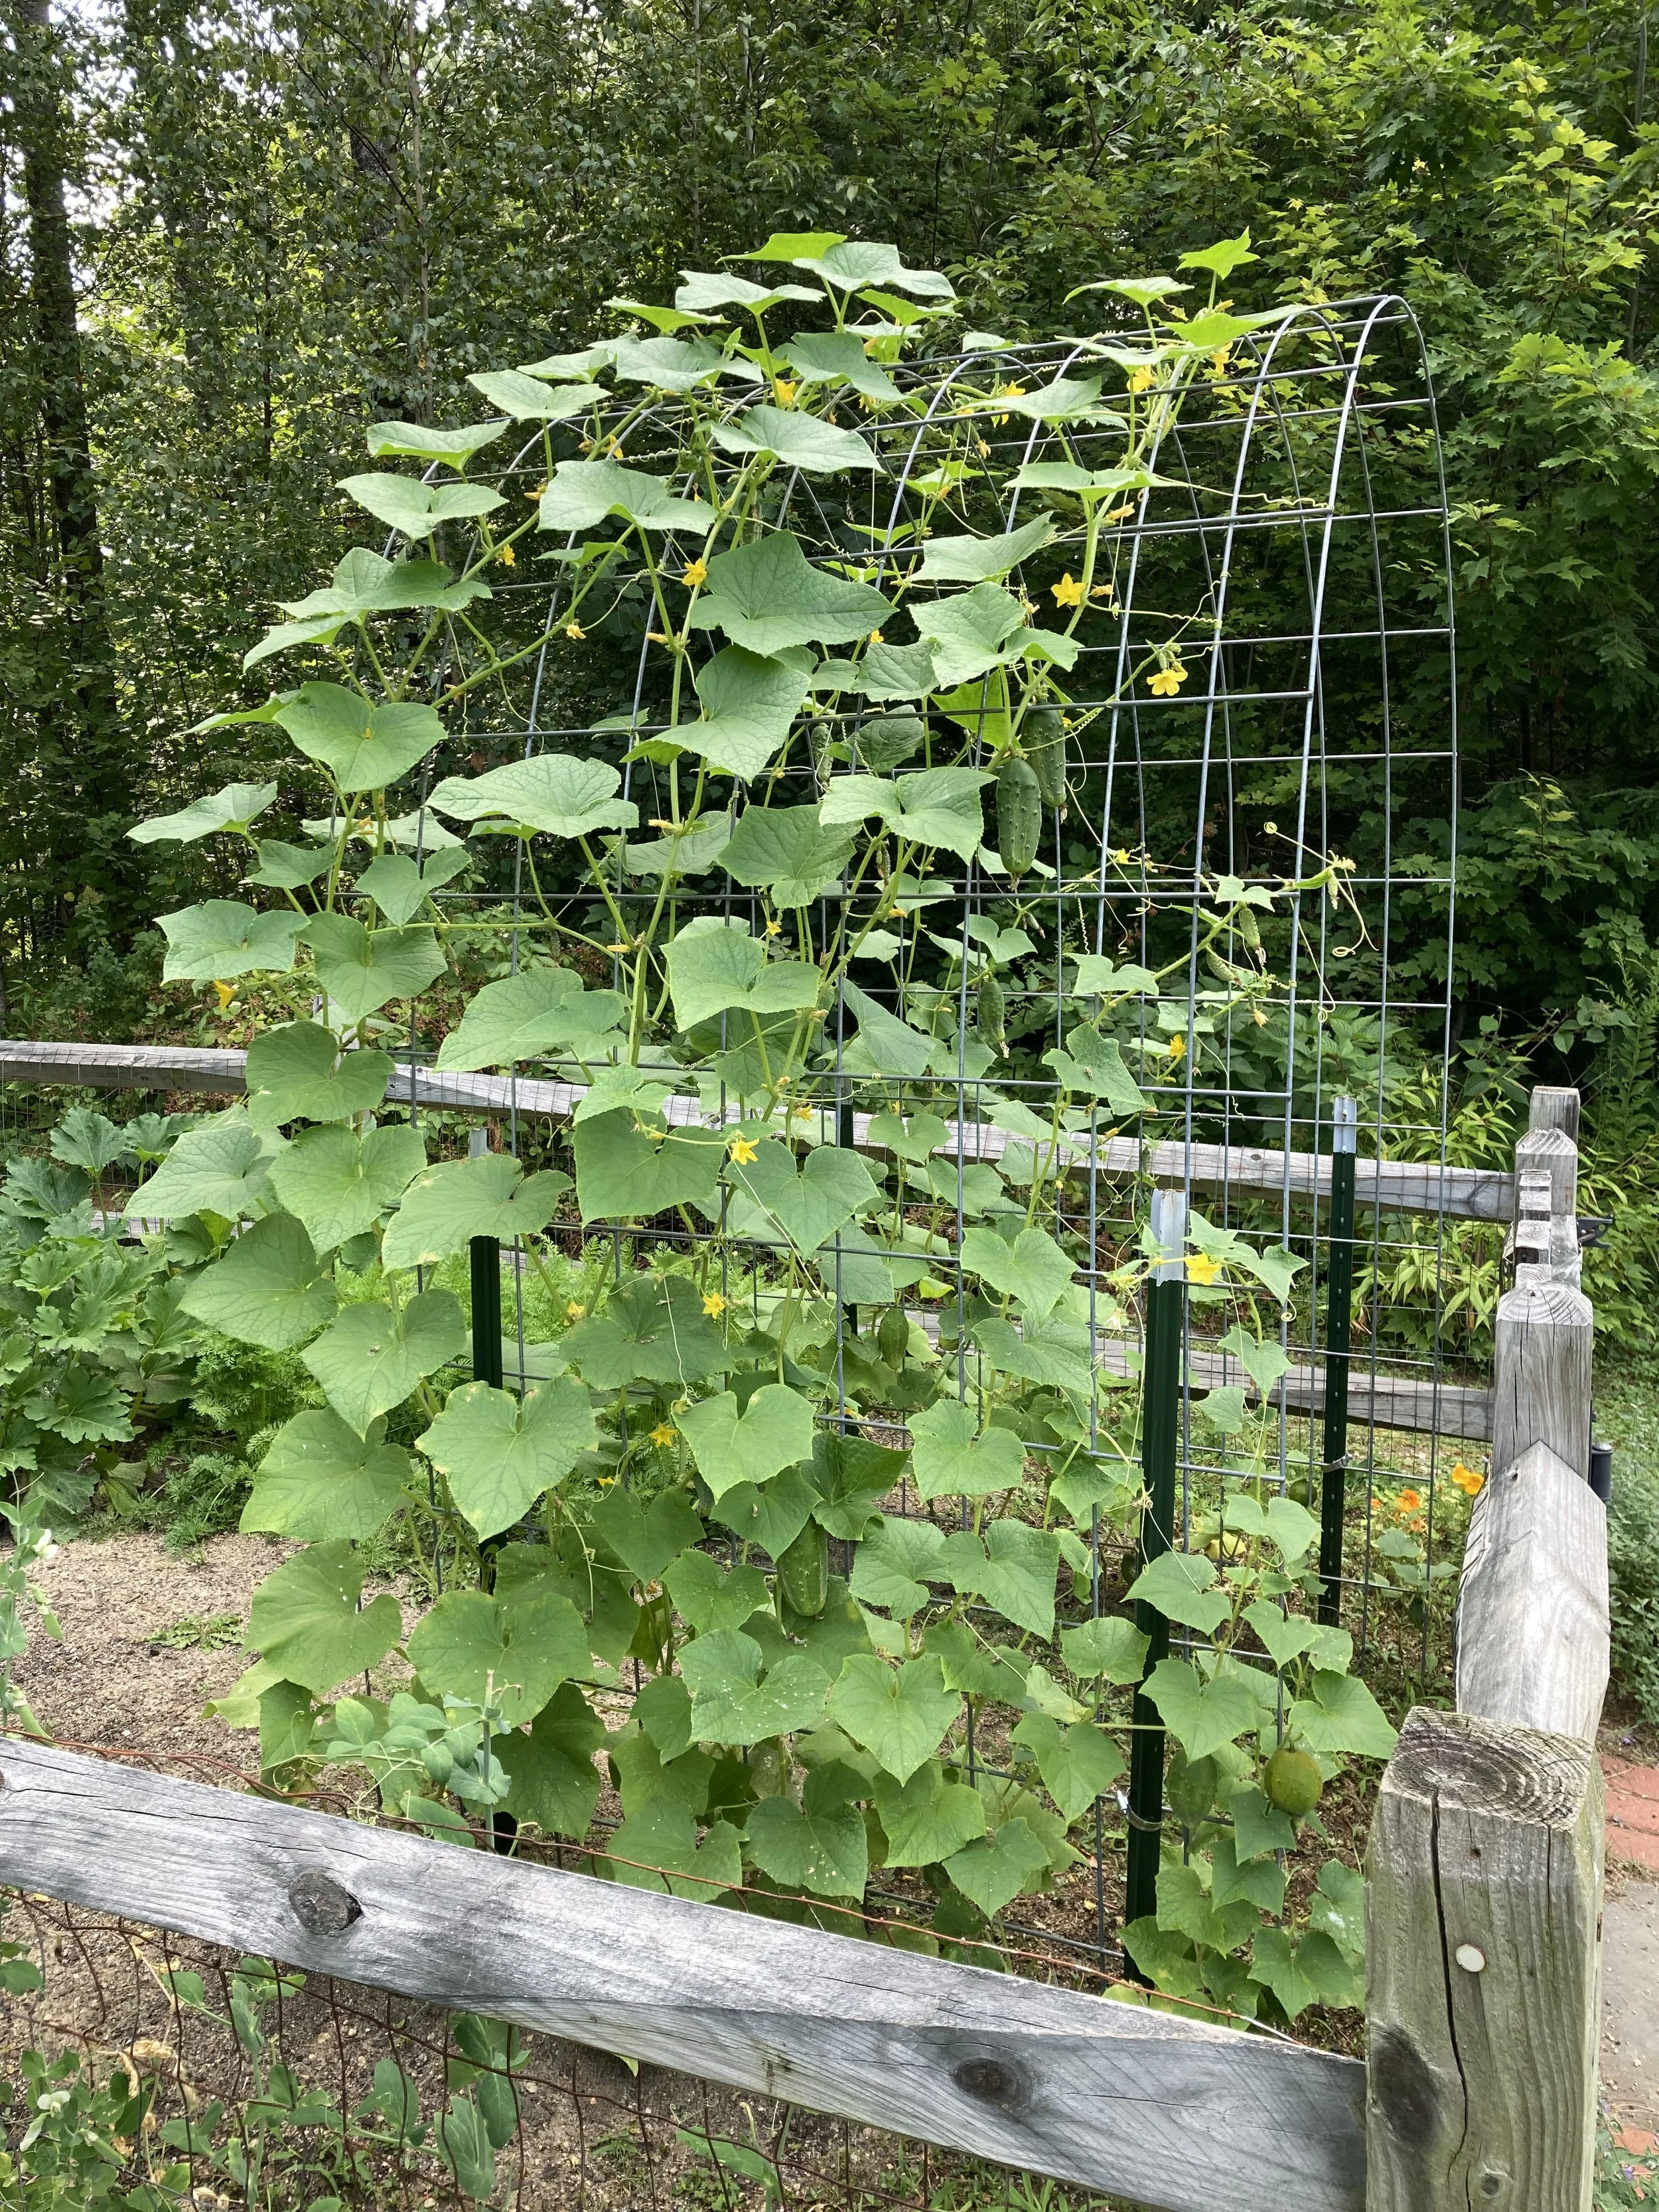
Last summer Pinterest blew up with DIY Cattle Panel Trellises and I decided I was going to jump on this bandwagon next season… And so here we are - it’s spring and I’m excited to get this set up and document my garden’s progress this year. | This post contains affiliate links |
- This post will show how we built our Cattle Panel Arch and I will also add progress photos to this post as our garden grows -
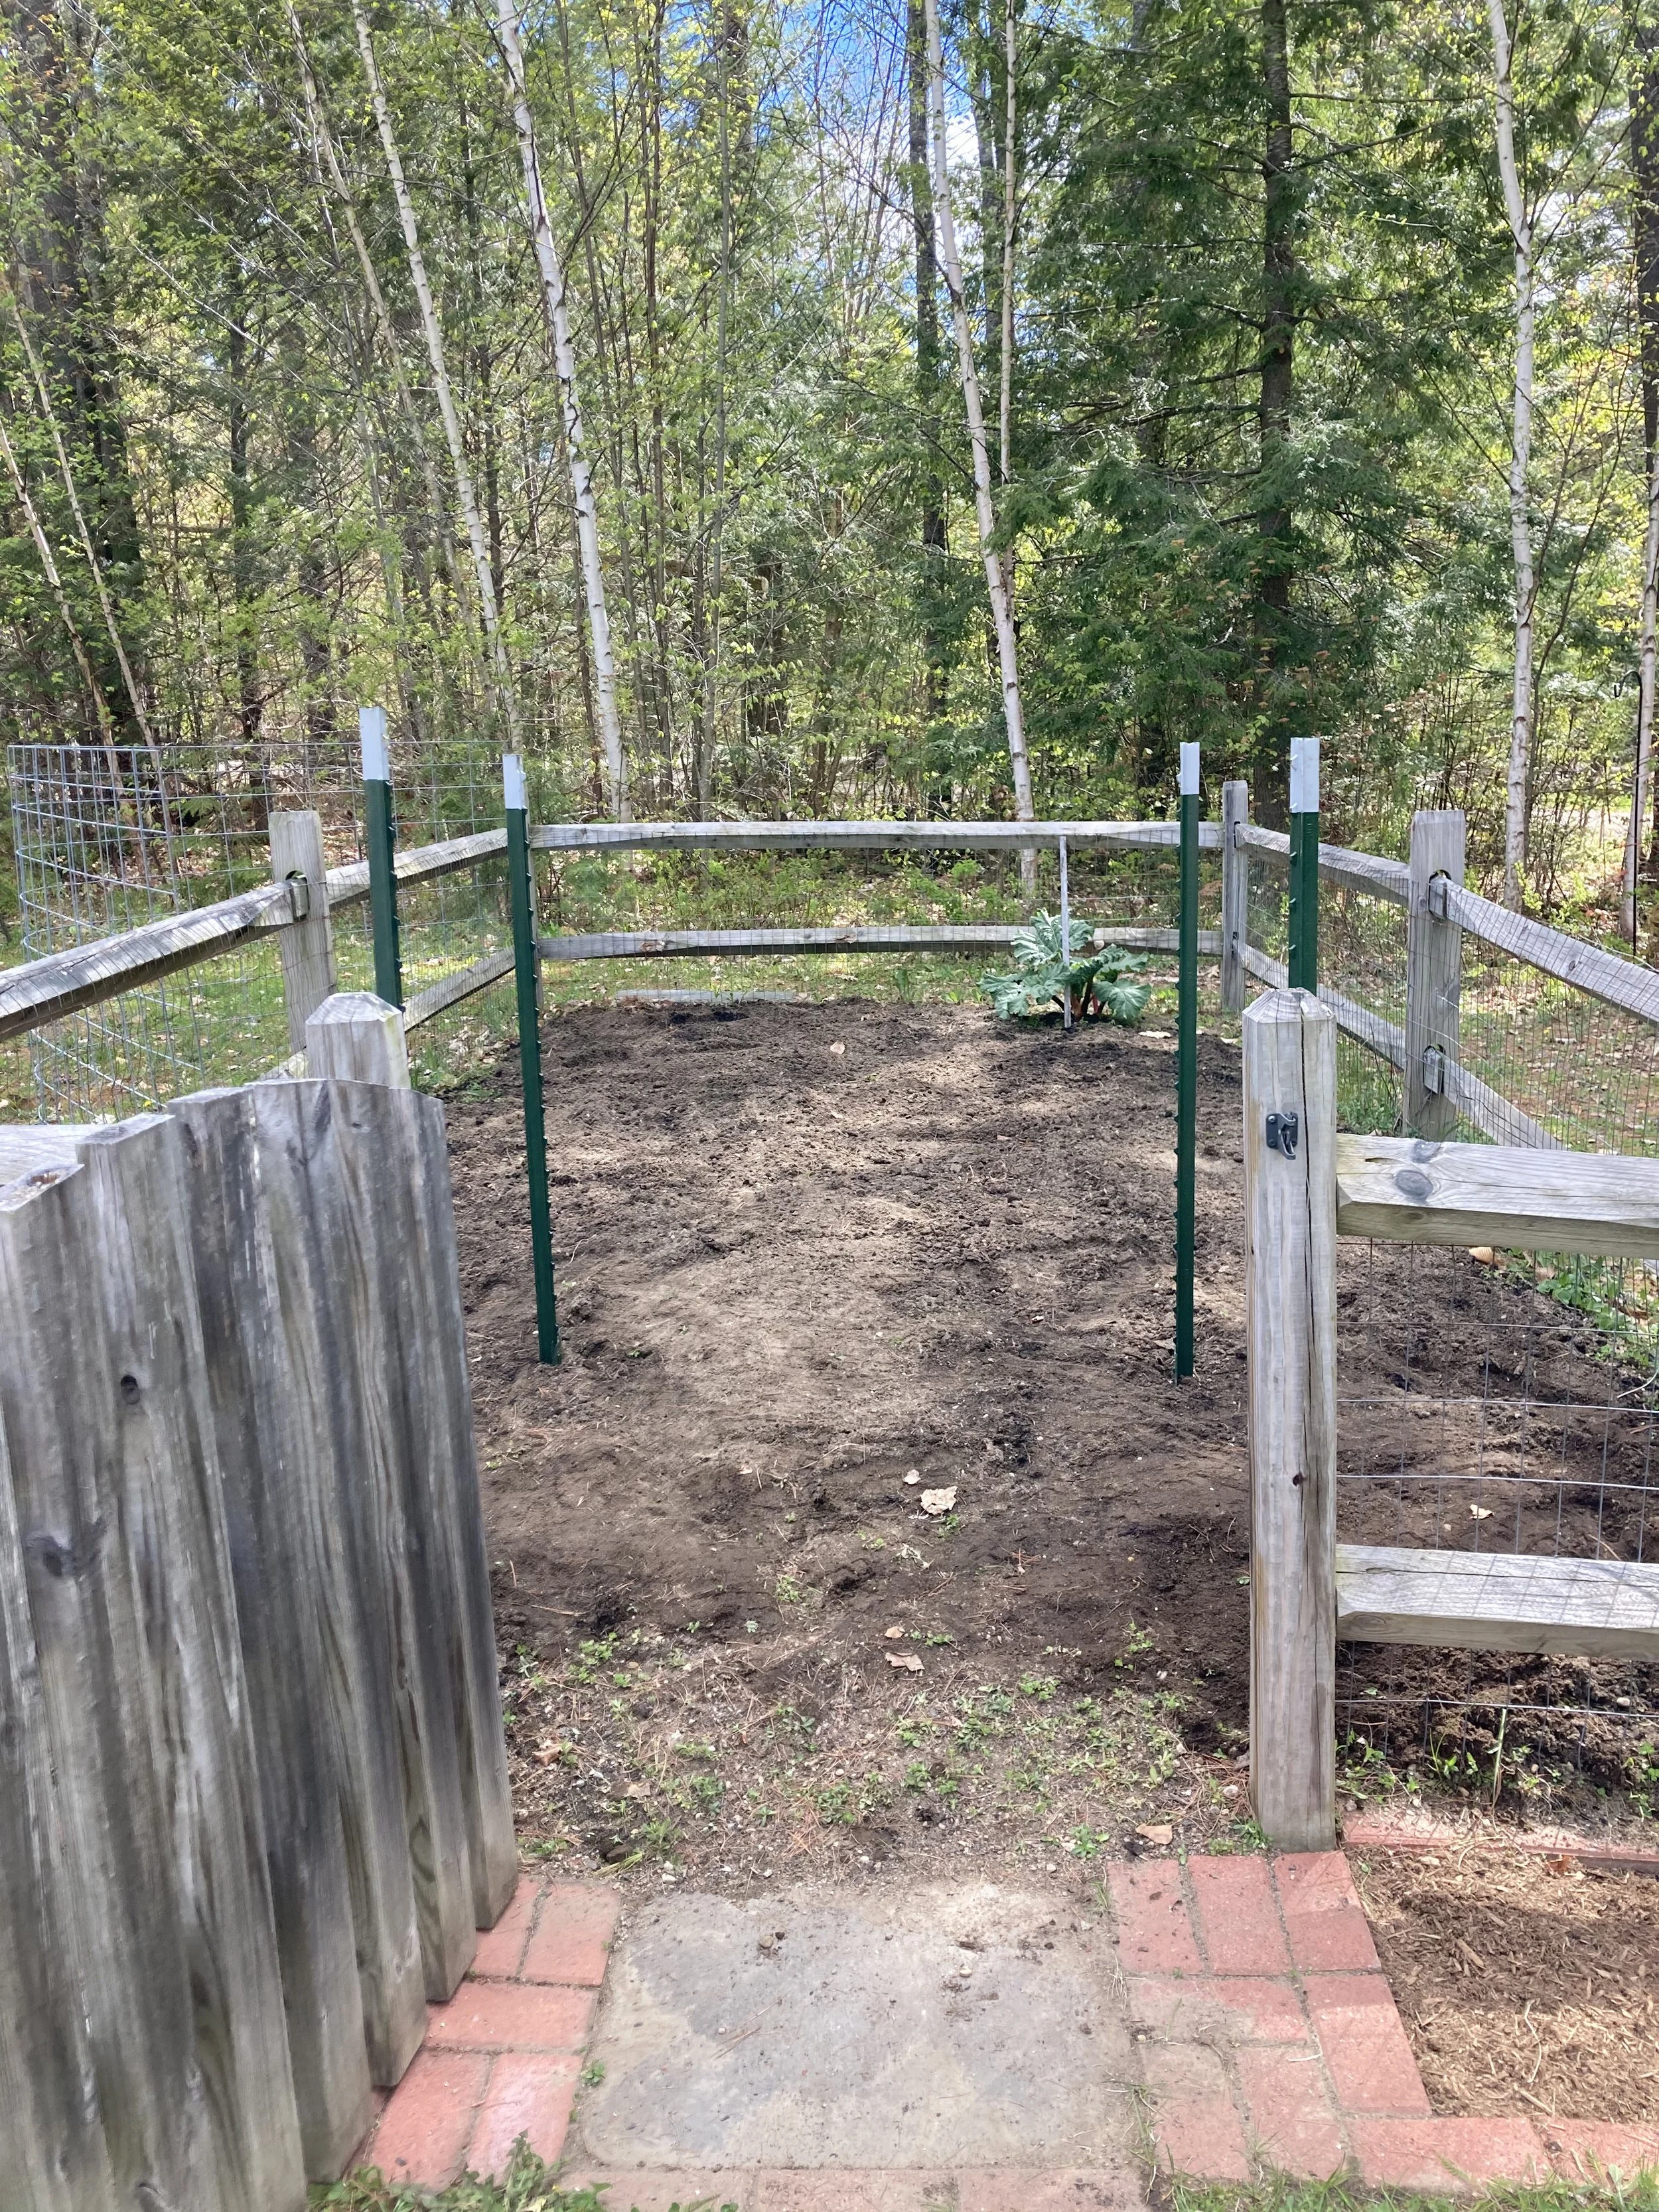
To make a Cattle Panel Trellis, you really only need a few things. We picked up most of our materials at a local Tractor Supply store but you could find these materials at other farm/garden centers too or order online. The trickiest part was getting everything home since the cattle panel is fairly large. Thankfully my father-in-law has a pickup truck and was able to pick up the items for us.
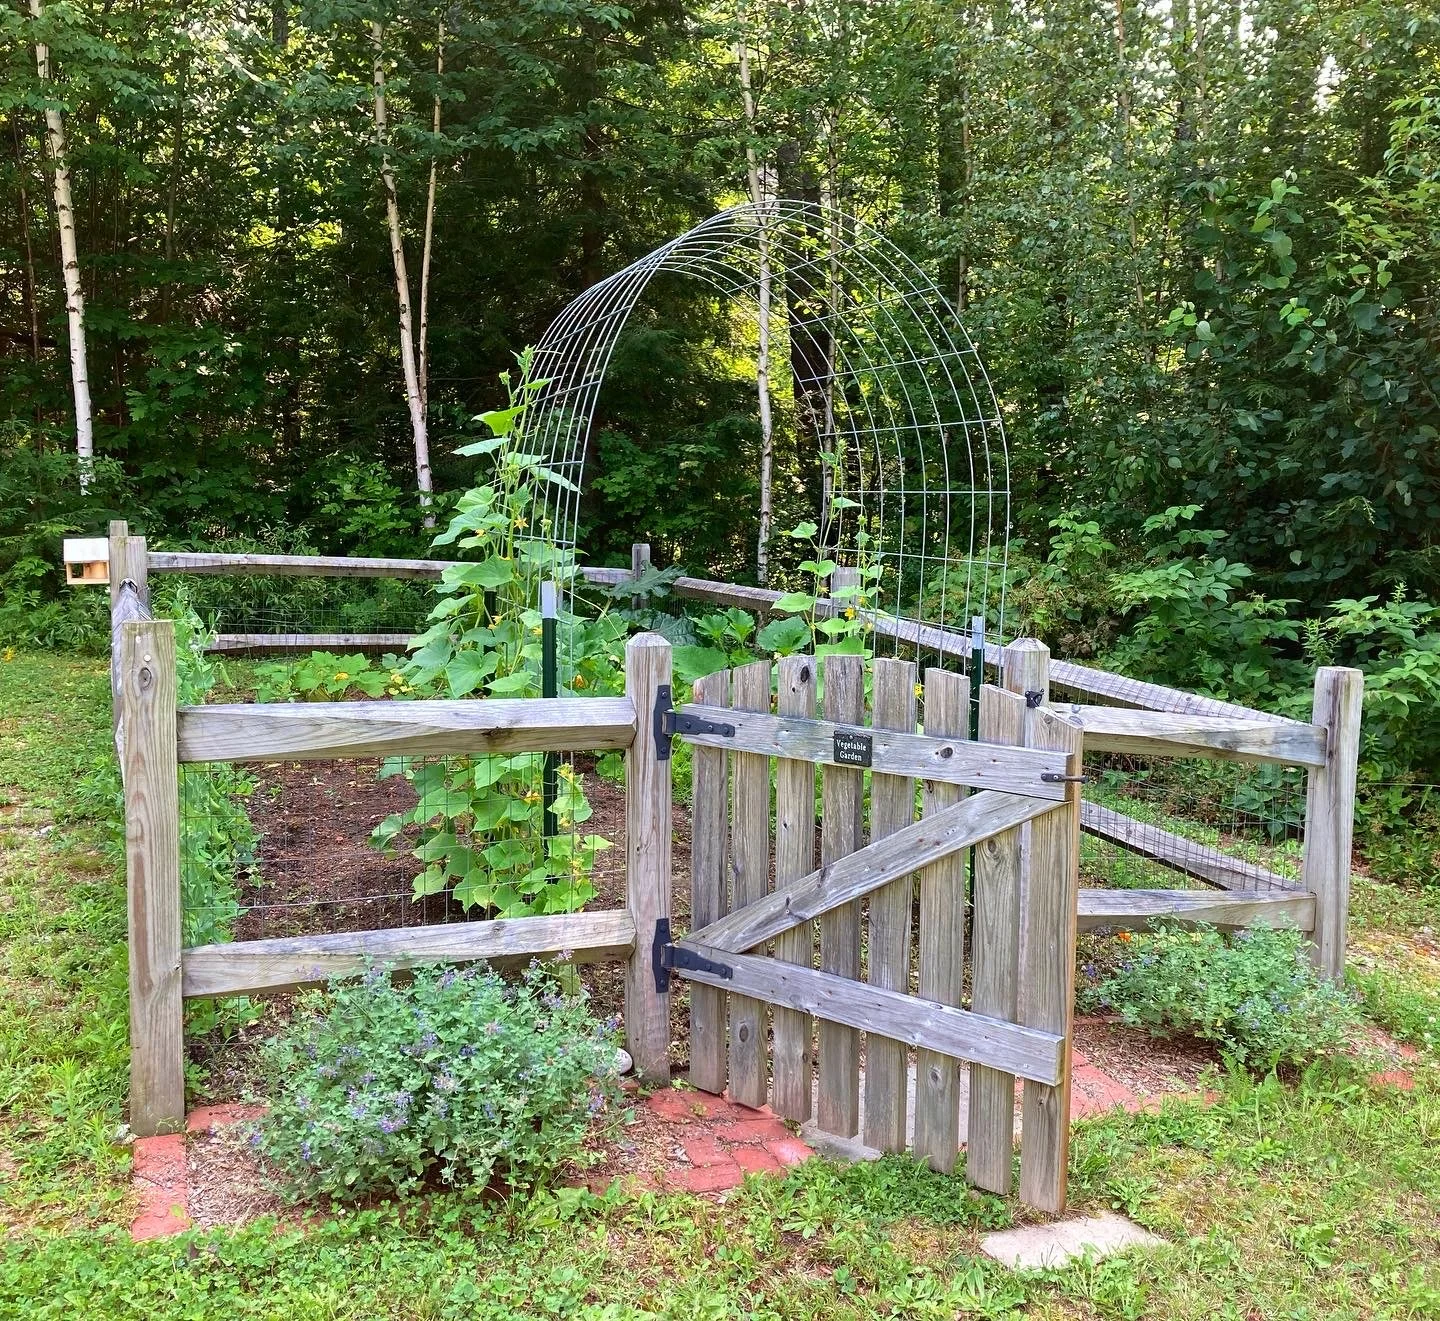
First, figure out where you want your arch to go. For us we put it just inside our garden gate to frame the entrance. It’s also on the north side of our garden so it won’t shade the other veggies too much.
Once you have it laid out and square, drive the t-posts in with a hammer or post driver until they’re deep and sturdy. This was easier-said-than-done with our rocky soil here in NH, so one post couldn’t go in quite as deep as the others but it was sturdy enough still.
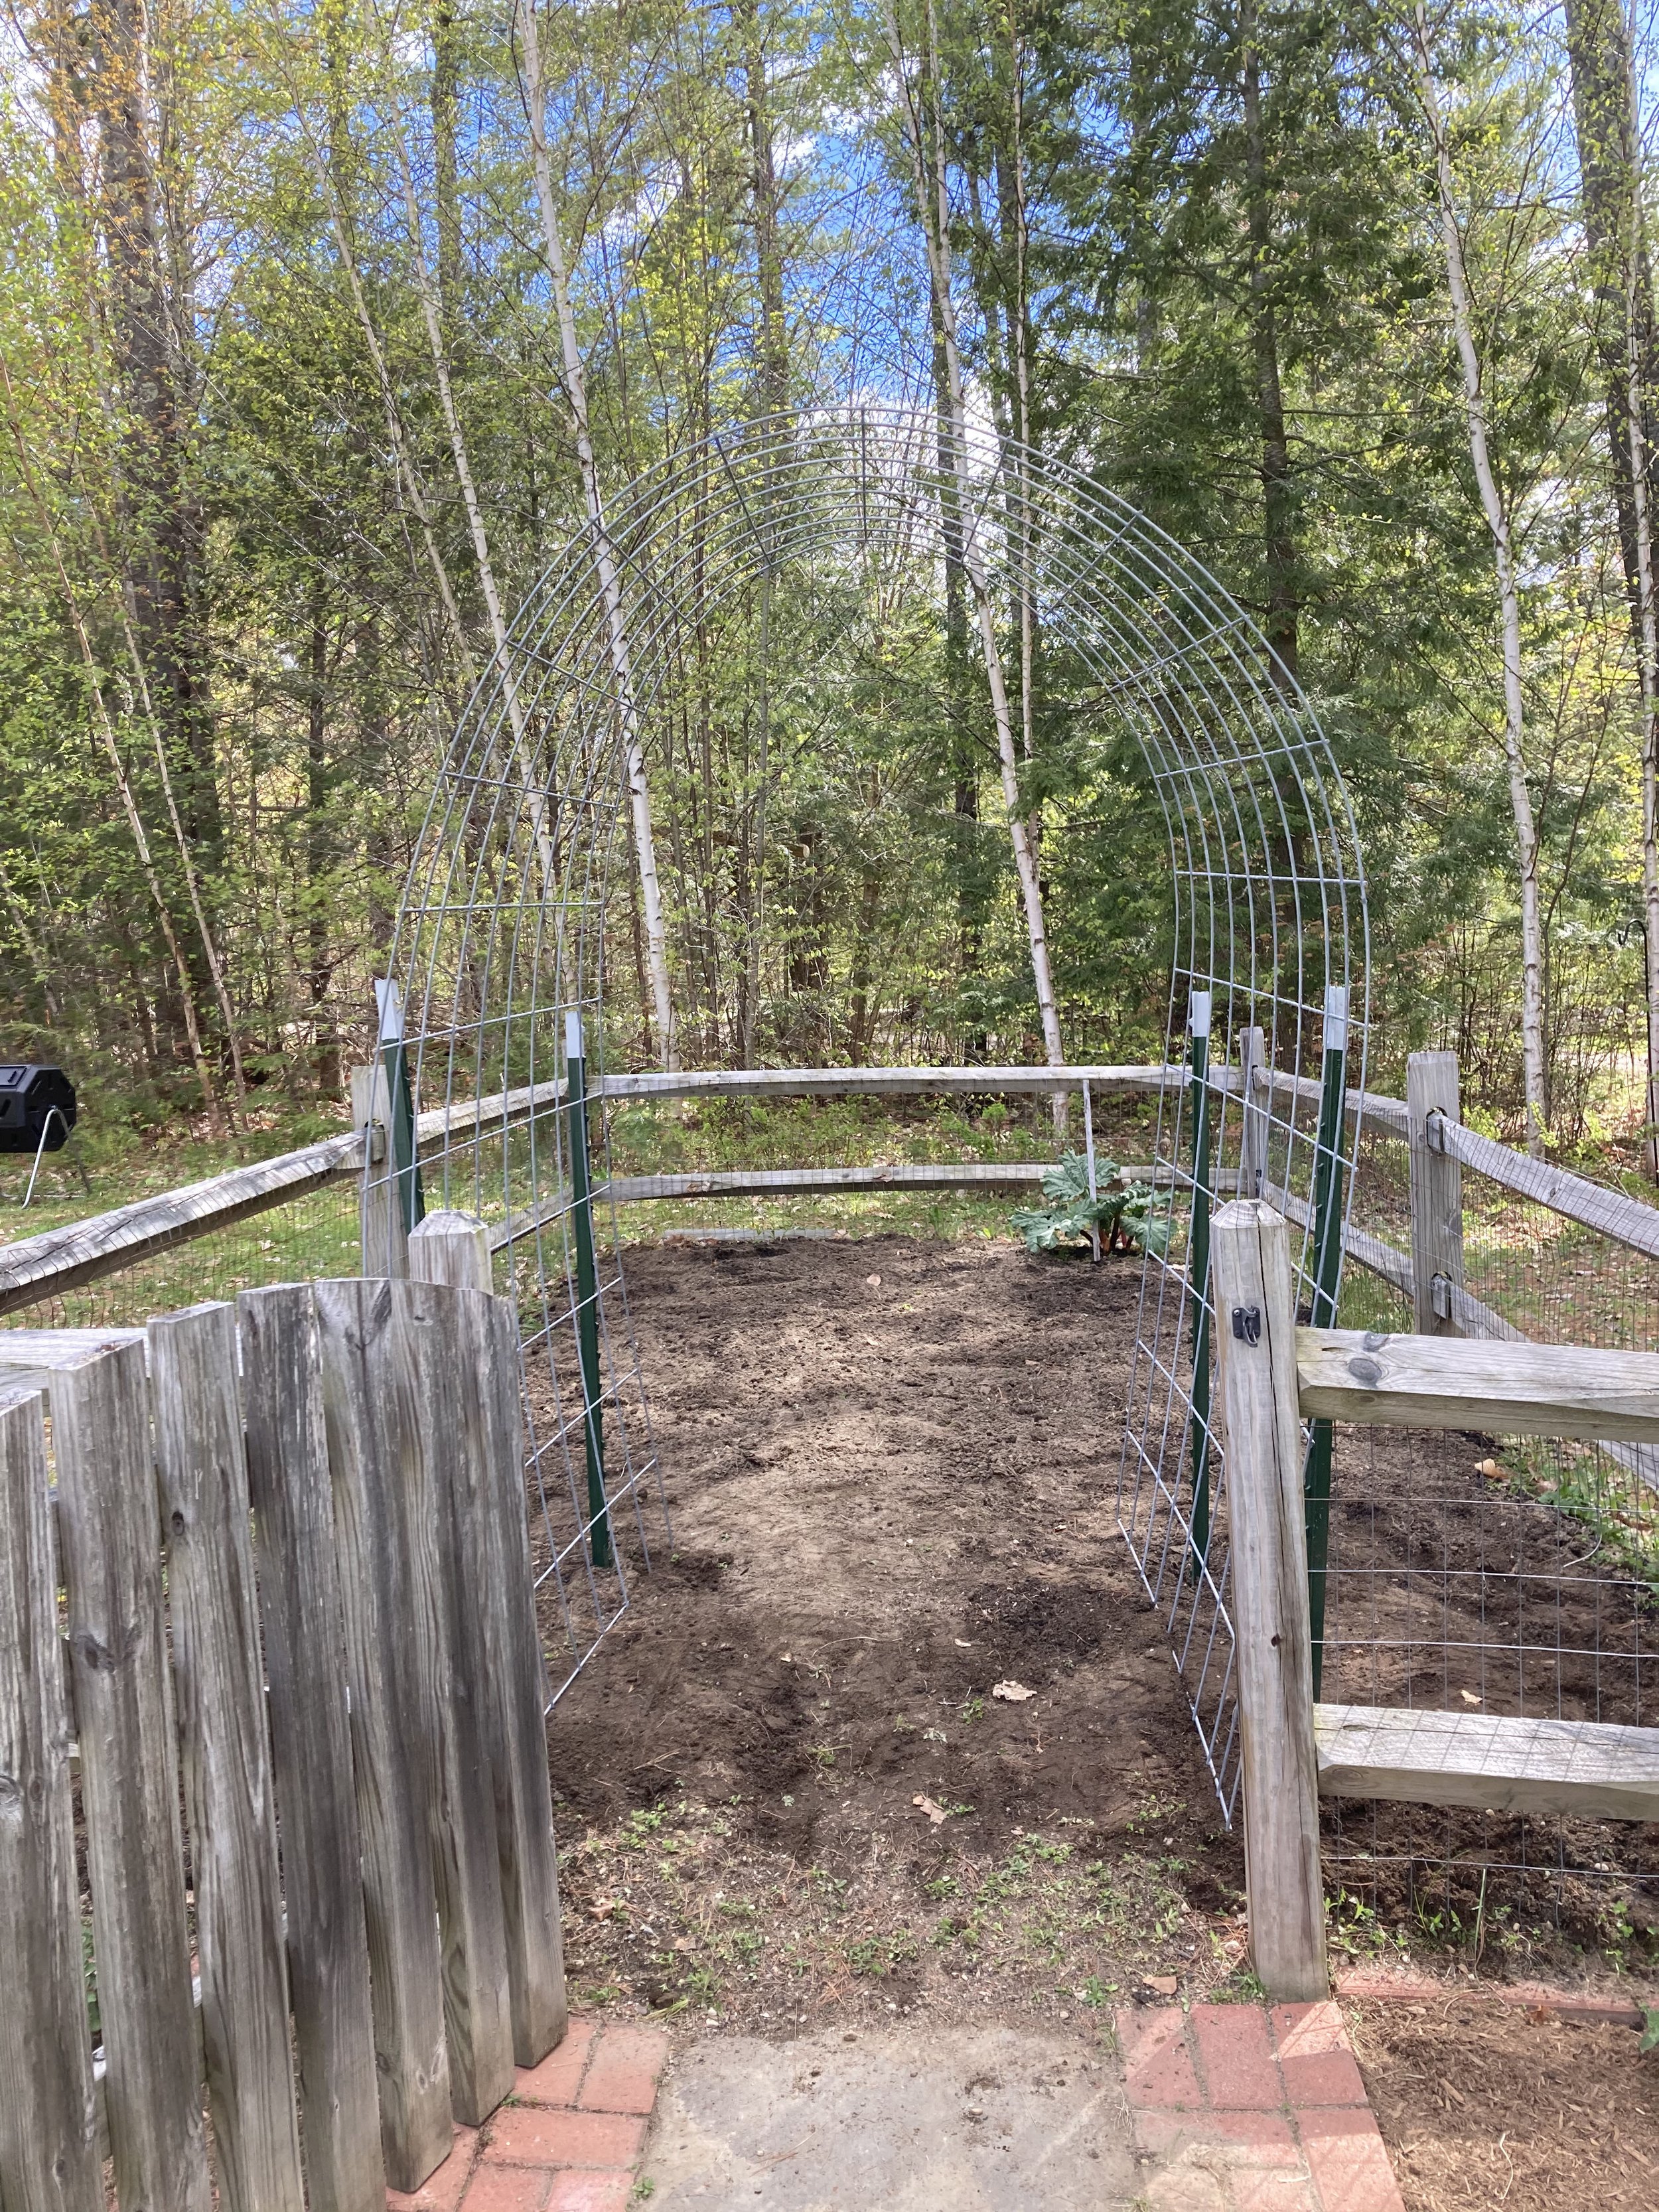
Next gently bend the cattle panel into a “rainbow” and set it inside the square you made. (Next year we might move our t-posts out a little wider to get a more gentle and less-tall arch, but this worked fine for us too as-is.)
Once you get it in place, secure it with hose clamps, heavy duty wire, or some rope so it stays in place.
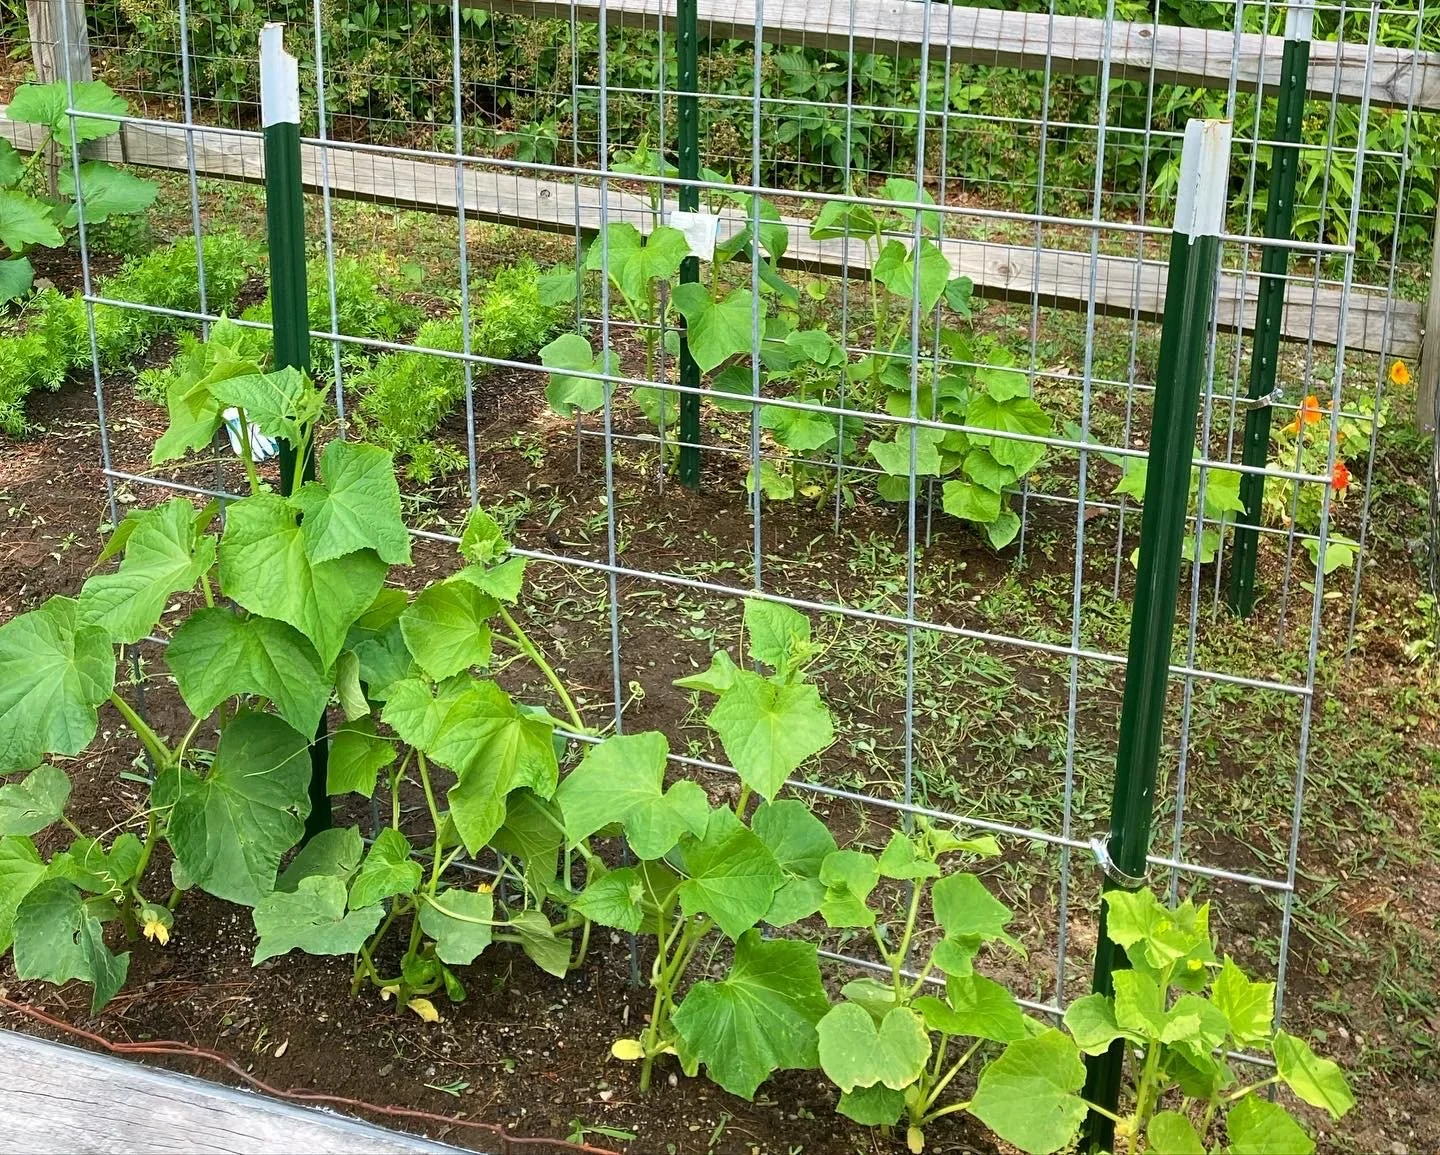
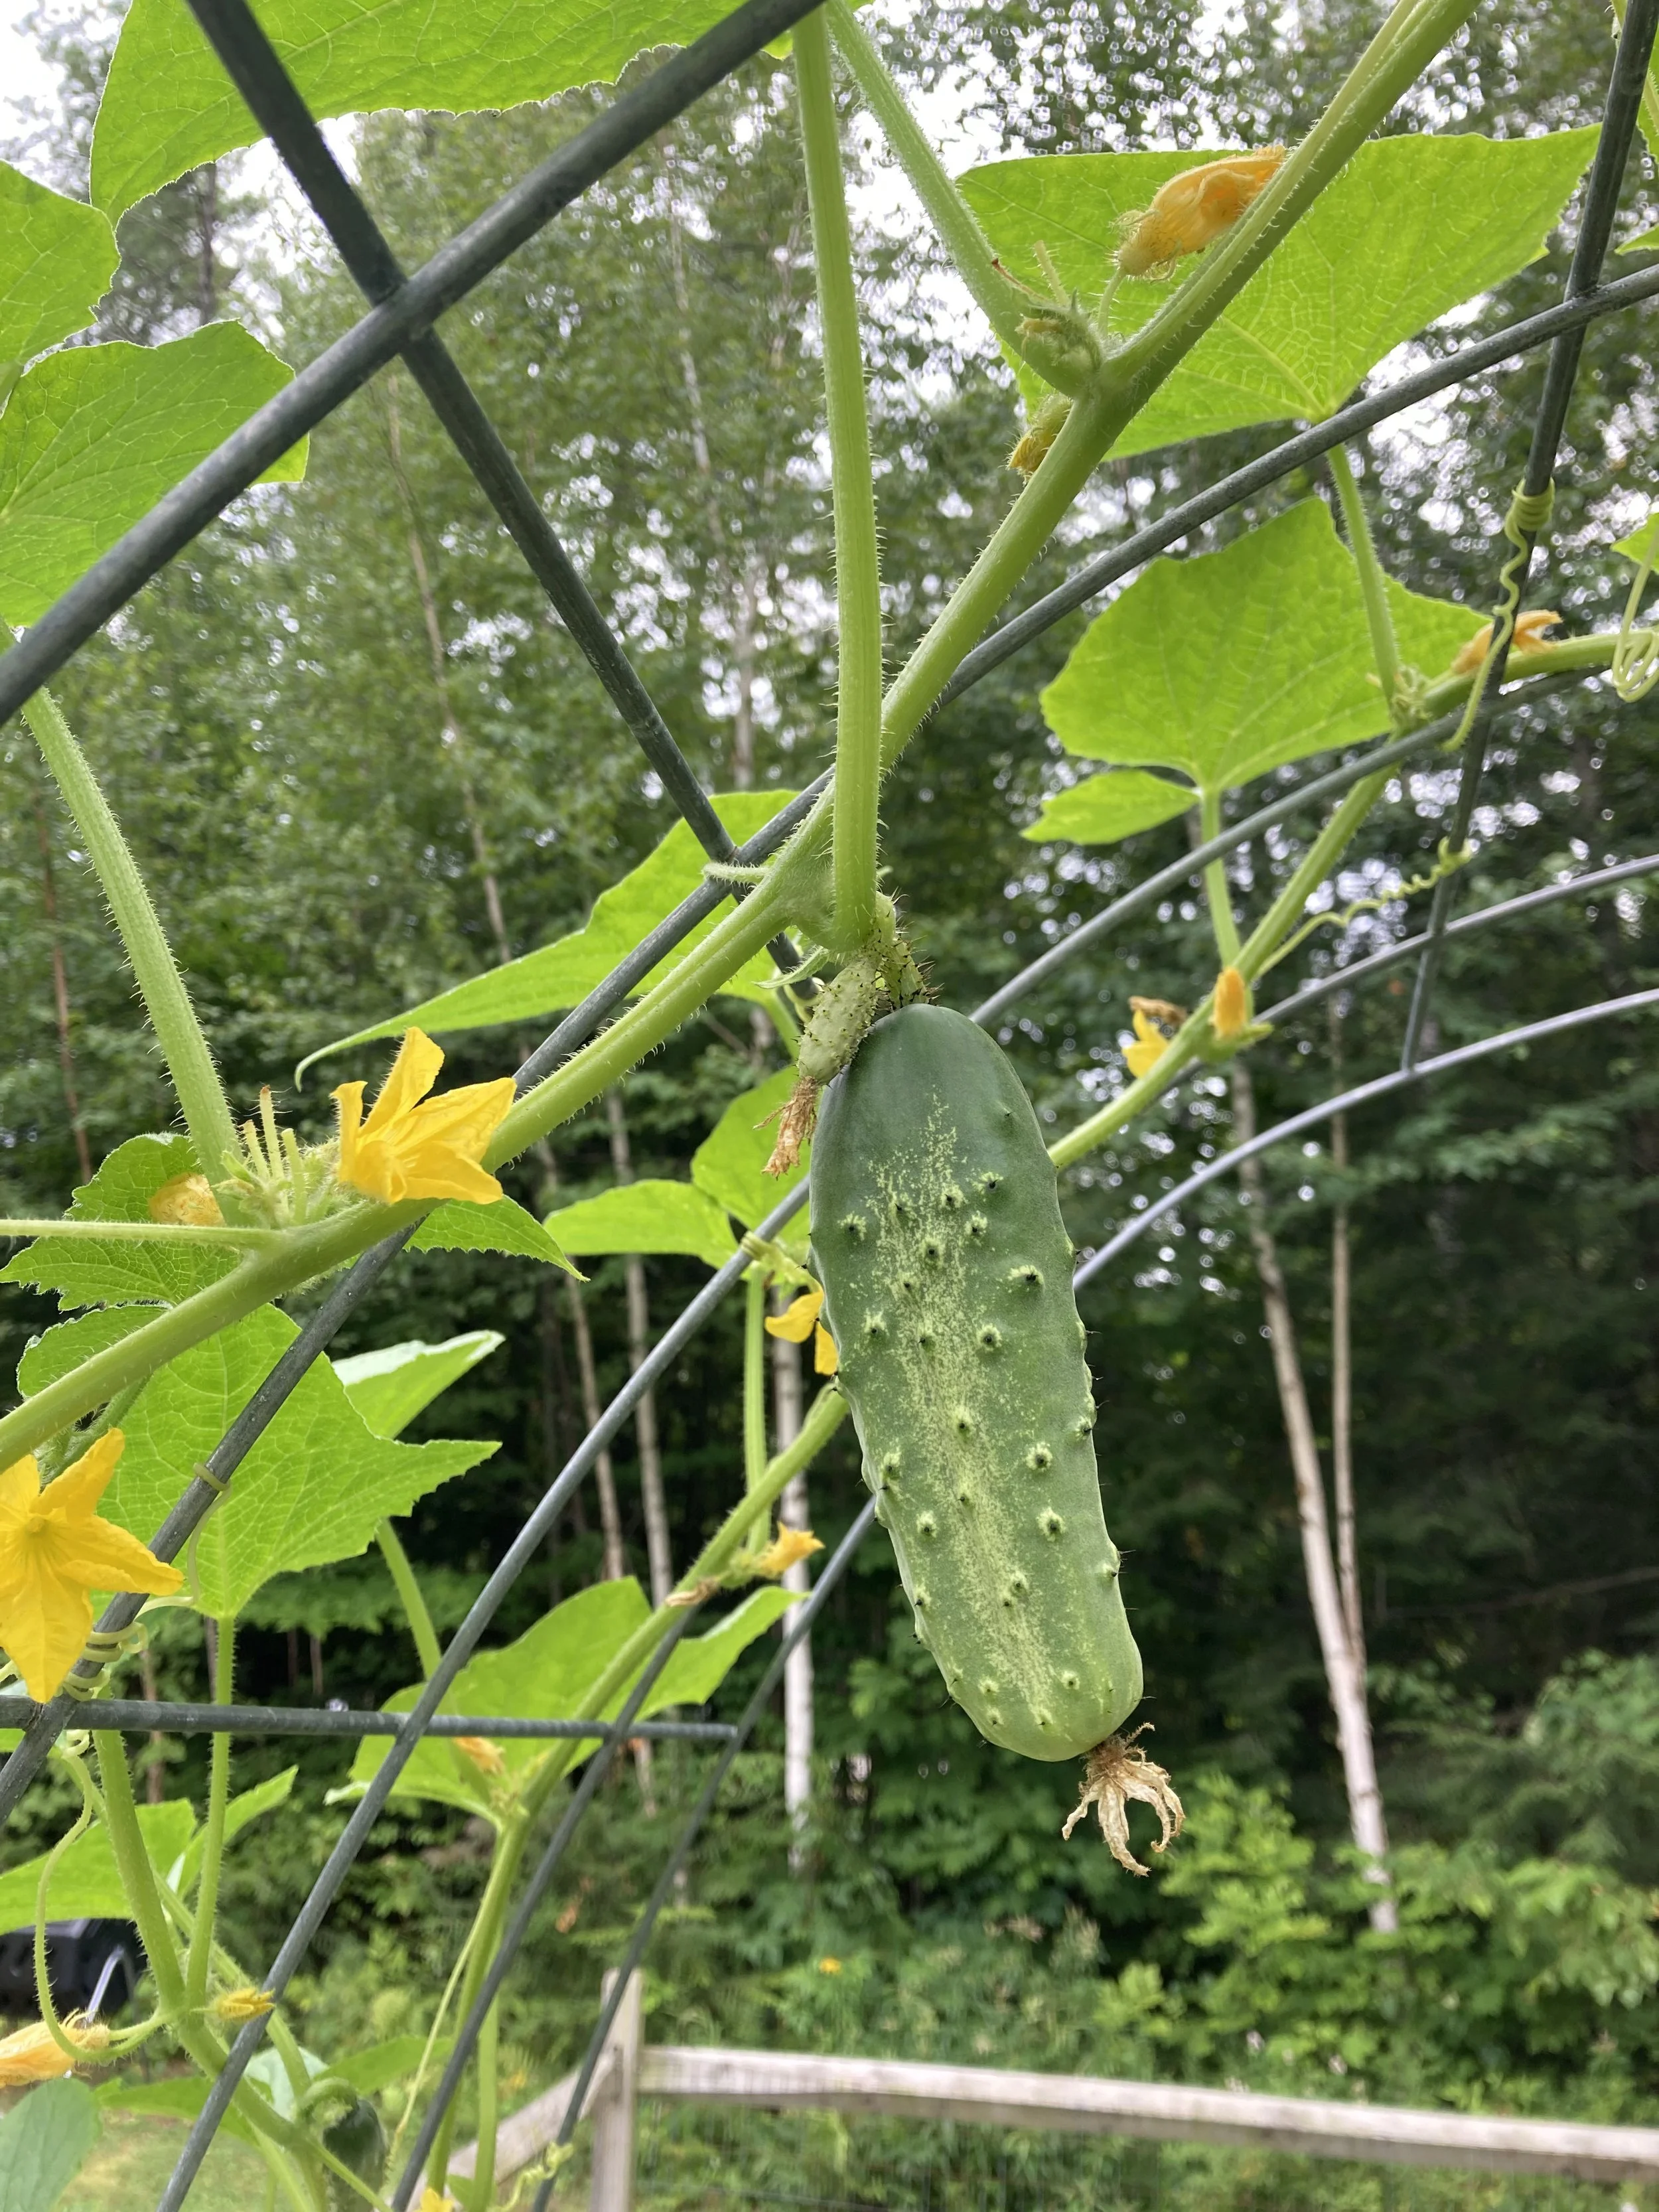
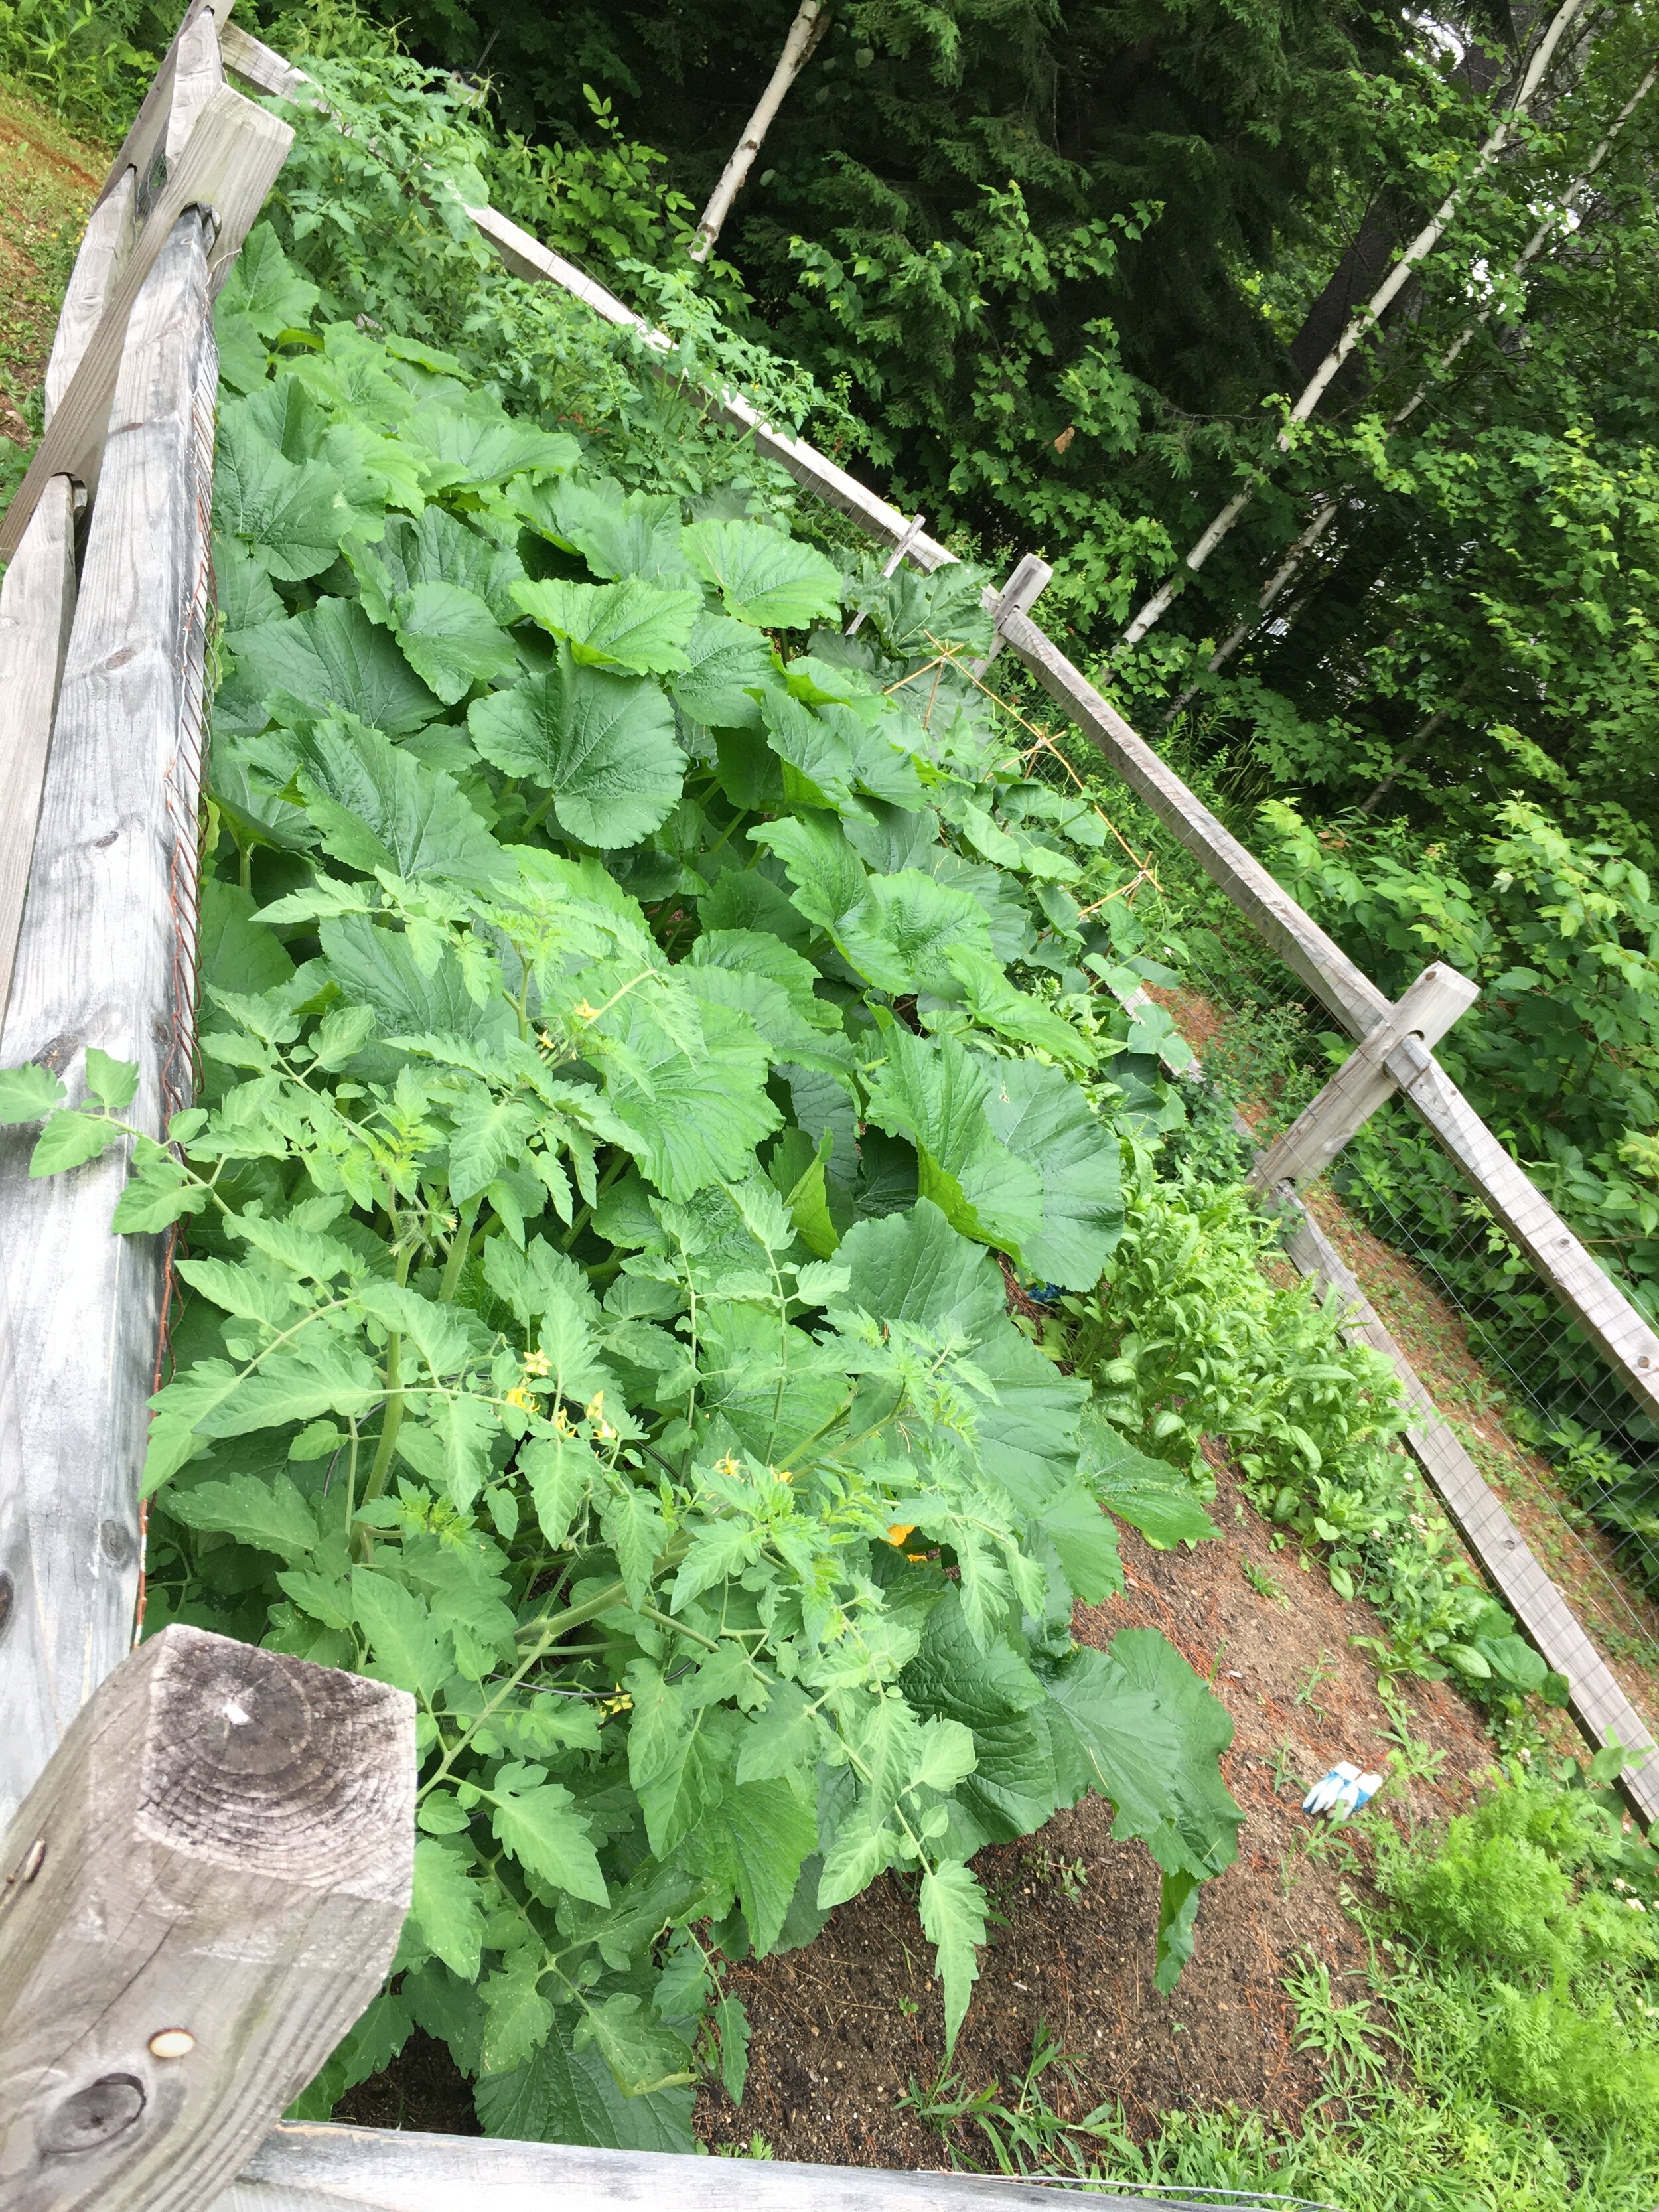
Now you can plant! We planted ours with vining cucumbers, but you could plant just about any vining plant on these - including peas, squash, ornamental gourds, flowers, etc.
The vines do a great job climbing the arch on their own, but it’s a good idea to check them daily and gently guide the vines where you want them. There’s always a rogue vine that will try to go the other way! They will especially need some help being trained to follow along the top of the arch since their natural inclination will be to continue growing straight up rather than bending around the curve at the top.
And that’s it! Overall it was a very easy project and one we will definitely continue with in the future. I also noticed a huge benefit for our pollinators too - the bees were able to reach the flowers easily and we had a bumper crop of cucumbers this year. They were also very easy to pick hanging down from the arch.
Good luck on your cattle panel trellis adventure!
From earlier in the season, before the vines reached the top.
We’ve lived in New England all our lives, but I’m ashamed to admit we’ve never tried maple sugaring ourselves until now. We have several family friends that own large-scale sugar shacks so we’re familiar with the process and had some great resources to ask questions. We kept it very small scale and simple, but you can get more technical with the process to make really consistent, great maple syrup. If you want to try this at home, I’d recommend doing your own research first to make sure your syrup is made safely and well. | This post contains affiliate links |
I didn’t take too many photos of the process but we started by tapping the trees. We drilled into sugar maples at a slight upward angle so the sap will drip out, tapped in special metal spigots (also called spiles) with hooks, and hung buckets to catch the sap. It's important to do this at the right time of year when the sap is running, usually late winter/early spring when the days are above freezing and the nights are cold.
Once we got a total of 5 gallons of sap, which only took a day or two, we started boiling. It’s a good idea to boil outside as it takes a while and makes a lot of steam and you probably don’t want that much moisture inside your house. We used a stainless steel pot on a propane stove ring in our driveway to boil. Once the liquid was reduced by half, we added more sap, and just kept boiling it down until it was a good color/consistency.
Serious maple sugar makers would reccomend you use a hydrometer to test the water content of your syrup to make sure it's at the right consistency. However, we totally just winged it and kept reducing until it looked pretty good. We prefer a lighter, more honey-tasting syrup so we didn't reduce it down to a dark amber syrup.
It takes a lot of sap to make a little syrup. We boiled down about 3+ gallons of sap to get the maple syrup you see in the jar. It takes a lot of work and a lot of time, but it was a fun experience for the kids and now we get to enjoy the fruits of our labor. Mmmmm, pancakes!
Disclaimer: This was a very quick overview on the process we did to make maple syrup. If you decide you would like to give it a try, I recommend researching it on your own and asking an experienced producer for advice before starting.
Since we moved into our home several years ago we’ve been trying to establish more pollinator-friendly areas in our yard. We planted perennial flower beds wrapping around our house which are now well established, and we also have a veggie garden we plant every summer. One item that we’ve been wanting to add has been a solitary bee house to help make our space even more bee-friendly. Thankfully Kind Bee Farms was kind enough to send me one of their all-inclusive bee kits to try! | This post contains an honest review of product provided by Kind Bee Farms |
Kind Bee Farms is unique in that it's an all-inclusive bee experience - you don't just get the solitary bee house, but you get baby leafcutter bee cocoons to hatch too!
The whole kit is well packaged and thought out and comes with everything you need to get started. Since our kids will be home this year remote learning/homeschooling, we thought this would be a great project for science enrichment too.
Once you open your kit, you have the choice whether to let your cocoons start the hatching process inside or outside. We opted for inside so our kids could get to see them come out their cocoons - and don’t worry, letting these bees hatch inside your house isn’t as scary as it sounds! The cocoon box comes with a breathable window so you can see the process and keep them contained. Once 1-5 bees have hatched it’s time to bring the box outside, take the lid off, and put it in the loft of your bee house.
Once our bees started to hatch, we moved the cocoon box out to the bee house. We loved how the bee house looked on our potting bench but realized the afternoon sun was too intense here so we ultimately decided to hang it on our garden fence. This worked out well so our kids could keep a good eye on the bees too. These bees are non-aggressive so I’m personally not worried about our kids watching them up close.
Hello little bee friend!
We’ve had a few bees hatch over the last few days and I’m excited to see the rest of them hatch, move in, and pollinate our fall flowers and veggie garden!
End of Season Update: Ultimately we only had a few bees hatch and then they stopped… I was worried maybe a brief cool spell we experienced had done them in but after hearing back from Kind Bee Farms I found out that they unfortunately had some warehouse and processing delays due to COVID restrictions which affected their cocoon timing. They were kind enough to offer those who didn’t have a great hatching experience free cocoons next year which I thought was great customer service. I’m really looking forward to trying again next year and am sure we will have great results next time!
- I received this item for review from Kind Bee Farms but all opinions expressed are my own. Please see our full Disclosure Policy for more information -
So our garden isn’t magazine-worthy (and it definitely could use a good weeding - the spot by the gate gets so over-run with crab grass I can never seem to keep up) - but it’s been doing really well this year and I thought I would give a quick tour and share some things we’ve been doing in our Victory Garden. New England, Zone 4-5. | This post contains affiliate links |
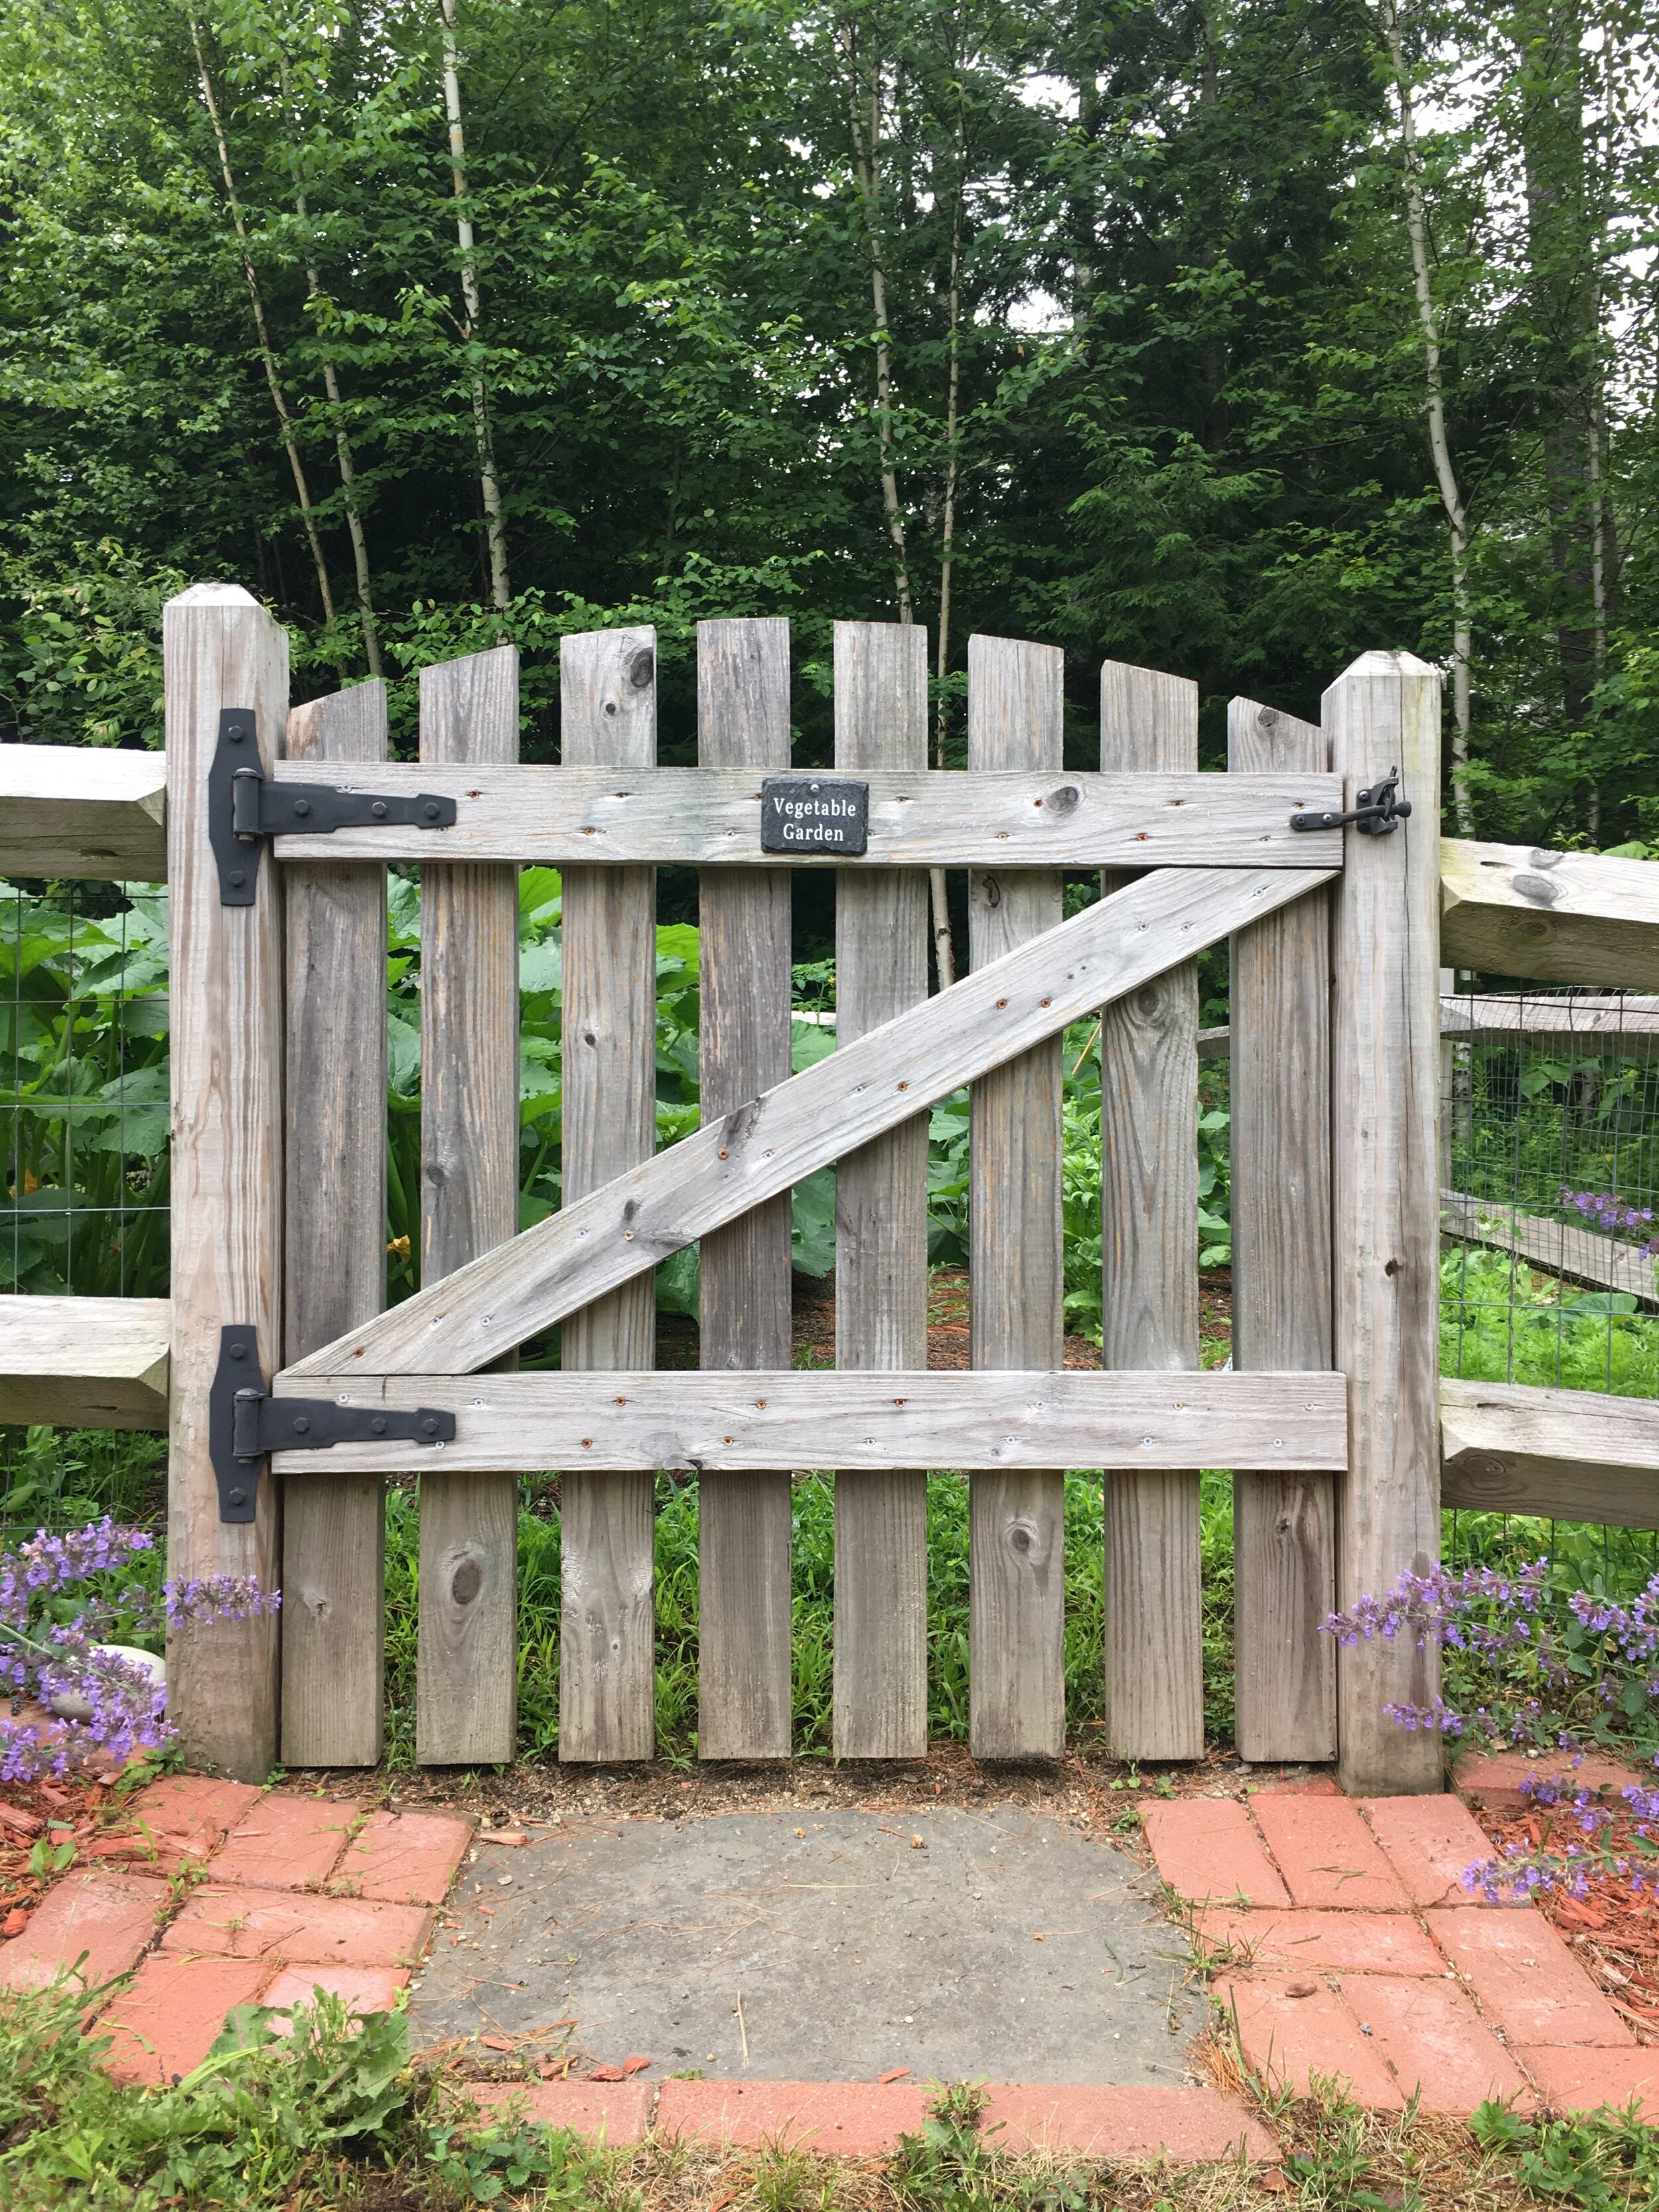
Our garden is approximately 12x24 feet. My husband built the enclosure seven years ago with split-rail fence lined with garden wire fencing (to help keep critters out) and then designed and built the gate himself - the gate is absolutely my favorite part! At the front of the garden I inlayed bricks and pavers (all of which we had on our property left over from the previous owner years ago) to create a little stepping stone walkway leading up to the entrance of the garden and a small flower bed on each side.
Inside the garden everything was planted from seed and directly sown into the ground mid-May with the exception of the Rhubarb plant (it’s a perennial) and the Tomato plants (I purchased them as seedlings from a local garden center).
For fertilizer we put a few bags of composted cow manure in before rototilling in the spring, and then after planting the seeds I sprinkled a small amount of 10-10-10 Fertilizer across the garden.
In each of the front flower beds I planted Catmint which is a perennial and a great pollinator plant! The blooms attract lots of bees and butterflies and help encourage pollination in the vegetable garden. I also just love how wild and cottage-y they look. They’re also very drought tolerant and hardy - a great no-care plant once they’re established.
Soon I would like to also get some type of Mason Bee House to add to the garden to further ecourage pollinators to come to the garden.
Just inside the garden, along either side of the front, I planted Snap Peas against the fence so they would have something to climb. I also planted Carrots along this front area on each side as well.
When I directly sow the seeds into the ground, I usually stake the empty seed packet with a twig (seen above for the Snap Peas), to mark where I’m planting and so I can reference when the seeds should start to sprout, mature, etc as they grow. Now that my plants are mature I could take all these out but I haven’t just yet.
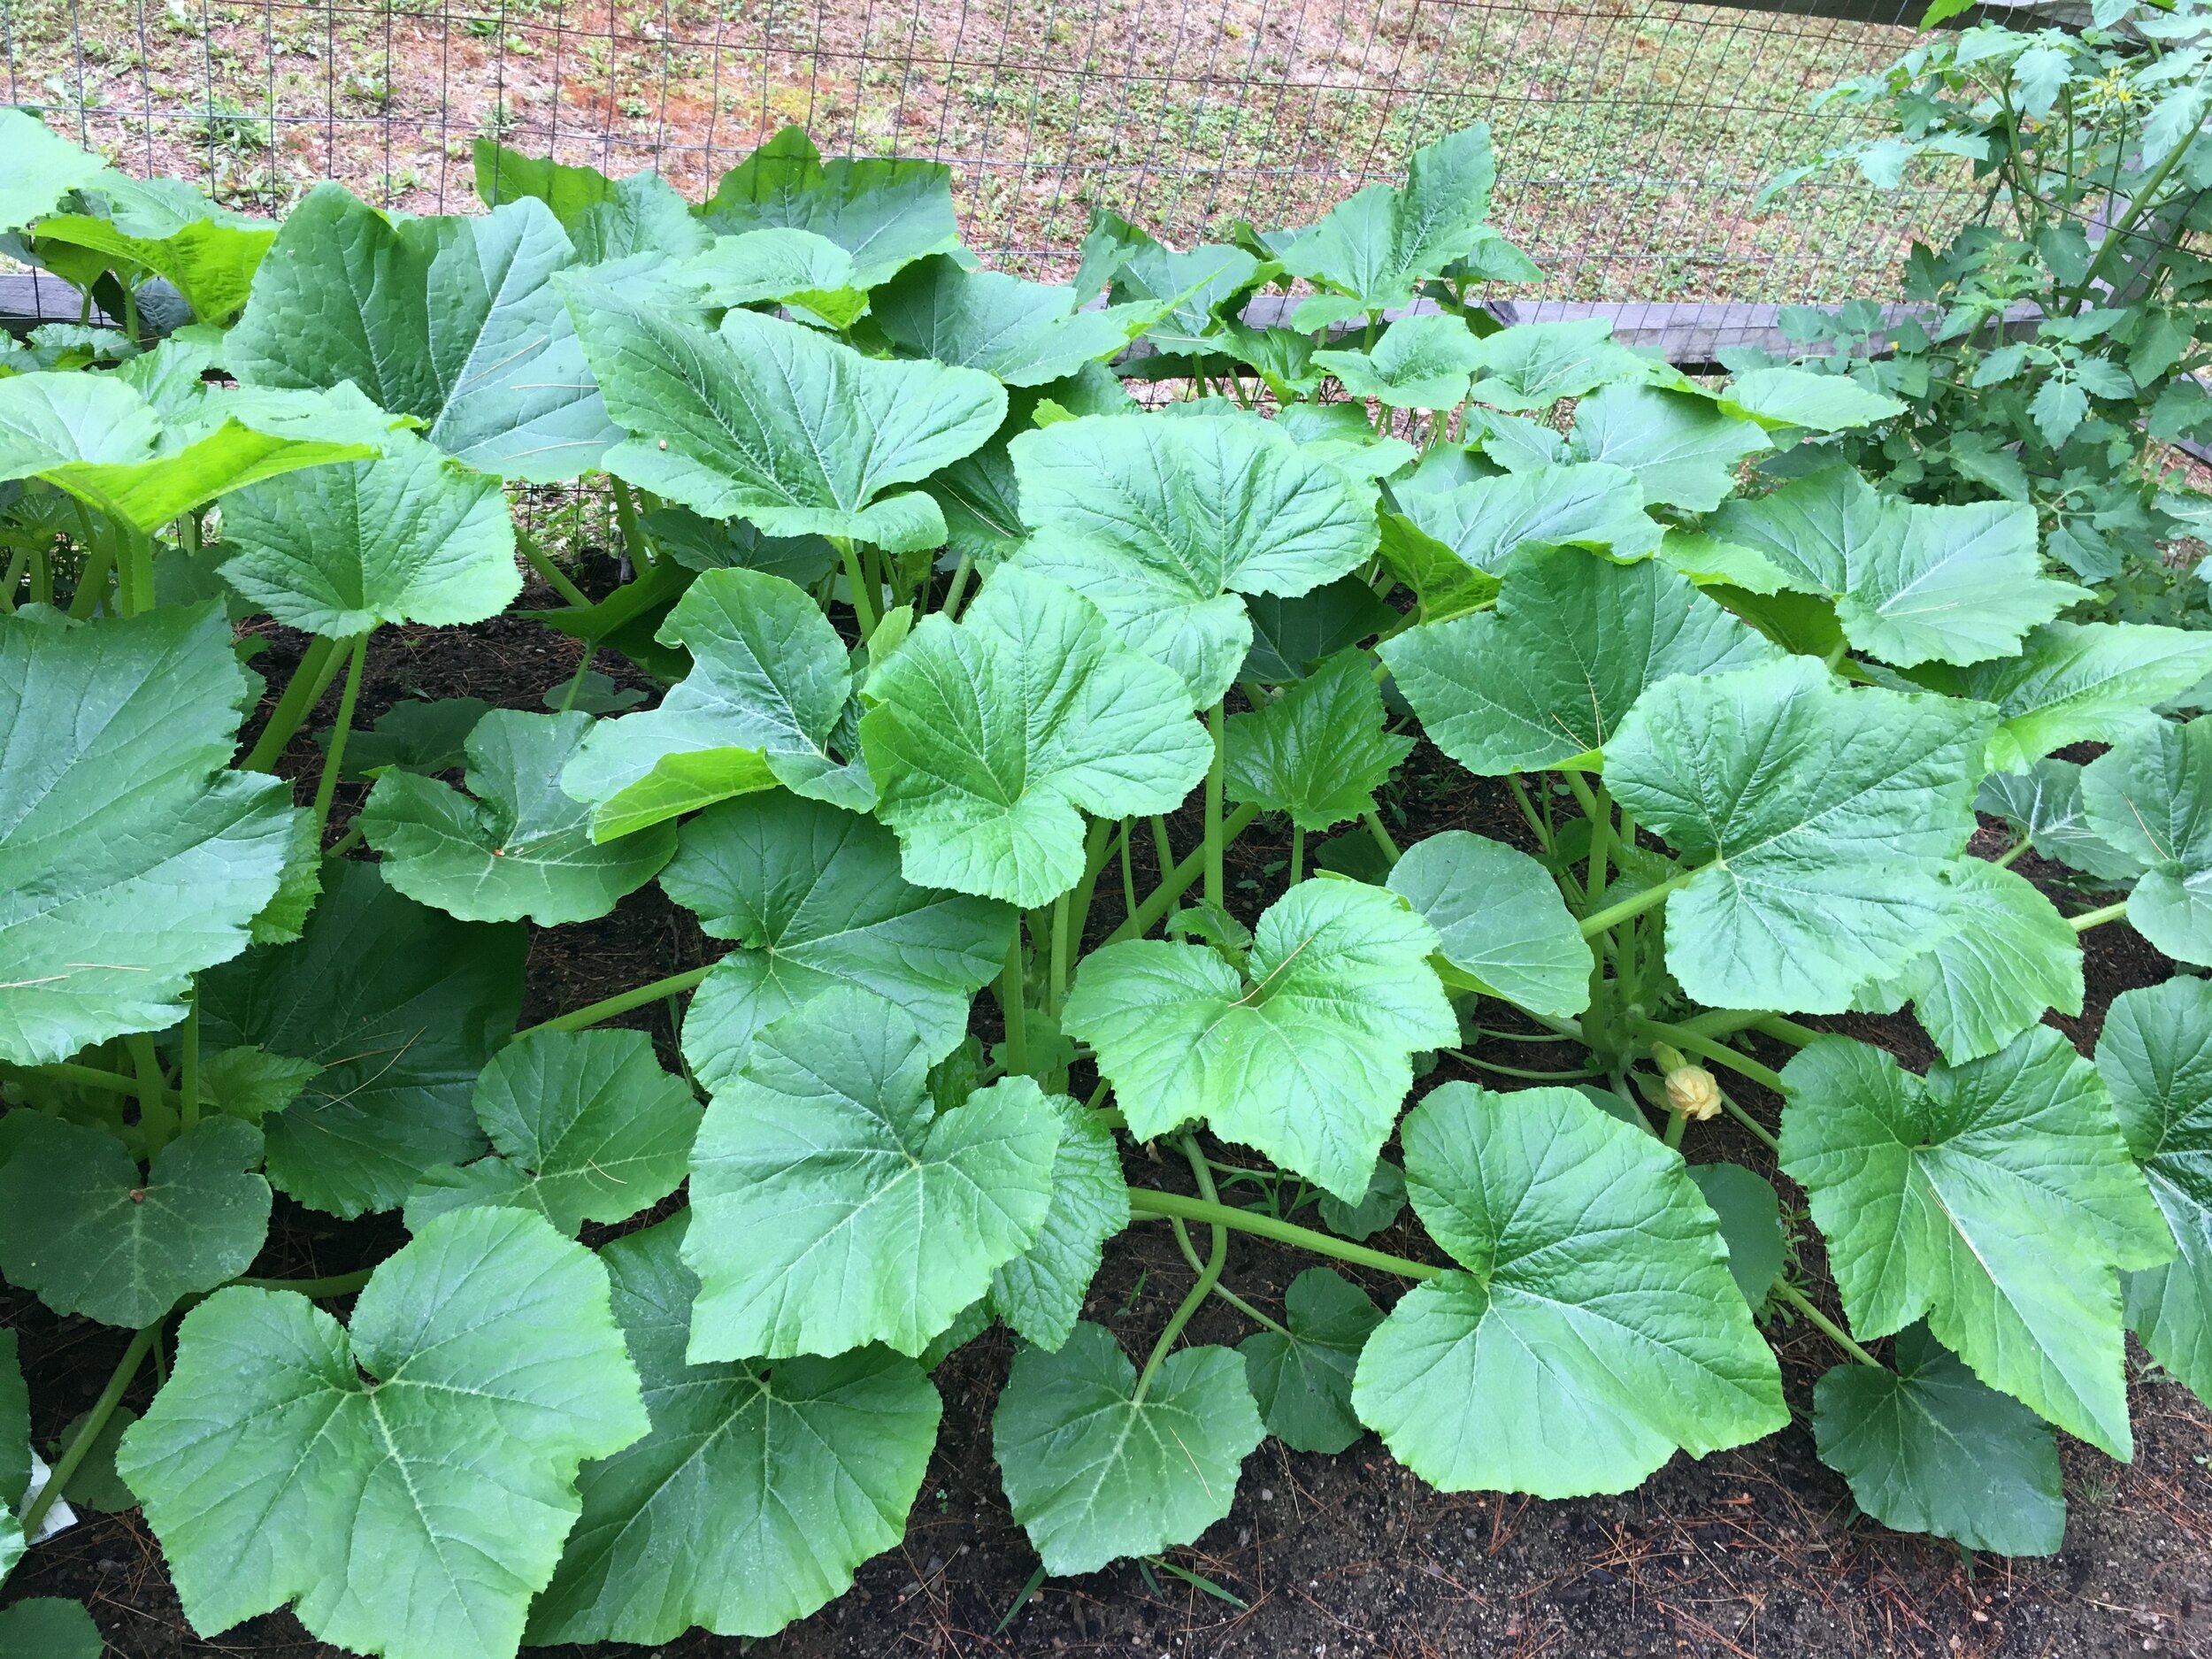
The Zucchini plants are huge this year! Right up to the top of the fence… though I do need to thin out some of the lower leaves on the ground soon for better air flow and access for pollinators (it also can help keep your plants from getting disease/mildew from the ground too).
Here are my Summer Squash plants, which are a bit smaller than the Zucchini ones but doing really well overall. I also need to thin out some of the lower leaves on these as well.
Spinach are cold weather plants and these ones pictured above are sadly done (I actually pulled them out after I took these photos). Once it starts getting hot they tend to “bolt” or grow upwards really fast and flower. Once they do that the leaves are bitter and don’t taste good. This spinach crop is done for now - though I will try to plant more Spinach late summer/early fall to get another harvest in the Fall.
Cucumbers are doing well too. It's a bit hard to see in this photo but I made a small trellis out of Bamboo Stakes and twine for them to grow on. The trellis may look flimsy, but bamboo is actaully really strong (and eco-friendly) so it's great to use in the garden to help support plants.
Along the back I have several Tomato plants growing, both cherry tomato and slicing tomato varieties; behind these along the fence I also have some Sunflowers growing too.
Now for the “showstopper” of the garden - our Rhubarb plant! This is definitely the plant that gets the most interest and questions about in our garden because it’s so big. Rhubarb is a perennial and will come back each year - so make sure to plant it somewhere out of the way where it will have room to grow. We planted this one in the back corner of our garden and marked the area with a stake so we don’t rototill over it in the spring.
While I’m honestly not a huge fan of Rhubarb myself (it’s very sour), growing it is a tradition in our family… when I was growing up we had a very large garden with at least 16 Rhubarb plants. We had so much Rhubarb that we would pick literally garbage bags full of it to give to neighbors and people at Church.
I transplanted this Rhubarb plant from my parents’ garden so I’m not sure on the variety… though from reading around online I’m guessing it’s some type of Canadian or Siberian variety. It can get very large with thick stalks and leaves over two feet across. If you decide to grow Rhubarb, make sure to read up on how to harvest it - you don’t want to over-pick the plant and the leaves are inedible (they’re actually somewhat toxic), it’s just the stalks that can be used.
Across the yard we also have some wine barrels that we’re using for an herb garden. Some of the more hardy herbs (Chives, Garlic Chives, Peppermint, Oregano) come back yearly, despite the fact the wine barrels freeze solid in the winter. I bought the blank slate garden markers on Amazon (and here is the how-to post on how I made them).
This year we also added two blueberry bushes to our landscaping since we didn’t have any fruit trees or bushes yet. It’s recommended to have two different varieties of blueberry bushes to encourage cross-pollinating and better fruit production, so we planted two different kinds near each other. We are already getting a few large berries from them which is very exciting! Here’s hoping they continue to do well in the years to come.
And that’s our little garden tour - thanks so much for following along! I’m no expert by any means, but if you have any questions please let me know.