I'm a wife, stay-at-home mom, crafter, and blogger living in rural New England. As seen in Martha Stewart Living, Food Network Magazine, and more! | Tutorials, DIY, crafts, parenting tips, recipes, money saving tips, product reviews, local product features, New England living, intentional living, and more! |
I know that pregnancy stretch marks are hereditary, and they say there's no escaping them.. but somehow I did.
Stretch marks run in my family and I was sure I was going to get ginormous ones during my pregnancy but somehow I didn't get a single one (whew!). My lack of stretch marks was probably due to a combination of slow, steady weight gain, staying well-hydrated, moisturizing, and a ton of luck, but I'm also going give a bunch of credit to Trader Joe's Coconut Body Butter.
I used this stuff twice a day on my belly and I'd like to think it worked wonders! It smells amazing, rubs in well, and soothed the awful itching that comes with stretching skin. I'm definitely recommending it to all my expectant friends!
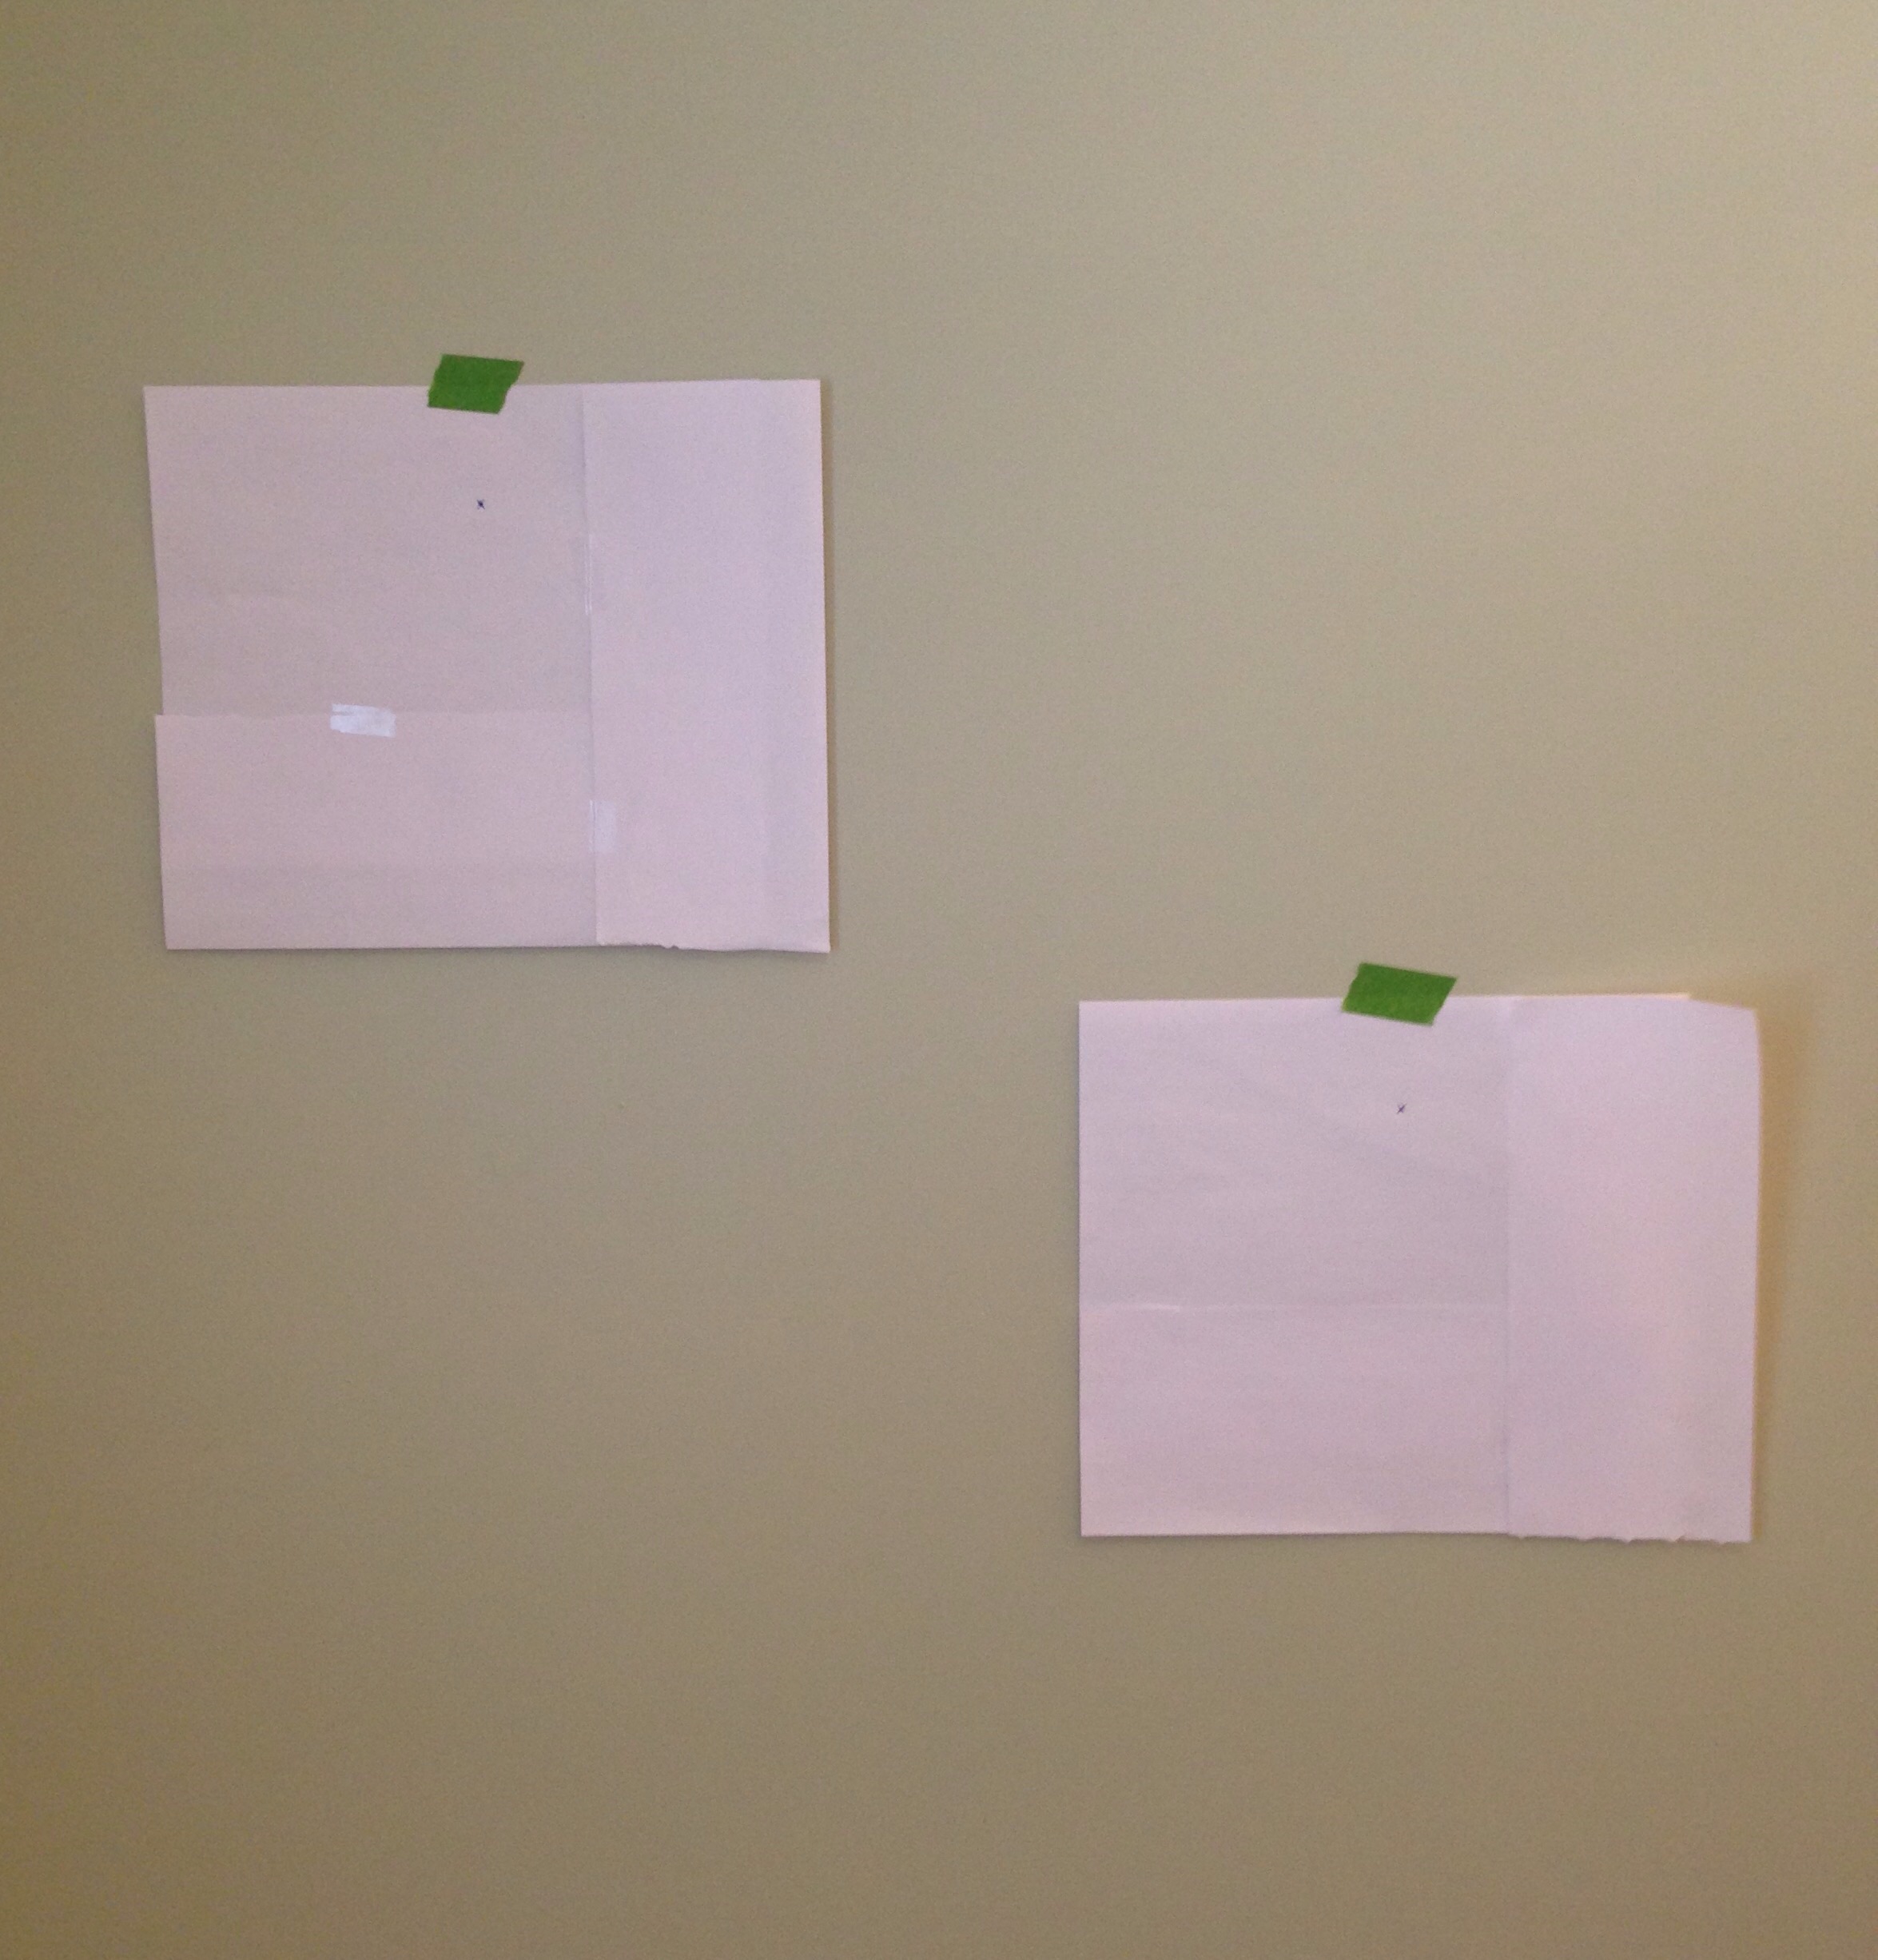
This post will show you a simple technique to lay out gallery wall so everything is spaced the way you want, without the trial and error of putting a lot of nail holes in your wall. My example is very small-scale (only two photos), but this technique would work well for any size gallery wall.
Materials:
picture frames
paper
painter's tape
scotch tape
pen or marker
nails
hammer Also useful:
tape measure
level
How-to:
Cut paper to size of frames. I used computer paper since it was handy, taped together in order to make it large enough.
Next, lay your paper template over the back of the frame and feel where the hanger is. Mark were the nail would be with a pen or marker.
Now's the fun part - start laying out your gallery wall by hanging up the paper templates with painter's tape and moving them around until you're happy with the height, spacing, etc. Here is where a tape measure and level might be useful if you have large pieces to hang or want to get the spacing absolutely perfect.
Next nail right through your paper templates, where the marking for the hanger is. Then take down the templates, ripping the paper off around the nail.
Now hang up your photos, and they'll be spaced just the way you wanted them!
This tiny gallery wall is in our family bathroom - it will have black and white photos of our little one taking a bath and brushing her teeth. I can't wait for the photos to come in so I put them in the frames!
Okay, this is a pretty silly little trick but I've been doing it for years... the best way to get twice as much out of your facial cleansing pads..? Cut them in half!
| Aveeno Cleansing Pads |
I don't wear a lot of make-up and these Aveeno Pads are super-soapy, half a circle is more than enough to remove my make-up and wash my face. Whenever I get a new jar, I just cut them all in half with scissors and put them back in the jar ready to go. It only takes a few minutes and by doing this simple little thing I get two months worth of product for the price of one!
File this one under "things I wish I started sooner..."
So our little one is almost 11 months old, and though I'd seen the Pampers Rewards numbers on her packages of diapers and wipes I never bothered to look into it ("Ain't nobody got time for that!").
But the other week my sister-in-law was saying how she's been doing Pampers Rewards for awhile now and has been getting rewarded with photobooks and toys for free... that got my attention. So I checked it out and signed up, it's pretty straightforward - make an account and enter the codes printed on packages of diapers and wipes. Once you have some points you can redeem them for all sorts of things - everything from contributions to charity, to free credits at Shutterfly, to free toys. And to make it easier there's even an app where you can enter codes on the fly from your phone (though I wish you could just scan the code instead of entering it.. now that would be easy!). Consistency pays off too - if you enter codes every month without skipping a beat you get rewarded every three months with little gifts.
Now if only I had started this when she was first born, then I'd be able to order all our Christmas cards for free!
Tip: Make sure to like Pampers on Facebook too - they periodically post free codes to help you boost your points!
UPDATE (May, 2015): Pampers updated their app so now you can scan codes with the camera on your phone rather than typing them in (hooray!). As of right now this feature is a little glitchy, but hopefully they'll work out these bugs soon.
Want to see what we've gotten from Pampers Rewards? Check out my other posts:
I always get told I make the best cookies, but making amazing cookies isn't all about the recipe - technique is what makes a good recipe great! Read on for my 5 tips to make perfect cookies, every time. | This post contains affiliate links |
5 Tips for Perfect Cookies
Sift
Make sure to sift all your dry ingredients. Doing this breaks up any clumps of flour or baking soda, combines everything evenly, and helps make your cookies light and fluffy.
Parchment Paper
Always line your cookie sheet with parchment paper, this is key to getting the cookie bottoms that perfect light golden brown. If you're planning on doing several batches of cookies make sure to round the corners of the parchment with some scissors first, as the sharp corners of the paper can start to burn after a few times in the oven.
Cookie Scoop
A cookie scoop is probably one of the best little investments you'll make in the kitchen and I don't know how I ever lived without mine. Using a cookie scoop ensures you get uniform-sized cookies every time and makes the whole process of getting your cookies ready for the oven go so much faster.
Time
Always bake your cookies for the lower suggested time. Cookies that are just cooked all the way through make for the softest, chewiest cookies. If they aren't cooked in the middle yet you can always put them back in for another minute or two, but it's best to start with the lowest time.
Your Secret Weapon - the "Bread Trick"
Accidentally over-cook the cookies? Forget to cover them on the counter? Believe it or not, the magical solution for over-cooked or stale cookies is just a slice of sandwich bread and a big ziplock. Put all the cookies in a gallon ziplock bag, throw in a slice of bread, seal, and leave for a few hours - the cookies will get softer as the bread gets staler. Magic!
I love consigning - it's so refreshing to clean out the closets, get rid of some of that stuff that's been weighing you down and get a little money back in return. Here I share the basics as well as my 5 top tips on making the most from your consigned items.
What is consigning?
Consigning is bringing your used or new items to a shop that will sell them for you and give you a cut of what it sells for. Yes, you could have a yard sale and keep all the money yourself but consigning is great because you don't need a yard full of stuff and a free Saturday to make a little extra money - and you also don't have to worry about meeting potentially creepy strangers from Craigslist or Facebook Yard Sale groups. With consigning, you can sell as little or as much as you want with no work involved - perfect for all those busy folks out there.
There are lots of different types of consignment shops - some only do clothes or kid items, others do antiques and decor items, and some do a combination. There are even really specific shops out there for things like bridal and formal wear, so no matter what you're looking to get rid of there's most likely a consignment shop for that.
The format for all these types of shops usually goes something like this: Items are generally consigned for 90 days. If the item sells you get a percentage of what it sells for, usually 40-60%, and some stores offer you a higher percentage if you take the amount in store credit rather than cash. Some consignment shops cut checks to you once a month, others keep tally using a computer system and you can even check in online to see how your items are doing. If the item doesn't sell within it's allotted time you often get the choice to donate it to charity or come and pick it up. We always do the charity option, that way we get the chance to make a little money back but if something doesn't sell it goes on to help someone else - it's just win-win.
My 5 top tips on making the most from your consigned items:
Keep with the seasons. Most consignment shops will only take what's in-season - if they don't, make sure to bring in only what's current or will be soon. Bringing in a snowsuit in May will get you no where - it likely won't sell in the allotted time and you will lose the sale and therefore the extra cash you were hoping to make.
Make sure your items look their best. This means making sure your clothes are clean, have no stains or heavy wear-and-tear, loose threads are cut off, and it's wrinkle-free. If you're consigning decor items, make sure they have no damage and are dust-free. Consignment shops won't take anything that doesn't look clean and ready to sell.
Know your market (consignment shop + audience). Some consignment shops are more "high-end" than others so it's important to know what kinds of items and brands they take and what they're looking for (there will be places that only take premium clothing brands like GAP, J-Crew, etc). Some shops will even post a list online of what they are looking for or no longer taking at this time. Once you get to know your local consignment shops, you'll soon learn where your items do best and you can decide where to bring what and when.
Always be ready to consign. Always have a designated space (a plastic tote, box, or even a paper bag) to put items you'd like to consign. How many times have you passed over that sweater in your closet? (a million) Put it in the box. A well-meaning relative sent you an outfit for your little one that's already two sizes too small? Put it in the box. You don't have to do a big purge to consign (though that's always a good thing), you can consign as you go.
Shop where you consign. If your consignment shop offers you a higher percentage back if you take your cut as store credit, definitely consider doing that - your money will go further for you. One of my favorite consignment shops is one of those "higher-end" boutique places where they sell a mix of consigned and new items. I love consigning and shopping there because they give me a higher percentage back as store credit and I can put it towards gently used premium-brand clothing or new clothes and gifts.
Where to start?
Ask around, Google around. See what's near you, then give those consignment shops a call or send them an e-mail to get more information. Make sure to find out what their policies are and if you need an appointment to drop off items.
Happy consigning!
A glimpse at our glamorous "To Be Consigned" system. I have three consignment shops I use regularly: one for premium brand clothing, one that will take any brand of clothing, and one for decor items. I write the initials of the consignment shop on each bag/box and leave them tucked away but still easily accessible. Then whenever I have an item I want to consign I drop it into the box for the correct consignment shop. The next time I know I'll be going by a particular place, I make sure to bring those items with me and drop them off - it couldn't be easier!
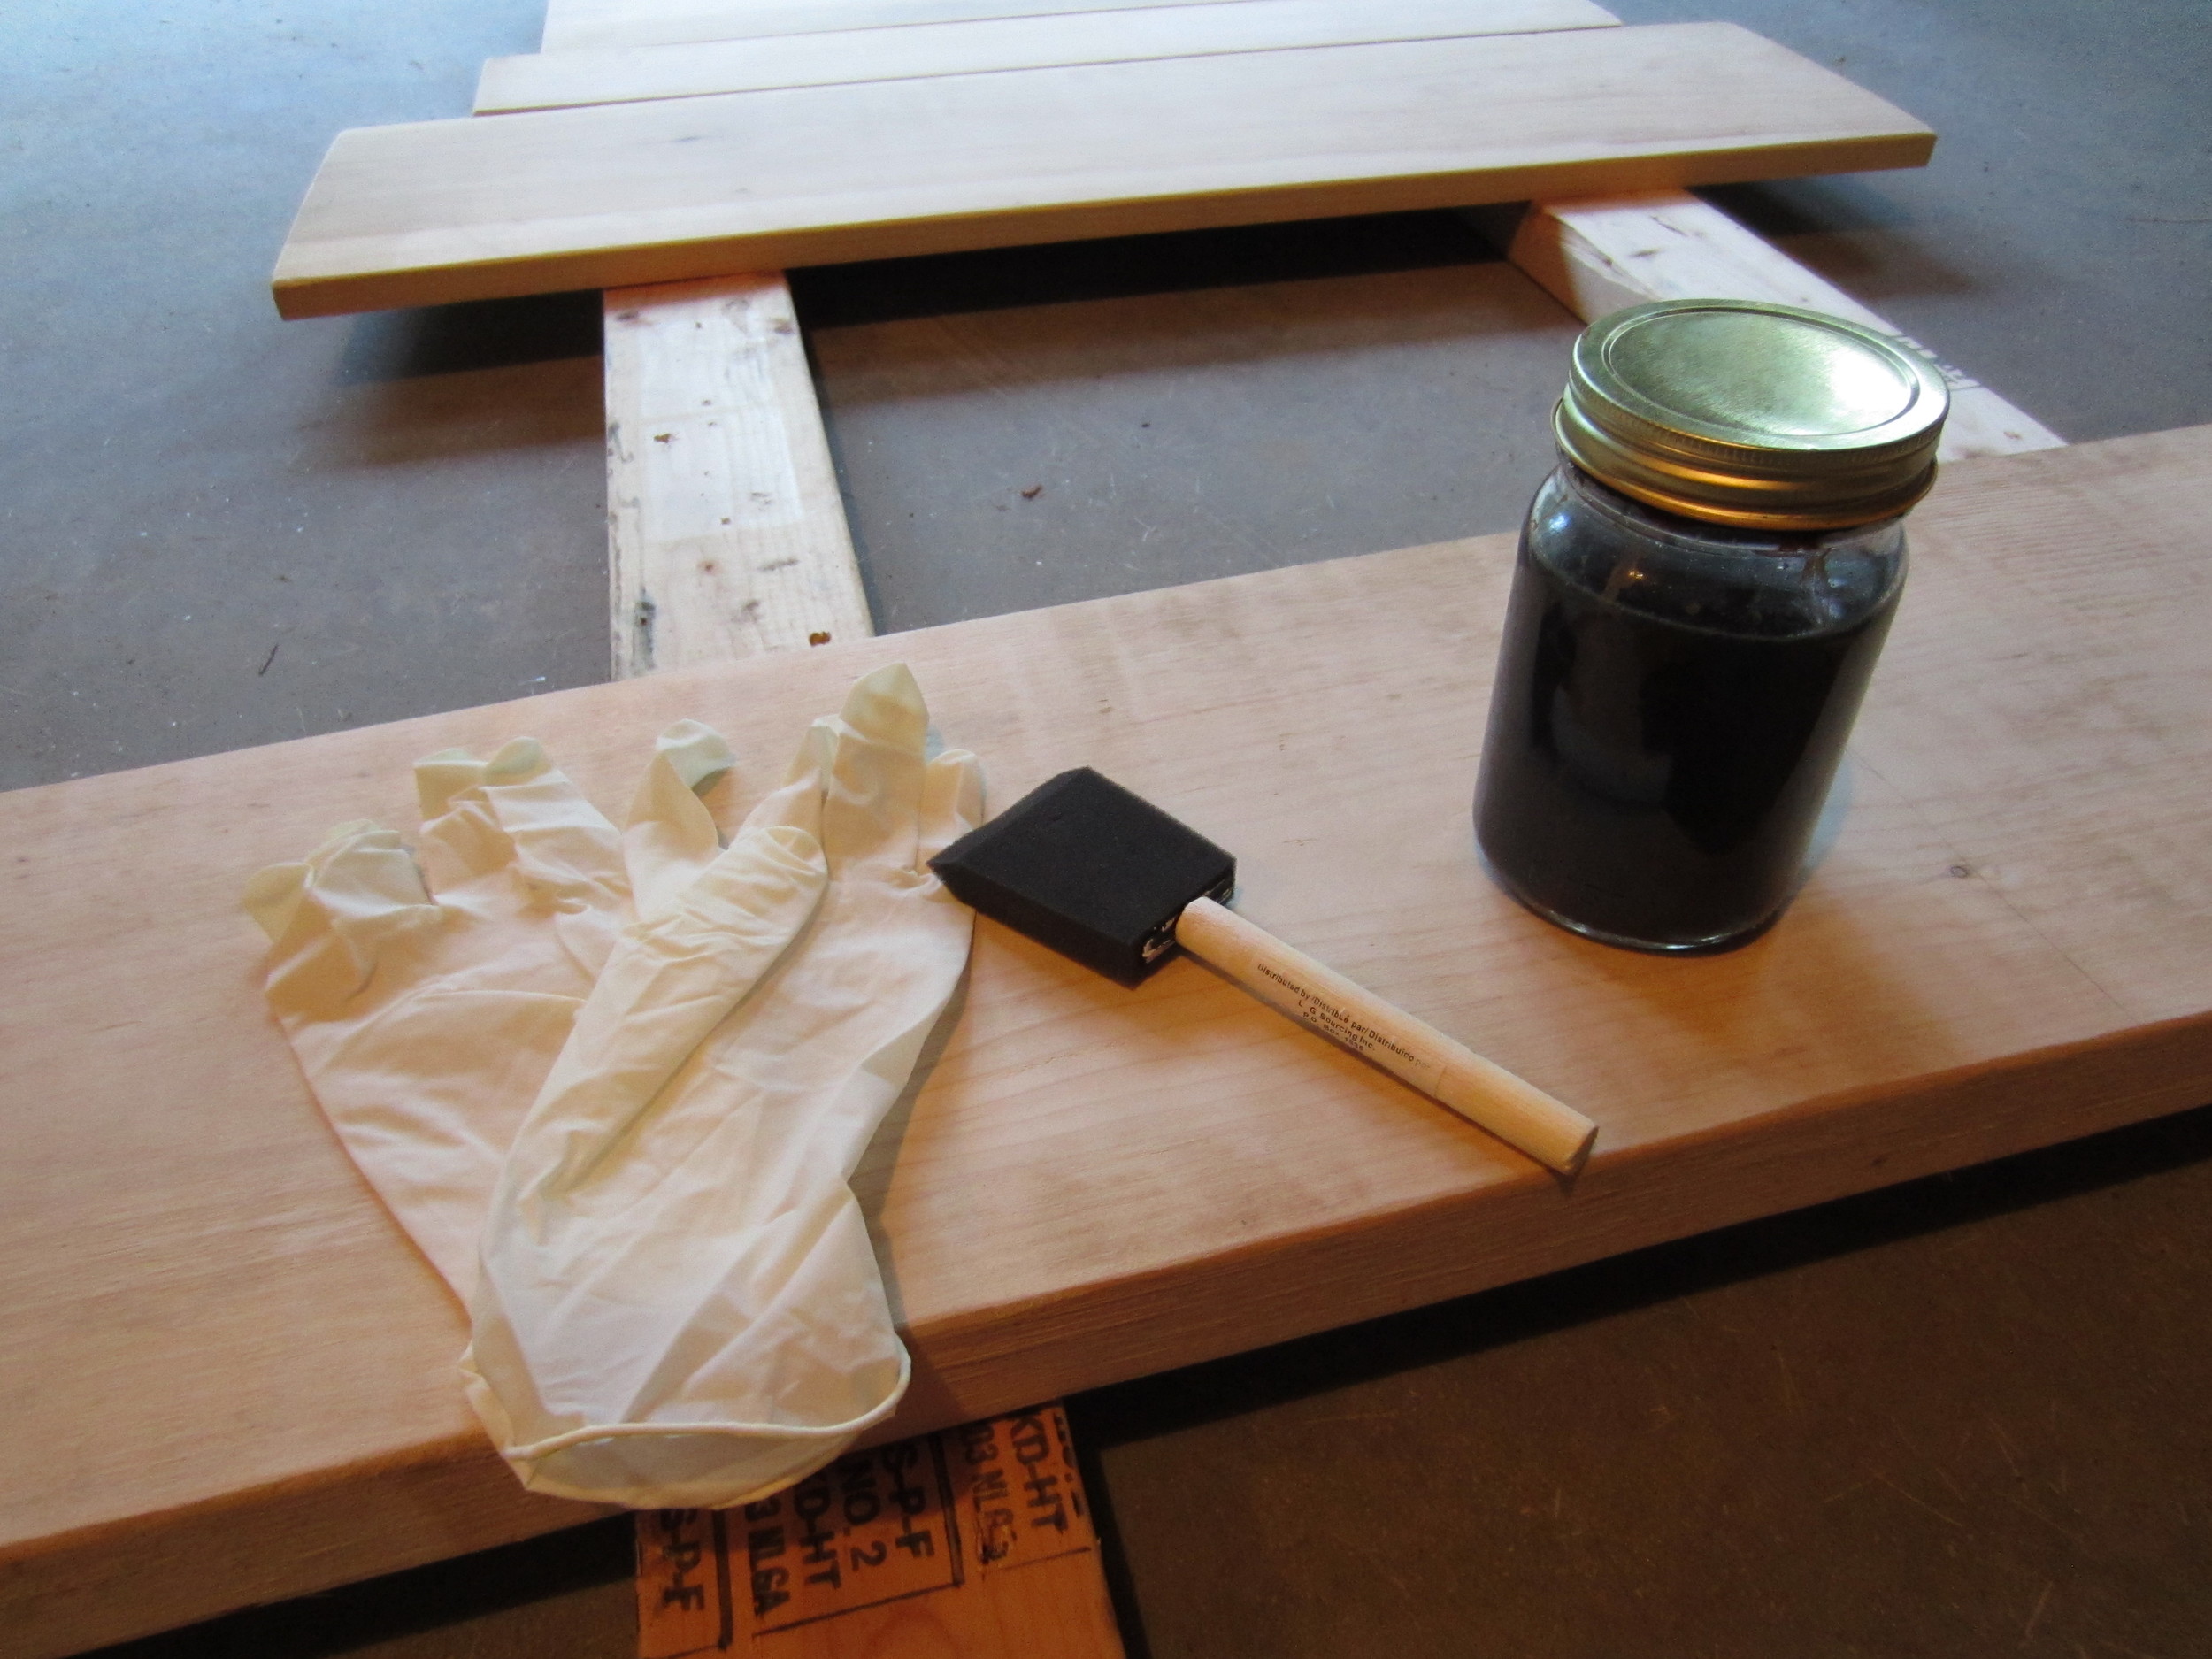
I'd heard that you can make your own stain using just steel wool and regular vinegar. I was intrigued and had to give it a try myself.
Materials:
glass jar
ball of fine steel wool
white vinegar
rubber gloves
sponge brush or rag
wood
How to:
Put a ball of fine steel wool in a glass jar and fill with white vinegar to about 1-2 inches from the top. Replace the lid and let sit for a few days until the steel wool has dissolved or nearly dissolved, giving the jar a shake once or twice a day.
Yep, that's it.* It's just that easy.
*I'd recommend leaving the jar on a paper towel and carefully opening and closing the jar before shaking it. We noticed that our jar built up quite a bit of pressure from the chemical reaction of the steel wool dissolving in vinegar and the pressure needed to be released a few times a day.
Two days later, after having been shaken up. Gross, huh?
Once the steel wool has dissolved, put on some rubber gloves, give the jar one last shake and start staining!
The stain is very deceiving at first.. when you initially put it on it just looks like you're putting dirty water on the wood - it doesn't look significantly changed. However, as it's exposed to the air and dries it rusts and gives the wood a beautifully rustic, warm color. Once it's completely dry, take a rag to rub the loose rust off - you're done!
After drying.
If you're using this process for a sign or something that won't be touched when finished I'd leave the wood raw like this. If you're thinking of using it for a table or something you will come in contact with, I'd strongly suggest sealing the wood to keep you from getting rust stains.
I didn't have a project in mind for this process, but I love how rich the color turned out! I think I'll be staining the edges of this board and turning it into something.
If you have a little one then you likely have a pile of bibs somewhere, probably taking up a drawer in the kitchen. For us, using a drawer wasn't an option - we only have three. Yes, three drawers in the entire kitchen.. ugh. So I tried to think of another way to store the bibs out-of-sight but still accessible.
My solution was to pick up one of those "over the cupboard door" towel hooks. I made sure to get one that had a good-sized hook on it to accommodate all the bibs. Then I just put it facing into the cupboard where we keep all the kid dishes and hung all the bibs from there - done!