I'm a wife, stay-at-home mom, crafter, and blogger living in rural New England. As seen in Martha Stewart Living, Food Network Magazine, and more! | Tutorials, DIY, crafts, parenting tips, recipes, money saving tips, product reviews, local product features, New England living, intentional living, and more! |
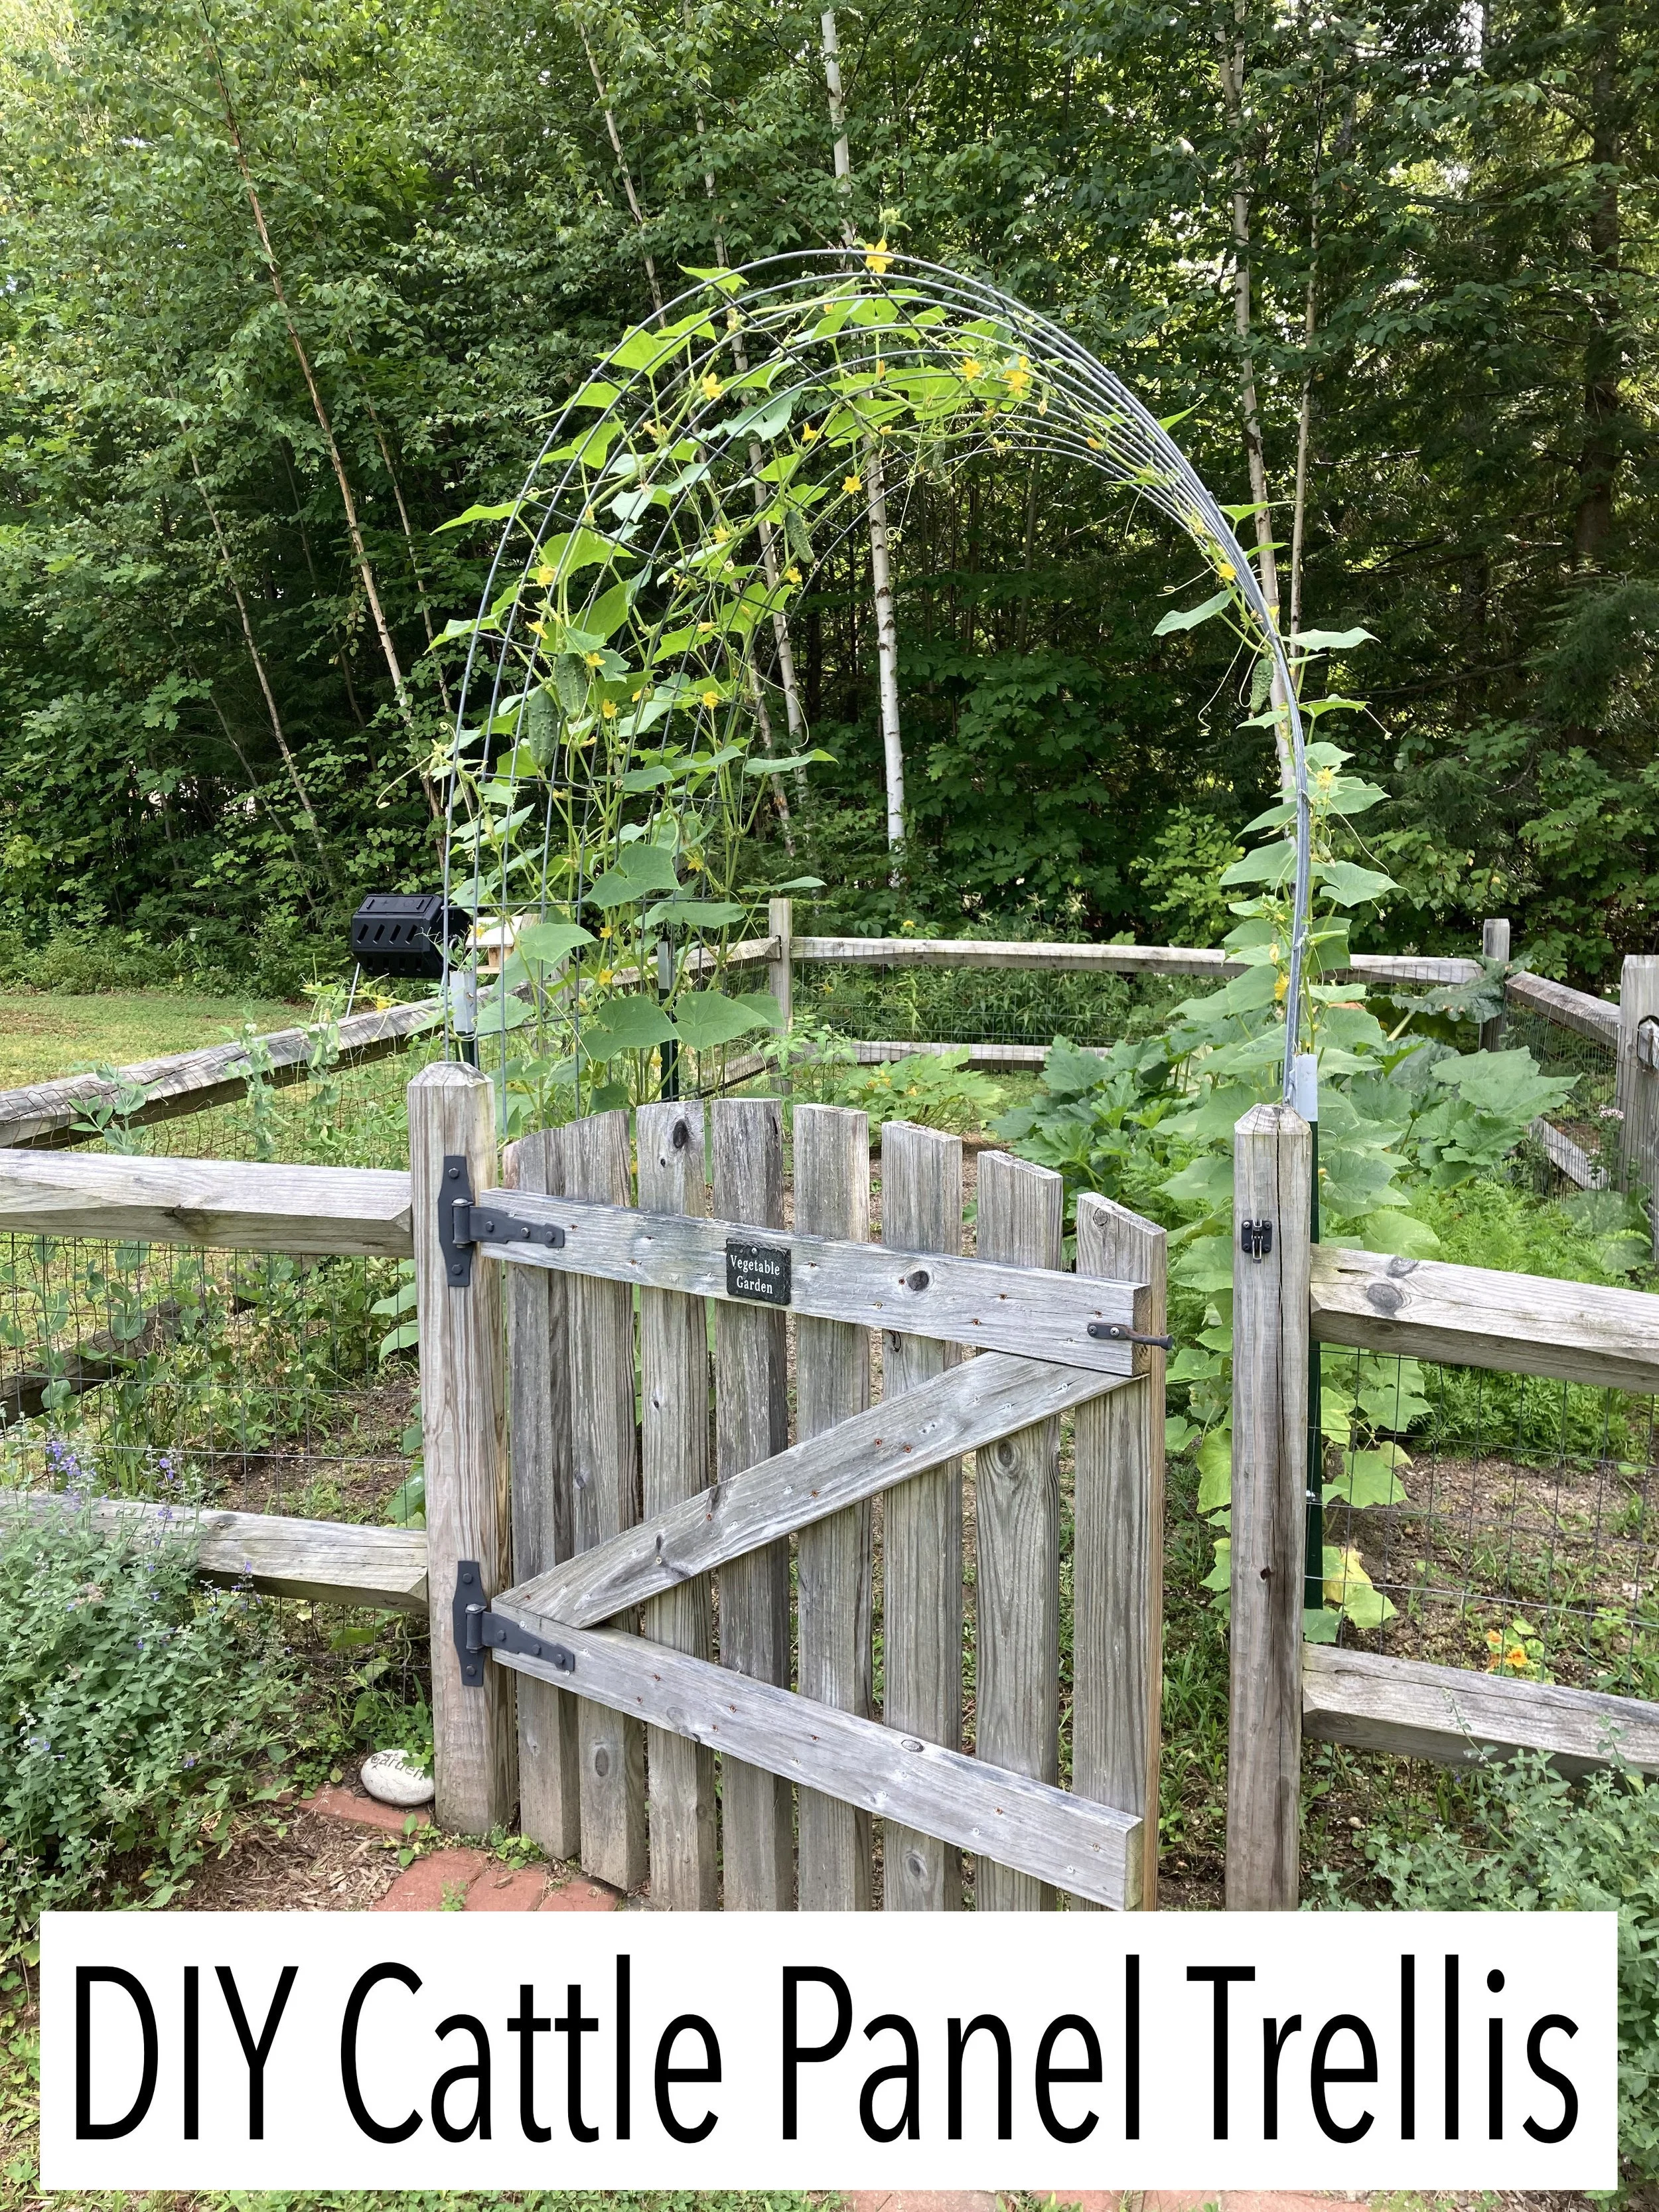
Last summer Pinterest blew up with DIY Cattle Panel Trellises and I decided I was going to jump on this bandwagon next season… And so here we are - it’s spring and I’m excited to get this set up and document my garden’s progress this year. | This post contains affiliate links |
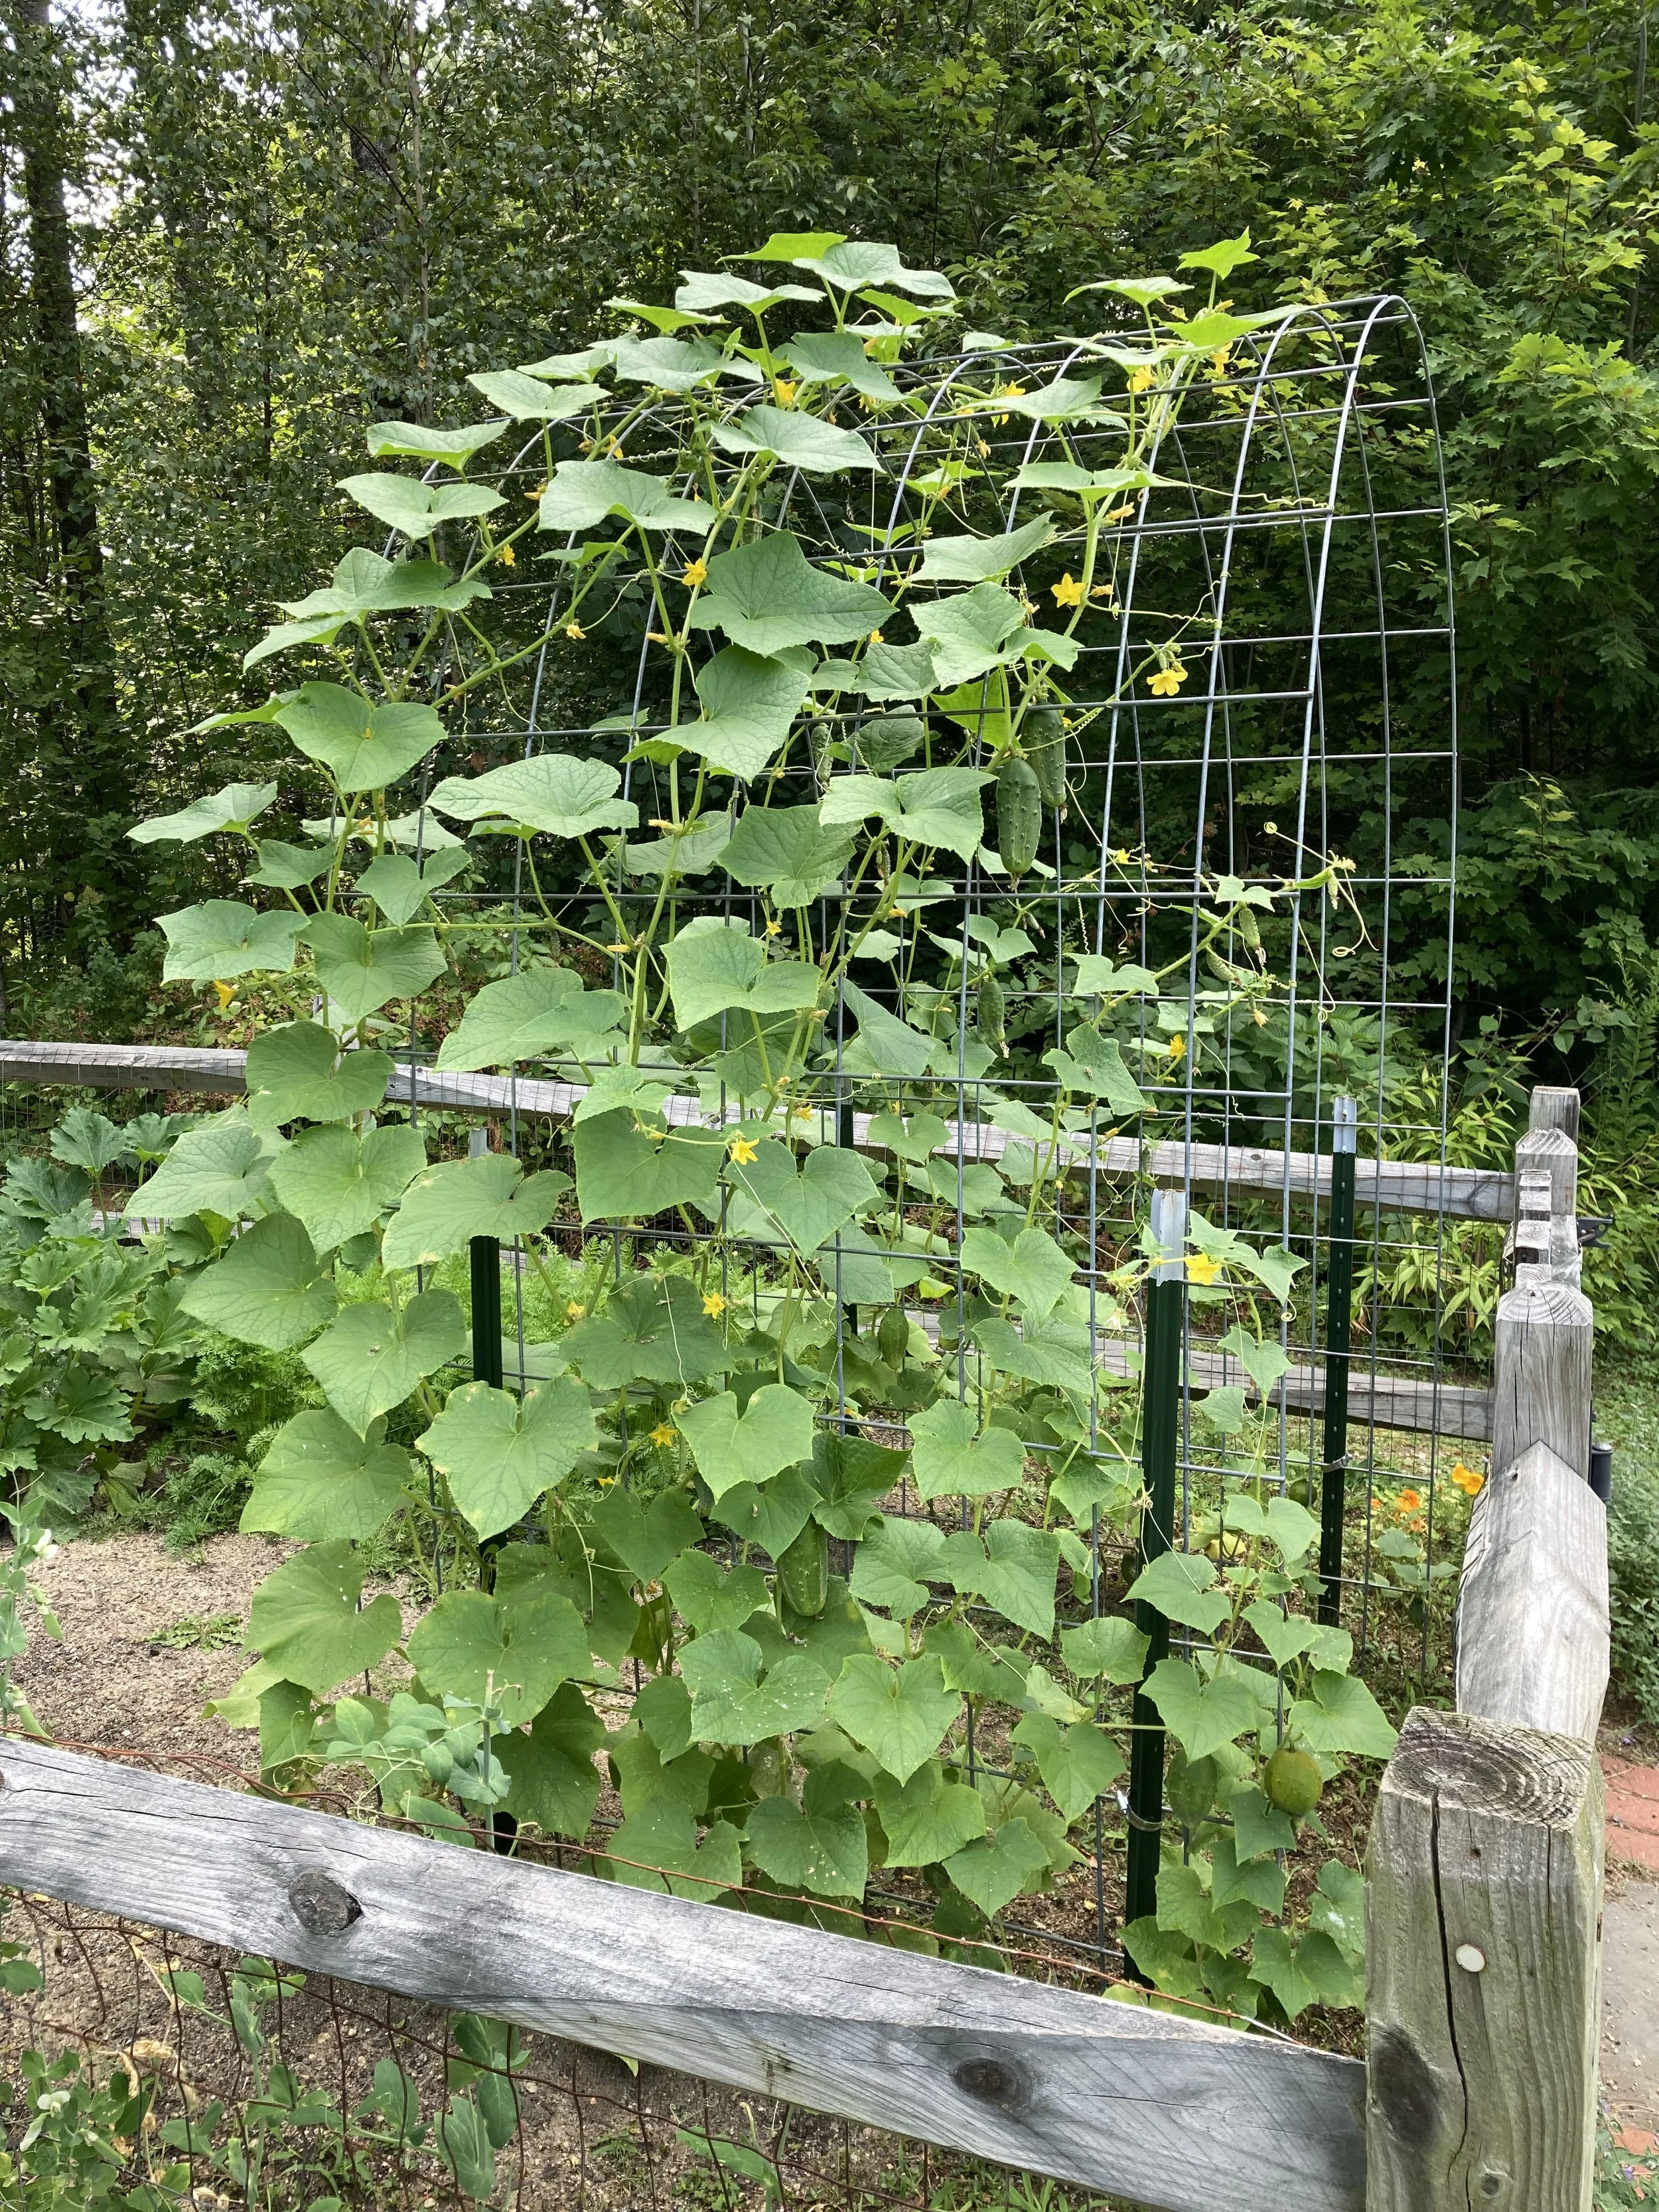
- This post will show how we built our Cattle Panel Arch and I will also add progress photos to this post as our garden grows -
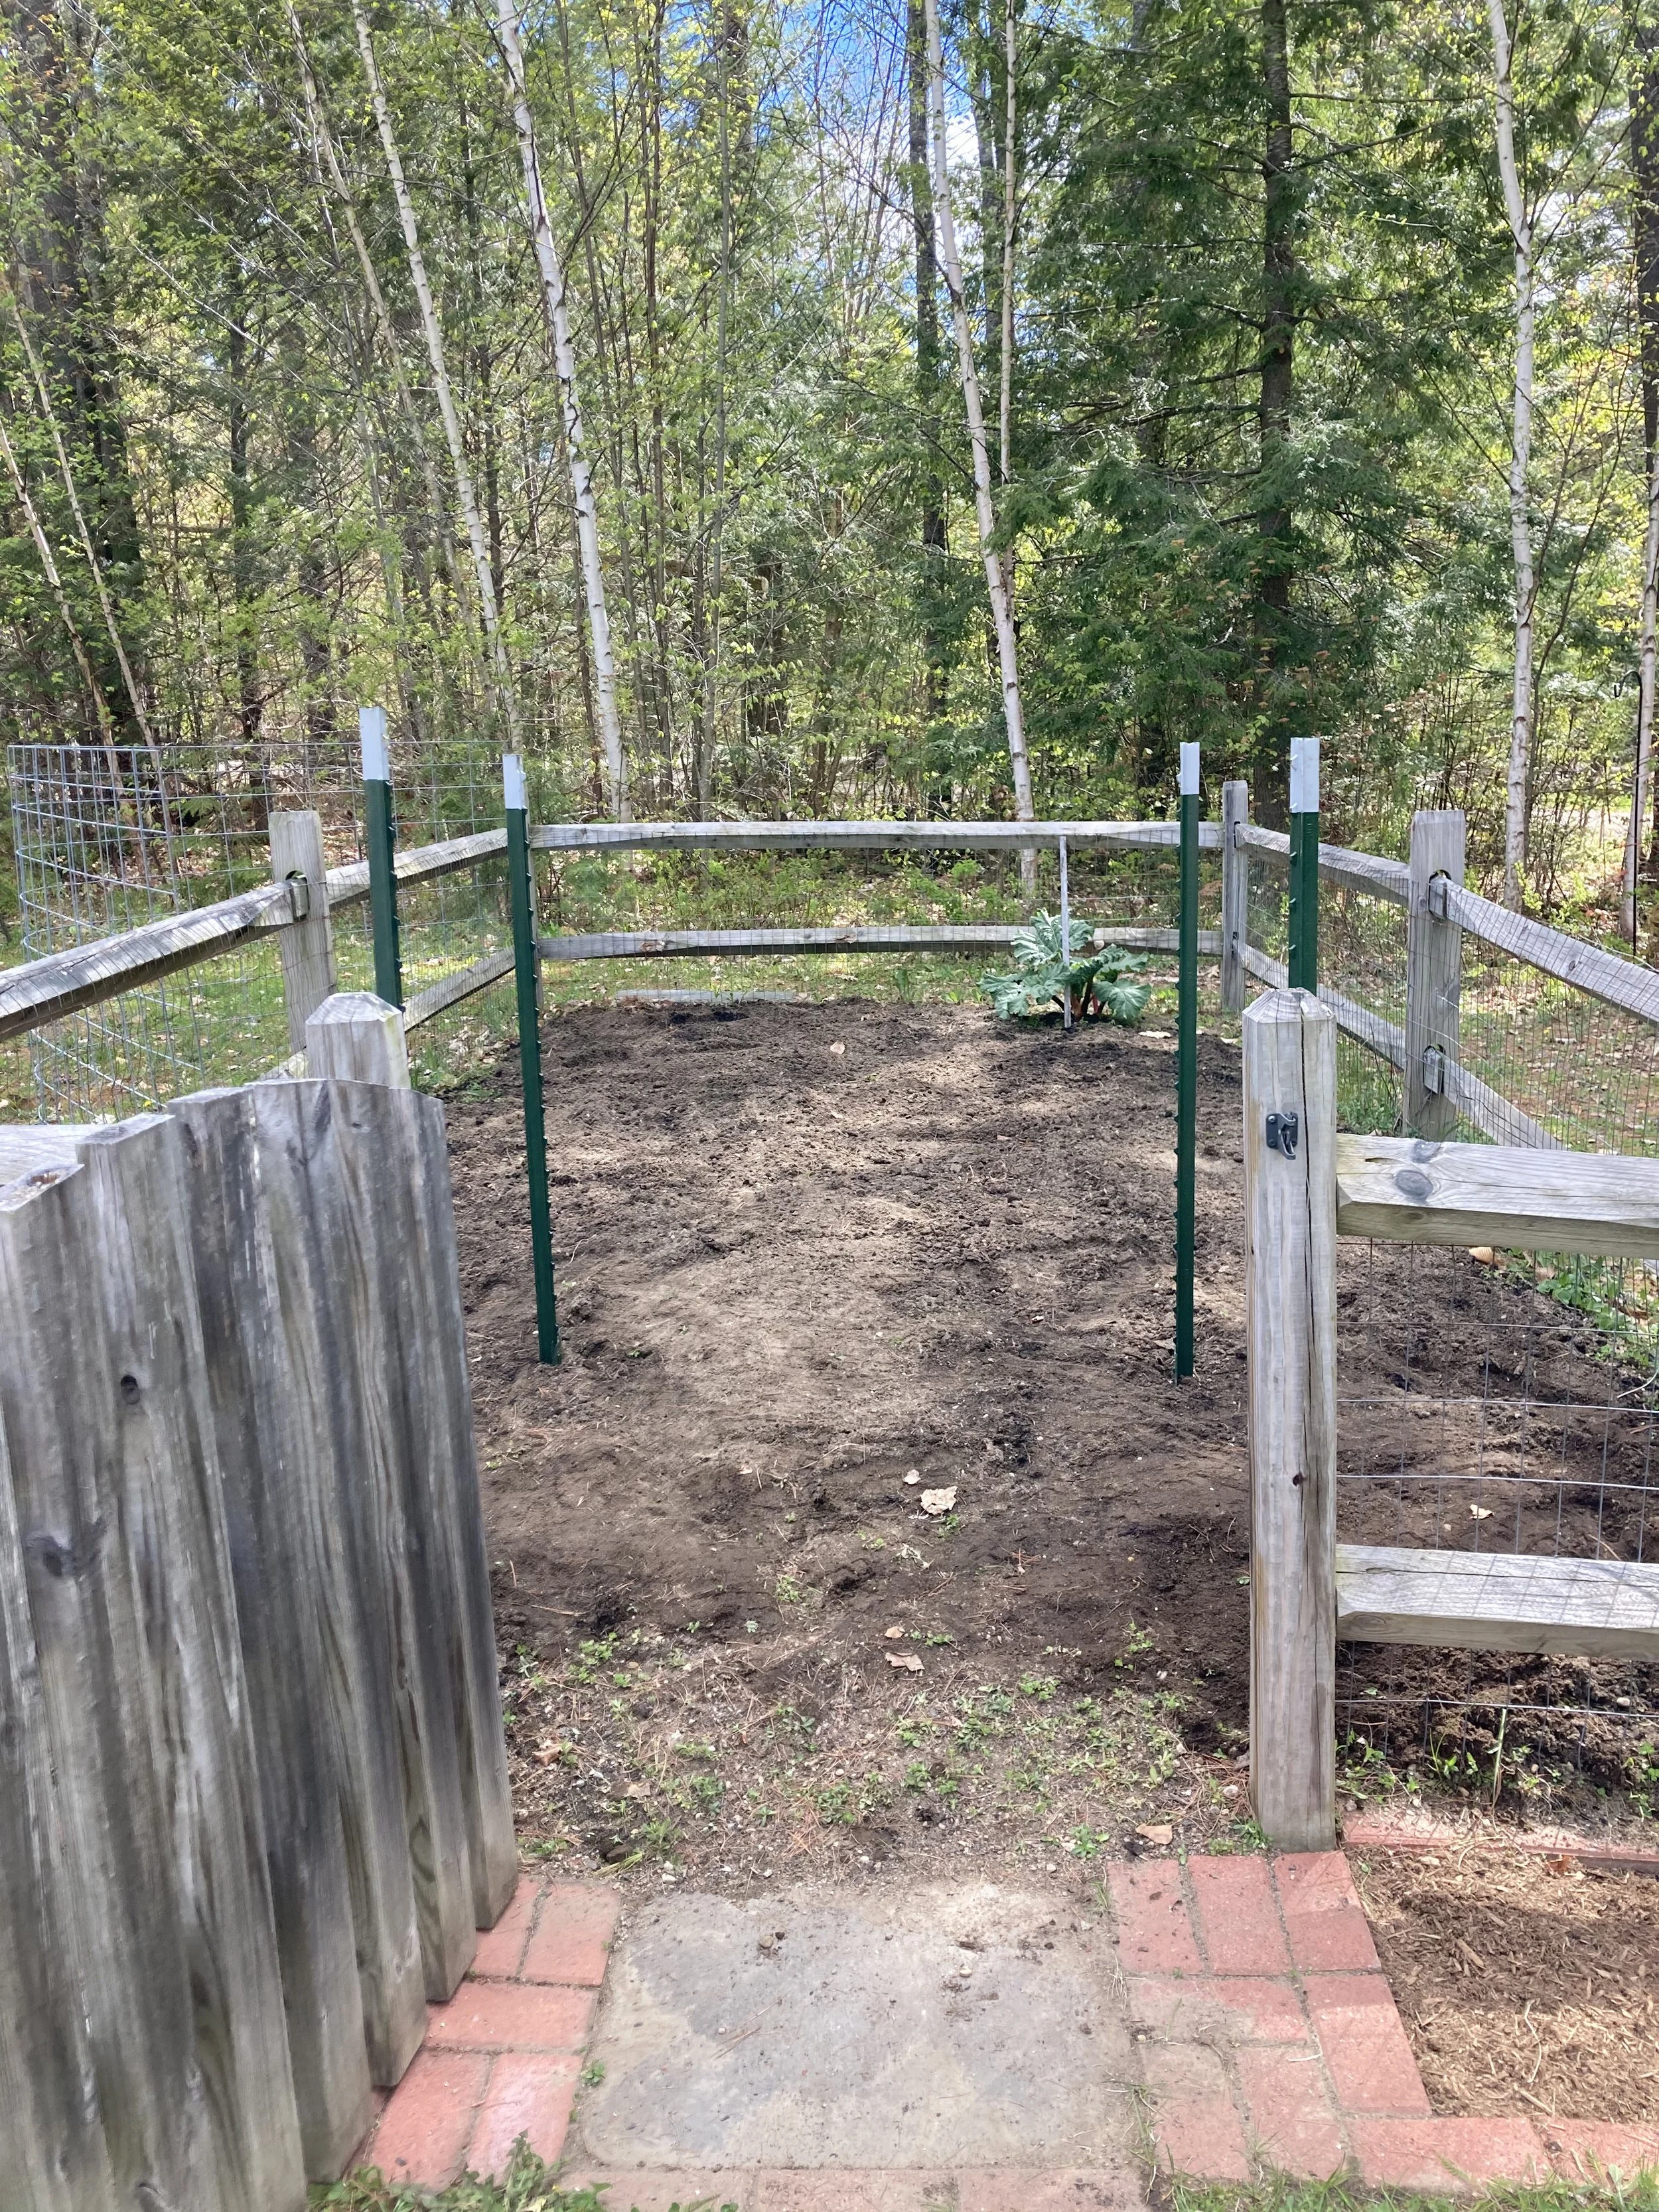
To make a Cattle Panel Trellis, you really only need a few things. We picked up most of our materials at a local Tractor Supply store but you could find these materials at other farm/garden centers too or order online. The trickiest part was getting everything home since the cattle panel is fairly large. Thankfully my father-in-law has a pickup truck and was able to pick up the items for us.
First, figure out where you want your arch to go. For us we put it just inside our garden gate to frame the entrance. It’s also on the north side of our garden so it won’t shade the other veggies too much.
Once you have it laid out and square, drive the t-posts in with a hammer or post driver until they’re deep and sturdy. This was easier-said-than-done with our rocky soil here in NH, so one post couldn’t go in quite as deep as the others but it was sturdy enough still.
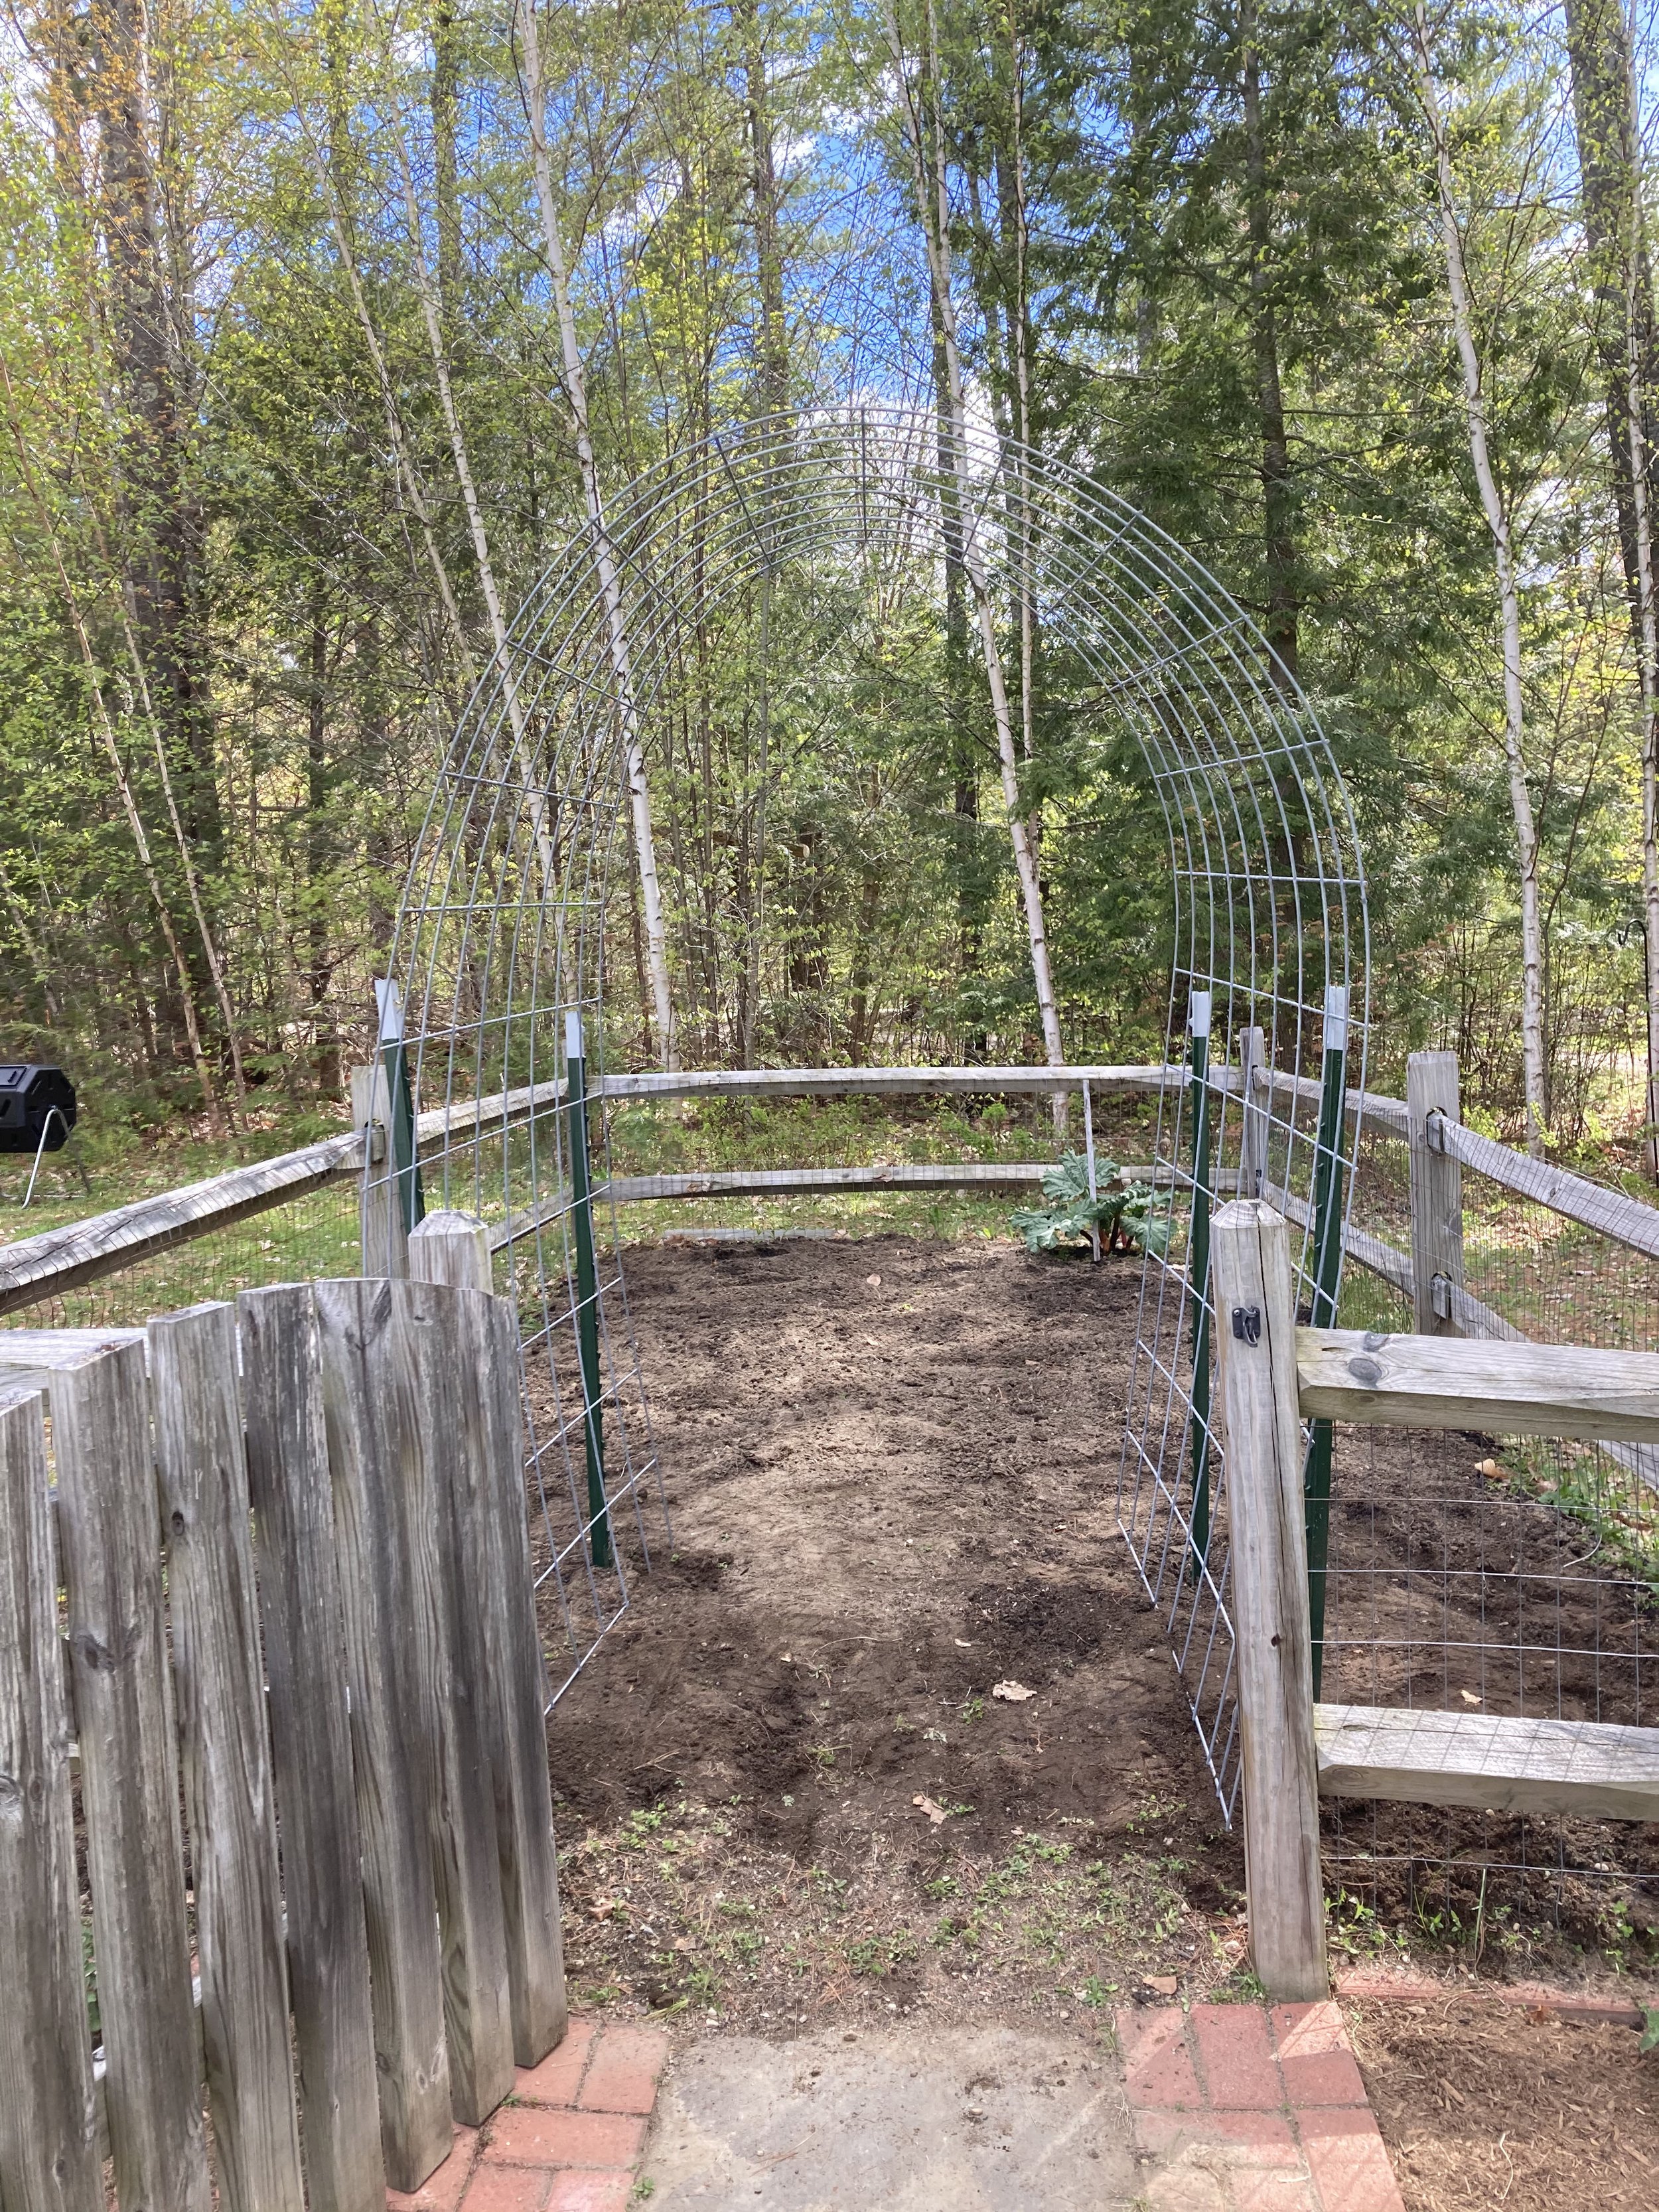
Next gently bend the cattle panel into a “rainbow” and set it inside the square you made. (Next year we might move our t-posts out a little wider to get a more gentle and less-tall arch, but this worked fine for us too as-is.)
Once you get it in place, secure it with hose clamps, heavy duty wire, or some rope so it stays in place.
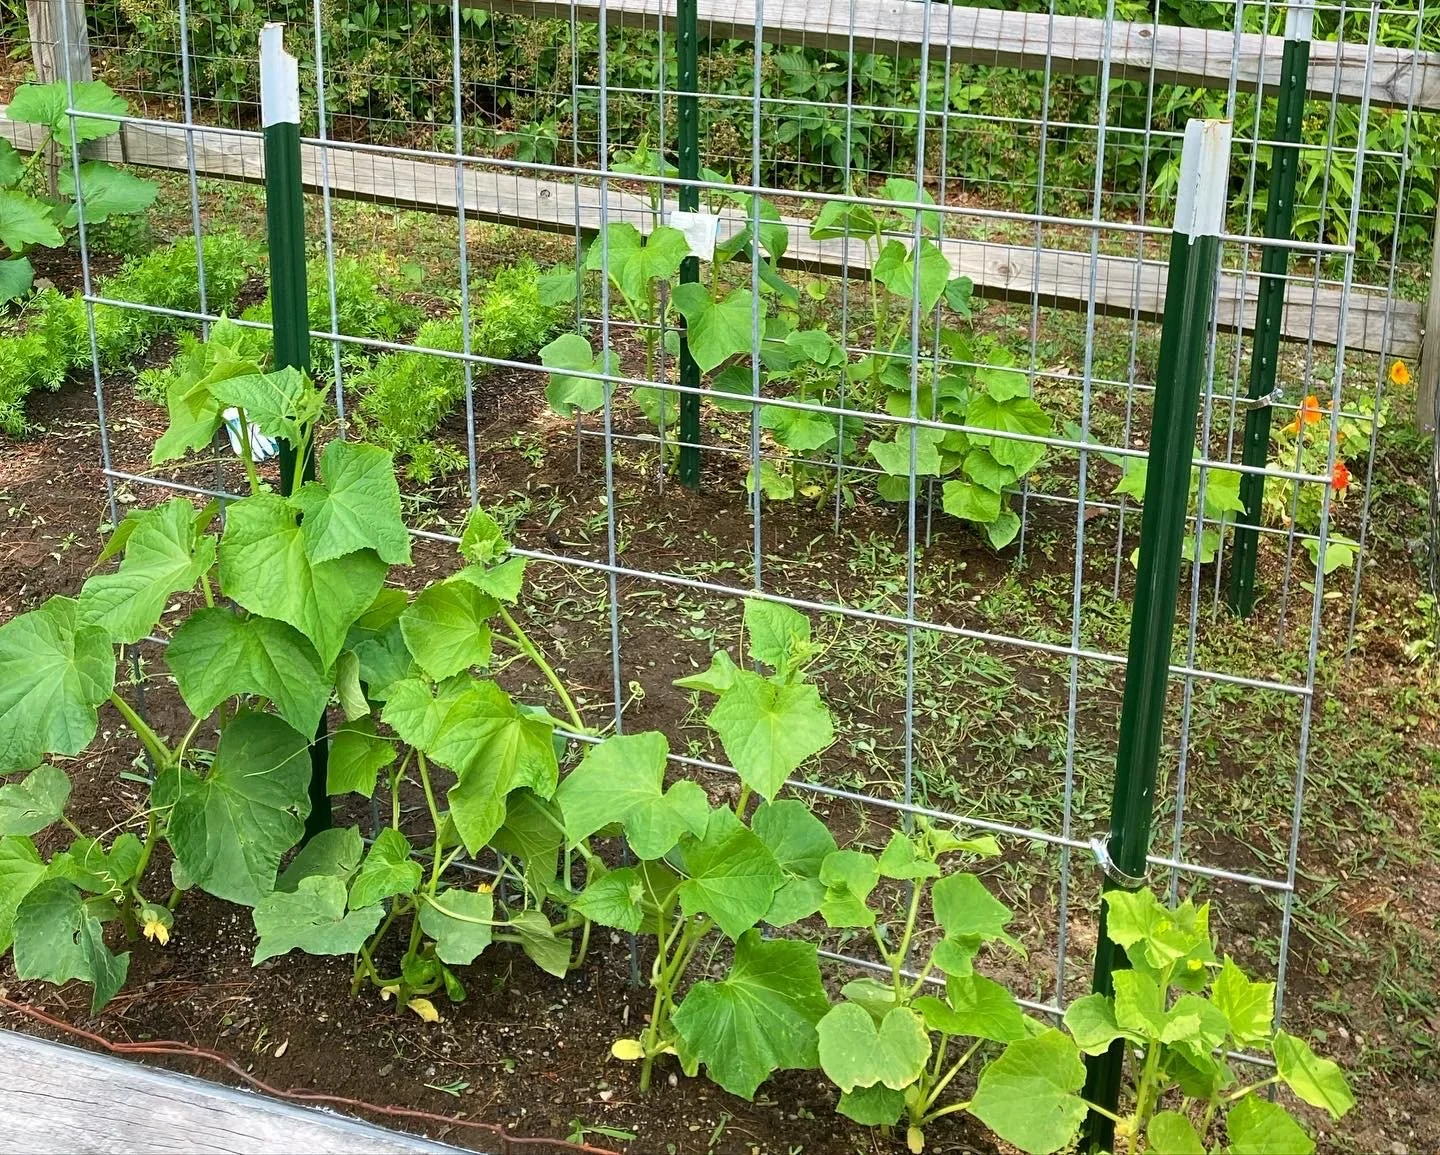
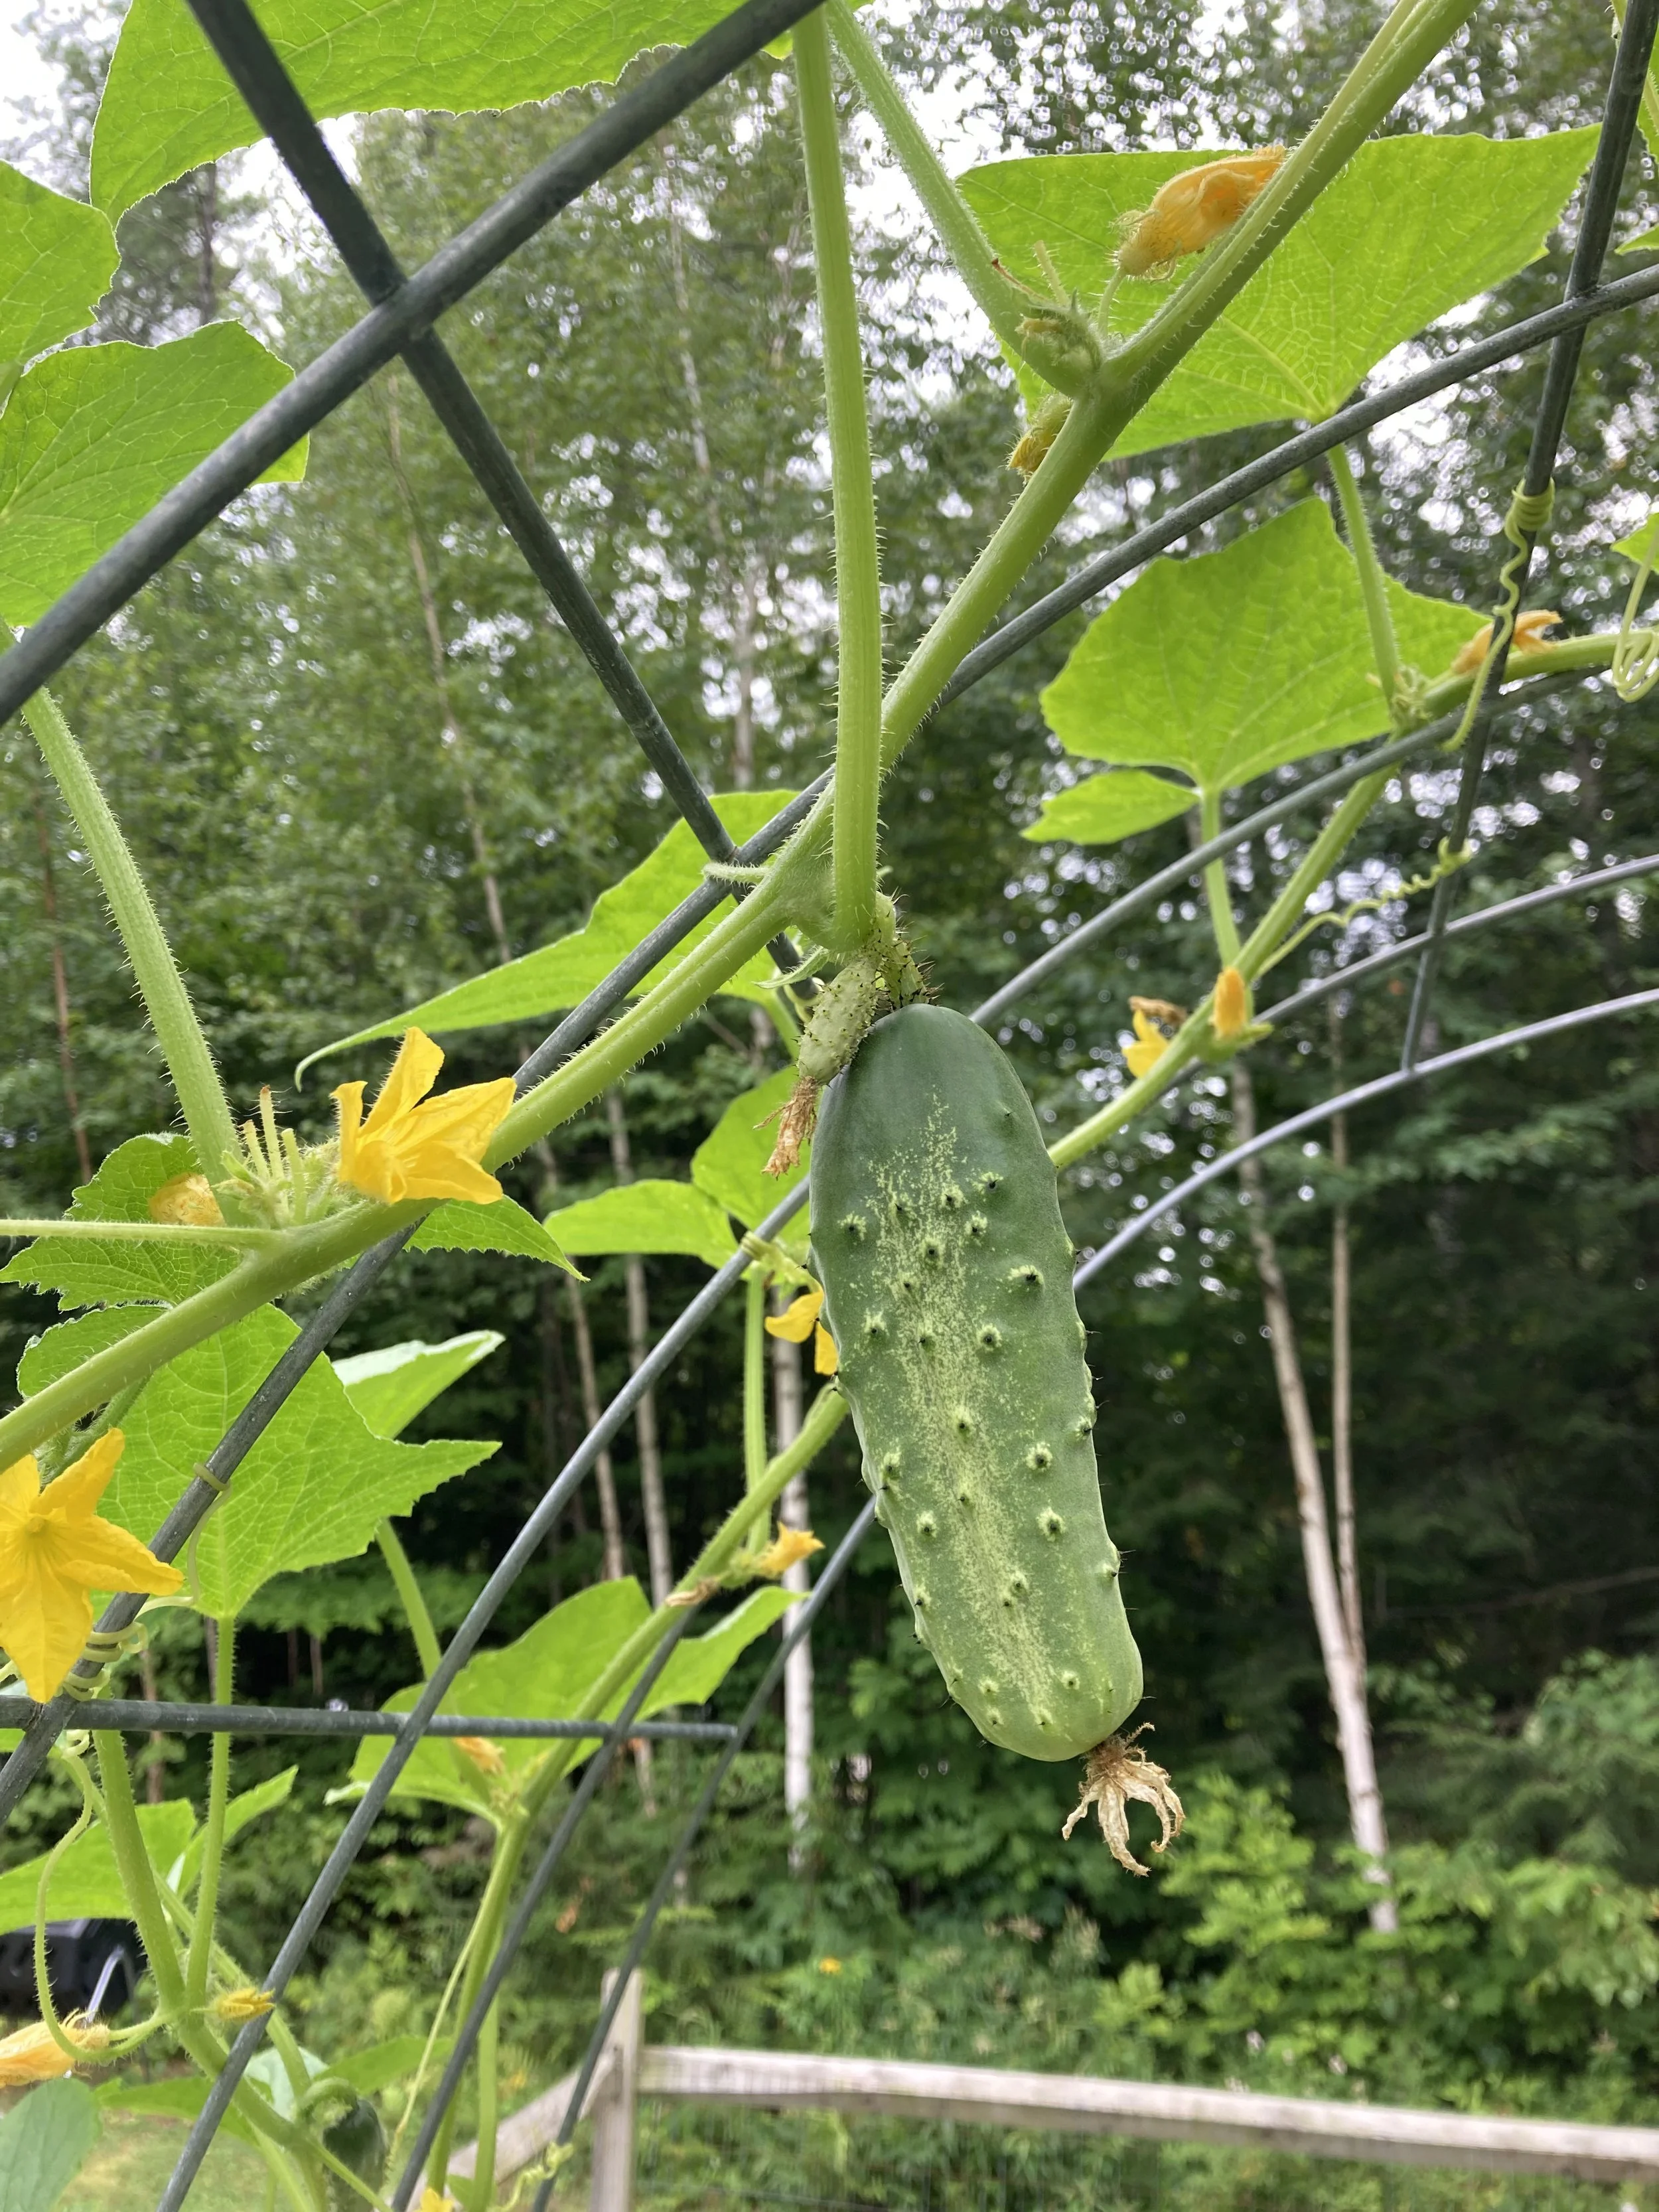
Now you can plant! We planted ours with vining cucumbers, but you could plant just about any vining plant on these - including peas, squash, ornamental gourds, flowers, etc.
The vines do a great job climbing the arch on their own, but it’s a good idea to check them daily and gently guide the vines where you want them. There’s always a rogue vine that will try to go the other way! They will especially need some help being trained to follow along the top of the arch since their natural inclination will be to continue growing straight up rather than bending around the curve at the top.
And that’s it! Overall it was a very easy project and one we will definitely continue with in the future. I also noticed a huge benefit for our pollinators too - the bees were able to reach the flowers easily and we had a bumper crop of cucumbers this year. They were also very easy to pick hanging down from the arch.
Good luck on your cattle panel trellis adventure!
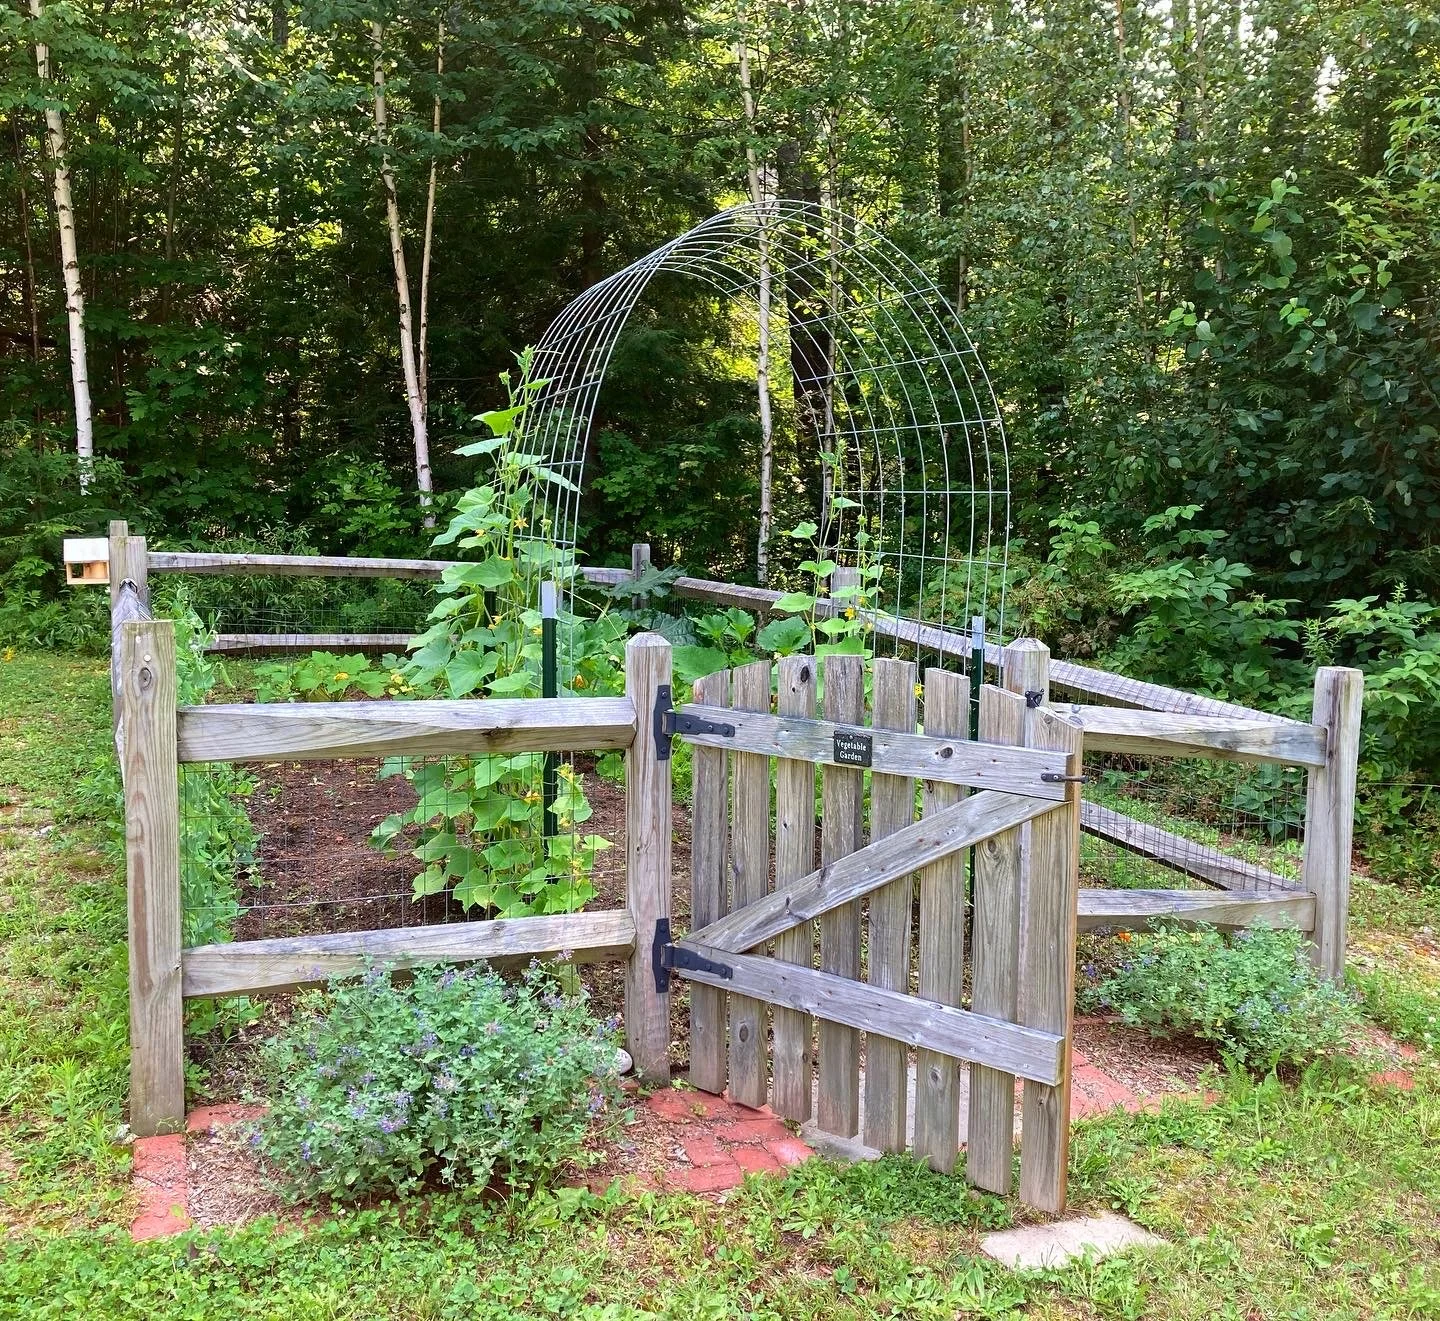
From earlier in the season, before the vines reached the top.
When you have kids, the chaos of their stuff seems to follow you everywhere - including into your car. I accept that our cars will never be pristine (dirt, crumbs, and dog hair will always be present), but I make sure that despite that we have a simple system to keep our things organized and to make sure we always have our essentials at hand. | This post contains affiliate links |
Disclaimer: Use organizers and other items at own risk. Make sure they are properly installed and compatible with your vehicle.
Keeping Toys in Check
I got tired of loose books and small toys spilling all over the back seat and the floor, so I got a backseat organizer to corral the kids’ items and keep them within easy reach for long car rides. In the organizer we always have some small books, an electronic kids toy, and some puzzles like a Rubik's Cube, as well as sunglasses for each kid in the small pockets in the front. I like this organizer because it fits between the car seats and can also buckle in so it doesn't slide around. (Side note: Where's Waldo has become a favorite car read and keeps the kids entertained for a long time.)
Trunk Organizer
With young kids we always carry supplies like a first aid kit, full change of clothing for each child, trash bags for wet/dirty clothes, extra towel and blanket, etc. For awhile all those items lived in a diaper bag in the trunk, but we are past the diaper stage now and it was time to retire the diaper bag and upgrade to something sleeker and space-saving. I am really loving this sturdy SUV trunk organizer for keeping everything hidden but still within reach.
The Infamous Car Potty
If you know, you know… With small kids traveling with a potty is a must, even for awhile once they’re past potty training age. You never know when an urgent bathroom request will happen, and these days with the pandemic it’s great to have a clean personal potty for your kid to use, rather than a dirty rest stop bathroom. Pro tip: We line our car potty with an open diaper to absorb liquid and waste and reduce the risk of a spill (makes for easier clean up too!).
Registration/Insurance Holder
It’s a good idea to keep all your car paperwork handy and organized in the glove box, because if you need it you don’t want to have to go digging for it - especially if it’s of an urgent nature (if you got pulled over, fender bender, etc). I personally like the little portfolios that keep everything ready and easy to find.
Roadside Kit / First Aid Kit
Always keep a roadside emergency kit and first aid kit in your car in the event you break down or have an accident. You may be able to find a kit that covers all your bases, but often you may have to purchase these separately or at least supplement with some additional tools or first aid items. Our trunk area has a hidden compartment underneath where we store all our roadside and first aid gear.
Extra Masks
It’s a sign of the times… make sure you always keep a spare set of extra masks in your car for the whole family. That way you’re never caught without one if you need it. We made our mask case using a slim wipes container (similar container linked here).
Disclaimer: Use organizers and other items at own risk. Make sure they are properly installed and compatible with your vehicle.
As you know by now, I love sharing about companies and products we love on the blog and our Instagram - and most especially those made right here in New England. It’s been a little while since I’ve done an interview on the blog in our New England Maker Series, but I’m excited to get back into it with Heather of Mermaids + Madeleines!
Heather Auclair of Mermaids + Madeleines is best known for her coastal-inspired handmade jewelry and fun watercolors. 5% of each purchase is donated to aid in sea life rescue and rehabilitation efforts - I just love a company that gives back!
Tell me a little bit about yourself and your business.
I’m Heather, a native of Maine, currently living life in Massachusetts with my husband and two rescue kitties. I’ve always enjoyed creating art. Whether it’s drawing, painting, crafting, or designing jewelry. I’m happiest when I’m making something,. I was lucky to grow up in a creative family and community by the ocean. I don’t think I realized how special it was until moving away. Mermaids + Madeleines is inspired by the ever-changing color and light of the coast. We’re so lucky in New England to have such a fascinating coastline. From place-to-place, no location is exactly alike in looks or atmosphere. Each spot has its own little charm and I find that totally uplifting. I try to capture this mix of joy and sense of ease in my works.
How did you start Mermaids + Madeleines? Had you been making jewelry for awhile or was this a new leap for you?
Mermaids + Madeleines started at a friend’s kitchen table (Hi Dana). We were both working at our own full-time jobs and not necessarily feeling completely fulfilled by them. What started as a creative/craft night once a week slowly bloomed into our own side businesses. I had always made some kind of jewelry, I think it started with embroidery floss bracelets at recess in grade school, and slowly morphed into beaded things. I kind of ebbed and flowed back into it after I started a program for advertising design at RISD. I took an elective in jewelry design and light metals and fell in love with it all over again. I quickly changed my concentration and began learning some benchwork skills, design, and technical drawing. I was lucky enough to land a job in commercial jewelry before graduating. First, starting out in costume jewelry and working my way over to find jewelry. While it’s great being able to pursue an interest and find a job that will pay you for it, to me, it just doesn’t come with the same creative freedom, or feel as rewarding as doing your own thing.
What does a typical day look like for you?
I try my best to start each day with some kind of movement, even if it’s only for 15-20 minutes, a barre class, a quick yoga, tabata, - something to get my mind and body moving first thing helps me to be more present and engaged the rest of the day. After having way too many nearly all-nighters for someone that is no longer in their 20’s I’ve started to try to be better about balancing work days and using the time I have. Mondays I do the (for me) dreaded stuff - like filling out inventory sheets, entering receipts, and ordering materials if needed. Tuesday and Wednesday, I like to use as creative days to design and fulfill orders, Thursday is usually a catch-up day for anything that can’t wait until the next week and straightening out the usual creative explosion I’ve created Tuesday and Wednesday. I run my little micro-business out of our (still functional) spare bedroom in our apartment so Friday-Sunday I try to keep my artsplosions to a minimum so it’s presentable for guests.
What is your favorite part about owning your own company? And least favorite part?
My very favorite part is when a customer reaches out, tags me in a post, or leaves a sweet review or message that the piece they received was exactly what they had been looking for, either as a gift or a treat for themselves. Being able to bring joy and happiness to someone through something you’ve made is one of the best feelings. In general, so far, I’ve loved owning my own business a little more than I expected to. It challenges me in ways I didn’t expect, and has forced me to learn and begin developing skills in areas I would have naturally been able to avoid, continuing to only work for someone else. Having said that, there are definitely aspects that aren’t my favorite. Logging inventory, dealing with accounting, and staring at spreadsheets isn’t really my cup of tea. If that were someone else’s job it would be way more fun, but I do think there’s a lot of value in gaining understanding about these less enjoyable parts of owning a business.
What has been the most exciting moment for Mermaids + Madeleines since you started?
I don’t know if I can pick just one exciting moment. I feel like there have been several. The first sale on Etsy, first show, first wholesale order. Finally receiving official paperwork in the mail - making things seem a little more real. There really is a moment or something to be excited about every day, even when it’s something small.
What advice do you have for people just starting out?
My advice is something that everyone says, and it’s the hardest advice to take: “Just start.” It’s so intimidating to put yourself out there. You’ll want everything to be perfect before it’s in front of people, and you can live forever in the phase of “it’s almost ready,” if you’re not careful. It’s easy to hide behind “not yet” but it won’t help you or your business grow. Plus, if you launch while you’re still building it gives you space and room to iterate, and alter without being too deeply invested in something that the market may not have interest in.
What is your long-term goal? Where do you see yourself in 5 years?
I would love to continue building the brand and create an independent website, not just relying on Etsy for sales (though I’m very grateful to that platform). I’d also like to branch into more art and accessories and eventually expand into more wholesale as well - working with small boutiques up and down the coast.
Who’s one of your favorite New England Makers?
I have so many favorite makers... all for different reasons, it's hard to pick just one, so I'll have to share the two that helped my business get started. Dana of Dana Kristen Creates was instrumental in the start of my maker journey with our Thursday night hangouts and continues to be an awesome friend and creative! Alana, of A&E Stoneworks was also pivotal in getting me to make that Etsy shop go live! I met her at an event and she encouraged me to just go for it. There have been, and continue to be so many I'm grateful for, including: Mary of On The Road Again, Lynn from Love Lissy Lou, Rachel from Little Lavender Lobster, Christine from Sea Crow Company, and Marie from Pieces of Maine Jewelry, and so many more... I could probably fill your entire blog post with names!
DO YOU OWN A NEW ENGLAND-BASED BUSINESS AND WOULD LIKE TO BE FEATURED IN AN UPCOMING INTERVIEW? OR WOULD YOU BE INTERESTED IN HAVING ME STYLE, REVIEW, AND FEATURE ONE OF YOUR PRODUCTS? Please drop me a note.
I wish this was some kind of belated April Fools joke, but it sadly isn’t… I fell down the garage stairs a few days ago, breaking my foot and bruising myself up pretty good.
I will spare you the x-rays, haha.
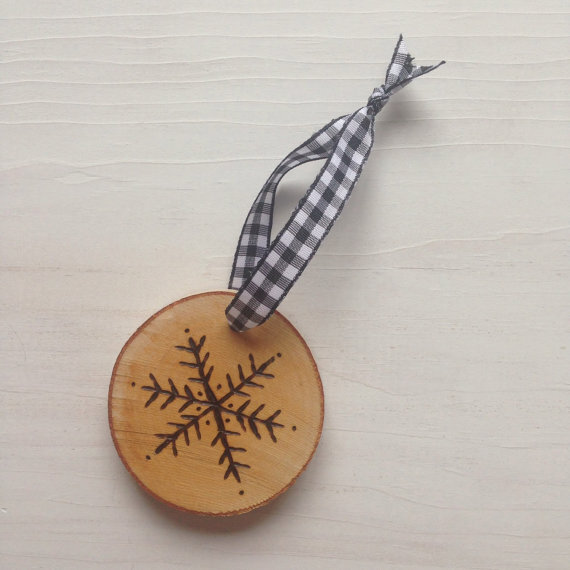
Initially I had planned to reopen my Etsy shop later this month after getting vaccinated - up until this point in the pandemic I didn’t feel comfortable risking all the extra trips to the post office or going out buying supplies, so for the past year I’ve just done wholesale orders to keep things simple and minimize my errands. I was looking forward to reopening the Etsy shop and offering my hand-etched birch ornaments and vintage finds again, but that will now have to wait a little longer as I am currently unable to drive, stand at my saw, or put sufficient pressure on the wood burning tool for hours at a time.
I’m looking forward to healing up (hopefully soon!) so I can finally reopen the shop after this year-long hiatus. Stay tuned for more info, and in the meantime feel free to check out our items locally at one of our Stockists.
We’ve lived in New England all our lives, but I’m ashamed to admit we’ve never tried maple sugaring ourselves until now. We have several family friends that own large-scale sugar shacks so we’re familiar with the process and had some great resources to ask questions. We kept it very small scale and simple, but you can get more technical with the process to make really consistent, great maple syrup. If you want to try this at home, I’d recommend doing your own research first to make sure your syrup is made safely and well. | This post contains affiliate links |
I didn’t take too many photos of the process but we started by tapping the trees. We drilled into sugar maples at a slight upward angle so the sap will drip out, tapped in special metal spigots (also called spiles) with hooks, and hung buckets to catch the sap. It's important to do this at the right time of year when the sap is running, usually late winter/early spring when the days are above freezing and the nights are cold.
Once we got a total of 5 gallons of sap, which only took a day or two, we started boiling. It’s a good idea to boil outside as it takes a while and makes a lot of steam and you probably don’t want that much moisture inside your house. We used a stainless steel pot on a propane stove ring in our driveway to boil. Once the liquid was reduced by half, we added more sap, and just kept boiling it down until it was a good color/consistency.
Serious maple sugar makers would reccomend you use a hydrometer to test the water content of your syrup to make sure it's at the right consistency. However, we totally just winged it and kept reducing until it looked pretty good. We prefer a lighter, more honey-tasting syrup so we didn't reduce it down to a dark amber syrup.
It takes a lot of sap to make a little syrup. We boiled down about 3+ gallons of sap to get the maple syrup you see in the jar. It takes a lot of work and a lot of time, but it was a fun experience for the kids and now we get to enjoy the fruits of our labor. Mmmmm, pancakes!
Disclaimer: This was a very quick overview on the process we did to make maple syrup. If you decide you would like to give it a try, I recommend researching it on your own and asking an experienced producer for advice before starting.
Recently I realized “Crap. I’m almost in my mid-30’s… and it’s all downhill from here. Time to start proactively taking care of my skin!” Up until this point I was just washing my face and maybe using some moisturizer some days and that was it. Thankfully I don’t really have any wrinkles or fine lines to speak of - yet - but I know they’ll be coming on soon. After some trial and error and consulting some friends that are really into skincare products, I settled on a simple routine that I’m enjoying so far and feel as though I’m getting the best bang for my buck. The best part? Most of these are inexpensive drug store finds, with just a few high-end heavy hitters. | This post contains affiliate links |
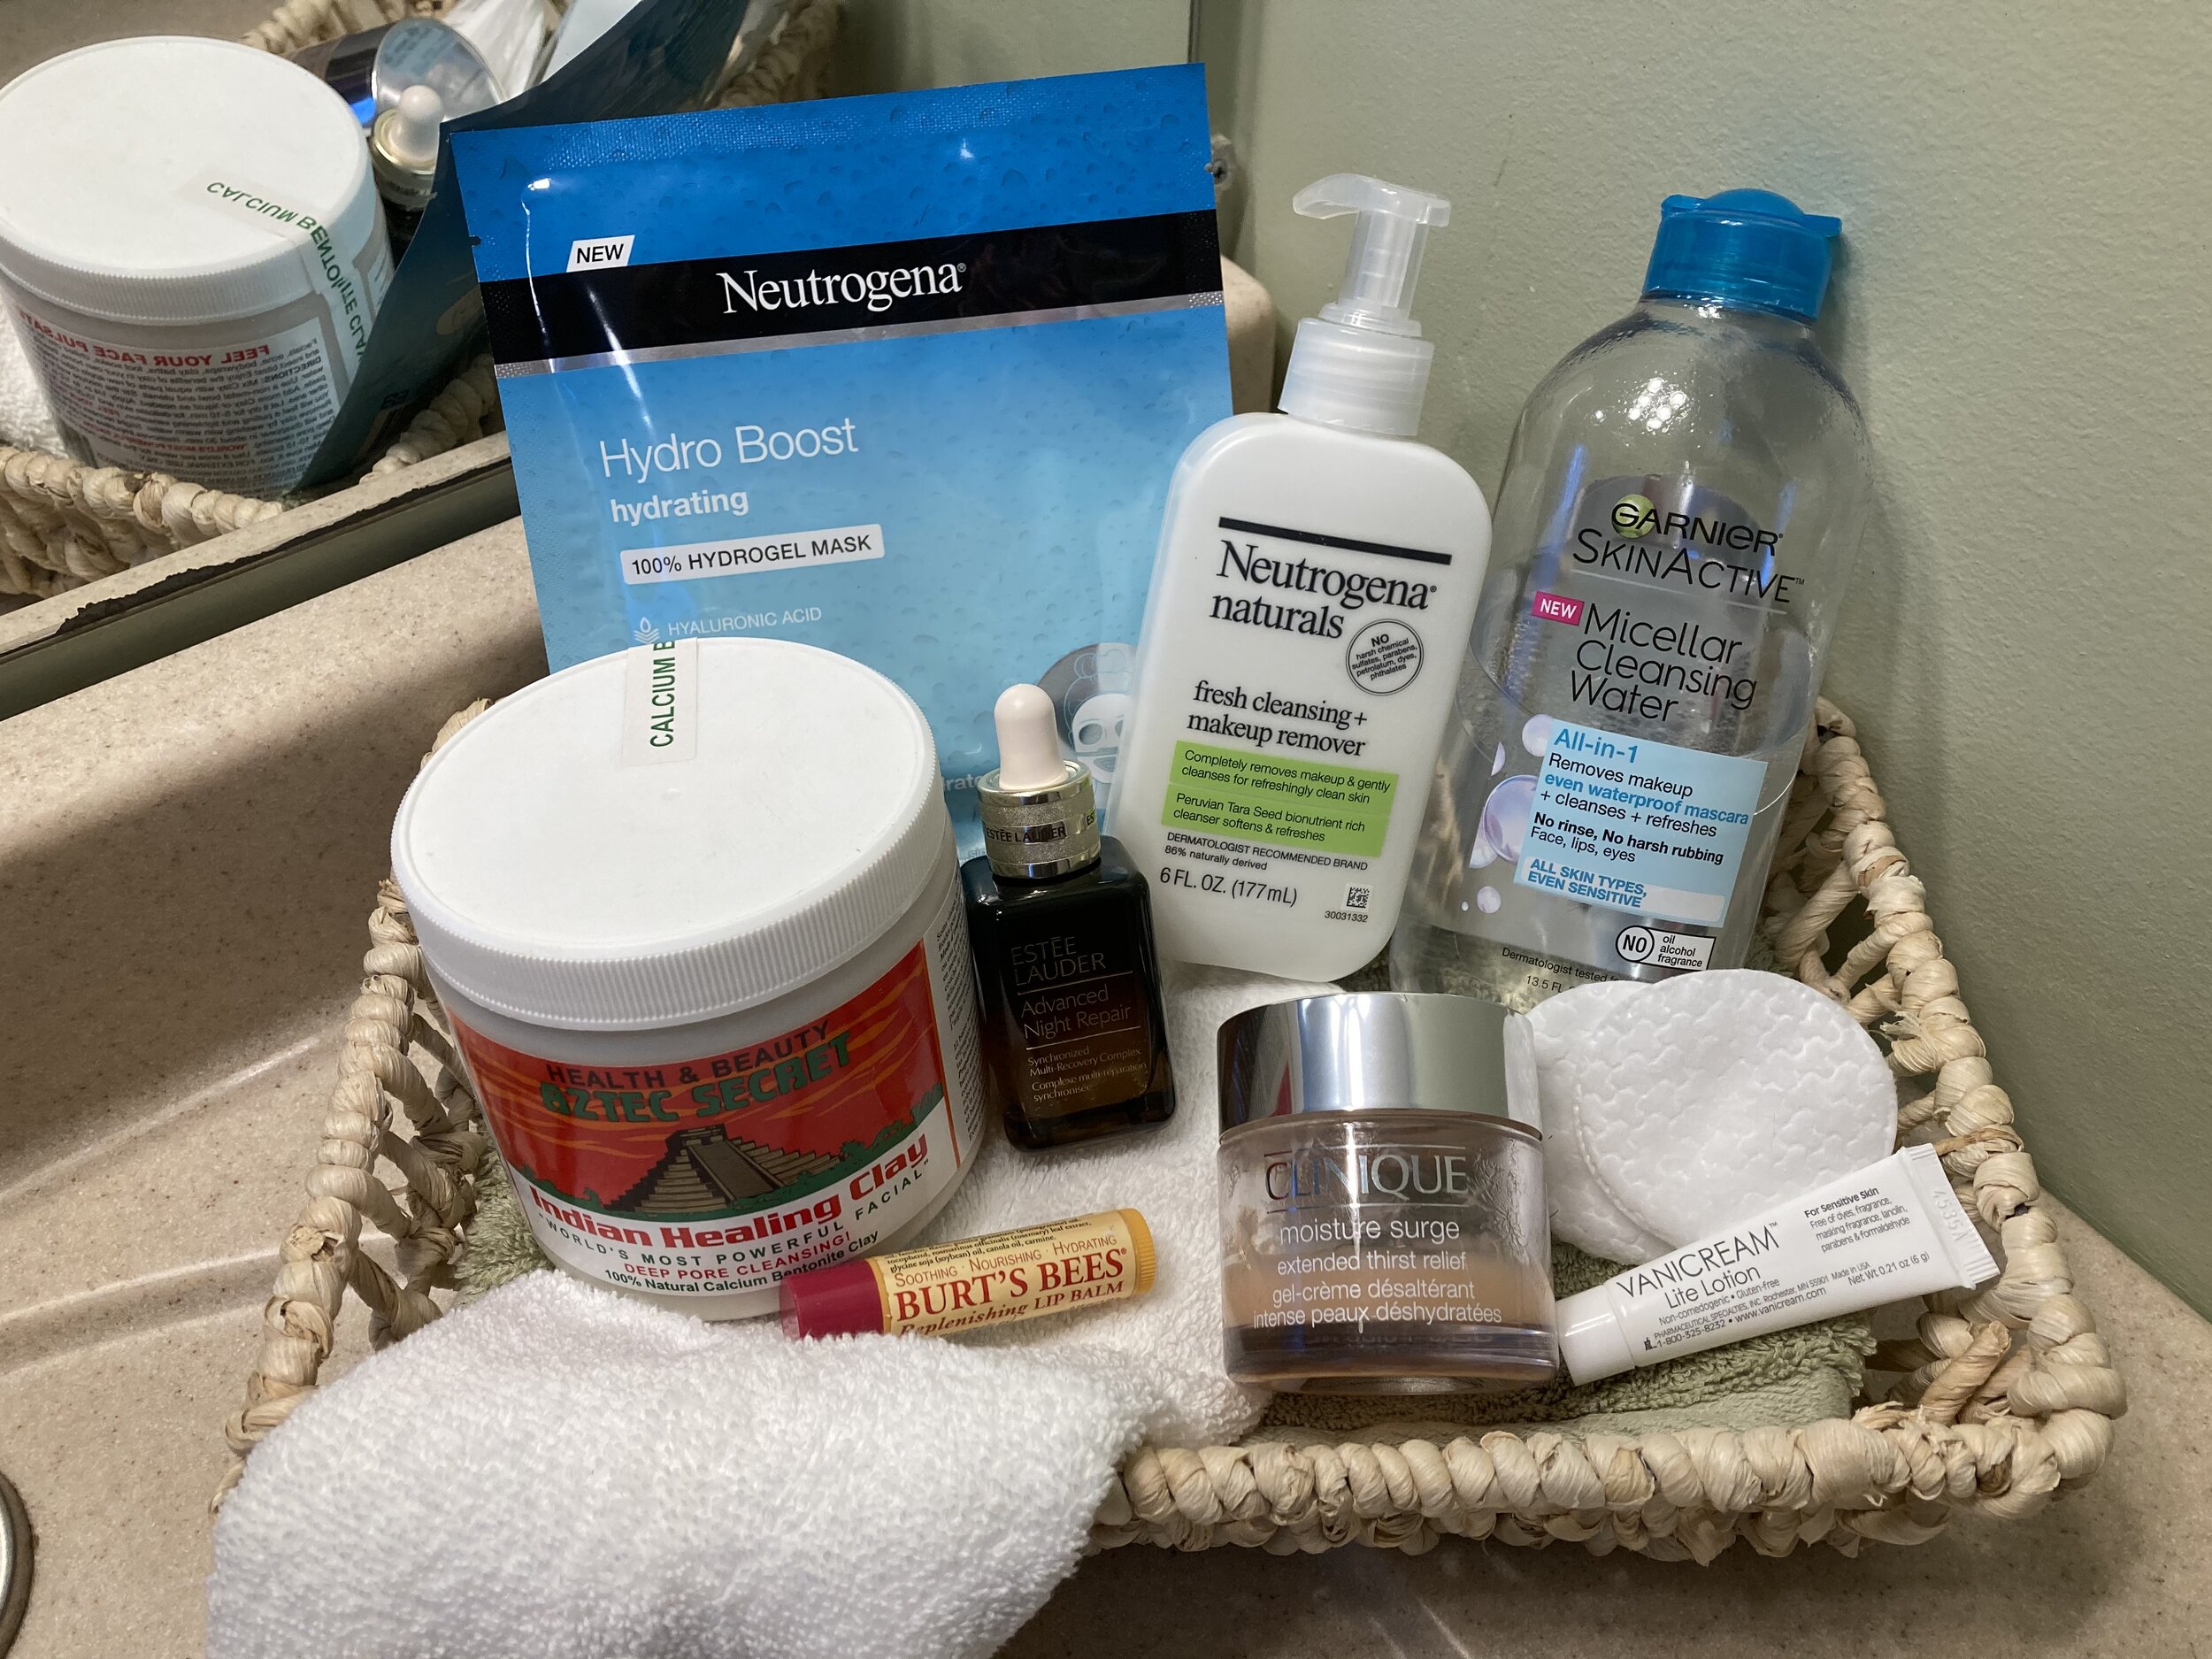
Simple Mid-30's Skincare Routine - Everything I’m using as the moment, including occasional treatments.
Disclaimer: I am not a “beauty blogger” or skincare expert, just sharing what I’m using and loving so far. It’s a good idea to consult your dermatologist or a skincare expert for more specific recommendations for your skin type and lifestyle. Also make sure to consult your doctor if you’re pregnant or breastfeeding, as certain skincare ingredients should not be used during those times.
AM Routine
Simple Mid-30's Skincare Routine - AM
Step One:Neutrogena Naturals Fresh Cleanser Every morning I start with using this Neturogena Naturals Cleanser, I really love this one because it's very gentle on my sensitive skin and smells amazing.
Step Two: CeraVe Vitamin C Serum (not pictured.. I started using this after I first published this post) After I cleanse and before I moisturize I put a little bit of this Vitamin C Serum on my skin. I feel as though it's made a big difference in evening out my skin tone and brightening. I also really love the way it feels!
Step Three: Clinique Moisture Surge Moisturizer I have been using this moisturizer for years and LOVE it. It's so light and a little goes a really long way. While it is a little on the expensive side, one jar lasts me forever so I definitely get a lot bang for my buck with this one.
What I'm Missing:SUNSCREEN This is a huge hole in my daily regimen and I know that... I have been trying to find a light, mineral based sunscreen for daily wear and haven't found the right one just yet. Once I find one I like I will update this post - and if you have any you love, please let me know!
PM Routine
Simple Mid-30's Skincare Routine - PM Routine
Step One: Garnier Micellar Cleansing Water This cleanser is perfect for end-of-day cleansing and removing makeup. I use the Blue verison since I sometimes wear waterproof mascara and it works like a charm to take it all off (the Pink version is reccomended for regular cleansing and non-water proof makeup removal). I just put a little bit on a cotton round and wipe it all away, no rinsing needed.
Step Two: Estée Lauder Advanced Night Repair Serum This serum has come highly reccomended to me by so many people as an important part of their daily skincare routine. It has hyaluronic acid which is supposed to help moisturize your skin and reduce fine lines. While I can't attest to wrinkle reduction (I don't have any yet), it does make my skin feel amazingly smooth afterwards and I'm hoping it will keep fine lines at bay in the future. This serum can be expensive but I find a little goes a long way and I haven't made much of a dent in the bottle at all yet.
These are things I do occasionally, maybe once every 2-4 weeks or whenever I feel like it. I never use both masks in the same weekend though - I spread them out.
Neutrogena Hydro Boost Hydrogel Mask This is a great, refreshing, hydrating mask. Love using this when my skin might be feeling a little dull or dry.
Aztec Secret Indian Healing Clay Mask This mask is amazing for deep cleaning pores! It comes as a powder and you mix a little in a bowl with some warm water to make the mask - you can also mix it with a little bit of Apple Cider Vinegar to give the mask a little more power. Since you mix it yourself you can stretch one jar for a long time.
Vanicream Lite Lotion I got this as a sample and love it for spot treating any extra dry spots that occasionally pop up, especially after doing a mask. It's fragrence-free too which is a nice break when my skin might be feeling sensitive.
Important Buying Tip: When purchasing “higher end” brands (such as Clinique or Estée Lauder), always make sure you’re purchasing directly from the company or from an established department store chain (such as Nordstrom, Macy’s, etc) to make sure you’re getting real, legitimate products. While you may be able to find high-end brands listed for sale on other online retailers (yes, even the big ones), these products are often knock-offs sold by third party sellers and who knows what could be in them.
So excited to have some of my custom ornaments heading down to ACK 4170, a beautiful gift shop located on the island of Nantucket! They are currently closed for the winter, but in the meantime you can shop their store online and then in-person again when they reopen for the season in April.
I wish I could mail myself down there with the ornaments - I haven’t been to Nantucket (yet) but have always wanted to visit!
Just stumbled across this sweet mention of our Ornaments on the Artists & Makers Page of Wiglesworth’s Mercantile’s website - thank you so much Anne! I was so honored to be a part of the opening of your shop and through your first Christmas season.
If you’re ever in Portsmouth NH, please be sure to check out Wiglesworth’s Mercantile in person - they cater to carrying New England-made products and have “Give Back” weekends once a quarter where they donate 10% of sales to local charities (how wonderful is that?!).