Lunchtime is often kind of hectic around here. Mornings tend to be when we do errands, groceries, story time, swim lessons, etc. and we always seem to be rolling back into the house right at lunchtime. This means I often only have a few minutes to get lunch on the table before a hunger-induced meltdown occurs. Having a no-prep, no-cook lunch is key to keeping everyone happy. | This post contains affiliate links and an honest review of a Nûby product |
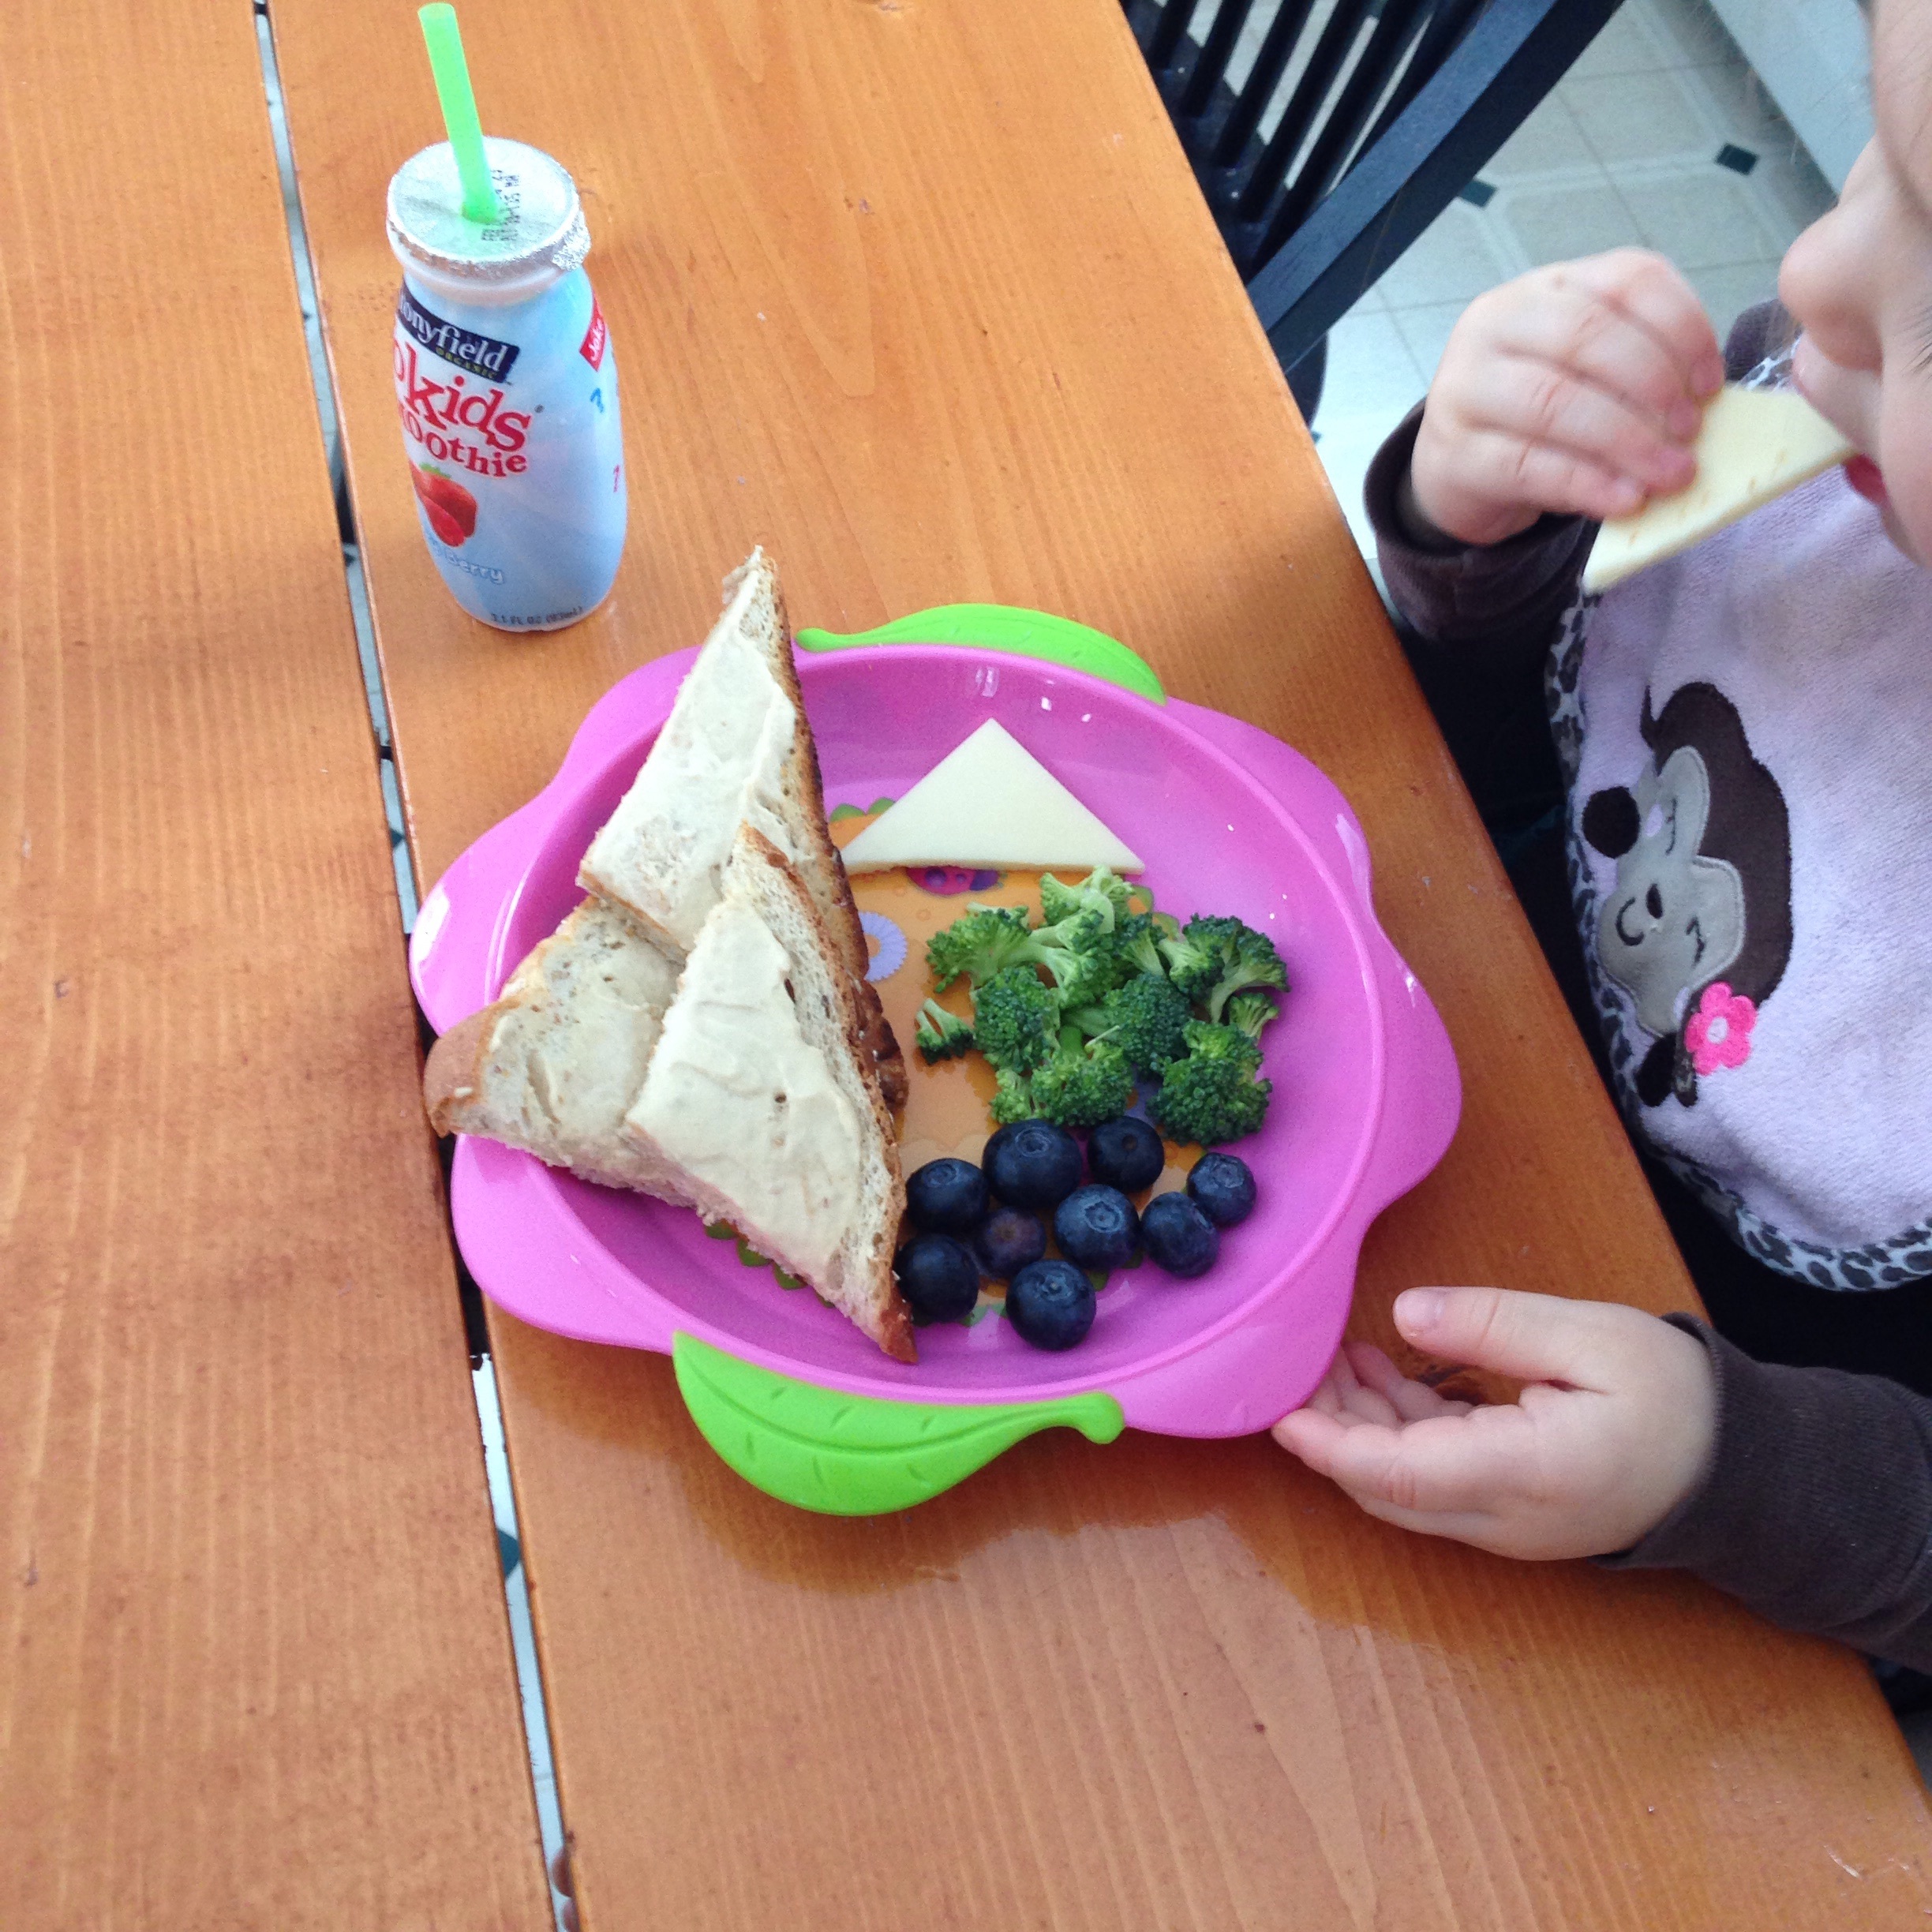
This little lunch isn't anything fancy but that's what's so great about it. It's essentially a collection of healthy snacks that, when put together, make a great toddler-friendly meal. This meal hits all the main food groups (dairy, protein, grains, fruit, and veggies) and best of all our little one loves it.
Our little one's meal includes a Stonyfield Yogurt drink, hummus on whole grain toast, blueberries, broccoli florets, and some cheese all served on this cute Nûby Flower Child Toddler Plate.
We love this fun plate from Nûby. It's BPA-free and has a great no-skid bottom which is really helpful when your little one is eating. Our daughter especially loves the fun shape, easy grip handles, and the pictures (lady bugs and daisies) printed on the bottom of the plate. This adorable plate has quickly become her favorite for mealtimes.
Toddler Meal Ideas
If you're looking for more meal ideas, mix and match these other great no-cook or quick-cook foods to make your own healthy toddler meal:
- smoothies
- puree pouches
- fruit cups (make sure to get ones packed in juice, not syrup. It's also still a good idea to drain and rinse the fruit to reduce the sugar content a bit)
- any fresh fruit (cut to appropriate-sized pieces if needed)
- any fresh or previously cooked vegetables (cut to appropriate-sized pieces if needed)
- yogurt
- cottage cheese
- cheese
- toast with mashed avocado spread on it
- hummus with crackers
- hummus with unsalted pretzels
- crackers with peanut, almond, or sun butter spread thinly on it (only use nut butters if your child does not have nut allergies)
- instant oatmeal
- cereal with milk
- cereal bar
Always use use your best judgement when it comes to safe foods and safe serving sizes to give to your little one, and always supervise them while eating.
- I received this item for review from Nûby but all opinions expressed are my own. Please see our Disclosure Policy for more information. -
Nûby's Flower Child Toddler Plate can be found at various retailers including Amazon.
KEEP UP WITH BIRCH LANDING HOME
| Etsy | Facebook | Instagram | Pinterest | Bloglovin' | Hometalk |
This is one of my favorite hearty side dishes for anytime of year, though it probably is best suited for Fall. Very quick and easy to put together too! | This post contains affiliate links |
I call it my Harvest Side Dish because it's basis is Trader Joe's Harvest Grains Blend. I'm a huge fan of this mix, even on it's own. It makes a great side to dinner any night of the week and adding some of my favorite fall foods in there just makes it even more harvest-y (that's a word, right?).
Harvest Side Dish
Prep time 10 mins | Cook time 25 mins | Serves up to 8
Ingredients
1/2 a package of Trader Joe's Harvest Grains Blend (if not available you can substitute a mix of Israeli couscous, orzo, baby garbanzo beans, and red quinoa, totaling 1 1/4 cups)
1 small onion
1 apple
1 package of apple chicken sausage
1/2 tsp sage
salt and pepper to taste
Directions
Cook Harvest Grains Blend (or your substitution) according to package directions.
While that's cooking, cut up sausage and onion and saute in pan until cooked through, seasoning with sage, salt, and pepper. Add in chopped apples towards the end (I like them soft but not mushy).
Once all your cooked ingredients are finished, mix together in a large bowl and serve hot.
Enjoy - told you that was easy!
KEEP UP WITH BIRCH LANDING HOME
| Etsy | Facebook | Instagram | Pinterest | Bloglovin' | Hometalk |
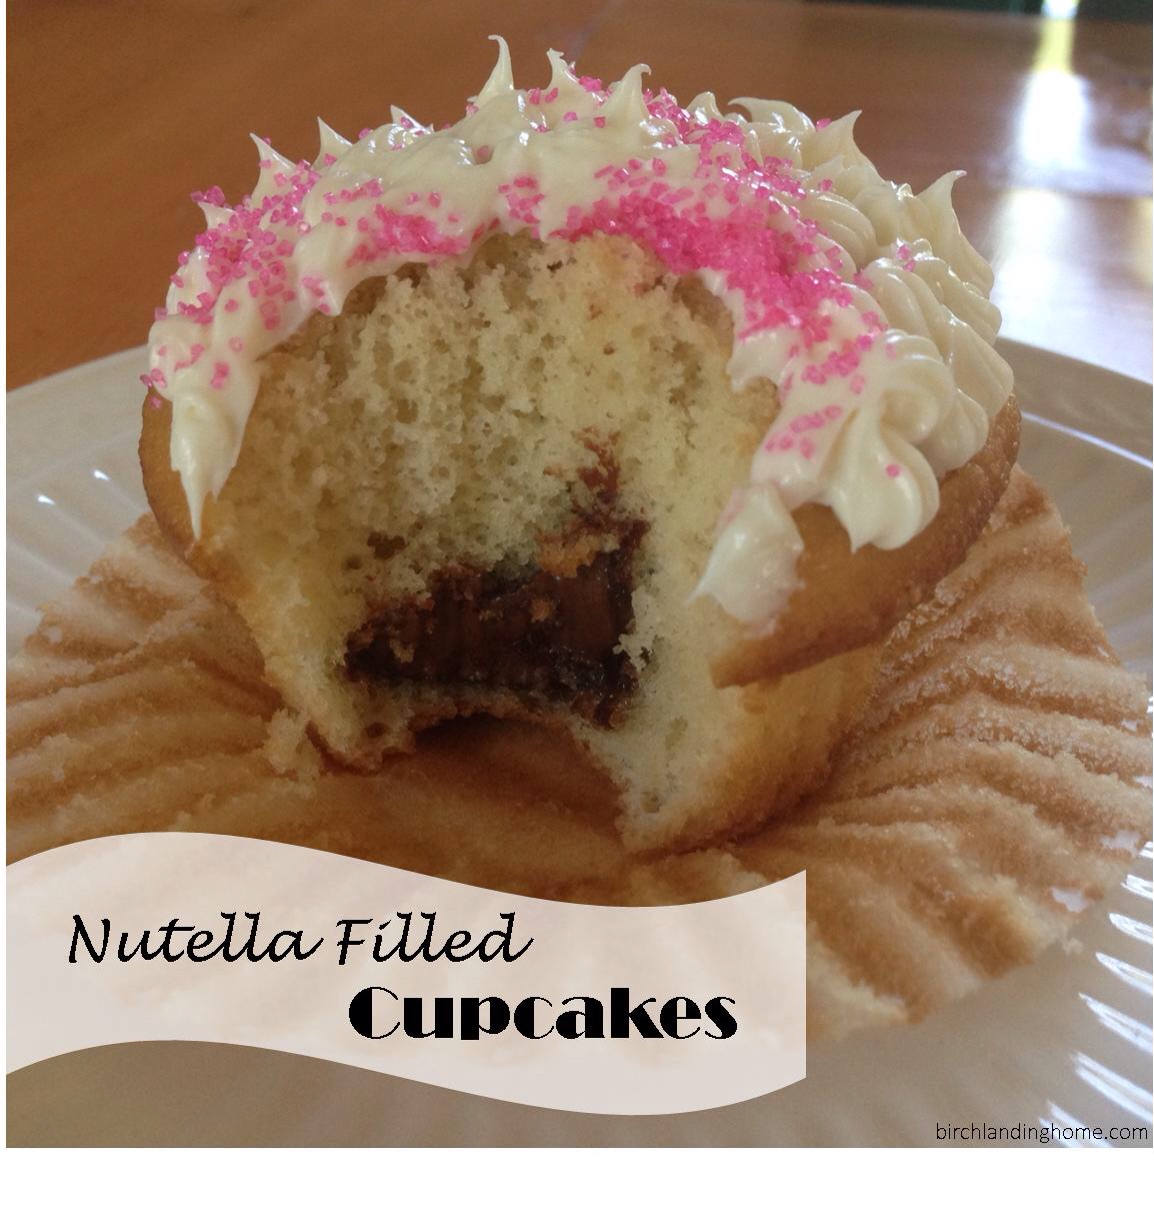
This past weekend we had some friends over and I needed to make a dessert for after dinner. After looking through the cupboards I realized we had a left over box of vanilla cake mix and vanilla frosting from my husband's birthday. I wanted to use that up, but needed something to jazz up the boring all-vanilla dessert. I saw a jar of Nutella and thought filling the cupcakes with that would be an awesome idea! This "recipe" can be super easy by using a box mix and ready-made frosting like I did, but if you have a great from-scratch recipe for cupcakes and frosting you can definitely use that instead!
At first I debated whether I should pipe Nutella into already cooked and cooled cupcakes, or put it straight into the batter before baking. I decided to go with adding the Nutella in before baking and other than it sinking towards the bottom half of the cupcake (some more than others), it worked great! Putting the Nutella in pre-baking also means a little less clean-up in the end, which is just fine by me.
Nutella Filled Cupcakes
Prep time 15 mins* | Cook time 20 mins* | Makes up to 24 cupcakes
*additional time needed to cool and decorate.
Ingredients
vanilla cake mix
wet ingredients needed for the cake mix (varies depending on brand, but you usually need eggs, water, vegetable oil)
vanilla ready-made frosting
Nutella
cupcake liners
sprinkles (optional)
Directions
Make cake batter according to package directions and fill muffin tin, lined with cupcake liners, with the batter.
Put a heaping teaspooon (or a little more) of Nutella on top of the batter.
Bake according to package directions (make sure cupcakes are thoroughly cooked).
Cool and decorate.
Enjoy!
Now wasn't that easy? :)
Tip: In the past I have used straight Nutella as frosting when I was short. It worked great, but keep in mind it stays very "goopy" and doesn't firm up or get that thin crust like most frostings do.
KEEP UP WITH BIRCH LANDING HOME
| Etsy | Facebook | Instagram | Pinterest | Bloglovin' | Hometalk |
This simple, hearty meal is basically a variation of traditional Pork Pie. The recipe isn't exact and doesn't have to be.. I generally don't make anything the same way twice and always go by what looks good. You can follow along the recipe for a general idea but feel free to incorporate substitutions and make it your own.
Our family got a total of three deer this year and so venison has been on heavy rotation. We've been finding ways to sneak it into lots of different meals and this Venison Pie has been a favorite!
Venison Pie
Prep time 50 mins | Cook time 30 mins | Serves up to 8
Ingredients
1 lb of ground venison
1 small onion, chopped (or about 1/3 cup chopped frozen onions)
1/2 tsp of Bell's Seasoning
1/2 cup frozen corn
3 medium potatoes, cooked and mashed
pie crust mix (I use classic boxed Jiffy Pie Crust Mix)
salt and pepper to taste
Directions
Start a pot of water boiling on a back burner. Meanwhile brown ground venison, onion, and Bell's Seasoning in a skillet, adding salt and pepper to taste.
Once browned add frozen corn, cover and simmer for about 30 mins. While that's simmering peel, chop, boil, and mash your potatoes.
Mix mashed potatoes and browned meat mixture together and fill prepared pie crust.
Bake at 450 degrees for about 30 mins. This meal goes great with baked beans or ployes.
Feel free to add more veggies or tweak the recipe however you like, sometimes I add mushrooms or shredded carrots to the mix.
KEEP UP WITH BIRCH LANDING HOME
| Etsy | Facebook | Instagram | Pinterest | Bloglovin' | Hometalk |
Perusing Pinterest the other day I came across a pin for these Apple Rose Tarts from Martha Stewart and thought they'd be perfect to make for Valentine's Day!
Since this adorable idea was from Martha Stewart, I'll lead you there to see the full directions. However, my one complaint about the article was that it didn't give a lot of specifics, so please read on for my tips and lessons learned.
Apple Rose Tarts: Tips + Tricks
- The article suggests buttering and flouring your muffin tin first, which I did, but I can't stress how important it is to really thoroughly do it. I thought I had done a good job coating the pan but when it came time to take the tarts out they didn't come out easy and quite a few had some damage.
- For the pie crust I went the easy route and used a box of classic Jiffy Pie Crust mix and had enough dough to line a 12-cup muffin tin.
- For the apples I used 3 Gala apples. I didn't have a mandolin and had to hand-cut them.. I definitely think a mandolin would have been a lot easier.
- Using 3 apples I ended up with enough thin slices to make 6 roses, and enough left over apple pieces to fill the other 6 muffin cups. (*In summary, 1 apple with make 2 apple roses.. so If you wanted to make 12 apple rose tarts you would need 6 apples)
- There wasn't any hint at how much sugar and cinnamon to use, so I filled a cereal bowl about halfway with white sugar (brown sugar would have probably tasted better but it would have browned the apple roses) and probably a teaspoon of cinnamon. When it came time to sprinkle the mixture on the apple slices I was very generous.
- The apple slices need to be really soft and pliable in order to roll them well. I had to microwave them until they were soft and steaming in order to roll them without breaking.
- Once you start rolling the apple slices, don't stop! Roll them tightly and place right into the prepared muffin pan - make sure it's close by.
- Let the tarts cool completely before trying to take them out of the tin.
The Apple Rose Tarts were a big hit! Hope everyone had a wonderful Valentine's Day!
Check out our other Valentine's posts:
KEEP UP WITH BIRCH LANDING HOME
| Etsy | Facebook | Instagram | Pinterest | Bloglovin' | Hometalk |
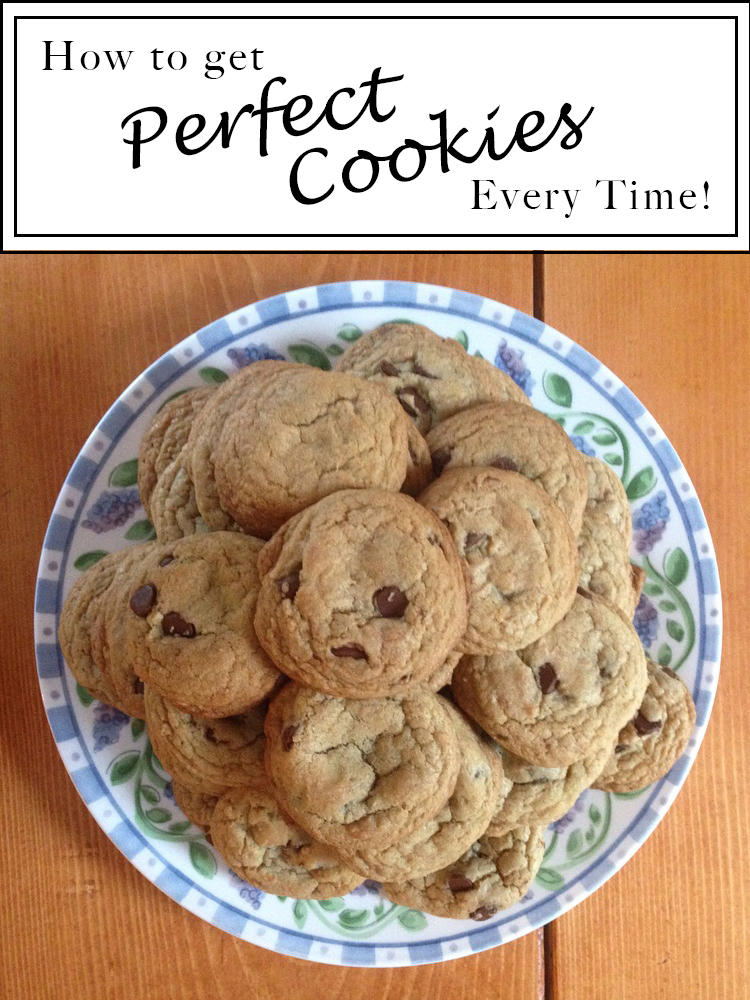
I always get told I make the best cookies, but making amazing cookies isn't all about the recipe - technique is what makes a good recipe great! Read on for my 5 tips to make perfect cookies, every time. | This post contains affiliate links |
5 Tips for Perfect Cookies
Sift
Make sure to sift all your dry ingredients. Doing this breaks up any clumps of flour or baking soda, combines everything evenly, and helps make your cookies light and fluffy.
Always line your cookie sheet with parchment paper, this is key to getting the cookie bottoms that perfect light golden brown. If you're planning on doing several batches of cookies make sure to round the corners of the parchment with some scissors first, as the sharp corners of the paper can start to burn after a few times in the oven.
A cookie scoop is probably one of the best little investments you'll make in the kitchen and I don't know how I ever lived without mine. Using a cookie scoop ensures you get uniform-sized cookies every time and makes the whole process of getting your cookies ready for the oven go so much faster.
Time
Always bake your cookies for the lower suggested time. Cookies that are just cooked all the way through make for the softest, chewiest cookies. If they aren't cooked in the middle yet you can always put them back in for another minute or two, but it's best to start with the lowest time.
Your Secret Weapon - the "Bread Trick"
Accidentally over-cook the cookies? Forget to cover them on the counter? Believe it or not, the magical solution for over-cooked or stale cookies is just a slice of sandwich bread and a big ziplock. Put all the cookies in a gallon ziplock bag, throw in a slice of bread, seal, and leave for a few hours - the cookies will get softer as the bread gets staler. Magic!
Looking for a yummy new cookie recipe? Be sure to check out my recipe for Grandma Dot's Apple Cookies!
Alright, now go make some amazing cookies (and share some with me, please?)
KEEP UP WITH BIRCH LANDING HOME
| Etsy | Facebook | Instagram | Pinterest | Bloglovin' | Hometalk |