I'm a wife, stay-at-home mom, crafter, and blogger living in rural New England. As seen in Martha Stewart Living, Food Network Magazine, and more! | Tutorials, DIY, crafts, parenting tips, recipes, money saving tips, product reviews, local product features, New England living, intentional living, and more! |
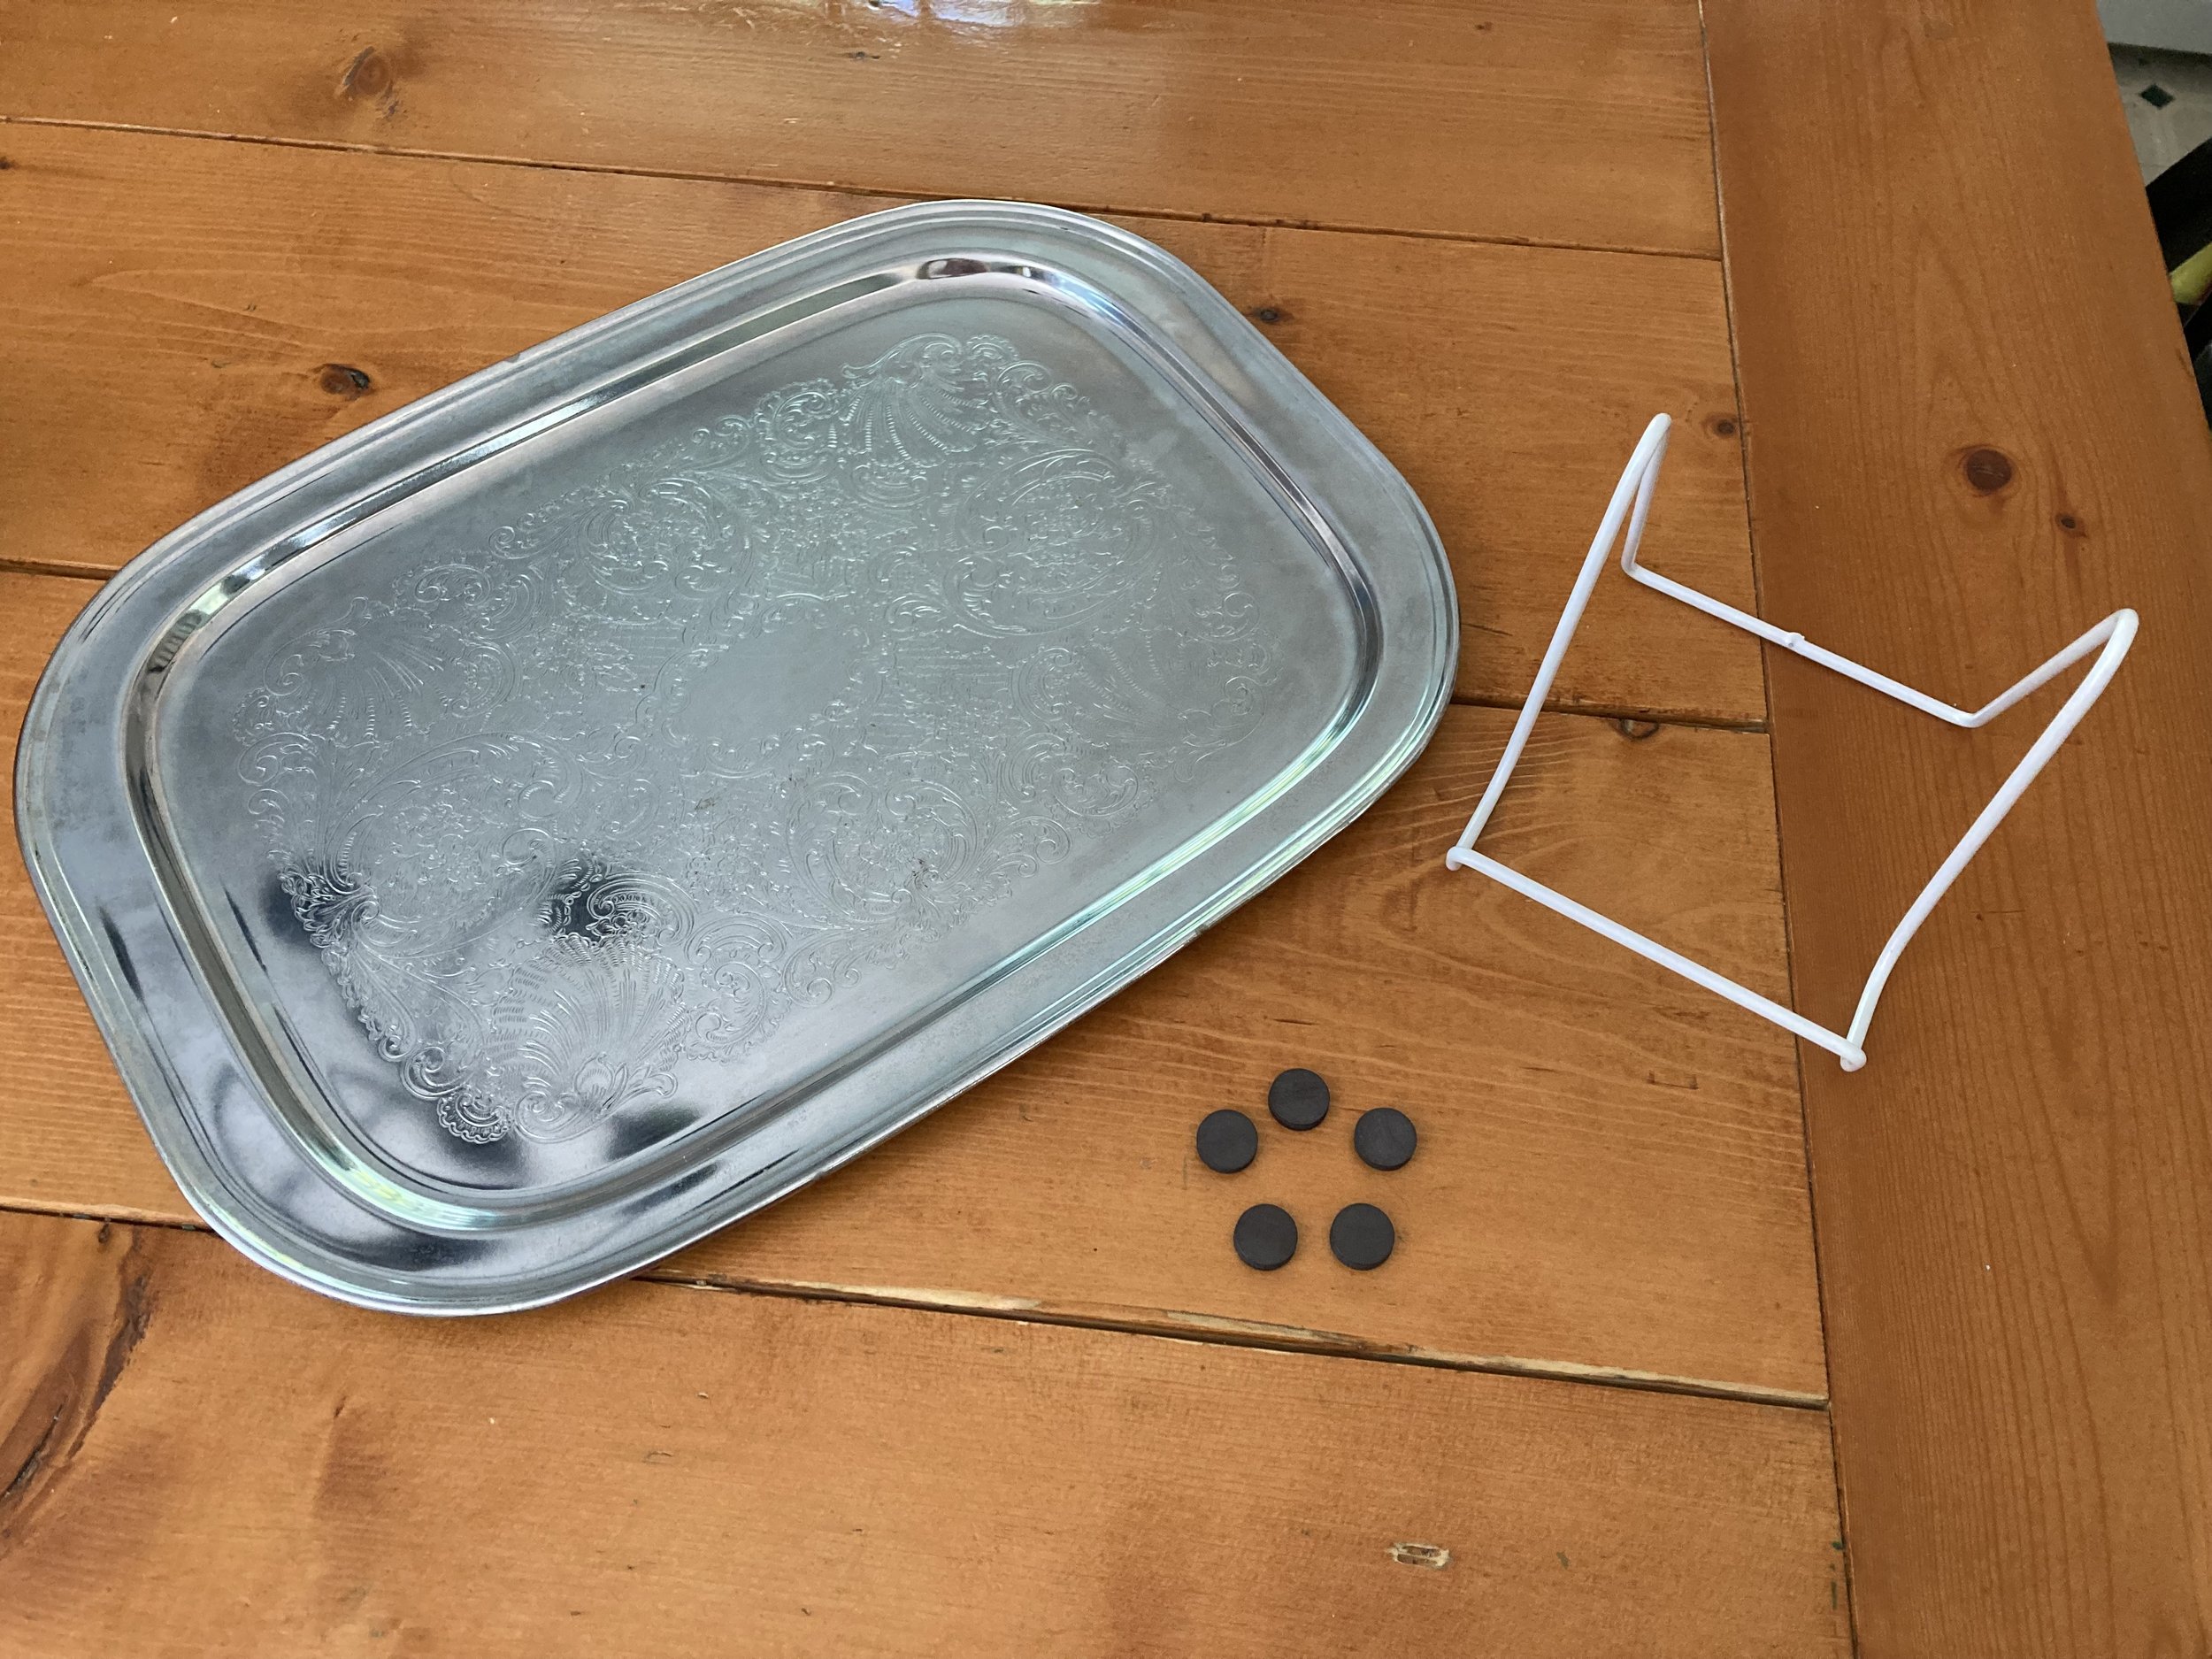
We’ve been slowly helping to clean out a family member’s attic and came across this old heavy “silver” (not actually silver) serving tray. Since not many people still use serving trays I thought it might be fun to repurpose it into something else - and since it seems to be made of some kind of steel (therefore magnetic), I thought it would make a fun magnetic memo board! | This post contains affiliate links |
Materials:
Vintage metal tray (check to make sure it's magnetic)
plate stand big enough to support the tray (similar size stand linked)
magnets
How To:
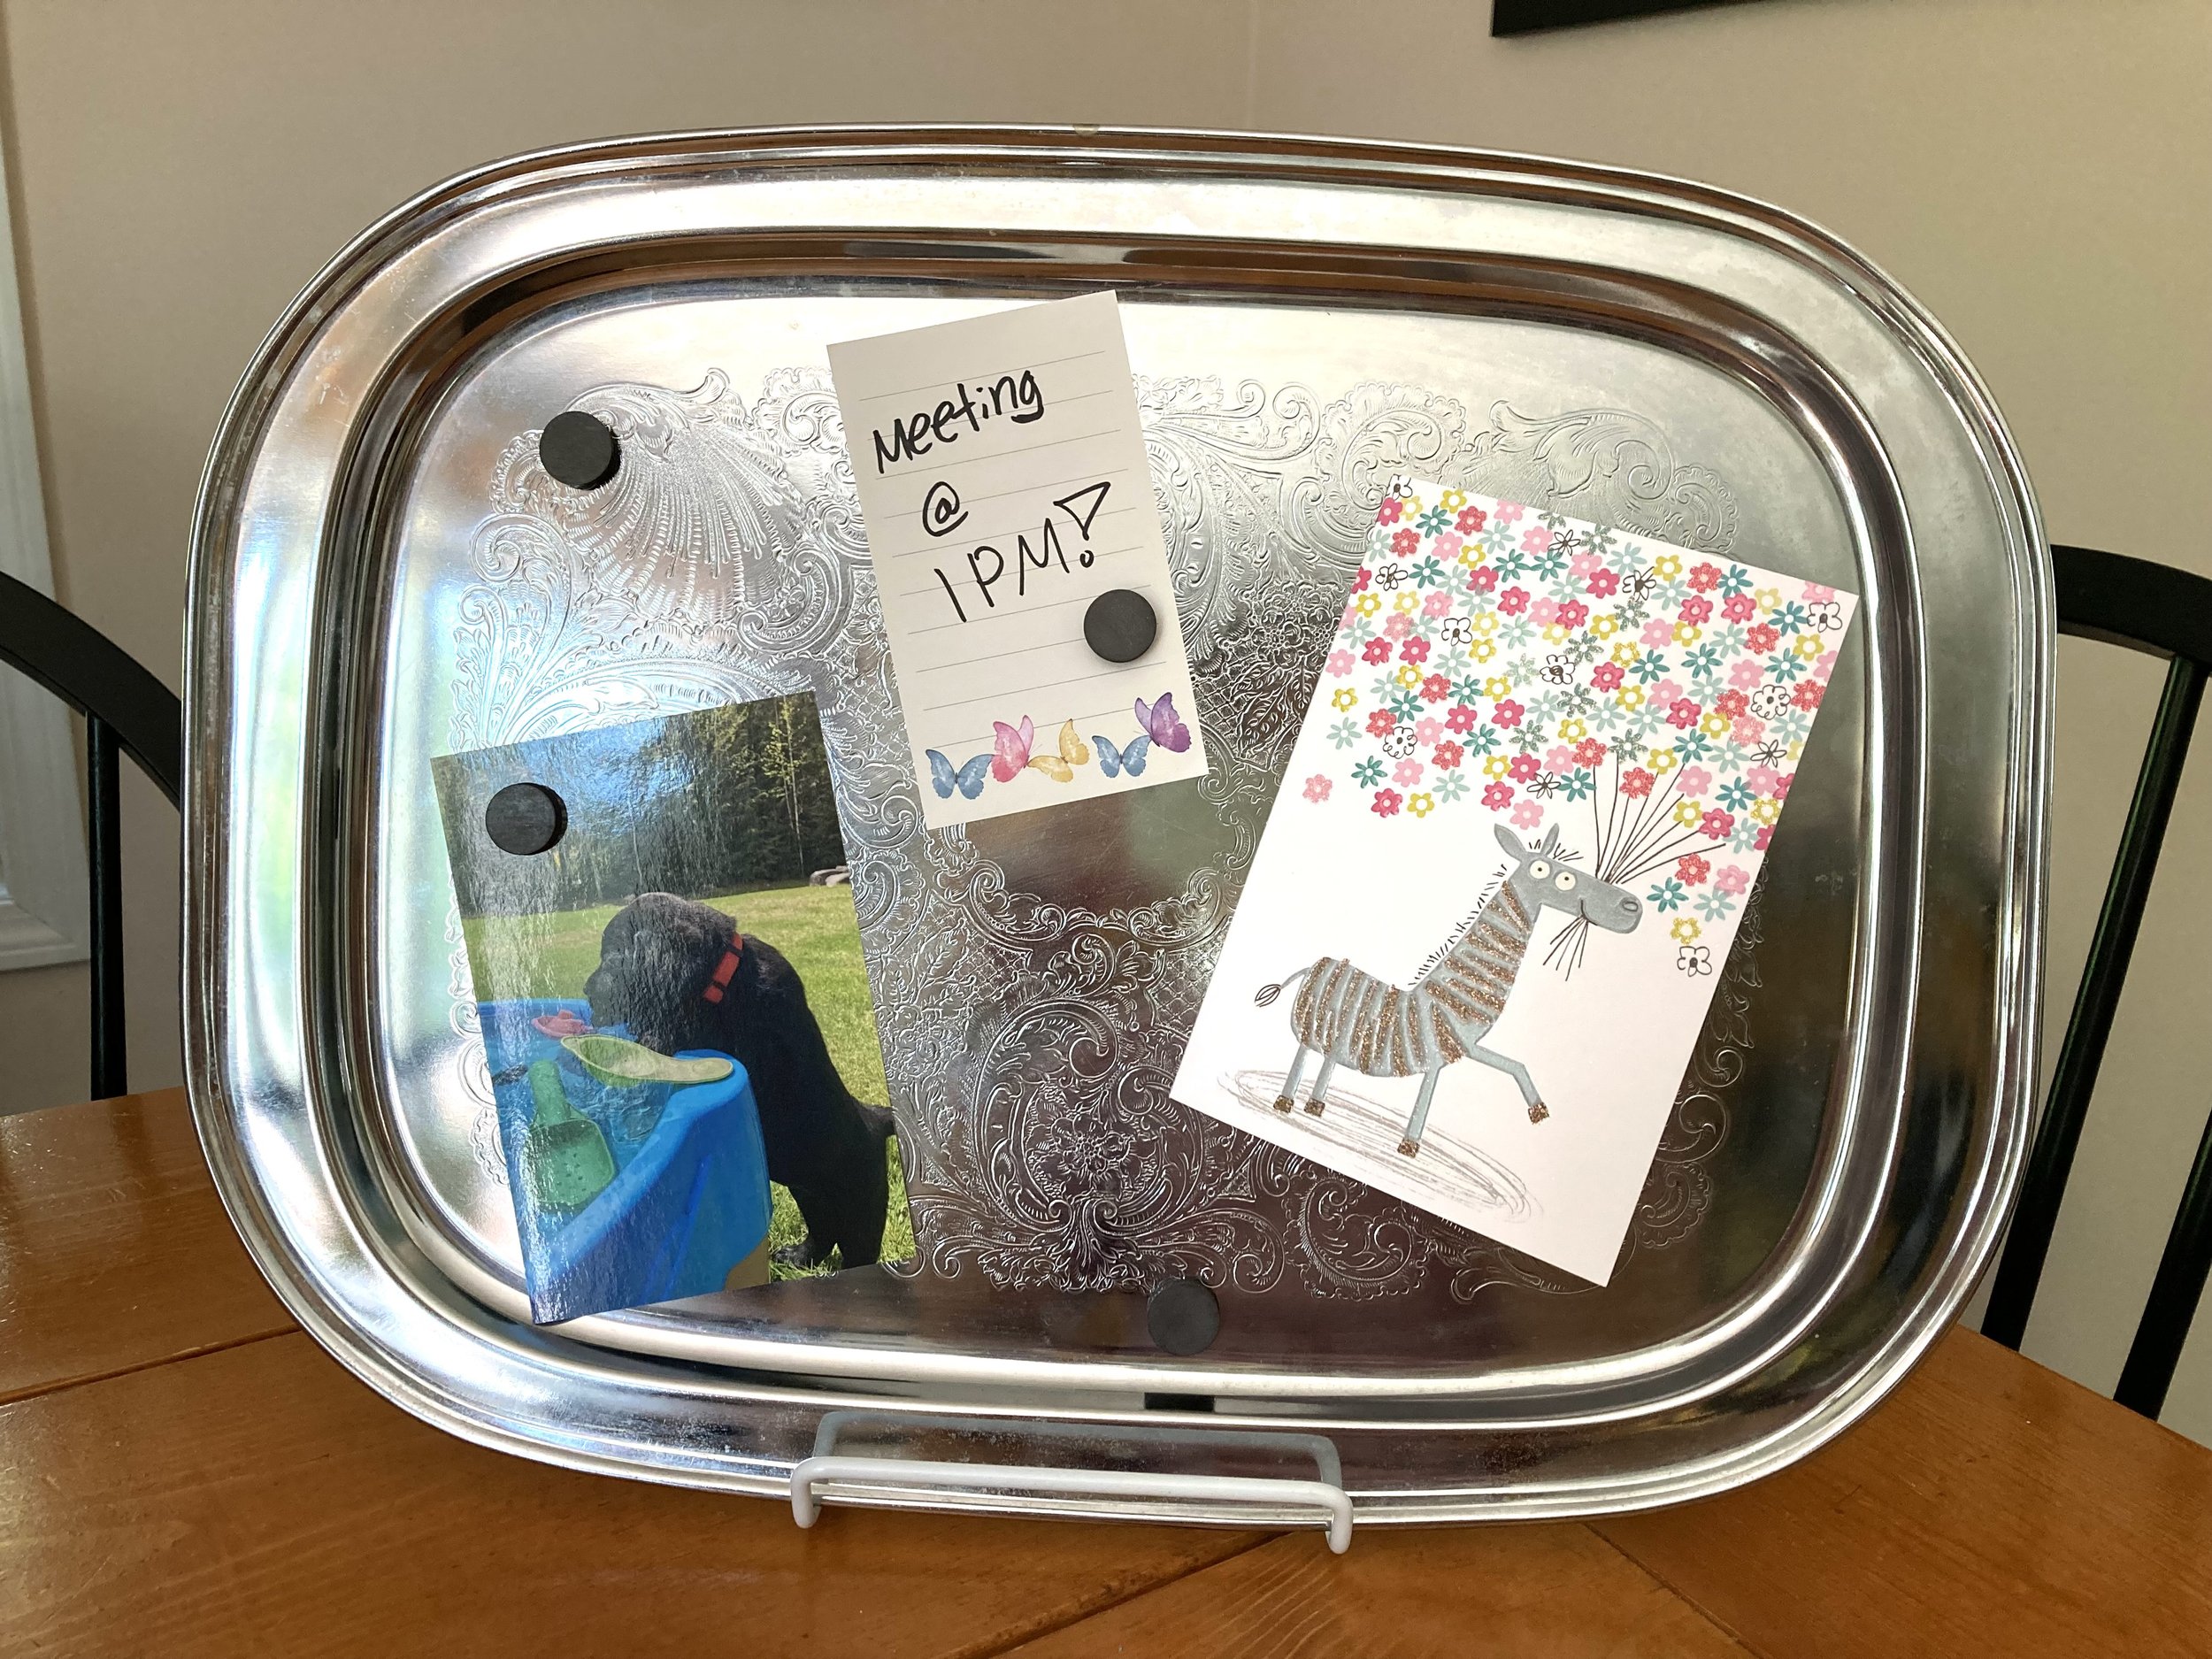
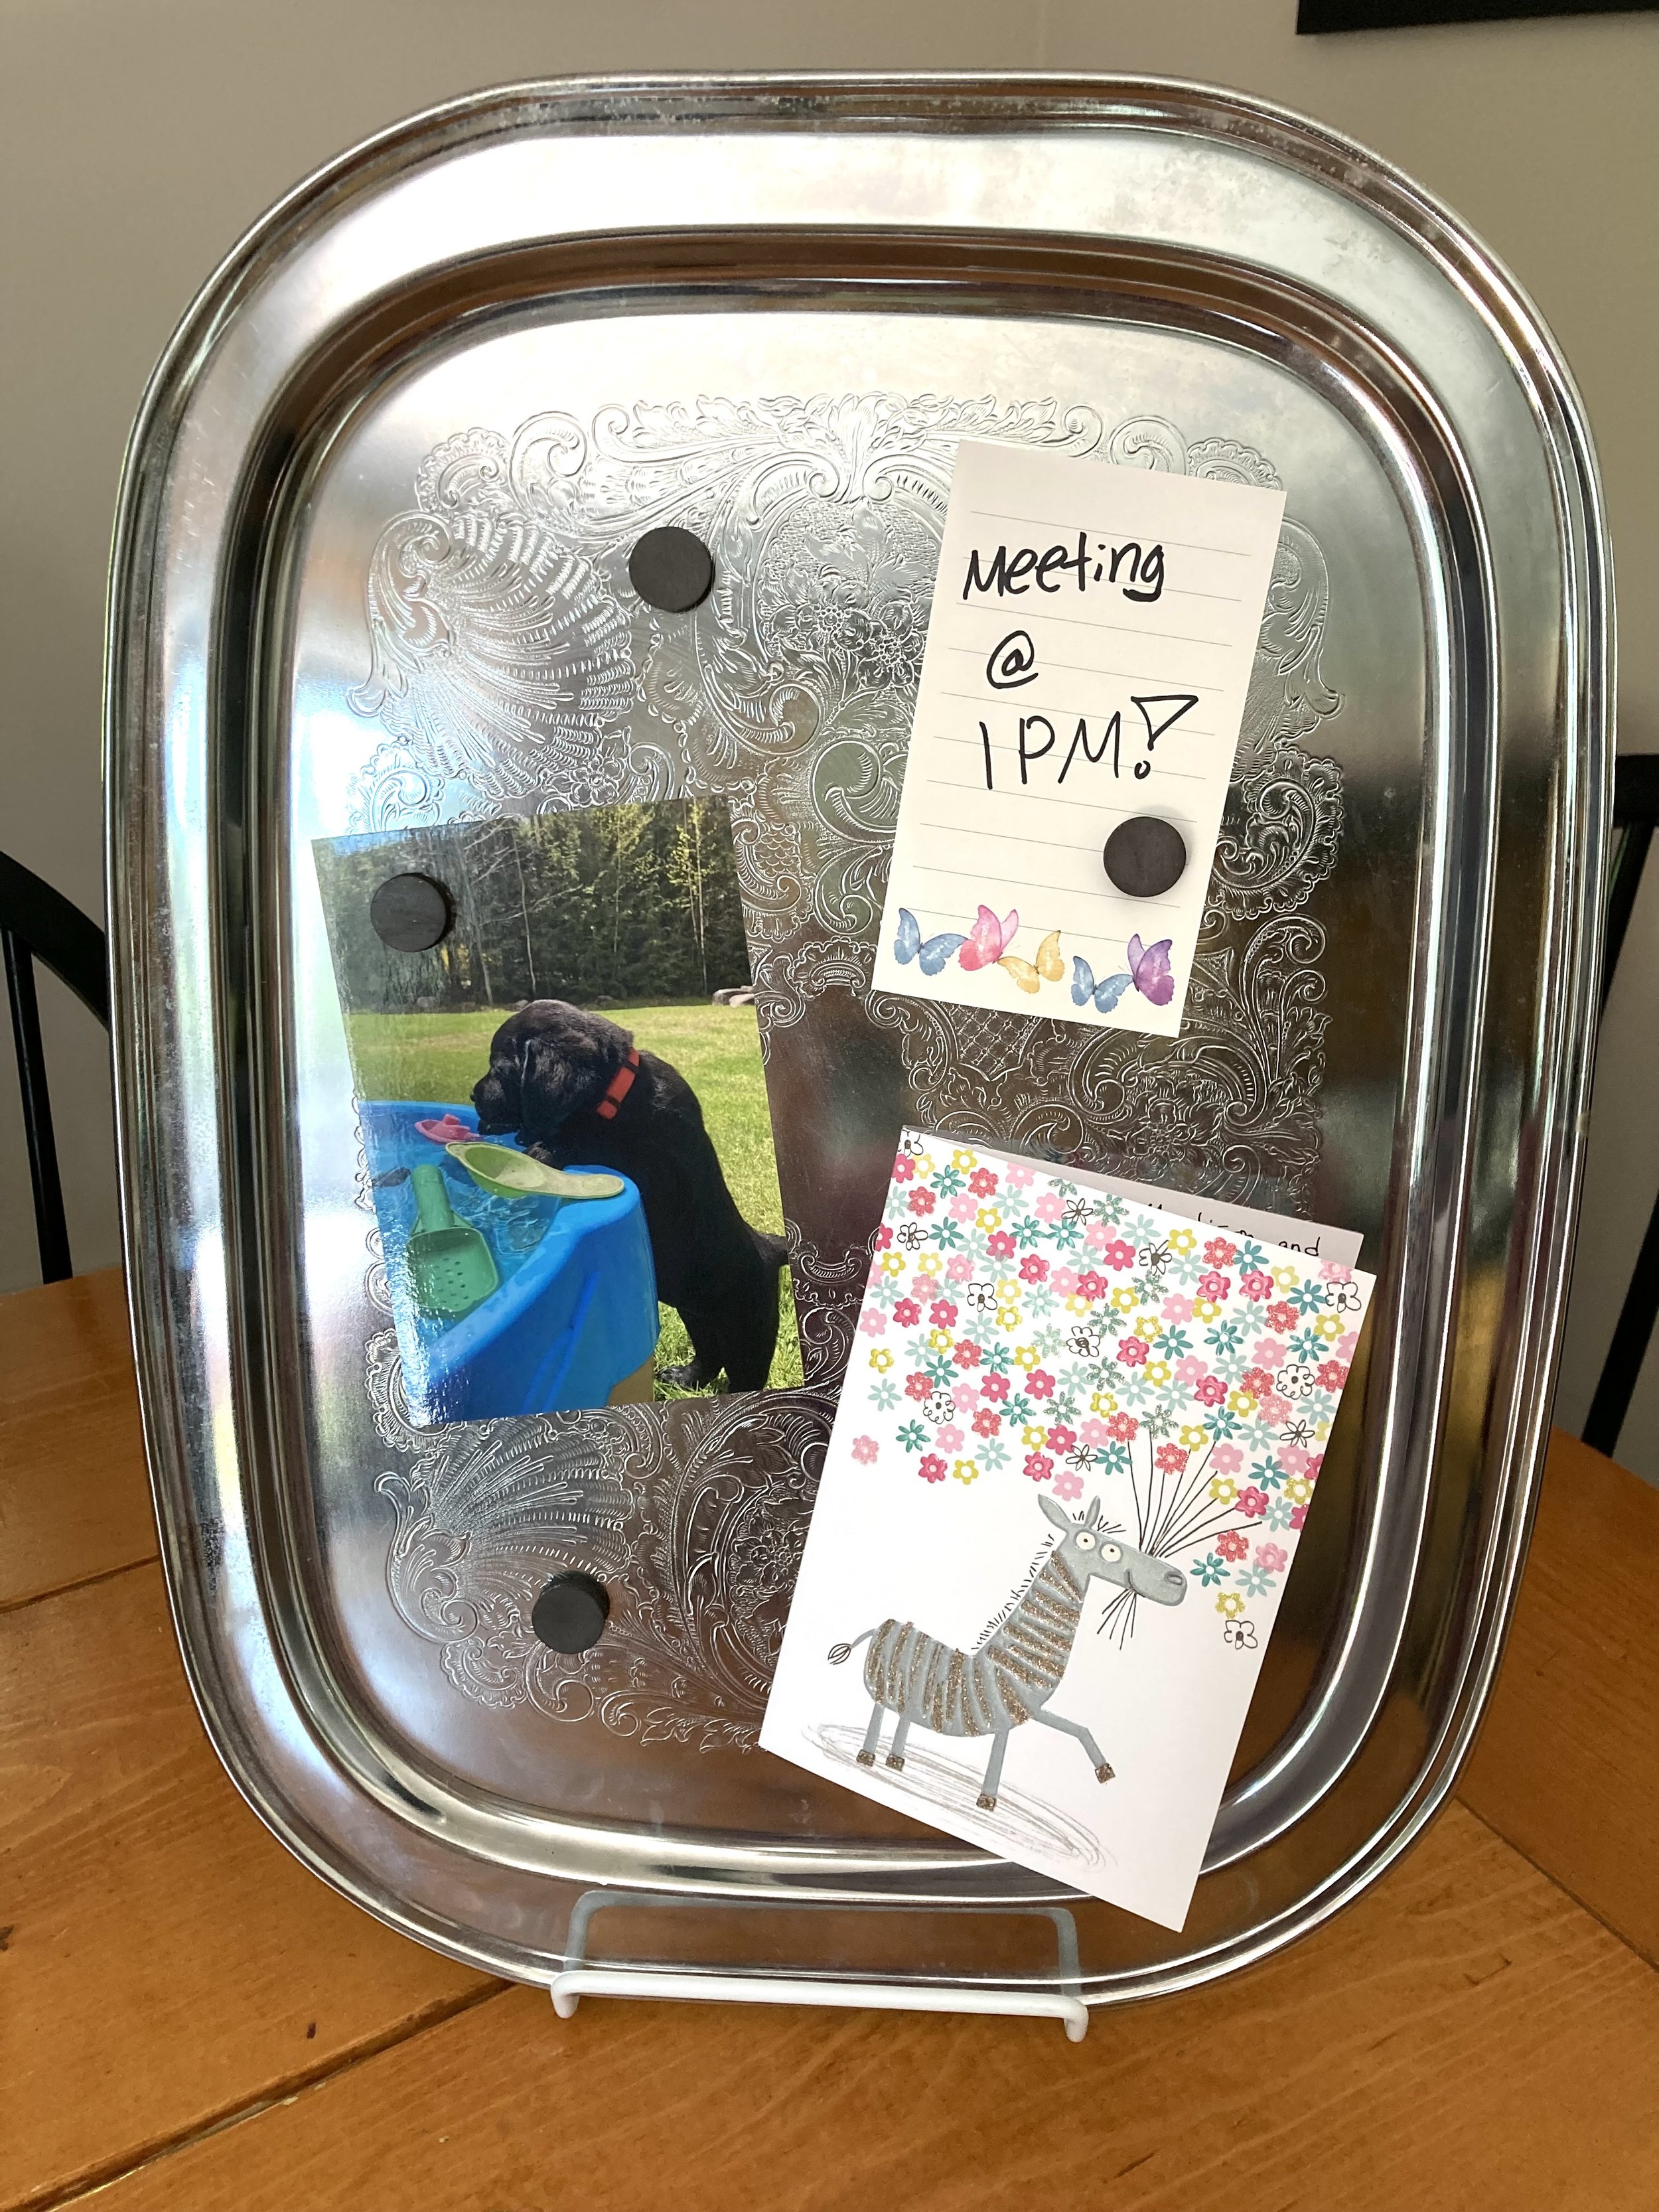
Really the how-to for this project could not be easier! Rest that serving tray on a plate stand that’s big enough/sturdy enough to support it, add some magnets, and BAM, you’re done! I think this project would look so cute on a dresser in a bedroom, a feminine office space, or on a desk nook in the kitchen. It can be used to hold reminders, photos, thank you notes, recipes, mementos, and more.
And if the horizontal orientation isn’t working for your space, just turn the tray and you instantly have a vertical memo board!
If you wanted to hang the tray on a wall instead, you could try using a tray hanger. Just make sure to buy the correct size hanger for your tray and make sure it's rated to support the weight of it.
PS - looking for vintage items like the serving tray in this post? Be sure to check out our Etsy Shop for some fun vintage finds! Our inventory is always changing so check back often :)
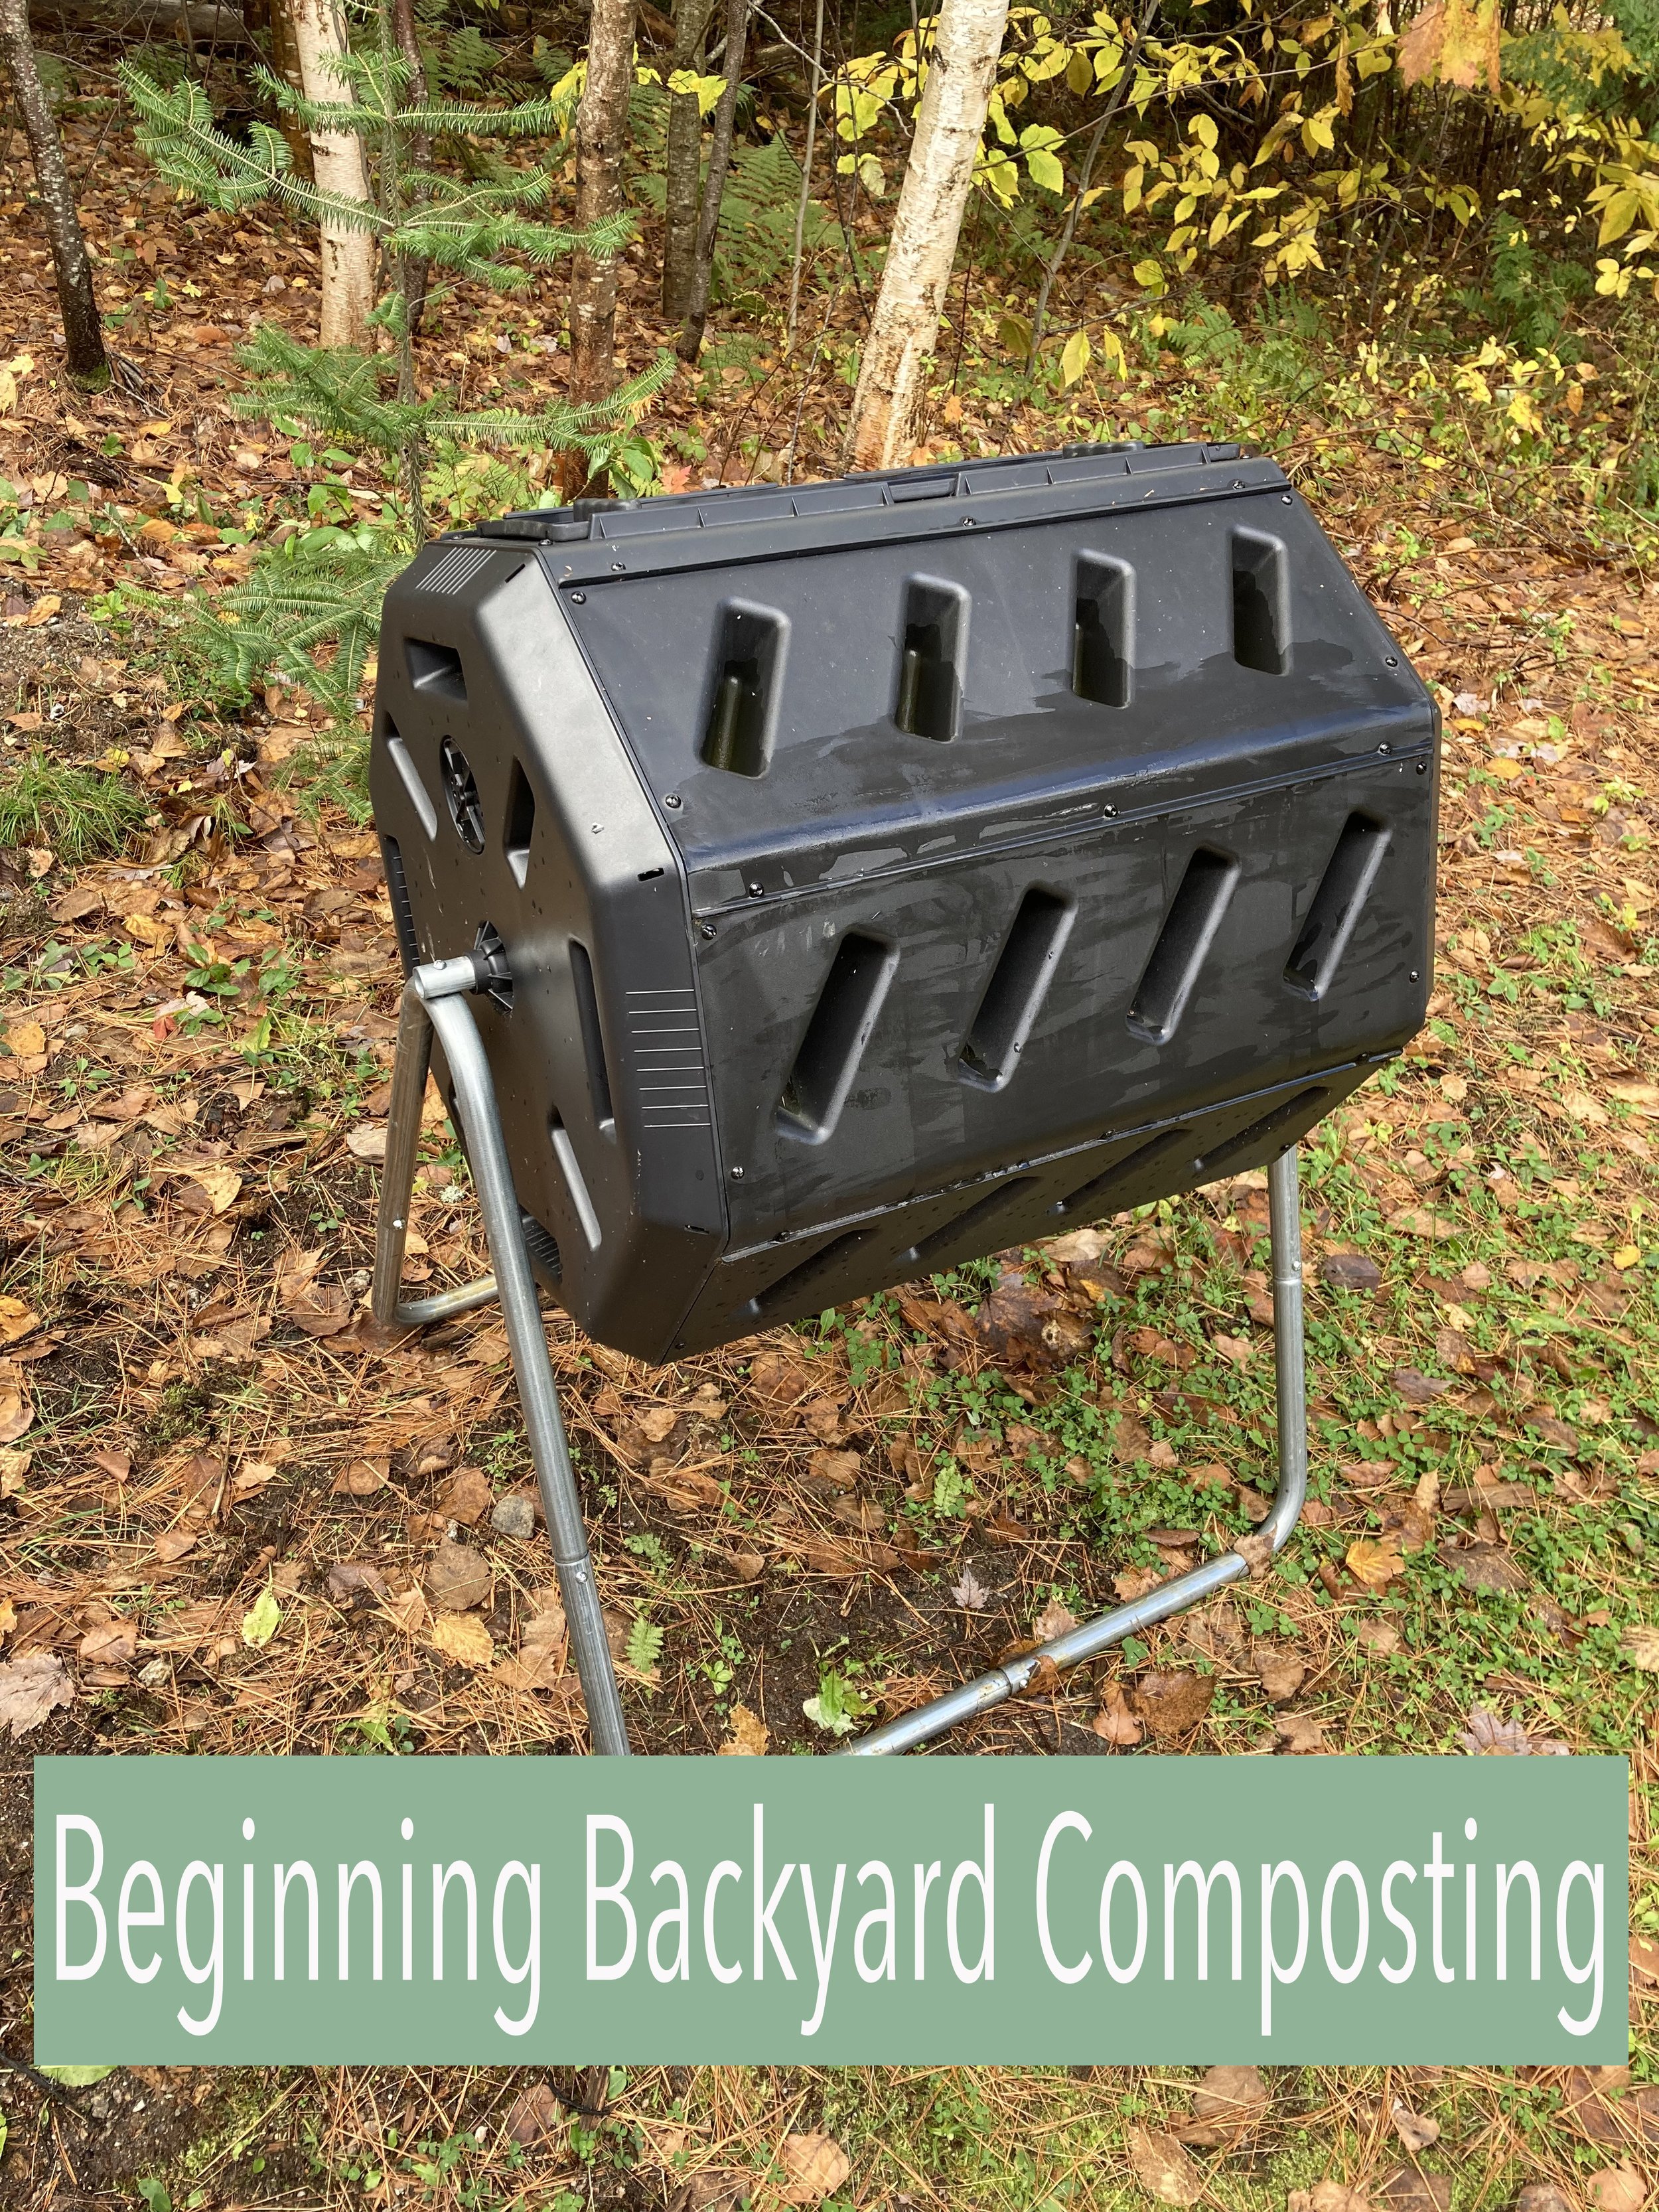
This year we finally jumped on the backyard composting bandwagon. We’ve been wanting to make more eco-friendly choices around our home and decided a big step we could make would be trying to eliminate as much food waste going into our household trash as possible. | This post contains affiliate links |
Composting has a lot of benefits. Some of which include reducing the amount of decomposing matter filling our landfills as well as producing nutrient-rich garden soil to benefit your own yard and garden.
Getting Set Up
When it comes to composting, you could just make a pile in the corner of your yard or make your own bin with some scrap wood or fence. However, we decided to opt for a tumbler-style bin since we were looking for something compact, self-contained, and efficient.
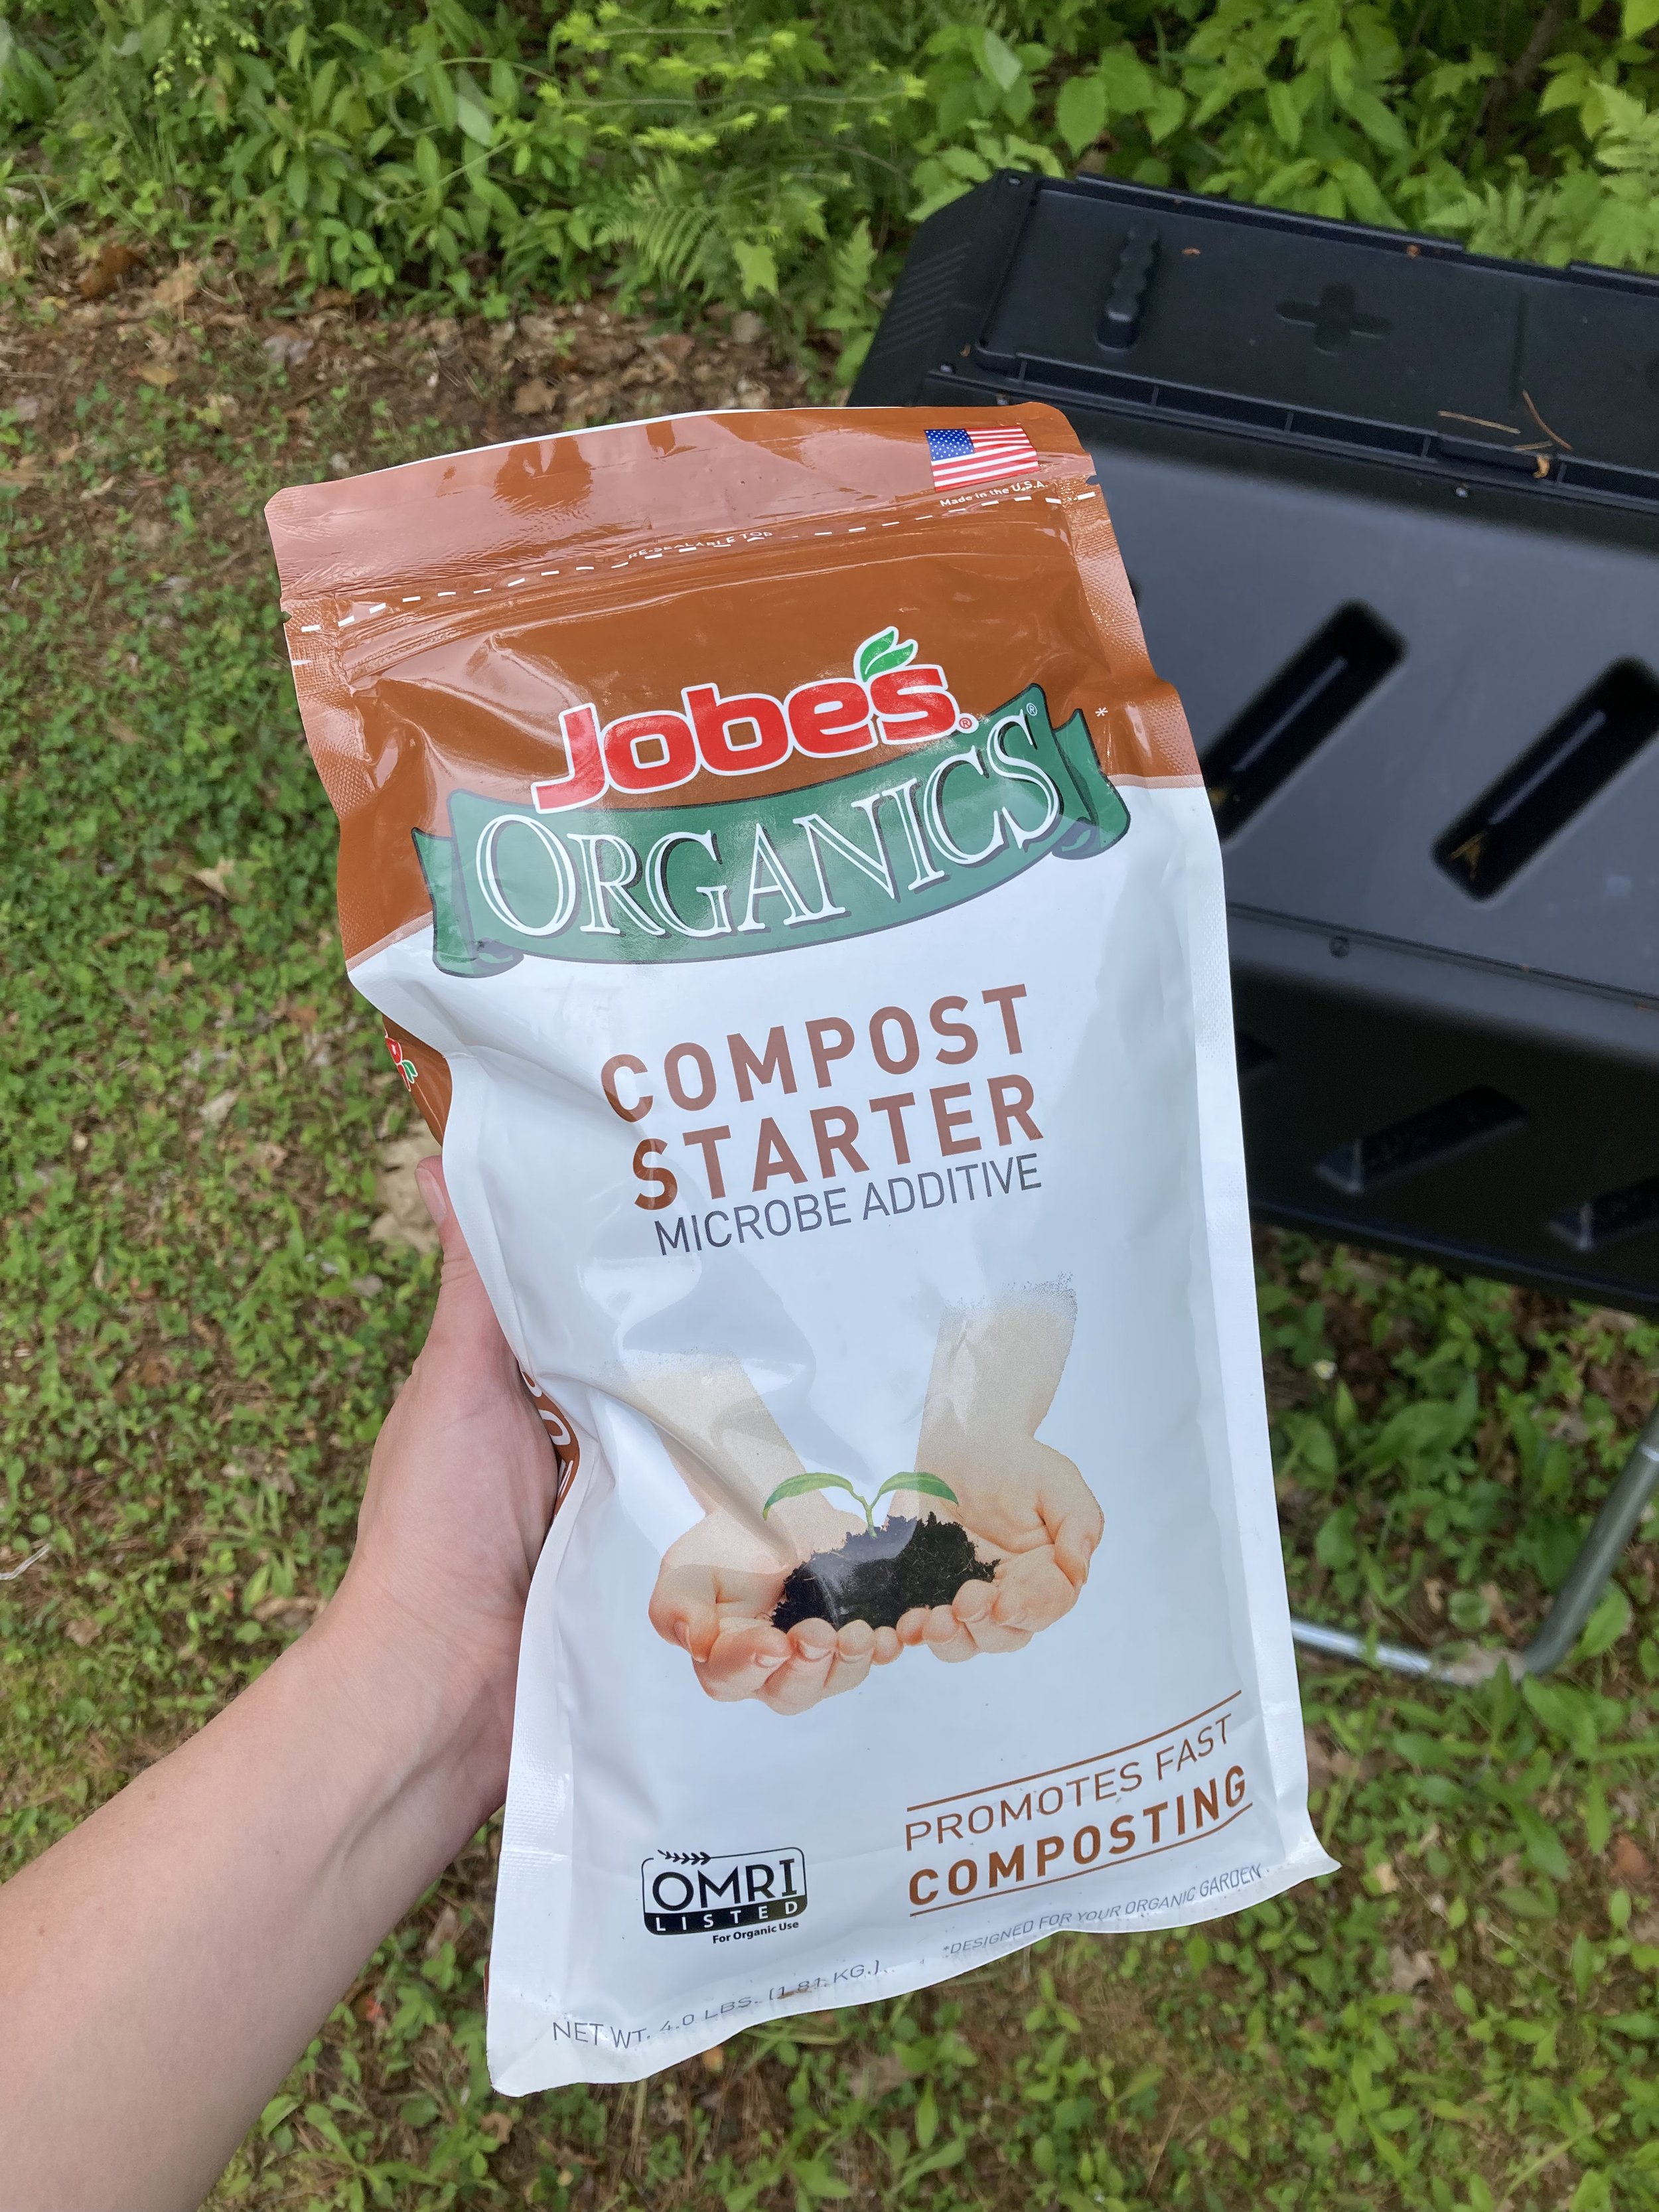
Once you decide on your compost set-up it's important to add some good microbes to "get the party started" and create a good environment for breaking down your food and yard waste. To do this you can add a shovel-full of garden dirt from your own garden to introduce some microbes, or you can buy some specialty compost starter to add to your composter (just follow the package directions).
Composting
Once you have it set up, just keep on adding food/yard waste and periodically turn your compost over (by hand if yours is a pile or by spinning the drum if it’s a tumbler-style). The trickiest part for me is keeping the ratios right - ideally your compost pile should be about 1 part “greens” (these would be fruit/veggie scraps, coffee grounds, etc… I like to think of them as wet items) and 2 parts “browns” (leaves, newspaper, brown paper bags, etc… I like to think of them as dry items). We personally tend to teeter from too dry to too wet in our compost bin but it seems to average out eventually.
I typically toss our kitchen scraps in a bowl on the counter as I'm cooking and promptly empty it into the compost bin outside. This has worked well for us so far since the weather has been mild. Once it turns winter here I will probably invest in a kitchen countertop compost container so I don't need to walk outside across the icy/snowy yard several times a day, and instead can just empty the kitchen container into the outside compost bin periodically as it fills up.
What to Compost
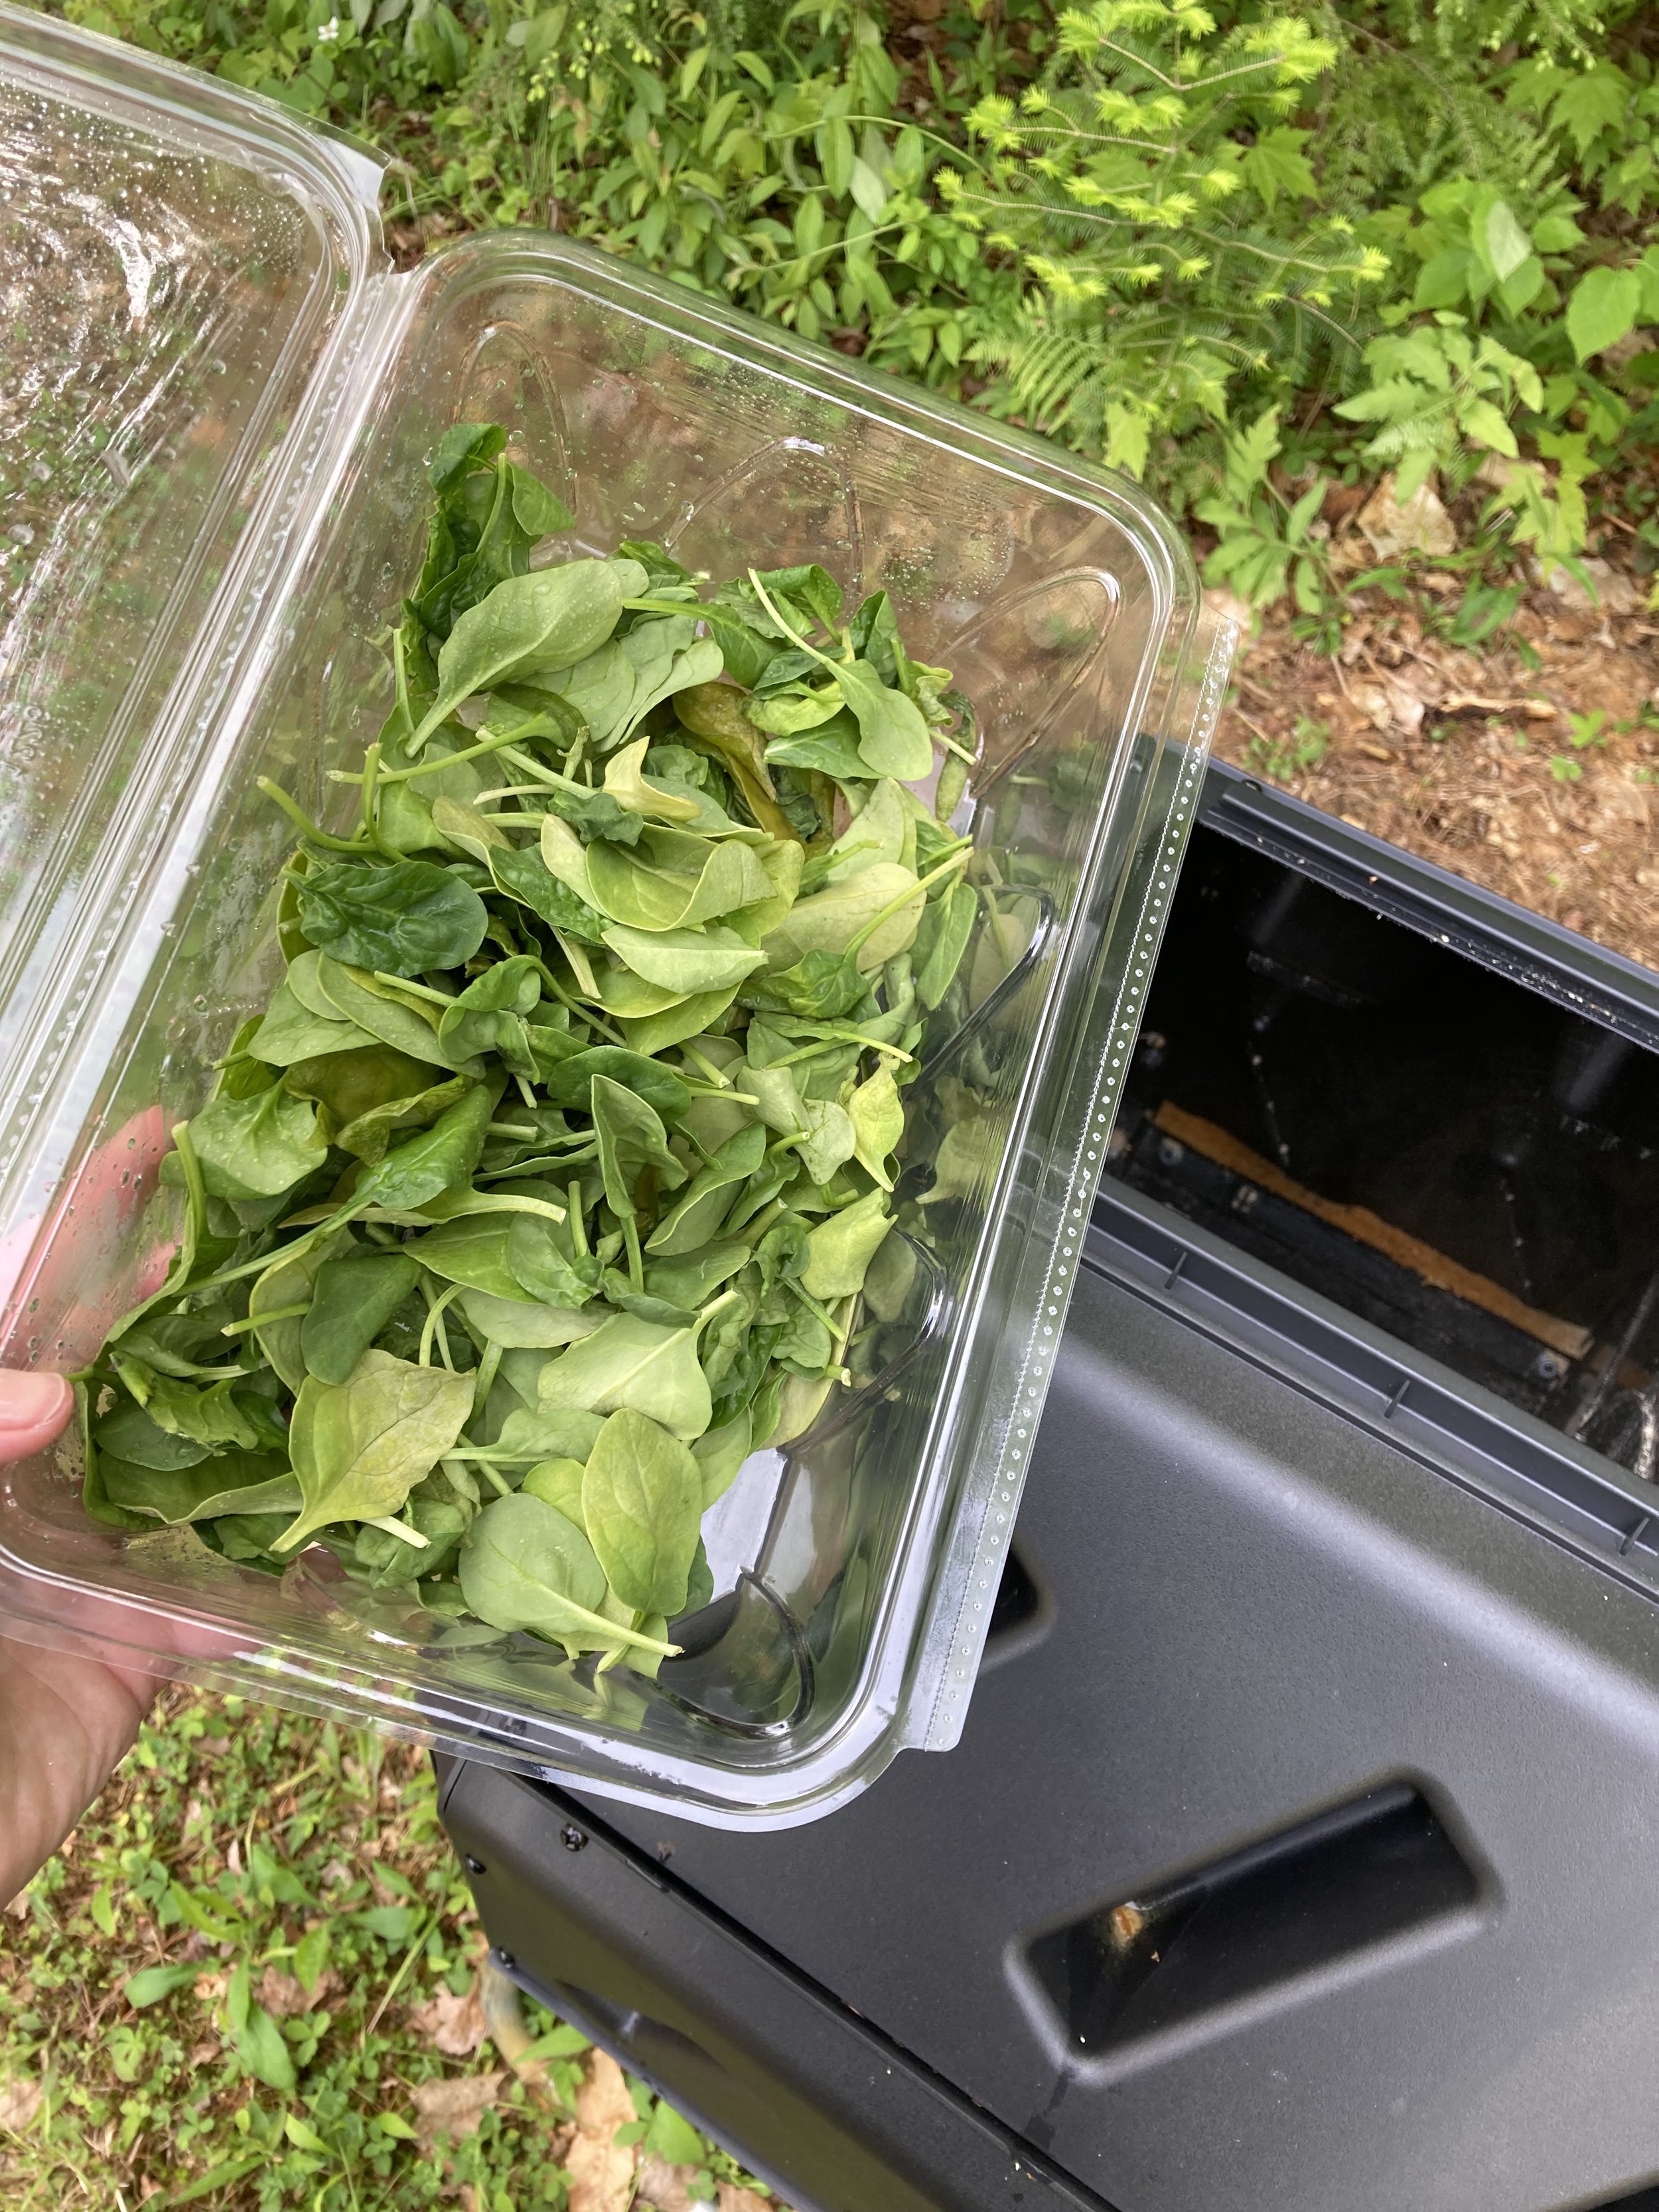
Slimy spinach in your fridge? Toss it in the composter and then recycle the container!
Here’s a short list of things you can potentially compost:
fruit
vegetables
inedible portions of fruit/veggies (i.e. - rinds/cores)
coffee grounds
egg shells
disease-free, non-invasive plants
shredded newspaper
shredded brown paper bags
shredded paper (non-glossy)
untreated sawdust (I make a lot of ornaments for my Etsy shop and compost the sawdust)
toilet paper rolls
leaves, grass clippings
small sticks
The smaller you make the items in your compost bin (cut them up or shred them), the quicker they should decompose and compost.
What NOT to Compost
Do NOT Compost:
x plastic or household trash x meat x dairy x cooked food x glass or metal x animal waste or used animal bedding/shavings x invasive or diseased plant materials - compost very strong smelling fruit/veggies with caution (i.e. citrus/bananas) if you live in an area with bears or raccoons that are an issue
Good luck in your composting adventure! I hope you enjoy the process and be proud in your efforts to be a little more eco-friendly in your home.
Disclaimer: I am sharing my experiences with what we’ve learned in the composting process so far. If you’d like expert or more detailed and specific information, I’d recommend contacting your local garden center or university cooperative for more information. Your local town or city may have composting programs to join or guidelines to follow too.
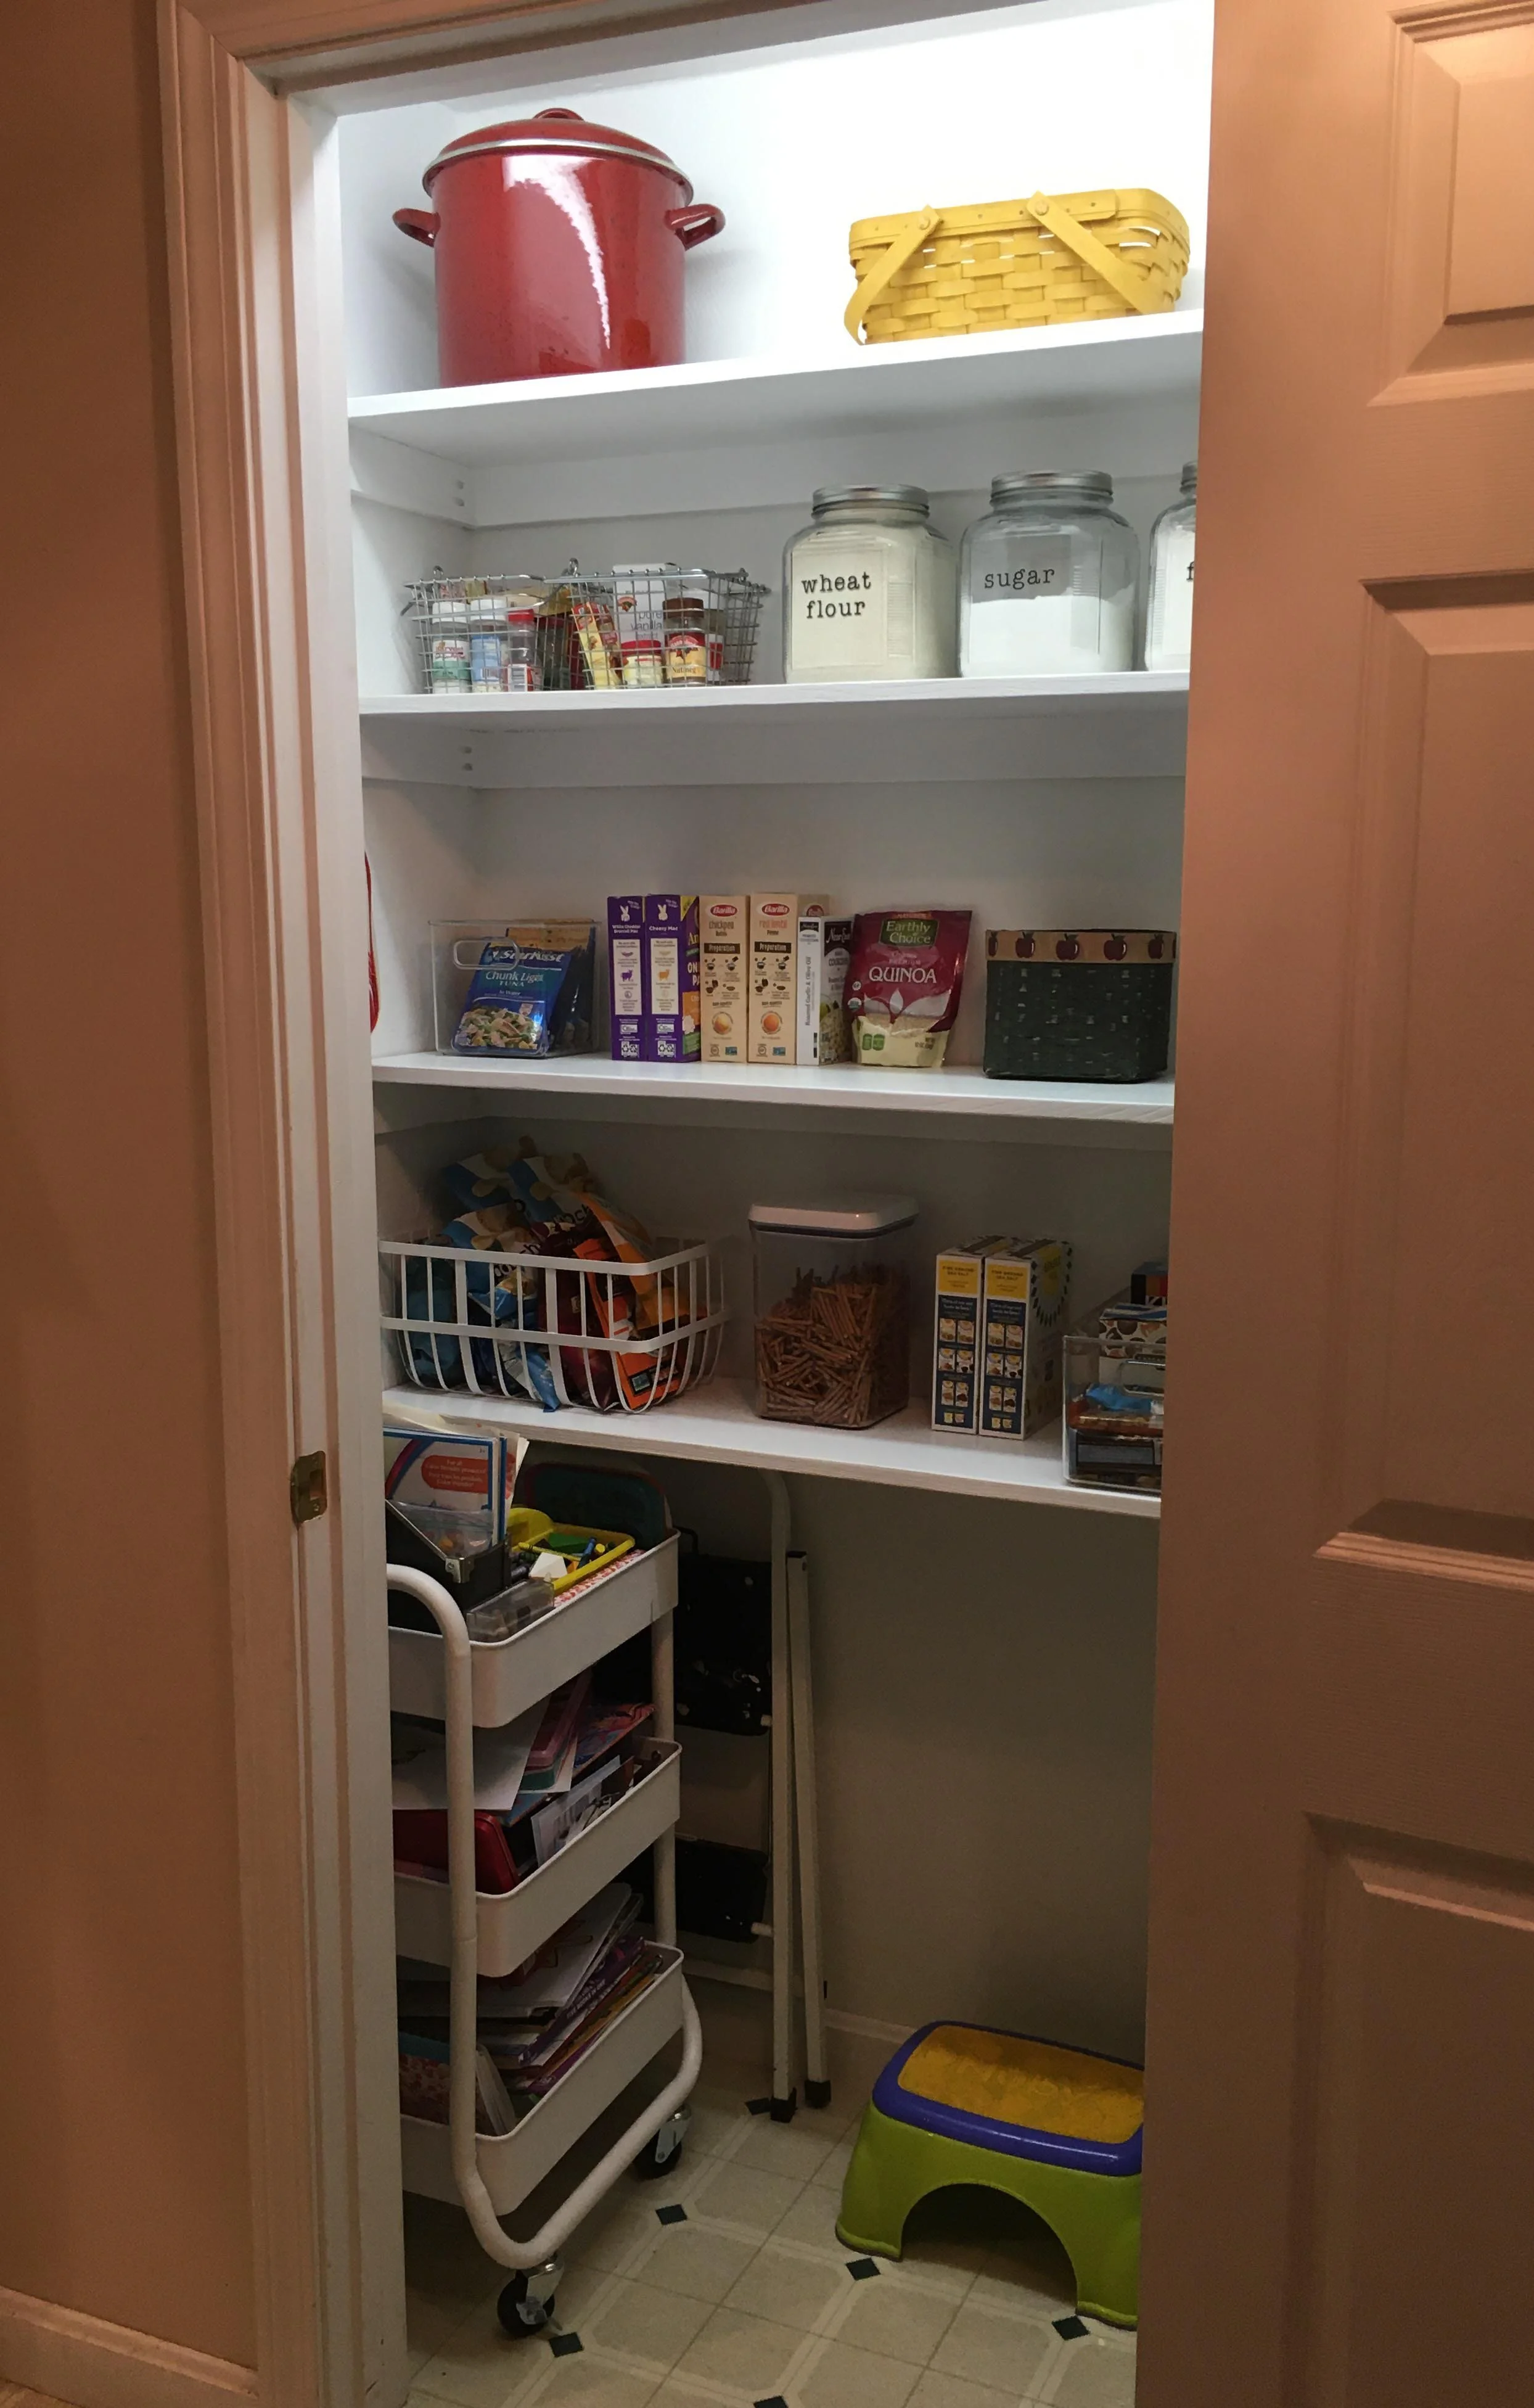
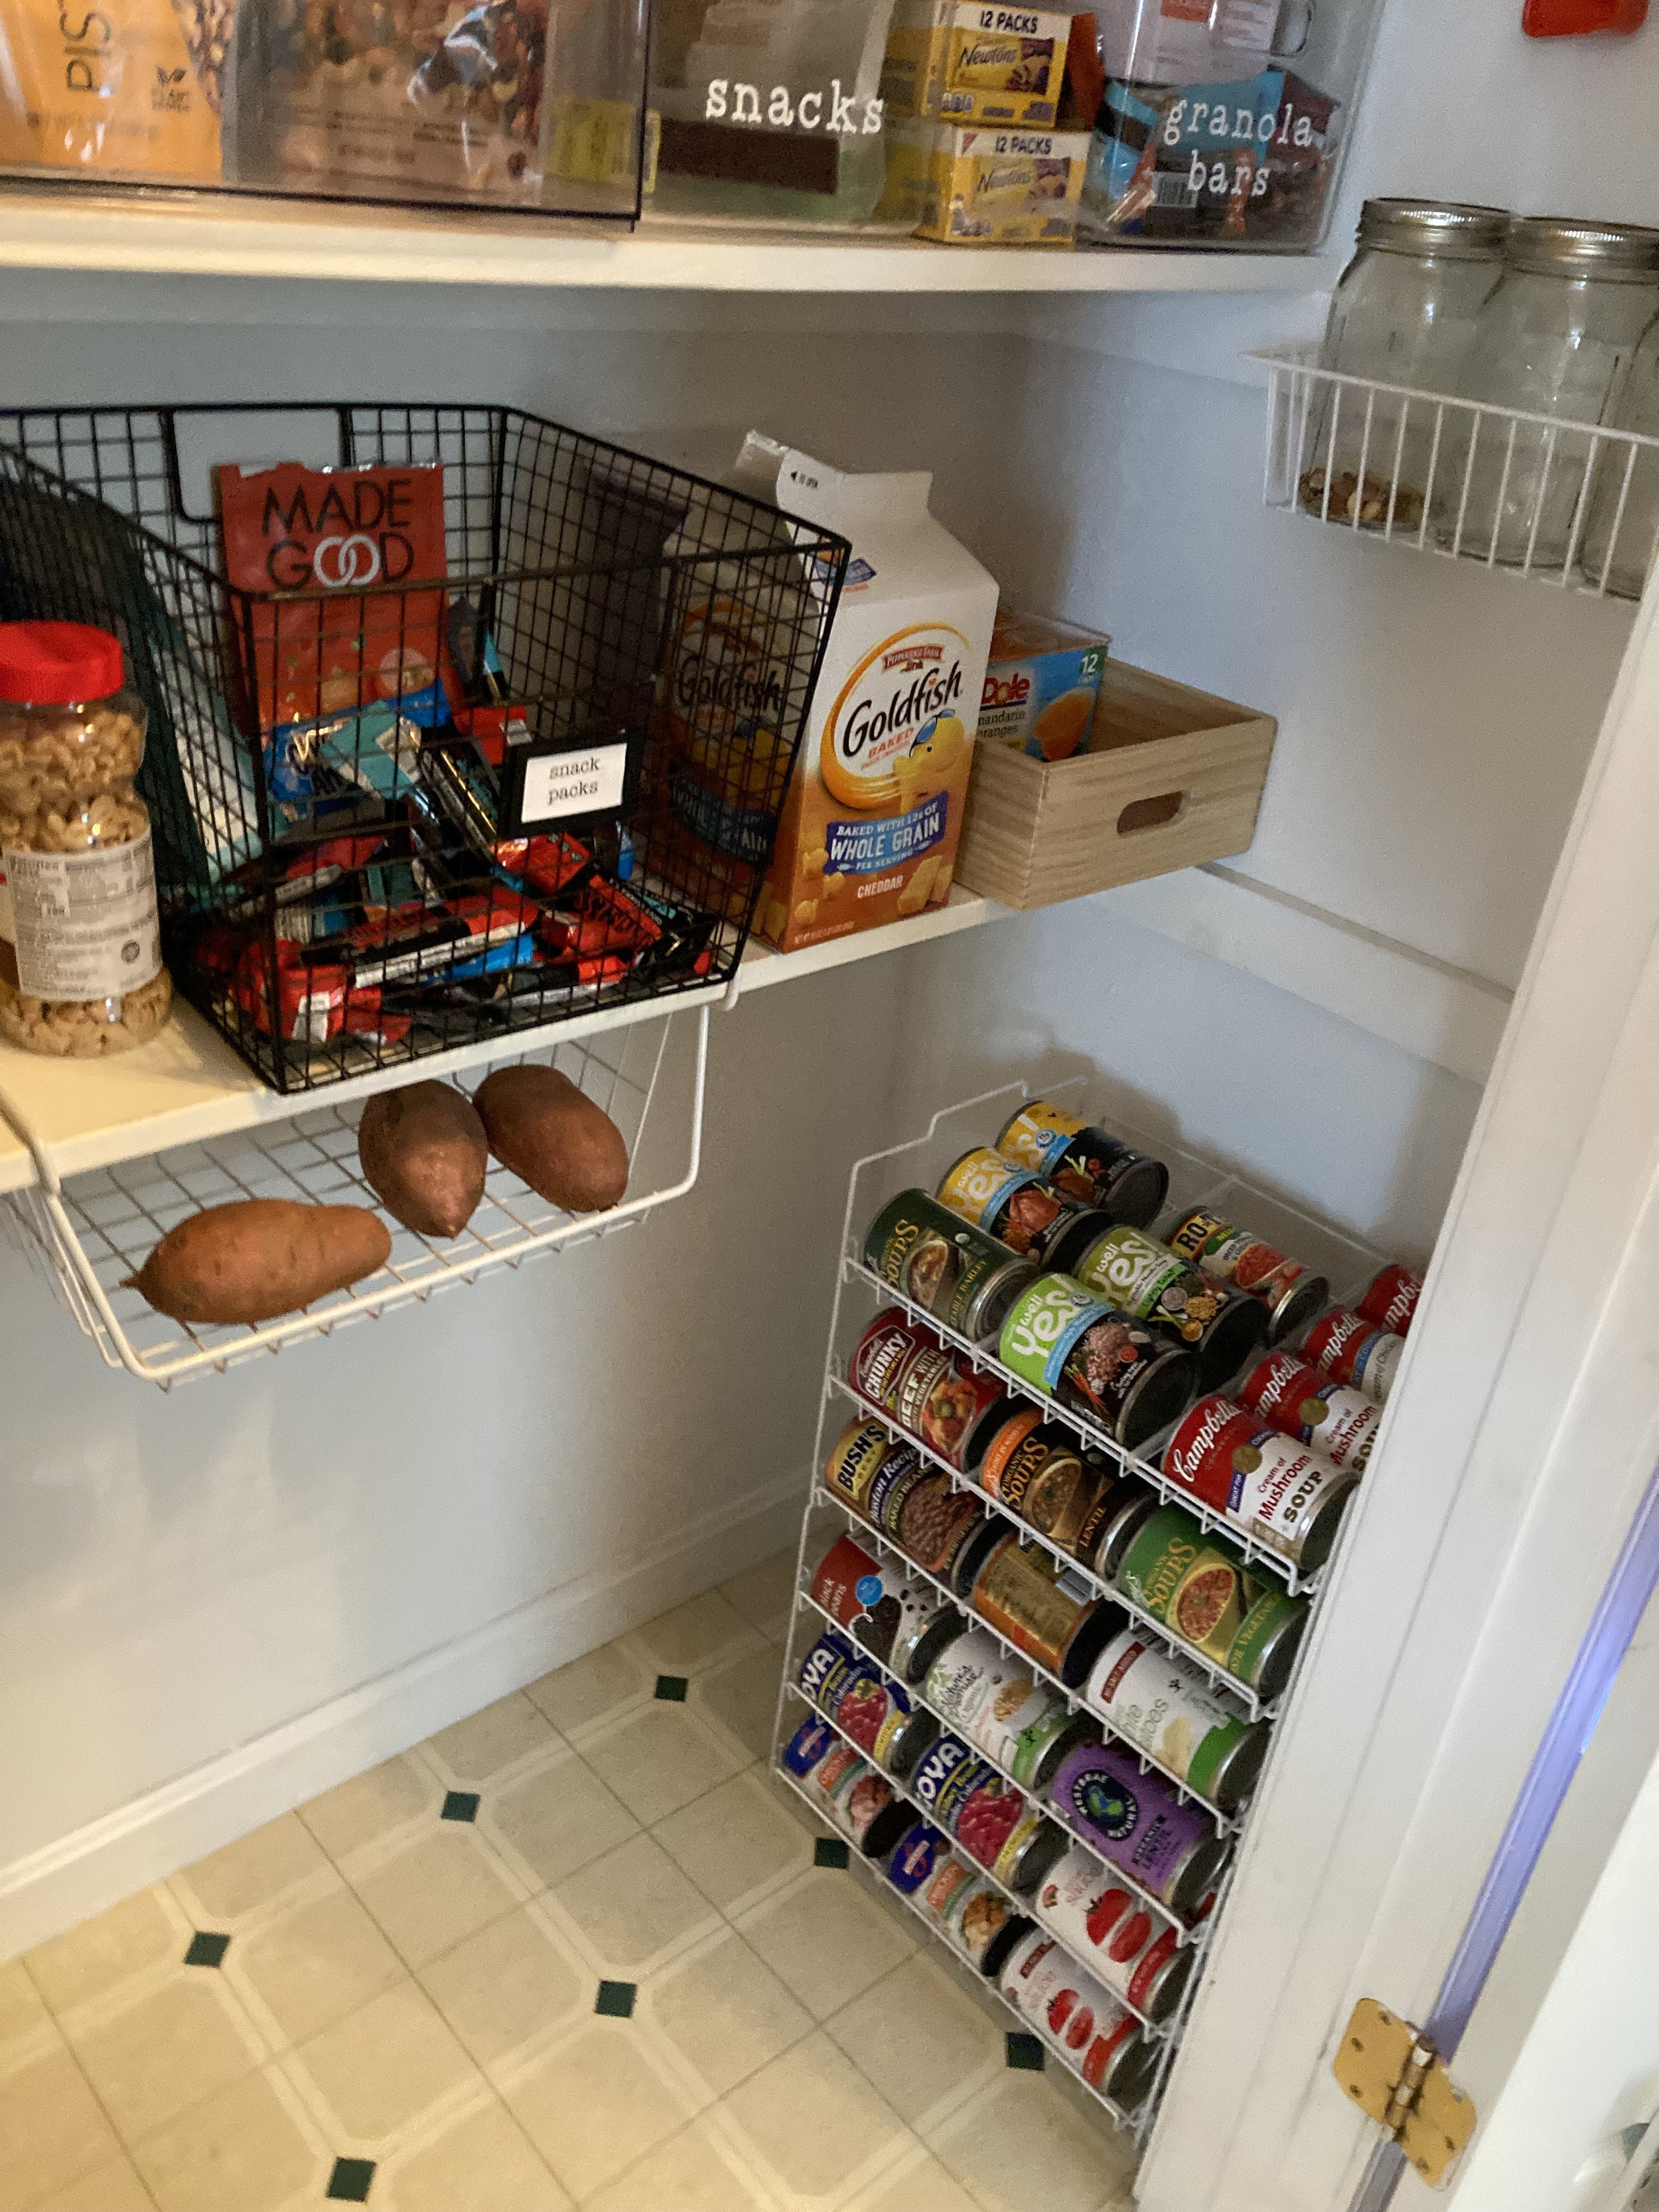
Our kitchen was lacking a pantry, so we often kept canned goods and backstock on a shelving unit at the foot of our stairs in the basement. But because half of our food and snacks were downstairs and half were upstairs it made for frequent mistakes when buying groceries… it was hard to visualize exactly what we had and where so we often ended up overbuying certain things and forgetting to buy others. Tired of wasting money, food, and time running up and down the stairs I decided to make over a coat closet into a functional pantry. | This post contains affiliate links |
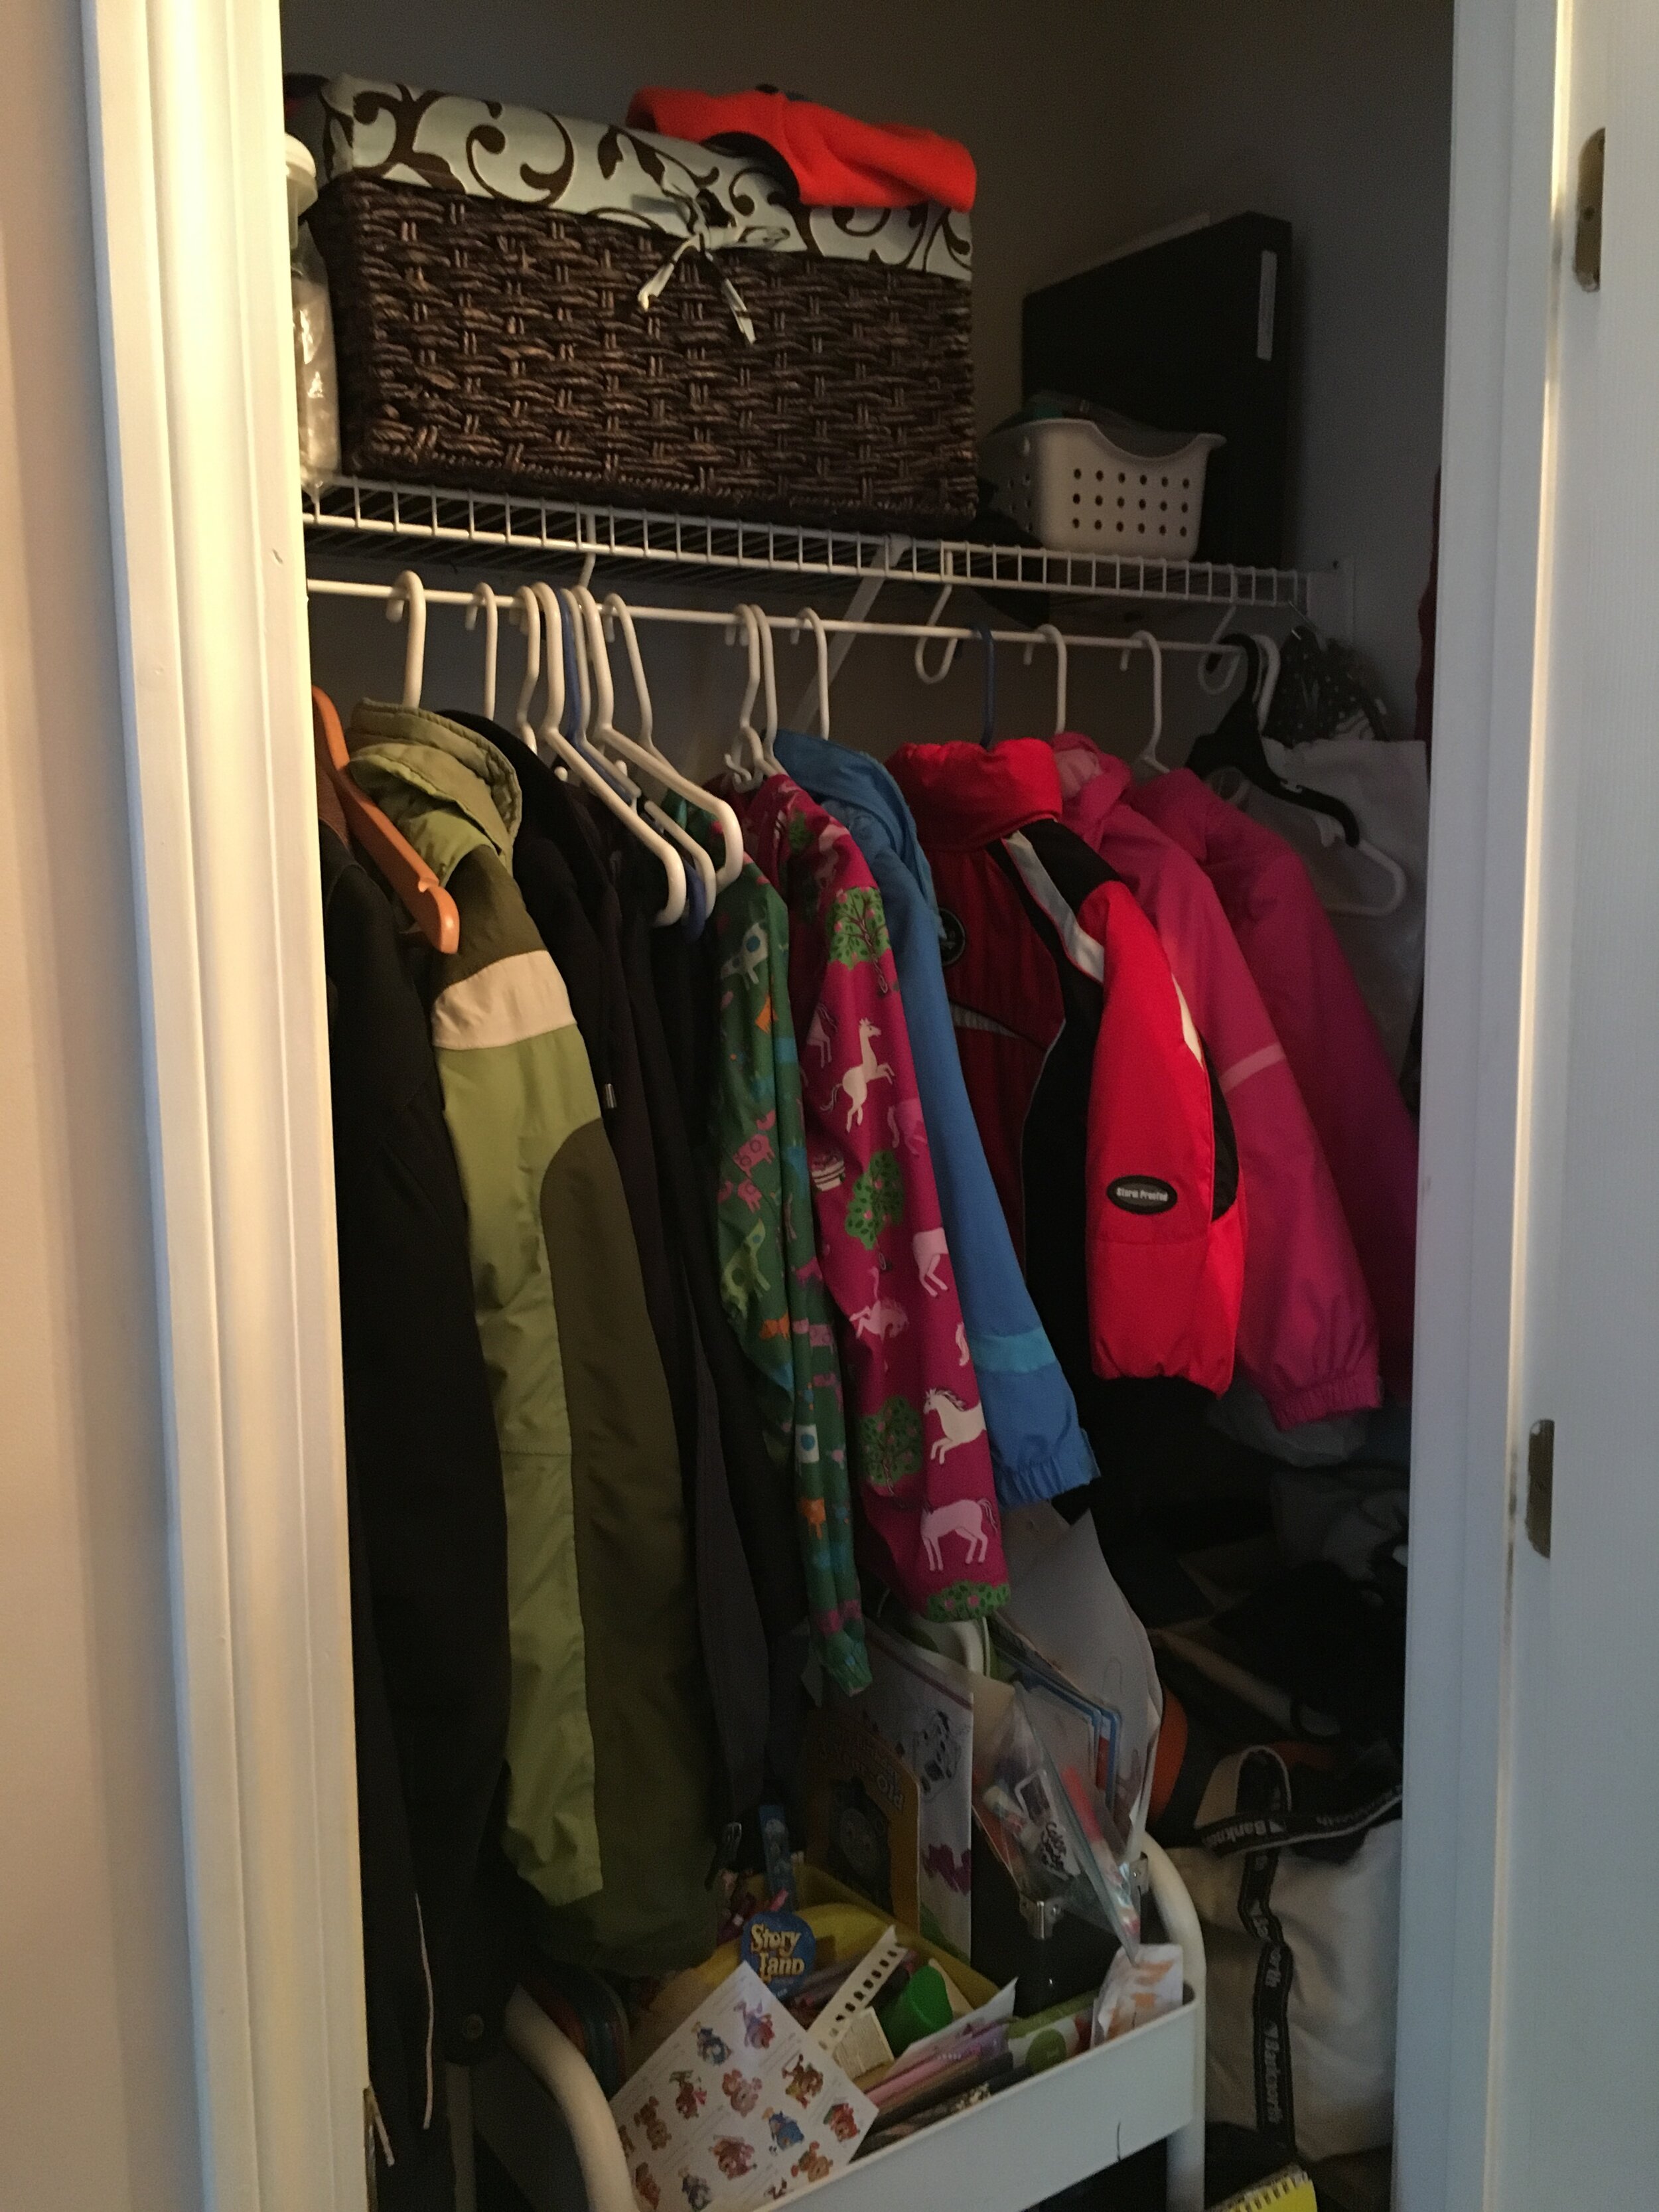
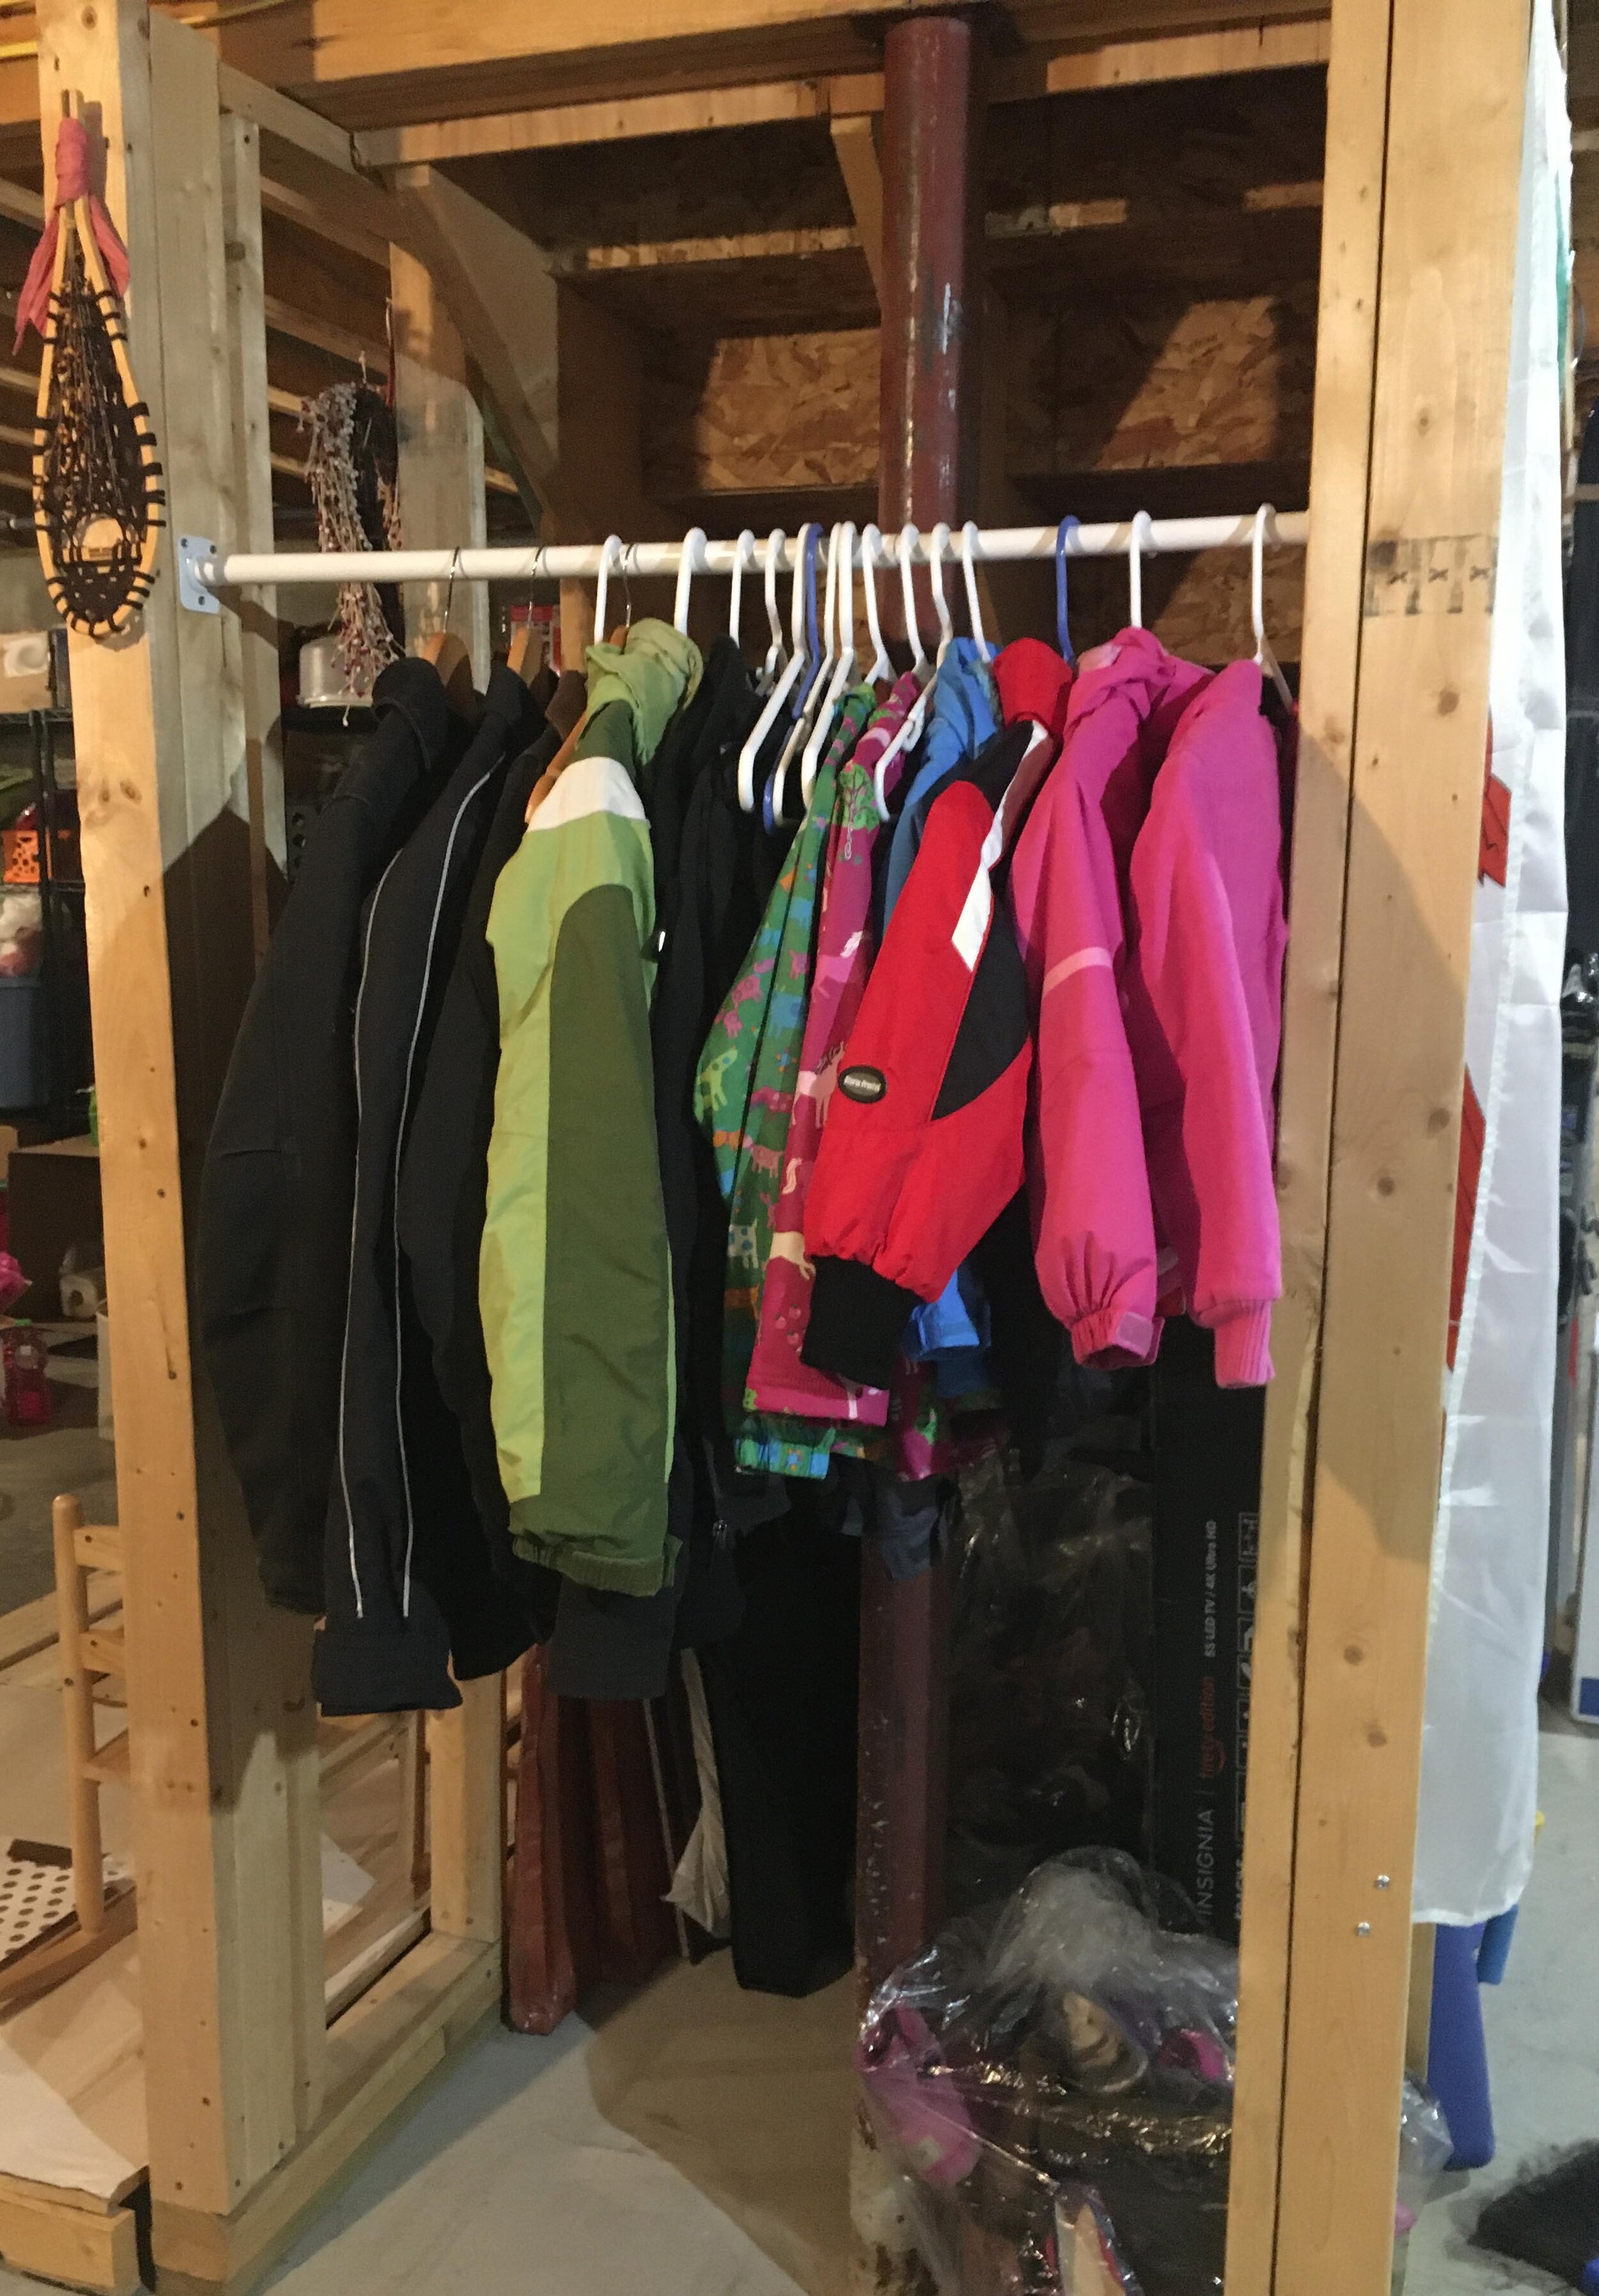
Now while this coat closet (pictured below) was pretty jammed full, it was very underutilized. It’s where we kept our off-season coats, hats, and boots as well as some hiking gear and my daughters’ Art Cart - most things we did not need to use daily, or often at all. My solution to this was to relocate all these items to our basement - I hung a closet rod under the basement stairs and moved all our off-season clothing and gear to this new space where it was still easily accessible but out of the way.
The next step was to pull out the old wire shelf and closet rod system, patch the holes, and repaint the inside of the closet. Thankfully I already had spackle and some leftover white paint so I was able to get the closet to a clean slate easily and it didn’t cost a dime.
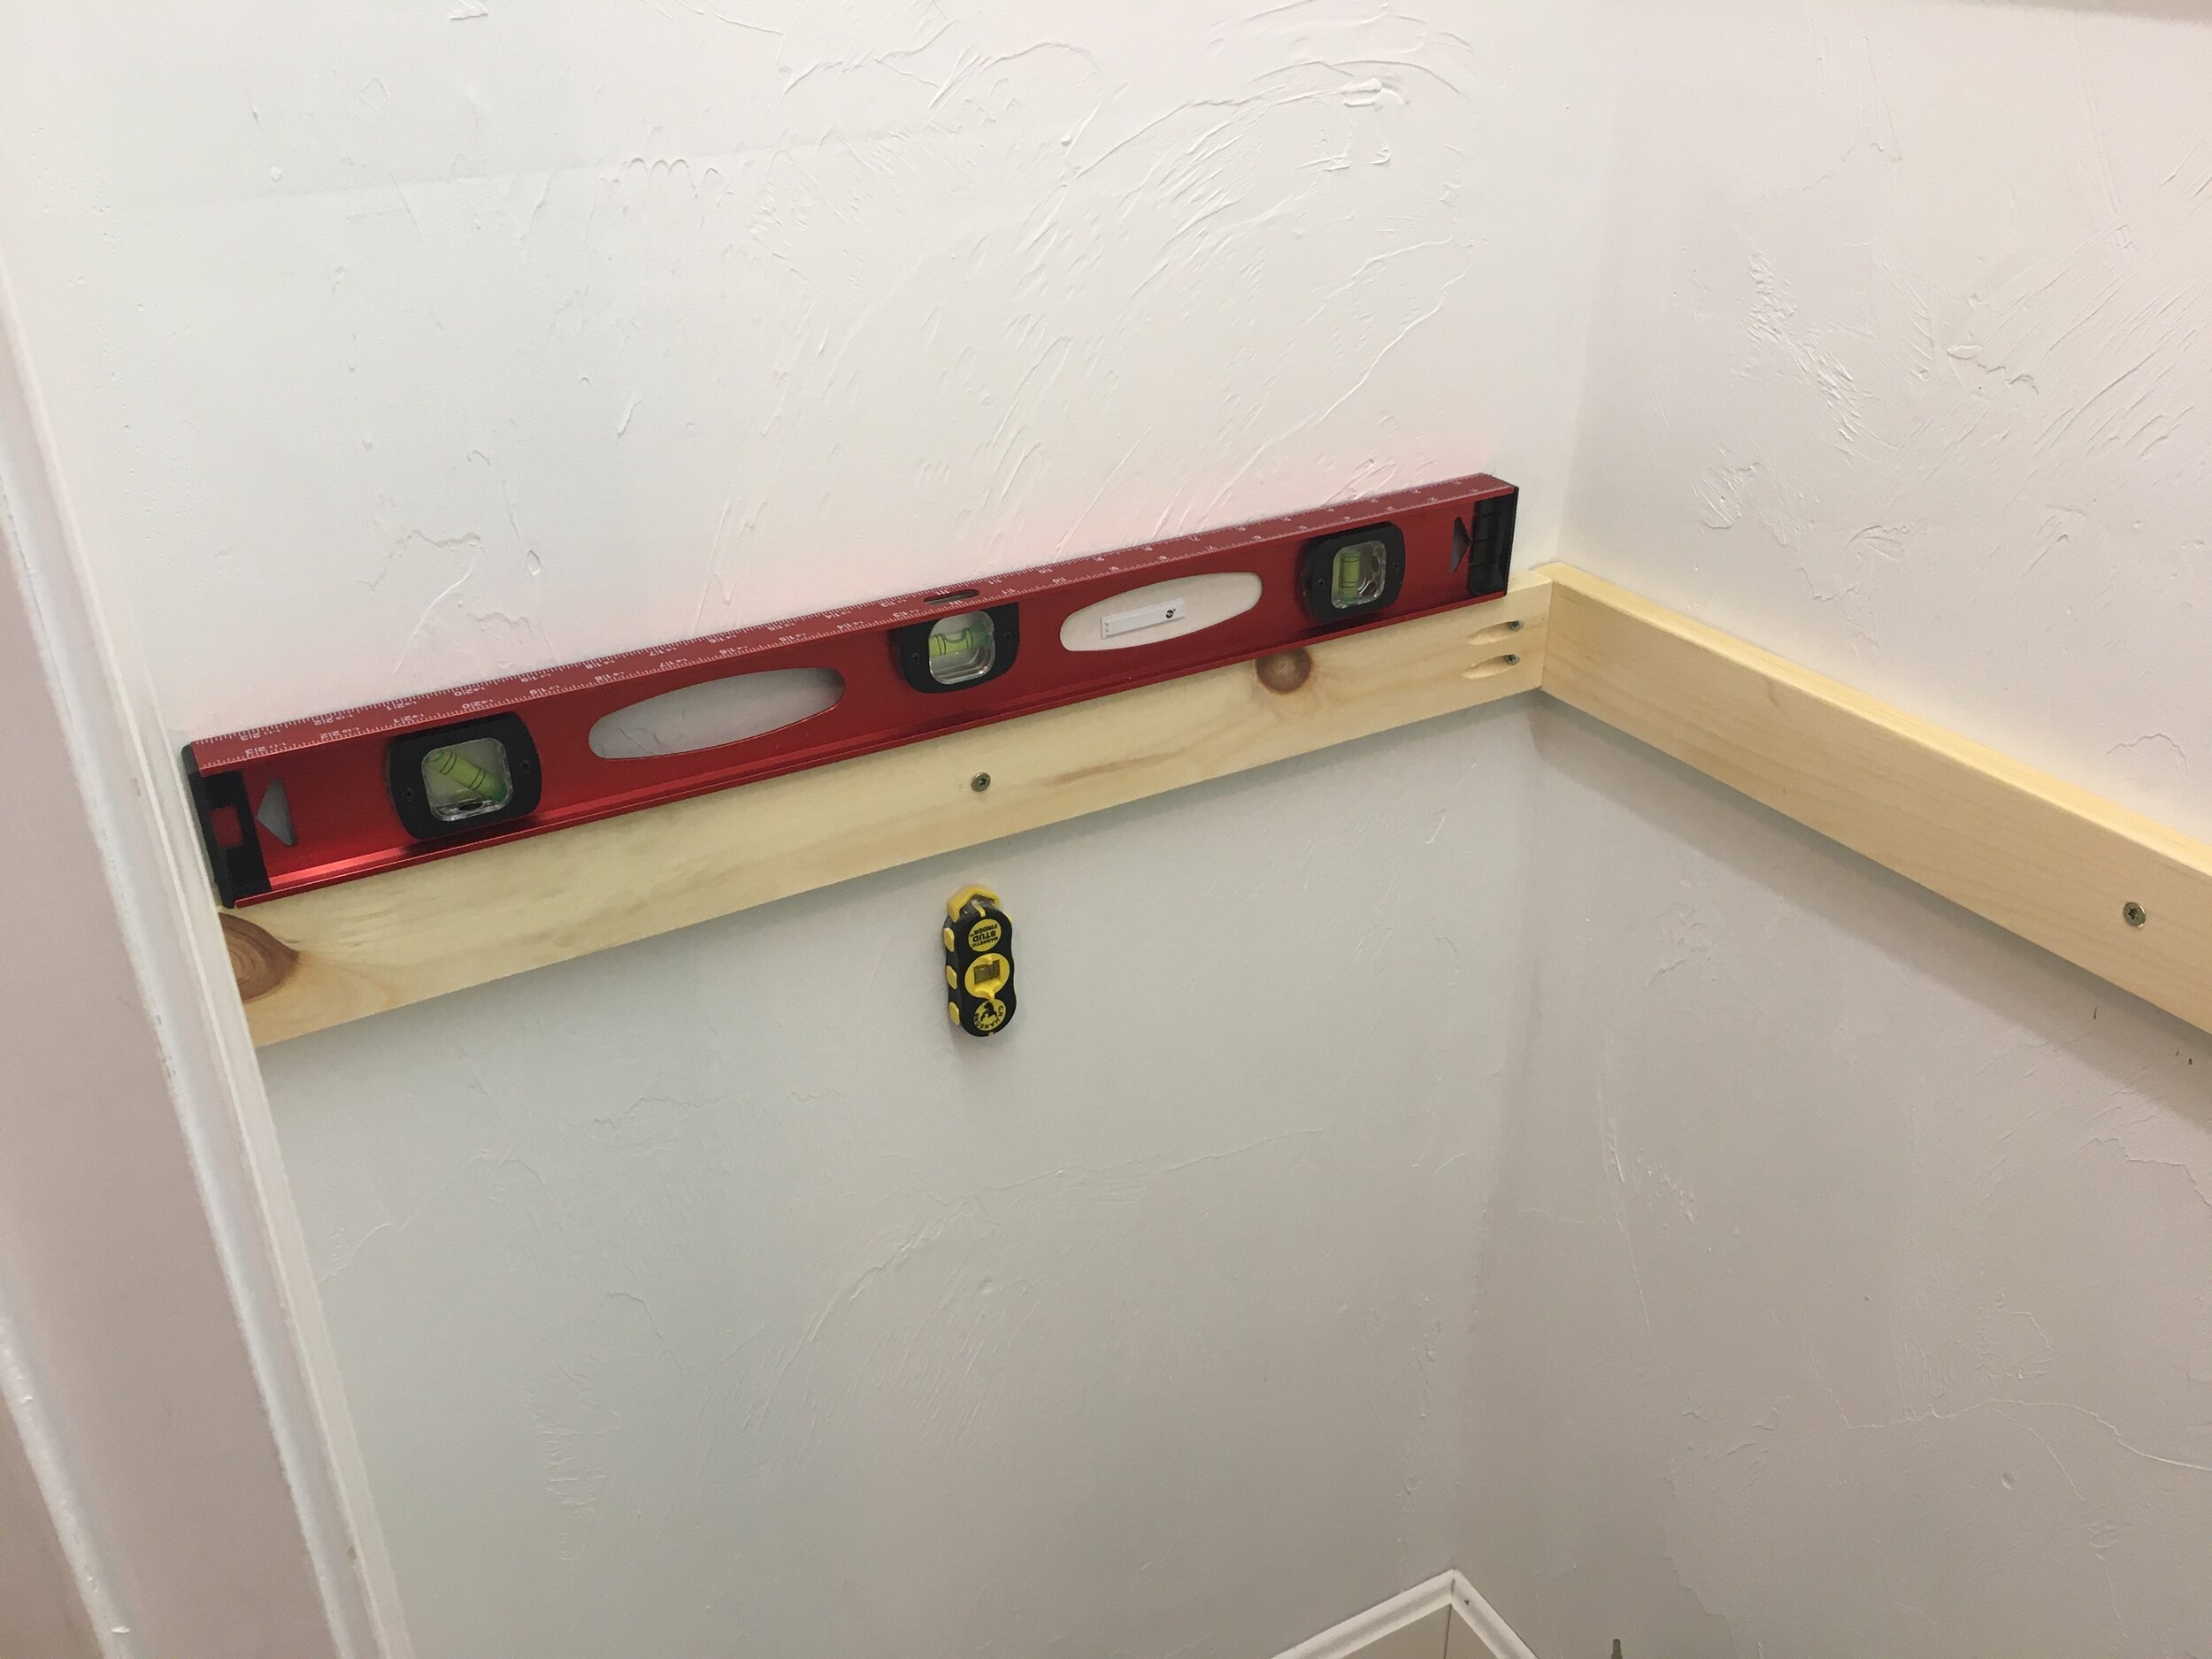
Now for the fun part! I got to decide how many shelves I wanted and the spacing, so I laid it out with painters tape to play with how I wanted it before I made a final decision. For our setup I decided on four shelves starting at about waist-height. I wanted to leave the bottom open to accommodate the dog food bin, the Art Cart, step stool, etc. Then I screwed in 1x3 inch “runners” that would support the shelves along the back wall. I used a stud finder to make sure I was screwing the runners into studs and a level to make sure everything was square.
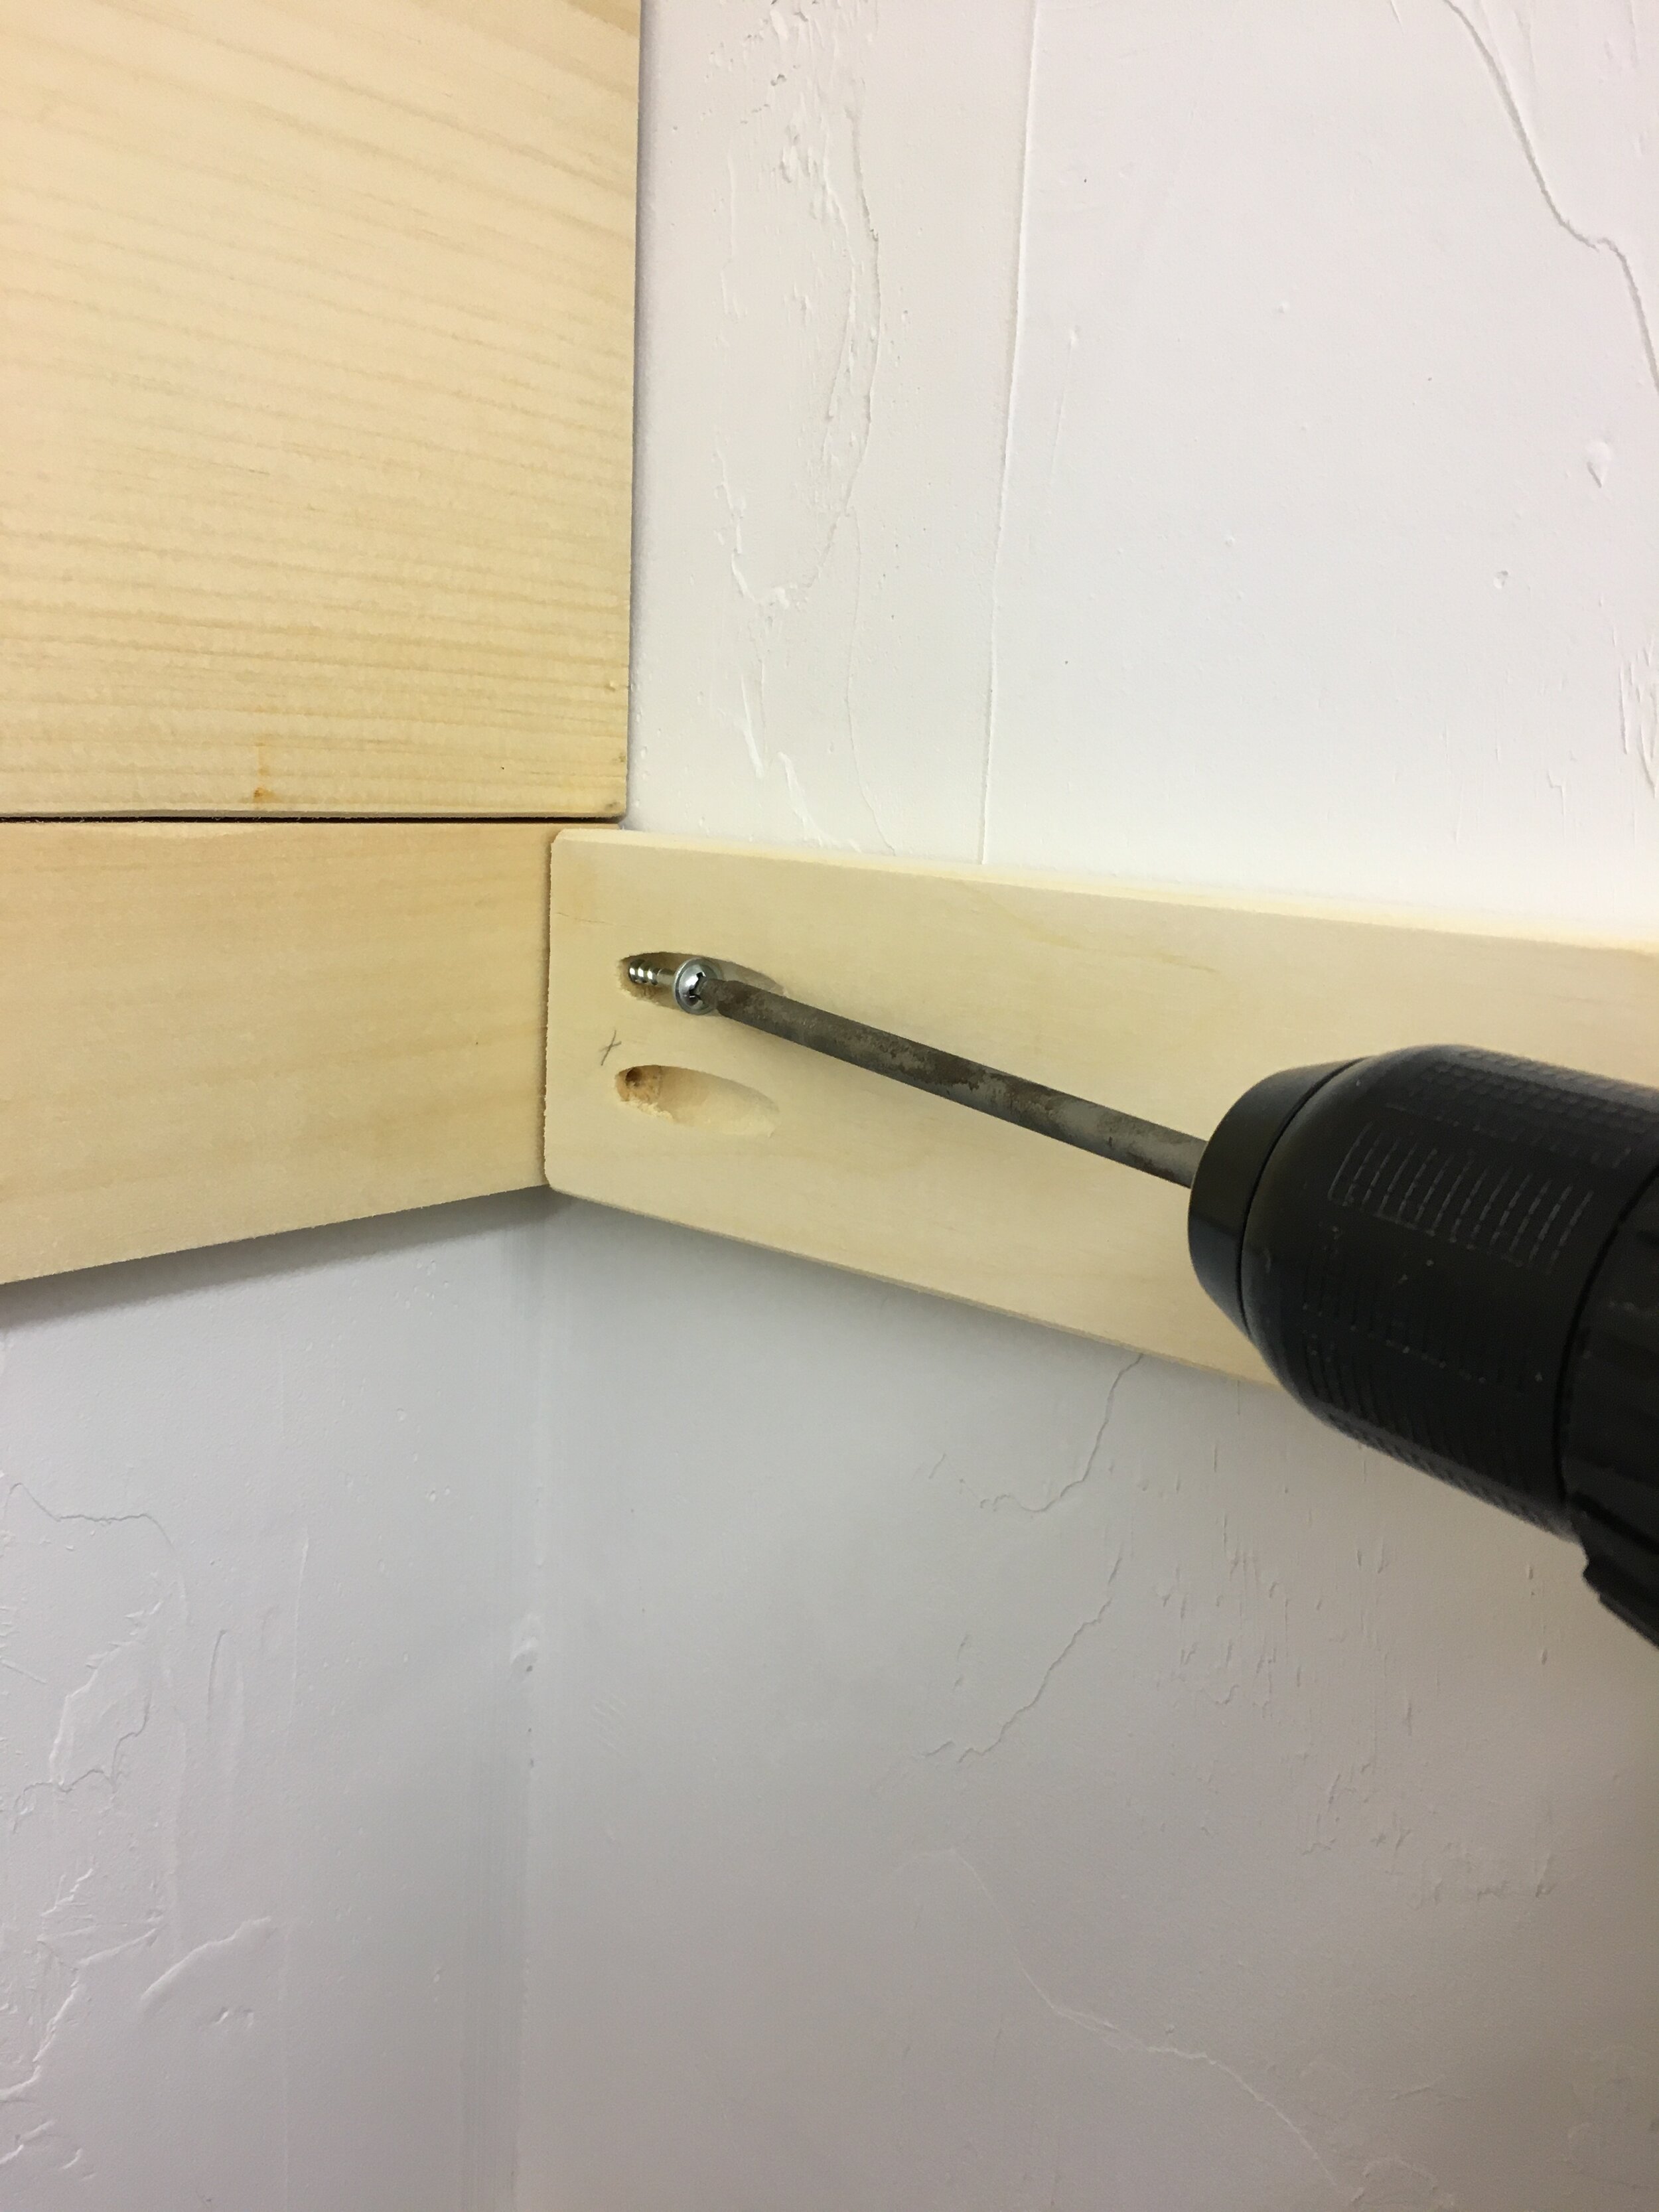
Then I added runners to one side of the closet next, following the same routine - but with these pieces I had pre-drilled pocket holes with our Kreg Jig first so it would make for a clean and secure joint in the corners.
Before installing the runners on the opposite side of the closet, it’s wise to keep in mind how you will be able to maneuver the shelf boards in once all the runners are in place (it would be very difficult to get the top shelf in with all the runners installed, for example). So before installing the opposite side’s runners I slipped some of the trickier shelf boards into place first (I used 1x12”s cut to length for the shelves) before I finished screwing in all the side runners.
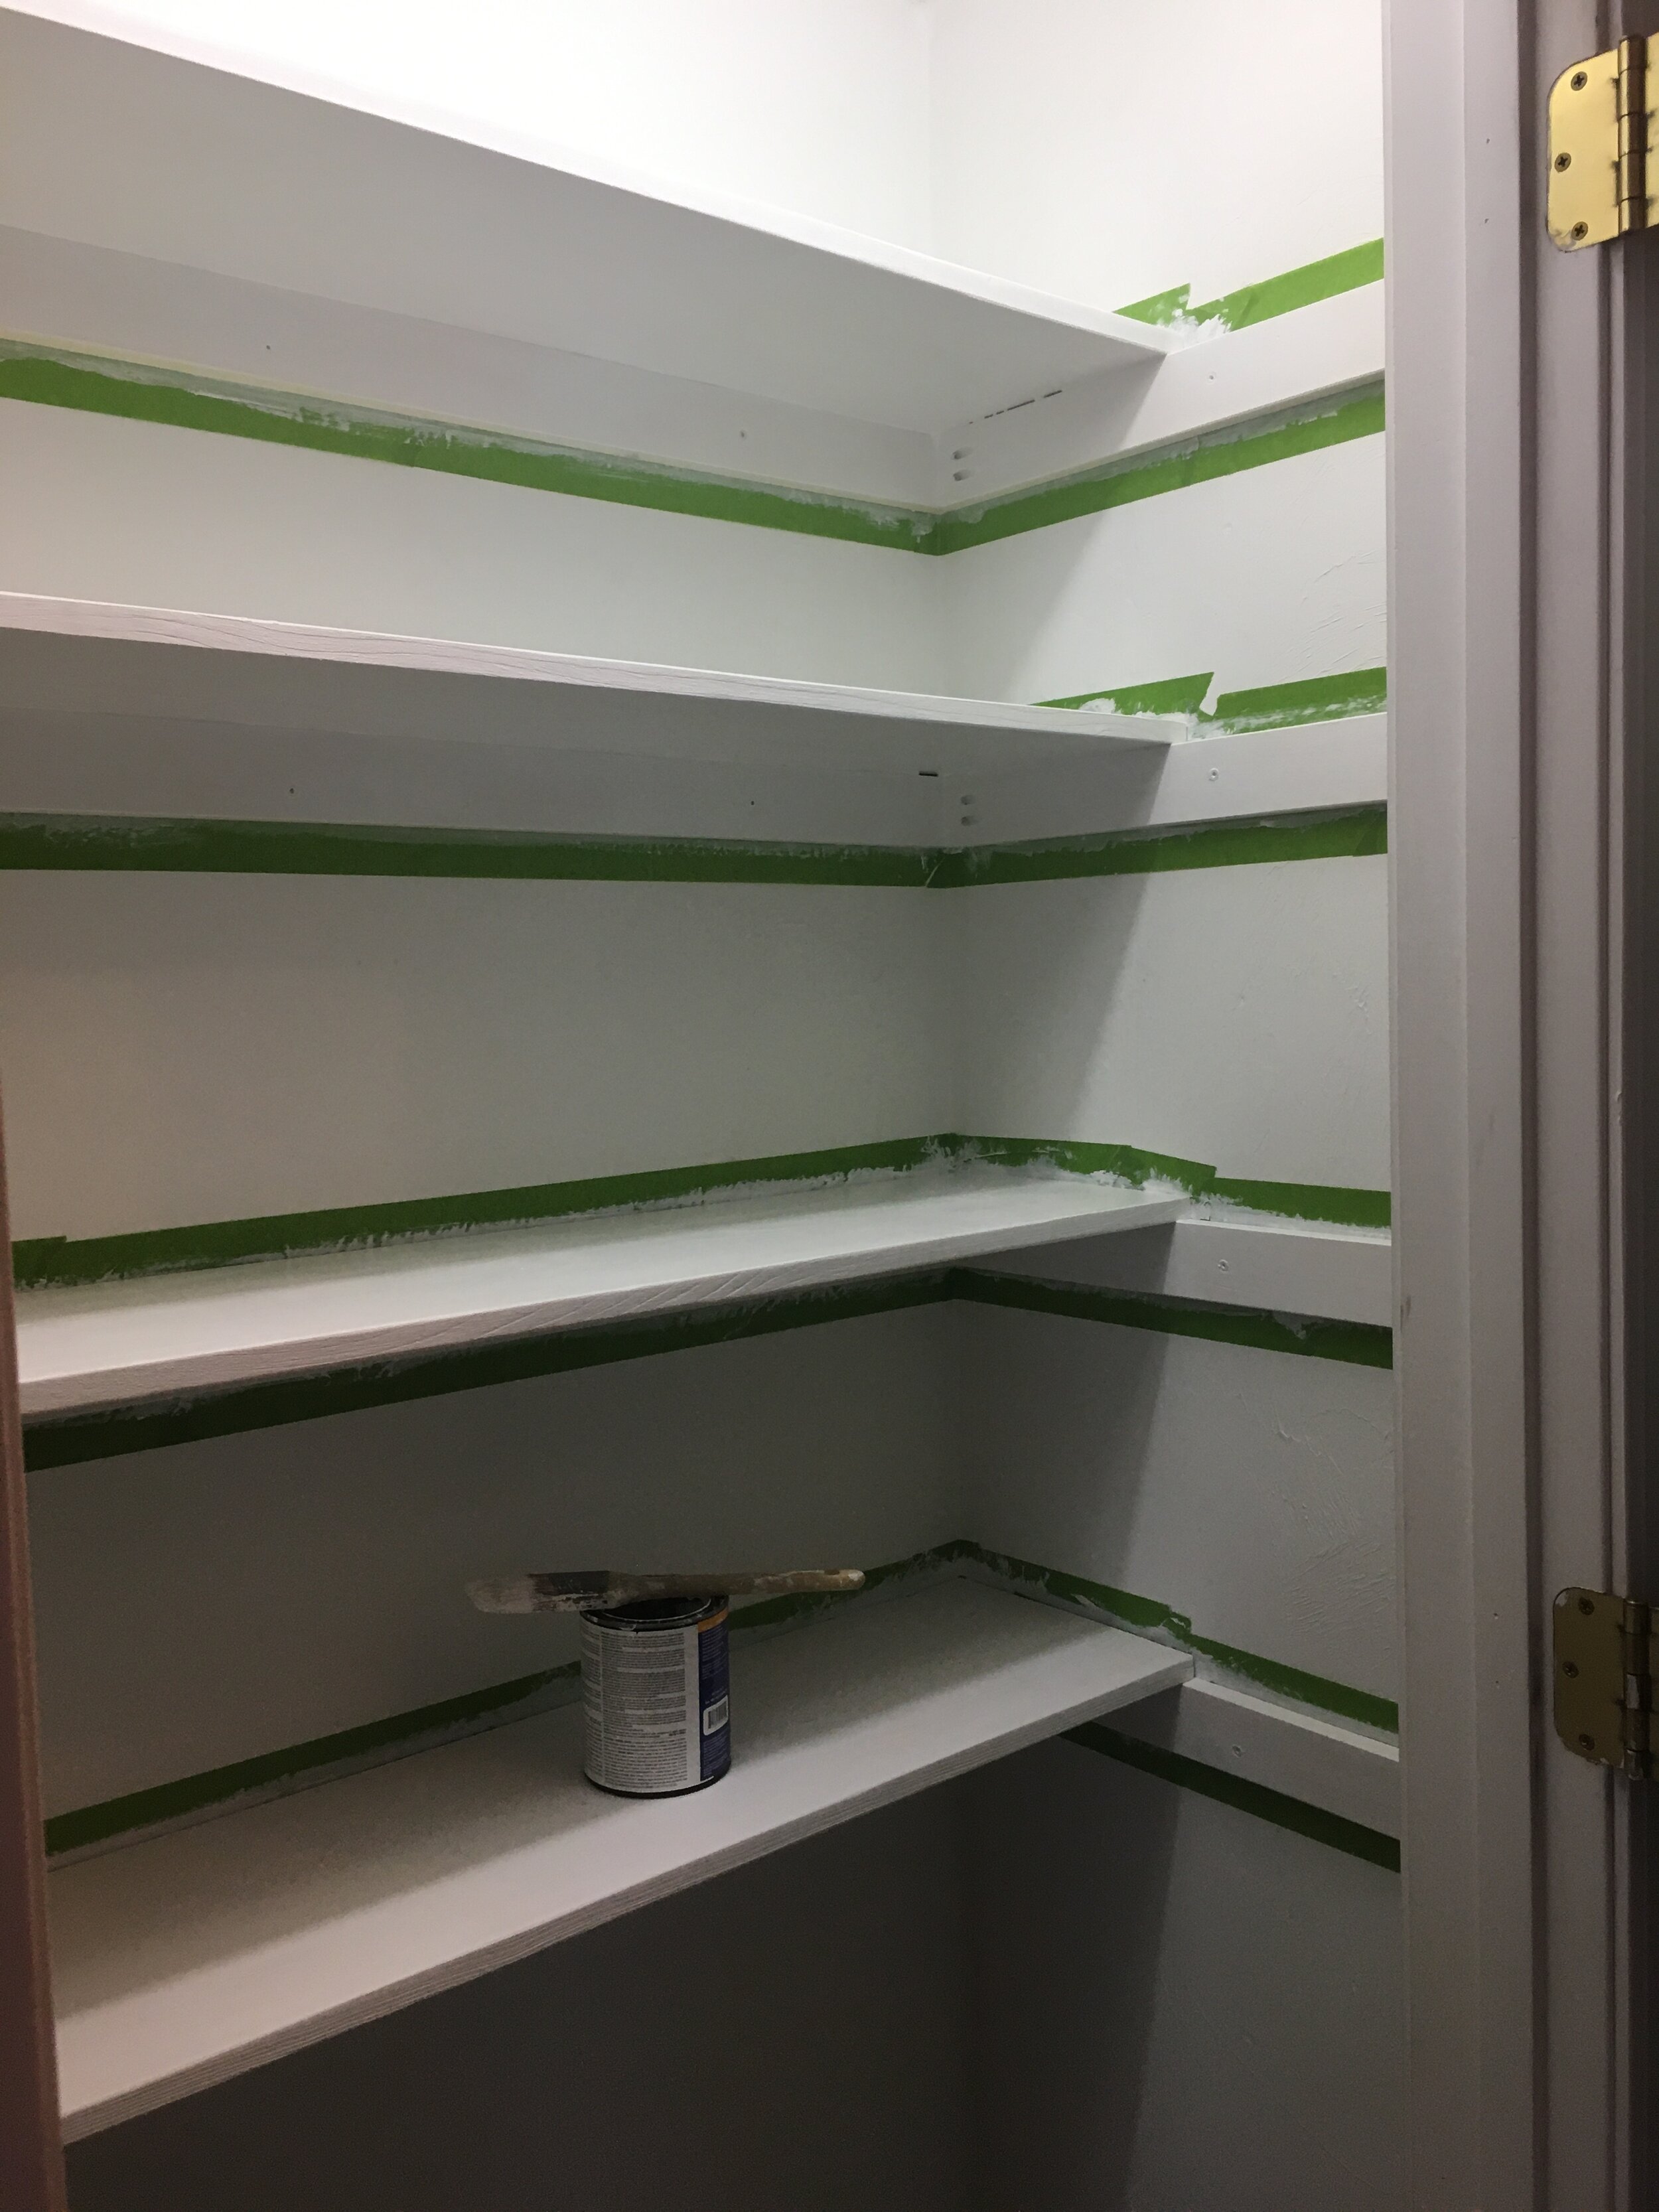
I secured the shelves into place with some finishing nails, then taped off the shelves and runners to get ready for paint. I used primer and then several coats of white semi-gloss paint since it’s a little easier to wipe down and keep clean.
I just love how farmhouse and “Shaker” the exposed rails on the sides look and I wanted to play it up. Once the paint was dry I added some functional hooks to hang aprons, lunchboxes, etc on the side rails.
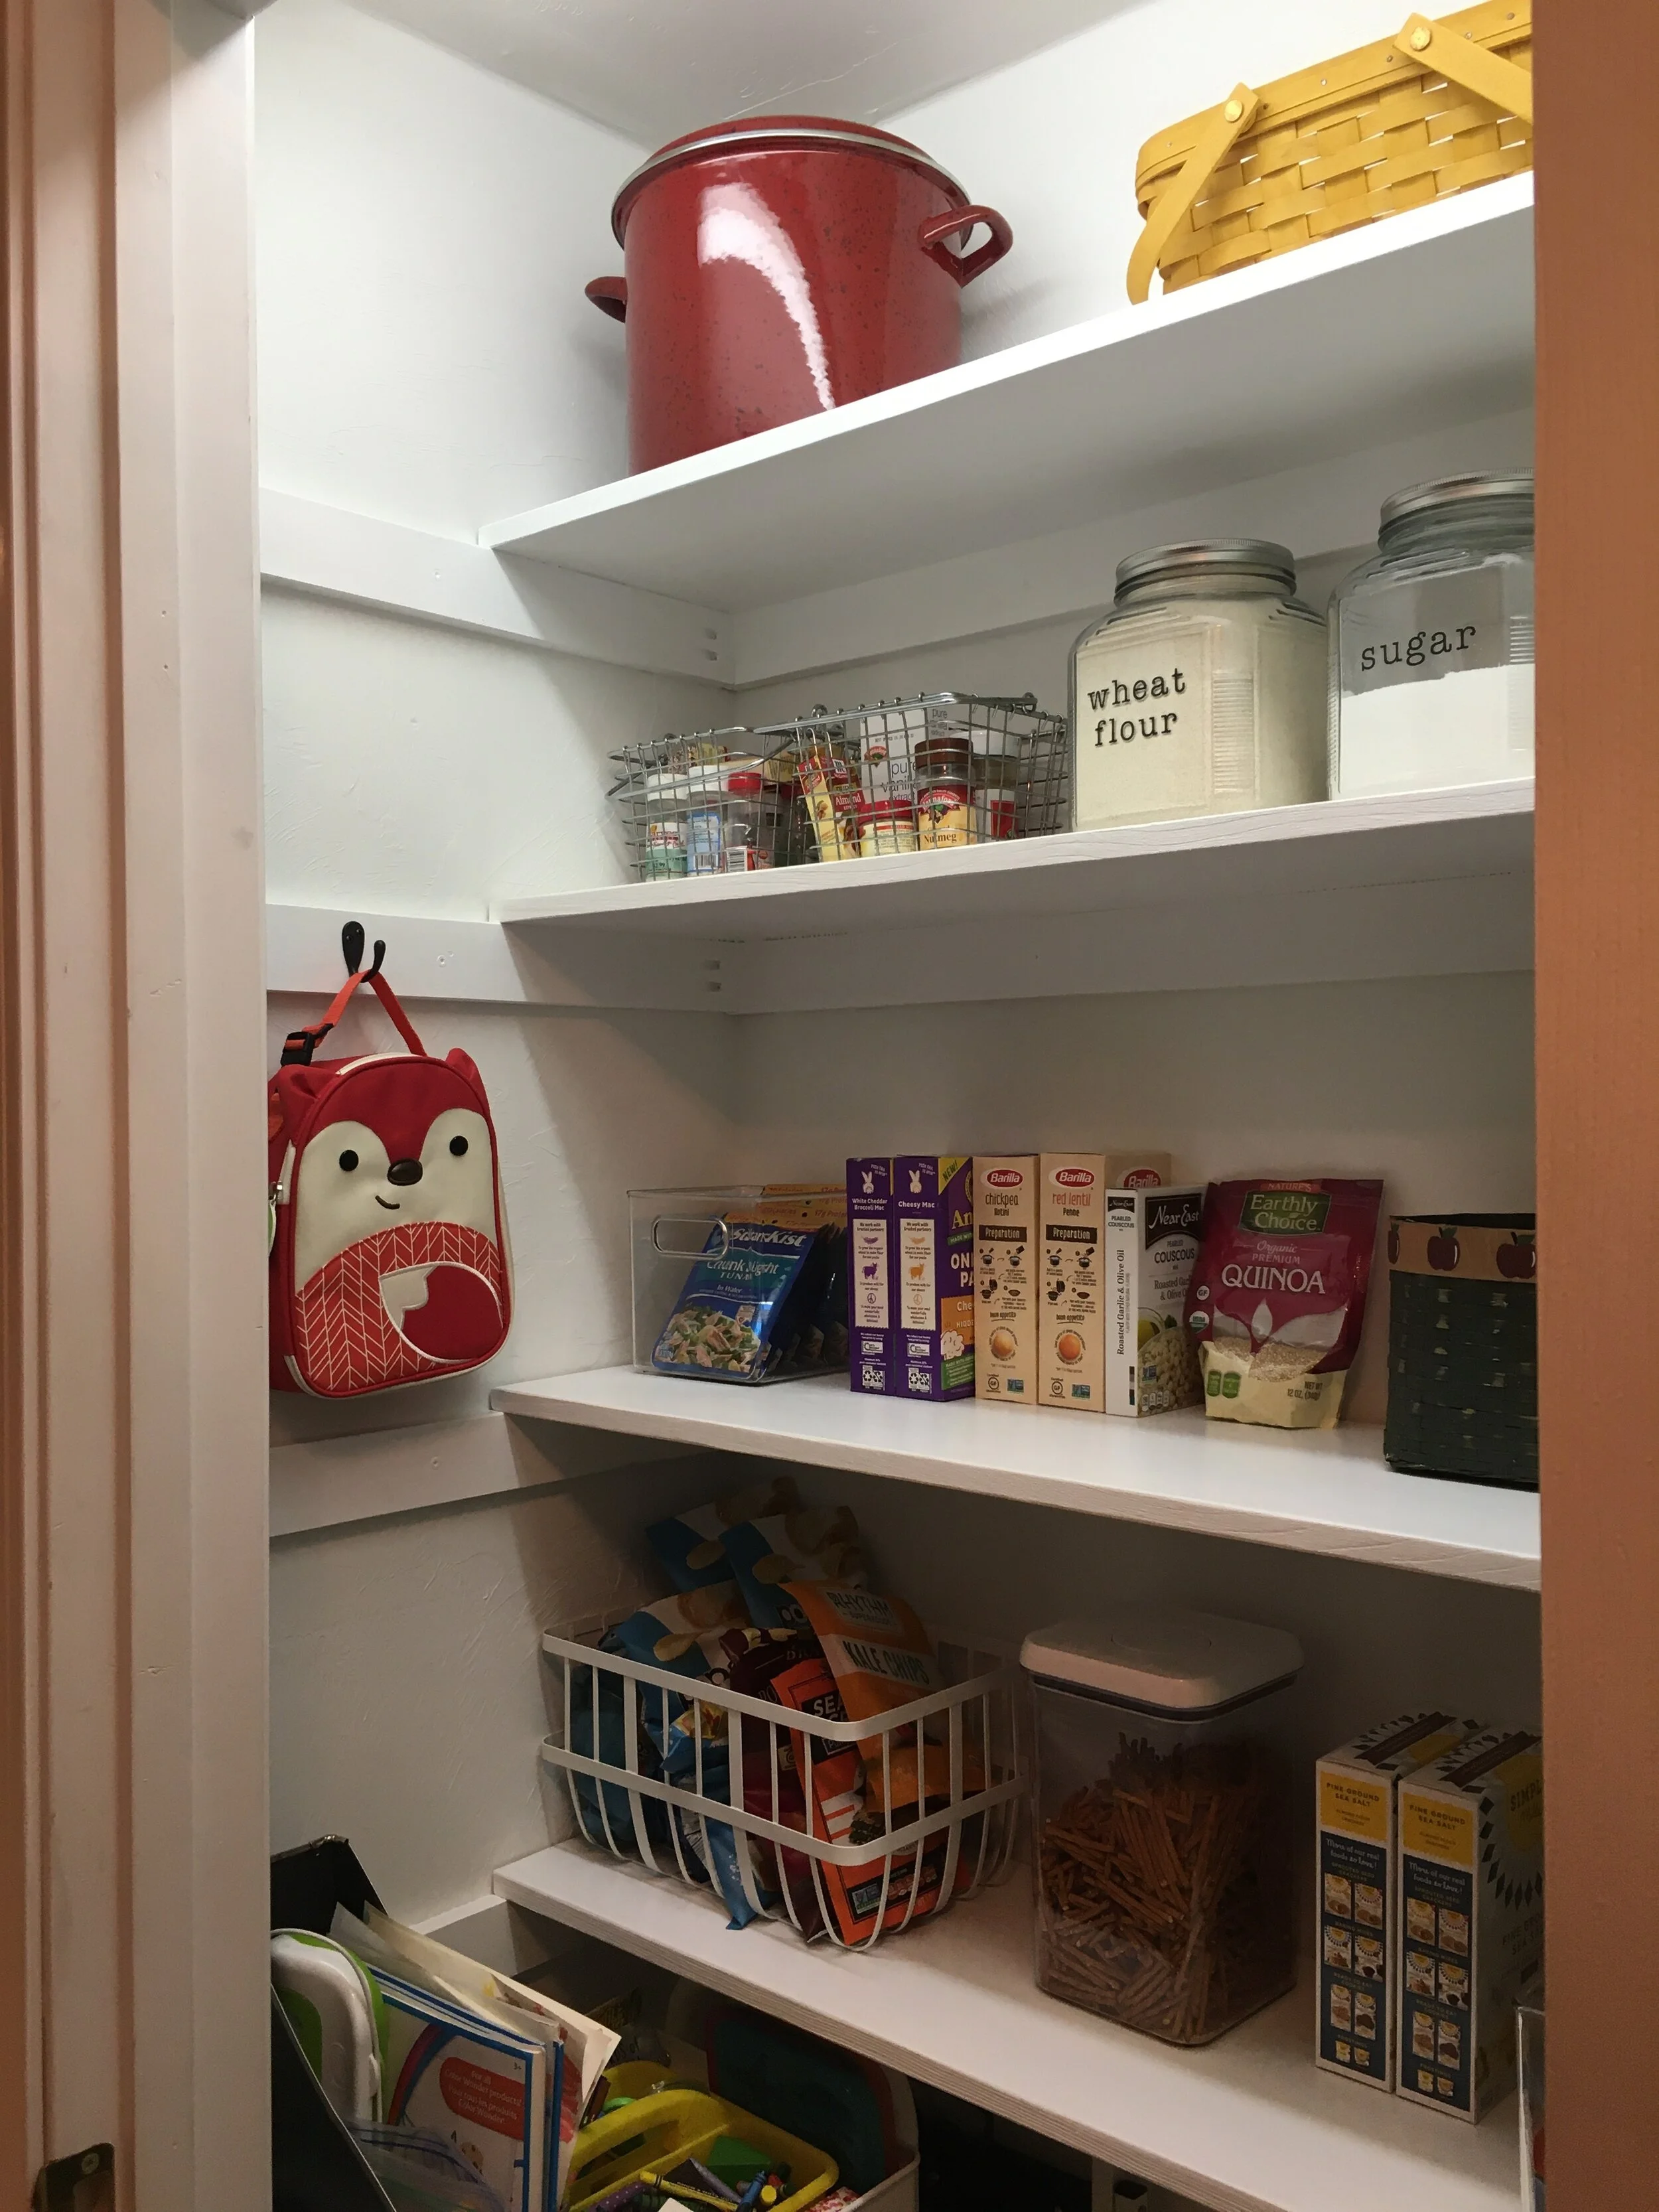
And now the project is complete! I am so happy with how it turned out and it’s wonderful to have everything in one place. I can see this project saving us money on groceries in the long run now as everything will be in one place now and we’ll be less apt to waste food.
Eventually, I would love to replace the closet door with a fun screen door and get some more glass jars and baskets for a cleaner looking pantry - but all in good time.
Over this past winter I added a few simple add-on organizers to our pantry to maximize the space and love how functional they are. Here they are below (and please excuse the glimpses of clutter in the pantry… as it now holds extra groceries and our family board games too - because, real life):
It turns out our door is an odd size and in order to get a screen door for it we would have to custom order one (at a cost of about $300+! Yikes). So instead I decided to cut a custom vinyl label to stick to the door to make it more finished. I could have designed my own but I found a design I really liked on
Etsy
and bought the digital design file. After purchasing the design file, I used my
Cricut
and
651 Permanent Vinyl
to make the label and then transferred it to the door. In hindsight I probably should have made it slightly smaller, but overall I love how it came out and how budget-friendly it was since I already owned a Cricut Machine and the vinyl.
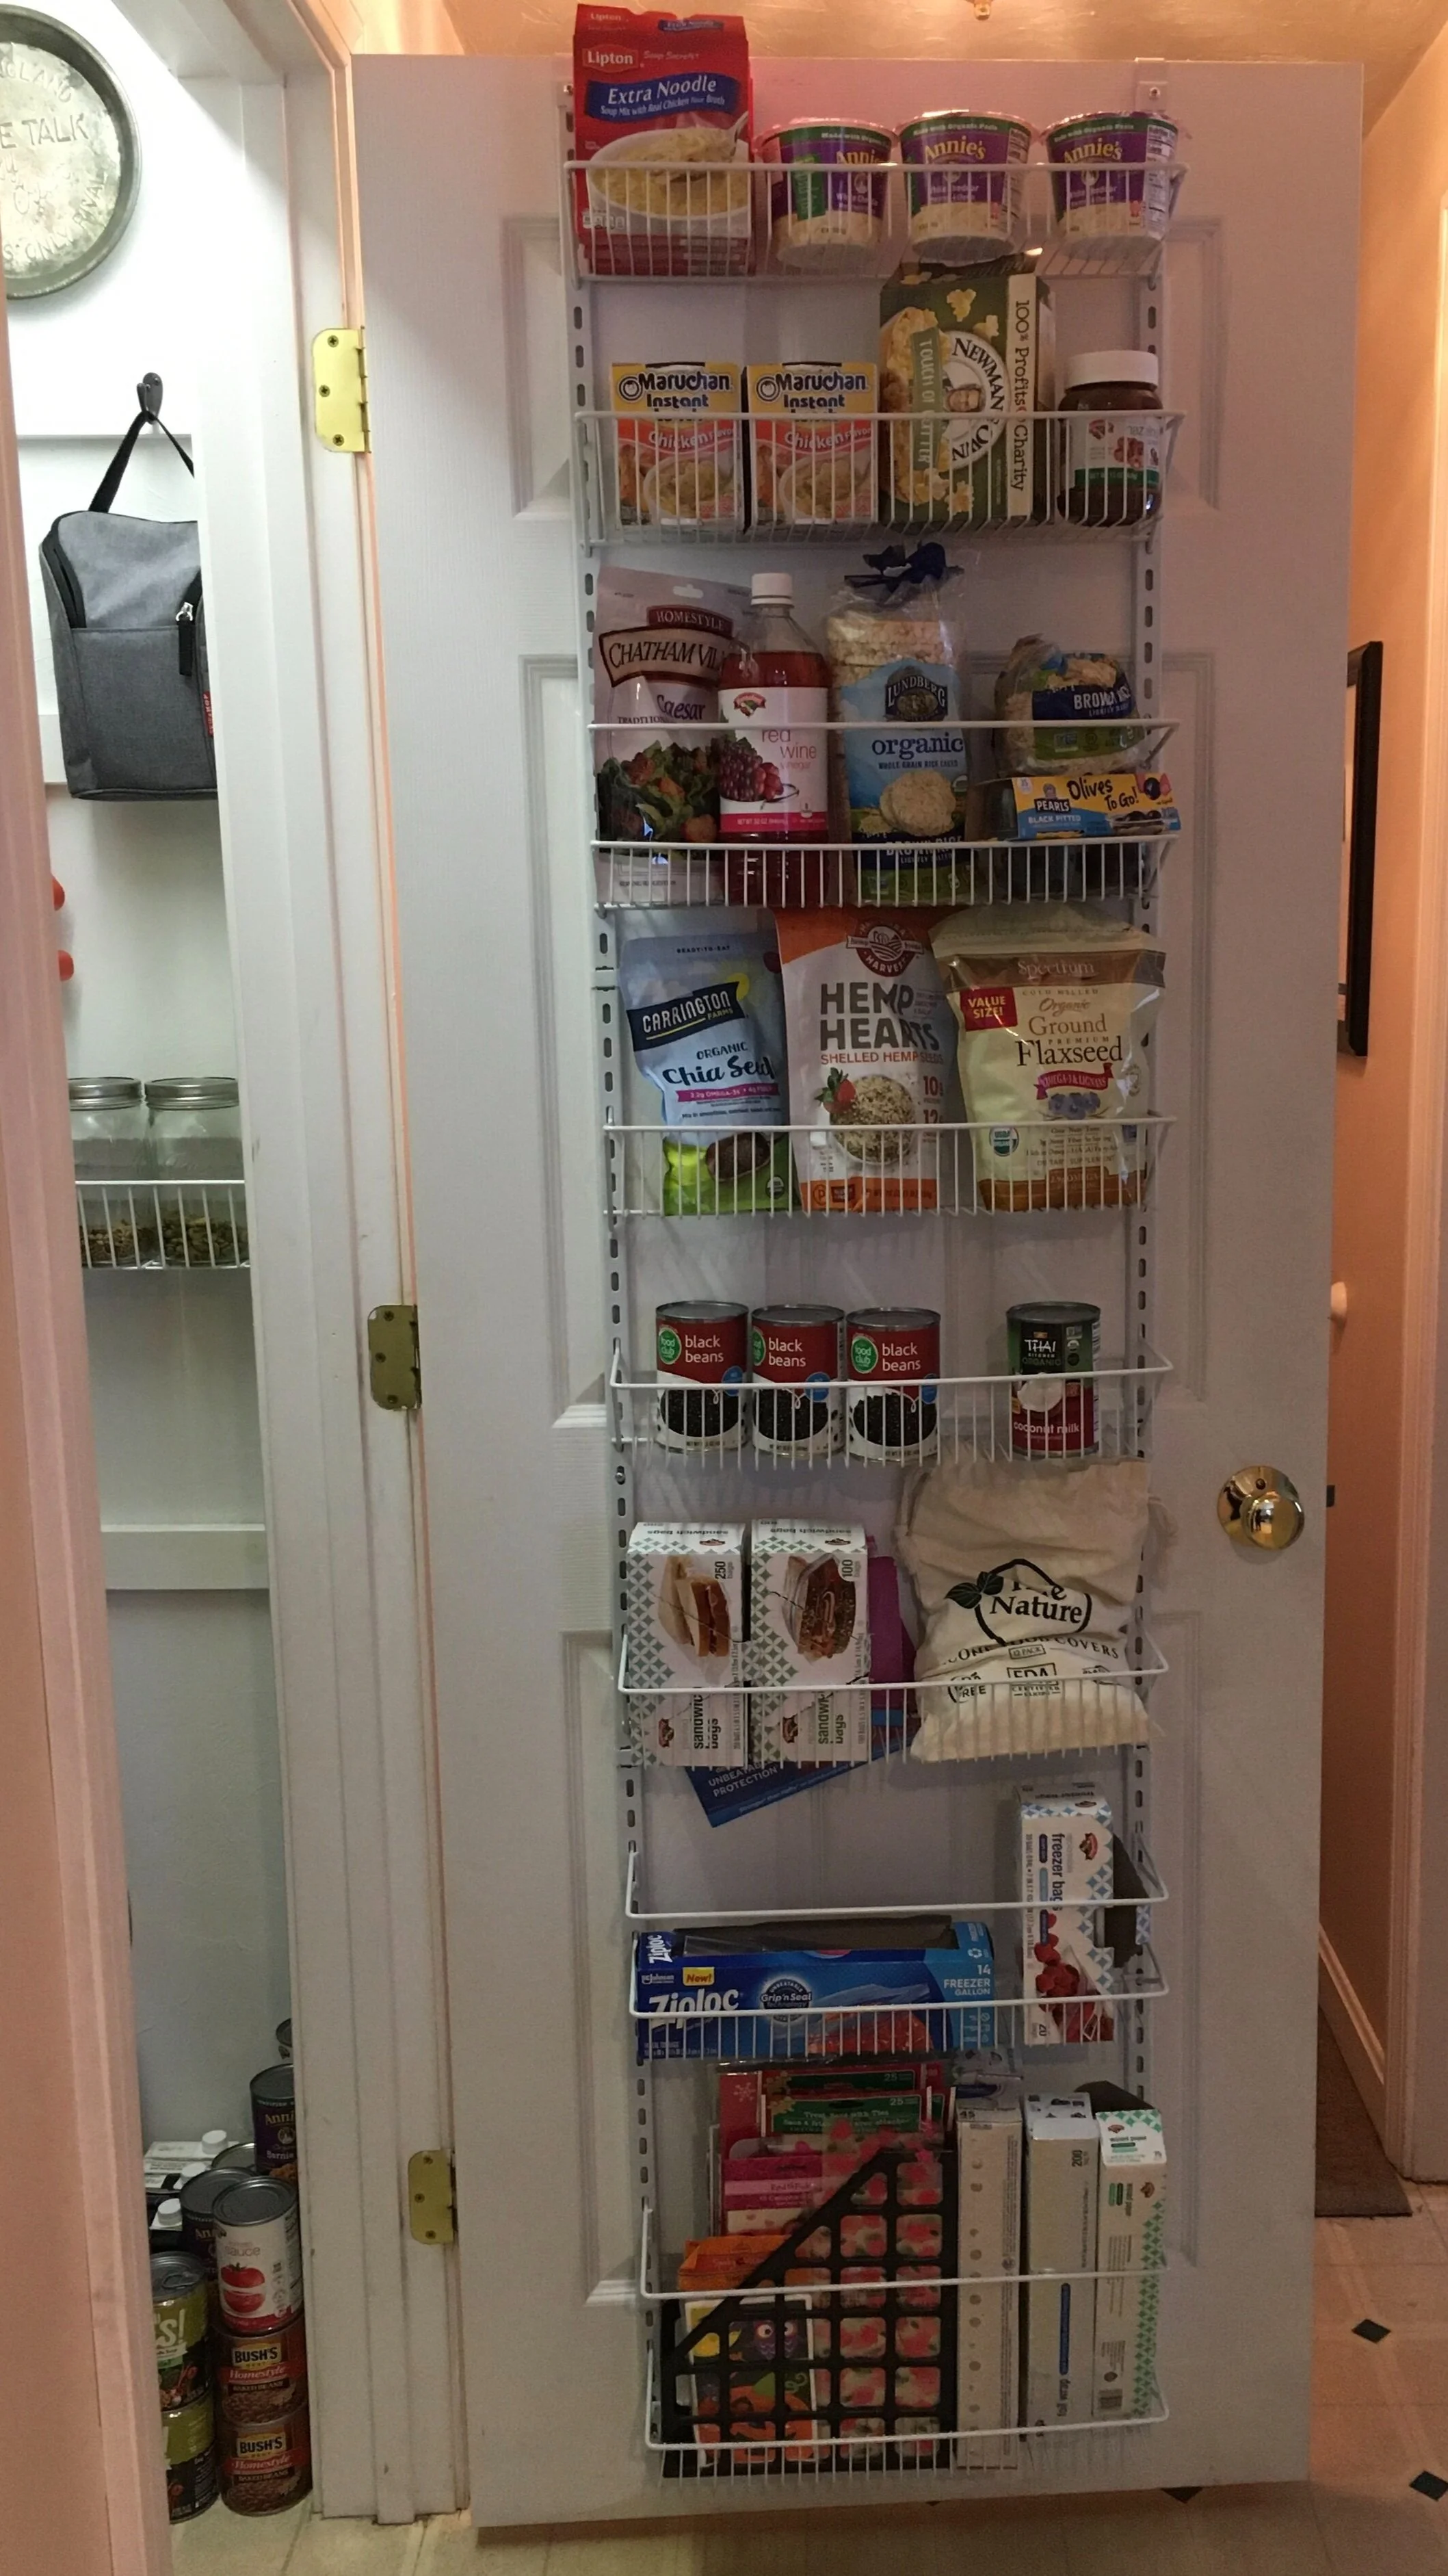
Finally, we decided to add a
ClosetMaid Adjustable Organizer
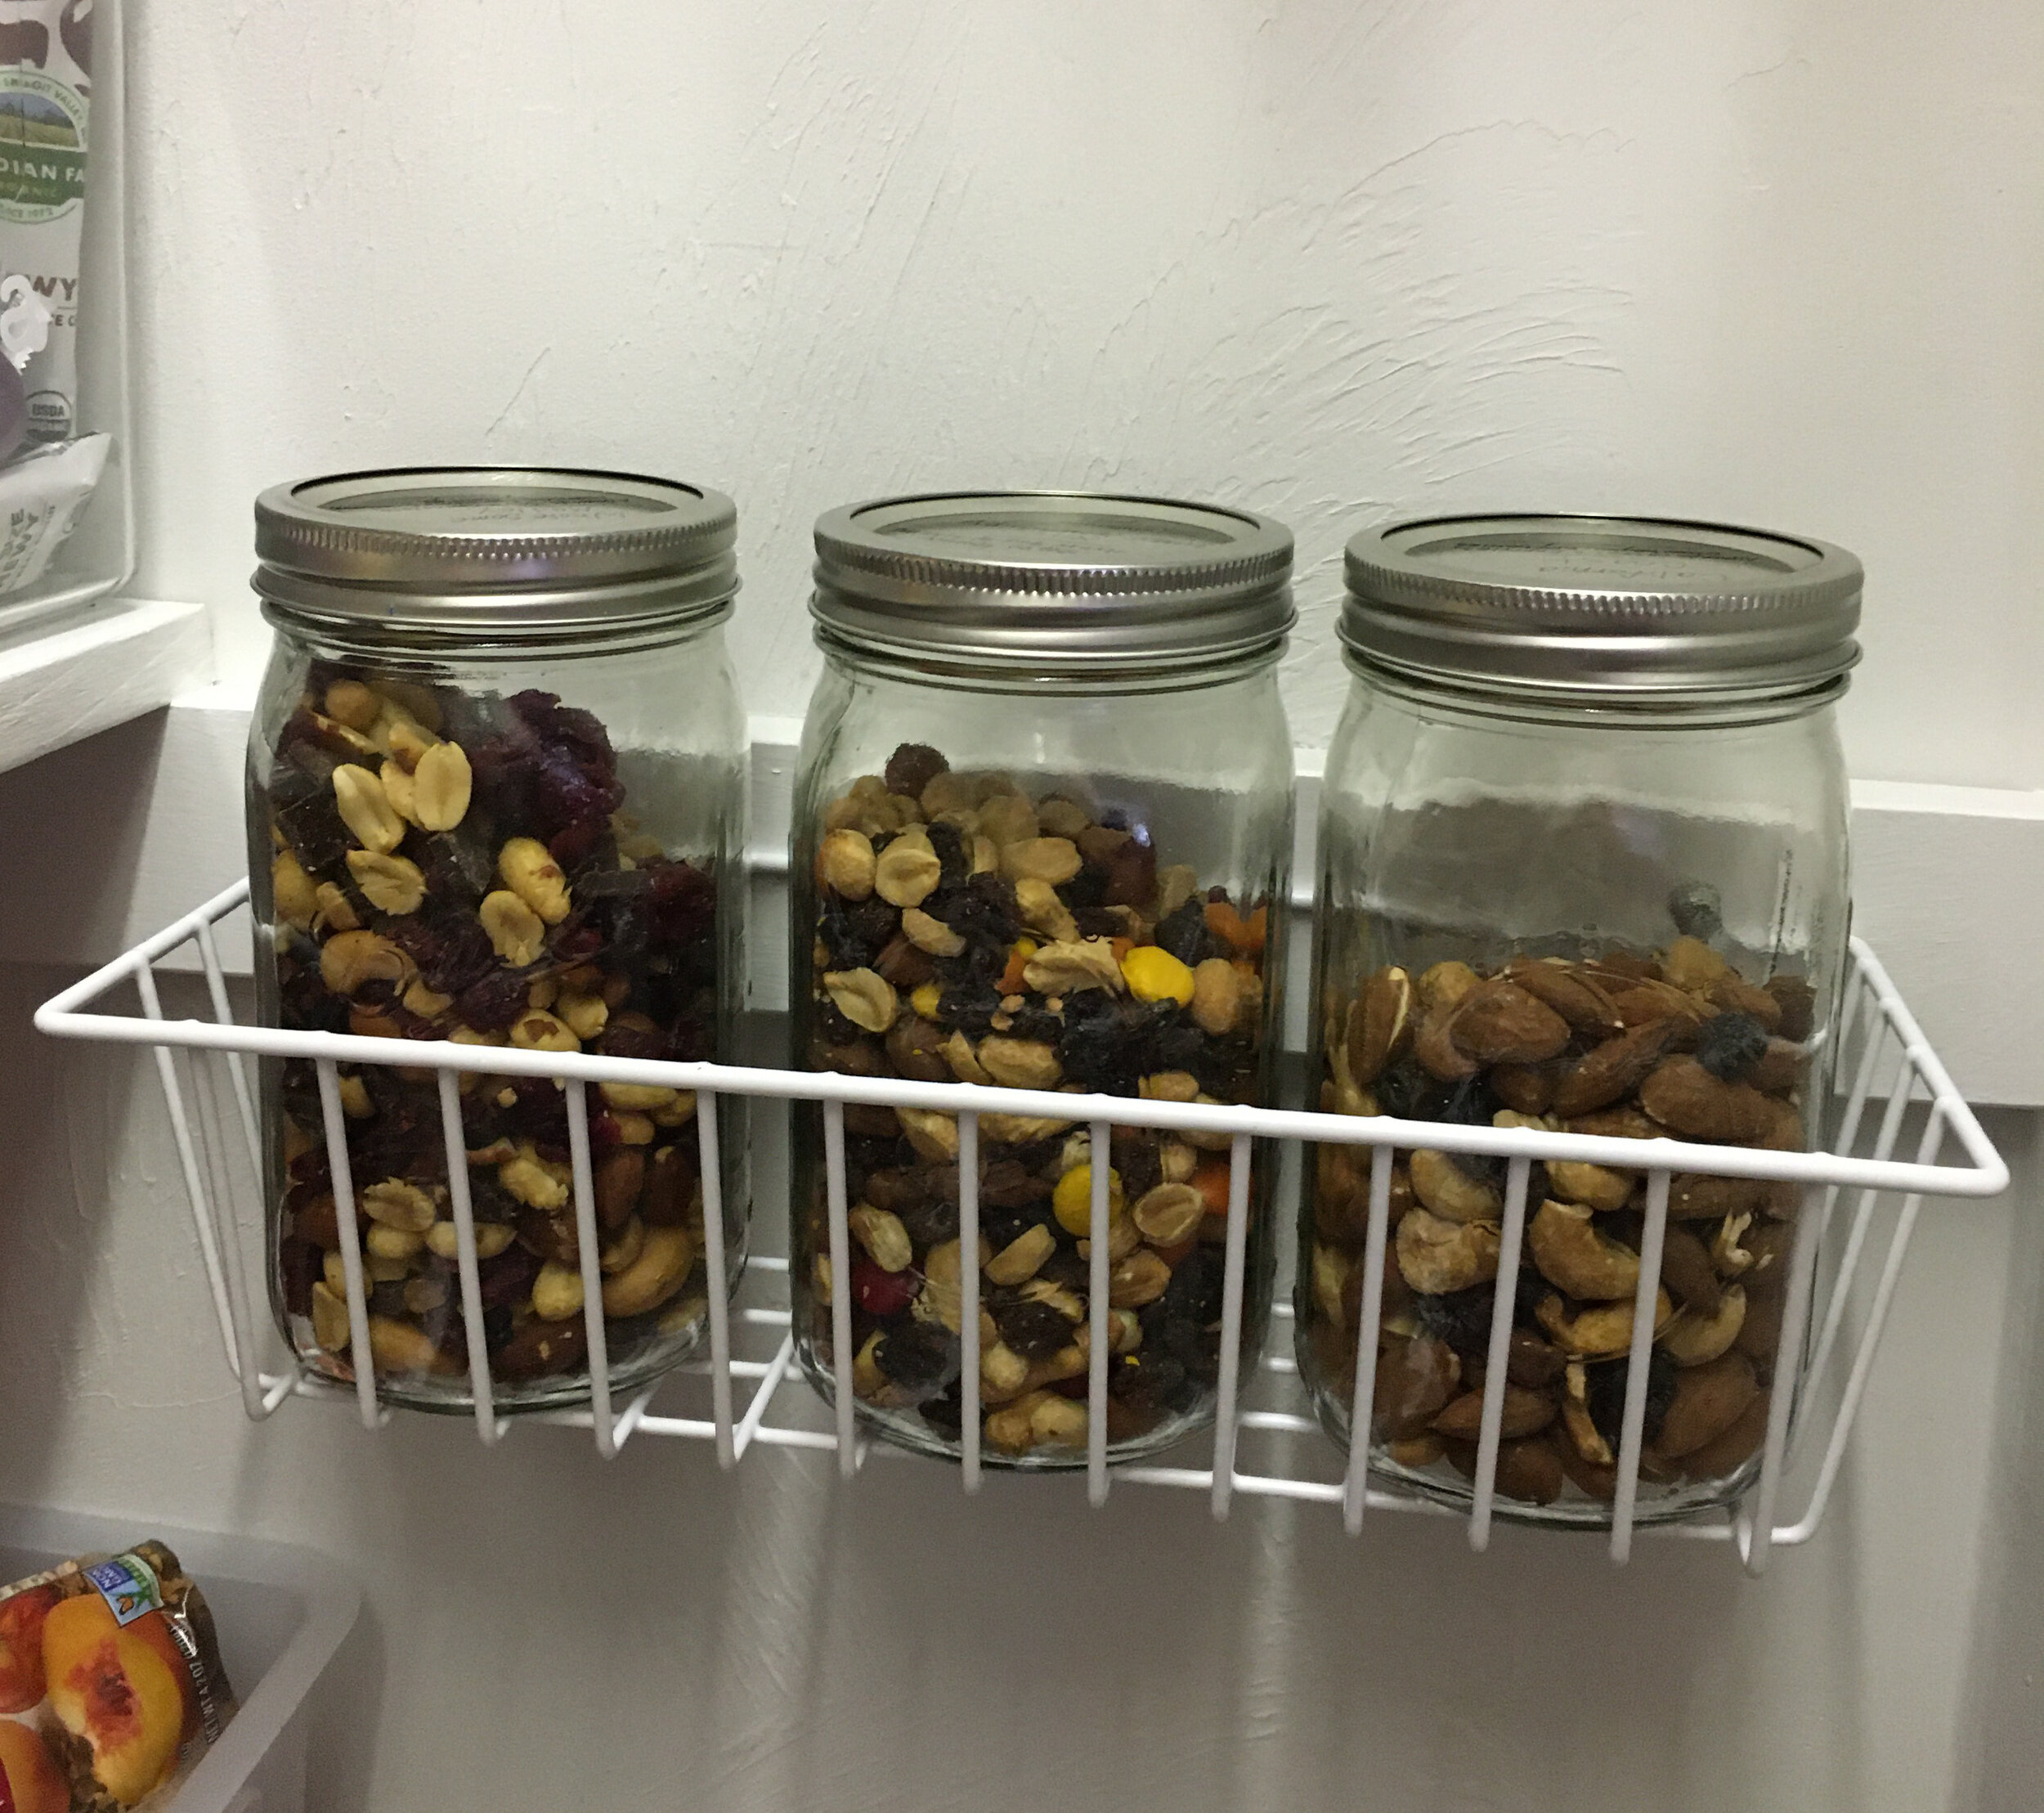
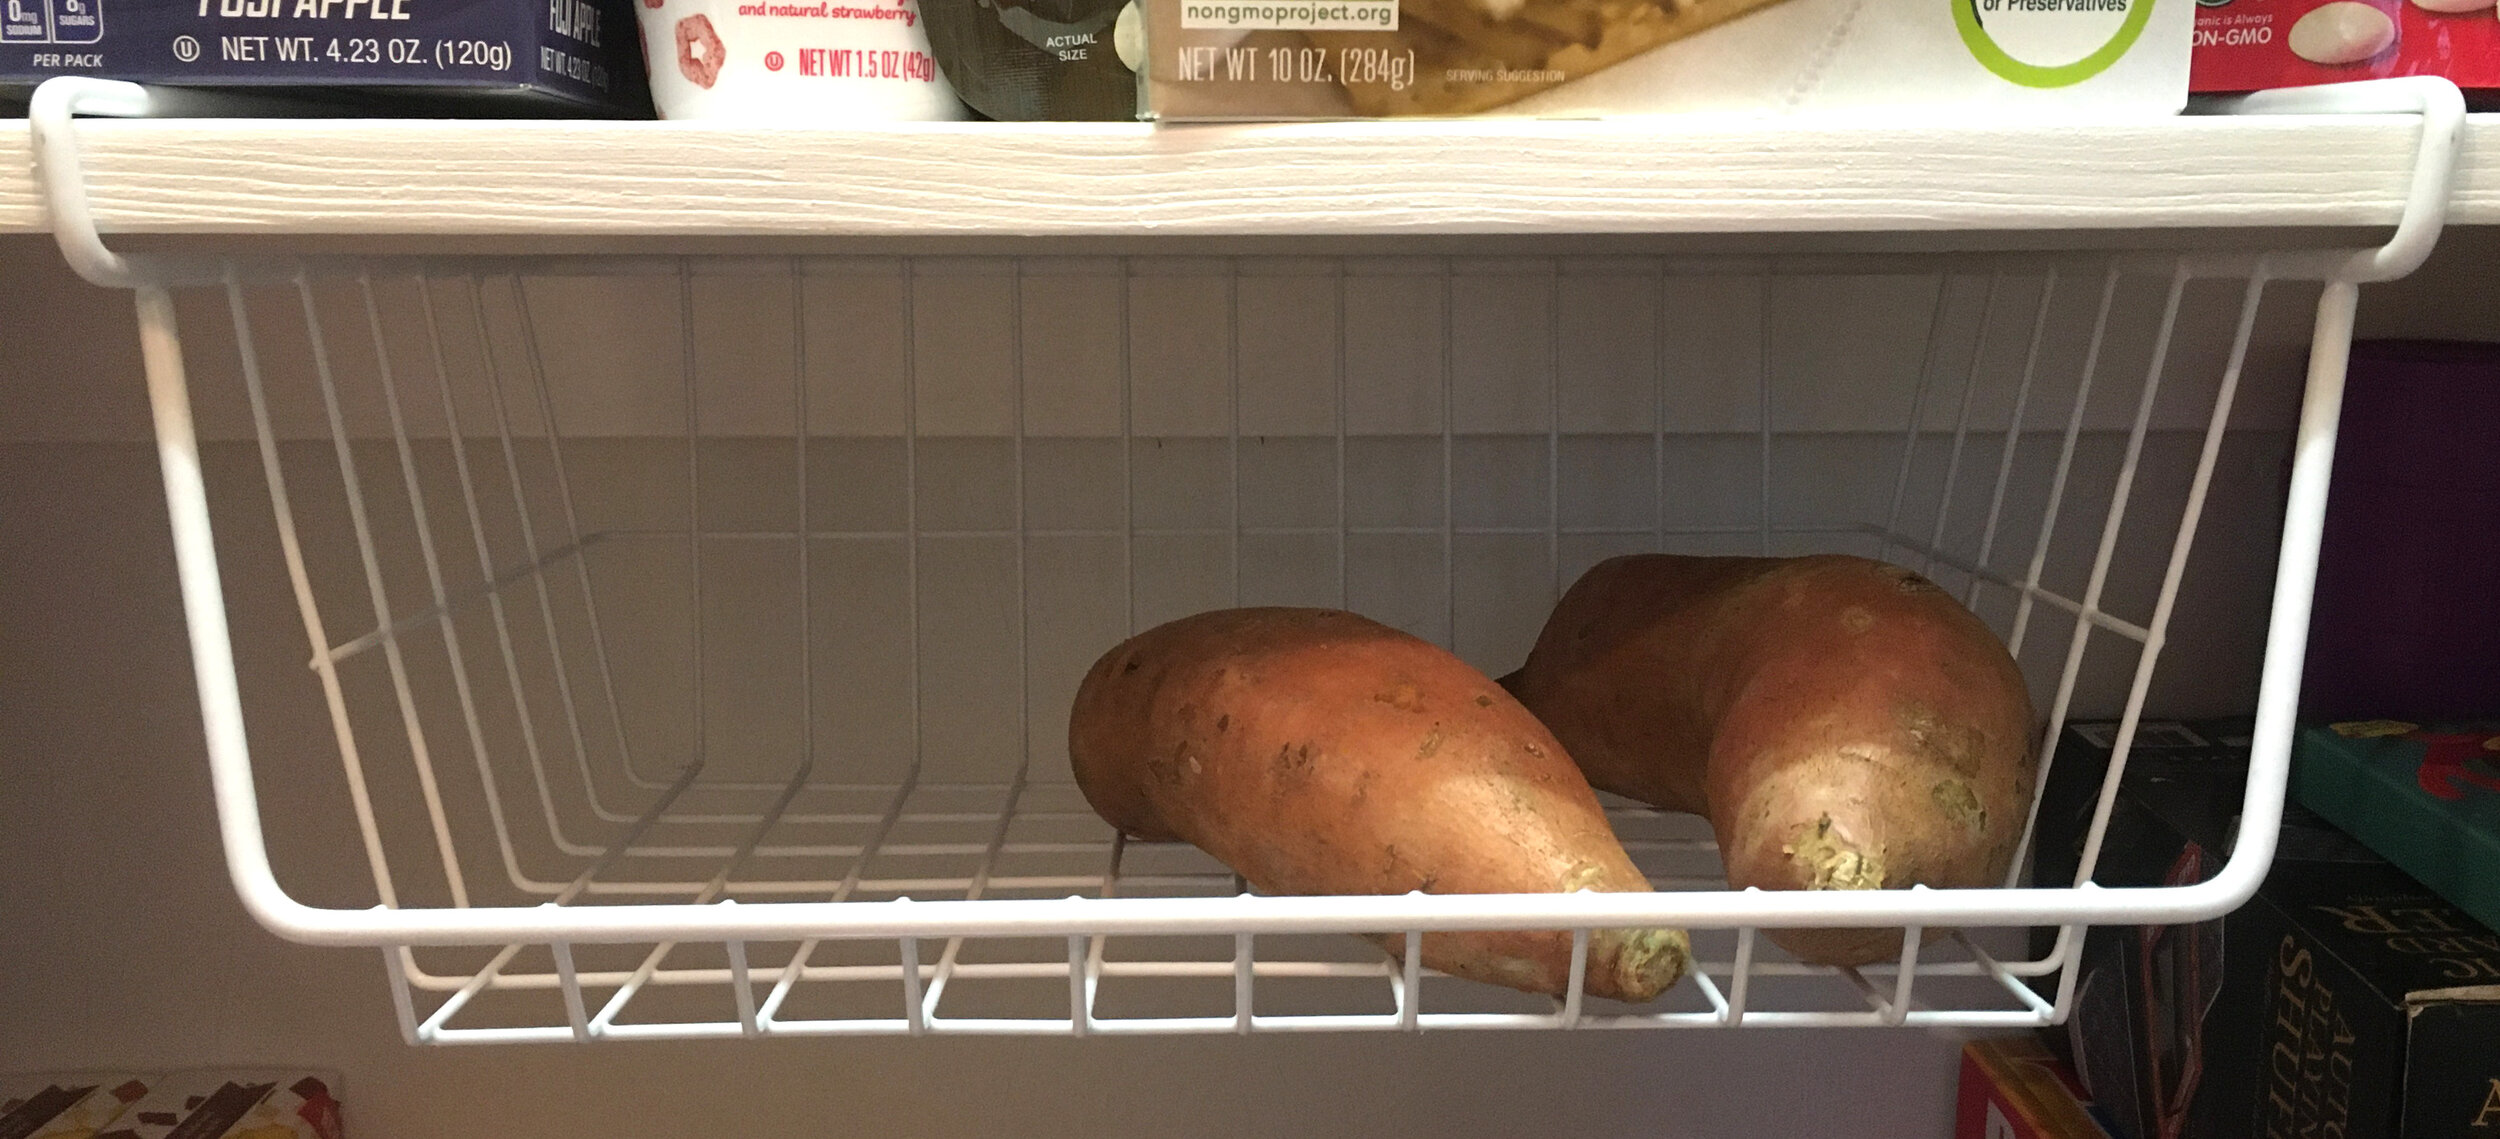
to the back of the pantry door to fully utilize the space. It was very simple to install and I am impressed with how sturdy it is once it's assembled and screwed in. We used the lower baskets for foil, parchement paper, ziplocks, silicone bowl covers, etc. The middle baskets we designated for frequently used canned goods, smoothie mix-ins, as well as salad fixings and rice cakes. Finally on the top two baskets we put convenience foods that we rarely use since I'm so short. Note: If you have a hollow-core door, you might want to use a specialty set of anchors/screws to attach it to the door for stability, rather than just screw into the door with regular screws.
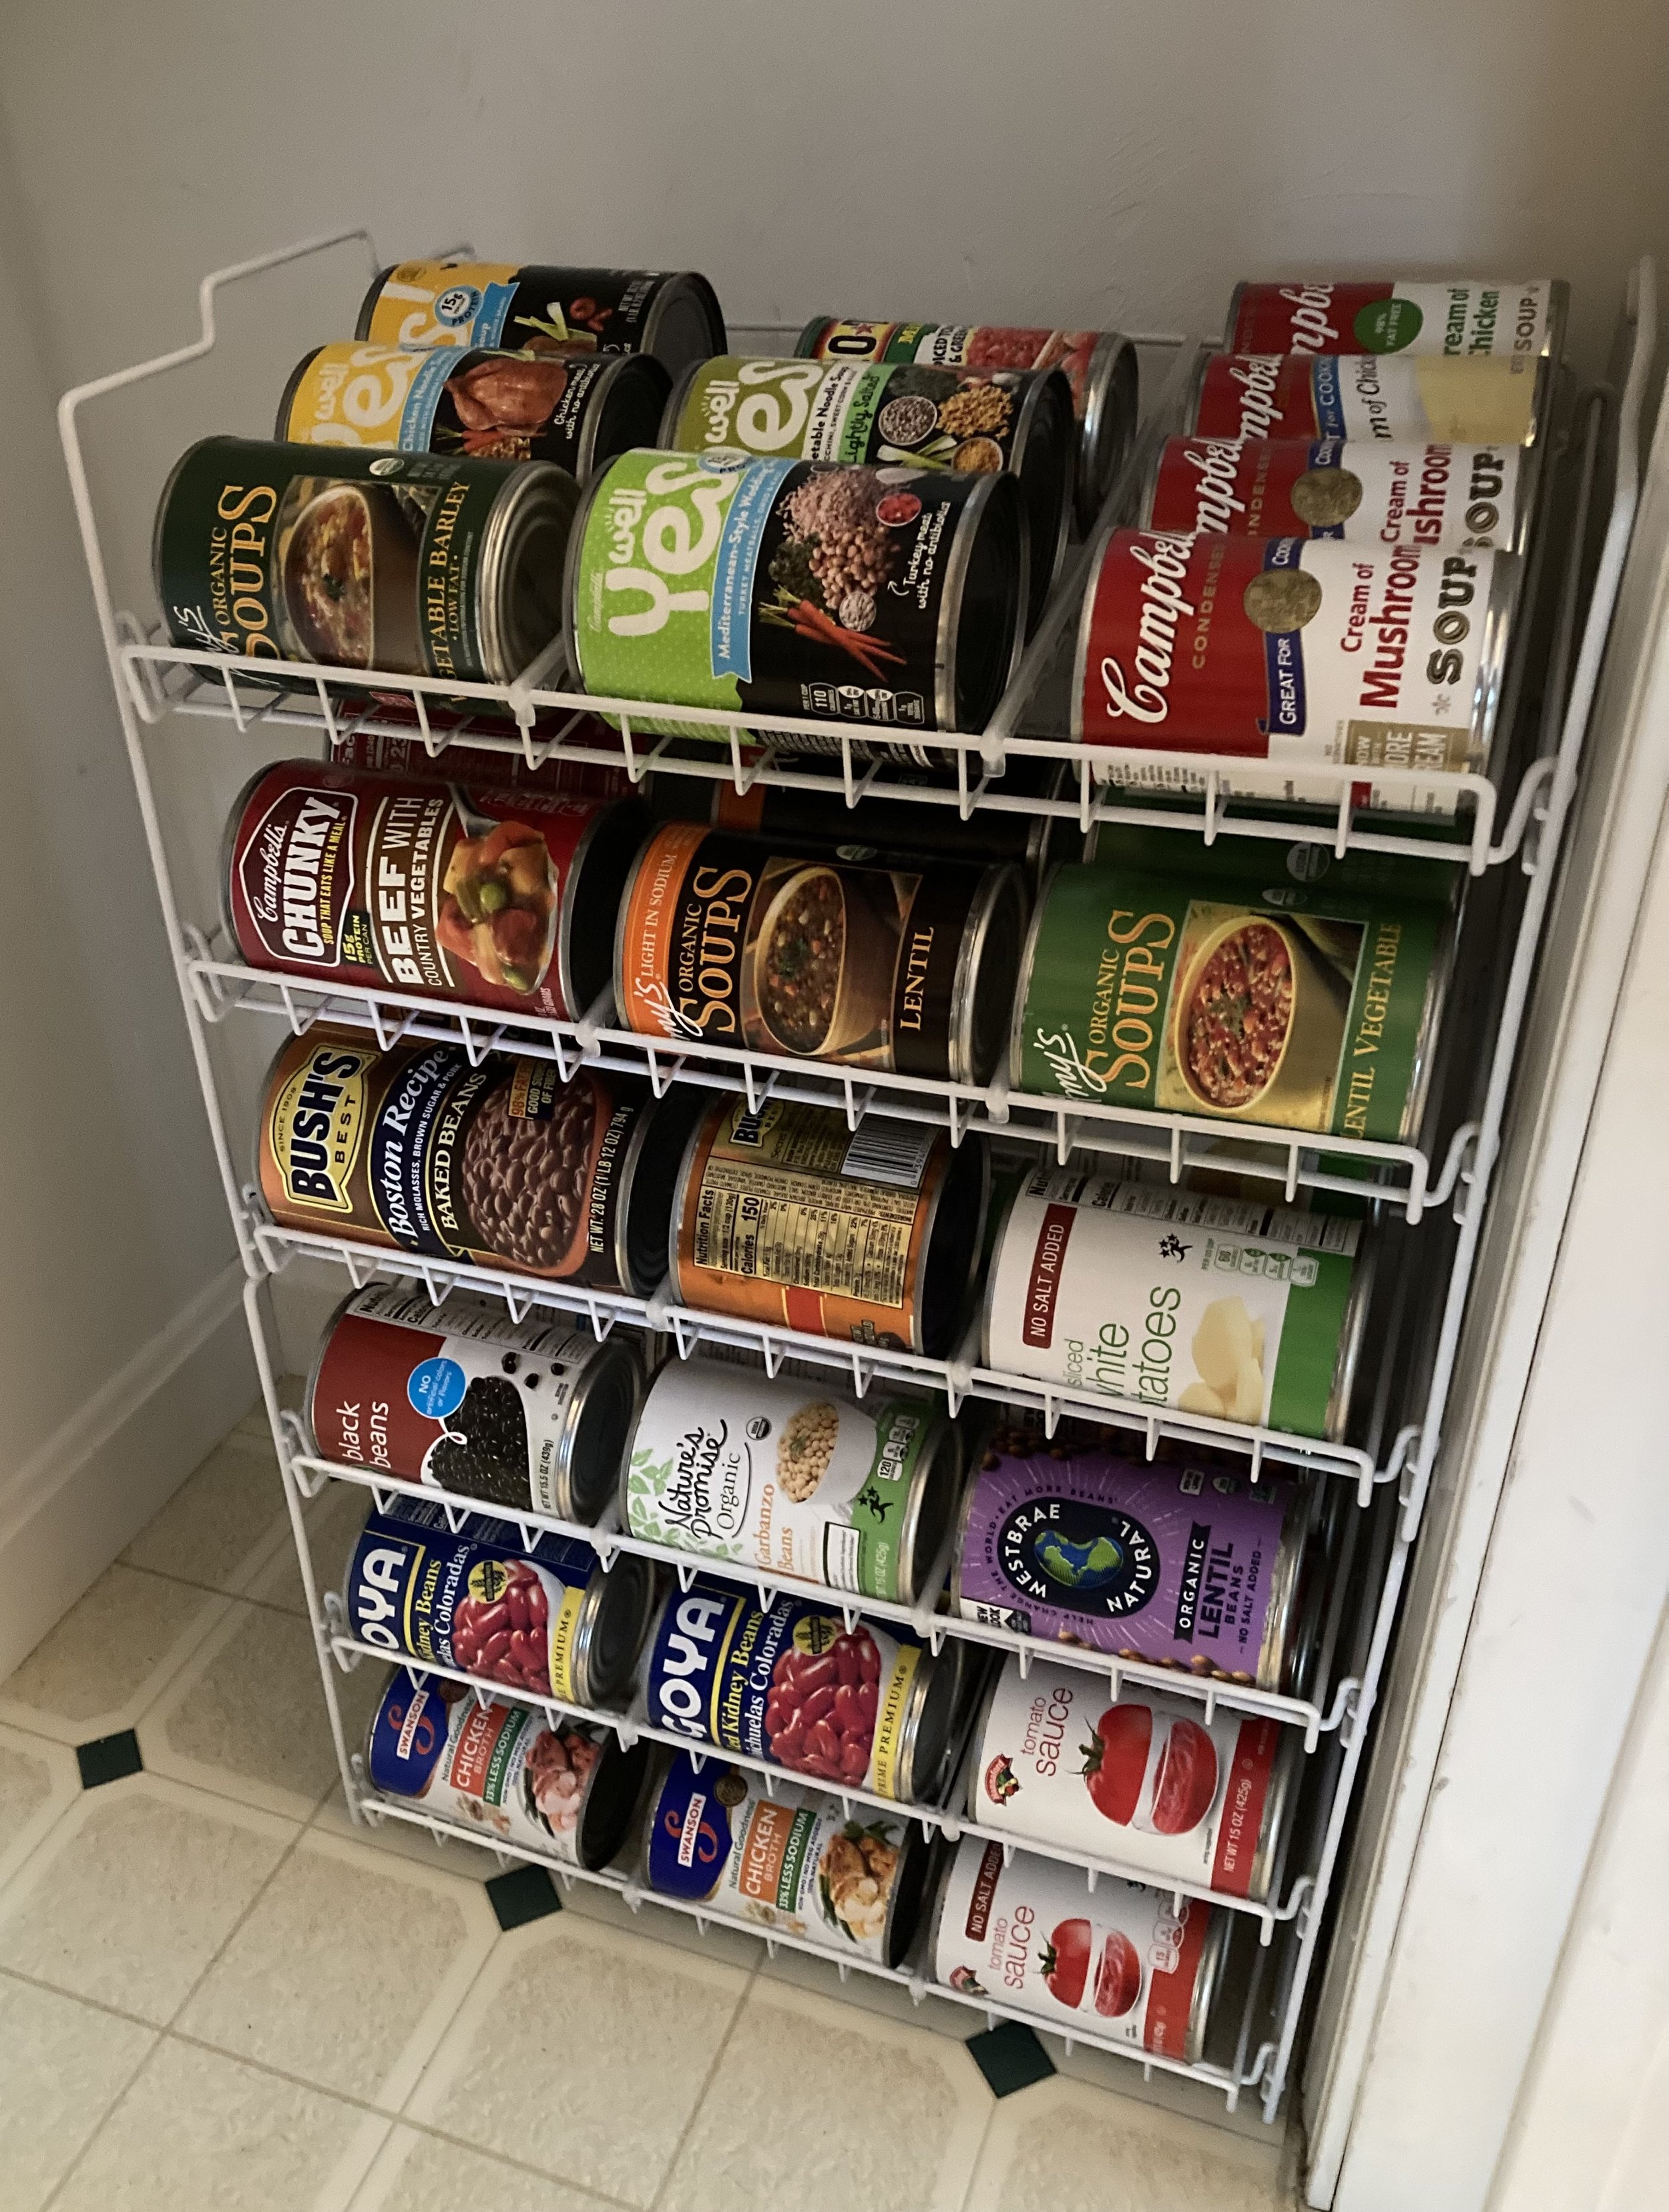
Another later addition to our pantry organization are these amazing stackable can racks for organizing canned goods. Before I had quite a few canned goods just sitting on the floor of the pantry and in a separate kitchen cupboard, but I never could see everything at once and often cans in the back got forgotten -- Now everything is in one spot where I can see them and I can meal plan more efficiently.
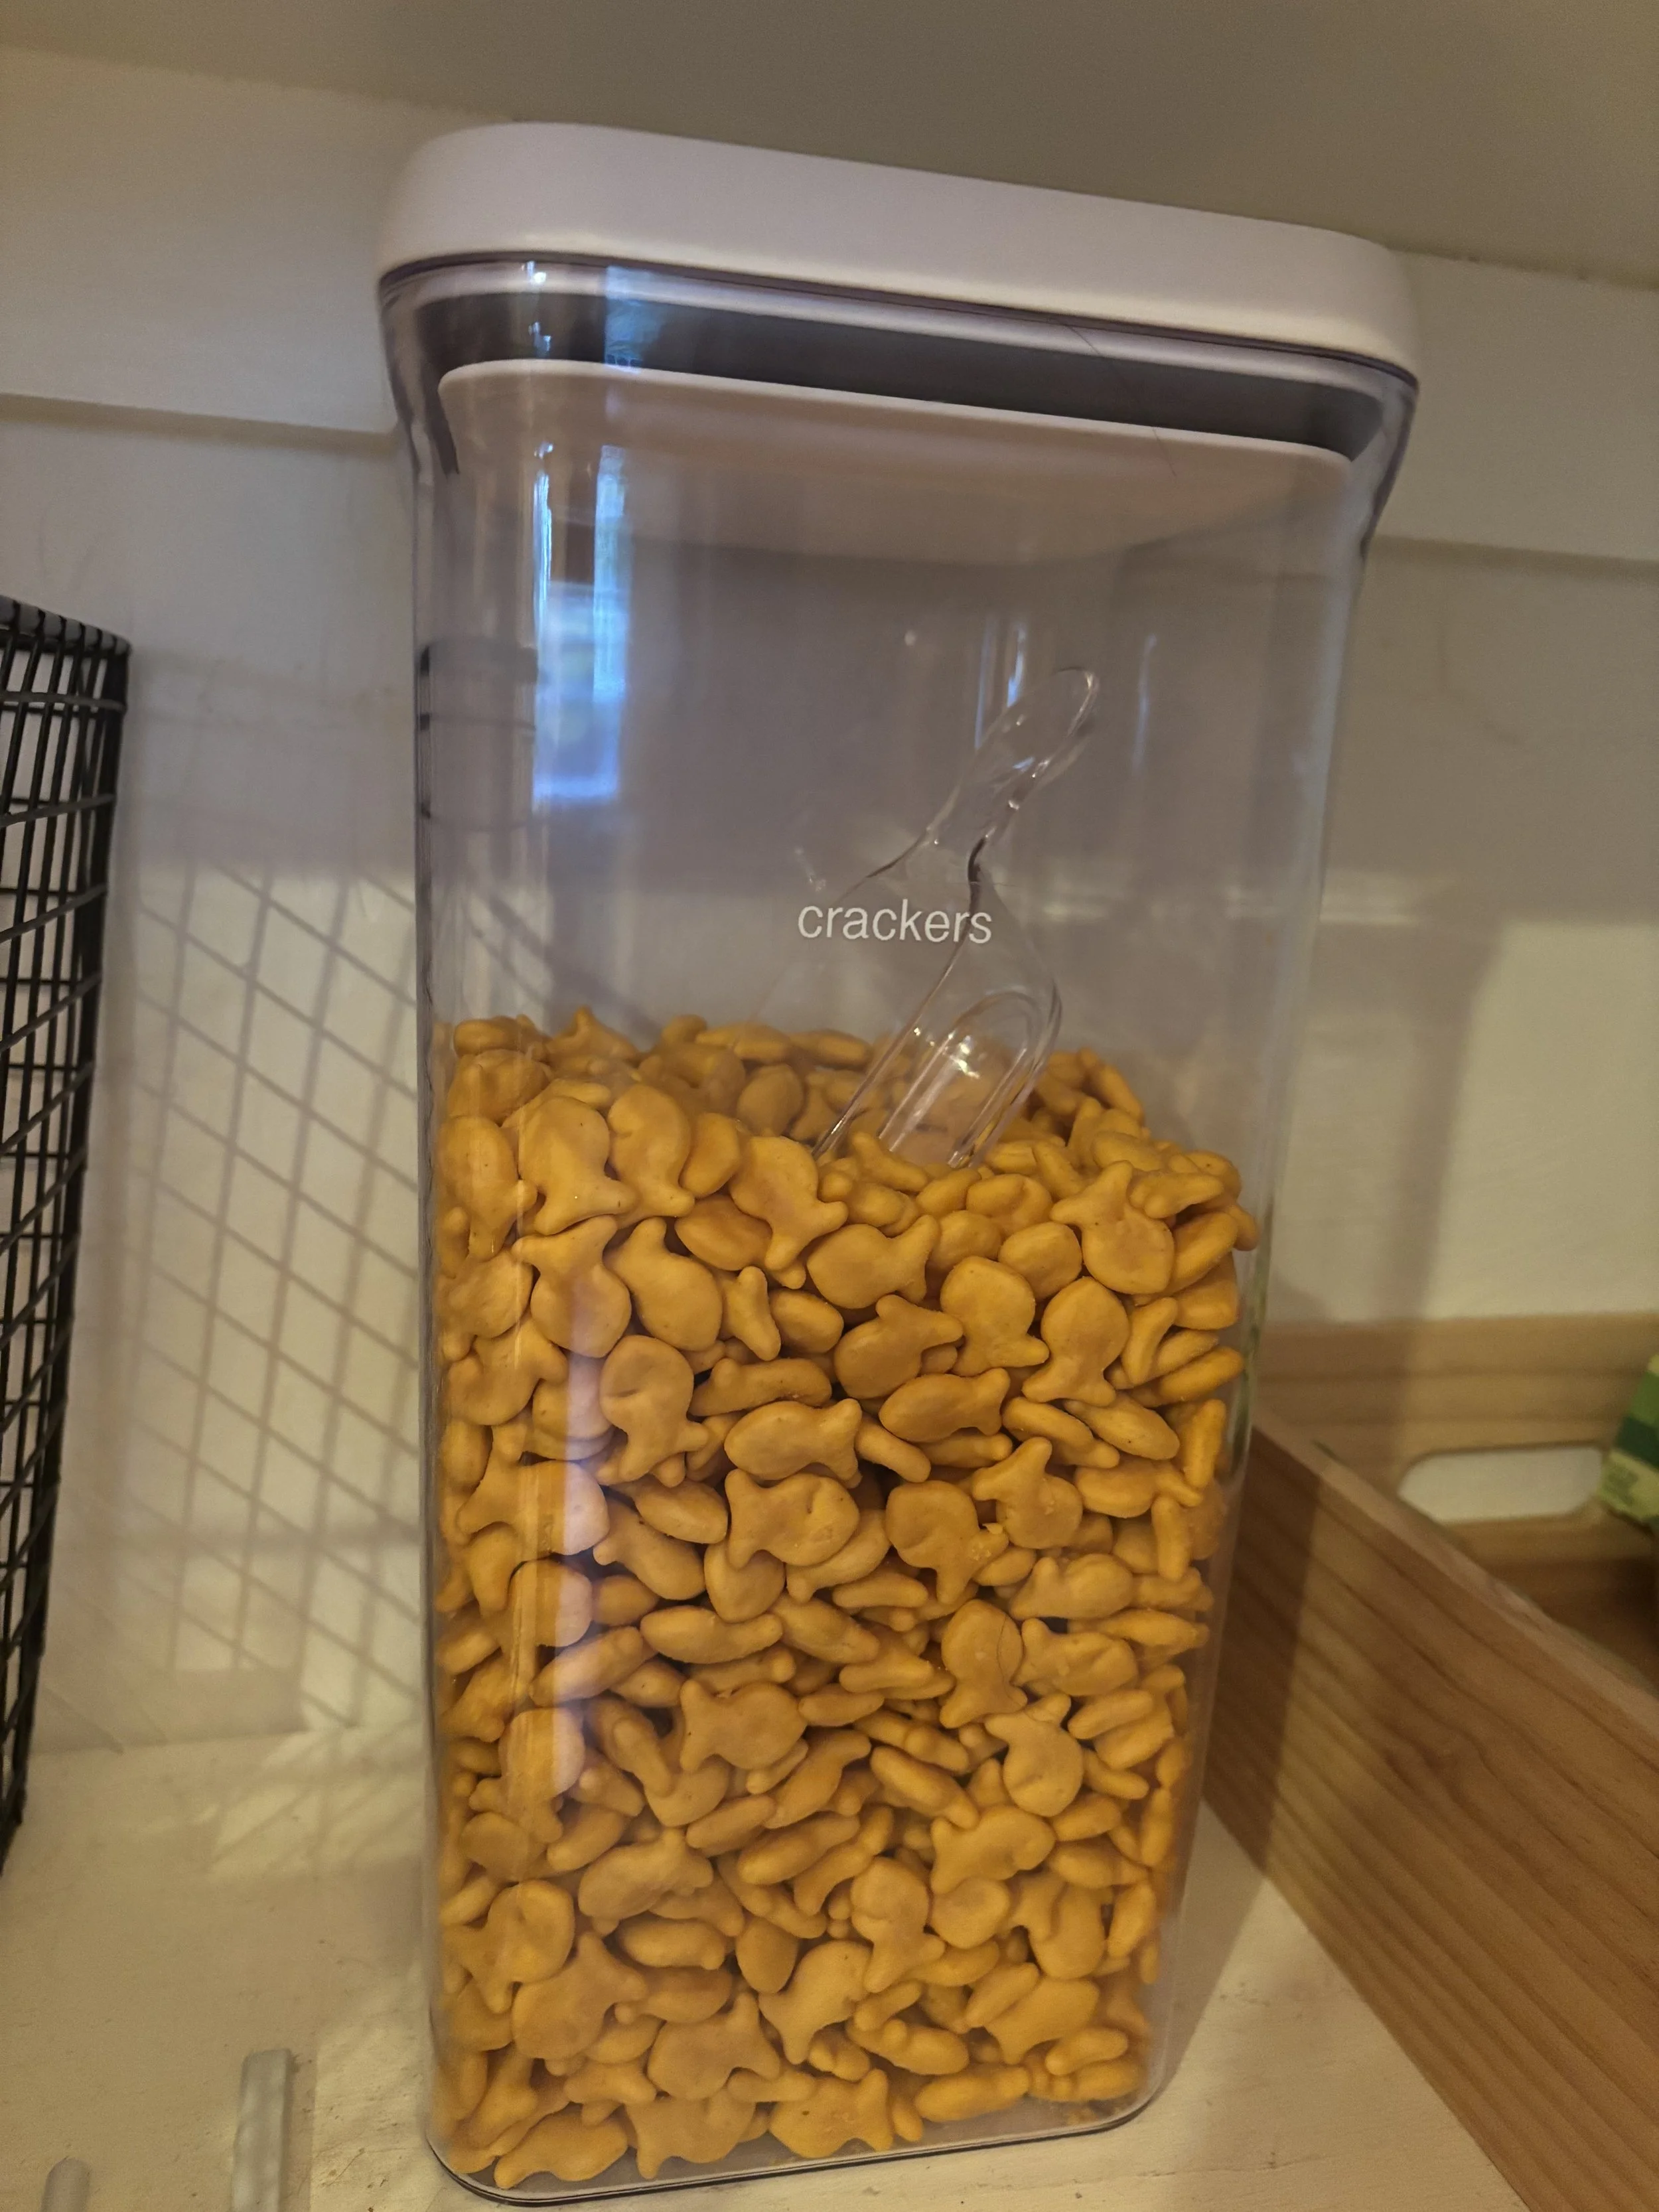
Another thing that's been a huge game changer is moving dry snacks into OXO POP Food Storage Containers. We love these for our snack crackers and pretzels. They keep everything fresh and it's easy to see if you're starting to run low on these staples. To keep the kids from going too wild with serving sizes we added clear OXO 1/2 Cup Scoops in each container too - making it easy to grab a serving. I used my Brother Label Maker to make labels for the containers. These can easily be peeled off and relabeled as needed.
This website shares personal opinions and experiences regarding a variety of topics. Please do your own research regarding all things and use information/opinions stated here at your own discretion and risk.
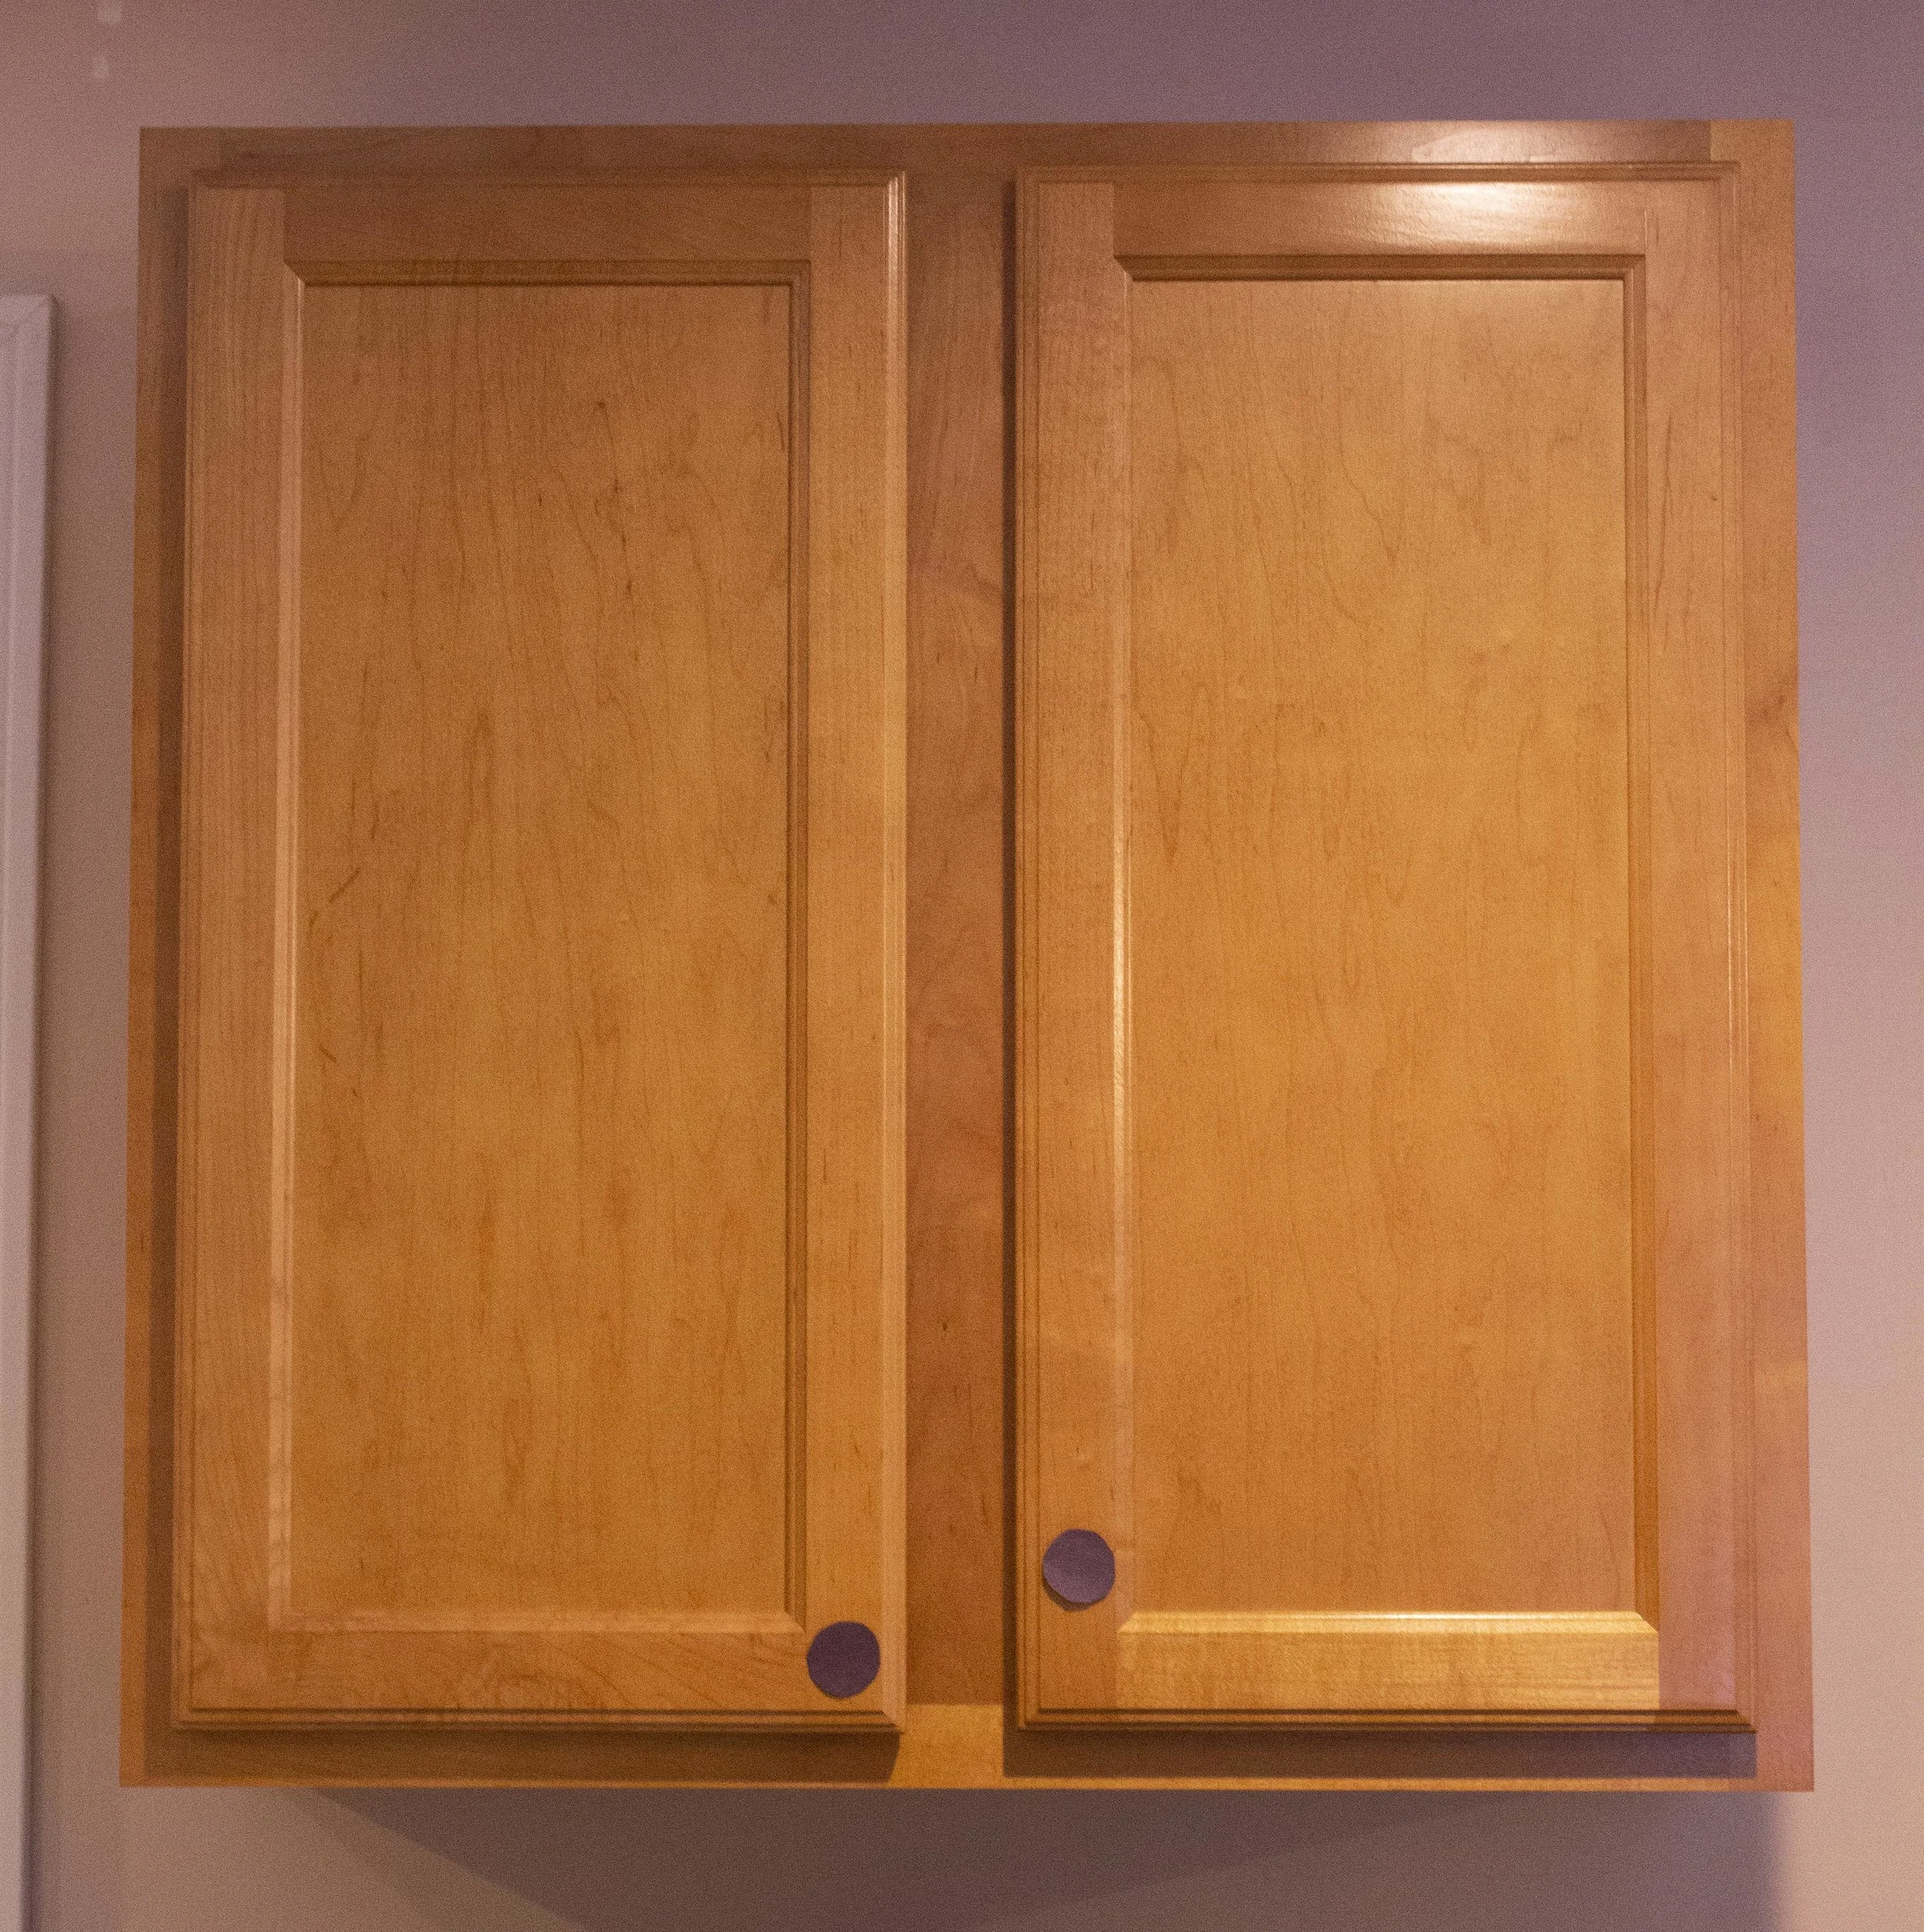
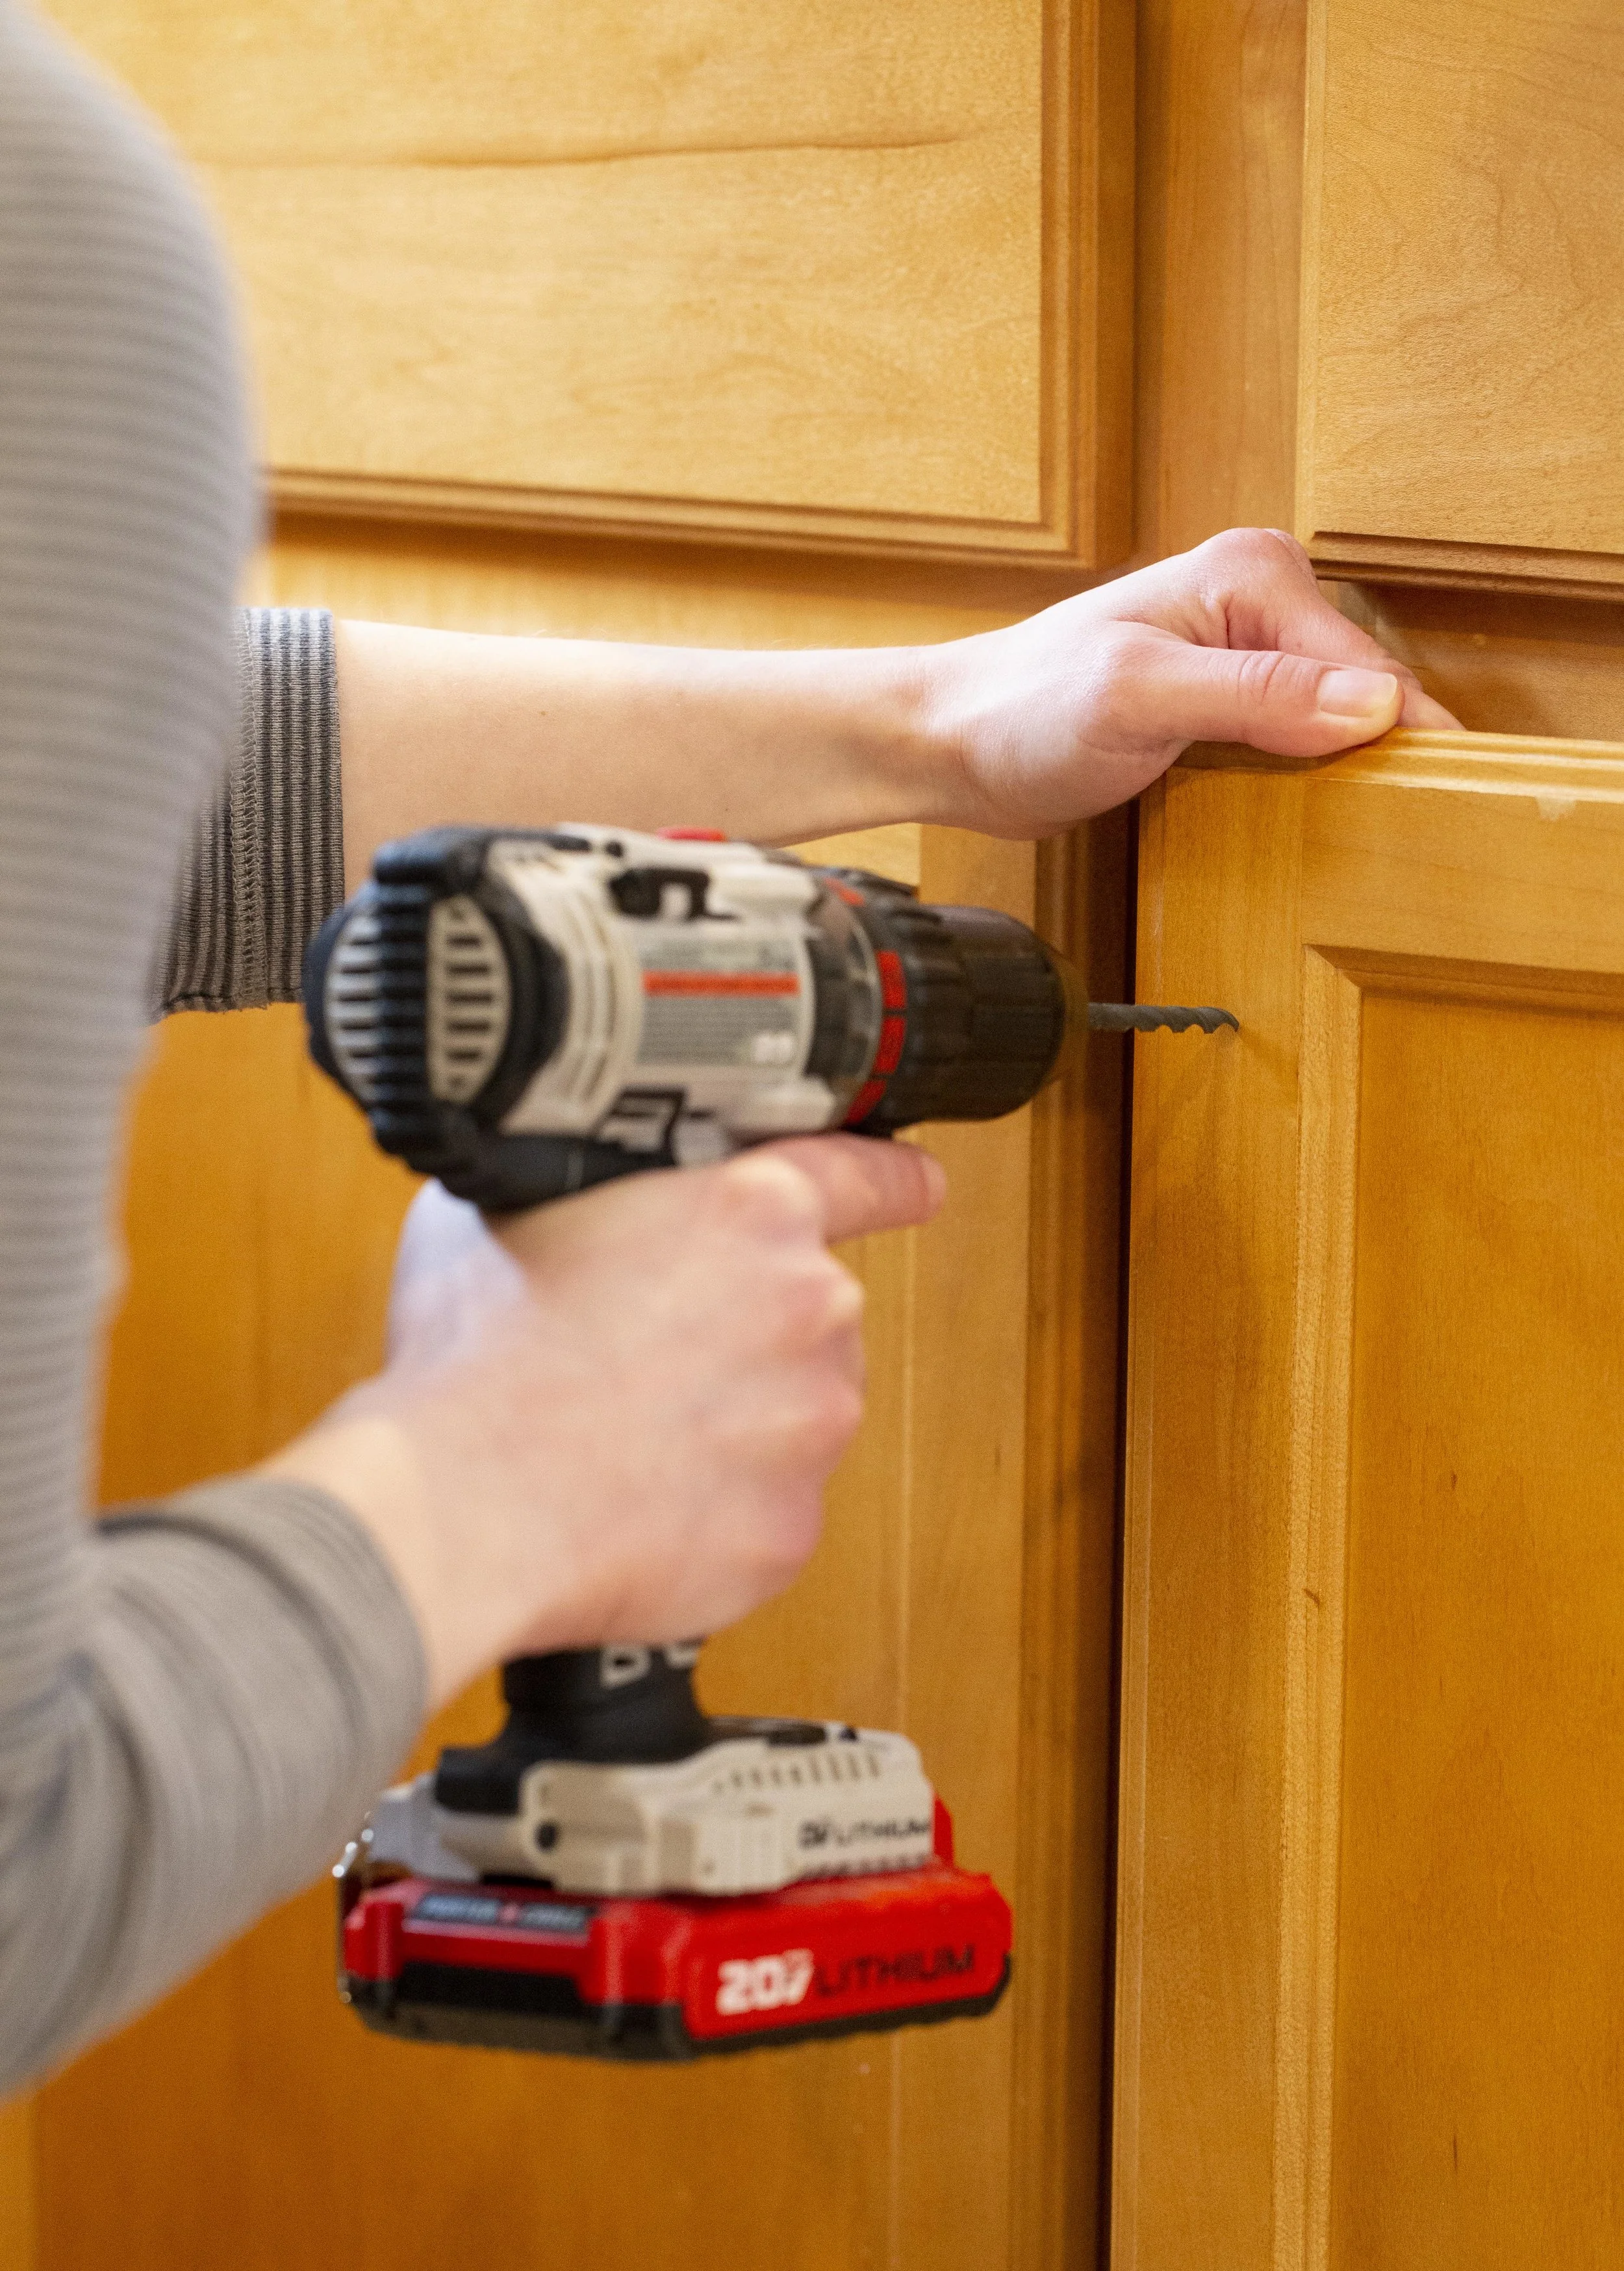
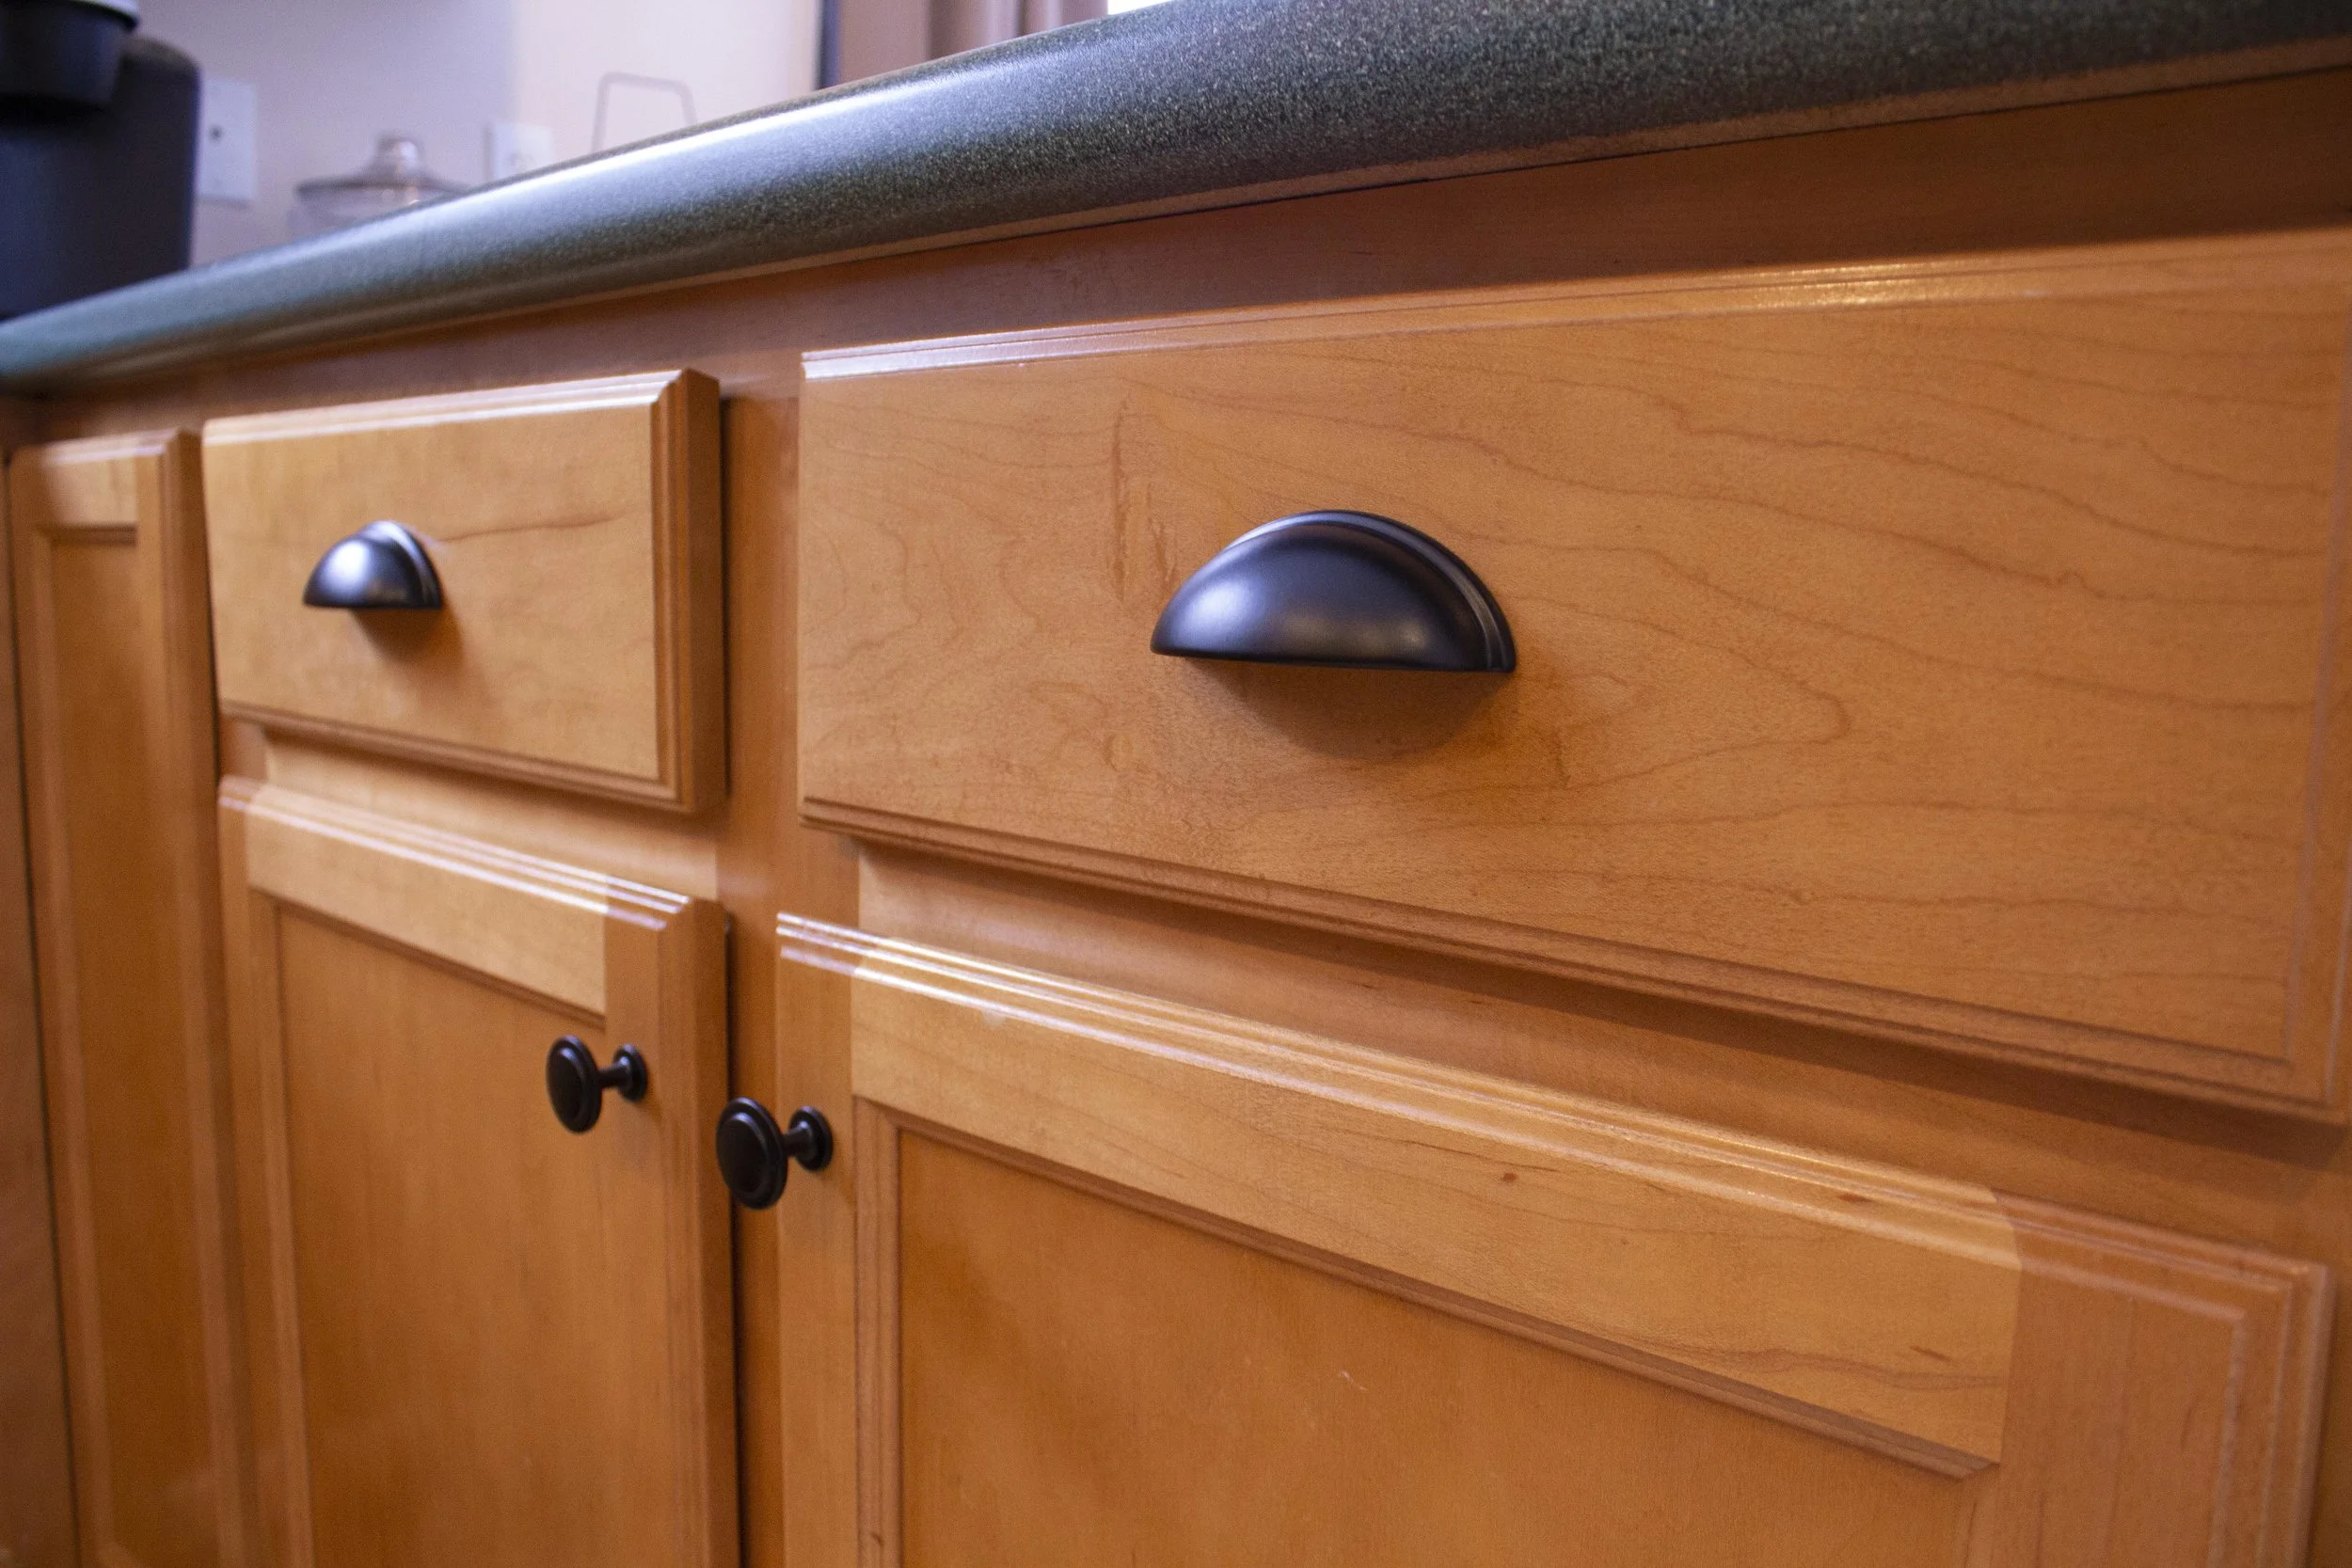
Our home came with a classic late 90’s “builder’s grade kitchen” - you know the type: honey-colored basic cabinets with no hardware and laminate counters. Someday we’d love to totally overhaul the space and paint the cupboards, trim them out, and install granite countertops - however all those things involve a lot of work and money and just aren’t in the budget right now. In the meantime we’re working on making small upgrades ourselves that will make the space look more finished. And what’s the easiest, budget-friendly way to update the look of your cabinets? Replace or install new hardware! If you’re installing new hardware on blank cabinets it can be a bit intimidating, so read on for my tips on installing for the first time. And don’t forget to enter our GIVEAWAY over on Instagram for a $50 Credit to Cosmas Hardware! | This post is sponsored by Cosmas Hardware and affiliate links |
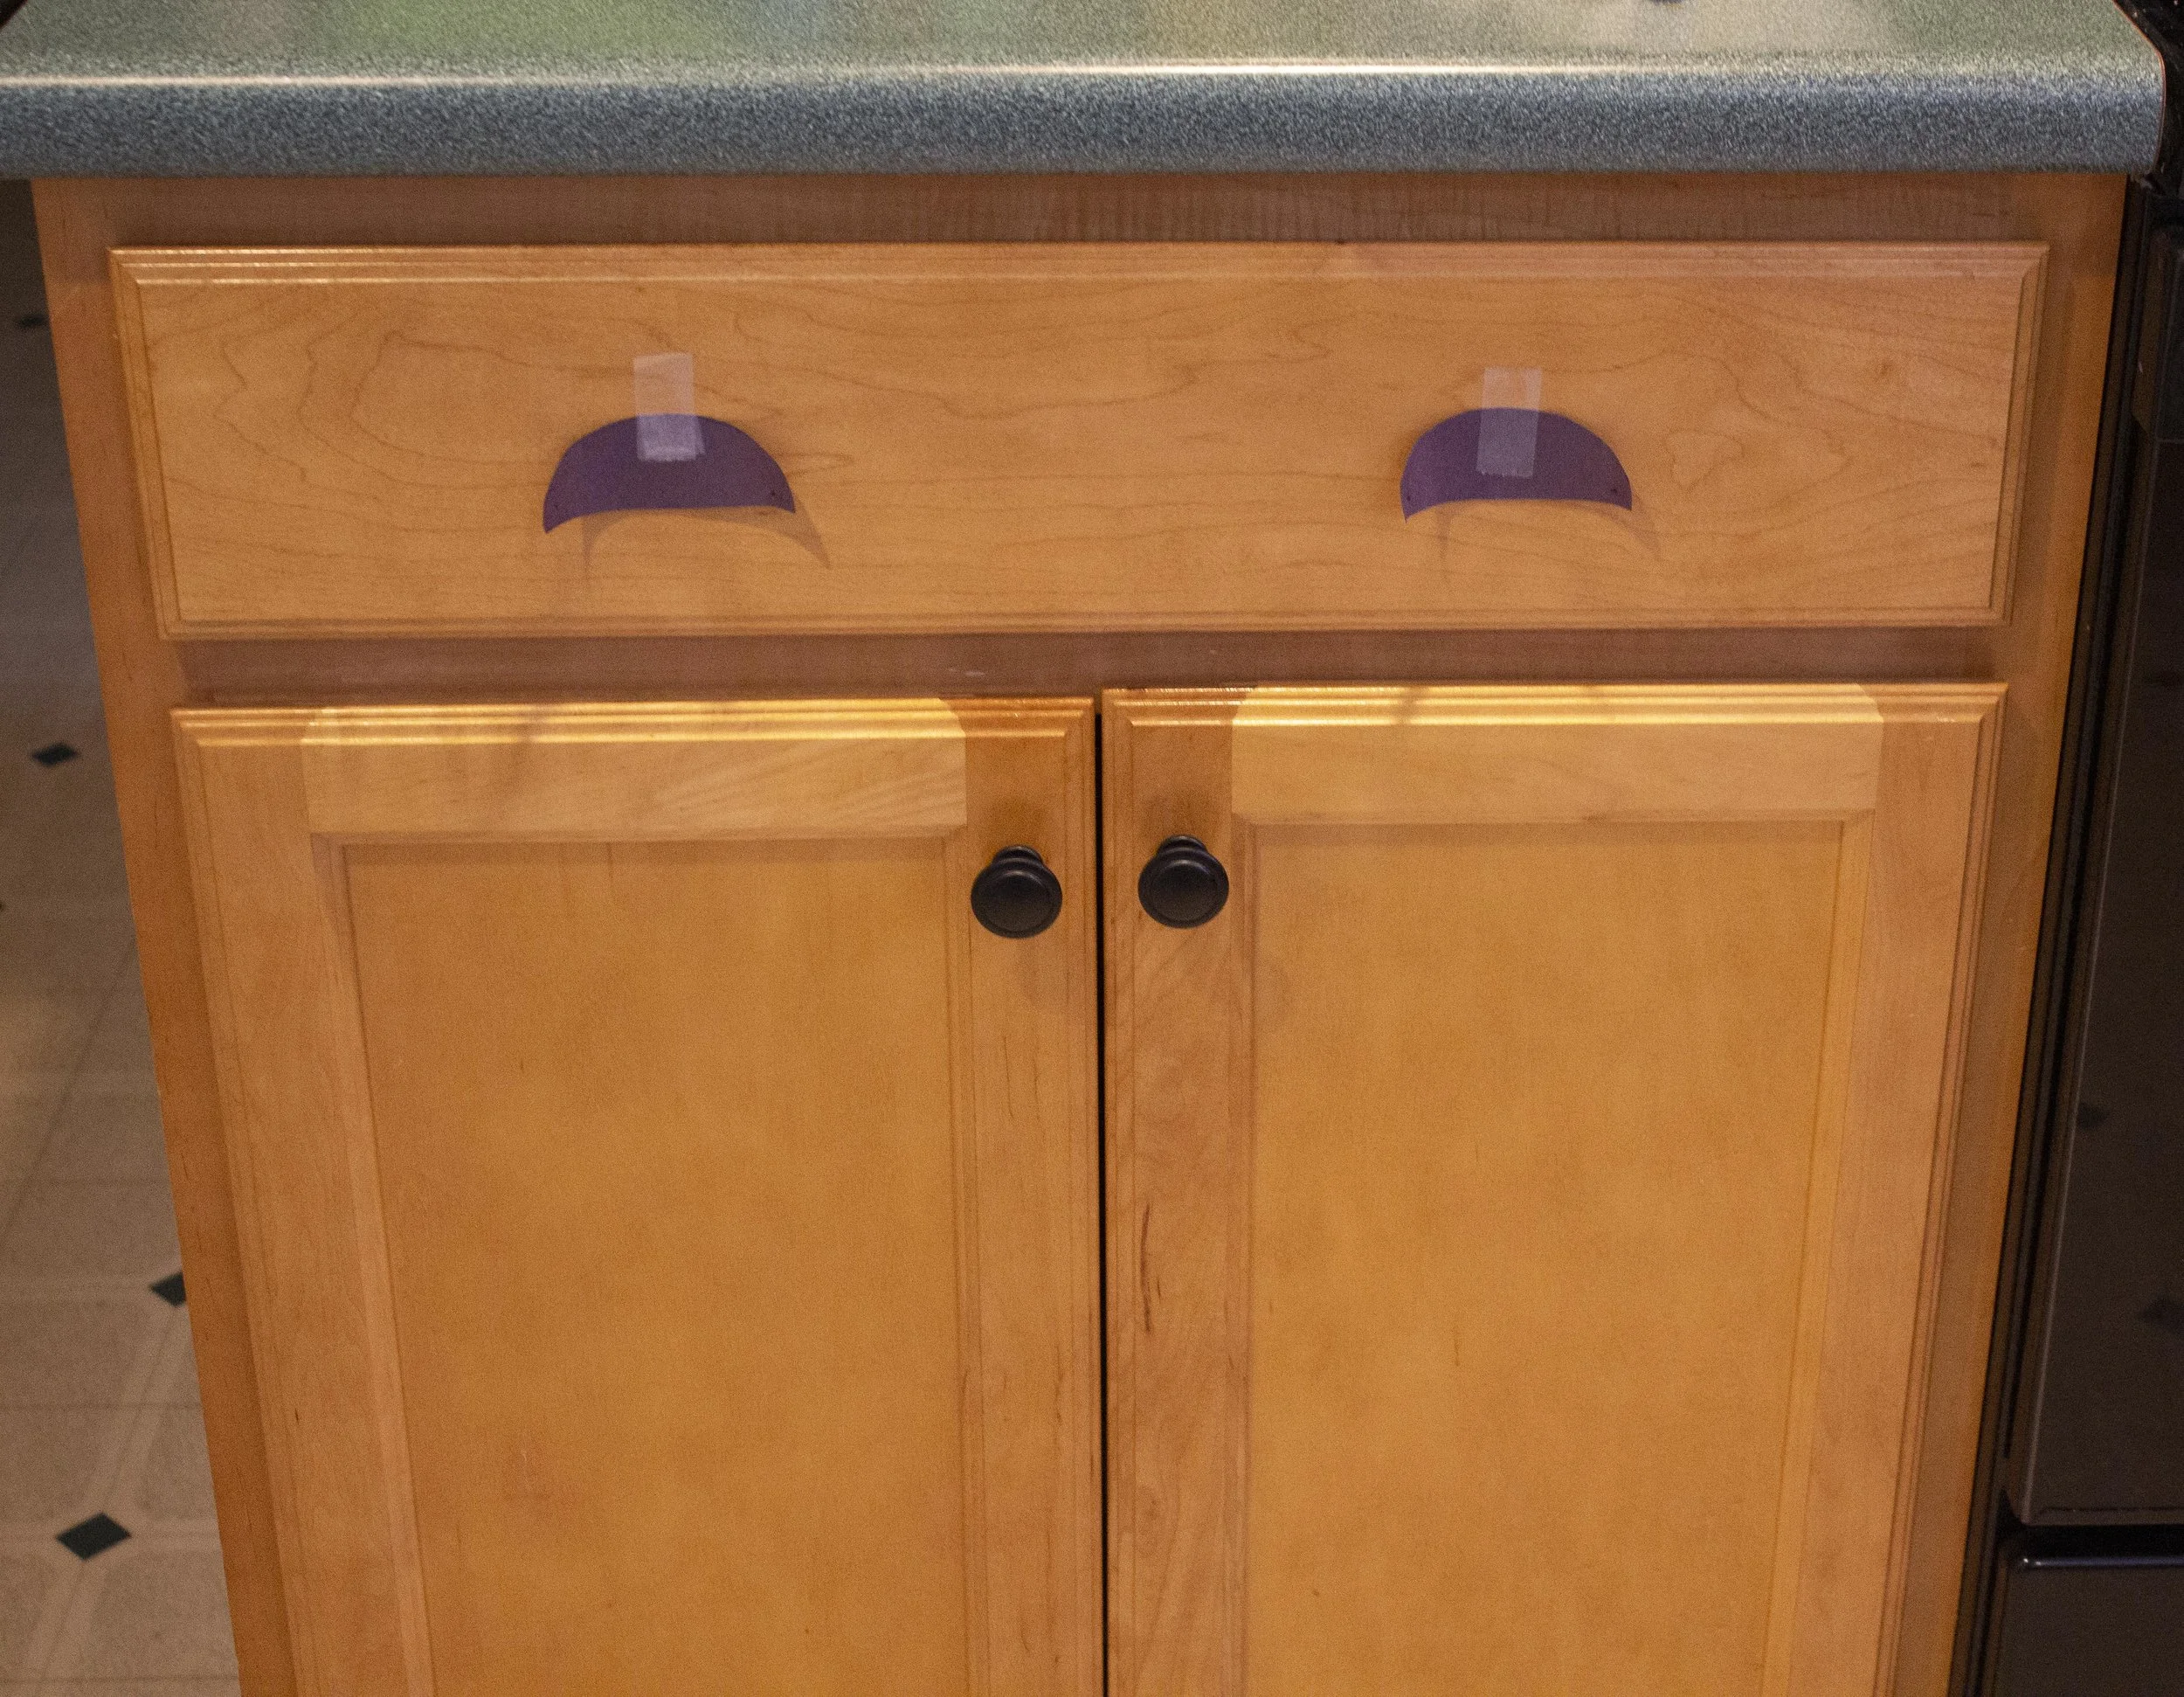
If you’re installing new hardware on a blank cabinet door, the first step is deciding hardware placement. I’m a very visual person so to help me decide on where things would go I first traced the hardware on a piece of black construction paper, cut it out, and taped them to the door and drawer fronts. This way I could step back and play around with the placement before I finalized it.
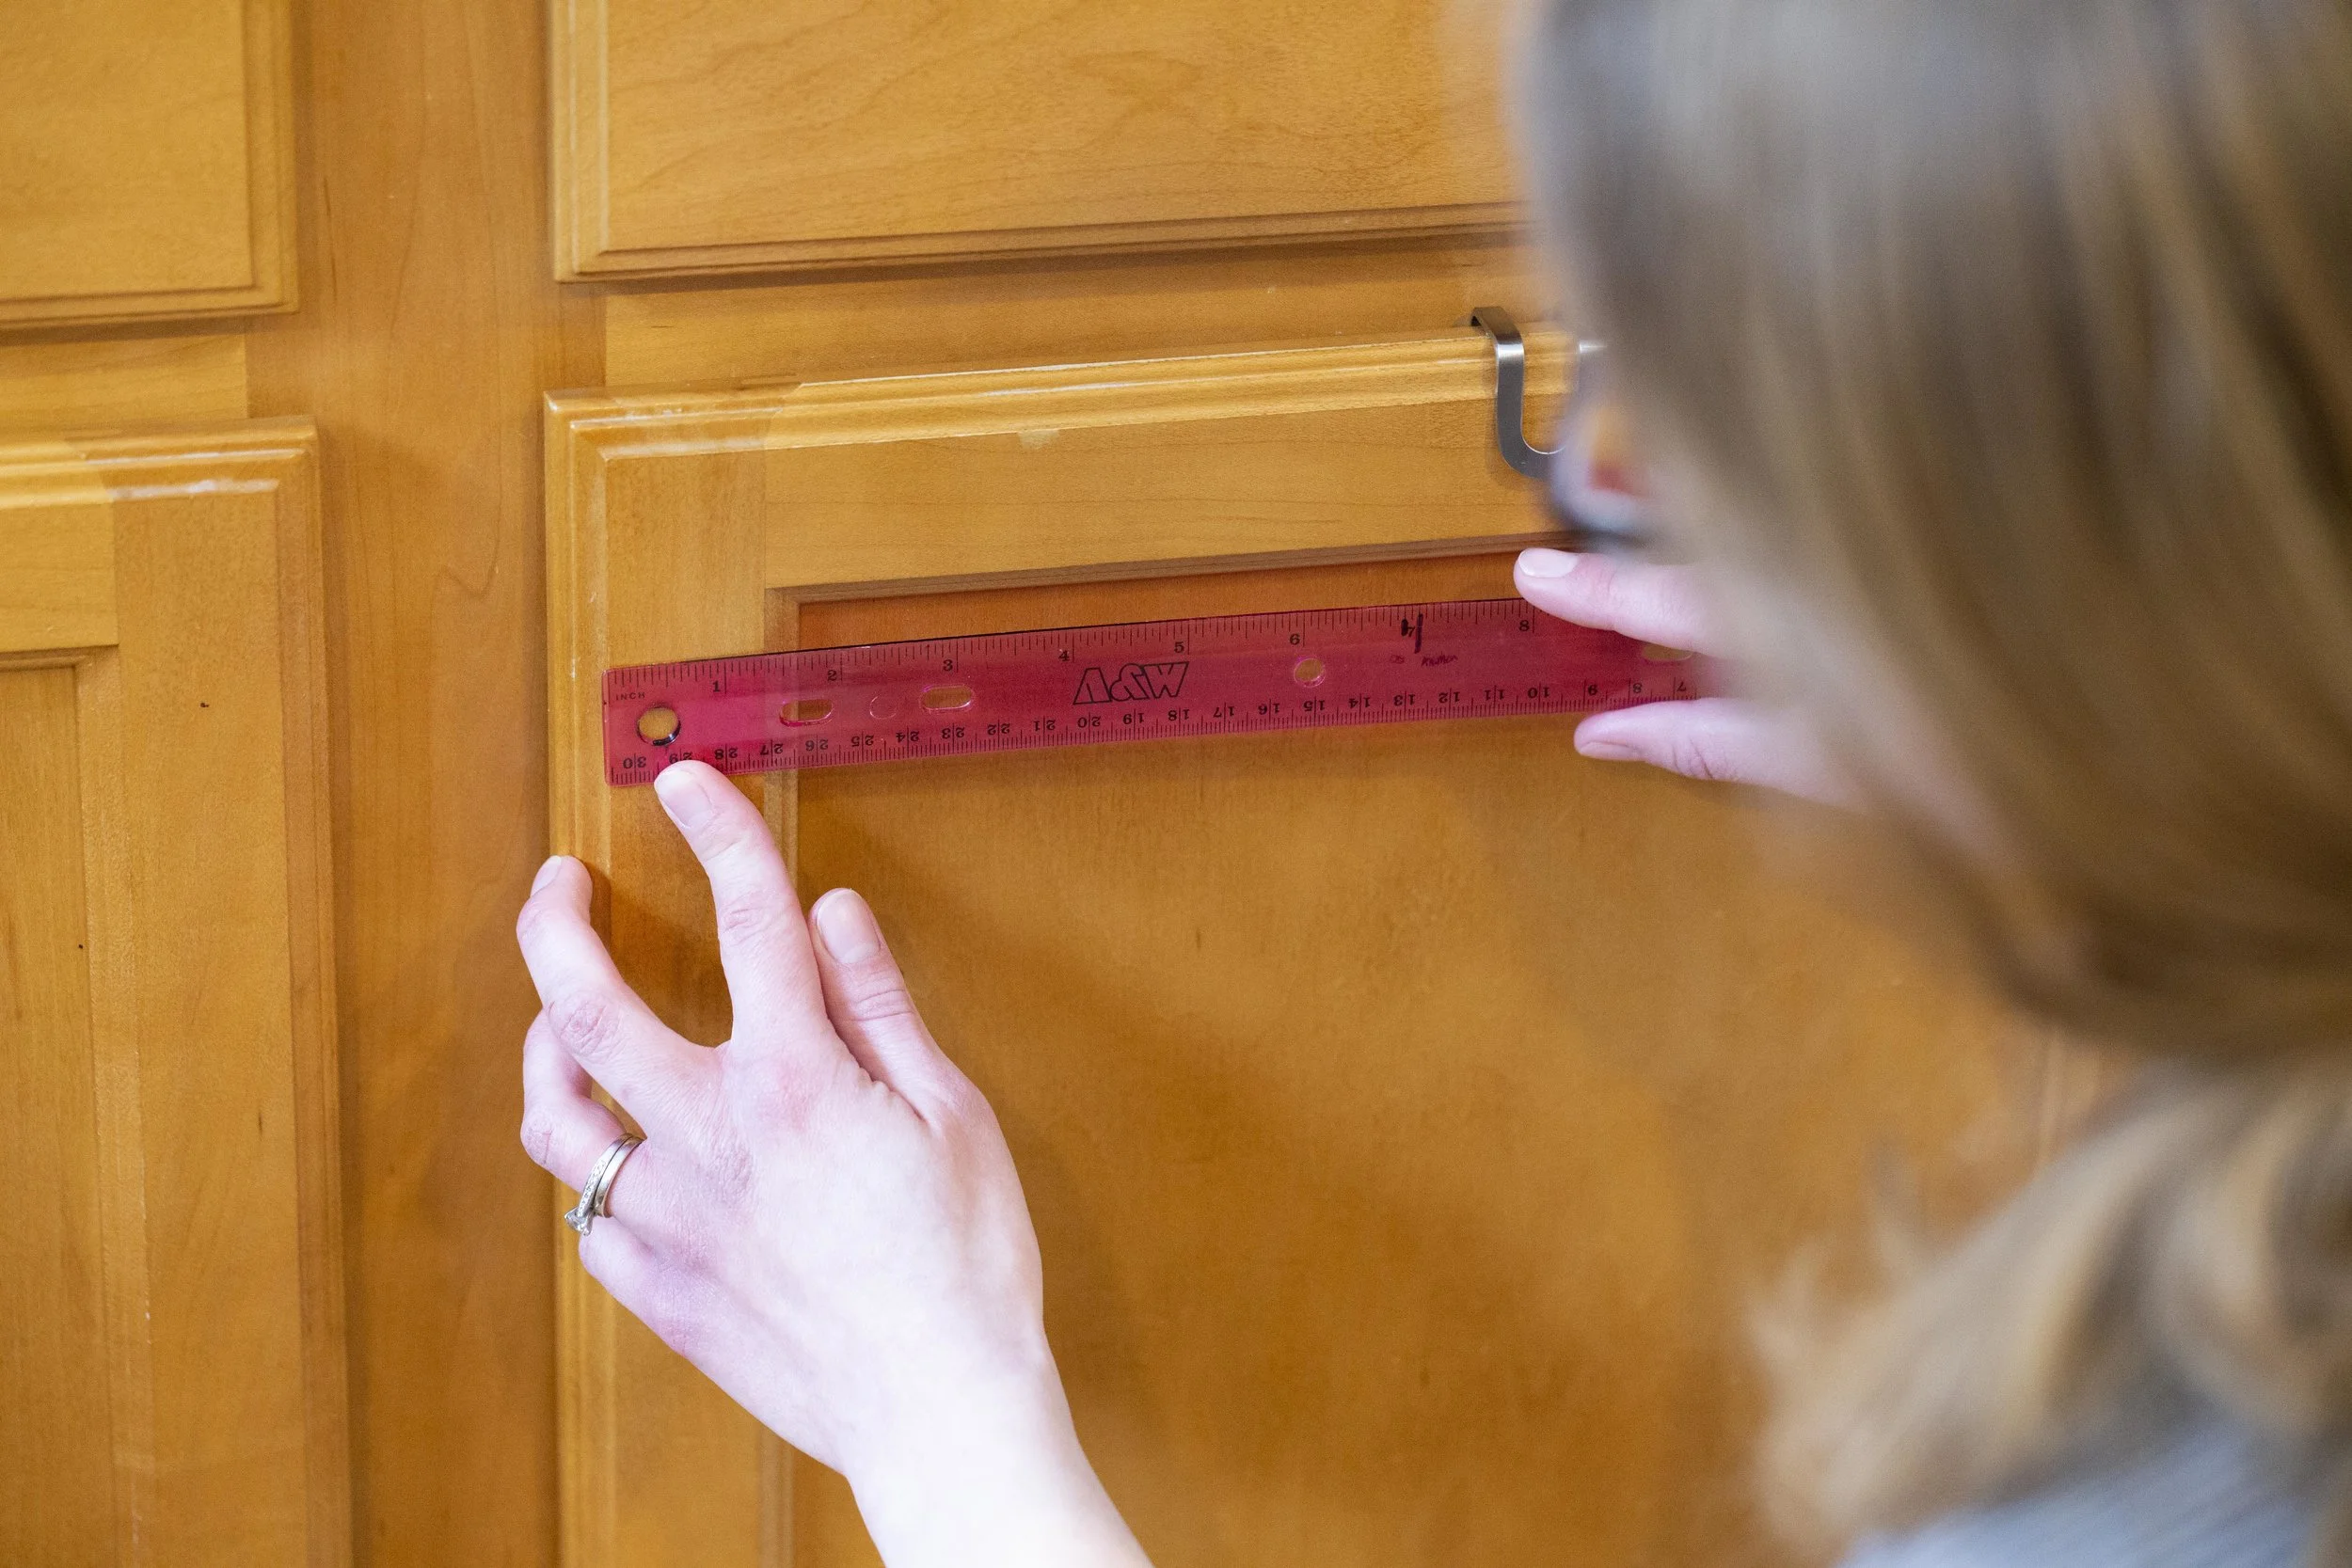
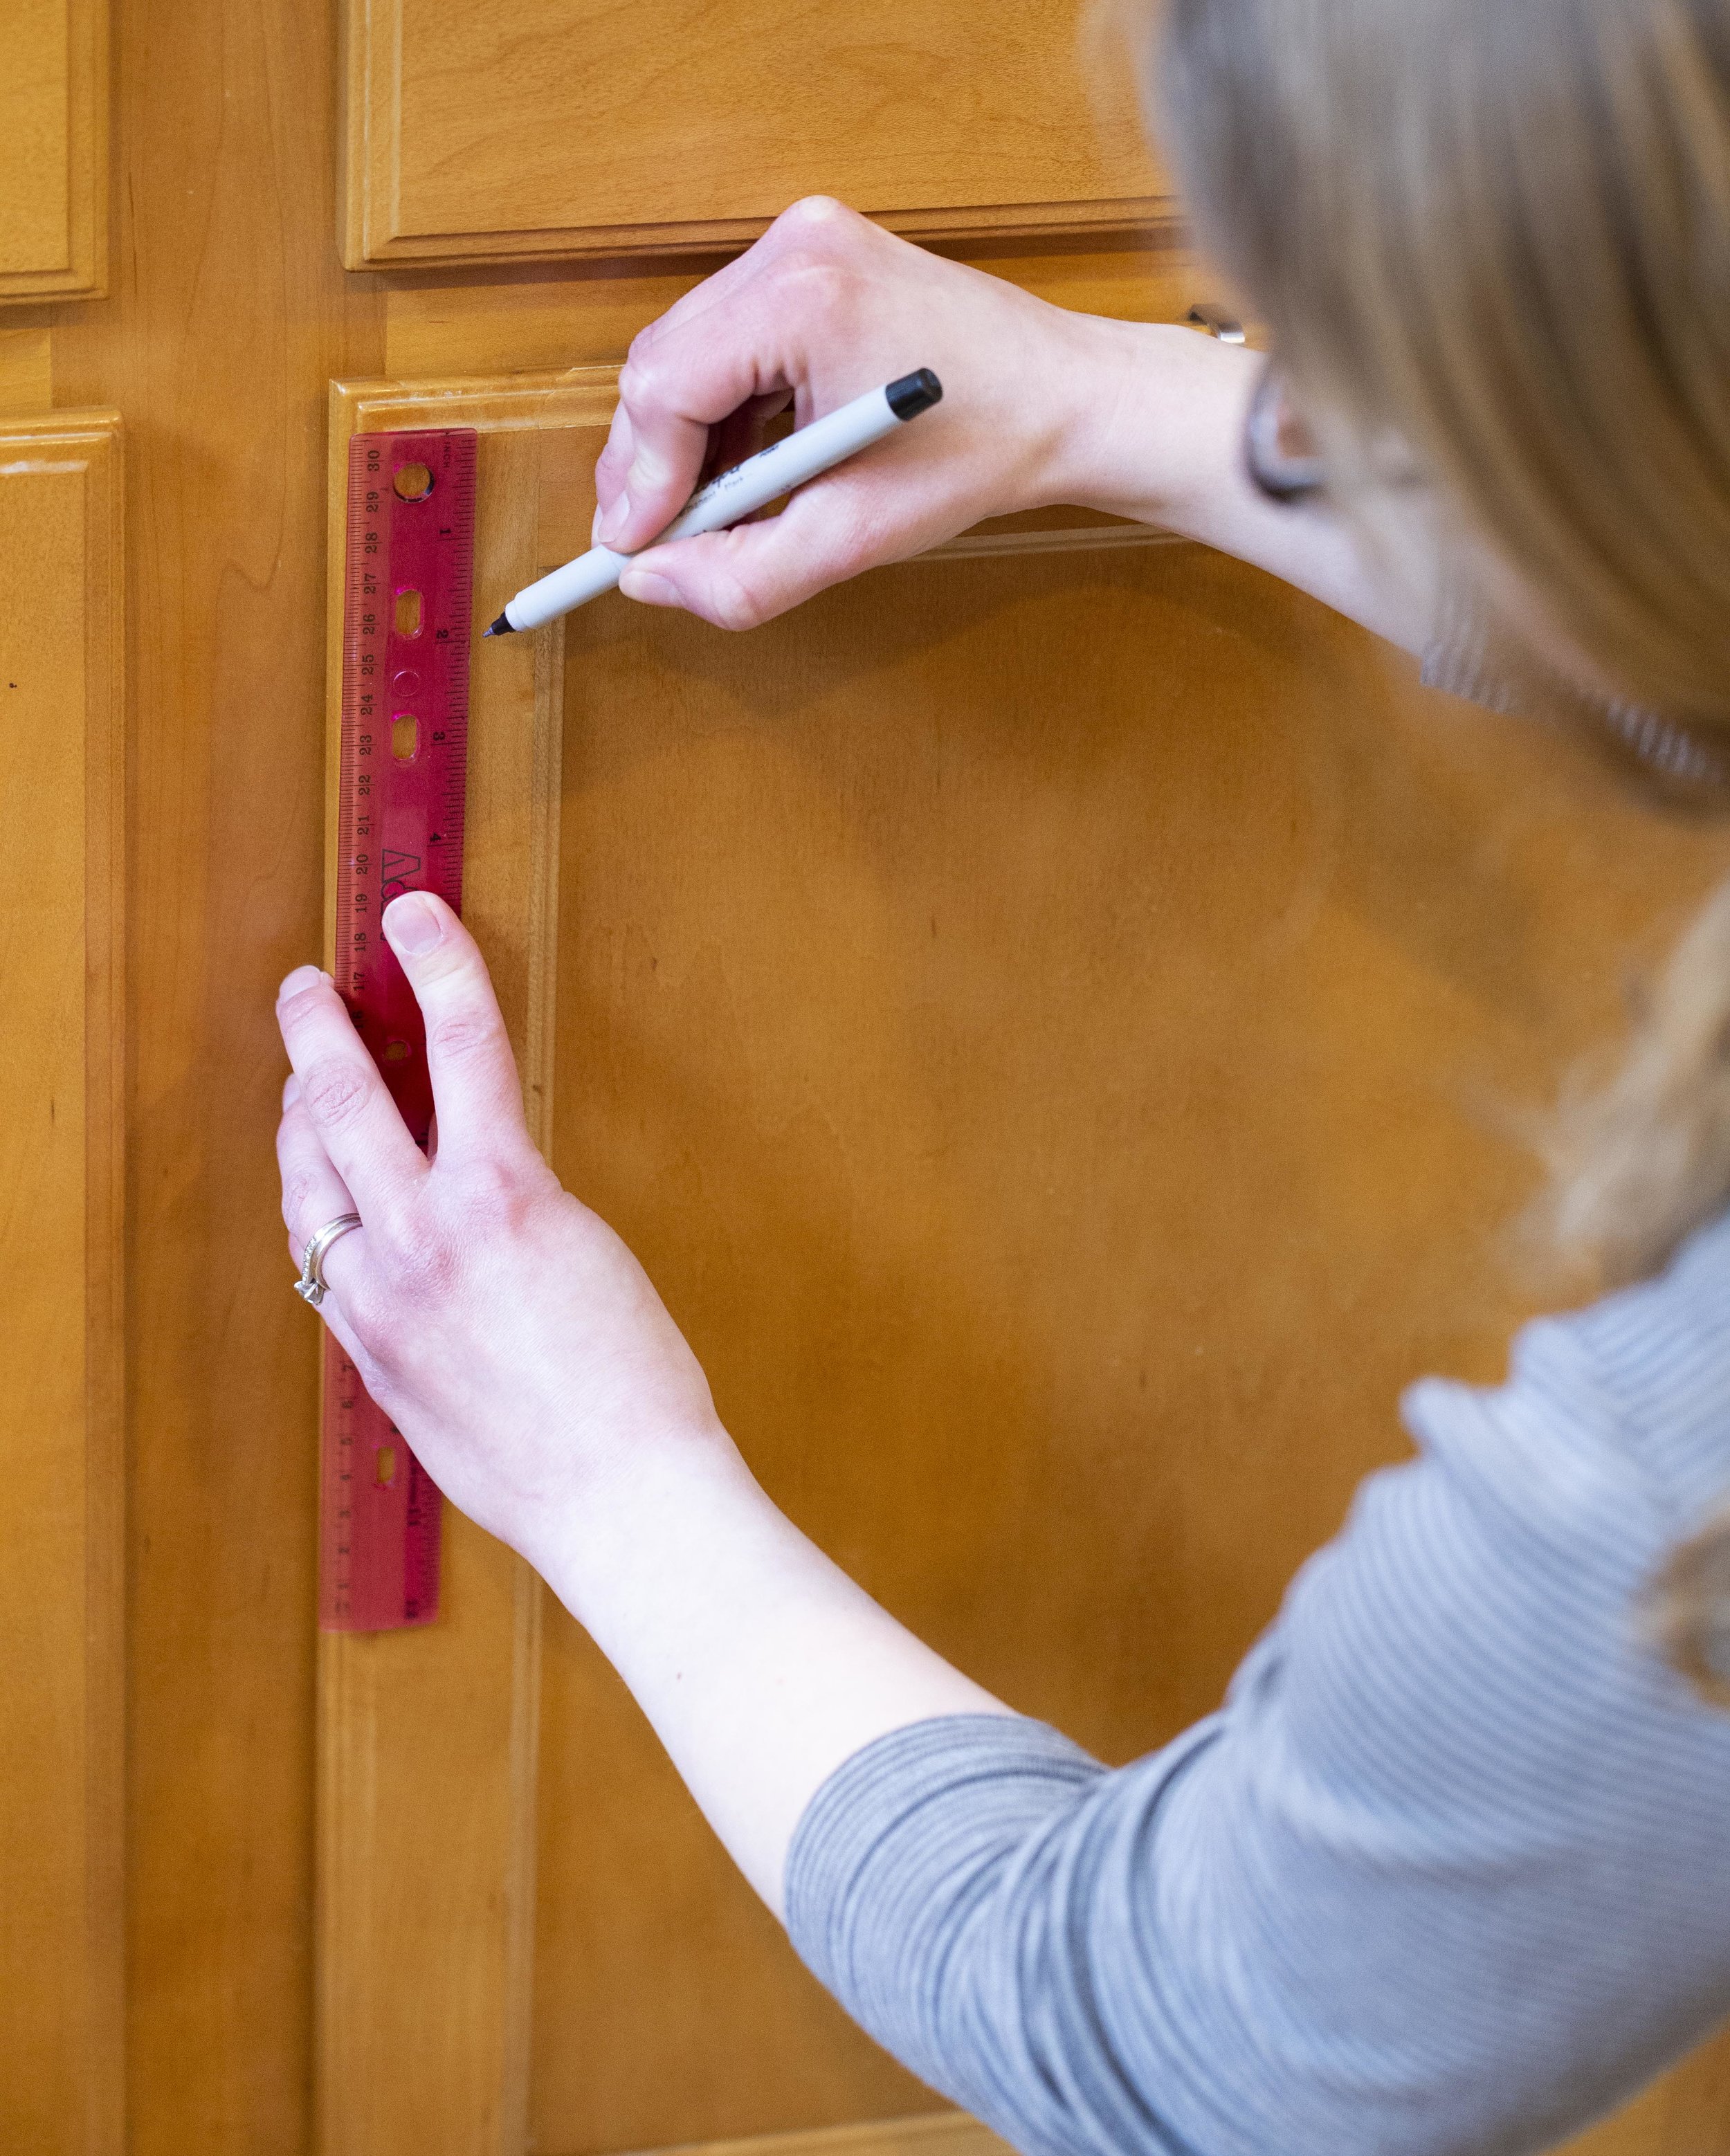
For our cabinets, we decided we liked the knobs two inches from the edge of the cabinet (not including the beveled edge). Once we decided on this placement, it was just a matter of measuring it out on all the cabinet doors so they were centered side-to-side on the trim piece as well as two inches in. Consistency is key to having uniform placement - and I made sure to measure multiple times in both directions before marking it with a pen
It’s important to measure the knobs on each door independently - if the doors aren’t hung evenly, it may look off initially but the hinges can be adjusted later so everything (the doors themselves as well as the hardware) will line up visually.
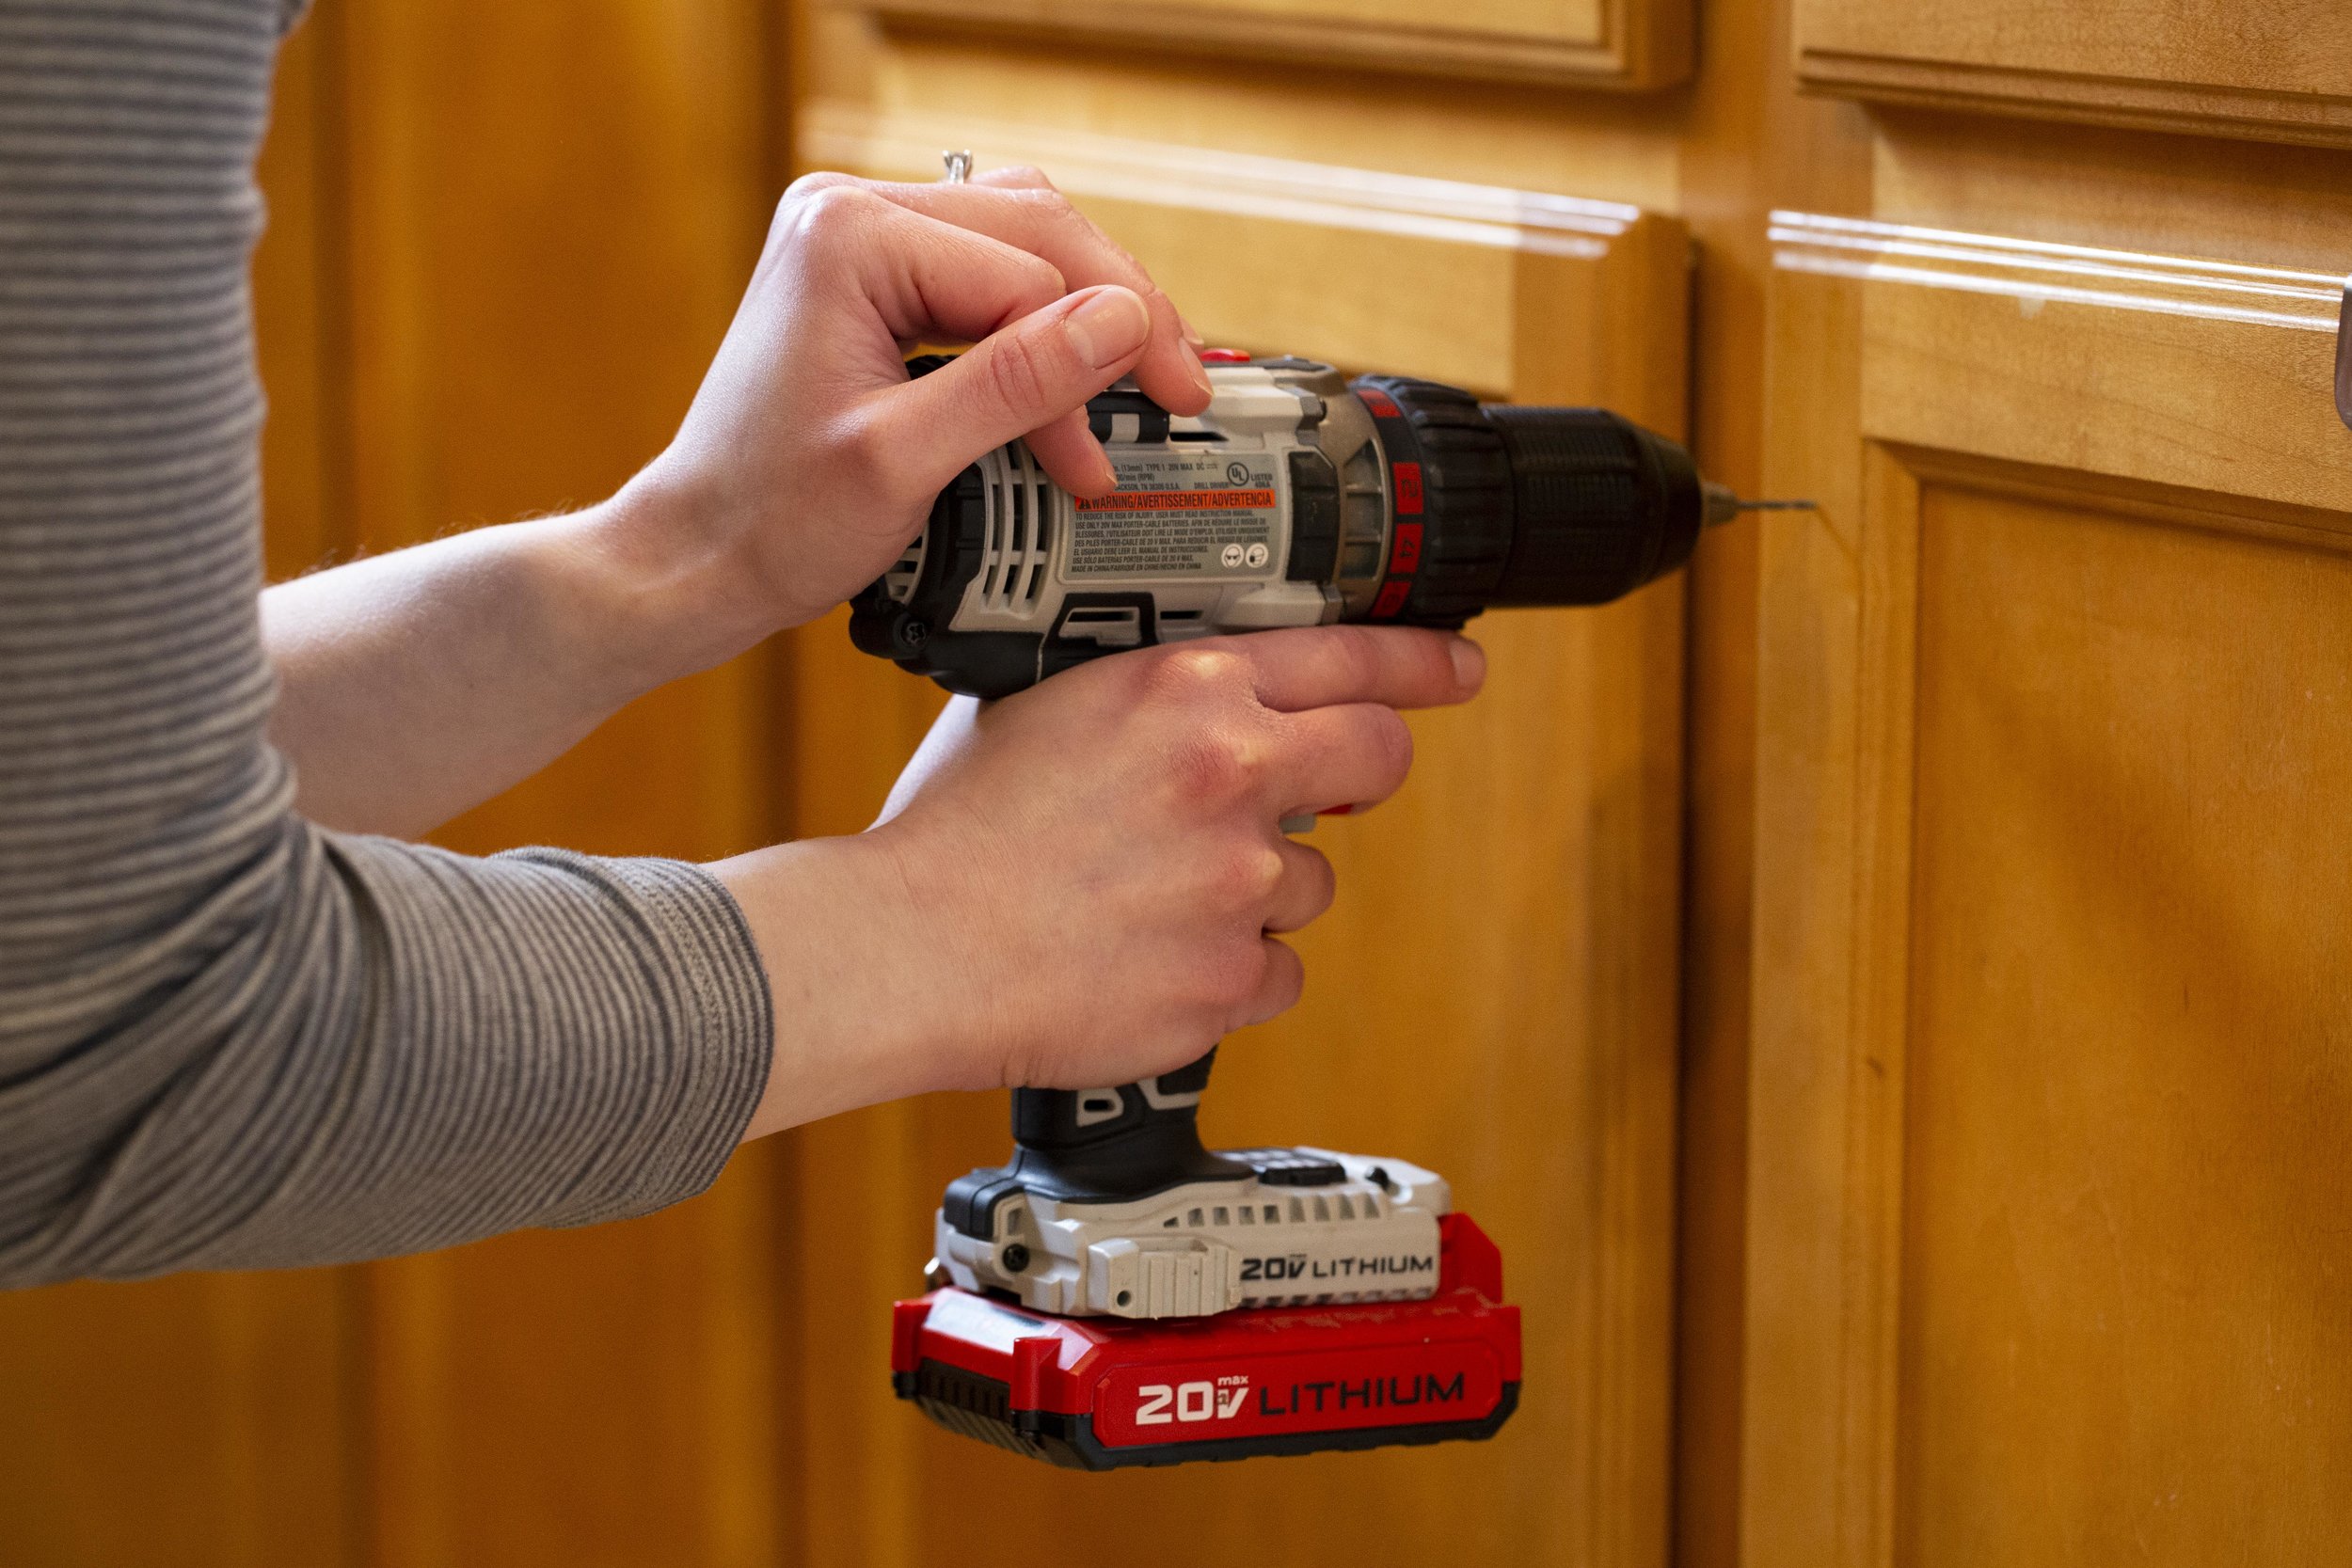
When it comes time to drill the holes, it’s important to make a small pilot (starter) hole before you drill the full size hole. There’s several reasons for this, but the two most important ones being that larger drill bits tend to “walk” when you drill on a smooth surface, and without drilling a pilot hole first you might end up off your mark. The other important reason is that pre-drilling the hole smaller first will help lessen the chance of the wood splitting. Be aware of what’s behind the cabinet front when you drill! Make sure you aren’t drilling into the cabinet frame or dishes that may be in the cabinet behind the door. For the larger hole you’ll want the drill bit diameter to be just barely bigger than the diameter of the screws that come with the hardware.
Once the larger hole is drilled, slide the screw in from the back and use a screwdriver to hold it in place while you thread the knob on snuggly.
Deciding on drawer pull placement. (Note that while the lower cabinet knobs are each in the correct place, they look off since the cabinet doors are uneven - this can be fixed by adjusting the cabinet door hinges, which I did once I was finished installing all the hardware.)
For the drawer pulls I followed a similar procedure as I did for the door fronts. One thing I had to keep in mind though is the drawer pulls I chose aren’t symmetrical top-to-bottom - the mounting screws are towards the bottom of of the pulls. Therefore, playing around with the placement of the drawer pulls was very important - the drawer pulls needed to look centered visually from top to bottom on the drawer fronts, even though that made for the screw placement to be slightly below center.
Once I liked the visual placement of the paper templates I carefully measured out the spacing on each side as well as down from the screw holes to make sure everything was accurate and even. These particular drawer pulls have screws 3” apart so I made sure that the spacing between the screw markings was accurate as well. (Once you get an idea of placement, you could also use a Cabinet Hardware Template here to help mark everything out.) In our kitchen the drawers are three different sizes, so this process needed to be repeated several times - on the shorter drawers I used one pull, and on the longer drawer I used two pulls.
After the hole placements were marked, I remeasured the spacings several times before drilling the pilot holes and then the screw holes. Then it’s simply a matter of screwing the screws in from the backside of the drawers with a screwdriver into the drawer pulls.
AFTER
And that’s it - the whole project took less than an afternoon to do and it really helps our kitchen look more finished. I just love how it came out! Once we replace our countertops with a more modern granite counter the space will really look sharp and the hardware will compliment it beautifully.
GIVEAWAY!
Head on over to our Instagram for details and to enter our Giveaway with Cosmas Hardware for a $50 shop credit so you can update the look of your kitchen too with the hardware of your choice!
- I received these items from Cosmas Hardware but all opinions expressed are my own. Please read our full Disclosure Policy for more information -
Disclaimer: Installing new cabinet hardware from scratch is something that most people can very easily do on their own and here I’ve shared my tips on the easiest way I’ve personally found to measure and install them. However, use your best judgement when installing your hardware - if you’re in doubt of your measuring or drilling skills, there’s no harm in consulting a professional before you tackle this or any project.
Okay, okay - so saying a hashtag "changed my life" is a bit dramatic, but let me explain...
As a Mom, you spend your entire day cleaning up after others... toys, food, diapers, everything - and at the end of the day the last thing you want to do is clean up more. Before kids I used to be good about keeping an empty sink and clean counters, but these days once the kids were in bed I just wanted to be done and the kitchen was left in disarray almost every night. However after seeing An Organized Life's Instagram hashtag #cleankitchenatnight, I was inspired and had to try it! | This post contains affiliate links |
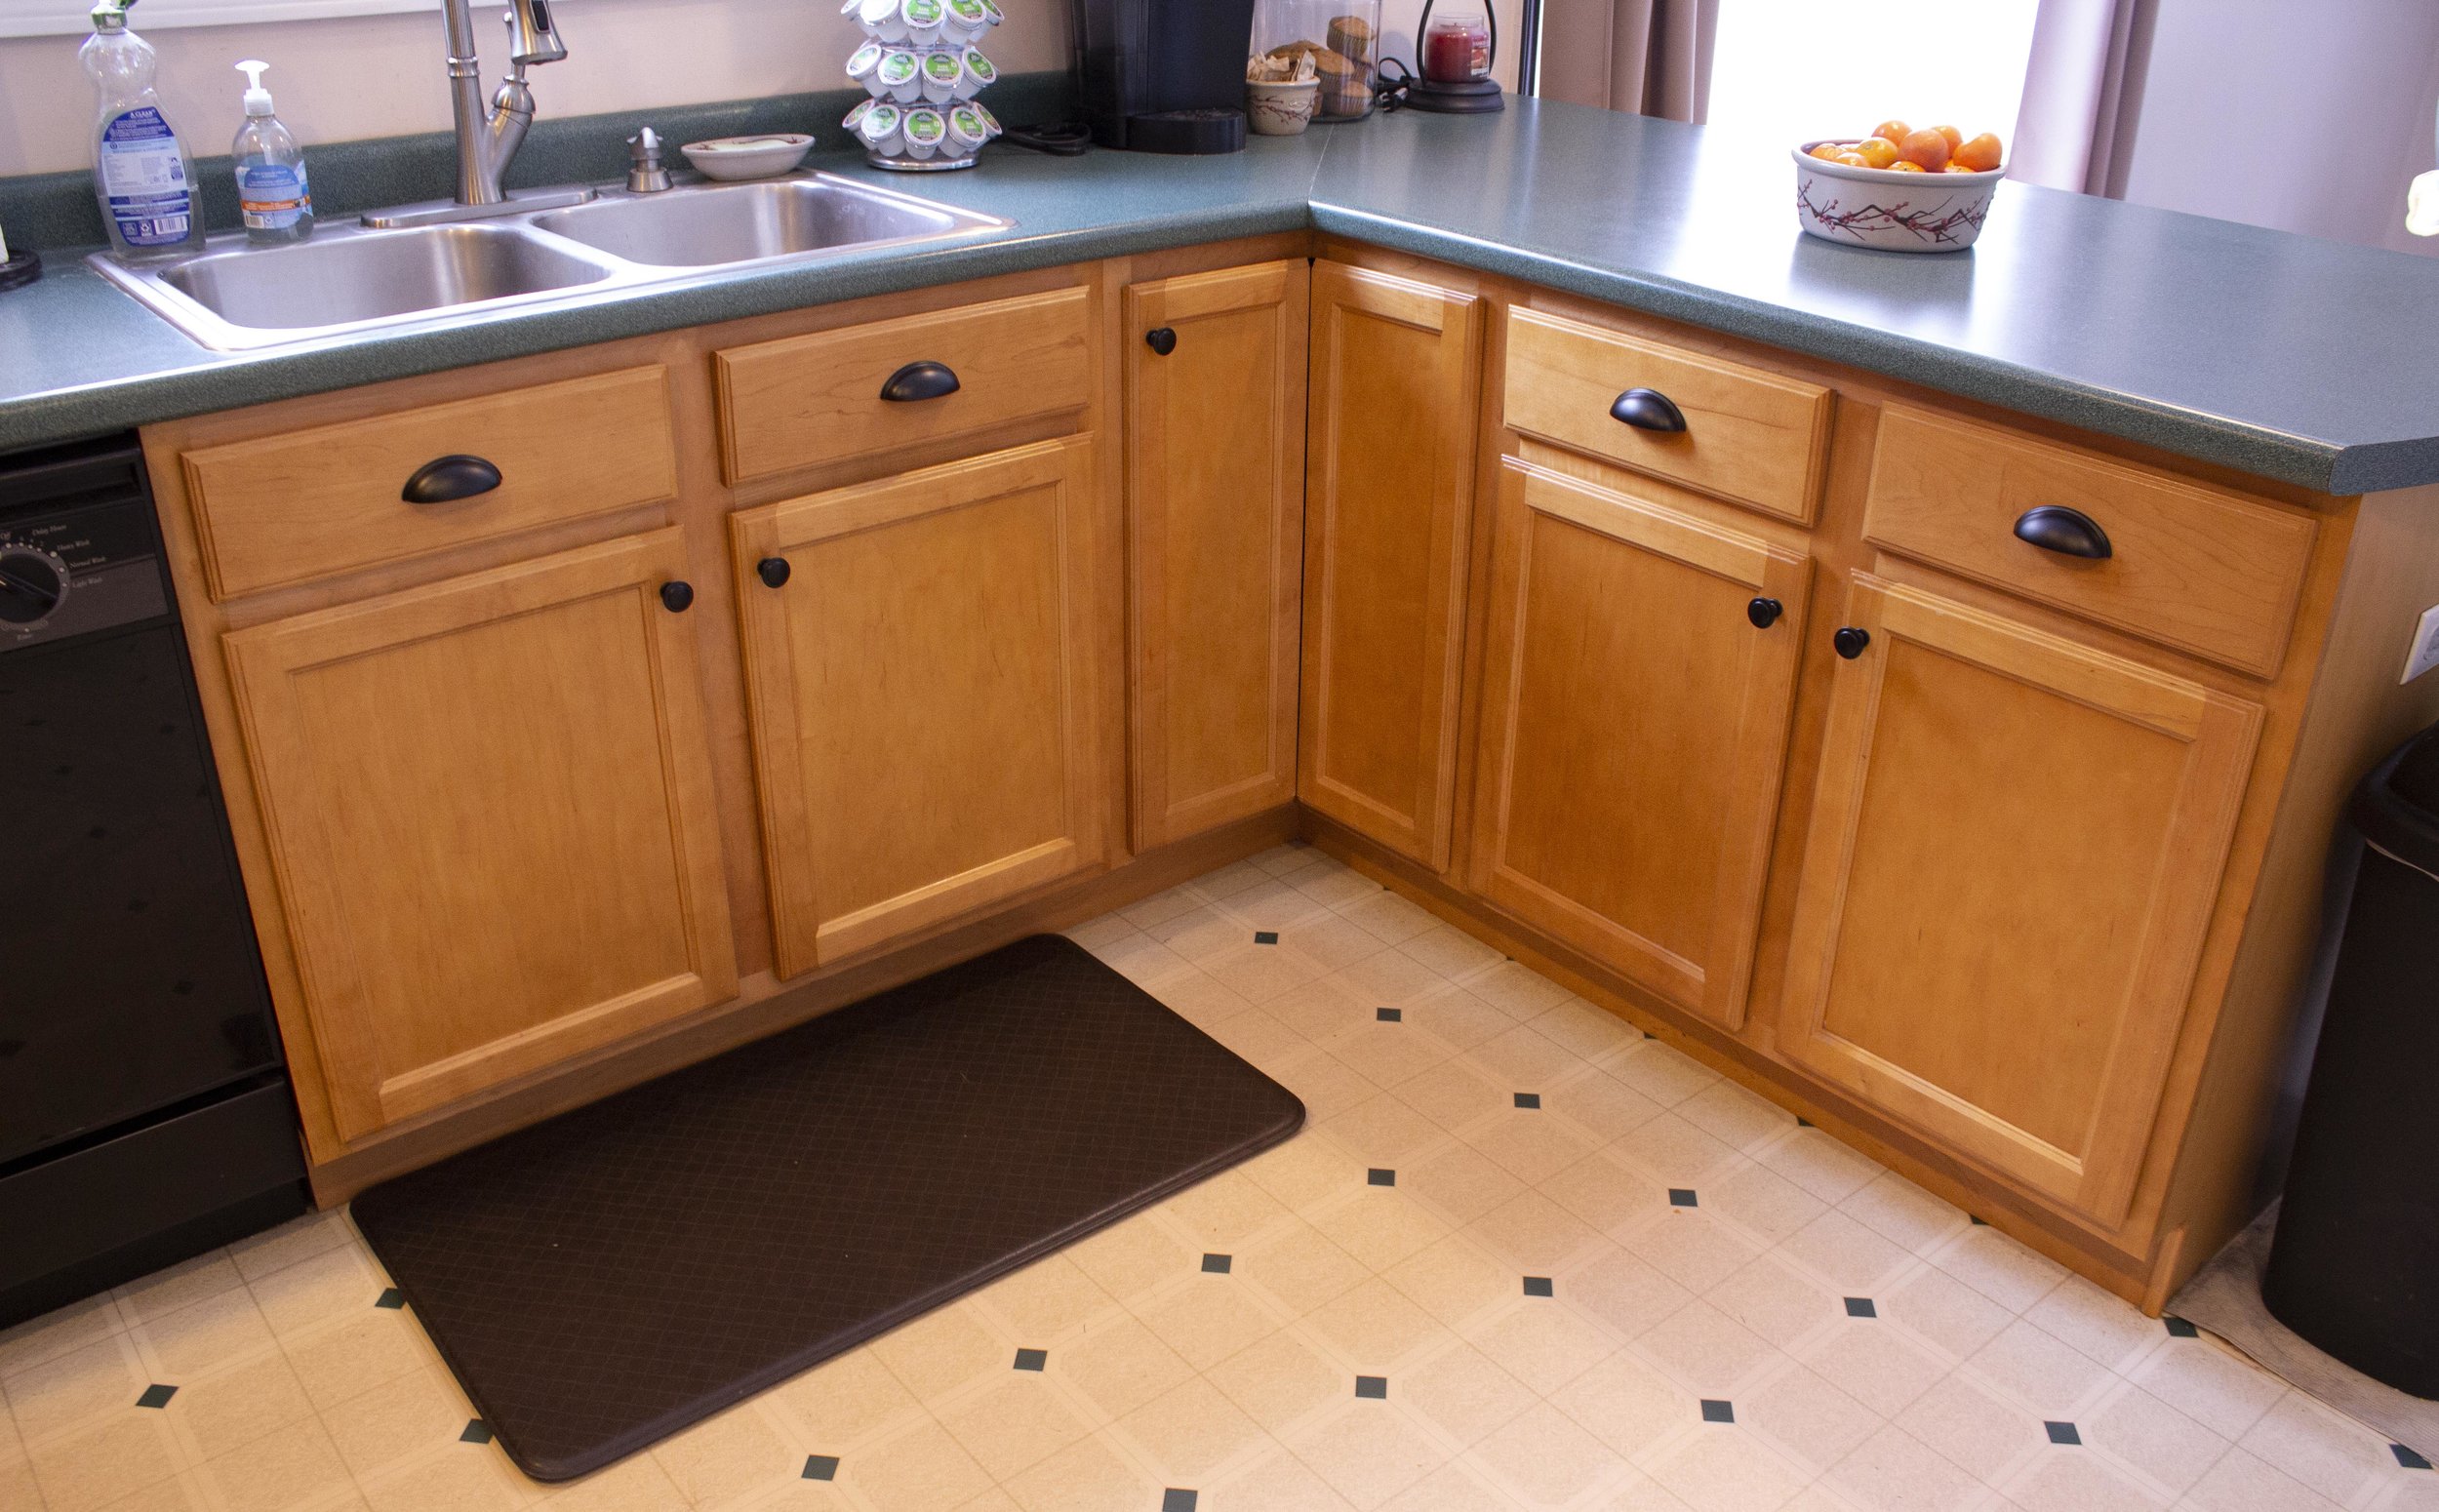
The whole point of "clean kitchen at night" is that it's a great motivator. Having a clean kitchen and clean slate to wake up to in the morning helps set a less-stressful and more motivated tone for the rest of your day, in all aspects of your life. It's so refreshing to see clean counters and an empty sink. Making meals throughout the day is so much easier too when all of the dishes, pans, and silverware are ready to go! I don't know how many times before I would go to make a meal, only to realize a specific pan, measuring cup, or casserole dish I needed was still dirty from the day before. Now meal prep is so much easier and quicker, simply because everything is already clean.
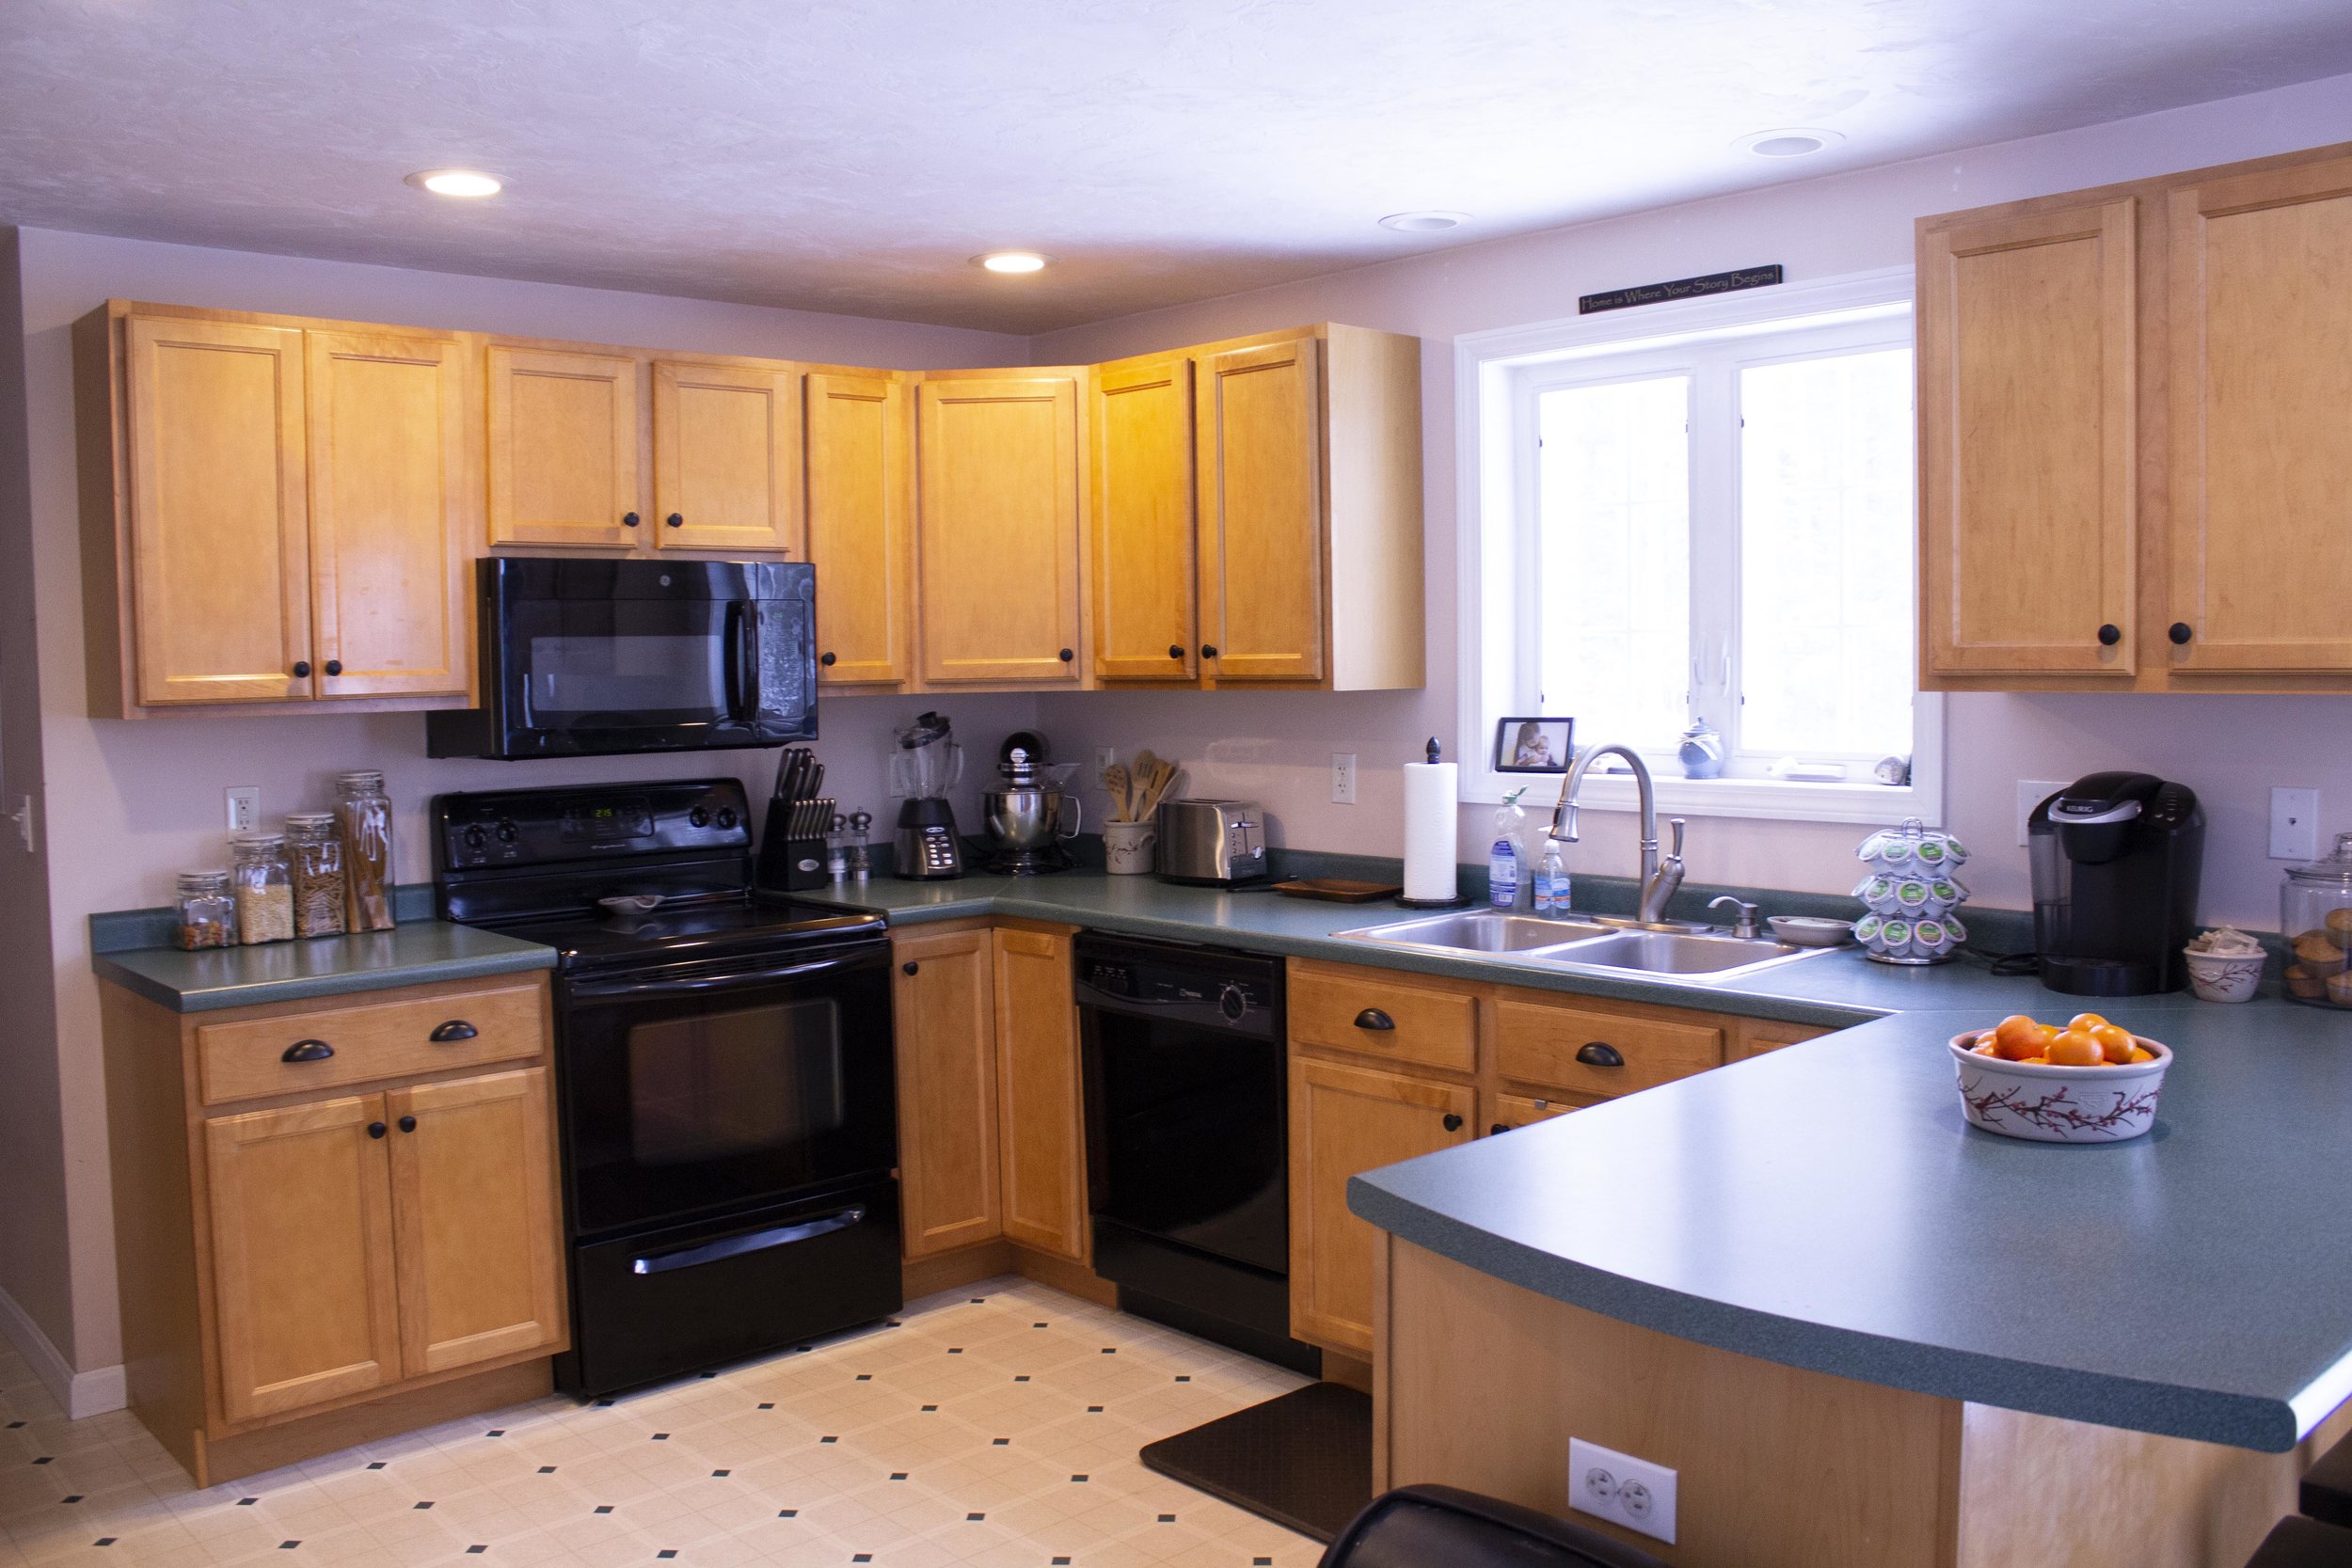
Now, we don’t have an “Instagram-worthy” kitchen… it still has the honey-colored maple cabinets and green (yes, green) builder-grade laminate counters. But trust me in that you don’t need a picture-perfect kitchen to feel the sense of accomplishment and motivation in leaving everything in a clean and organized state each and every night.
As cheesy as it sounds, having a clean kitchen really does reduce stress and brings some peace to normally chaotic mornings. And I’ve found this motivation snowballs into all other areas of my life too - I feel so much more productive in work and efficient in accomplishing my to-do list every day. There's a saying that goes something like "cluttered house, cluttered mind" - and it's true... if you surround yourself with messes and clutter you feel it. If you have a sense of control over your house, even if it's just the kitchen, it makes you feel like you have life together (even if you don't, haha).
Don’t believe me that “Clean Kitchen at Night” really makes a difference?
I challenge you to give it a try! For the next week, I challenge you to make a point to clear out the sink, clean the clutter off the countertops, and wipe down your whole kitchen every night. It can be hard work at first, but once you get in the rhythm it goes quick - especially when you’re only picking up that day’s mess and not messes from previous days too. Try it for a week and let me know if you feel less stressed and more motivated across all aspects of your life - I hope you do!
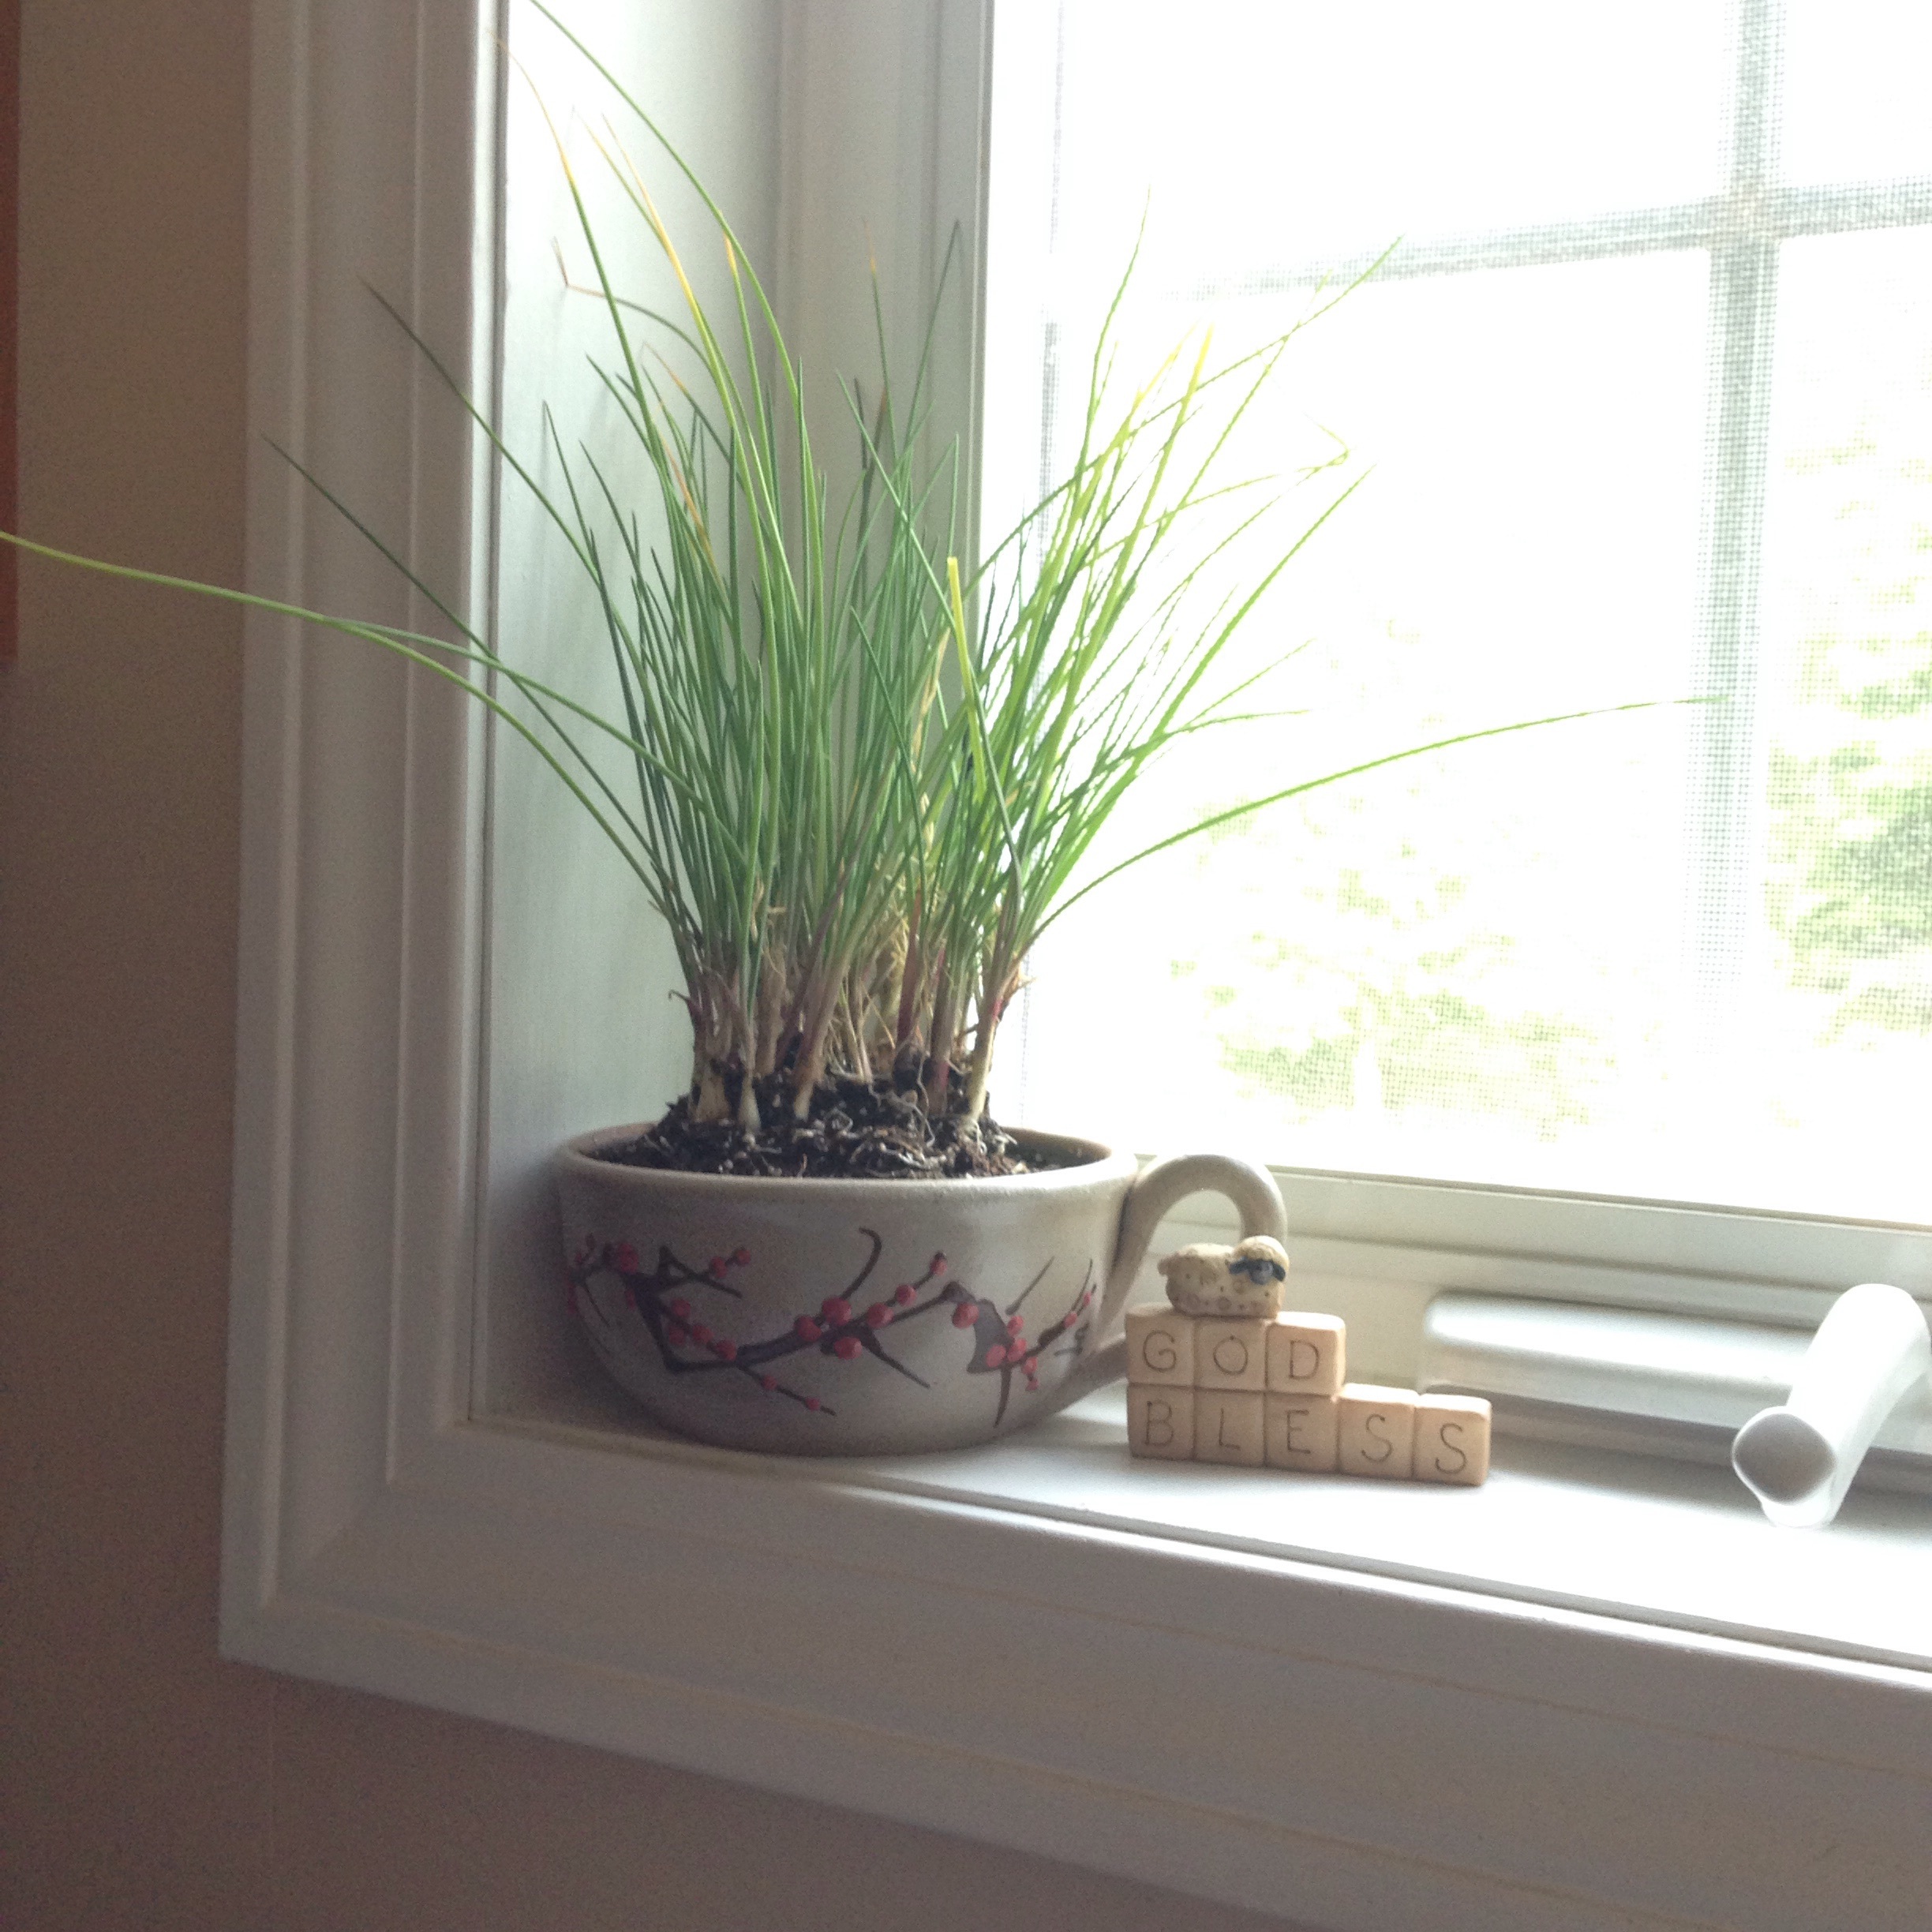
Ever have a favorite mug but the handle broke? :( Well that very thing happened to this great Salmon Falls Chowder Mug I have. I superglued it back together and while the repair looked pretty good I didn't dare trust it to hold a piping hot cup of soup or coffee over my lap anymore. I was thinking of tossing it but decided to repurpose it into a little herb planter for the kitchen instead.
The first step was to fill the bottom with some gravel so my herbs won't sit directly in water. Alternatively, you could drill a hole in the bottom for drainage and put a saucer underneath, but since I don't have anything to put under the mug that matches I decided to use it as-is.
Then I filled it with dirt and added an Italian Chive plant I picked up at the local garden center and it was done! (Pretty easy, right?) Depending on the size of your mug and your plants, you could add more than one type of herb in it. You could also grow your herbs from seed.
Now I just need to keep it on a sunny windowsill and water it very carefully as needed. Keep in mind since there's no drainage hole at the bottom and it's a small container, it would be very easy to over-water a plant like this.
If you have a little one then you likely have a pile of bibs somewhere, probably taking up a drawer in the kitchen. For us, using a drawer wasn't an option - we only have three. Yes, three drawers in the entire kitchen.. ugh. So I tried to think of another way to store the bibs out-of-sight but still accessible.
My solution was to pick up one of those "over the cupboard door" towel hooks. I made sure to get one that had a good-sized hook on it to accommodate all the bibs. Then I just put it facing into the cupboard where we keep all the kid dishes and hung all the bibs from there - done!