I'm a wife, stay-at-home mom, crafter, and blogger living in rural New England. As seen in Martha Stewart Living, Food Network Magazine, and more! | Tutorials, DIY, crafts, parenting tips, recipes, money saving tips, product reviews, local product features, New England living, intentional living, and more! |
Our kitchen was lacking a pantry, so we often kept canned goods and backstock on a shelving unit at the foot of our stairs in the basement. But because half of our food and snacks were downstairs and half were upstairs it made for frequent mistakes when buying groceries… it was hard to visualize exactly what we had and where so we often ended up overbuying certain things and forgetting to buy others. Tired of wasting money, food, and time running up and down the stairs I decided to make over a coat closet into a functional pantry. | This post contains affiliate links |
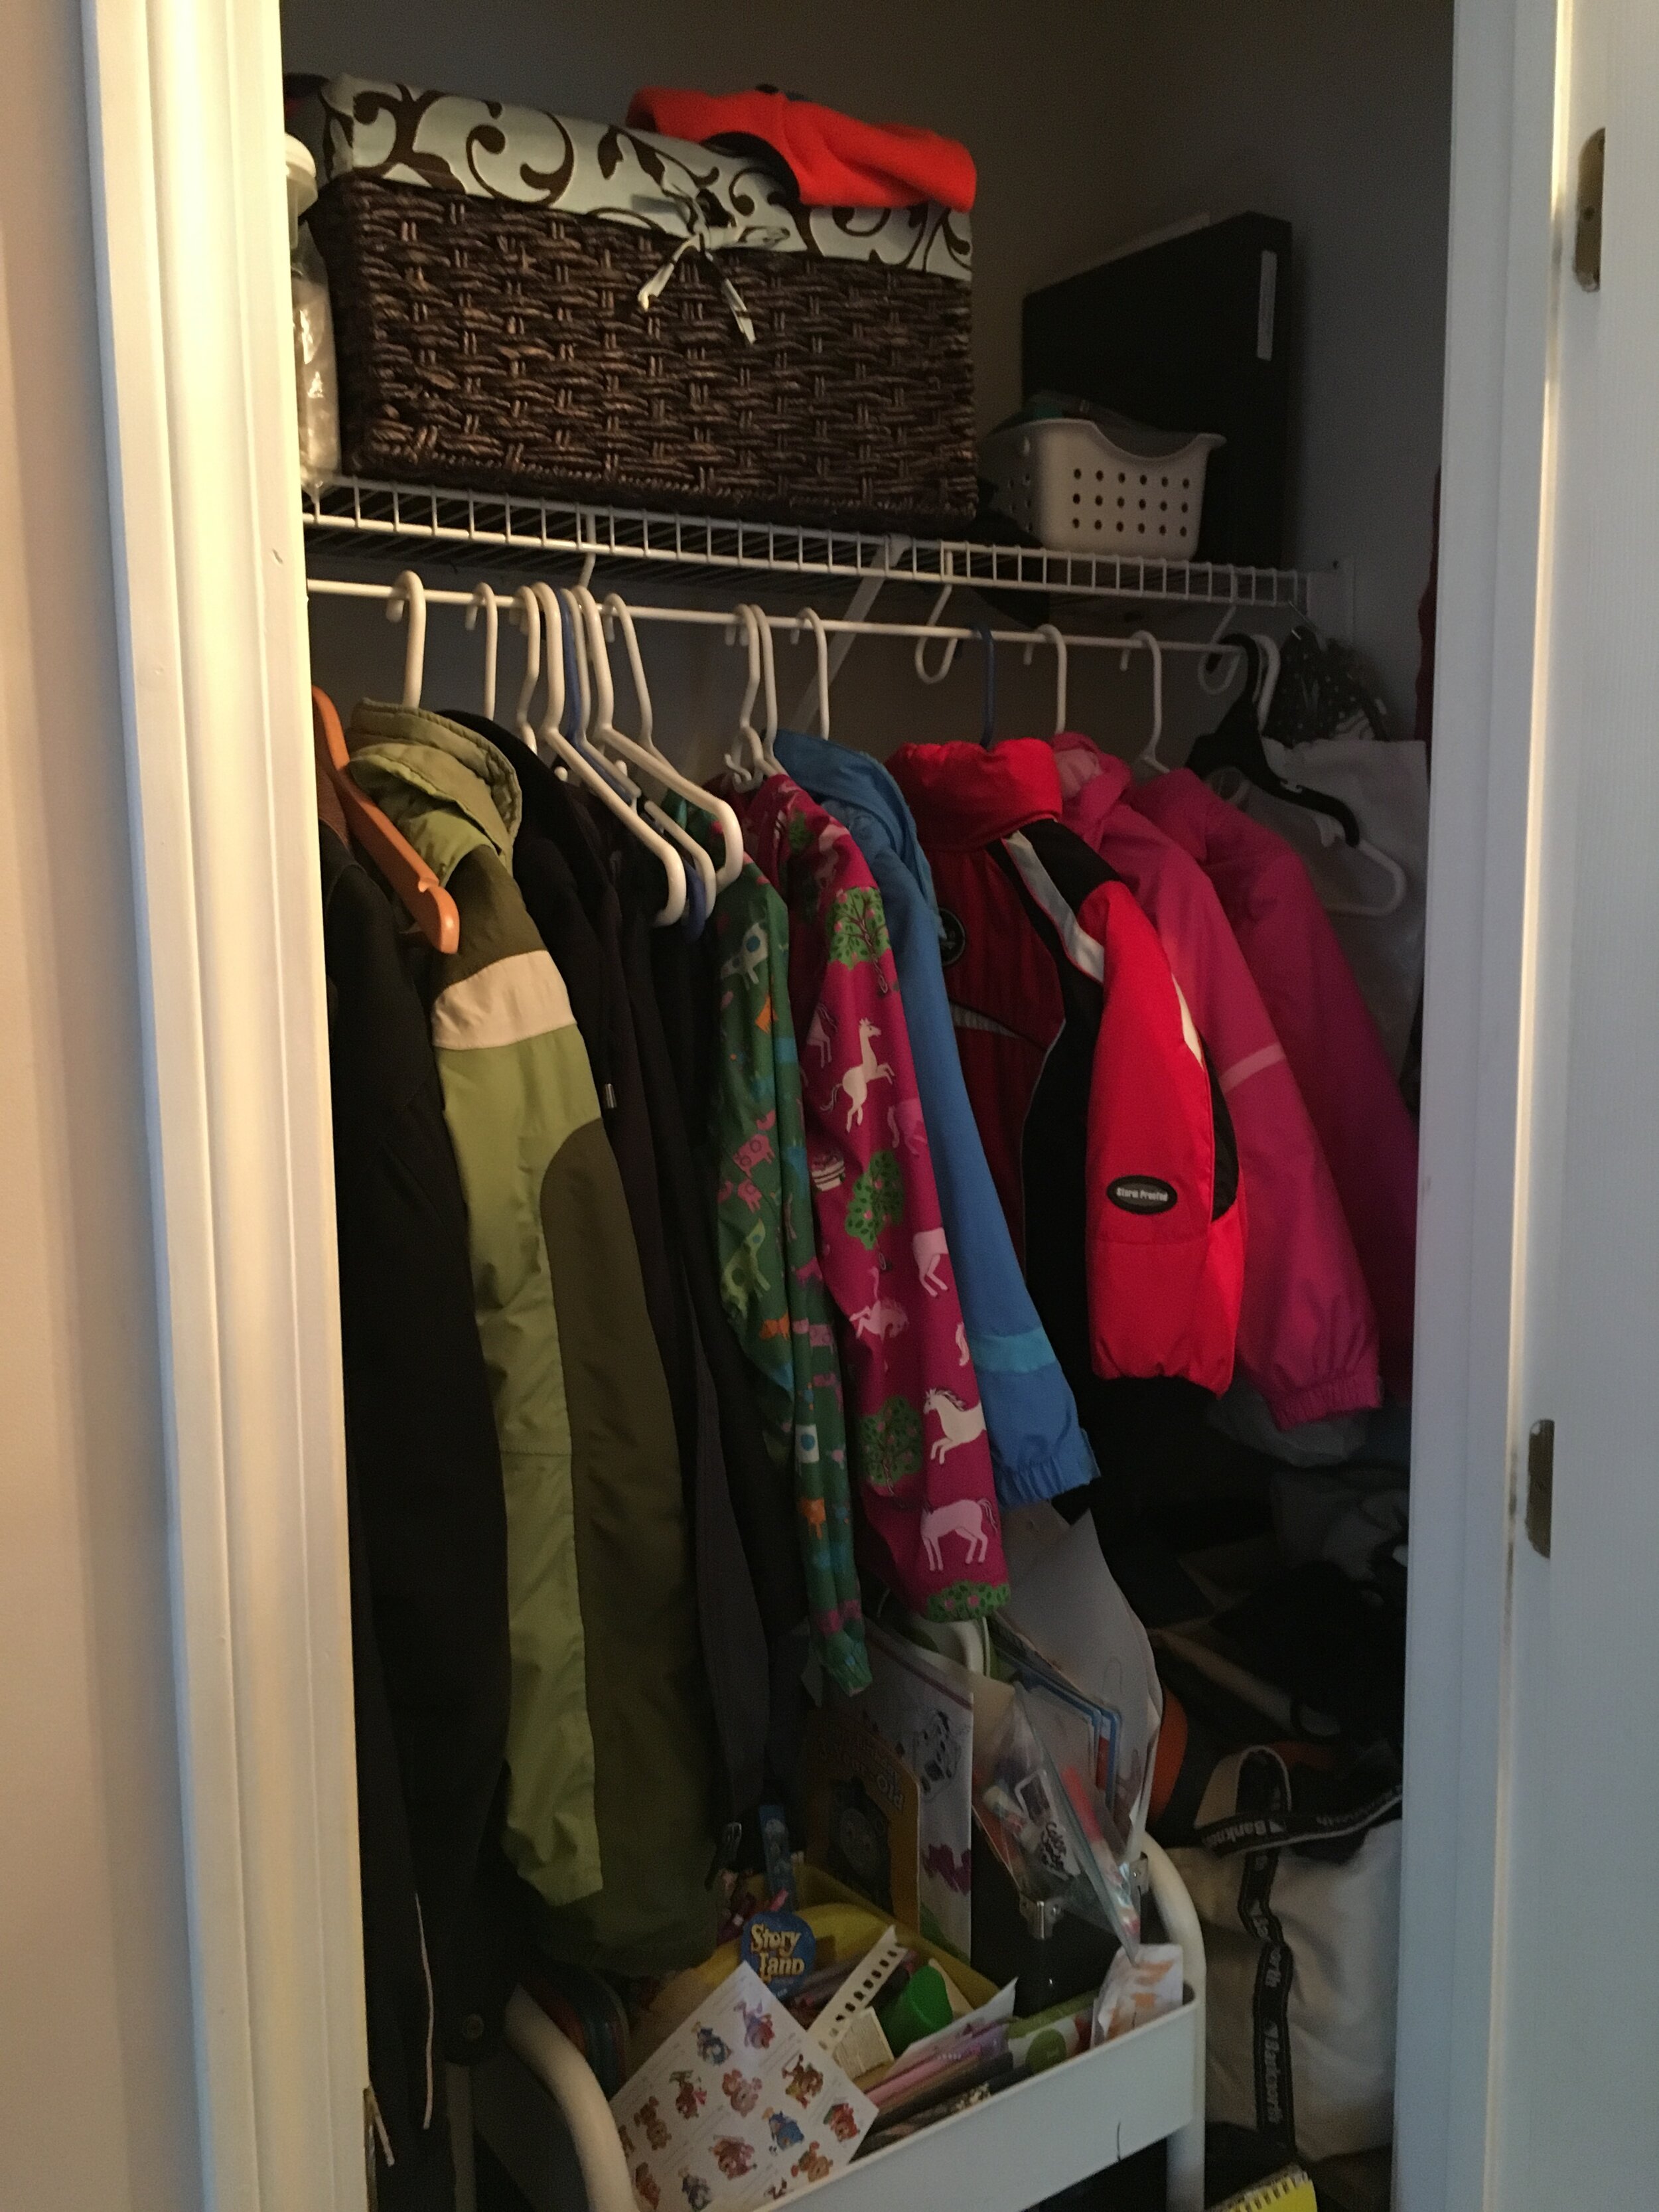
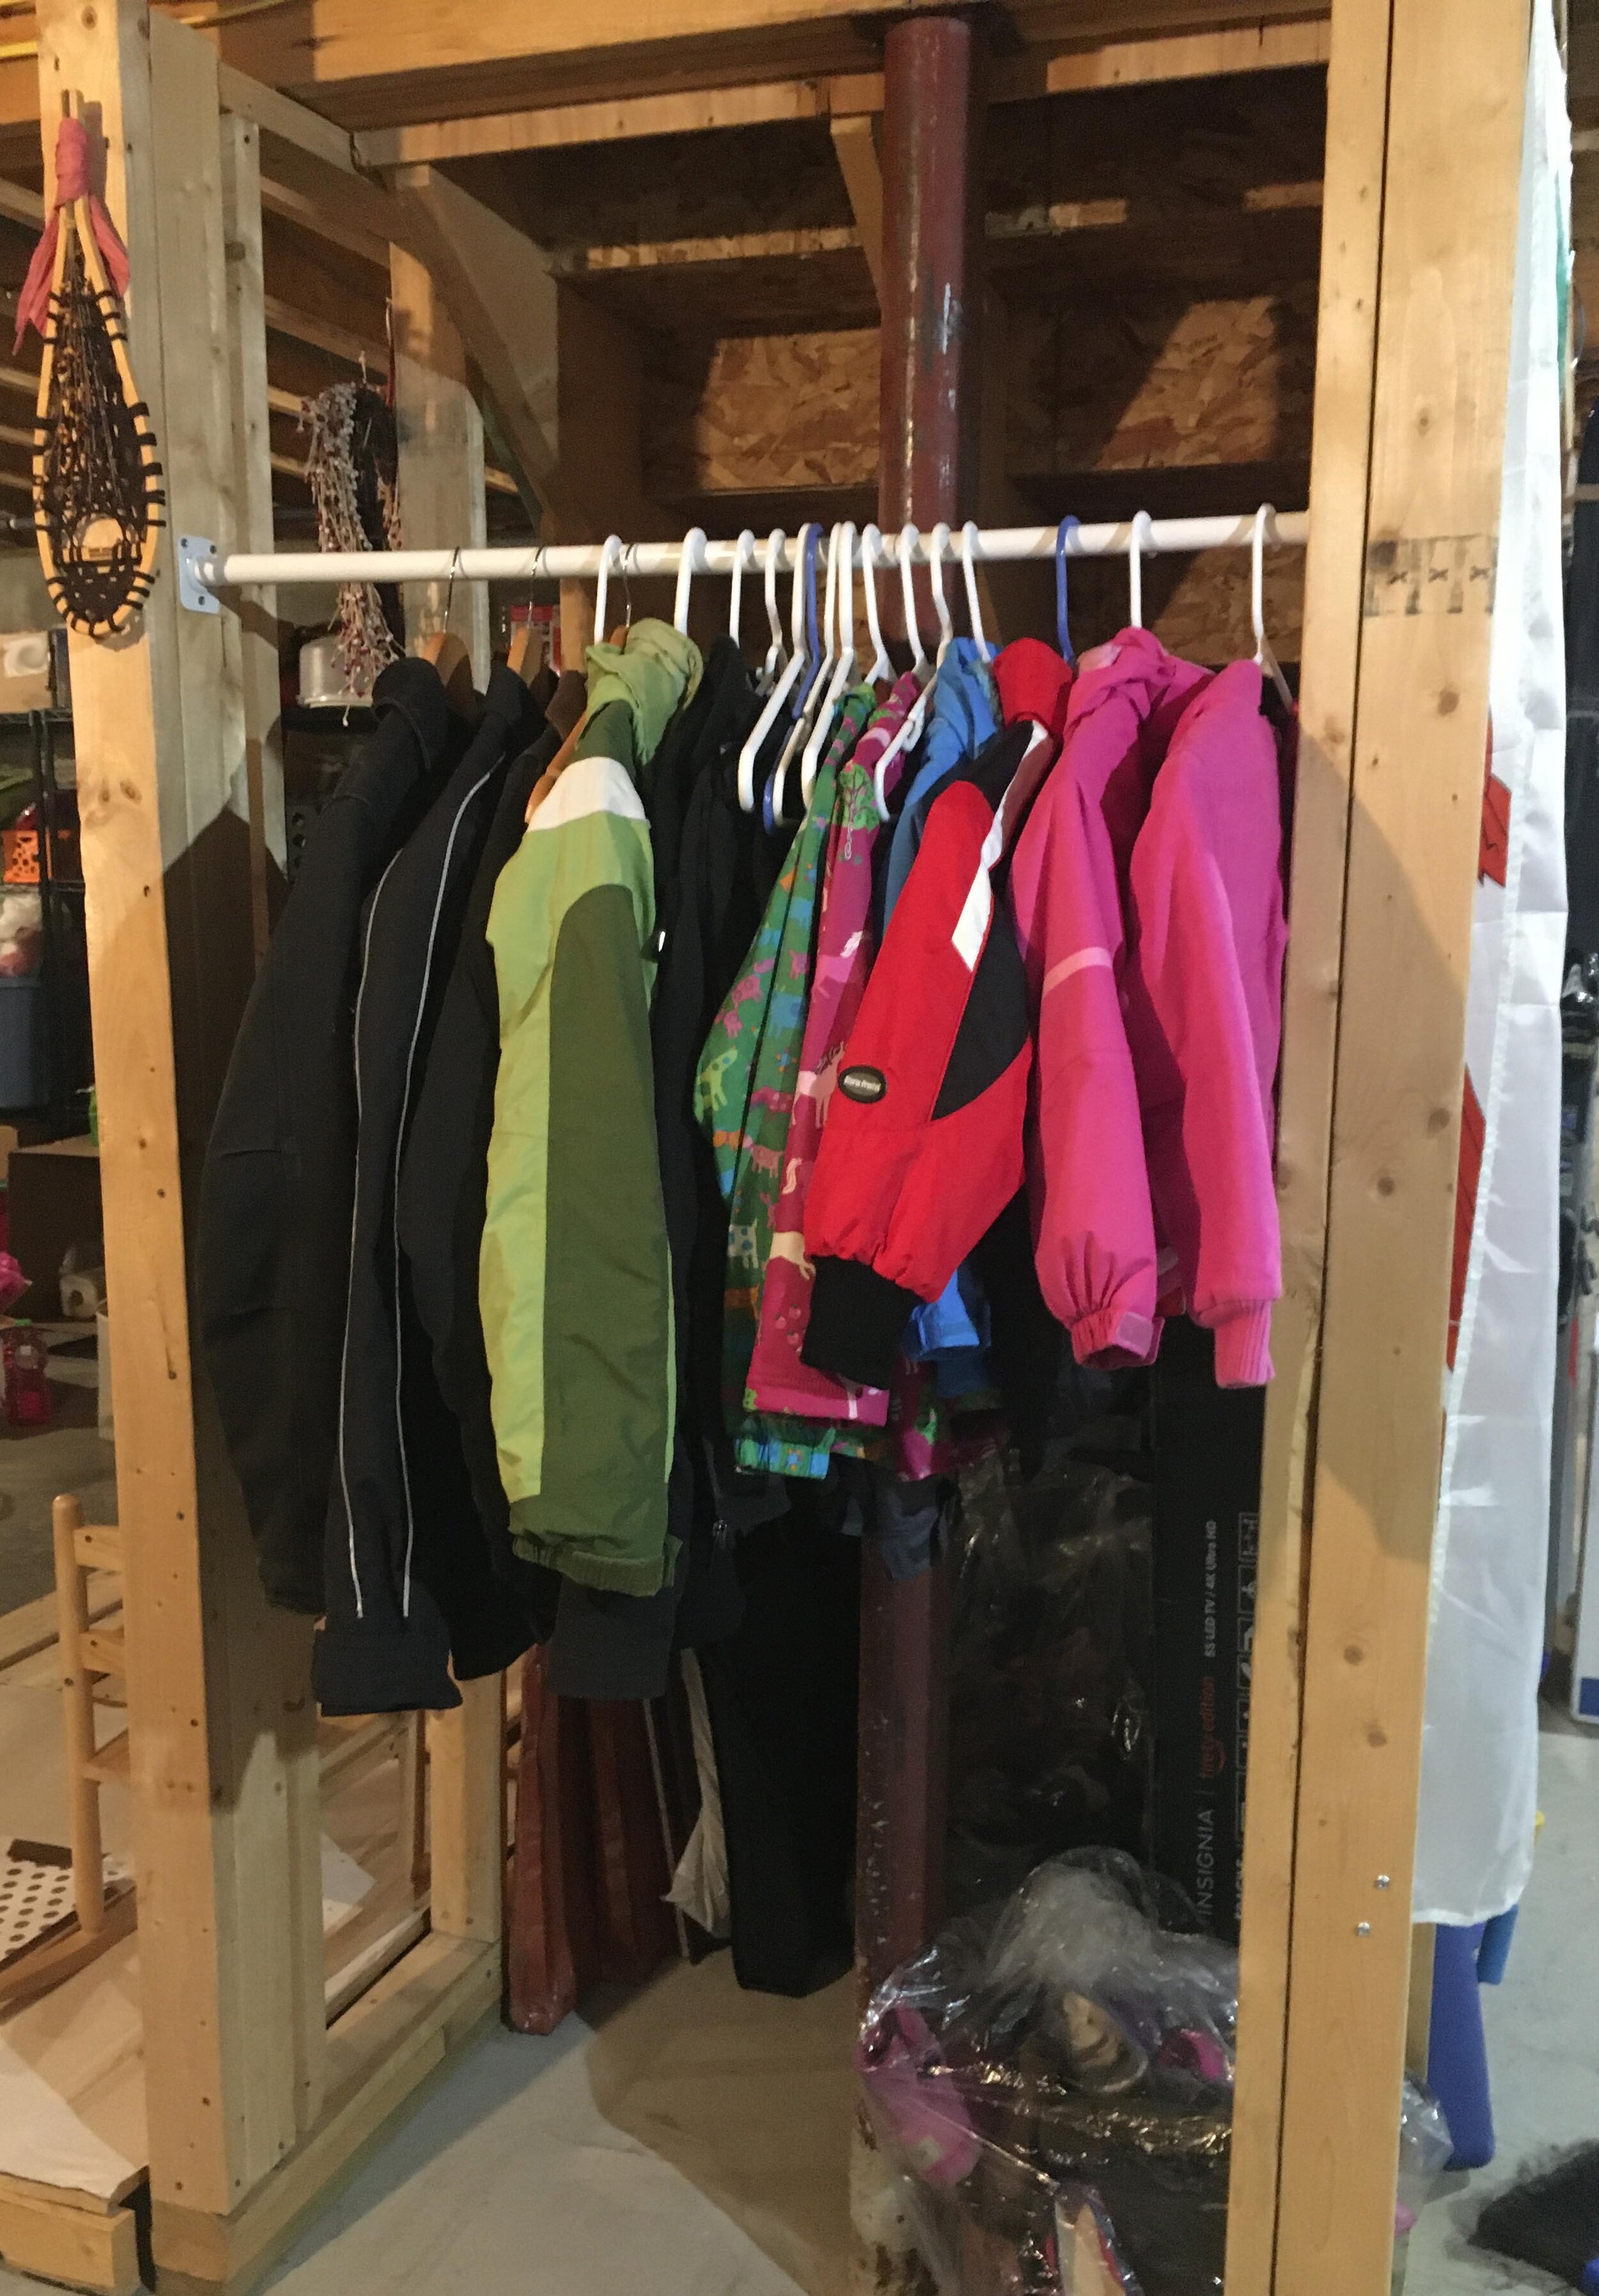
Now while this coat closet (pictured below) was pretty jammed full, it was very underutilized. It’s where we kept our off-season coats, hats, and boots as well as some hiking gear and my daughters’ Art Cart - most things we did not need to use daily, or often at all. My solution to this was to relocate all these items to our basement - I hung a closet rod under the basement stairs and moved all our off-season clothing and gear to this new space where it was still easily accessible but out of the way.
The next step was to pull out the old wire shelf and closet rod system, patch the holes, and repaint the inside of the closet. Thankfully I already had spackle and some leftover white paint so I was able to get the closet to a clean slate easily and it didn’t cost a dime.
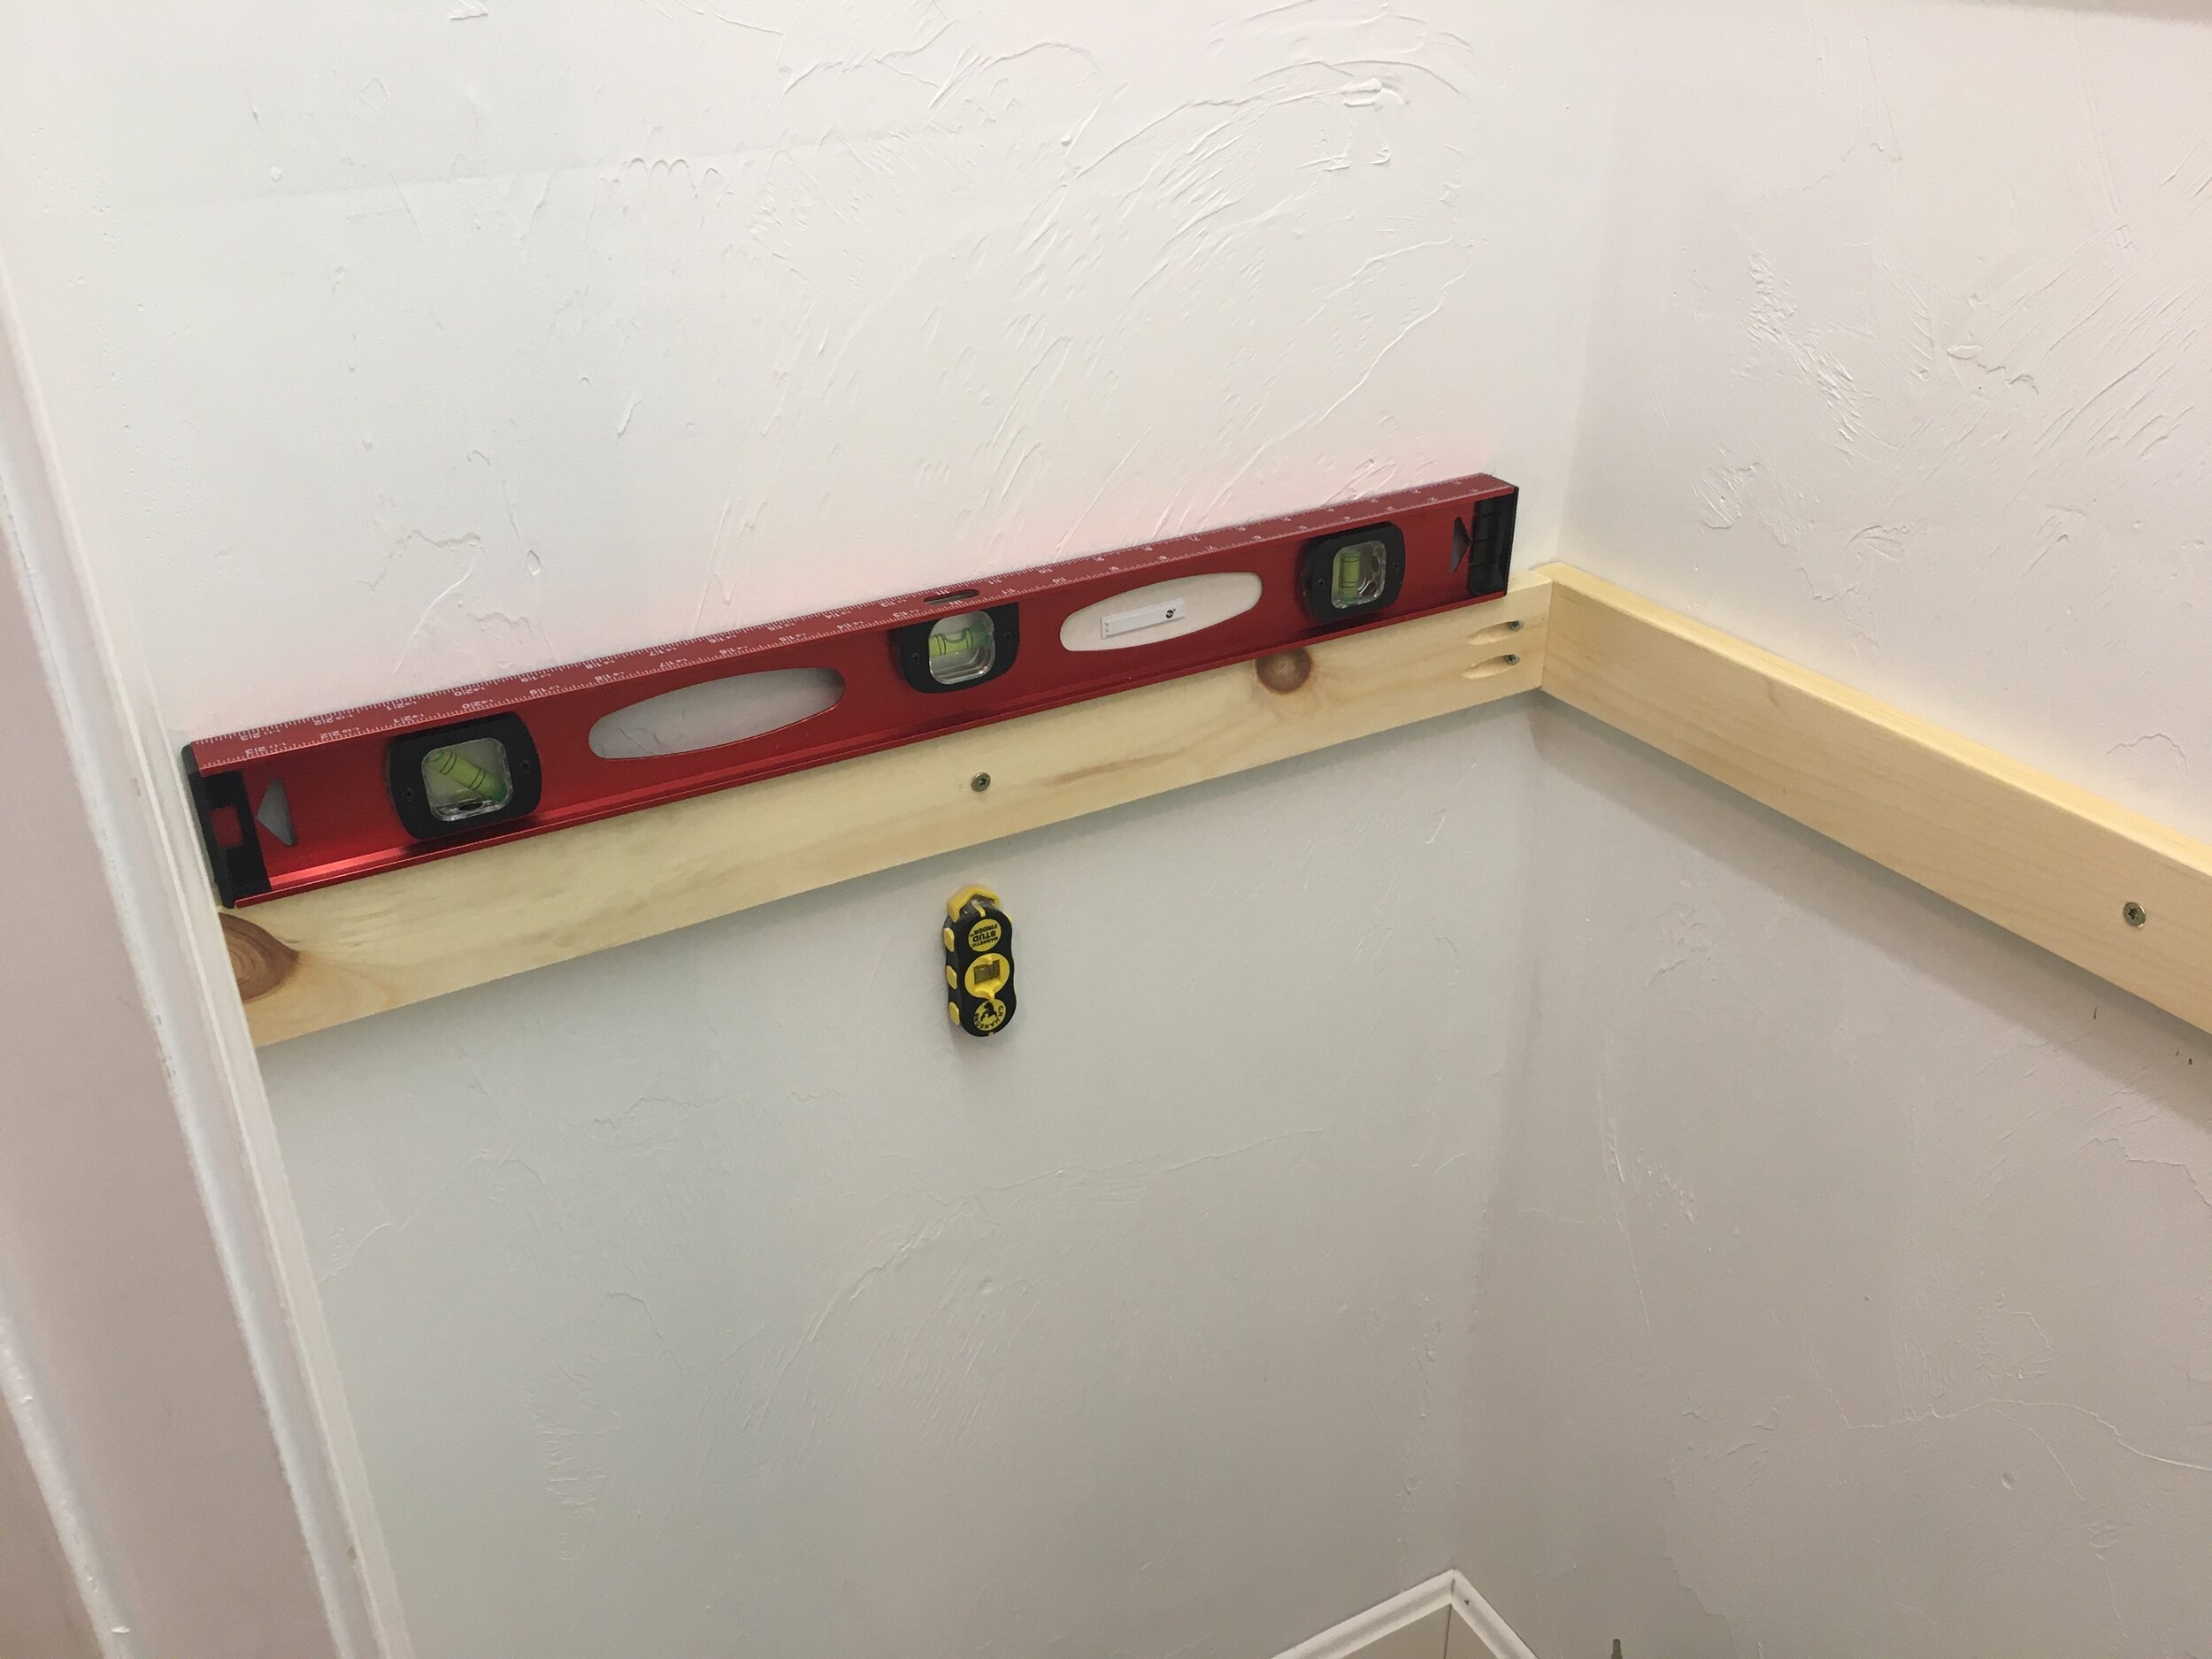
Now for the fun part! I got to decide how many shelves I wanted and the spacing, so I laid it out with painters tape to play with how I wanted it before I made a final decision. For our setup I decided on four shelves starting at about waist-height. I wanted to leave the bottom open to accommodate the dog food bin, the Art Cart, step stool, etc. Then I screwed in 1x3 inch “runners” that would support the shelves along the back wall. I used a stud finder to make sure I was screwing the runners into studs and a level to make sure everything was square.
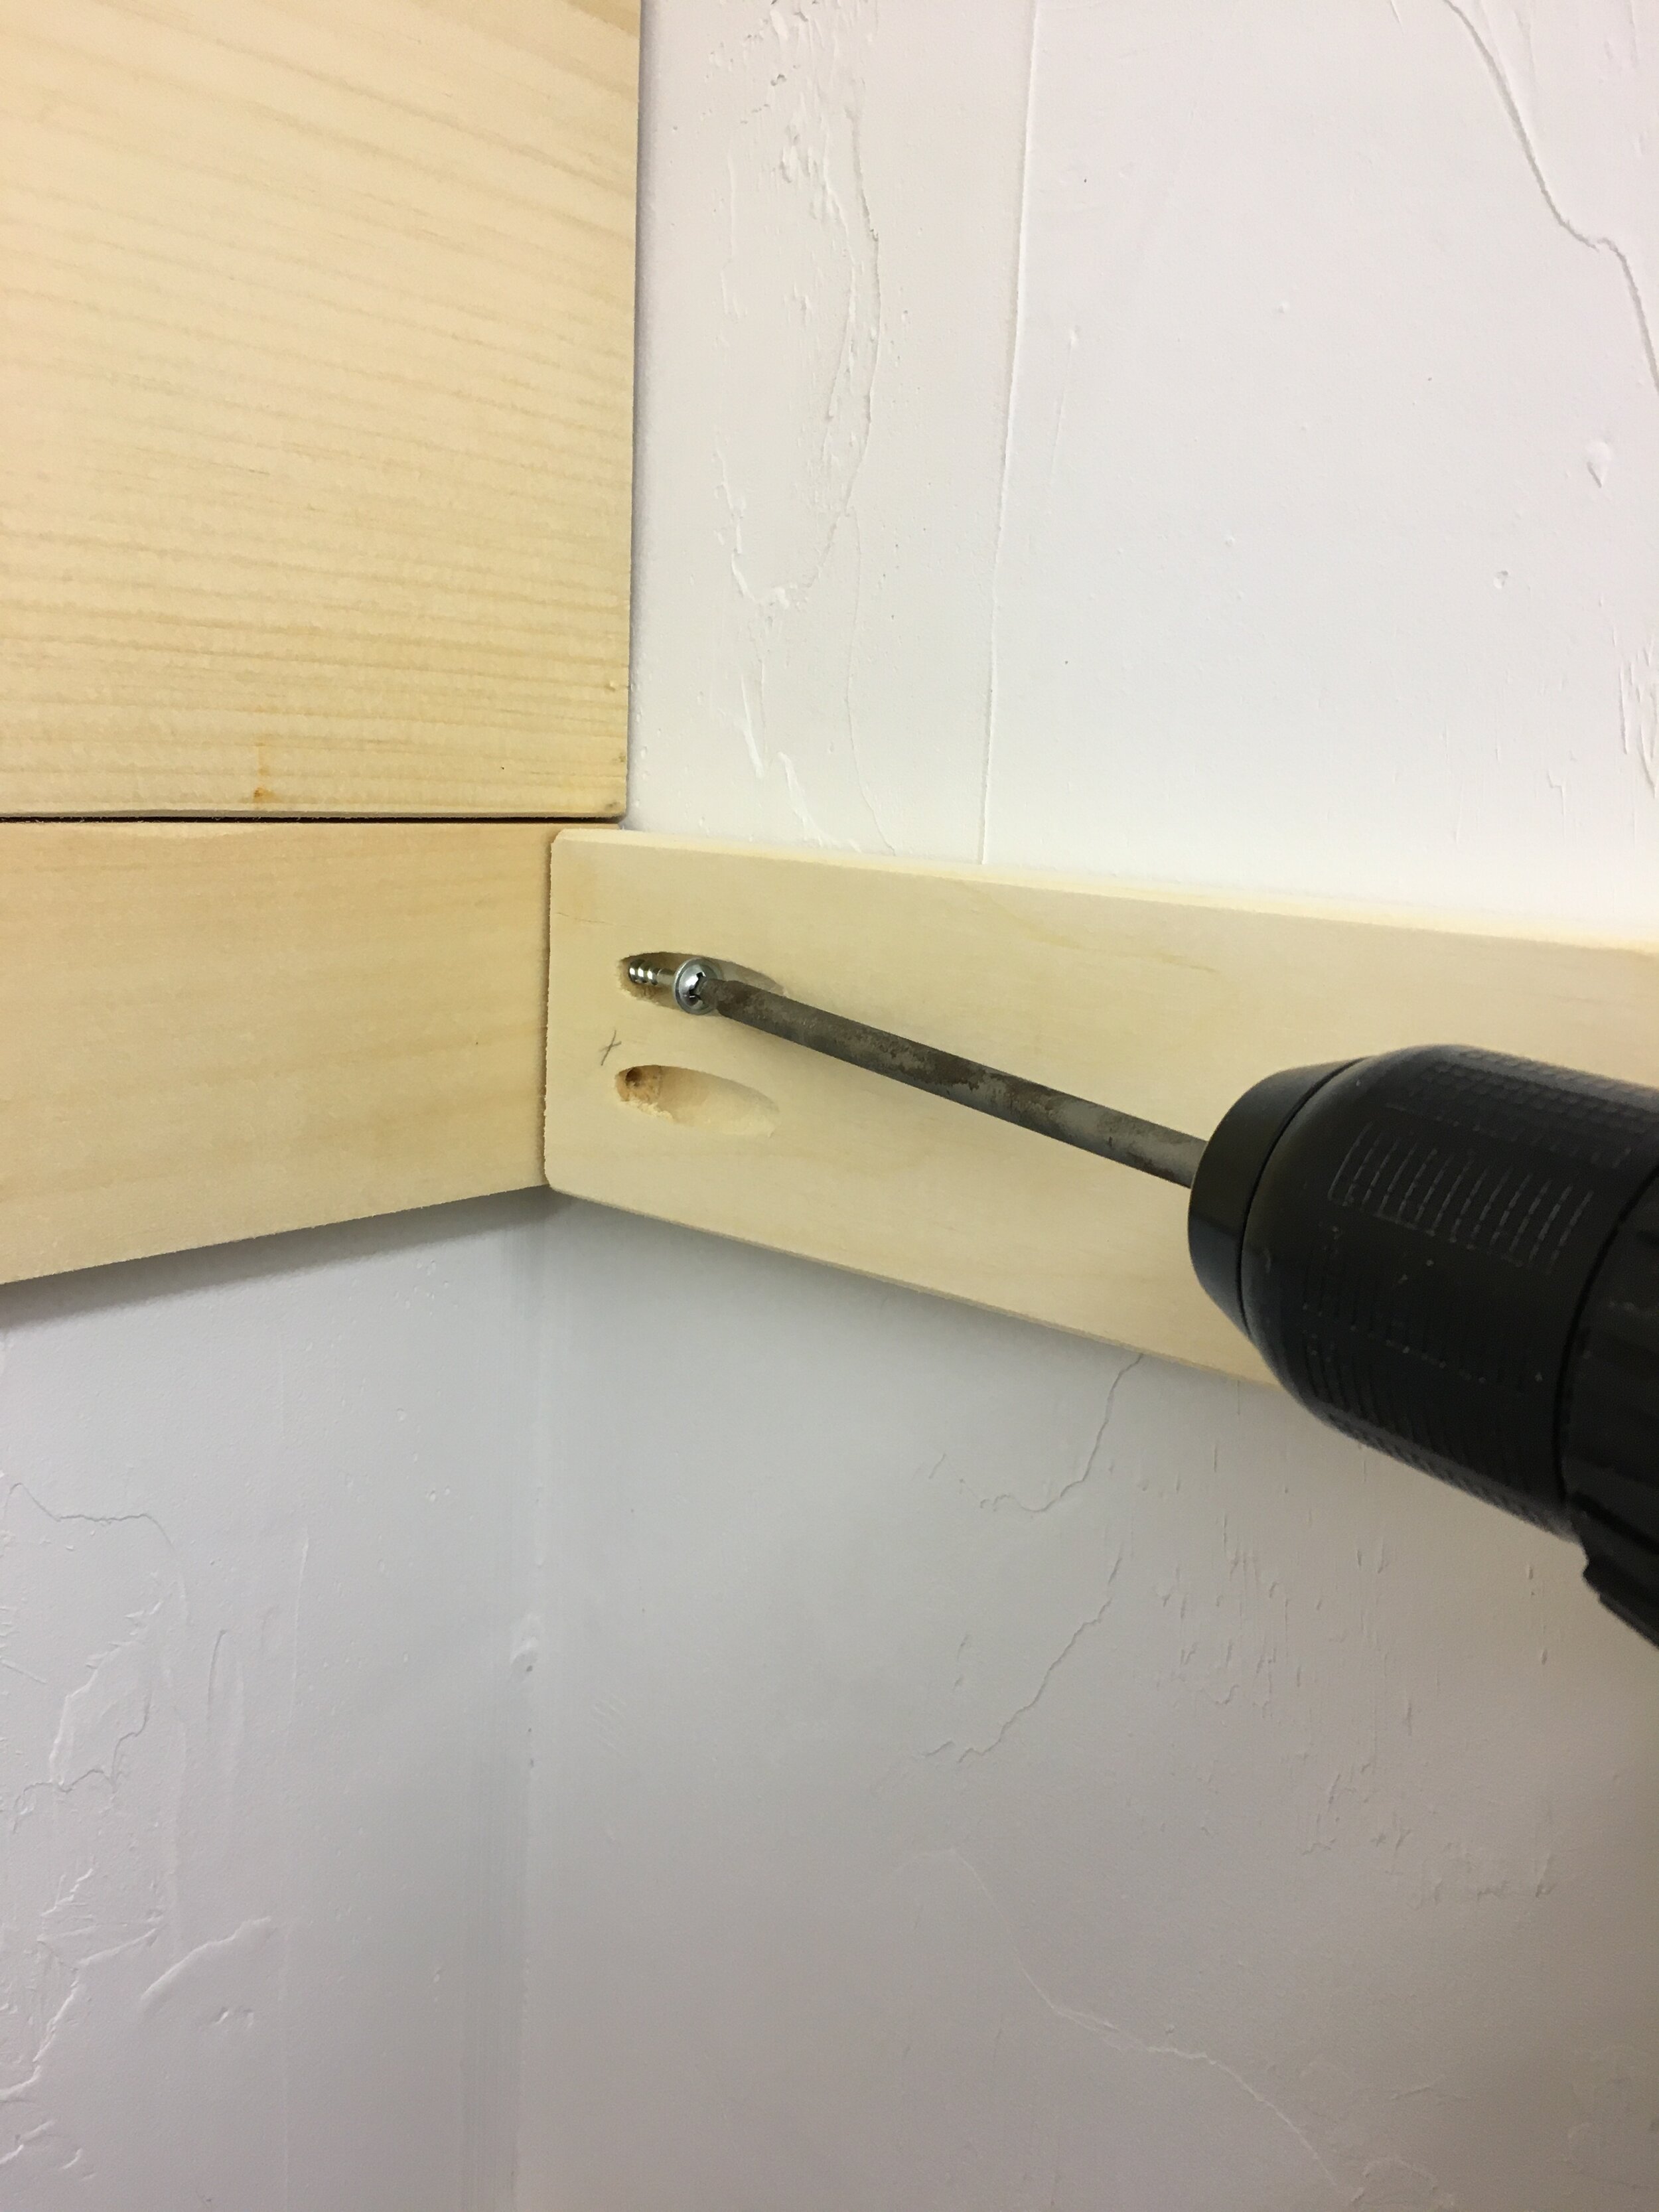
Then I added runners to one side of the closet next, following the same routine - but with these pieces I had pre-drilled pocket holes with our Kreg Jig first so it would make for a clean and secure joint in the corners.
Before installing the runners on the opposite side of the closet, it’s wise to keep in mind how you will be able to maneuver the shelf boards in once all the runners are in place (it would be very difficult to get the top shelf in with all the runners installed, for example). So before installing the opposite side’s runners I slipped some of the trickier shelf boards into place first (I used 1x12”s cut to length for the shelves) before I finished screwing in all the side runners.
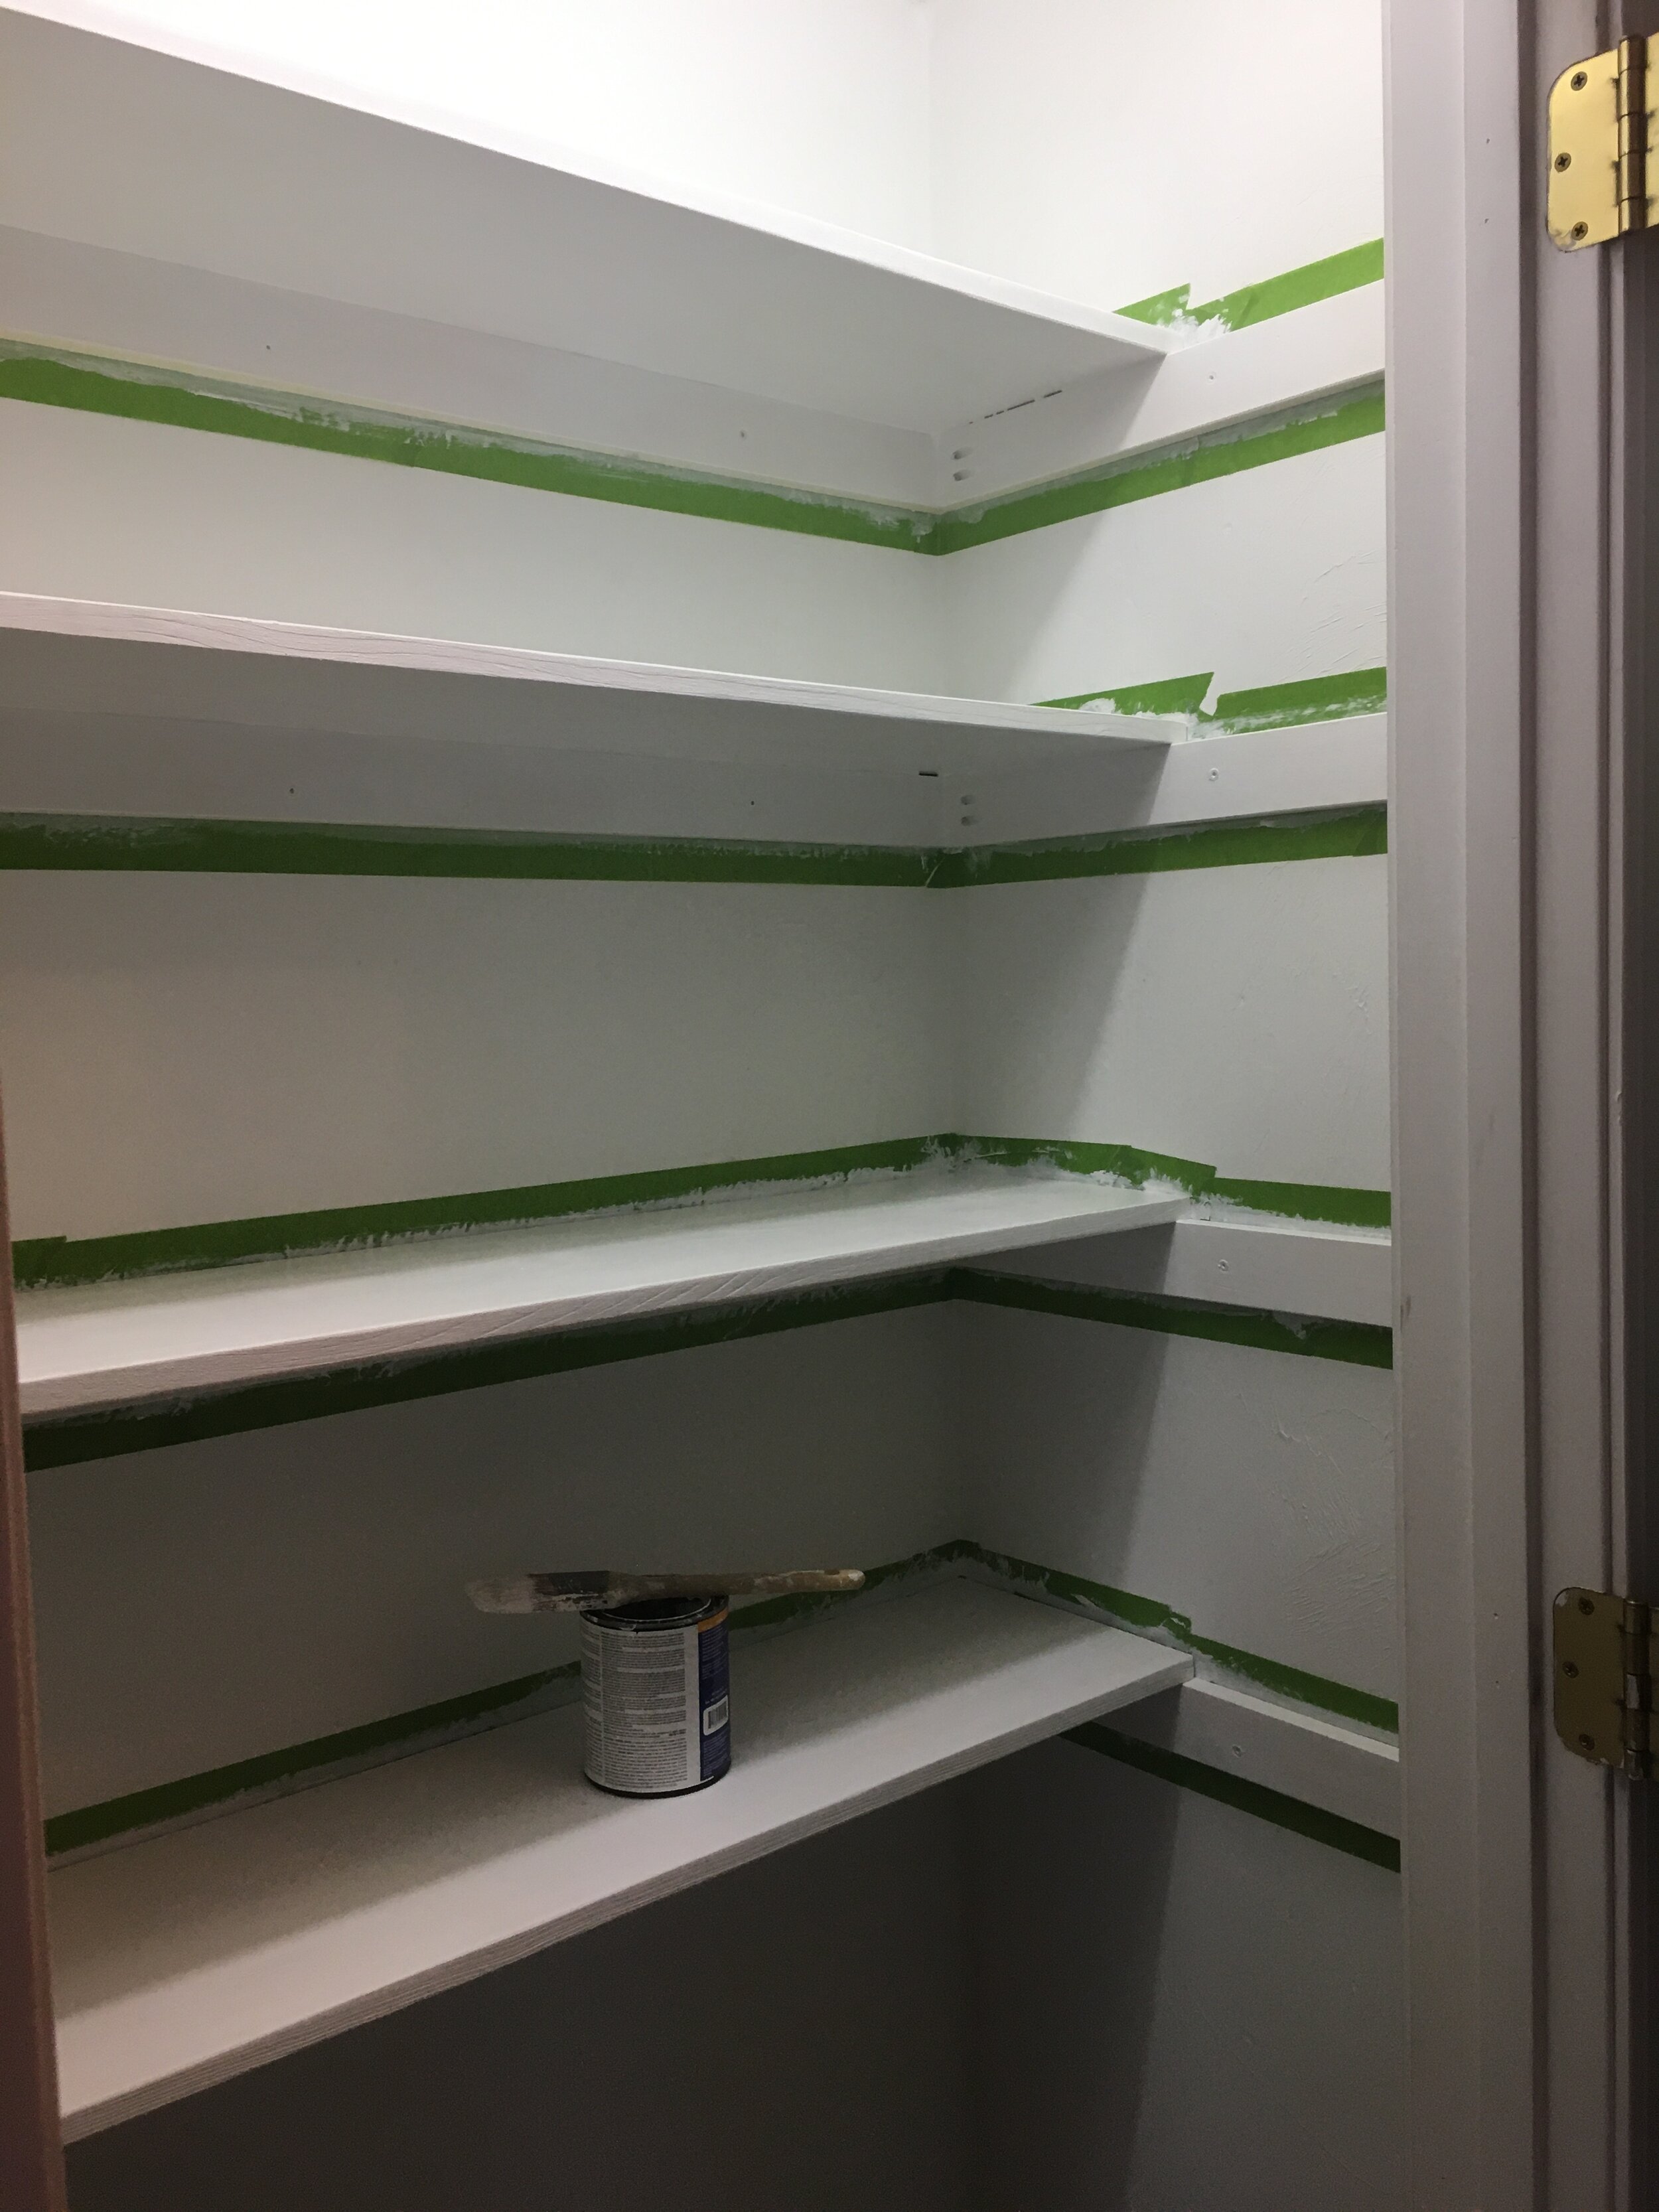
I secured the shelves into place with some finishing nails, then taped off the shelves and runners to get ready for paint. I used primer and then several coats of white semi-gloss paint since it’s a little easier to wipe down and keep clean.
I just love how farmhouse and “Shaker” the exposed rails on the sides look and I wanted to play it up. Once the paint was dry I added some functional hooks to hang aprons, lunchboxes, etc on the side rails.
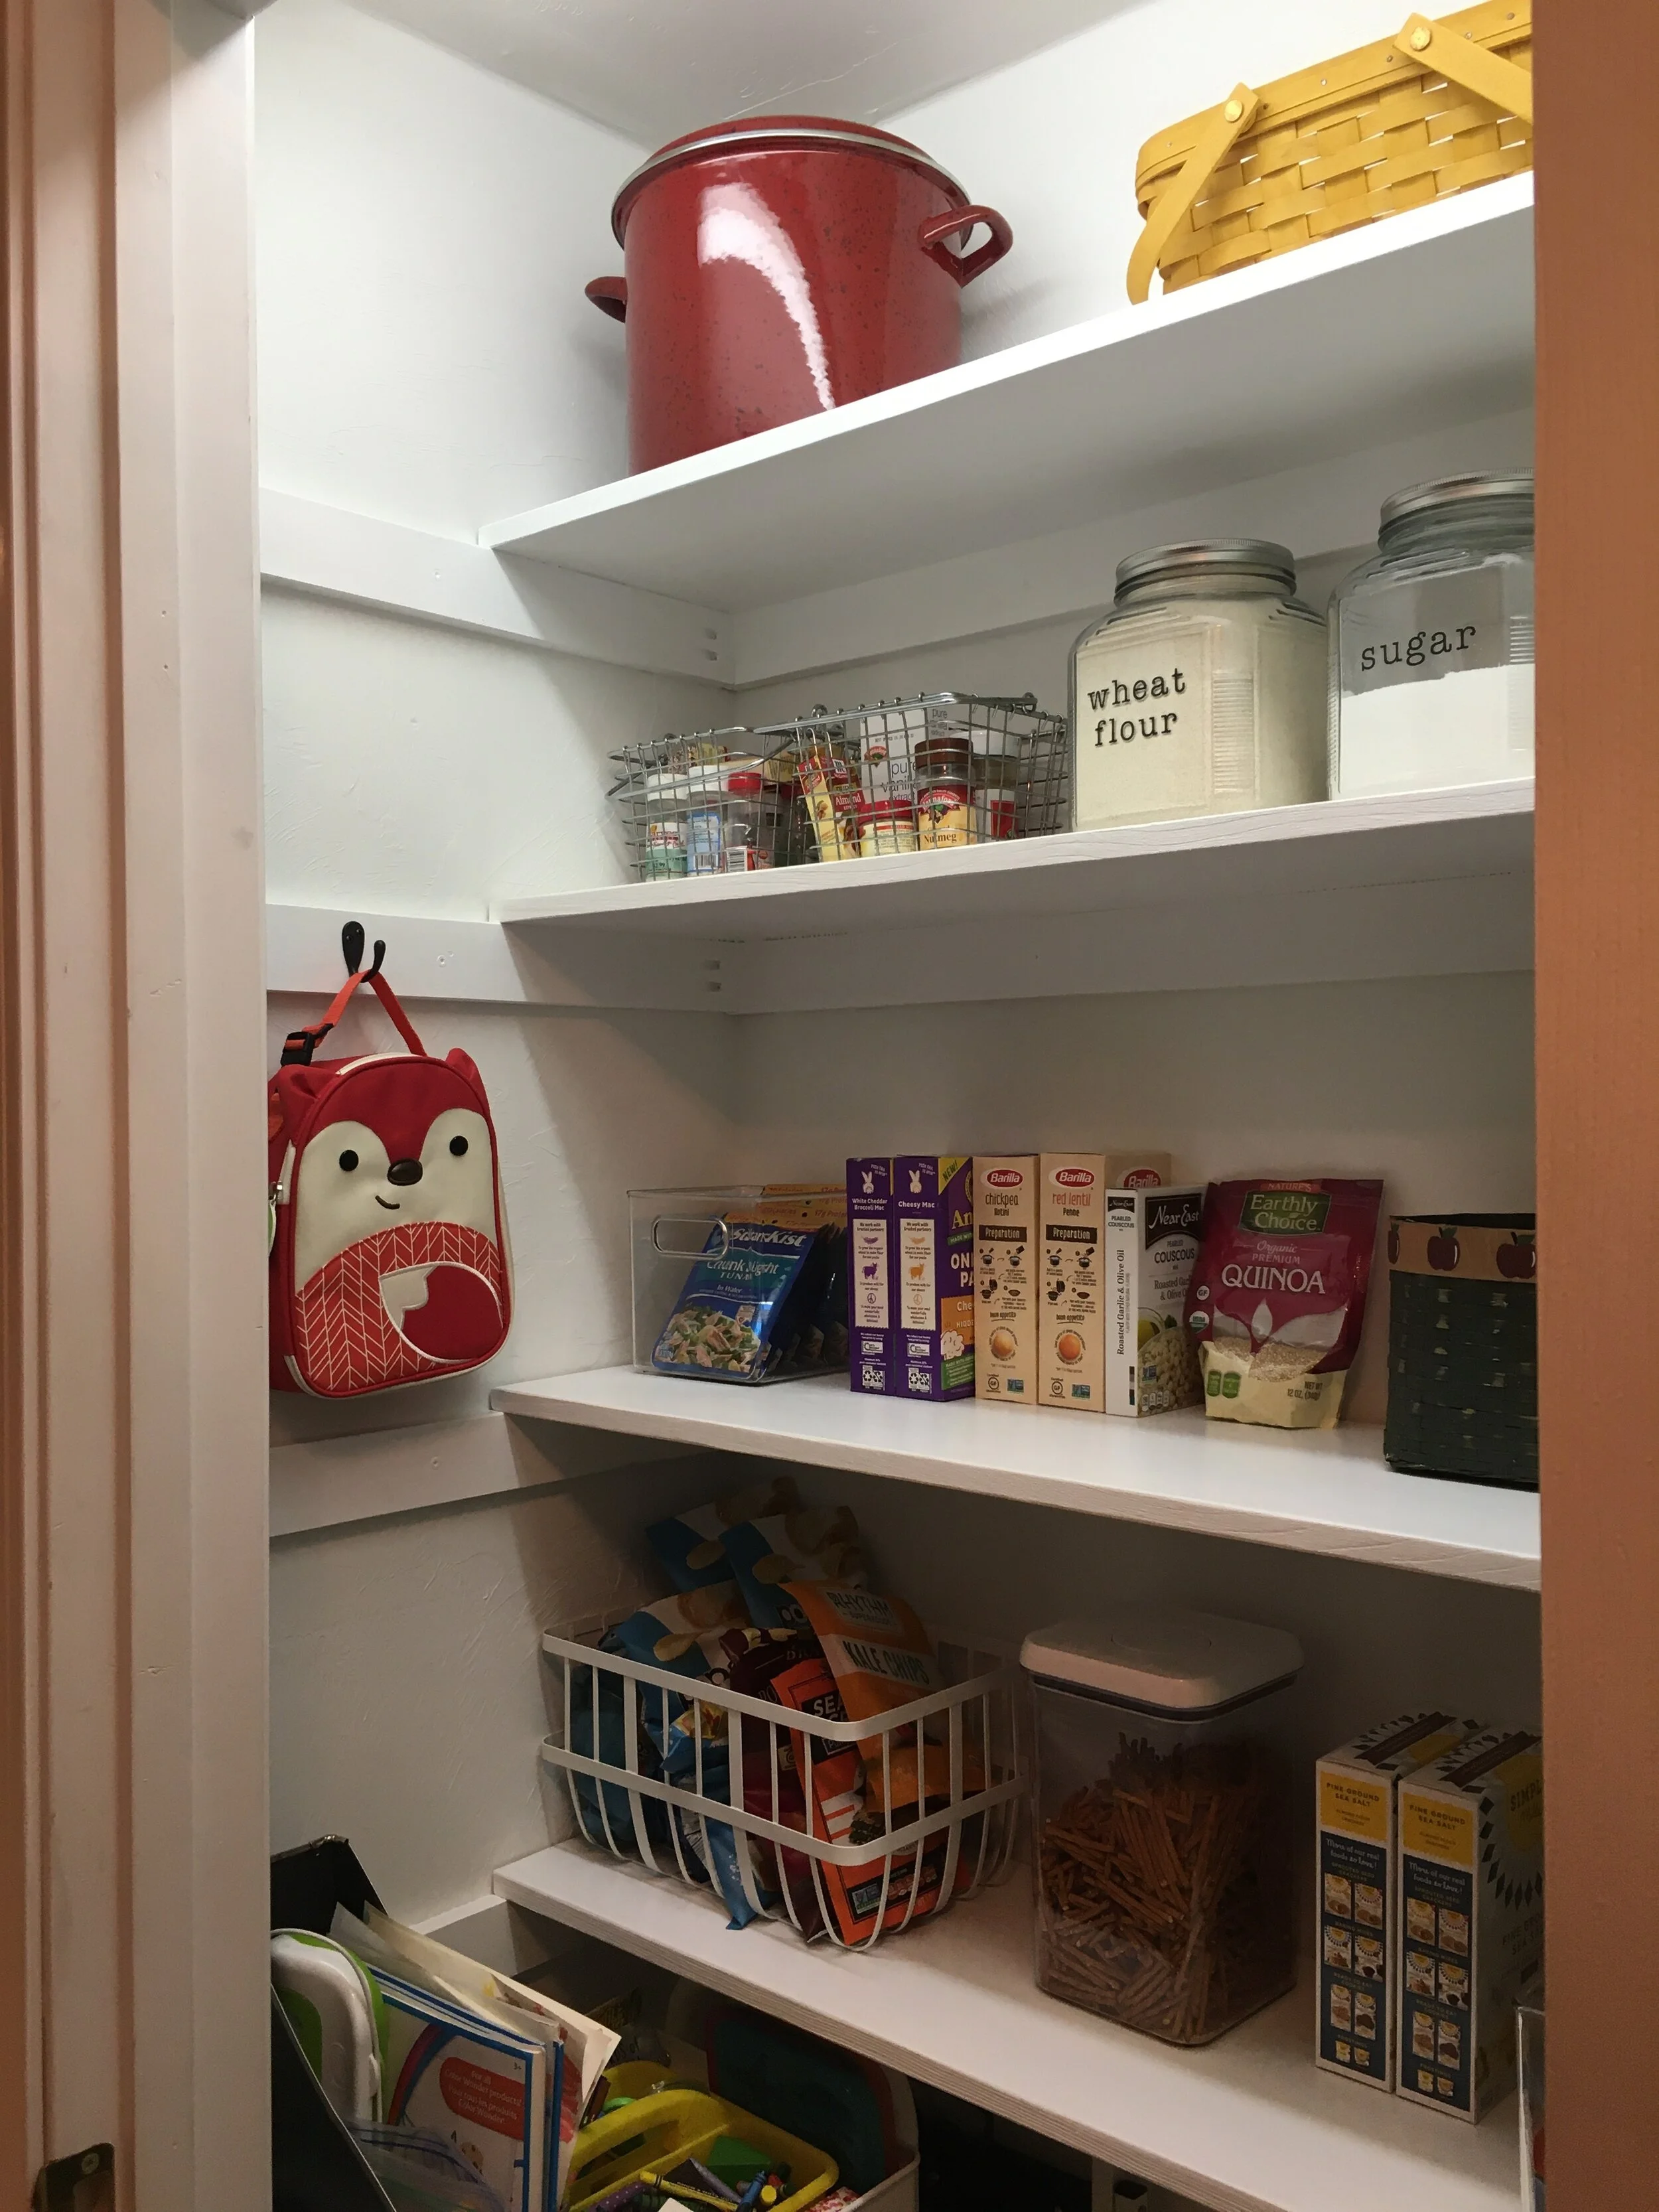
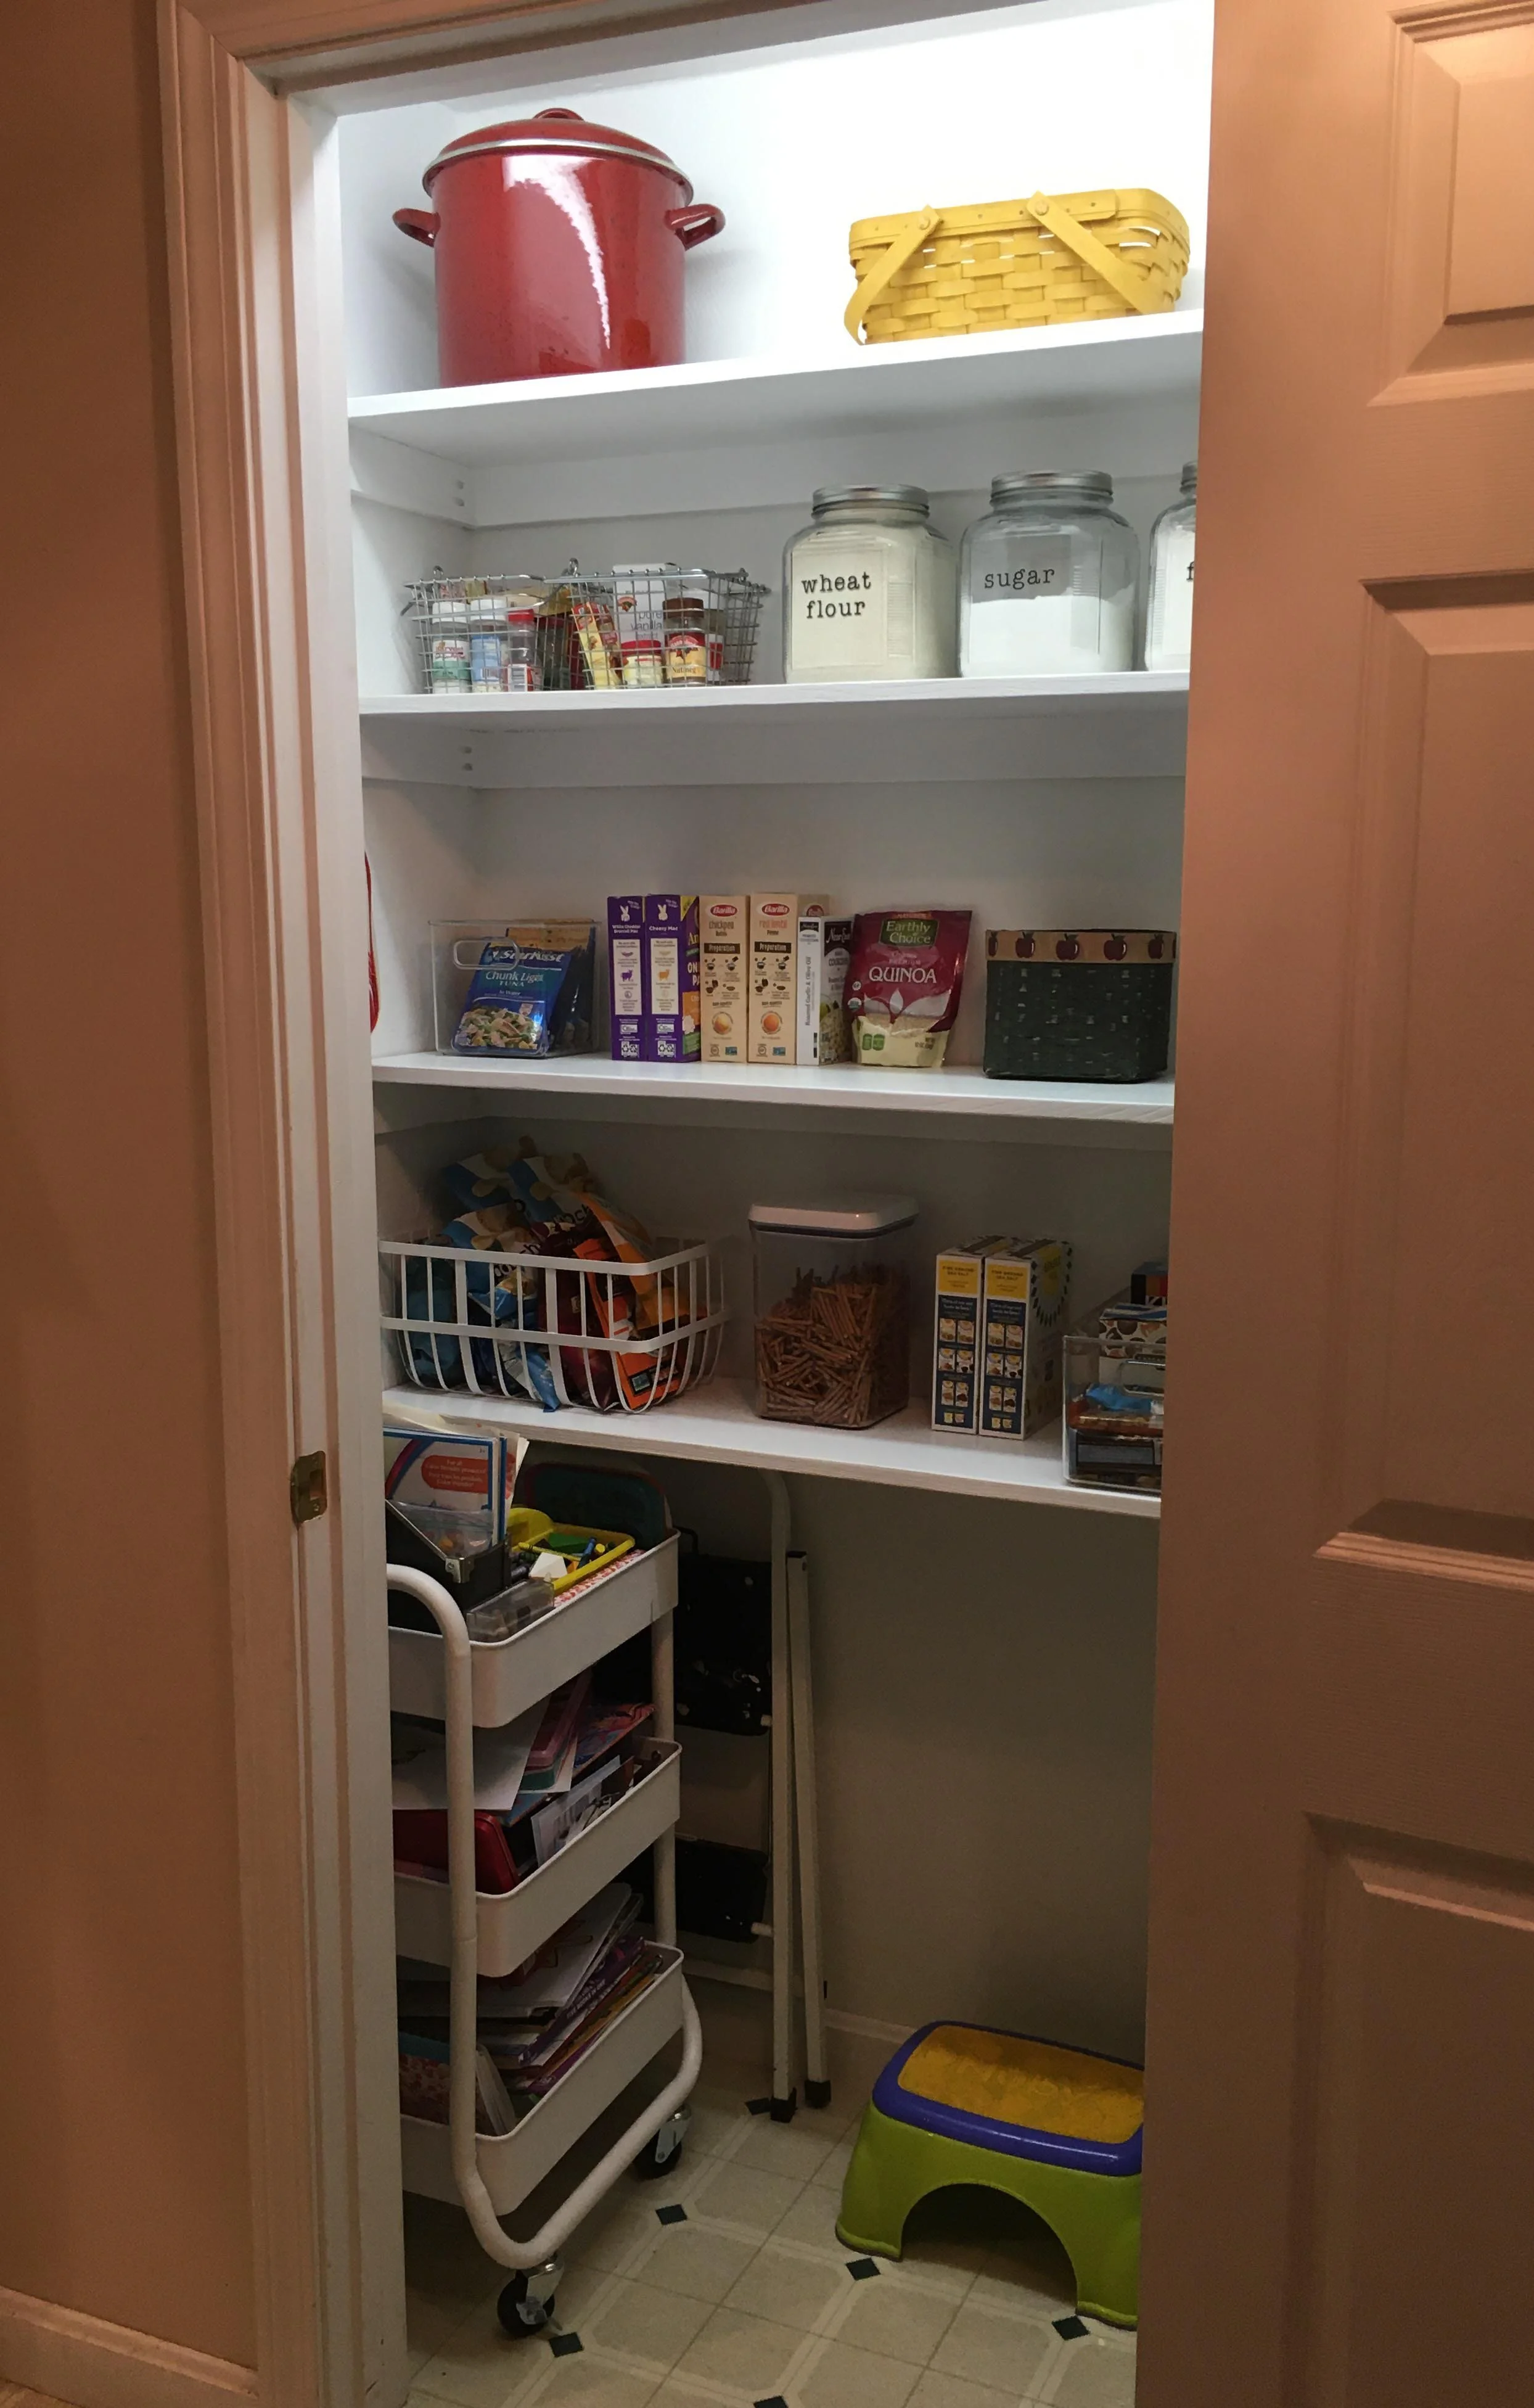
And now the project is complete! I am so happy with how it turned out and it’s wonderful to have everything in one place. I can see this project saving us money on groceries in the long run now as everything will be in one place now and we’ll be less apt to waste food.
Eventually, I would love to replace the closet door with a fun screen door and get some more glass jars and baskets for a cleaner looking pantry - but all in good time.
Over this past winter I added a few simple add-on organizers to our pantry to maximize the space and love how functional they are. Here they are below (and please excuse the glimpses of clutter in the pantry… as it now holds extra groceries and our family board games too - because, real life):
It turns out our door is an odd size and in order to get a screen door for it we would have to custom order one (at a cost of about $300+! Yikes). So instead I decided to cut a custom vinyl label to stick to the door to make it more finished. I could have designed my own but I found a design I really liked on
Etsy
and bought the digital design file. After purchasing the design file, I used my
Cricut
and
651 Permanent Vinyl
to make the label and then transferred it to the door. In hindsight I probably should have made it slightly smaller, but overall I love how it came out and how budget-friendly it was since I already owned a Cricut Machine and the vinyl.
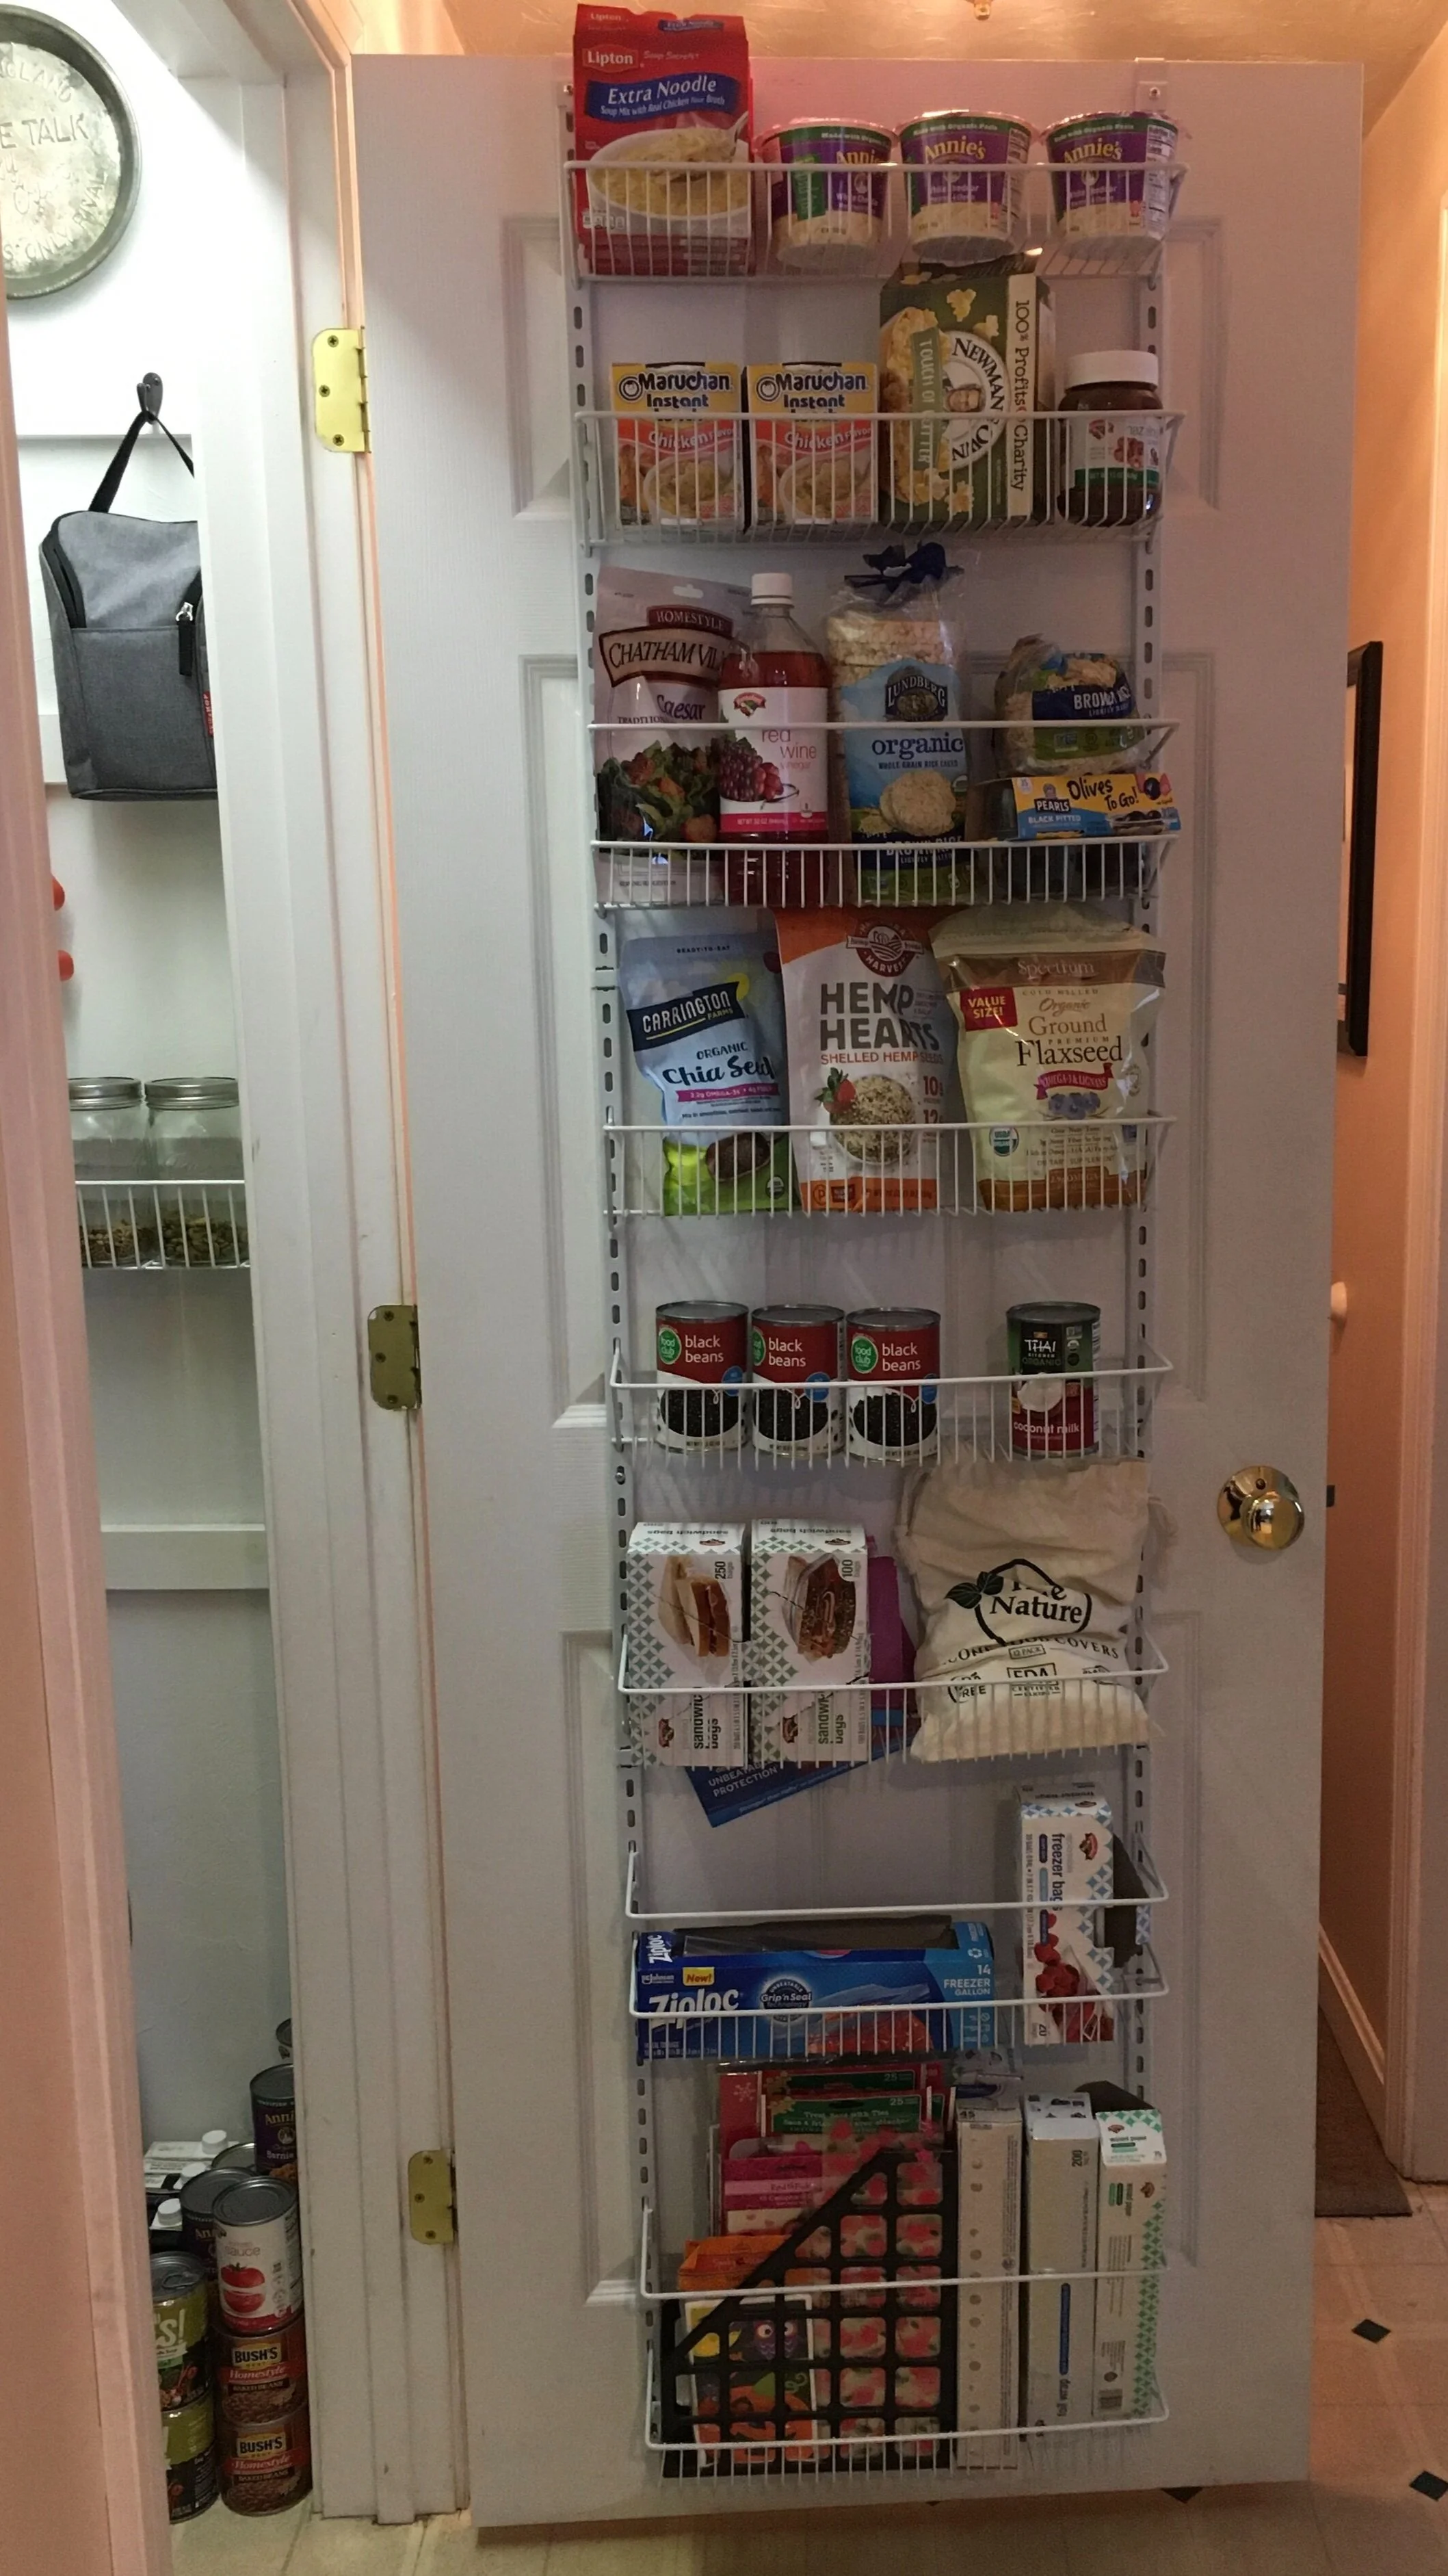
Finally, we decided to add a
ClosetMaid Adjustable Organizer
to the back of the pantry door to fully utilize the space. It was very simple to install and I am impressed with how sturdy it is once it's assembled and screwed in. We used the lower baskets for foil, parchement paper, ziplocks, silicone bowl covers, etc. The middle baskets we designated for frequently used canned goods, smoothie mix-ins, as well as salad fixings and rice cakes. Finally on the top two baskets we put convenience foods that we rarely use since I'm so short. Note: If you have a hollow-core door, you might want to use a specialty set of anchors/screws to attach it to the door for stability, rather than just screw into the door with regular screws.
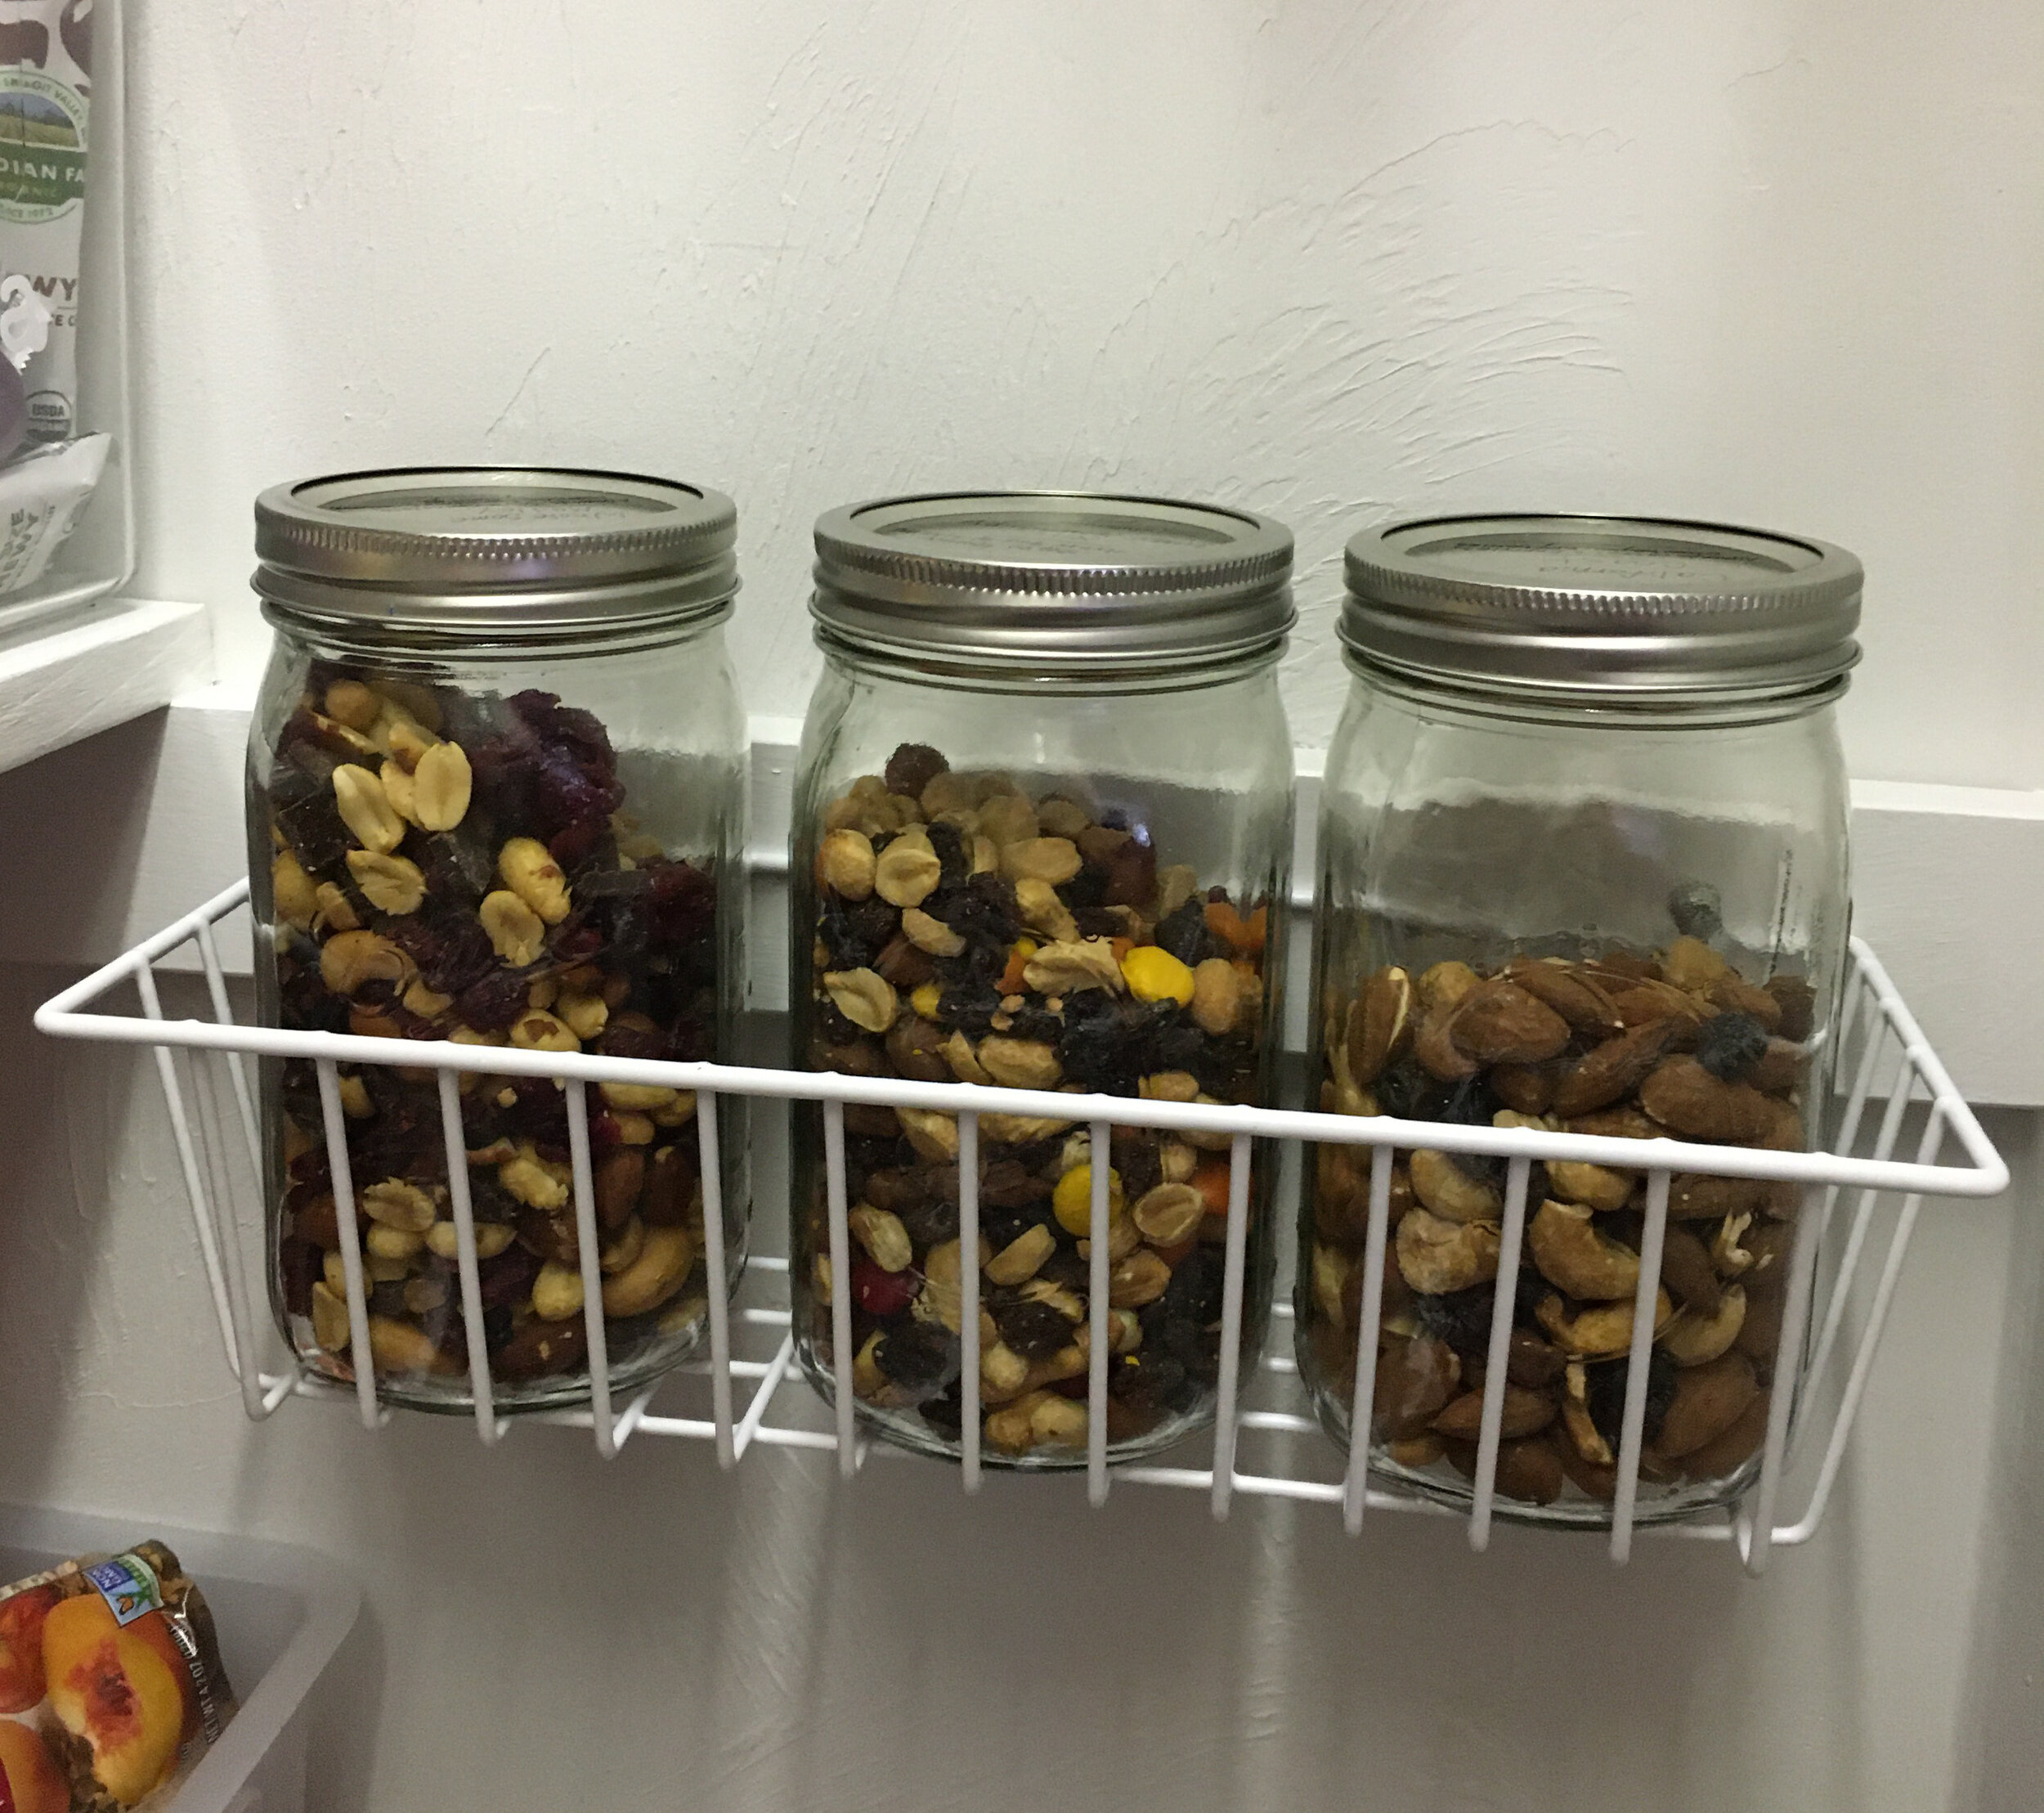
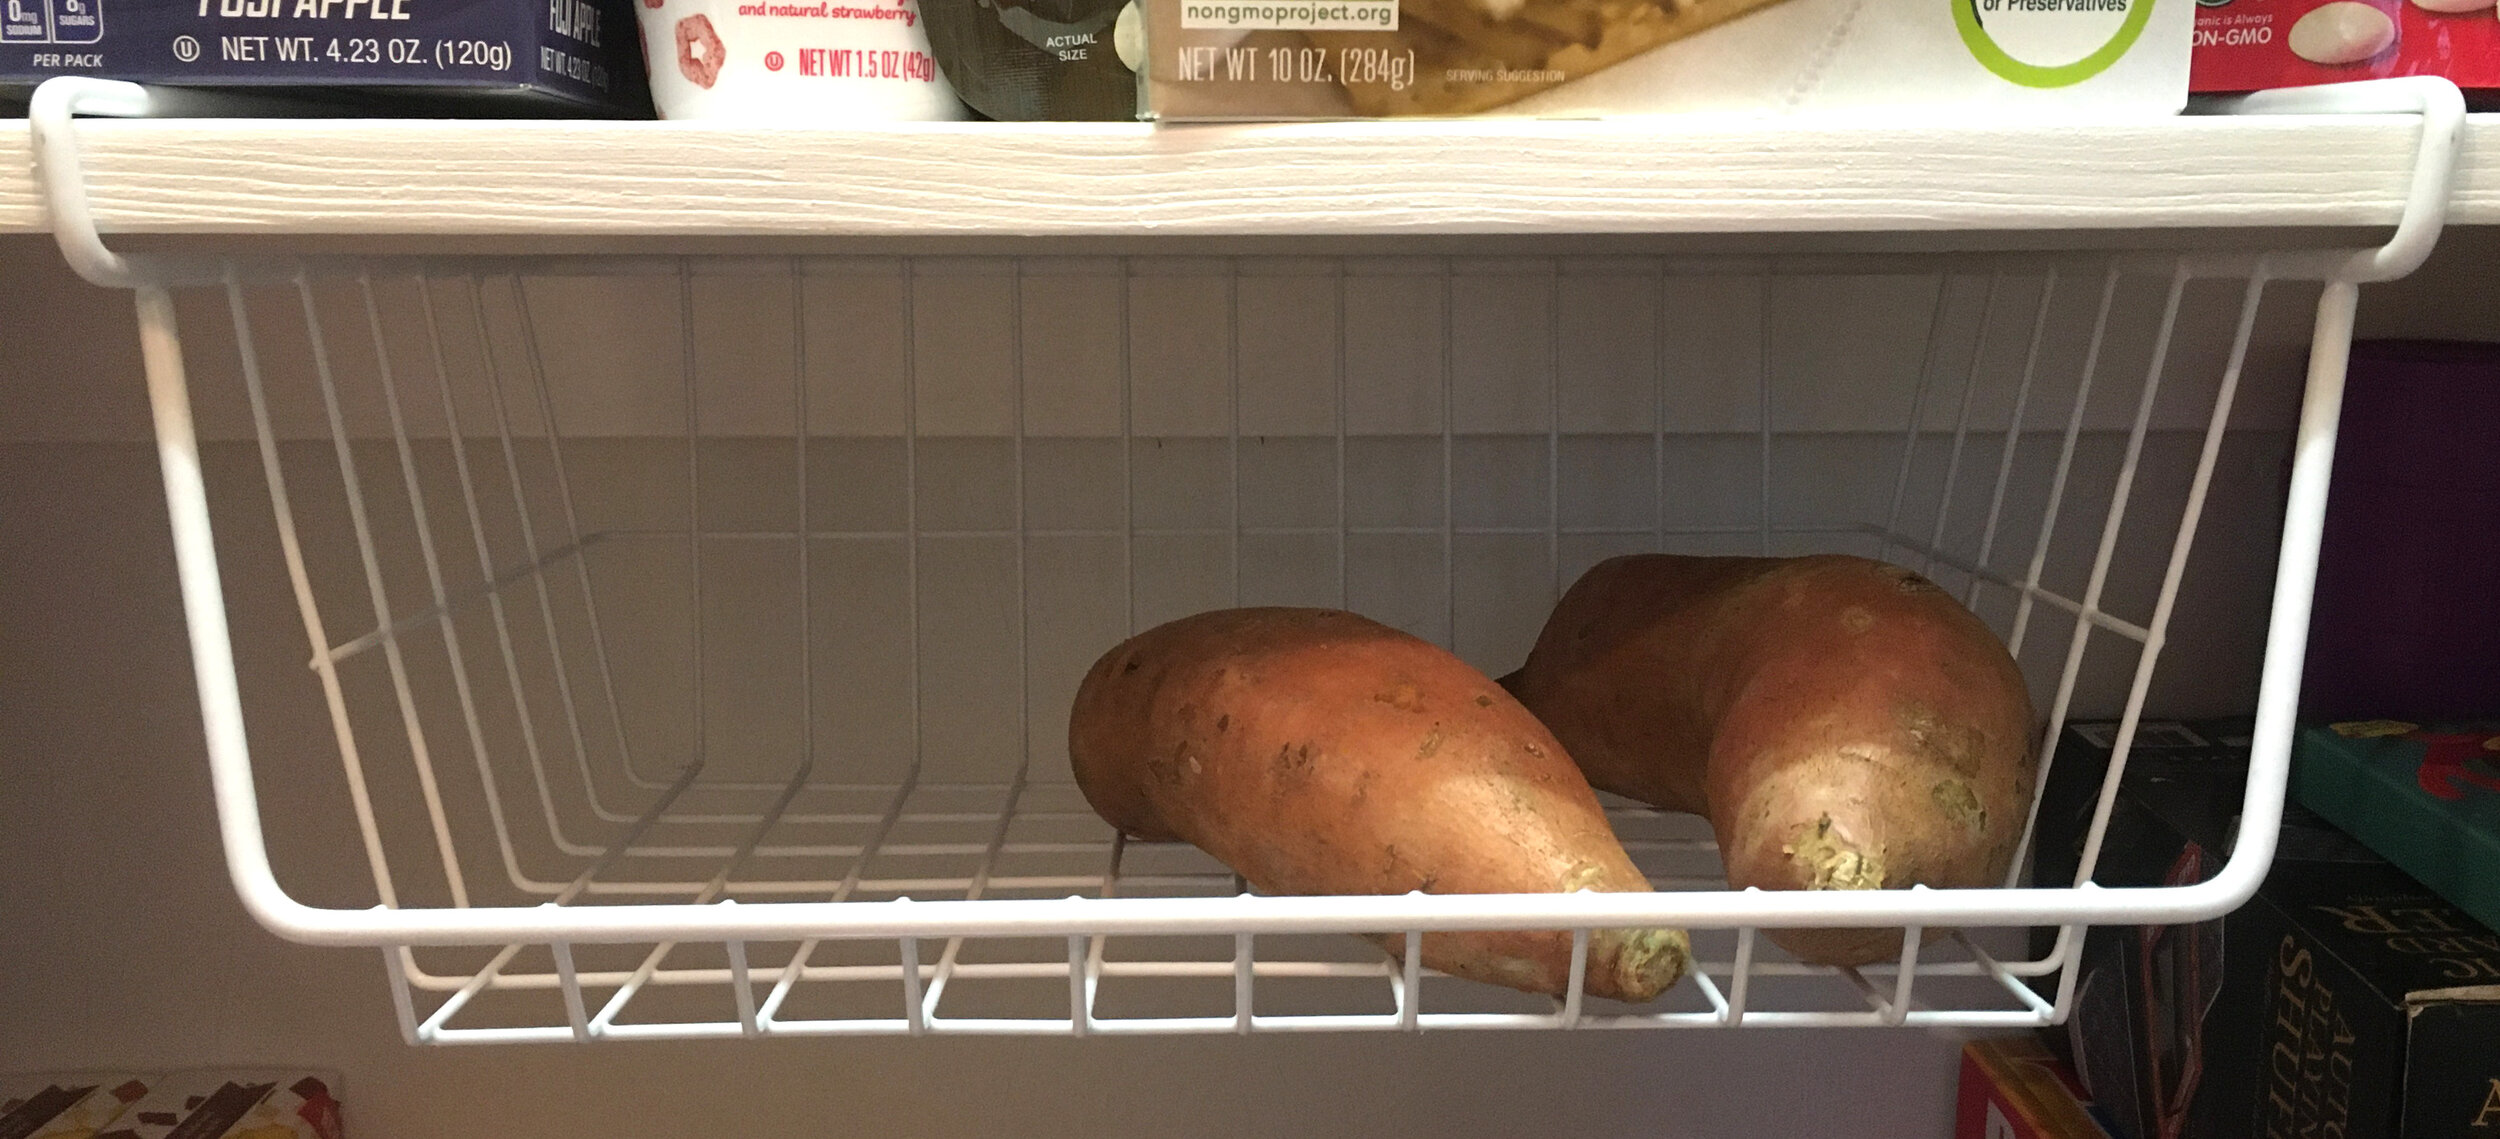
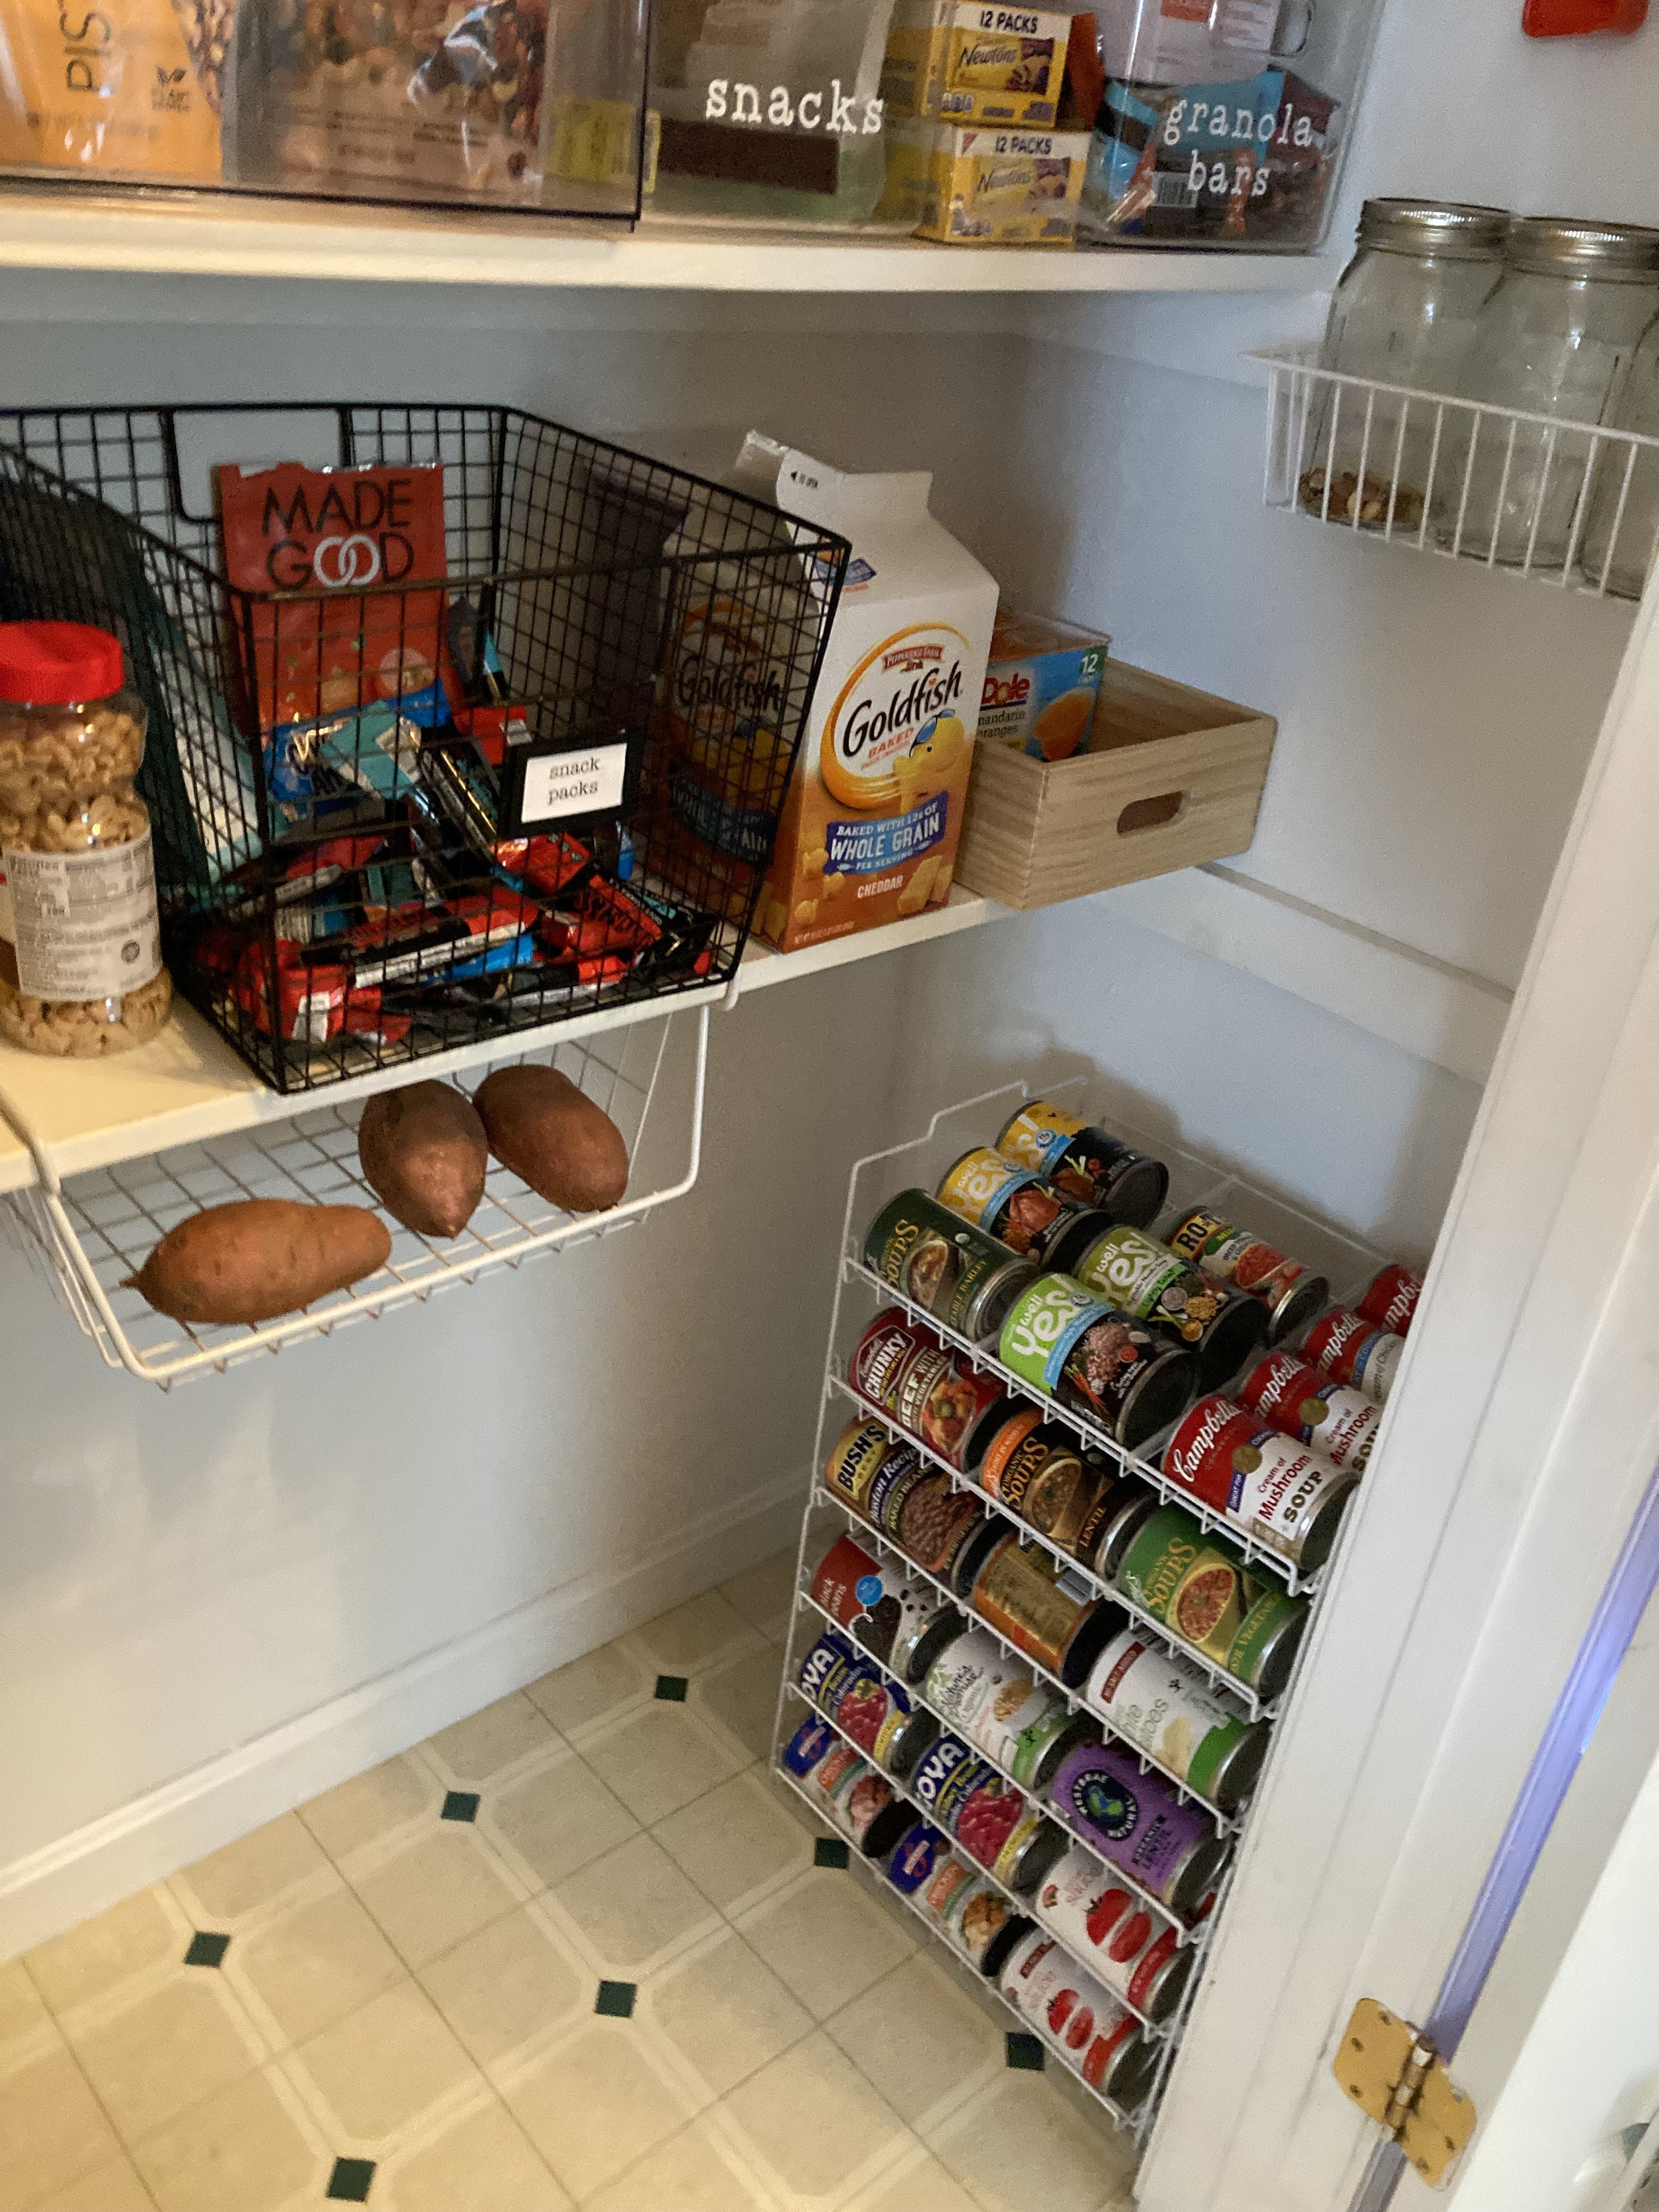
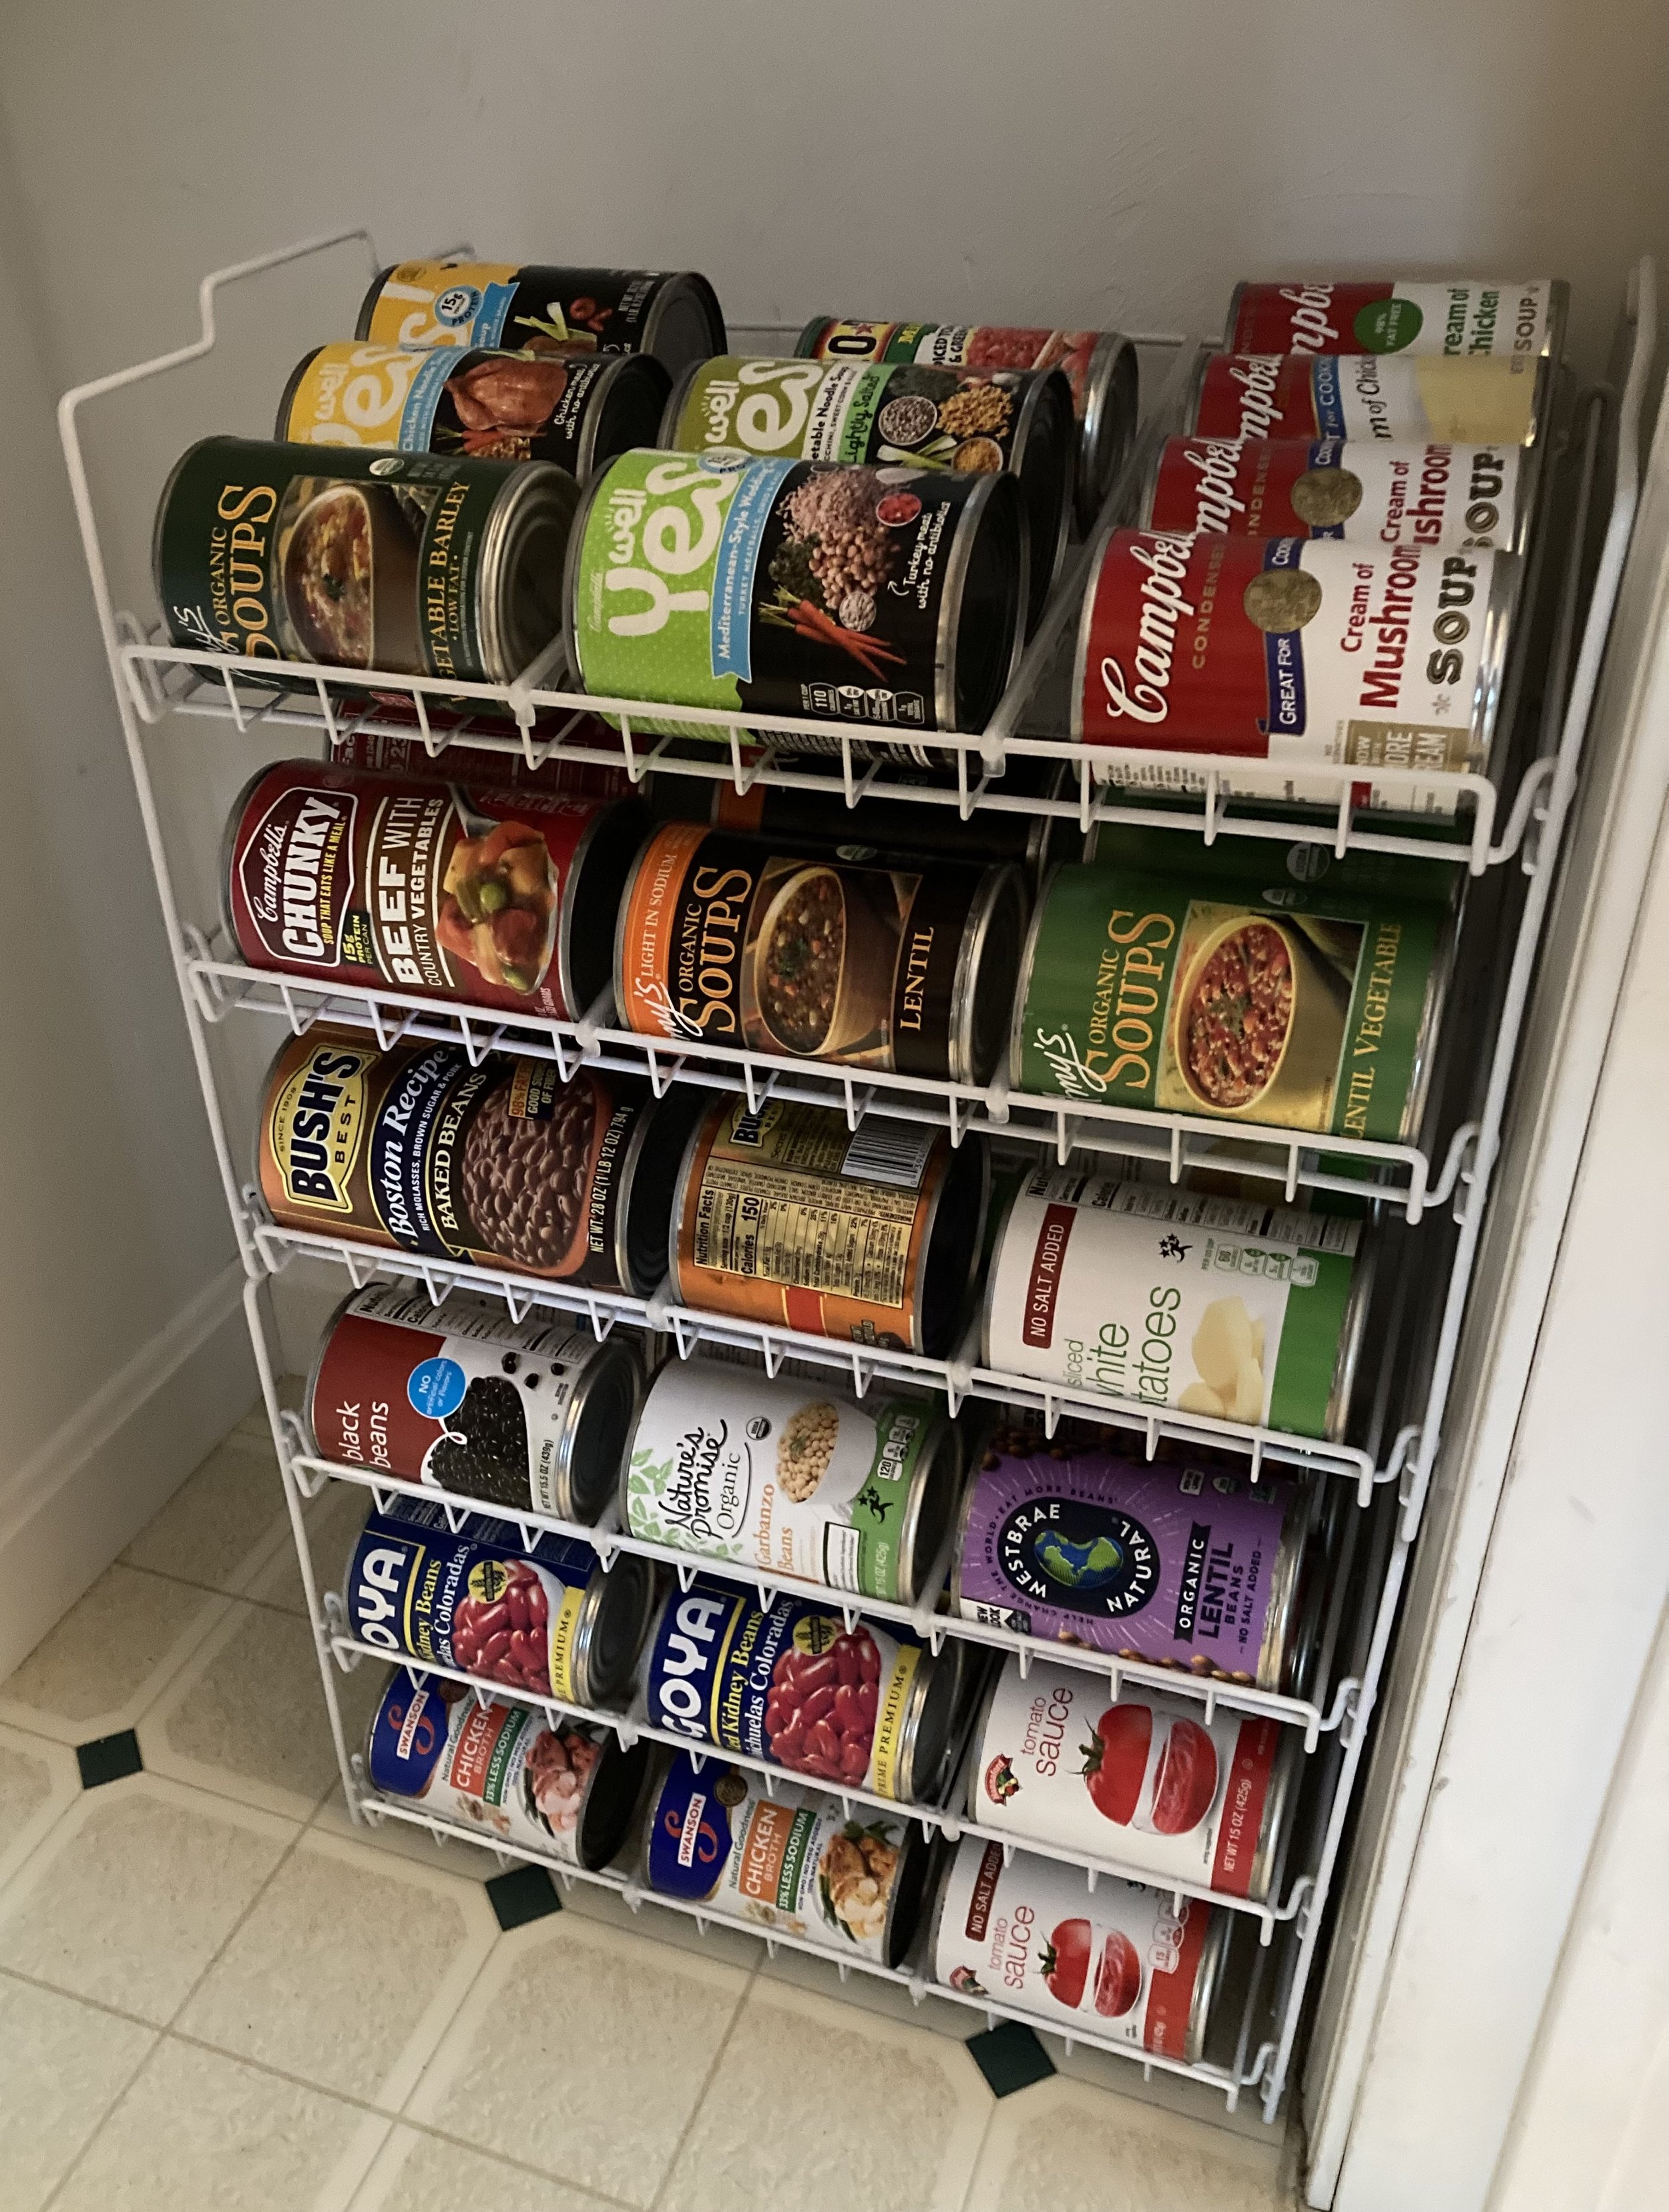
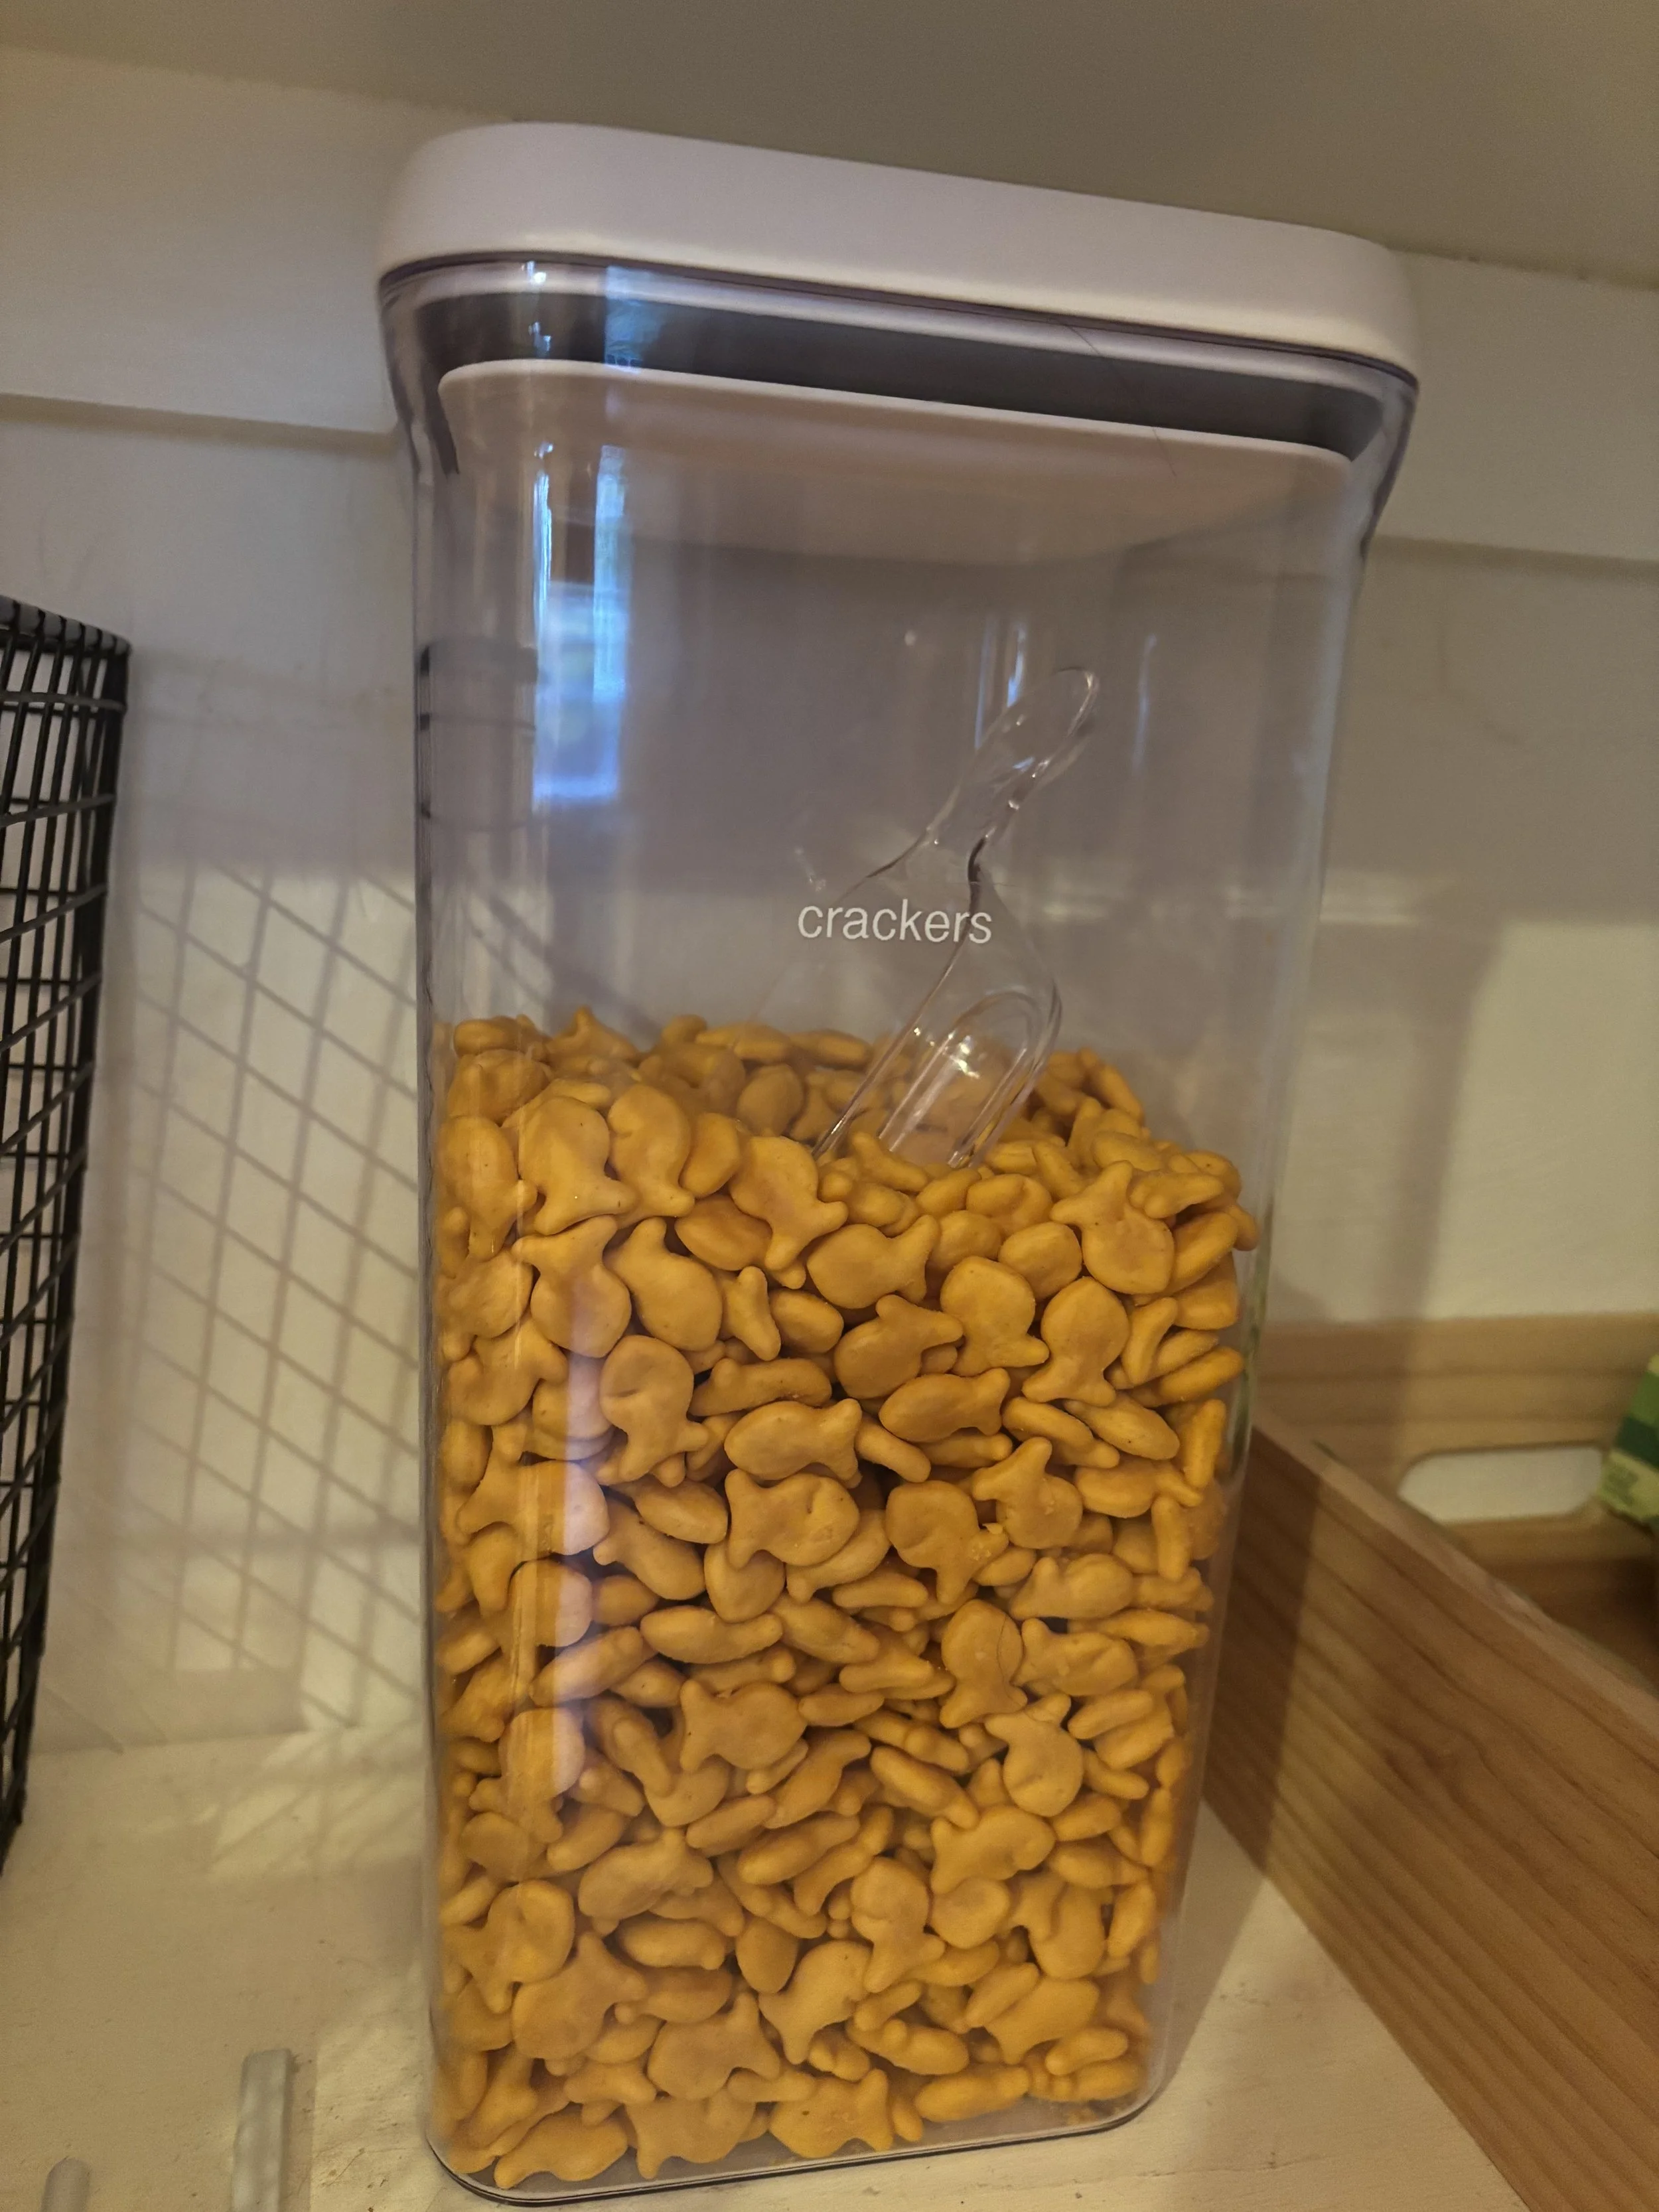
Another later addition to our pantry organization are these amazing stackable can racks for organizing canned goods. Before I had quite a few canned goods just sitting on the floor of the pantry and in a separate kitchen cupboard, but I never could see everything at once and often cans in the back got forgotten -- Now everything is in one spot where I can see them and I can meal plan more efficiently.
Another thing that's been a huge game changer is moving dry snacks into OXO POP Food Storage Containers. We love these for our snack crackers and pretzels. They keep everything fresh and it's easy to see if you're starting to run low on these staples. To keep the kids from going too wild with serving sizes we added clear OXO 1/2 Cup Scoops in each container too - making it easy to grab a serving. I used my Brother Label Maker to make labels for the containers. These can easily be peeled off and relabeled as needed.
This website shares personal opinions and experiences regarding a variety of topics. Please do your own research regarding all things and use information/opinions stated here at your own discretion and risk.
Picking a car seat for the baby you’ll soon be bringing home is such a stressful choice - so many options and opinions out there! Ultimately do your homework and pick the car seat that you feel is safe, fits your lifestyle, and fits correctly in your car. For us, we decided to skip the Infant Car Seat completely (don’t worry, we still used an appropriate car seat, I’ll explain) and I’ll tell you why we did… | This post contains affiliate links |
When my sister had her first baby I remember helping her carry the baby in her Infant Car Seat when she was about one or two months old and thinking (excuse my language) “this sucks!” It was exhausting, and extremely awkward to carry the weight of the baby and carseat (probably around 25 lbs total) by a handle away from your body, trying not to let it bump into your legs or anything else around you. Depending on the model of infant car seat you buy the seat itself can weigh 11-20 pounds, then you add the weight of the baby which will be an average of 6-9 pounds at birth and quickly get heavier as time goes on. That’s a lot of weight to awkwardly haul around.
However, my sister-in-law had decided to skip the infant car seat all together for her kids, and opted for a Convertible Car Seat from day one. I thought this was genius and we decided to do the same. A true Convertible Car Seat is one that’s good from birth through a particular weight limit, typically fairly high. For us the seat we chose was good for 4-65lbs, which meant that it would be rear-facing and perfect for bringing home the baby from the hospital and could grow with us and eventually convert to a forward-facing carseat up to the 65lb weight limit (which will take them into elementary school-age most likely) - and some Convertible Car Seats even go up to a 120lb limit!
By going with a Convertible Car Seat from day one, we only had to purchase one car seat instead of two, as most babies will outgrow their Infant Car Seat well before the age of one. Rather than buying a car seat that would only get used for several months, we invested in one that would grow with our baby and our needs. This saved us money in the long-run, and was less wasteful on the environment.
Since the Convertible Car Seats stay in the car (they don’t disconnect from a base and get carried around like an infant seat), I chose to wear our baby whenever we got to our destination with a Soft Structured Baby Carrier. I found this to be far more convenient and easier than lugging around an Infant Car Seat. Wearing your baby is also great for bonding, can help keep them healthier (they’re closer to you and less likely to be touched by strangers), and so much better ergonomically for your back and body than carrying an infant seat.
But what about waking up the baby, people ask? Yes, you tend to rouse the baby a little when you take them out of their car seat. But they reality is, it’s not recommended for them to sleep in their car seats for any signifiant amount of time as it can supposedly increase their risk of SIDS. Anyways in our experience with our two kids, they often woke up when we turned off the car, before I even tried to take them out of their carseat. And if they are tired enough, you should (hopefully) have no trouble getting them to go to sleep in their crib once you get home.
*Disclaimer: I am not a car seat expert, and my opinion should not be taken as fact. I am simply sharing our opinions on why we preferred a Convertible Car Seat over an Infant Car Seat. Before making your carseat decision, do your homework and discuss your options and concerns with your pediatrician and car seat experts like Car Seats for Littles.*
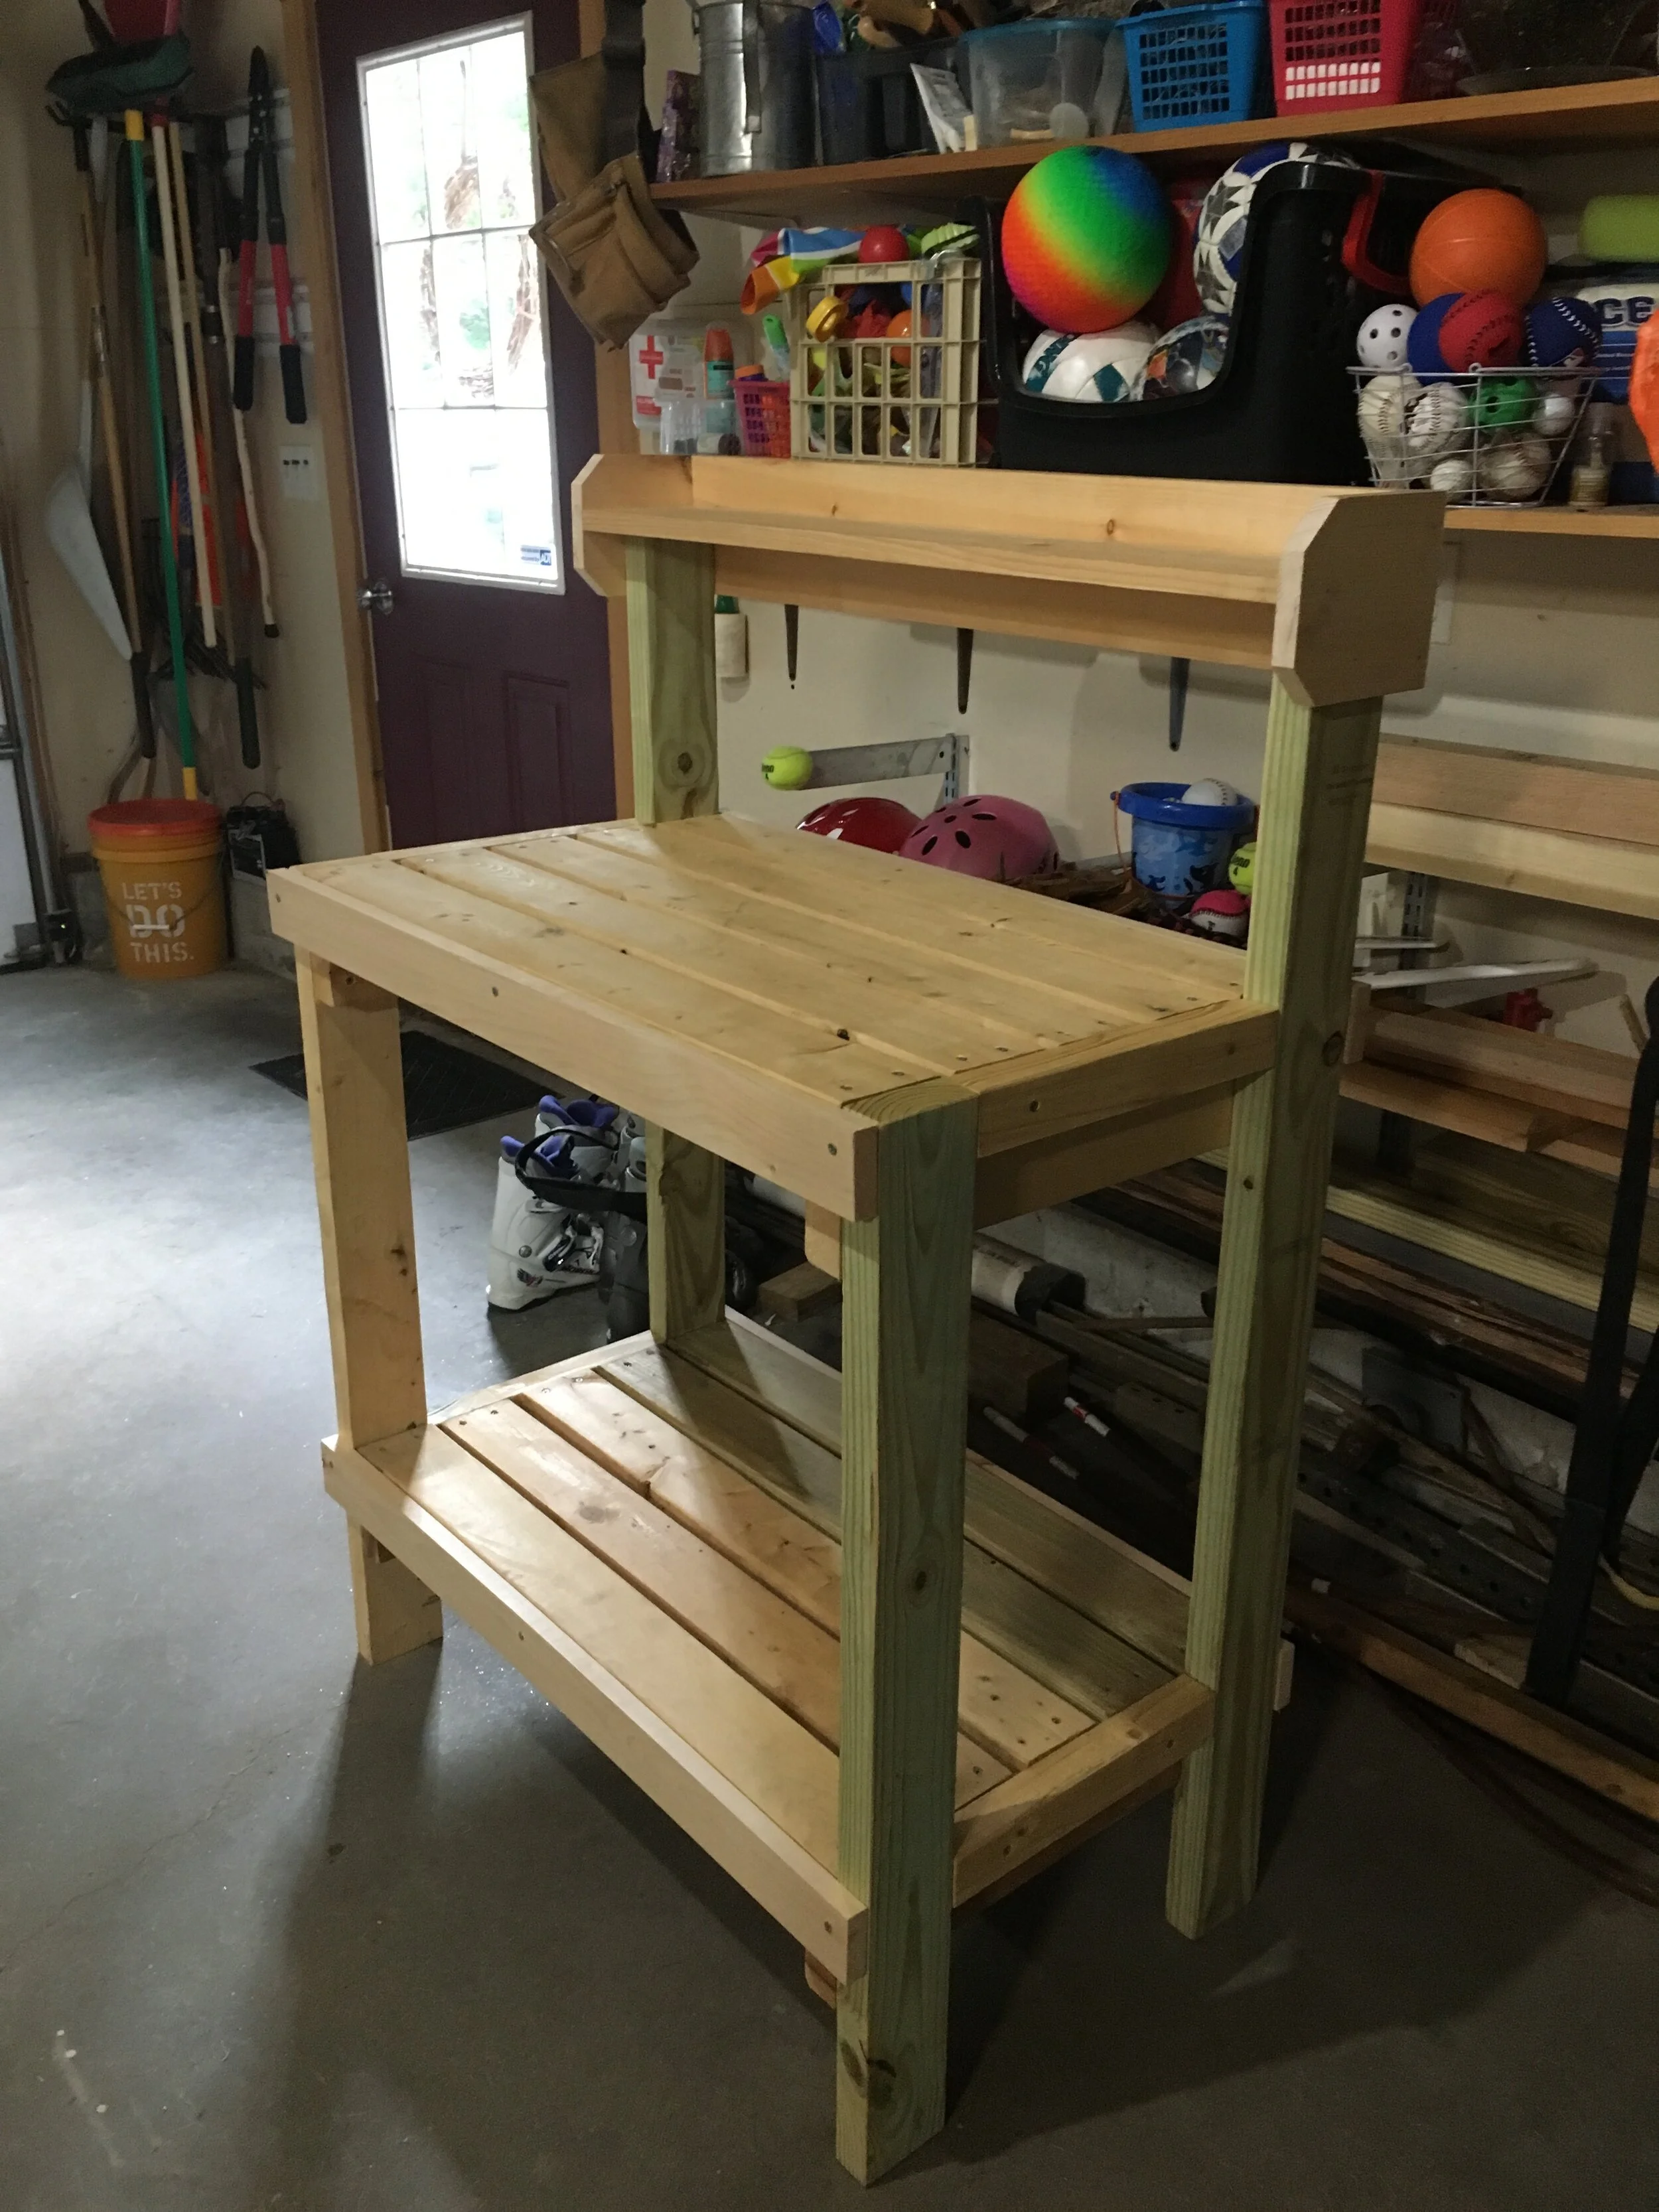
I’ve been wanting a potting bench for a while now - something by the back door to display some decor, use as an outdoor work station, and double as a place for UPS to leave packages. After looking around online and at local stores, I couldn’t find anything that I liked that fit the narrow space - so I did what any #woodworkingmom would do, I decided to build it myself. | This post is not sponsored but does contain affiliate links |
{ Note: The plans I worked from were from Ana White and can be found HERE }
I came across these Ana White plans for a Simple Potting Bench on Pinterest and thought it was perfect! It was exactly the simple, rugged style I was looking for and easy to tailor to our space too. Most of the wood needed were 2x4’s, which are sturdy and cheap - and thankfully between our garage and my father-in-law’s garage we had all the wood scraps I needed to piece together this project. Since I used leftover wood we already had, this project cost me nothing which was pretty amazing!
Since I only used what wood we had on hand, I had to make do - some of the wood was pressure-treated, some was not, some had knot holes or gashes, and not all of it was “true” (straight). But that was fine by me as this was to be a rustic piece for outside.
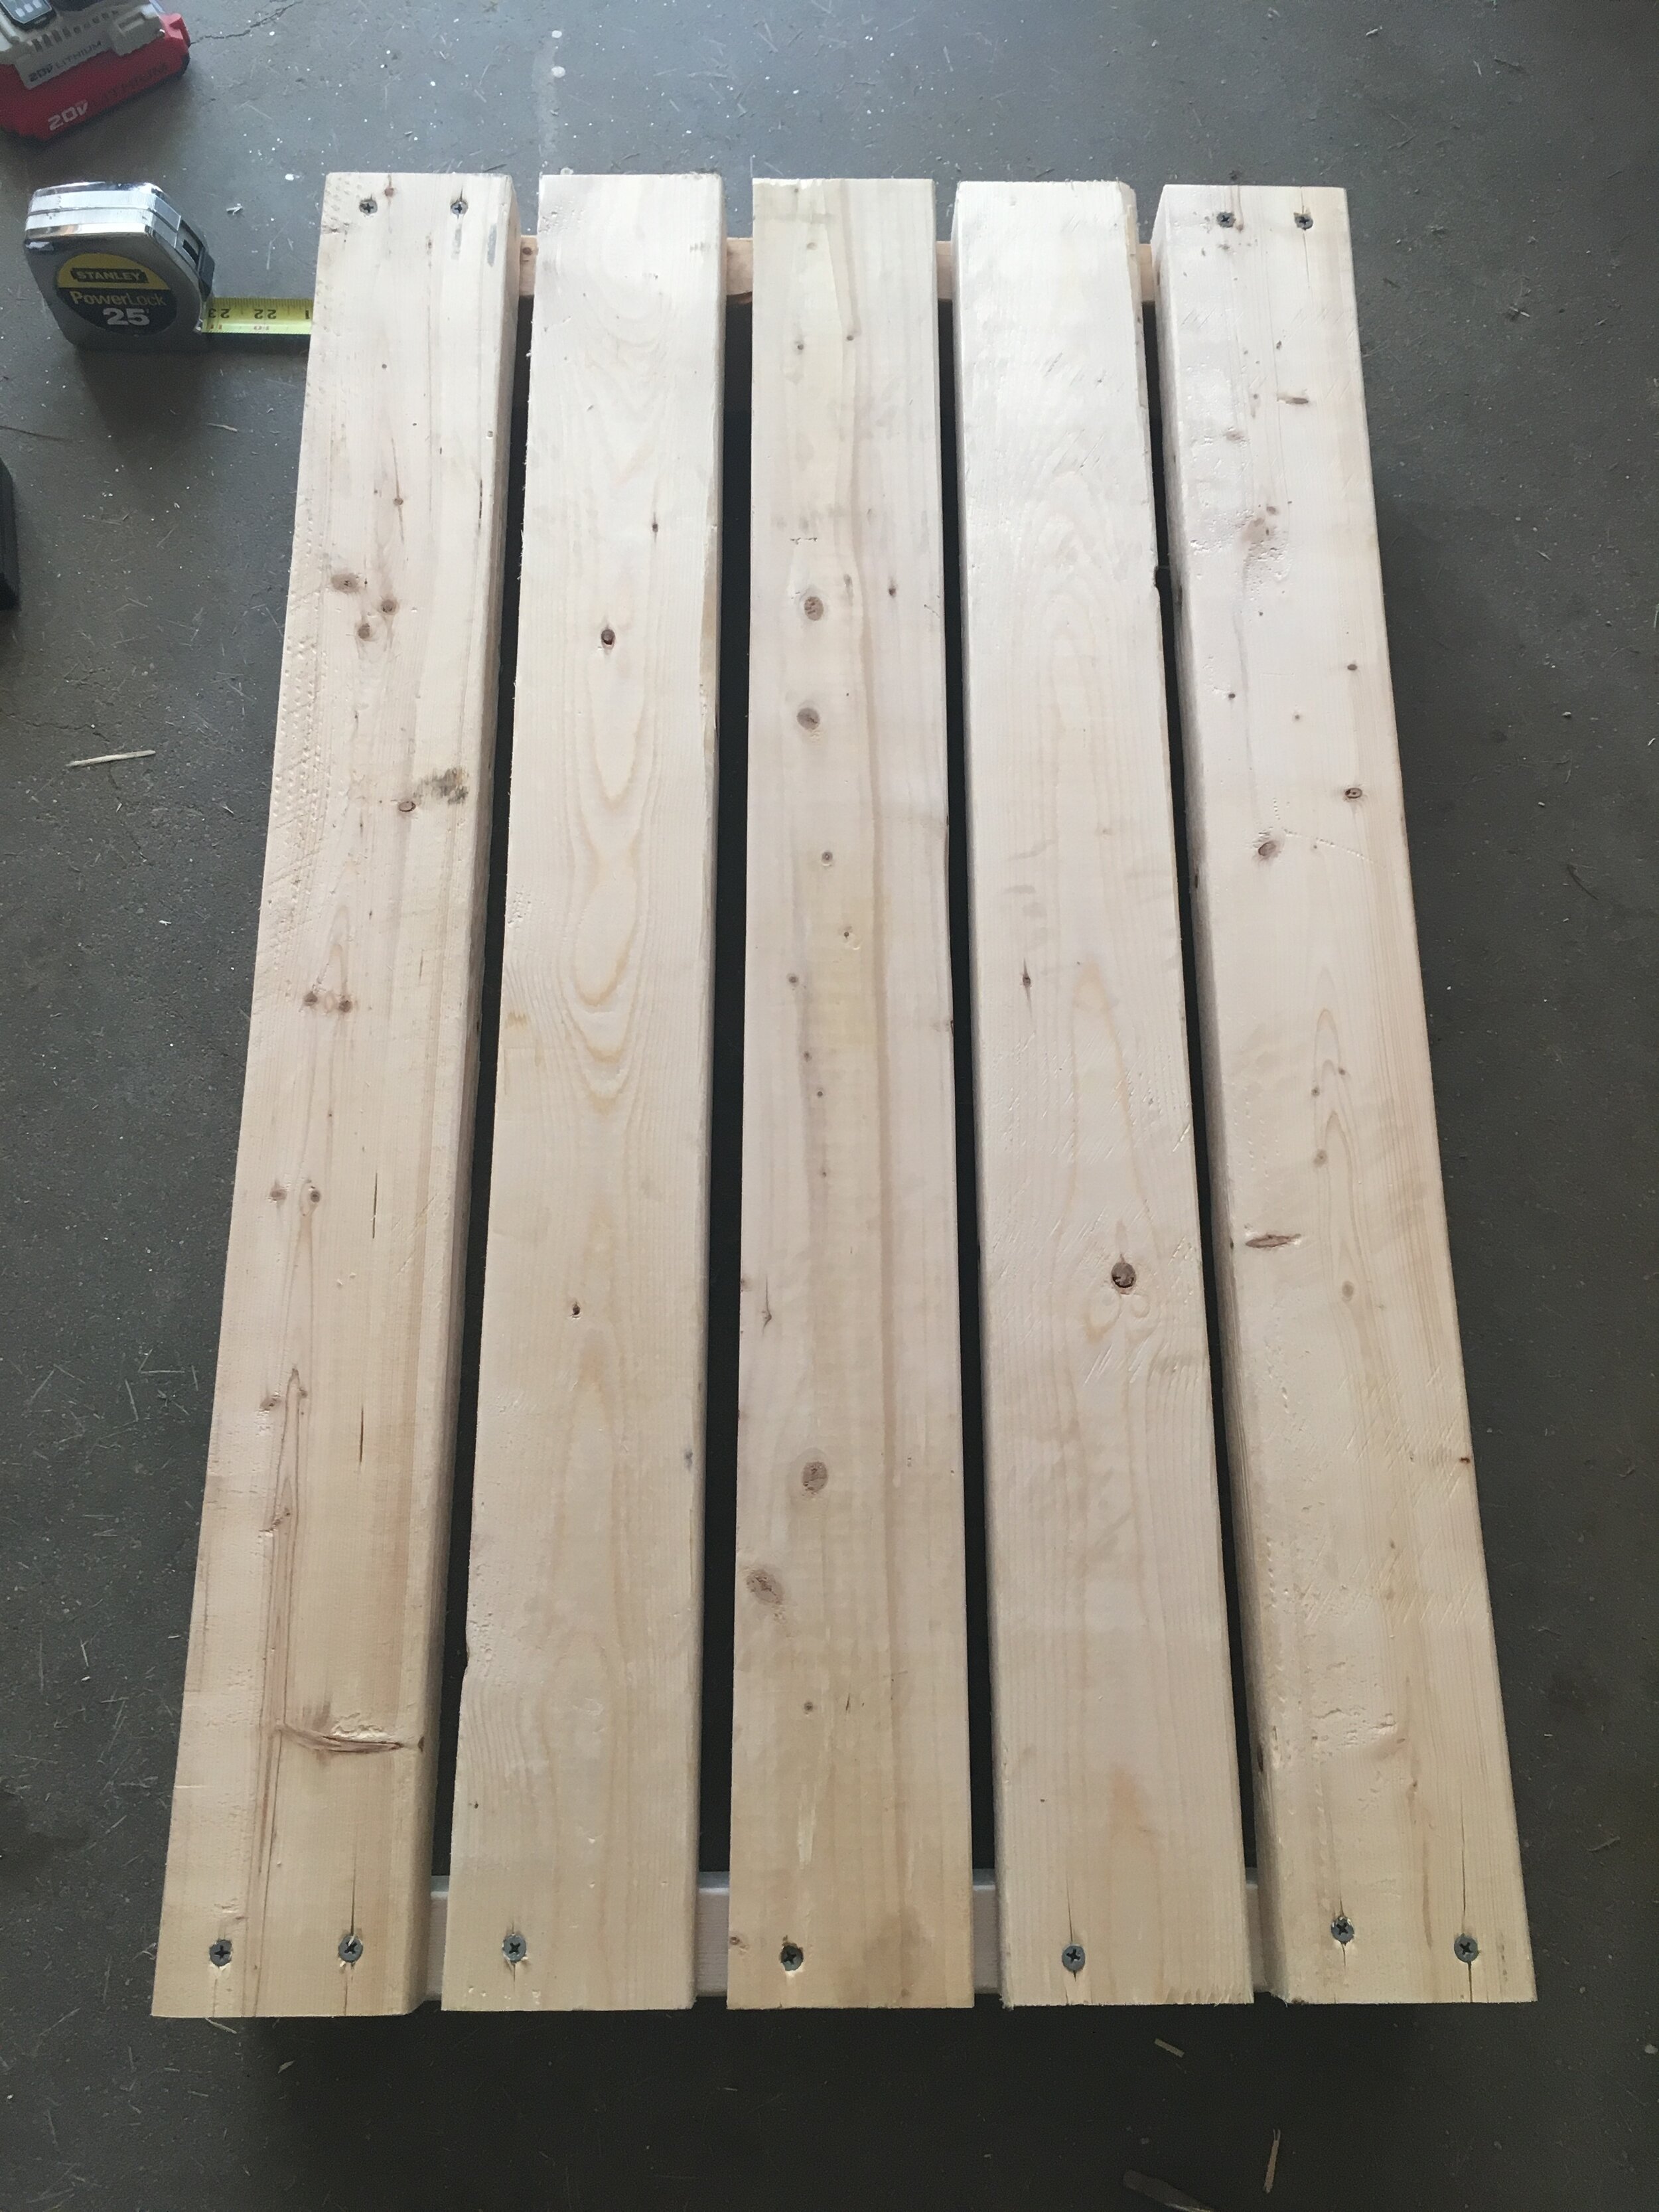
Before I started building, I followed Ana White’s “cut list,” cutting and making piles of all the wood in the dimensions I would need to build the project. I carefully chose the lumber for each section to minimize how the knot holes, gashes, or crooked pieces would be seen in the final piece. For our potting bench I made it 4 inches narrower so it would fit against the small wall next to our back door and because of this I had to adjust my cut list and refigure some of the overall dimensions.
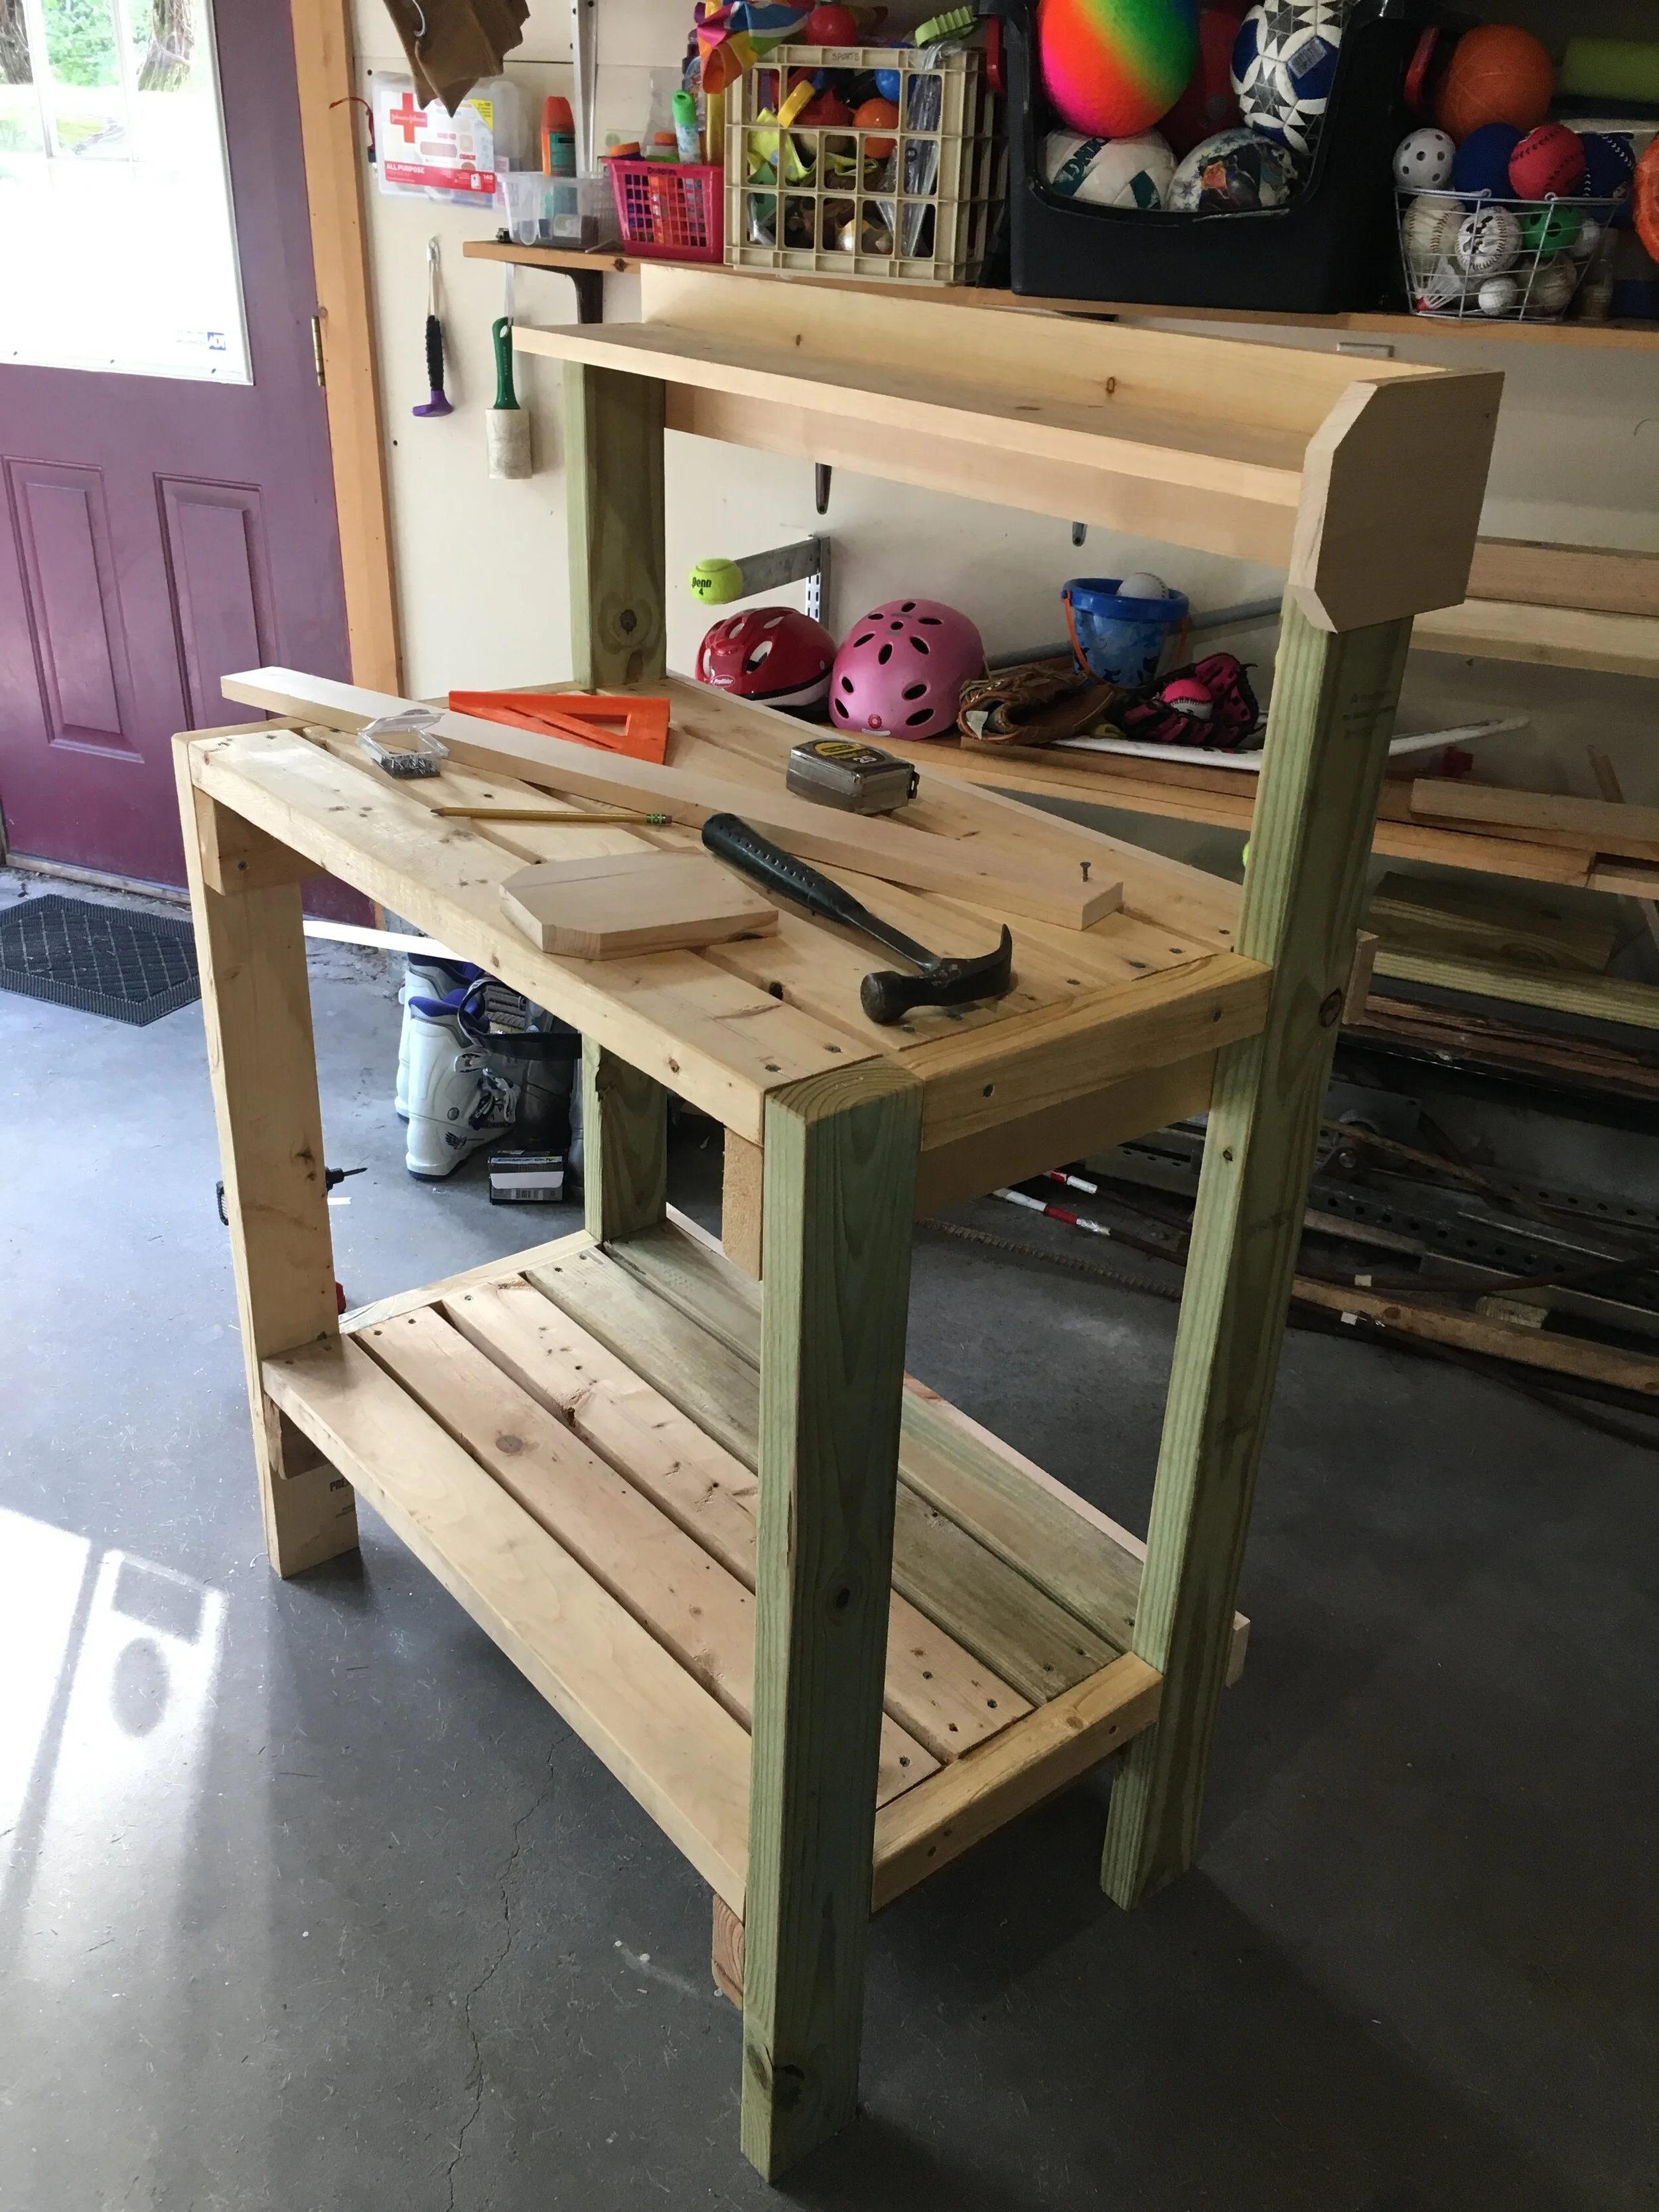
The next step was constructing the shelves individually - attaching the outer planks first, checking for square, then spacing out the middle planks and attaching them. To build this whole project I used an Impact Driver, which made the entire project go much quicker and easier.
To attach the legs, I laid the project on it’s side and carefully measured the distances between the legs as well as up the legs before attaching the shelves to makes sure everything would be as level and as square as possible.
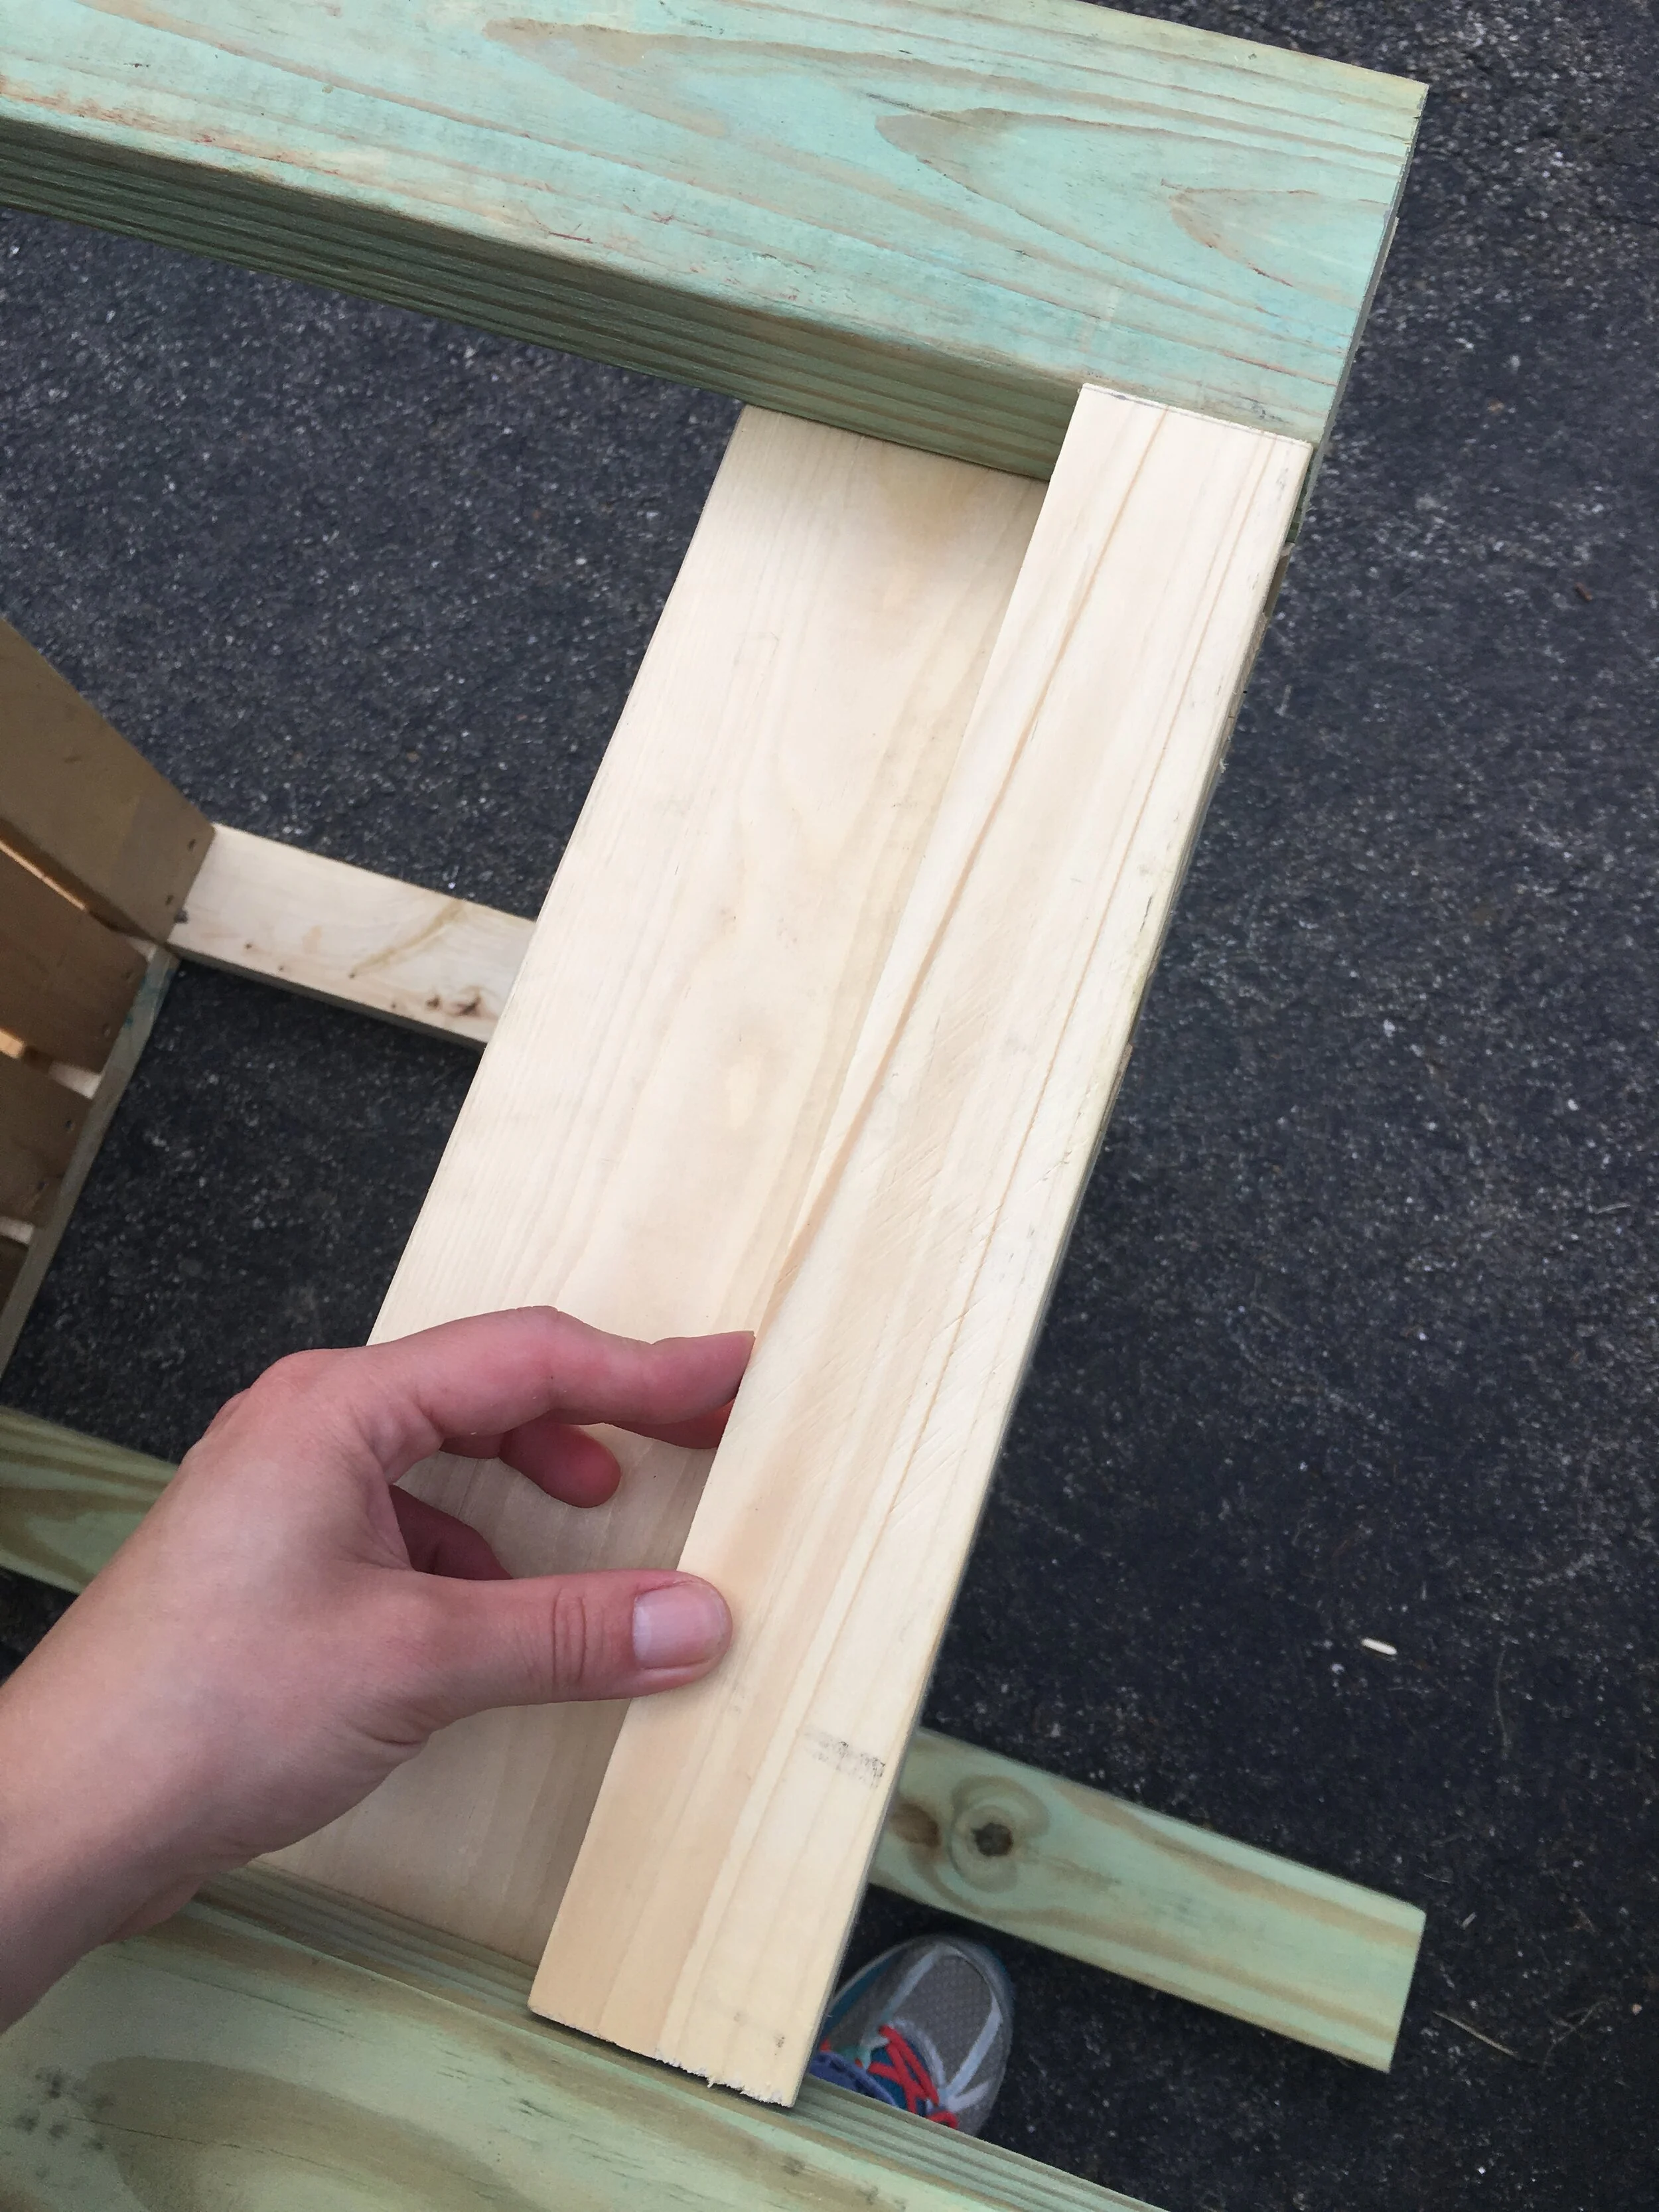
Finally to make the project look more “finished” I added some wood scraps to the sides of the project to conceal the butt ends of the shelves and make it look a little more polished.
I also decided to add some 1x3”s to the front of the shelves to make it look a little more polished from the front as well. (I did not counter-sink these screws, but I should have as they were more noticeable than I was expecting in the finished piece.)
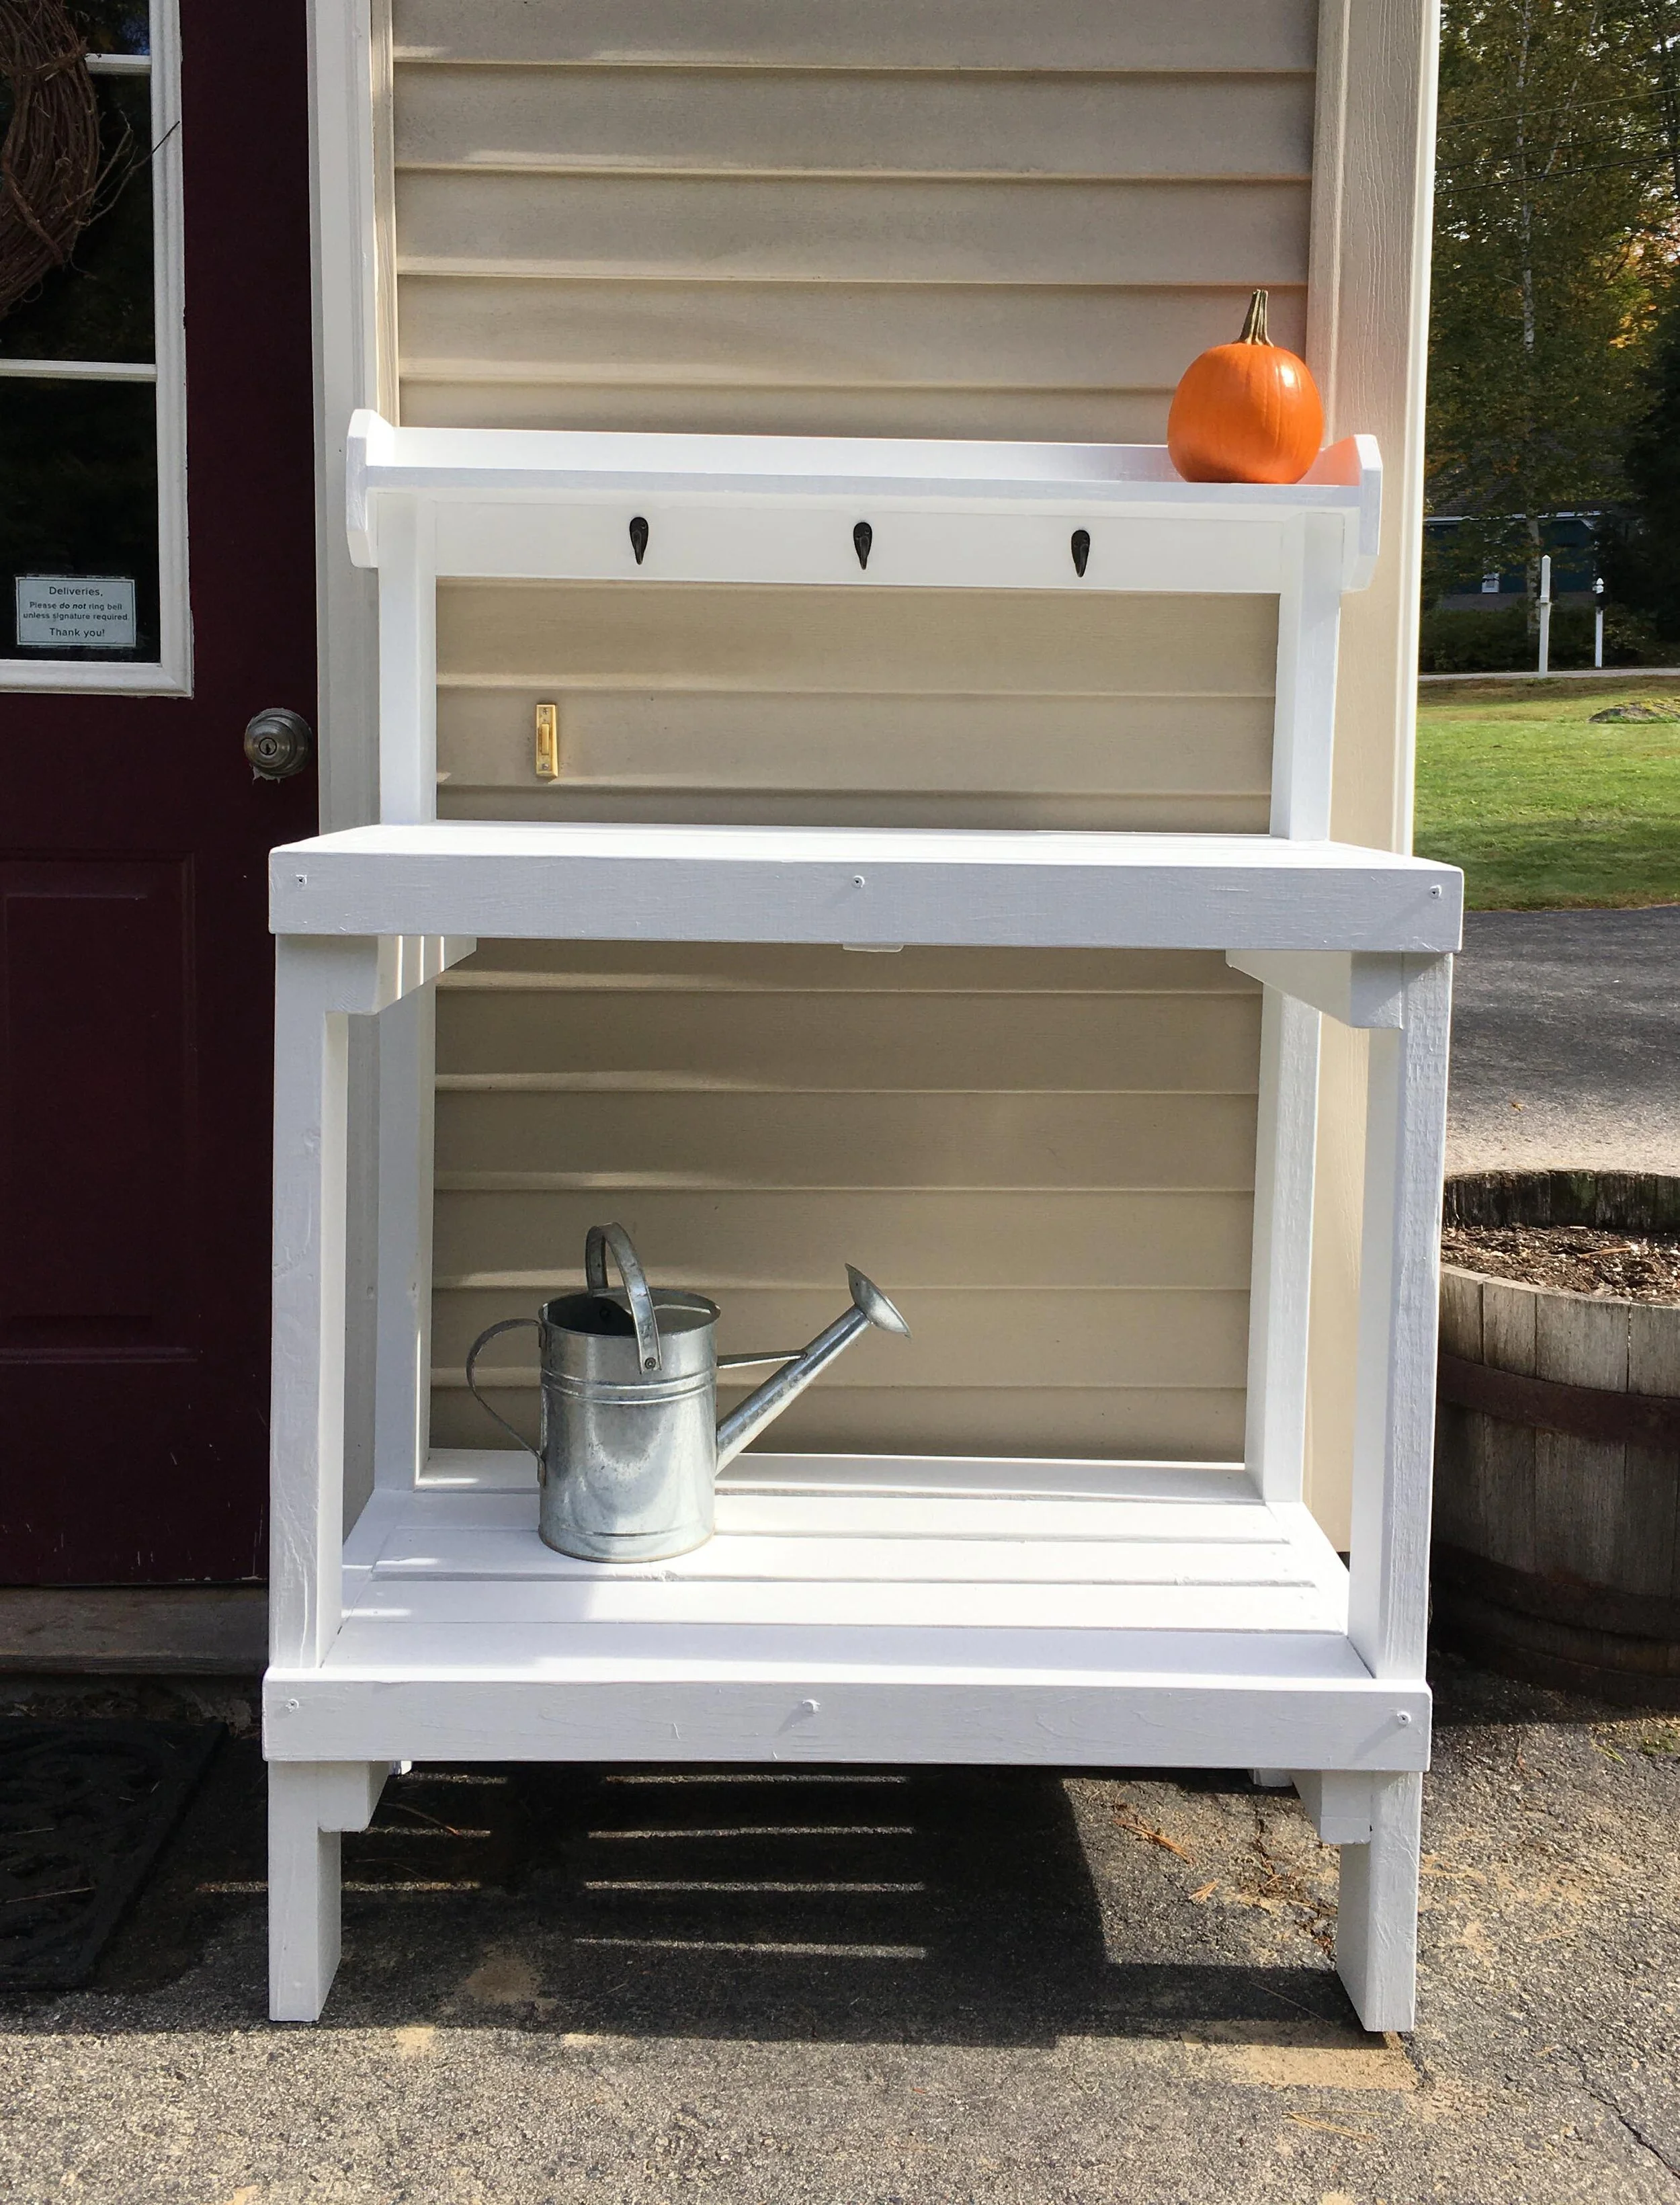
Then came time for painting - I chose to paint the whole potting bench in several coats of my favorite Valspar Stainblocking Bonding Primer/Sealer. This stuff has great coverage and really covers and seals well. My one regret was not giving all the wood pieces a single coat of paint before assembling - as once everything was assembled it was a huge pain to get in all the nooks and crannies.
Finally I finished the project by adding a few little hooks underneath the shelf (very similar hooks linked here), from which I can hang tools or decor. I’m really happy with how this came out and how quickly it came together. I can’t wait to decorate it with some plants come next spring!
PS - I’m thinking this potting bench would also be great for parties and BBQ’s! It would be perfect on a patio or deck as a makeshift buffet table.
UPDATE: Spring, 2020
Just wanted to give a quick update after I made the potting bench last Fall: Over winter we decided to store it in our shed, just so we wouldn’t have to snow blow and shovel around it all winter, but as soon as the threat of snow passed in early Spring we brought it right back out. It’s been wonderful to have for planting and working on outside this spring, and due to the current Pandemic situation we’re getting more packages than ever so it’s great to have a designated spot for deliveries (and right in view of our security camera too).
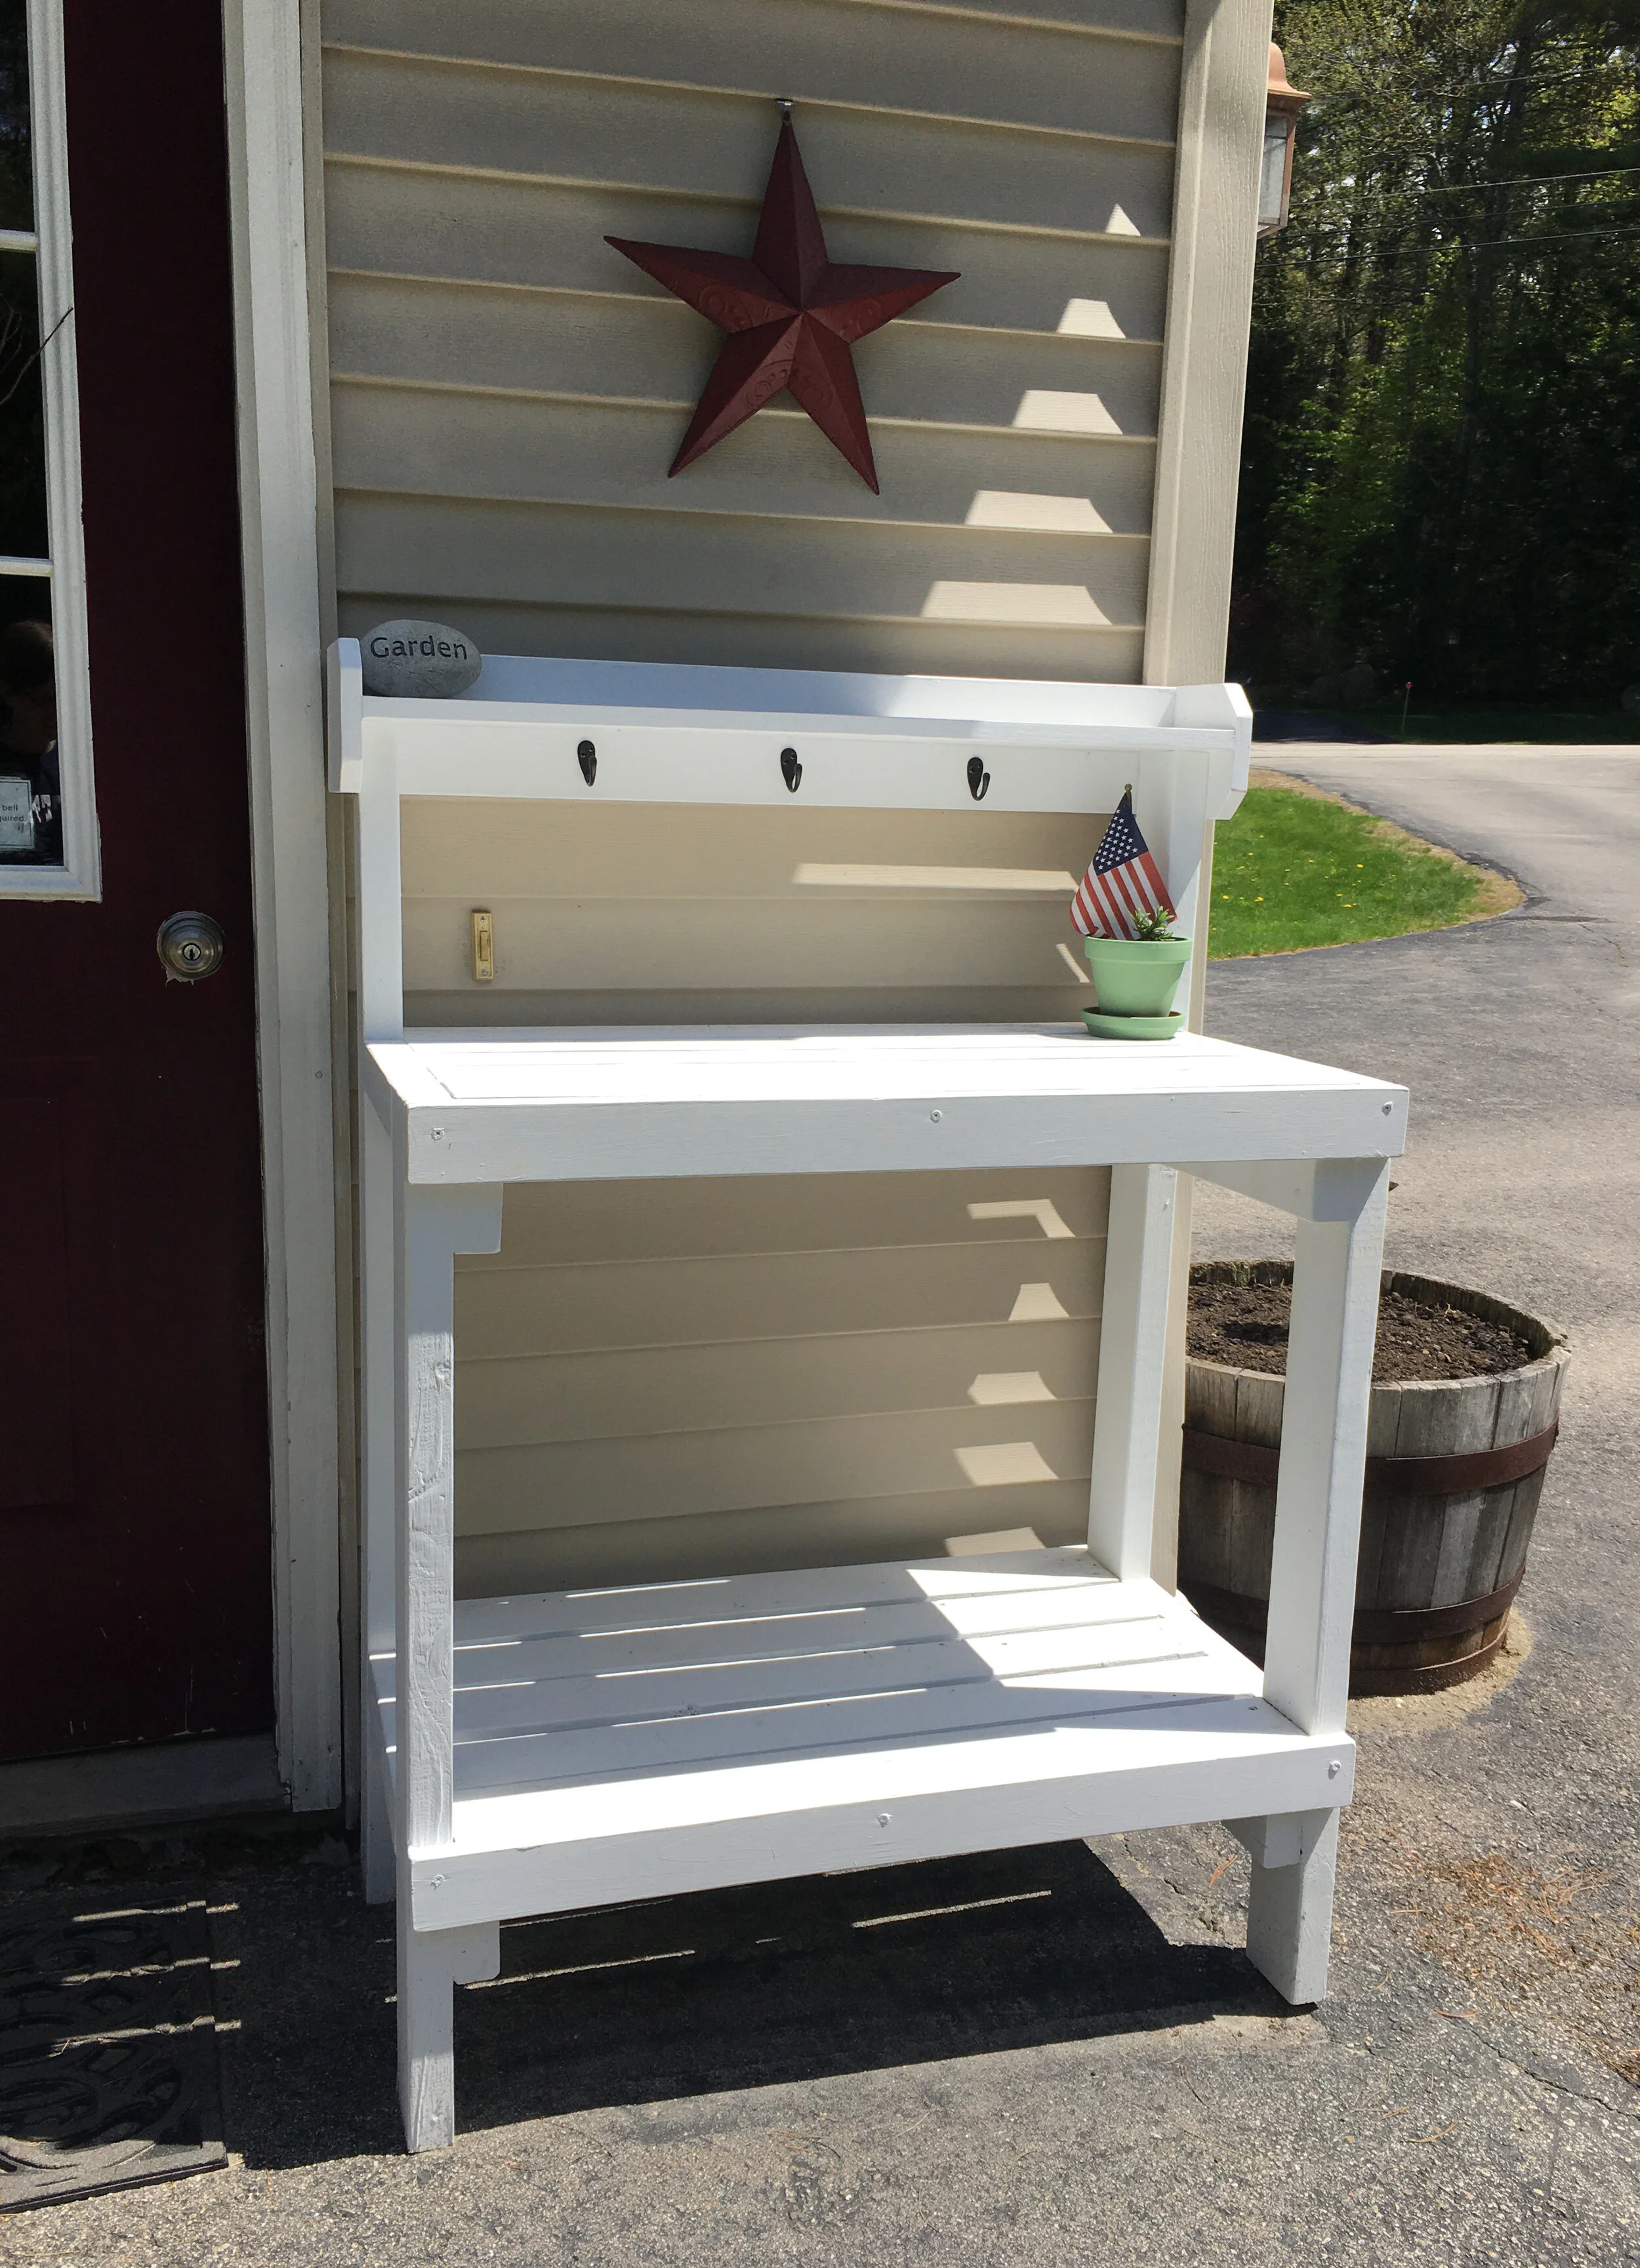
For decor right now I'm keeping it very simple, especially since the potting bench is utilized daily for mail - there's just a garden rock, a metal barn star (hung from a special hook that doesn't damage vinyl siding), and a small potted lavender plant with an American flag - all items we already had around our house.
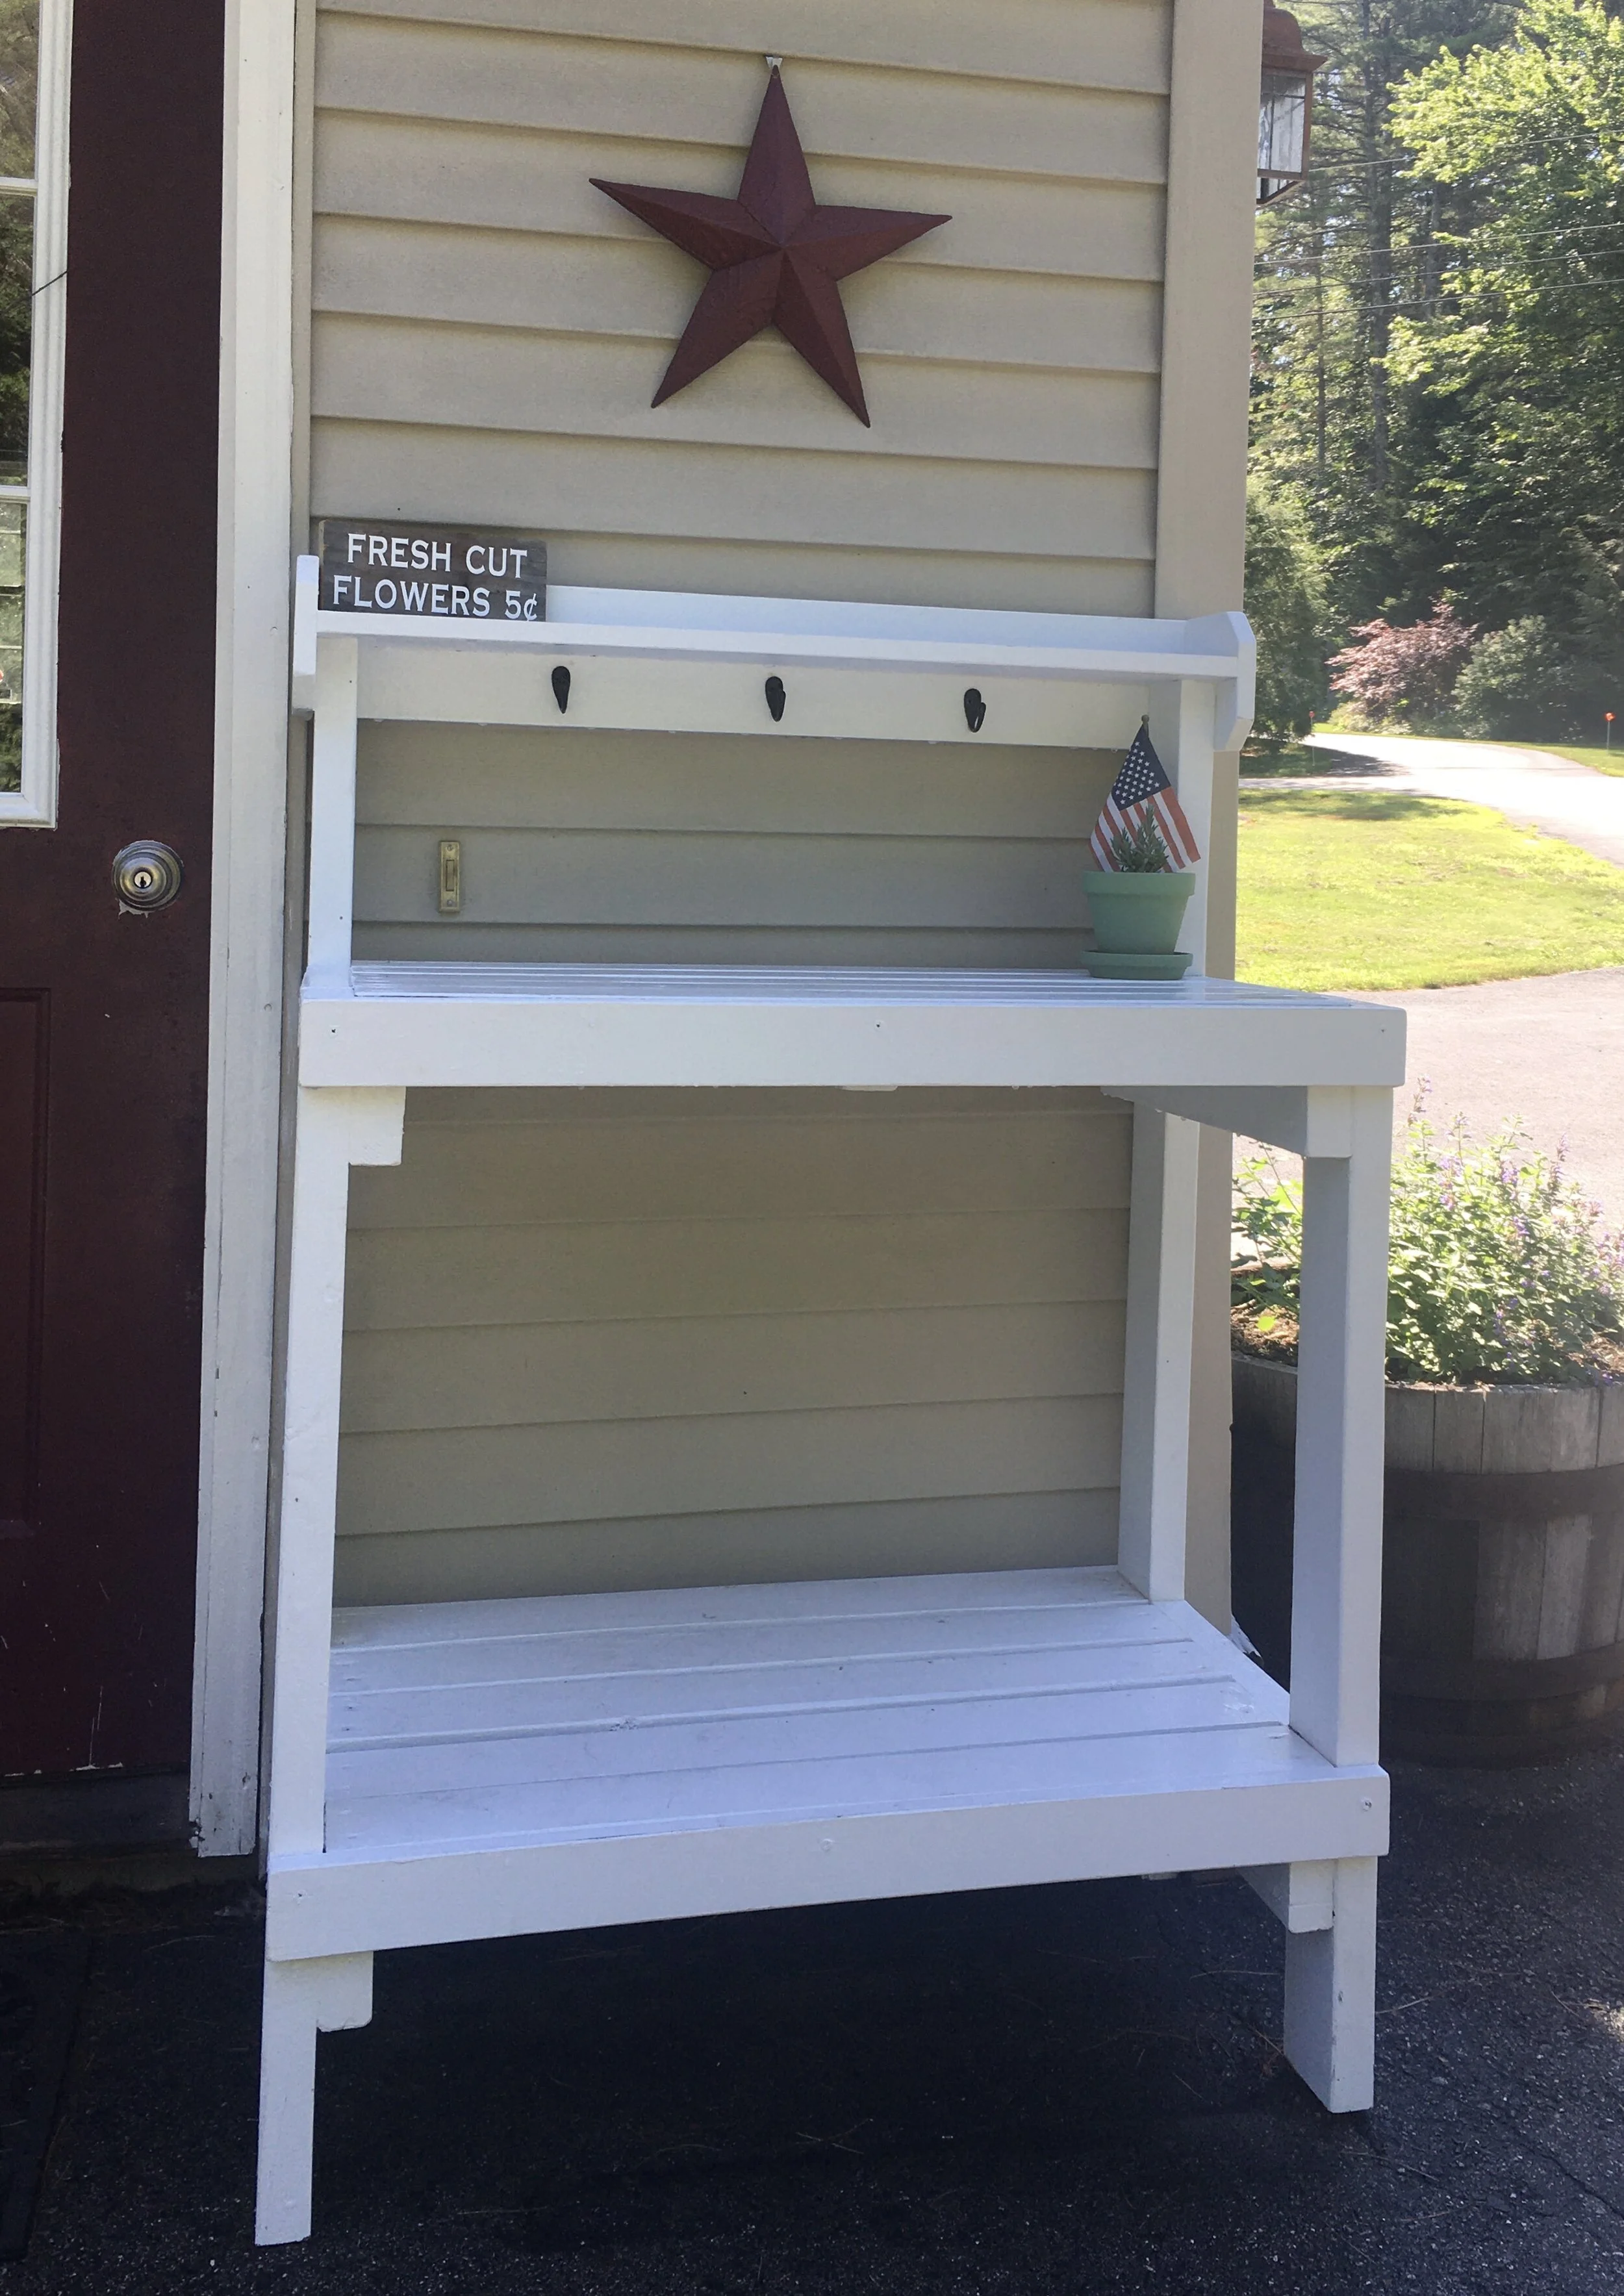
Summer, 2020 - sharing another little decor update for the potting bench:
I found this weathered piece of wood in our scrap bin and thought it would make a cute sign for the potting bench. I used my Cricut Machine to design and cut a stencil that said "Fresh Cut Flowers 5¢" and used it to paint the sign. I think it looks cute and it's a great finishing touch!
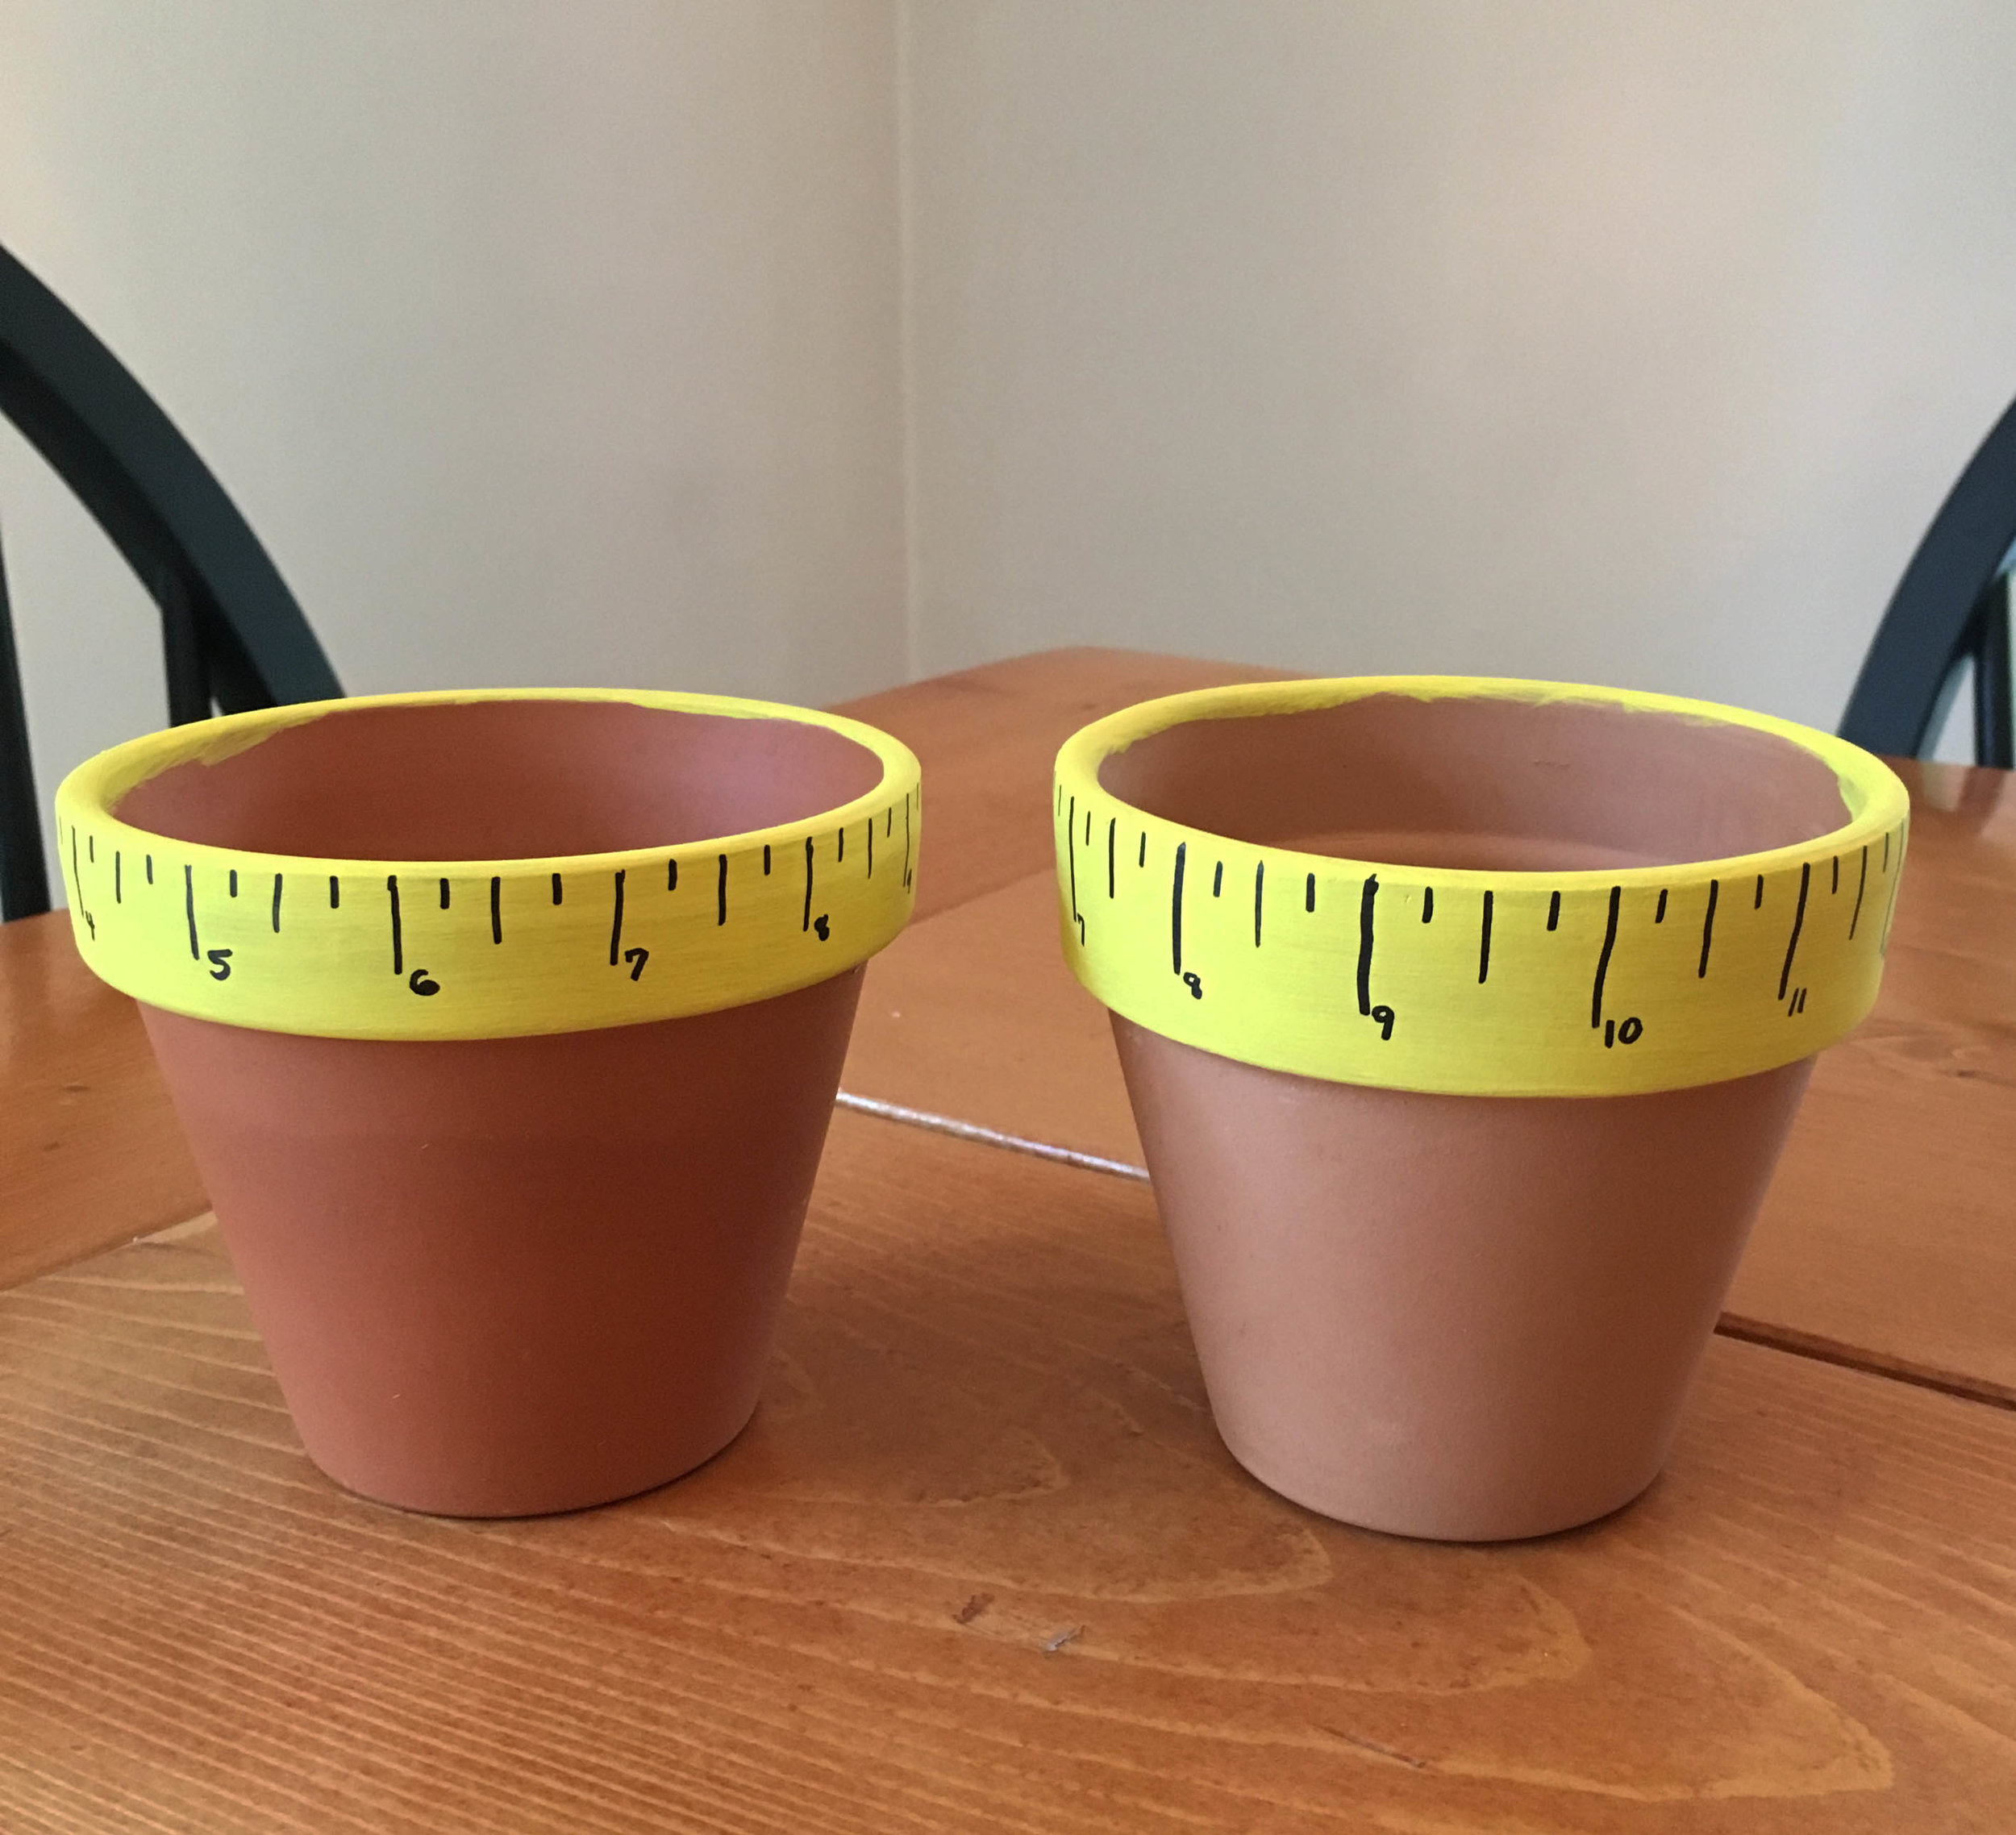
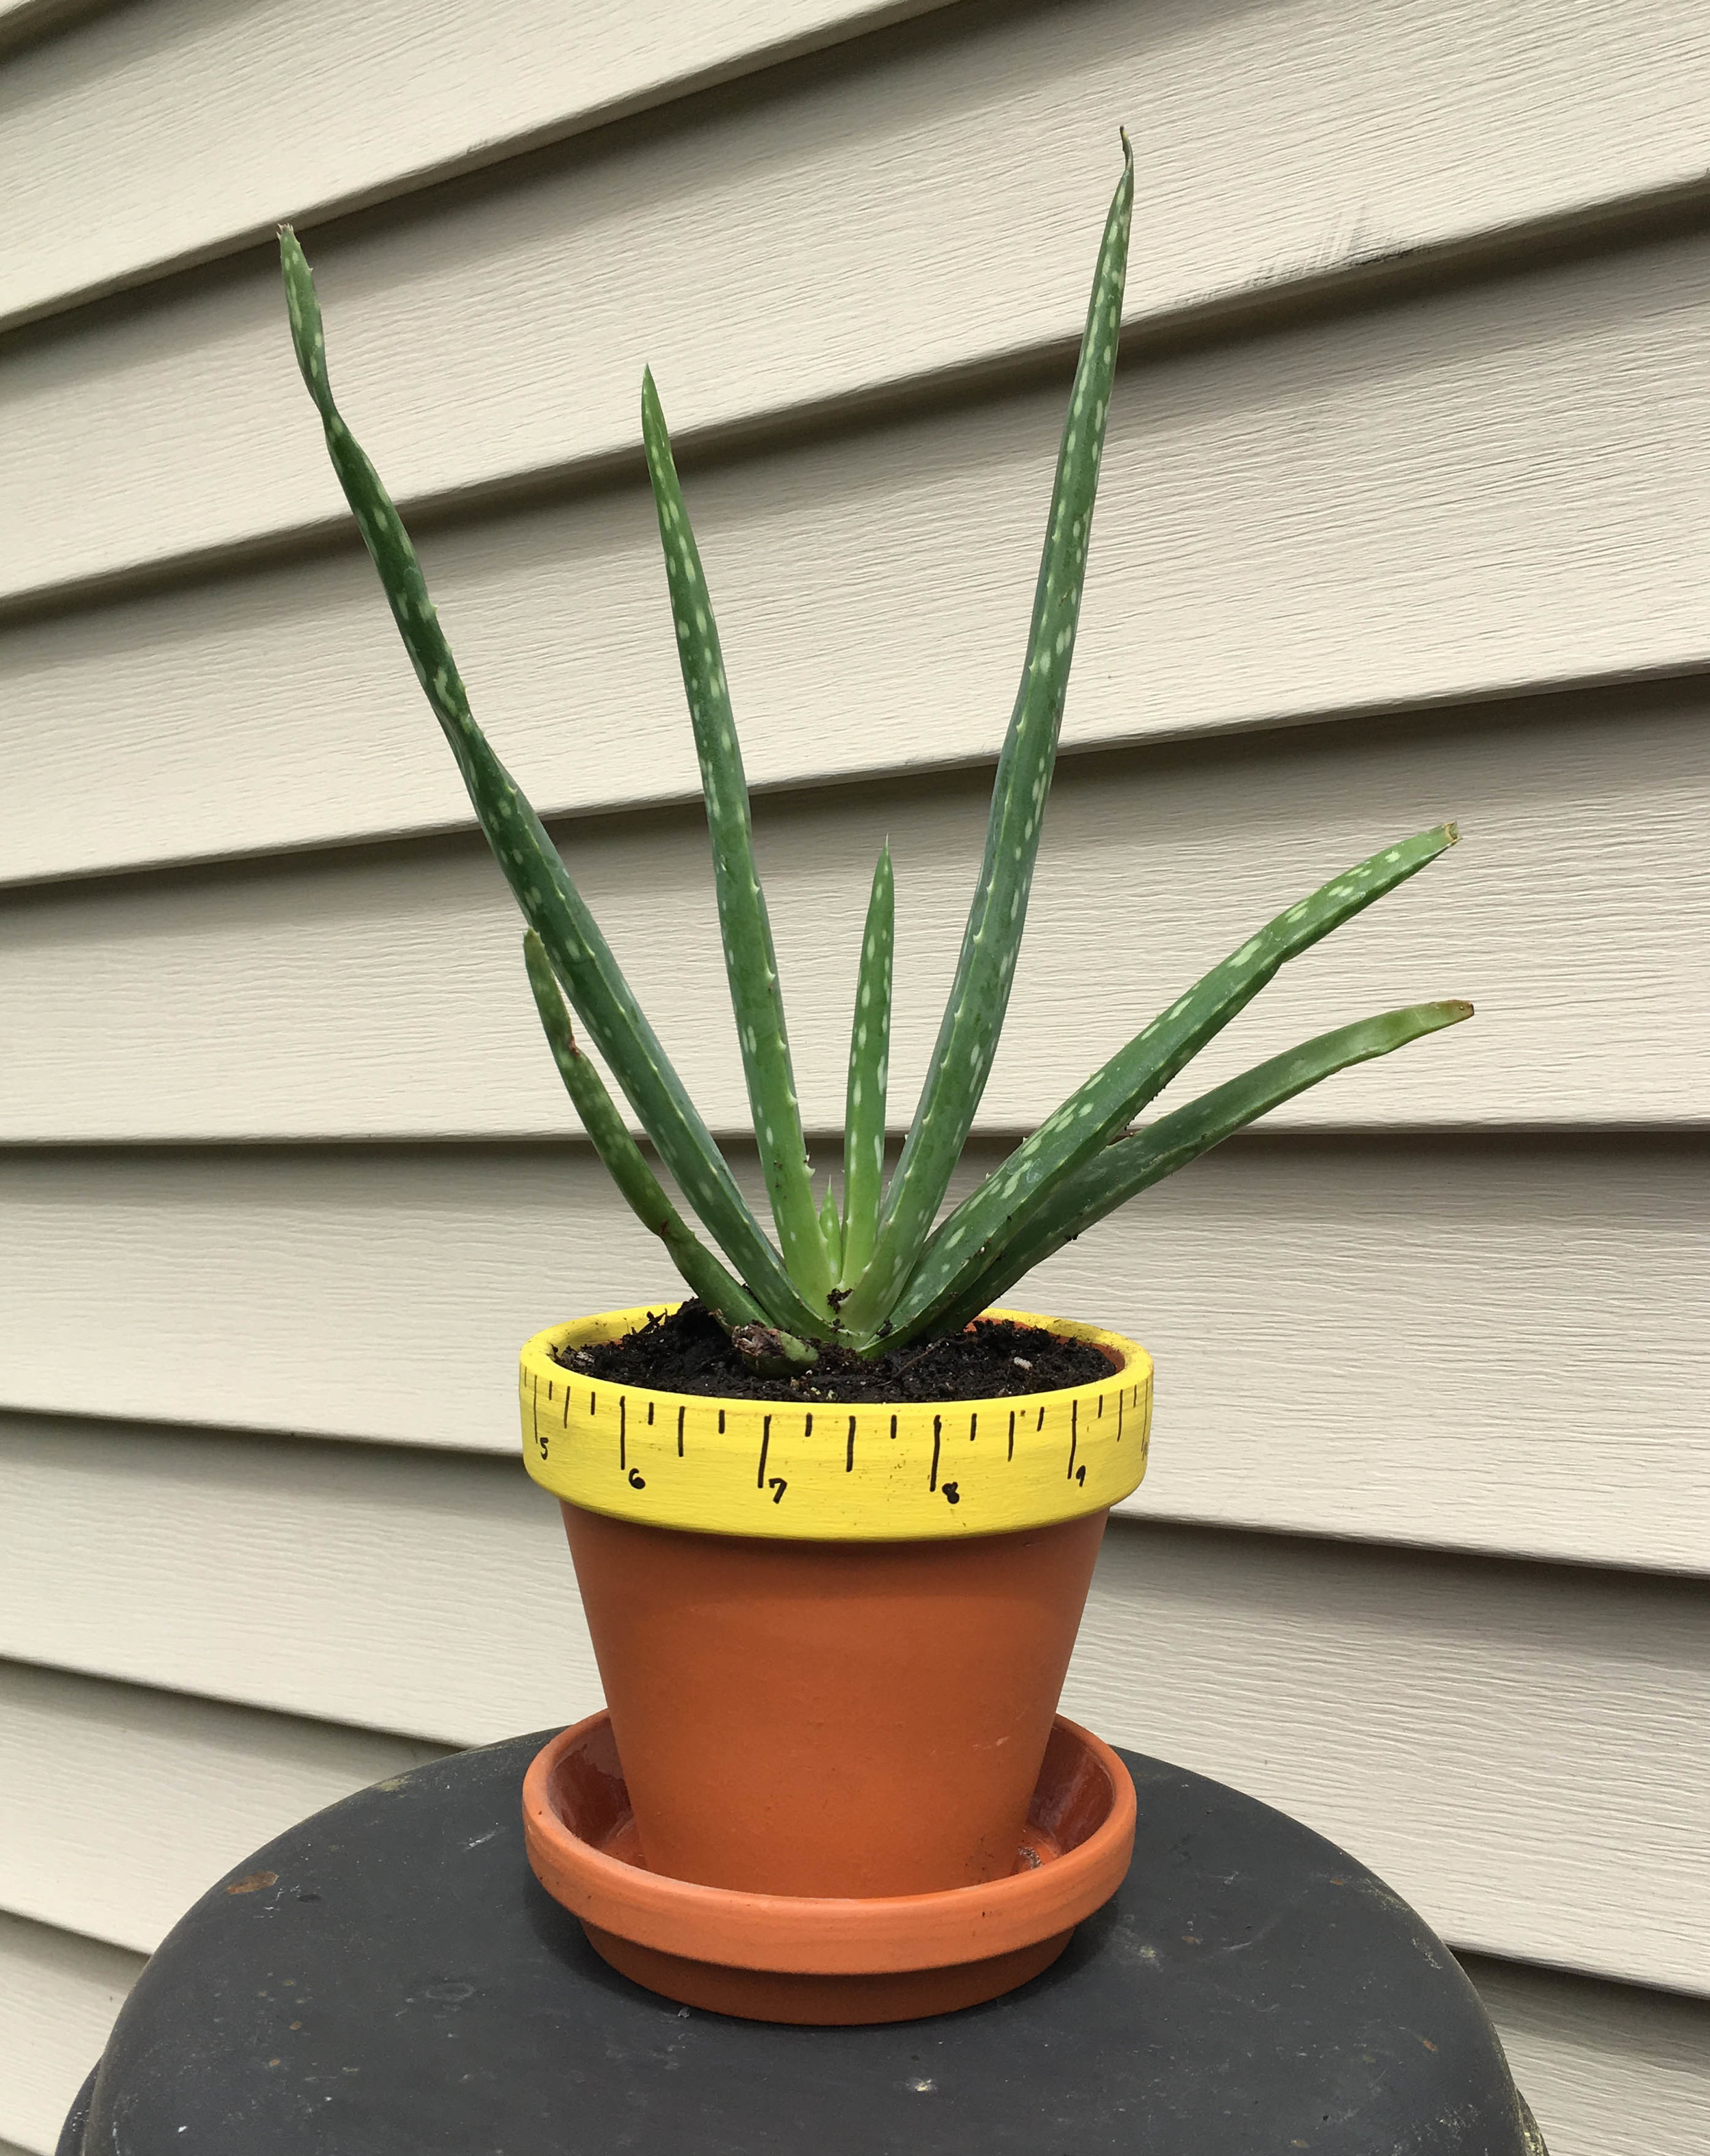
Teacher gift ideas are always tough… I always want to do something thoughtful, useful, but still affordable. This year we decided to make ruler painted flower pots to go with the “Thanks for helping me GROW” theme. In them we planted small aloe vera plants which will come in handy for soothing sunburns over summer vacation. | This post contains affiliate links |
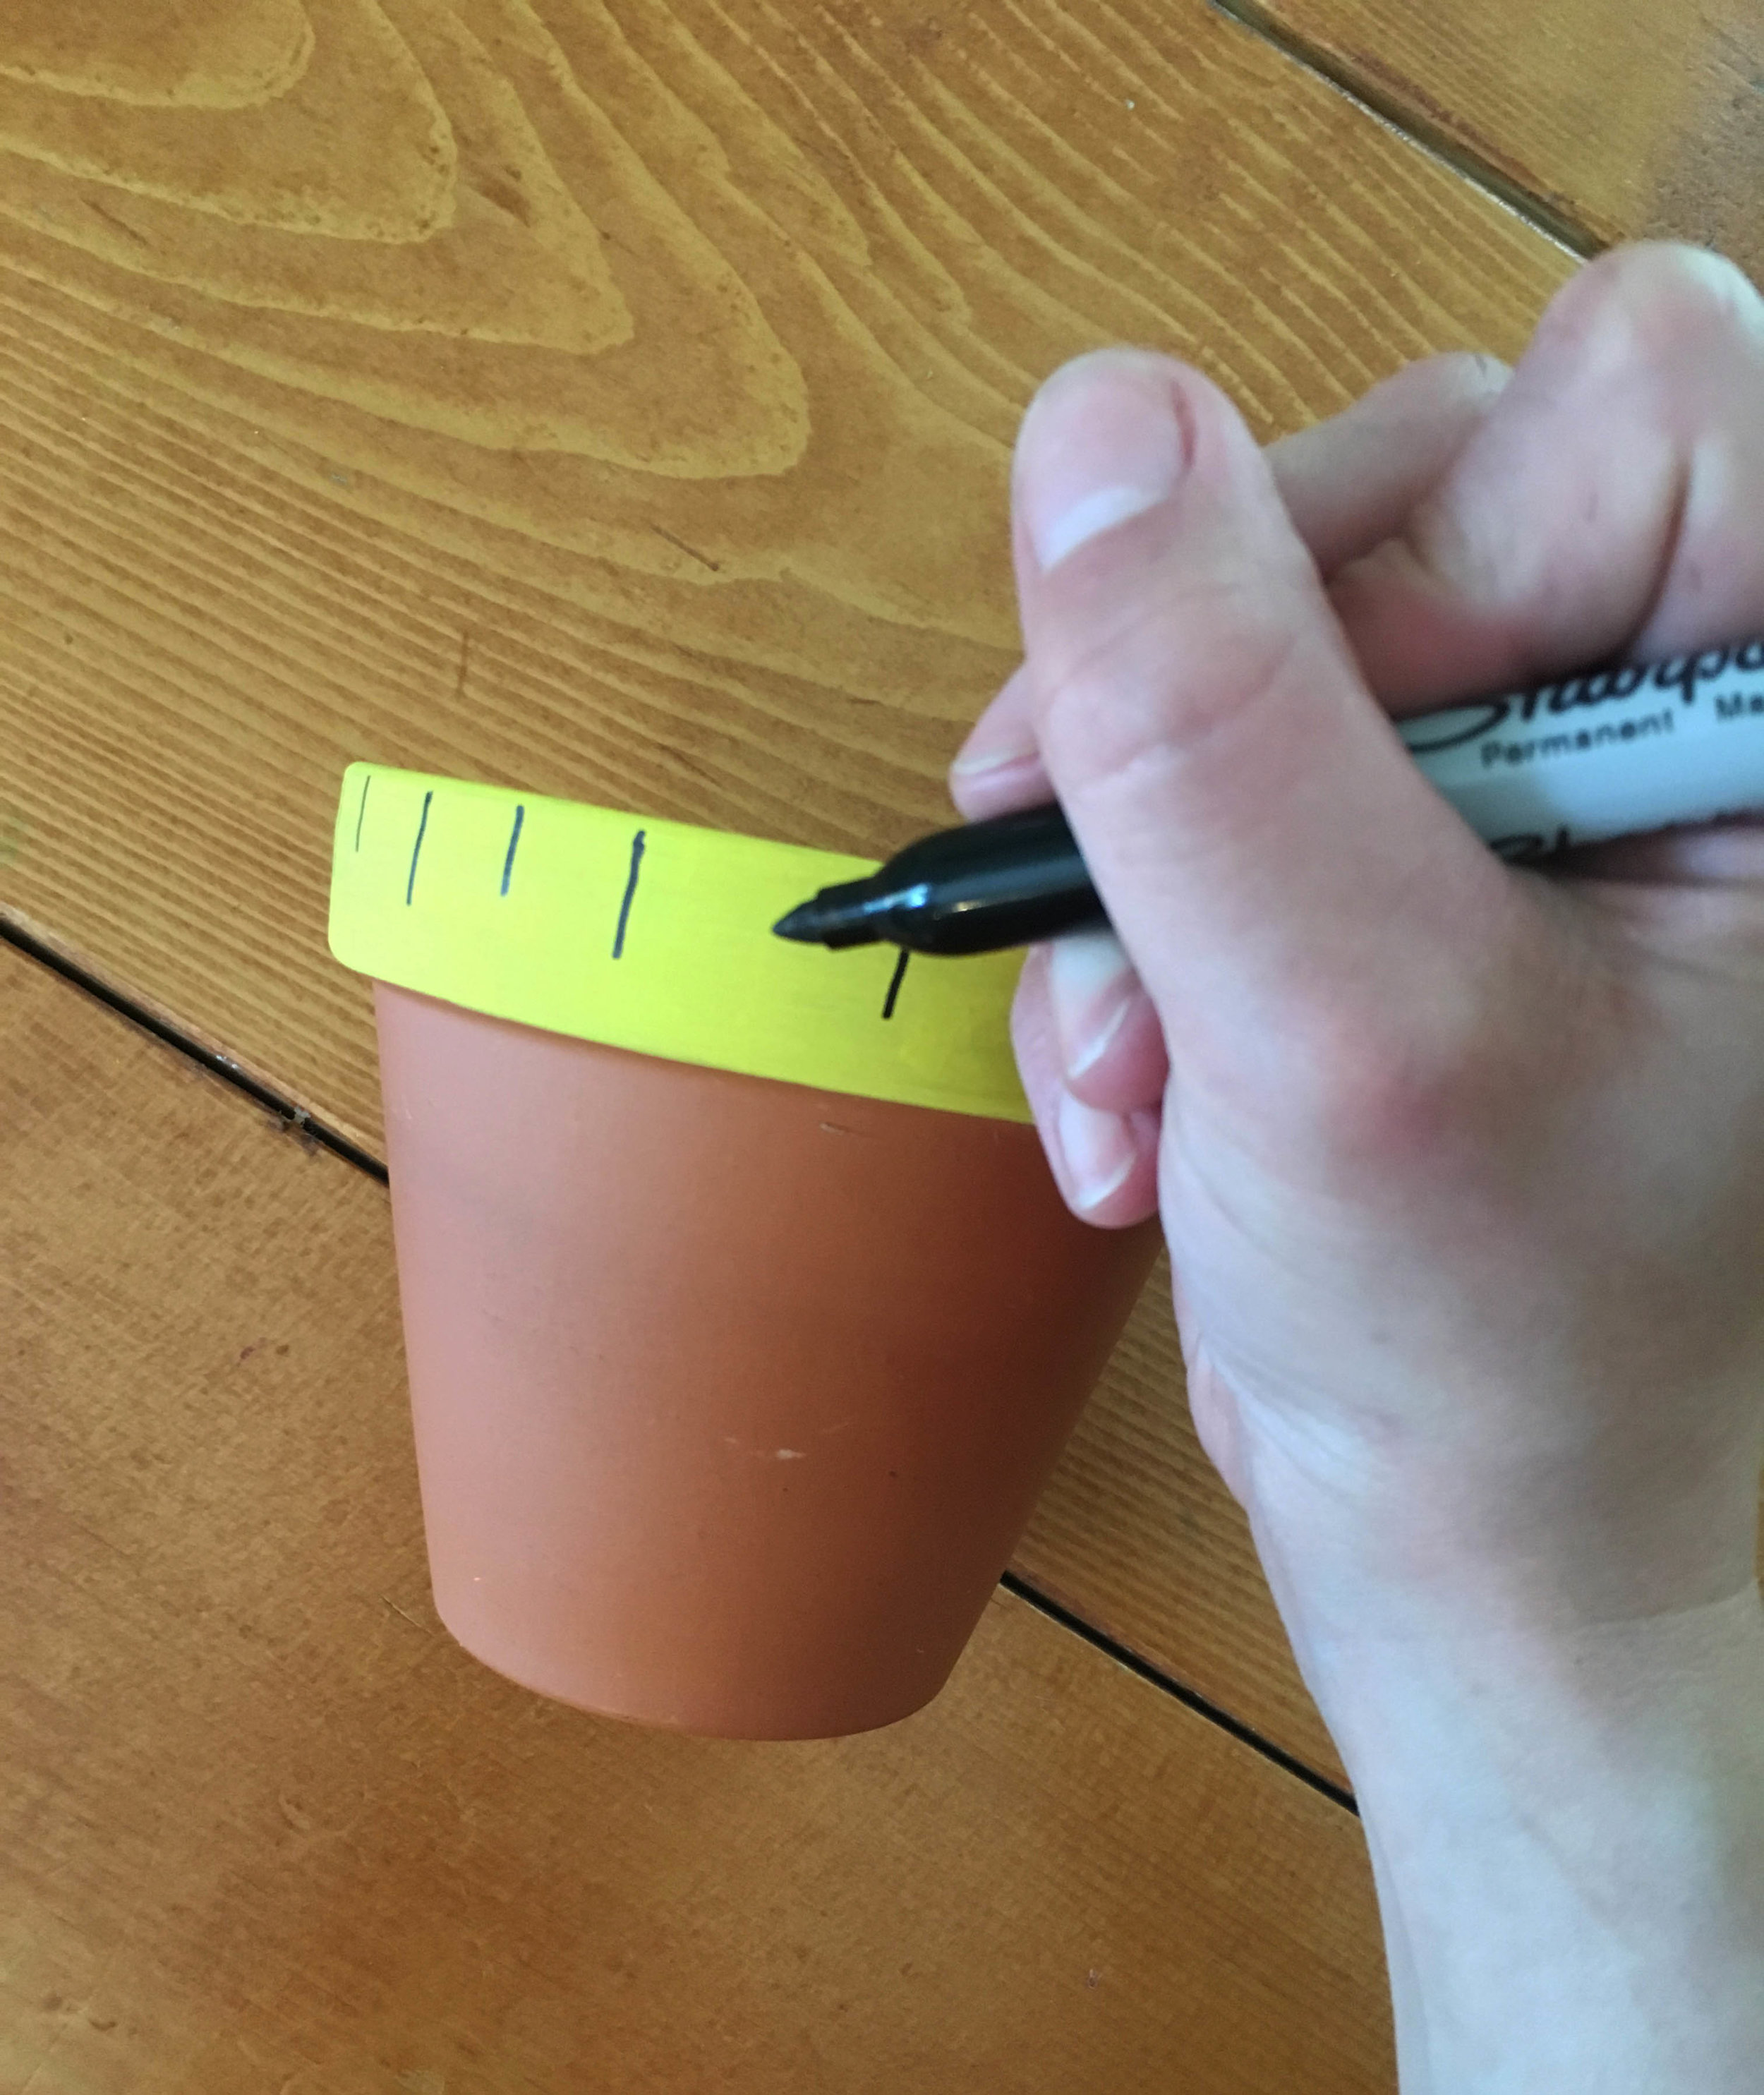
First paint the lip of the pot with the yellow acrylic paint, you might need to do several coats to get good coverage.
Then mark inch lines evenly around the rim (I made a template with a piece of scrap paper). It may not come out evenly when they meet up so feel free to take artistic license with the spacing.
Then using a sharpie or black paint and a fine paintbrush, paint the lines of the ruler (whole, half, and quarter lines) as well as the numbers.
Once everything is dry, fill with soil and a plant of your choice. We decided on aloe vera since it’s a useful plant as well - the teachers will be able to use it to soothe any sunburns that may happen over summer vacation.
All that’s left is to add a card or a gift tag and a message of thanks!
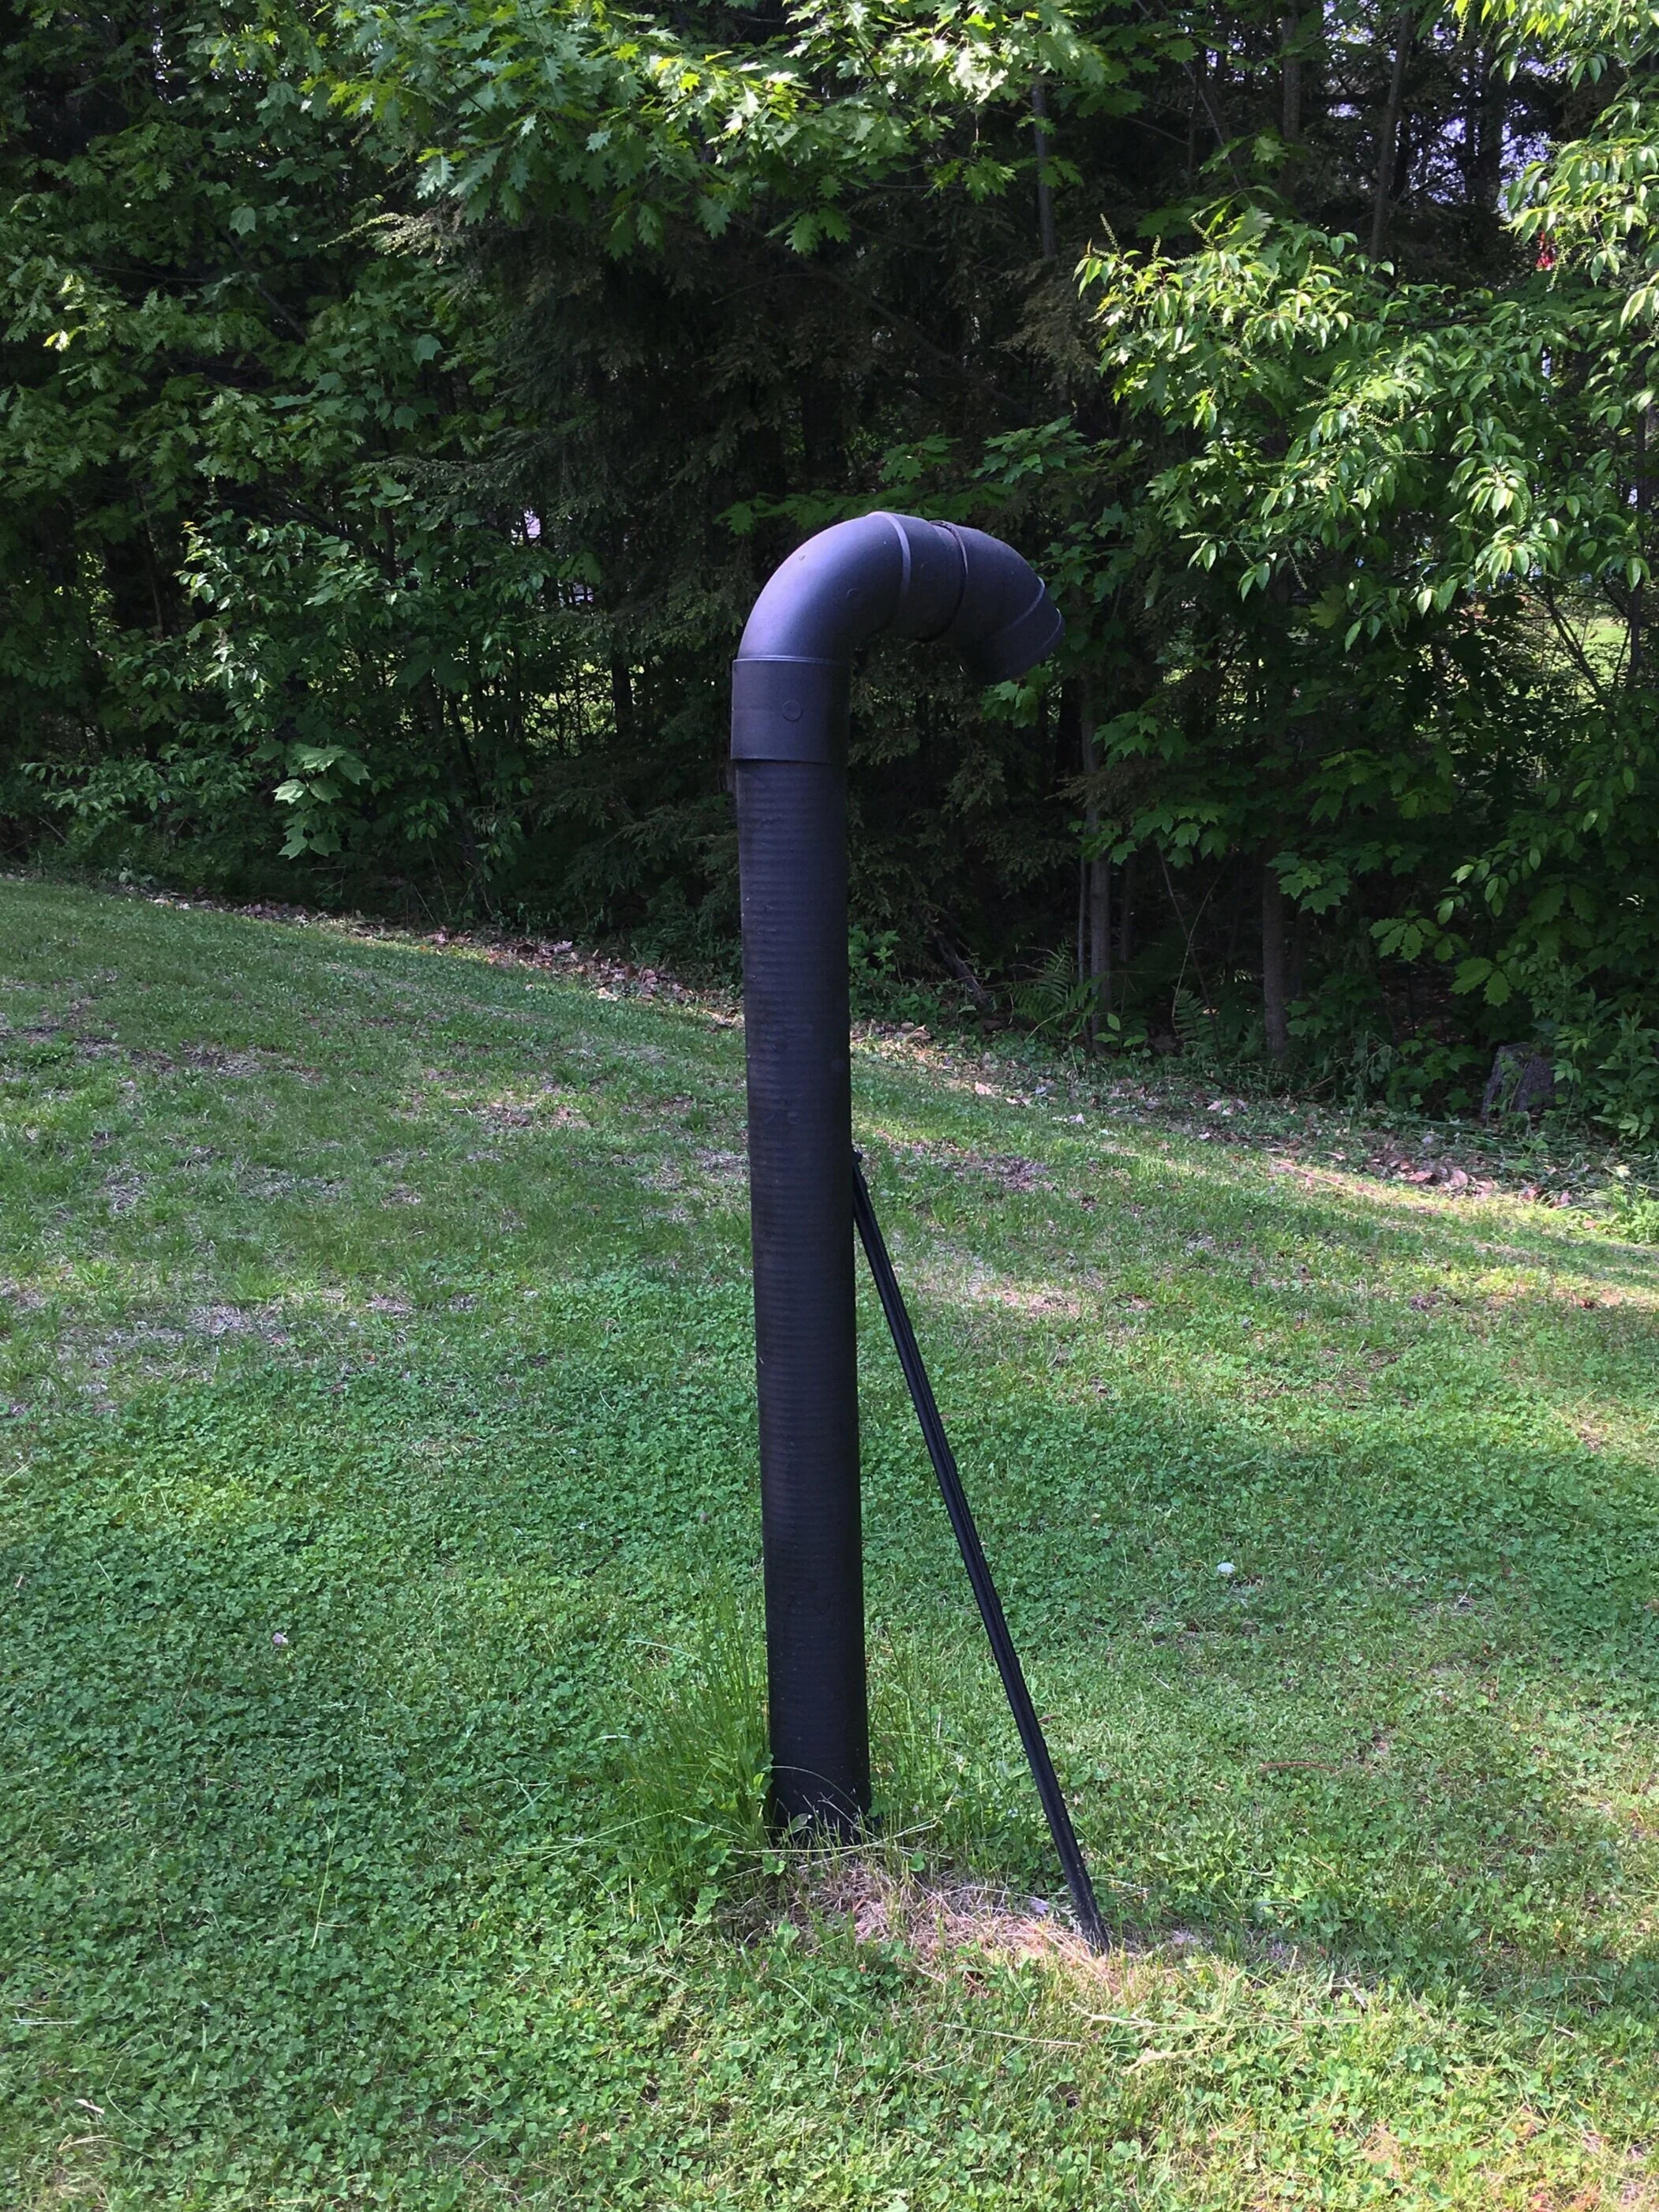
Okay, so I don’t know if “makeover” is the right word here because it’s not a huge change but it certainly helps! So in our area, most homes have septic tanks/leach fields with terribly ugly white or sea foam green PVC vent pipes that stick out like a sore thumb in their lawn. They can be tricky to hide because you don’t want to plant or build anything too heavy or substantial around them and risk damaging the leach field underground or diminish their venting capabilities… so we were limited on options on how to “make it over.”
In any case, I decided to pick up some outdoor rated matte black spray paint from our local hardware store and give our vent pipe a quick coat of black paint and it’s made a huge difference! The black definitely makes the pipe look more industrial and blends in with the grass and trees better than a bright white pipe. Like I said before, it’s certainly not a huge change but it’s a small one that’s made a big difference in my opinion.
AFTER: I forgot to take a “Before” photo but this is the After! The black definitely helps the pipe blend in with the trees and background much better than a white pipe.
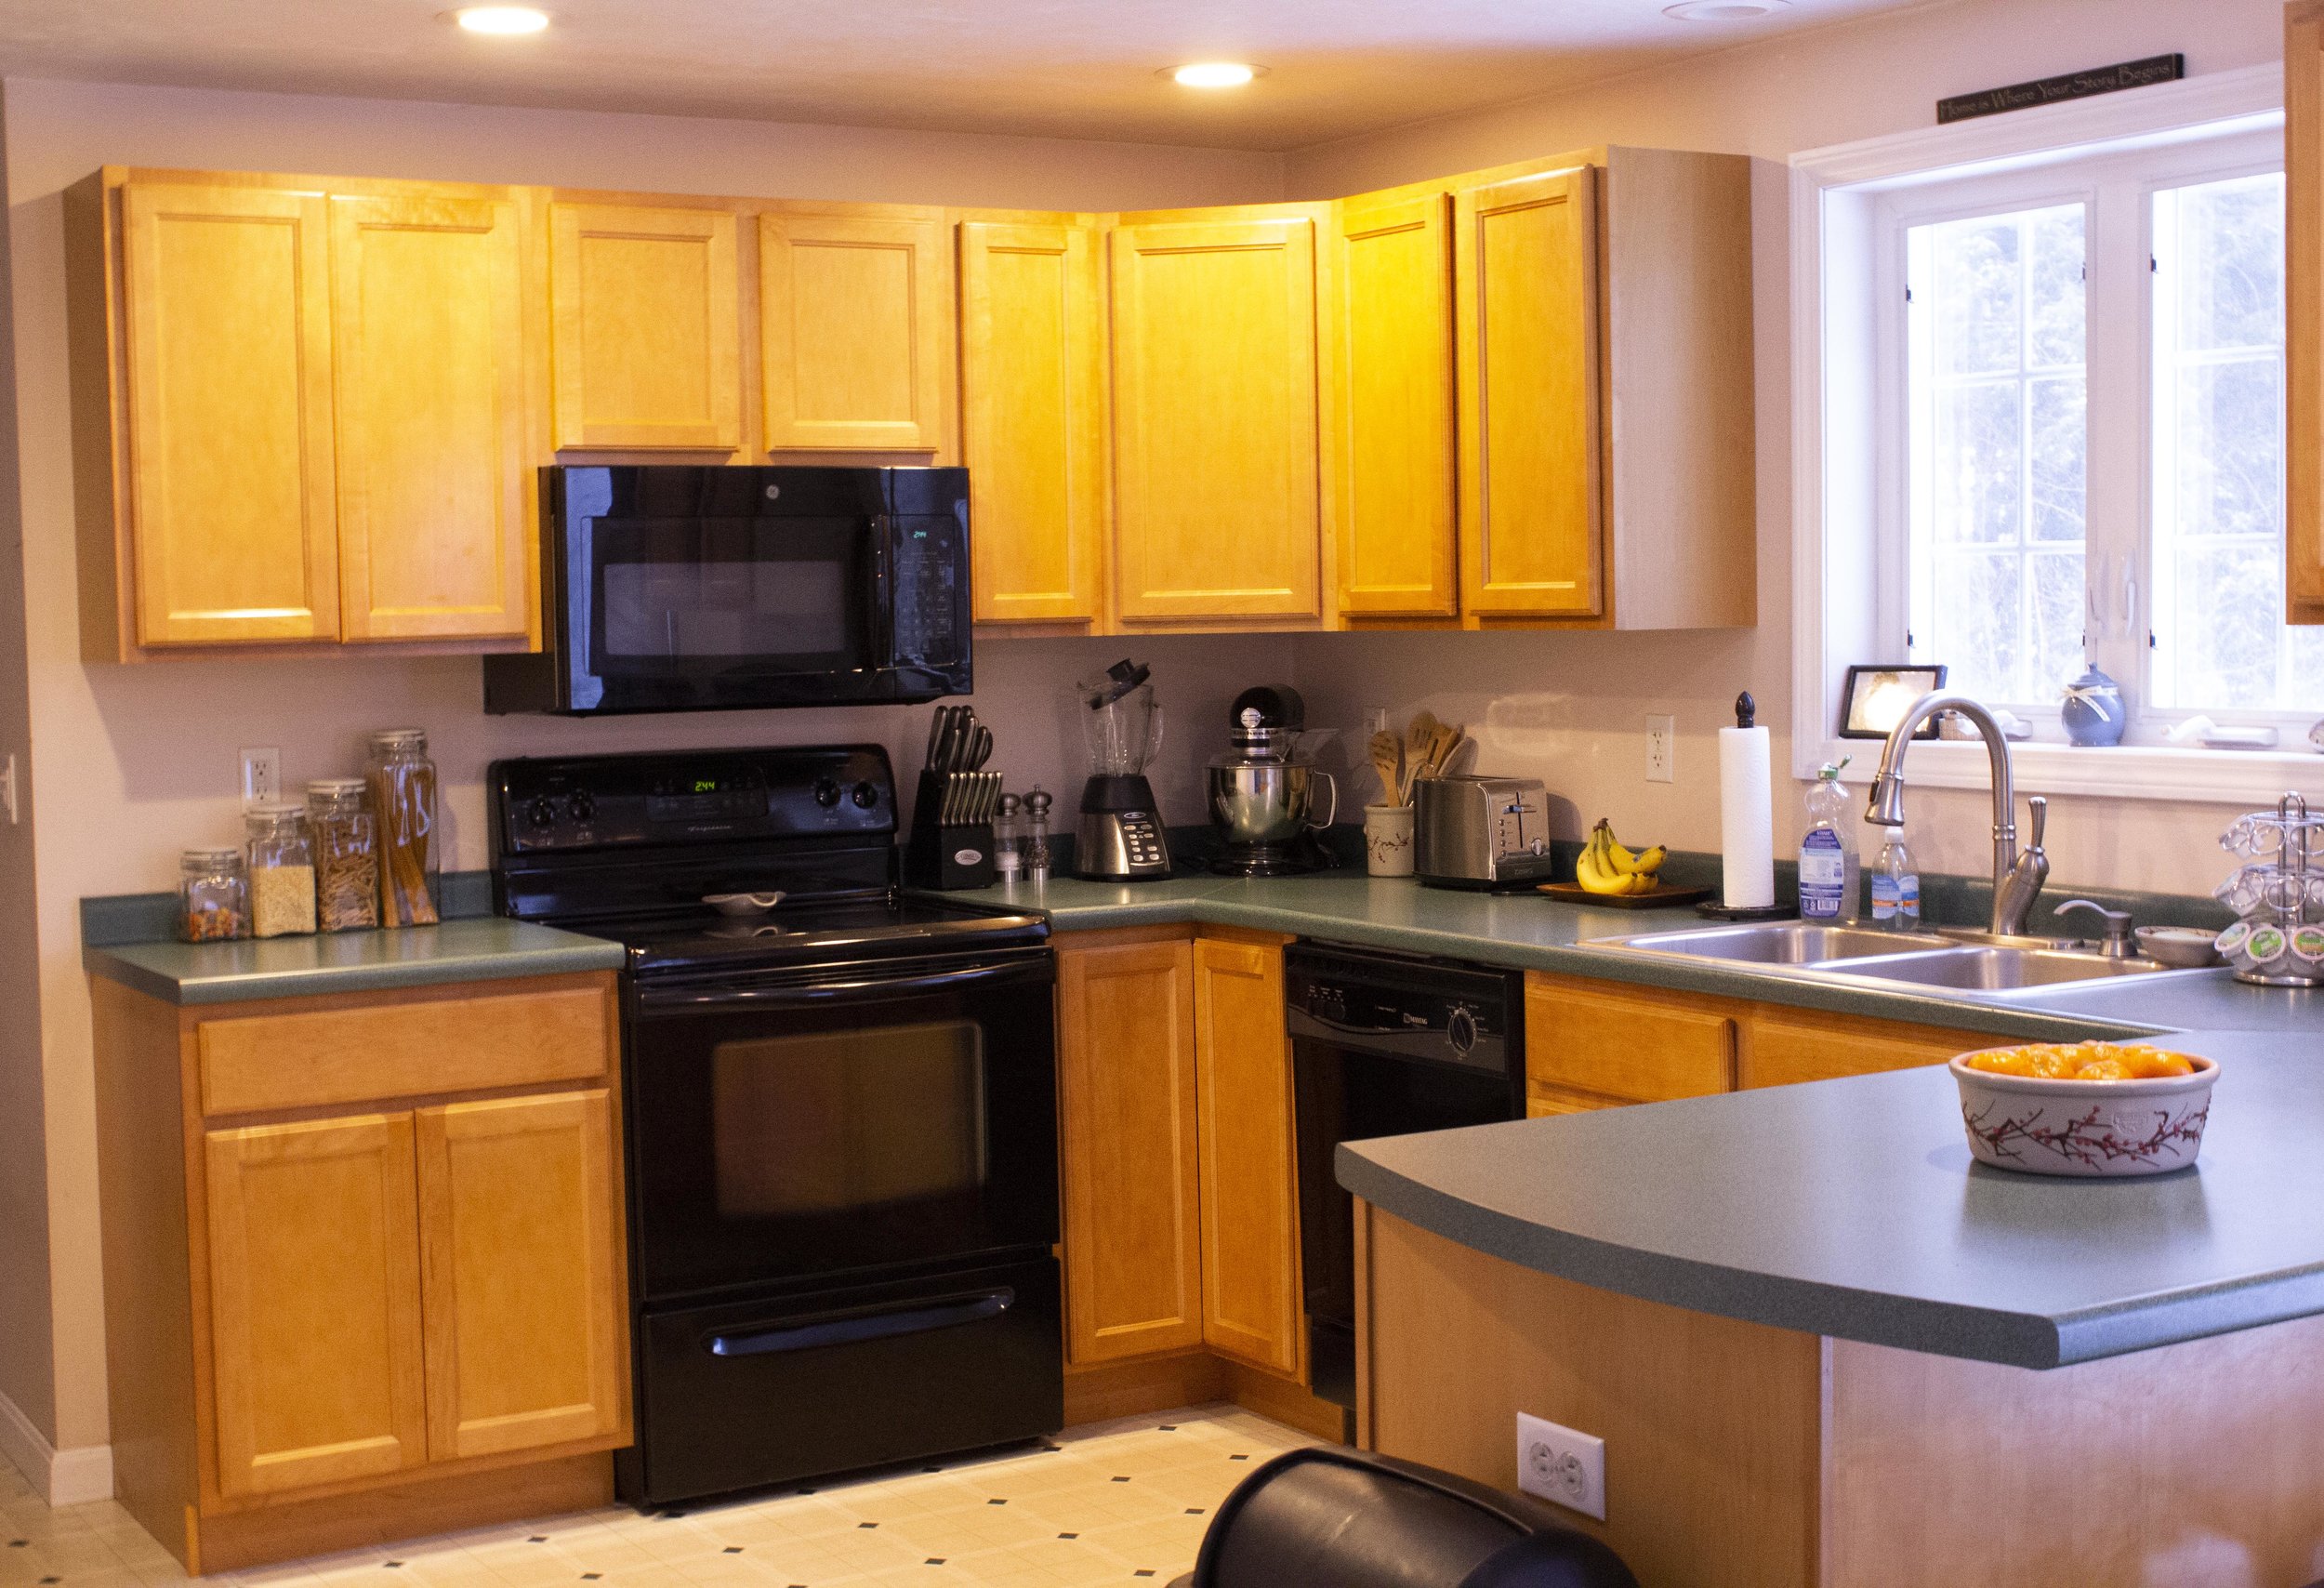
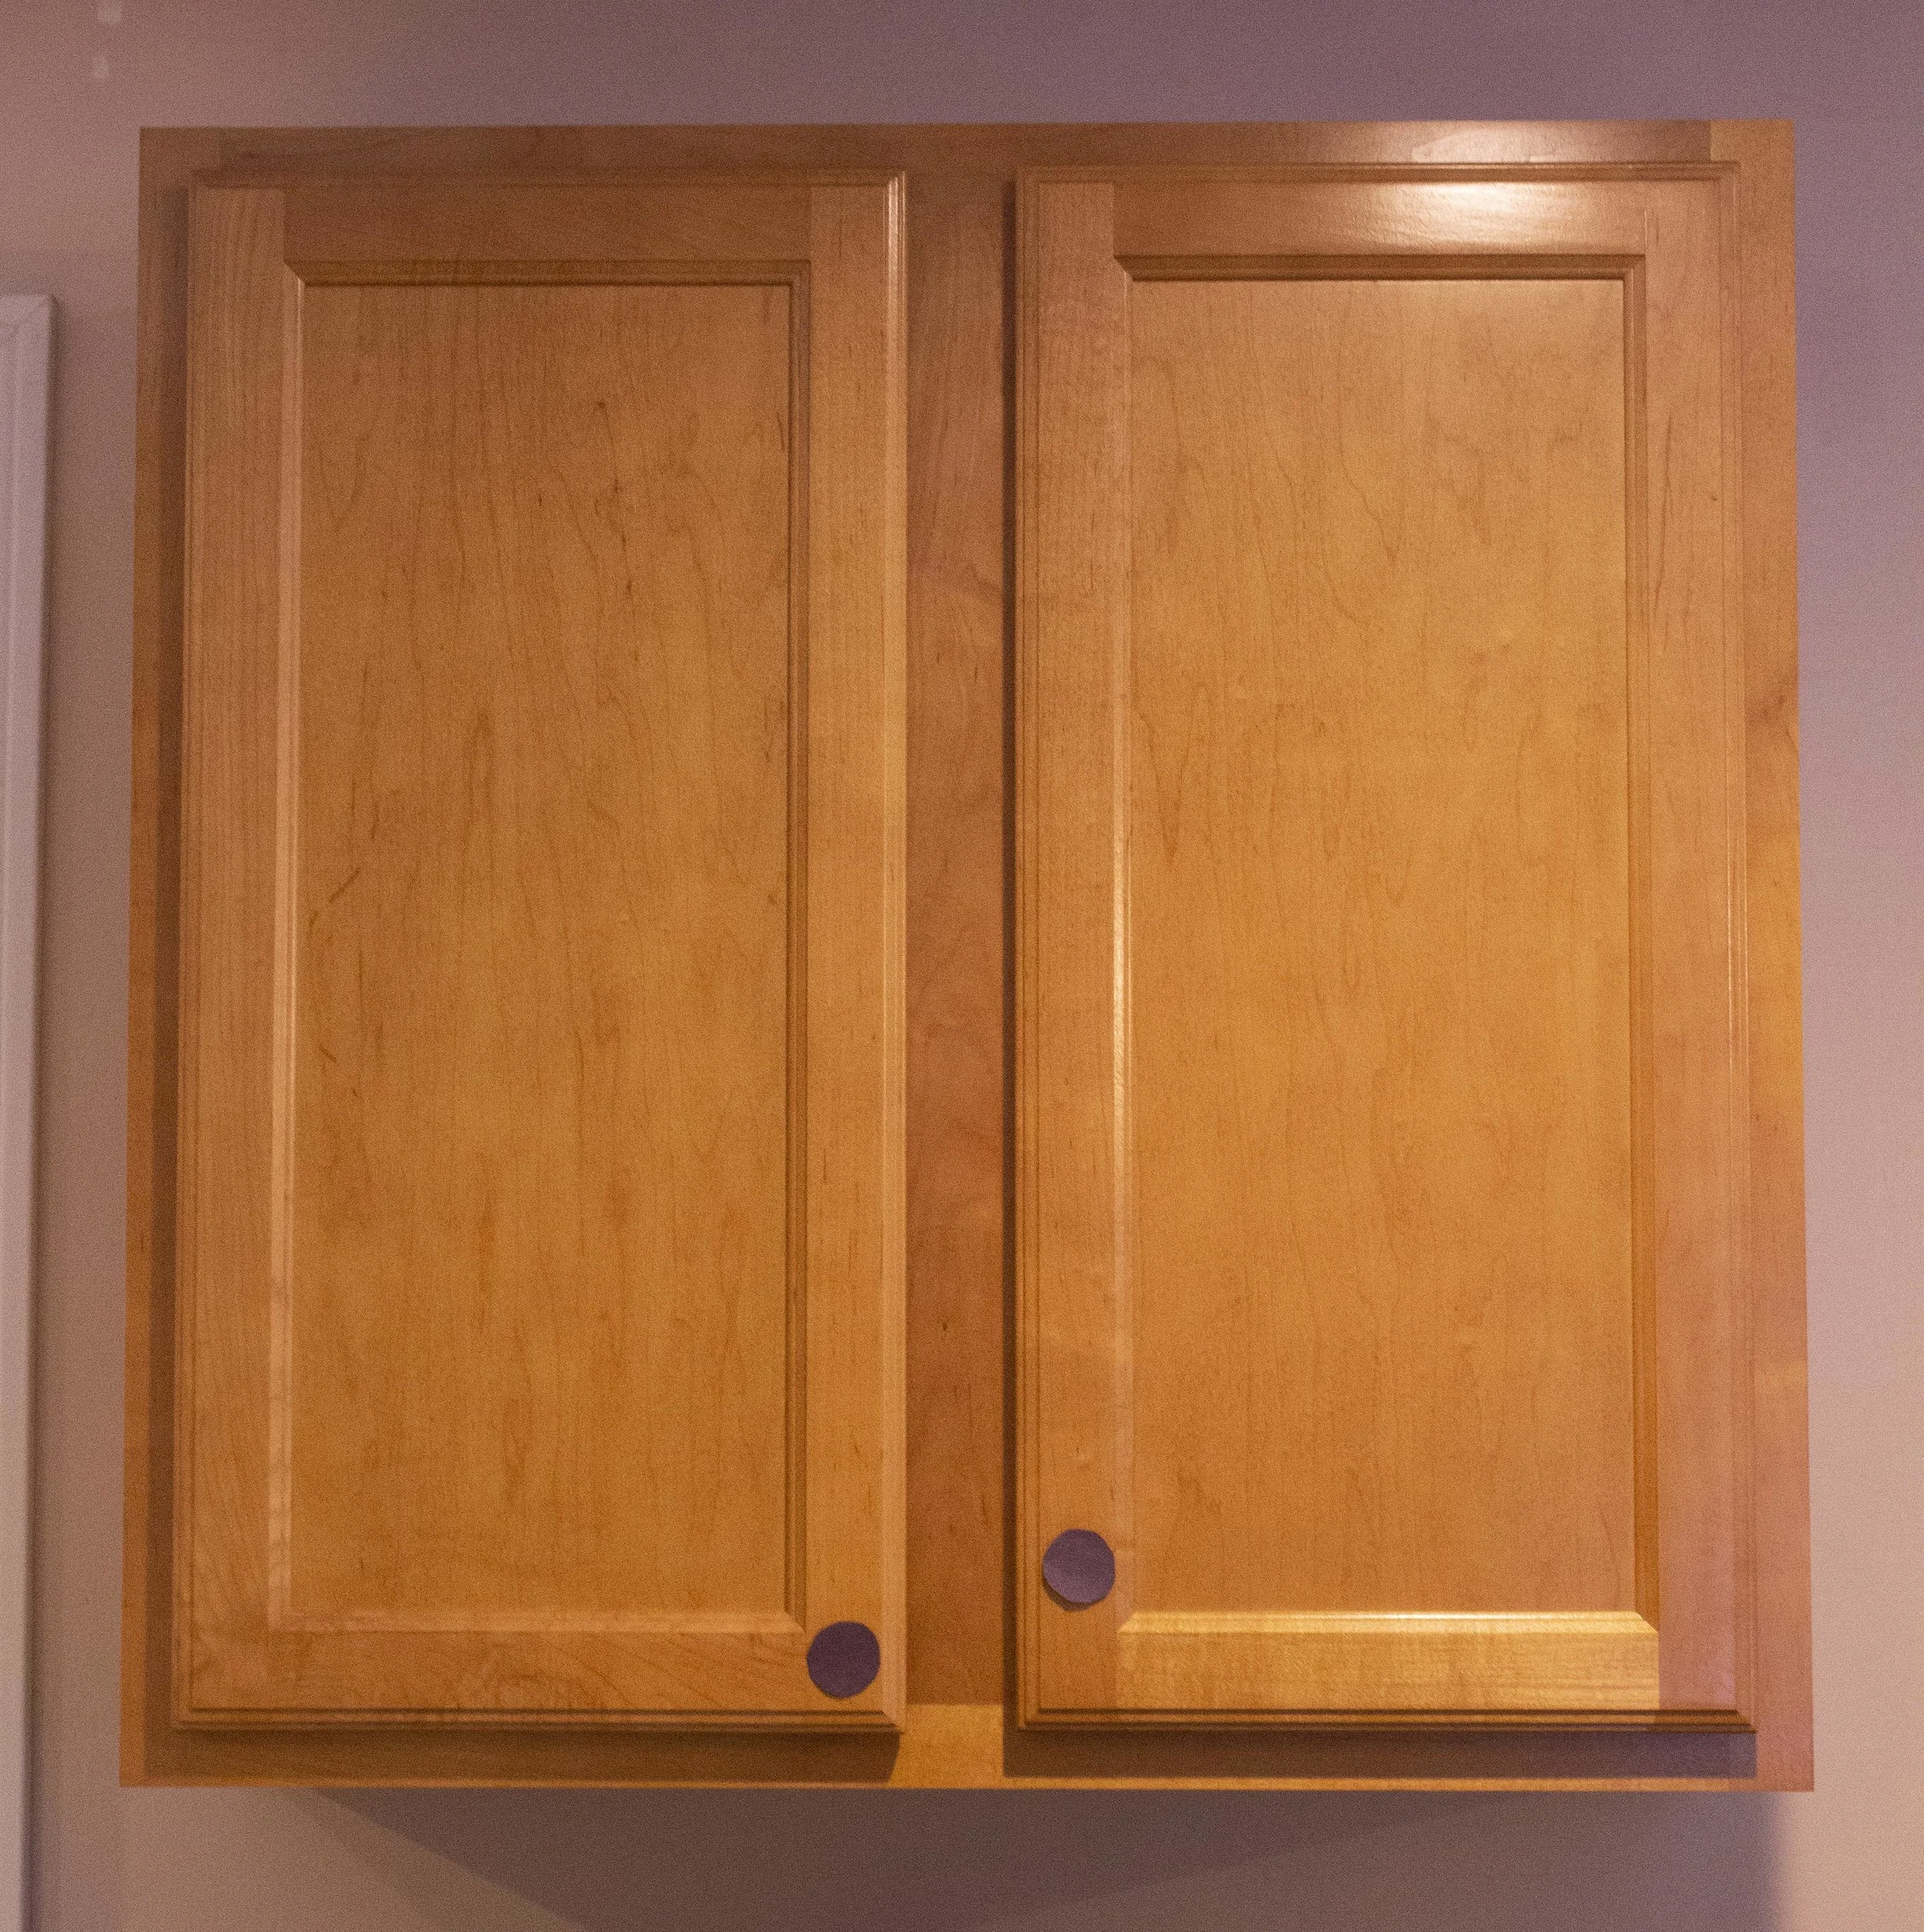
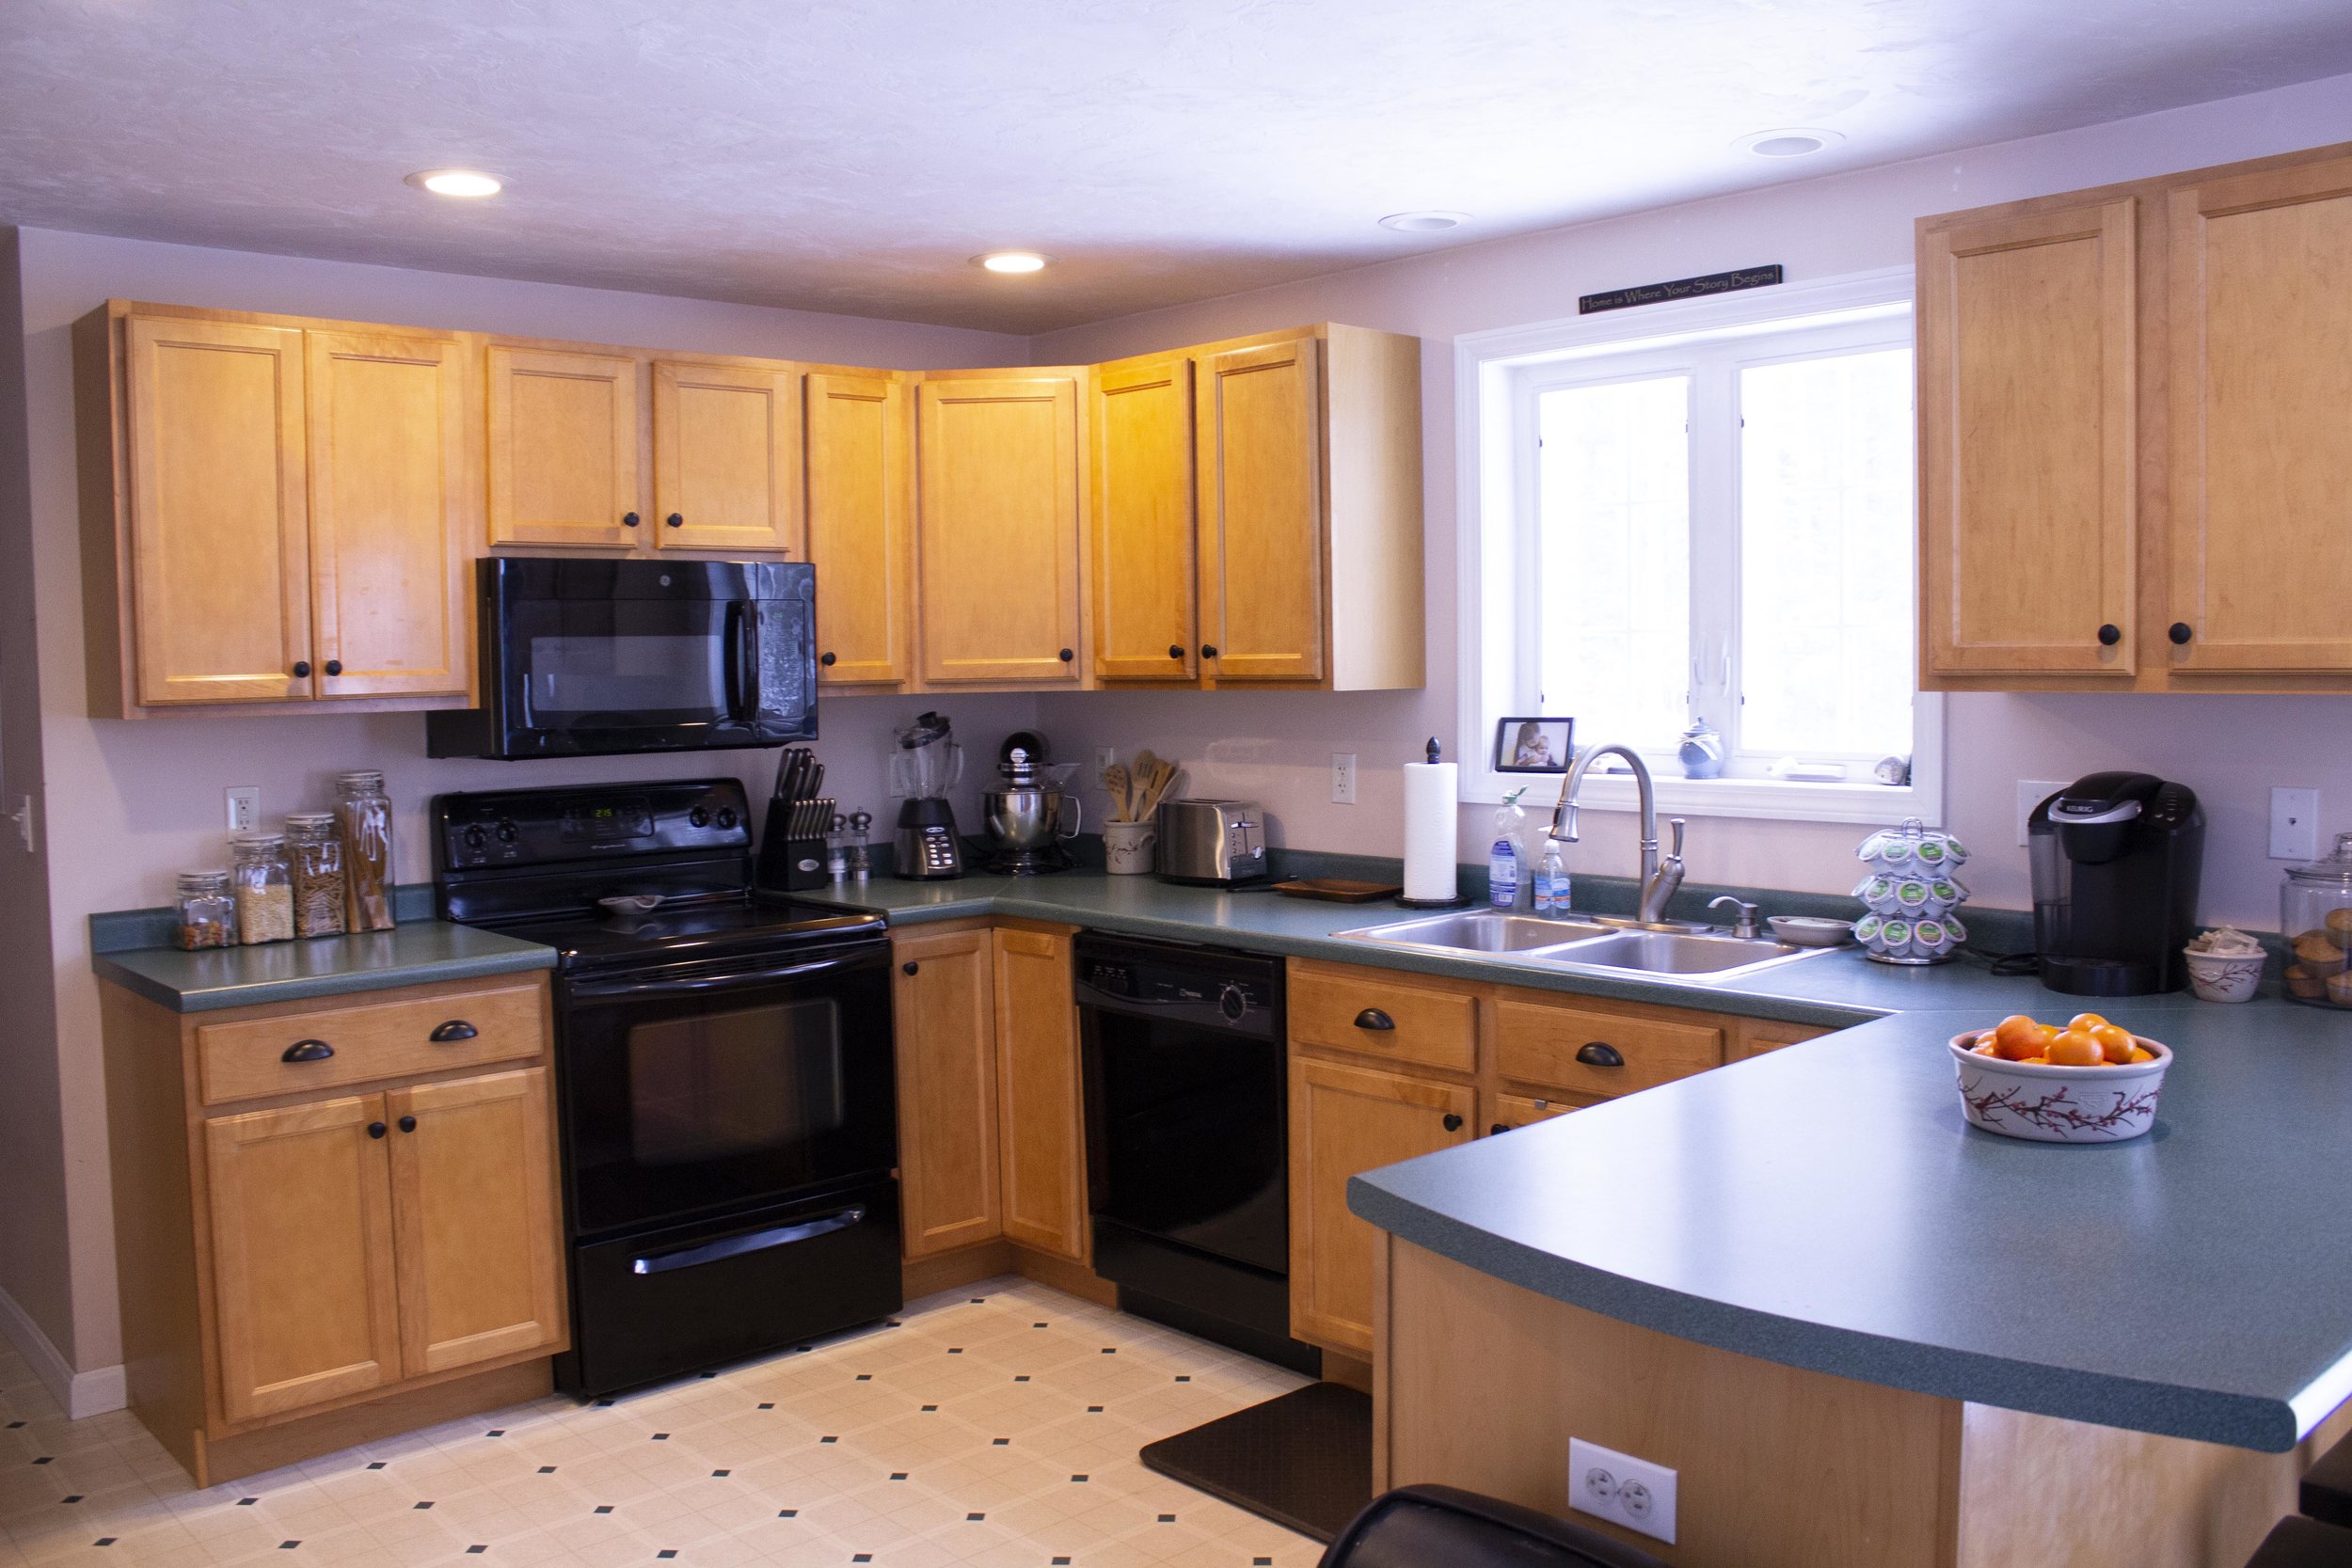
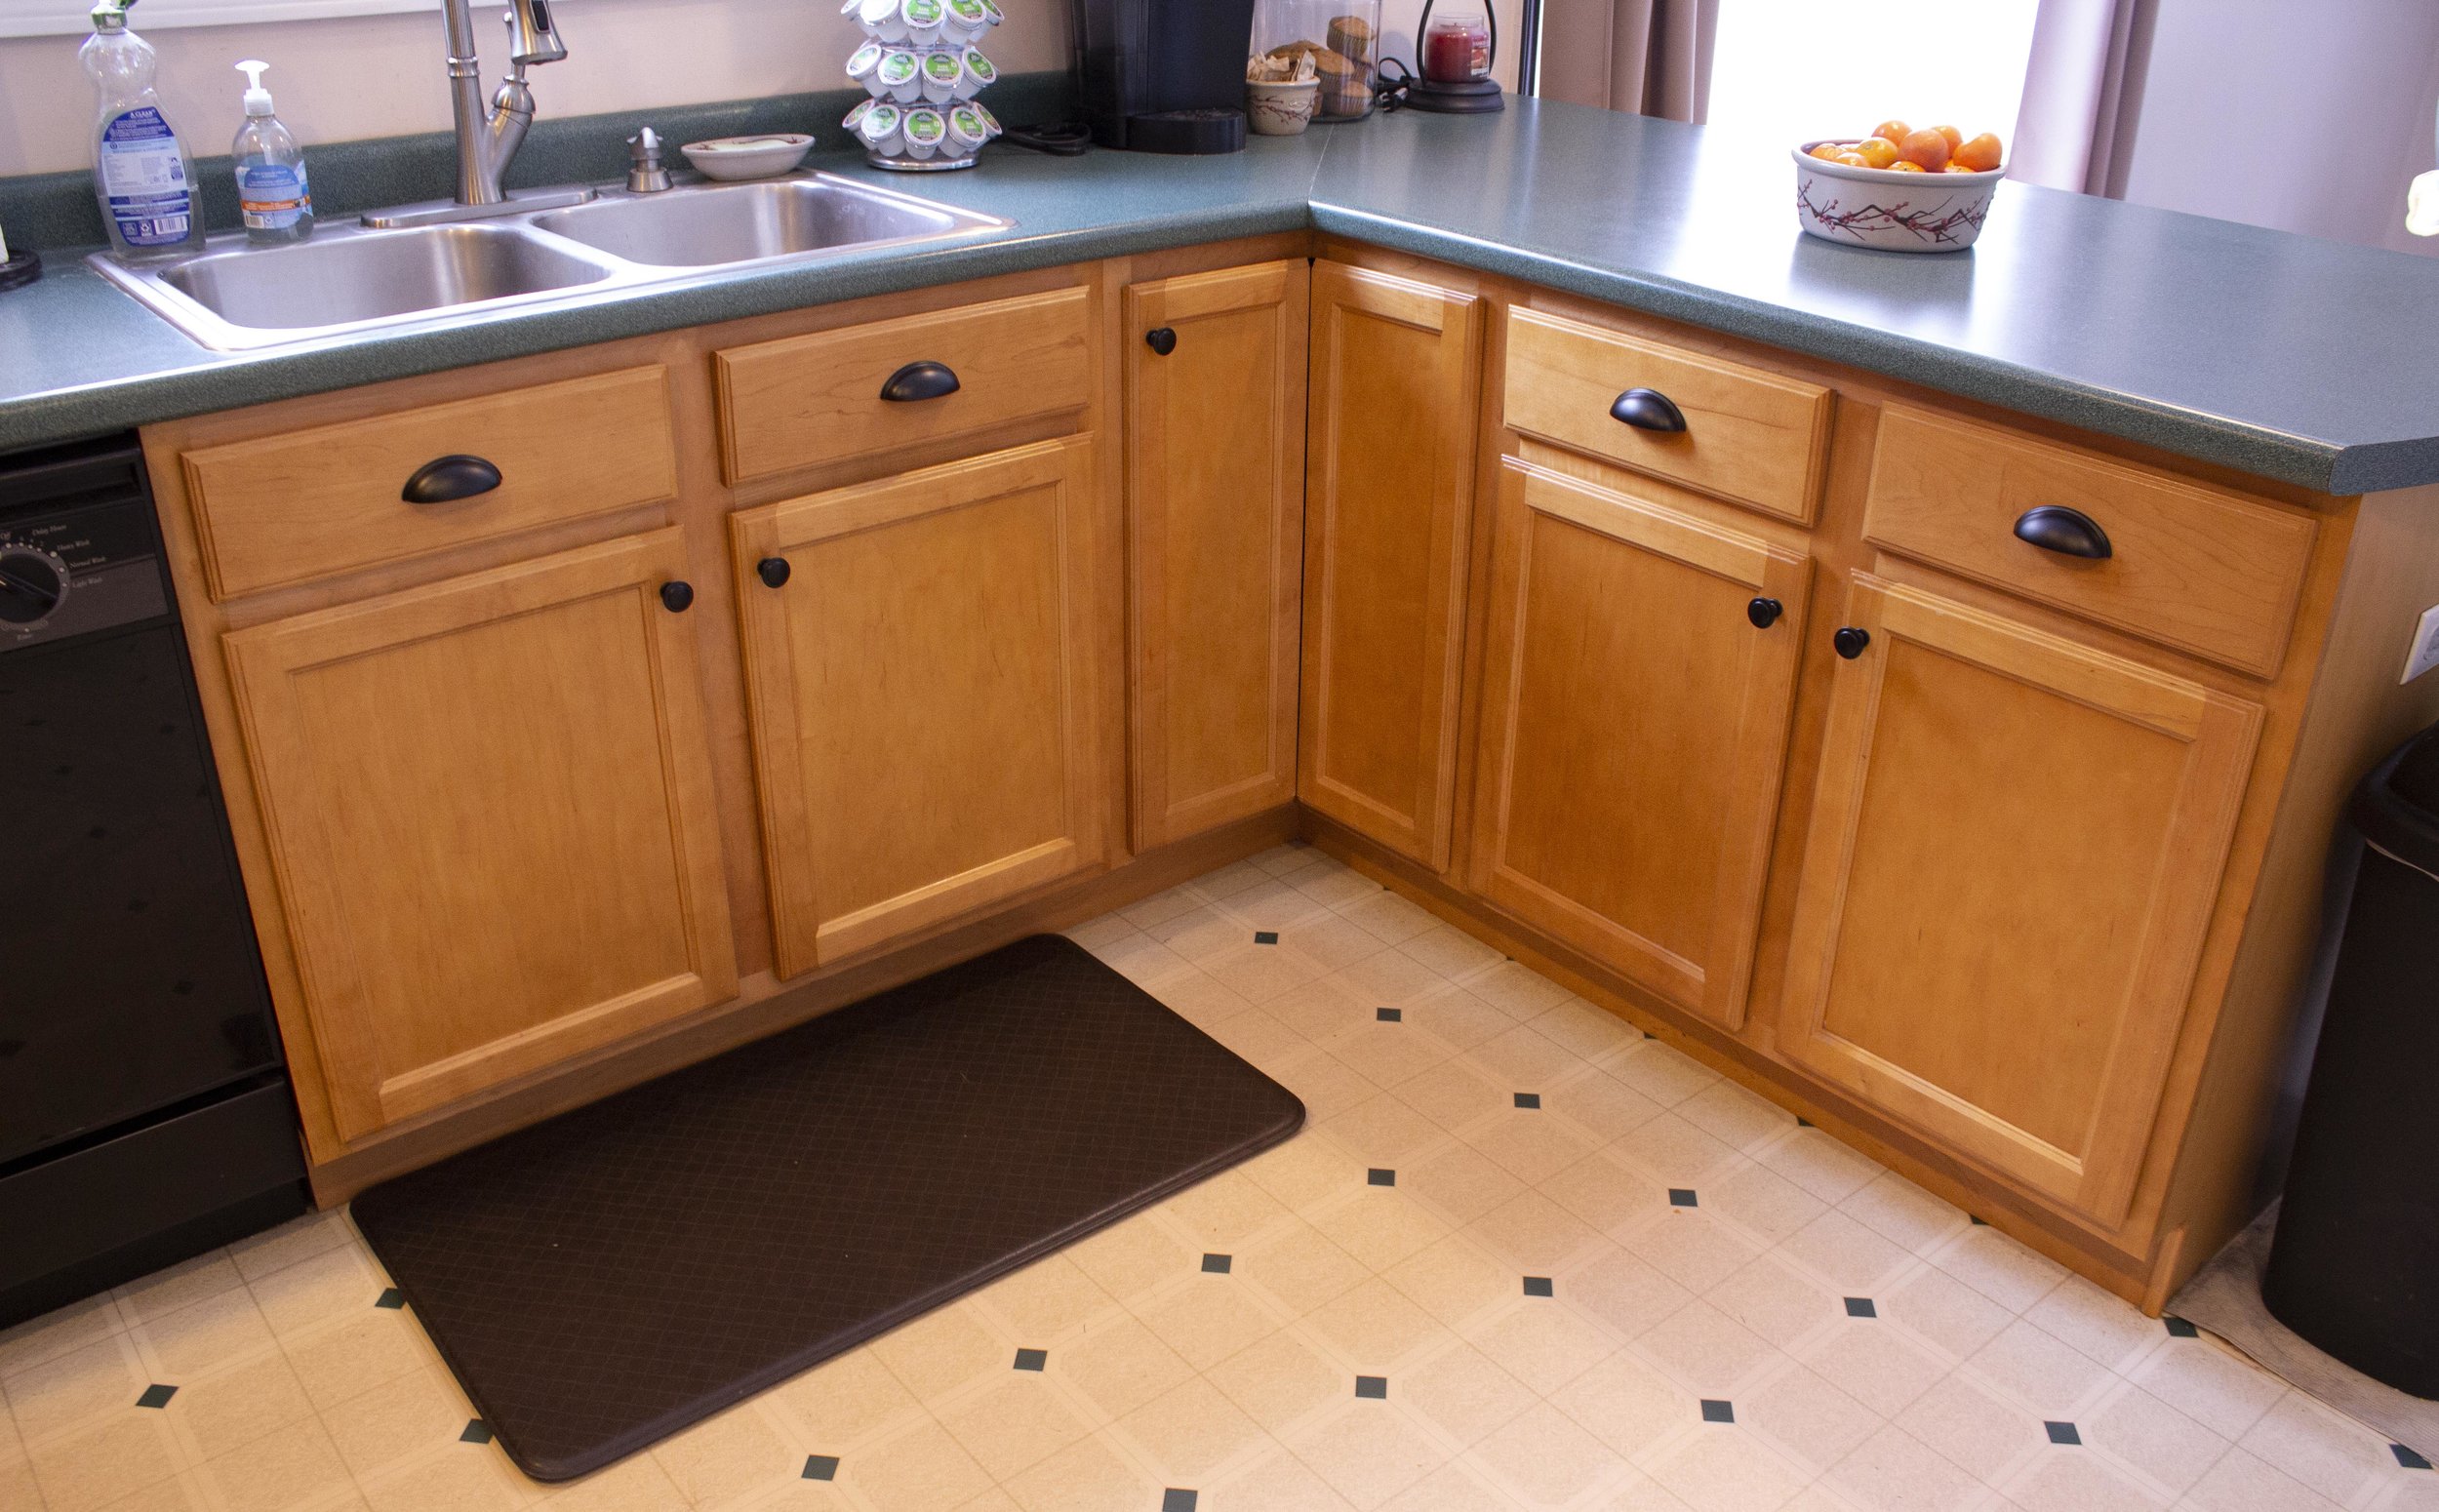
Our home came with a classic late 90’s “builder’s grade kitchen” - you know the type: honey-colored basic cabinets with no hardware and laminate counters. Someday we’d love to totally overhaul the space and paint the cupboards, trim them out, and install granite countertops - however all those things involve a lot of work and money and just aren’t in the budget right now. In the meantime we’re working on making small upgrades ourselves that will make the space look more finished. And what’s the easiest, budget-friendly way to update the look of your cabinets? Replace or install new hardware! If you’re installing new hardware on blank cabinets it can be a bit intimidating, so read on for my tips on installing for the first time. And don’t forget to enter our GIVEAWAY over on Instagram for a $50 Credit to Cosmas Hardware! | This post is sponsored by Cosmas Hardware and affiliate links |
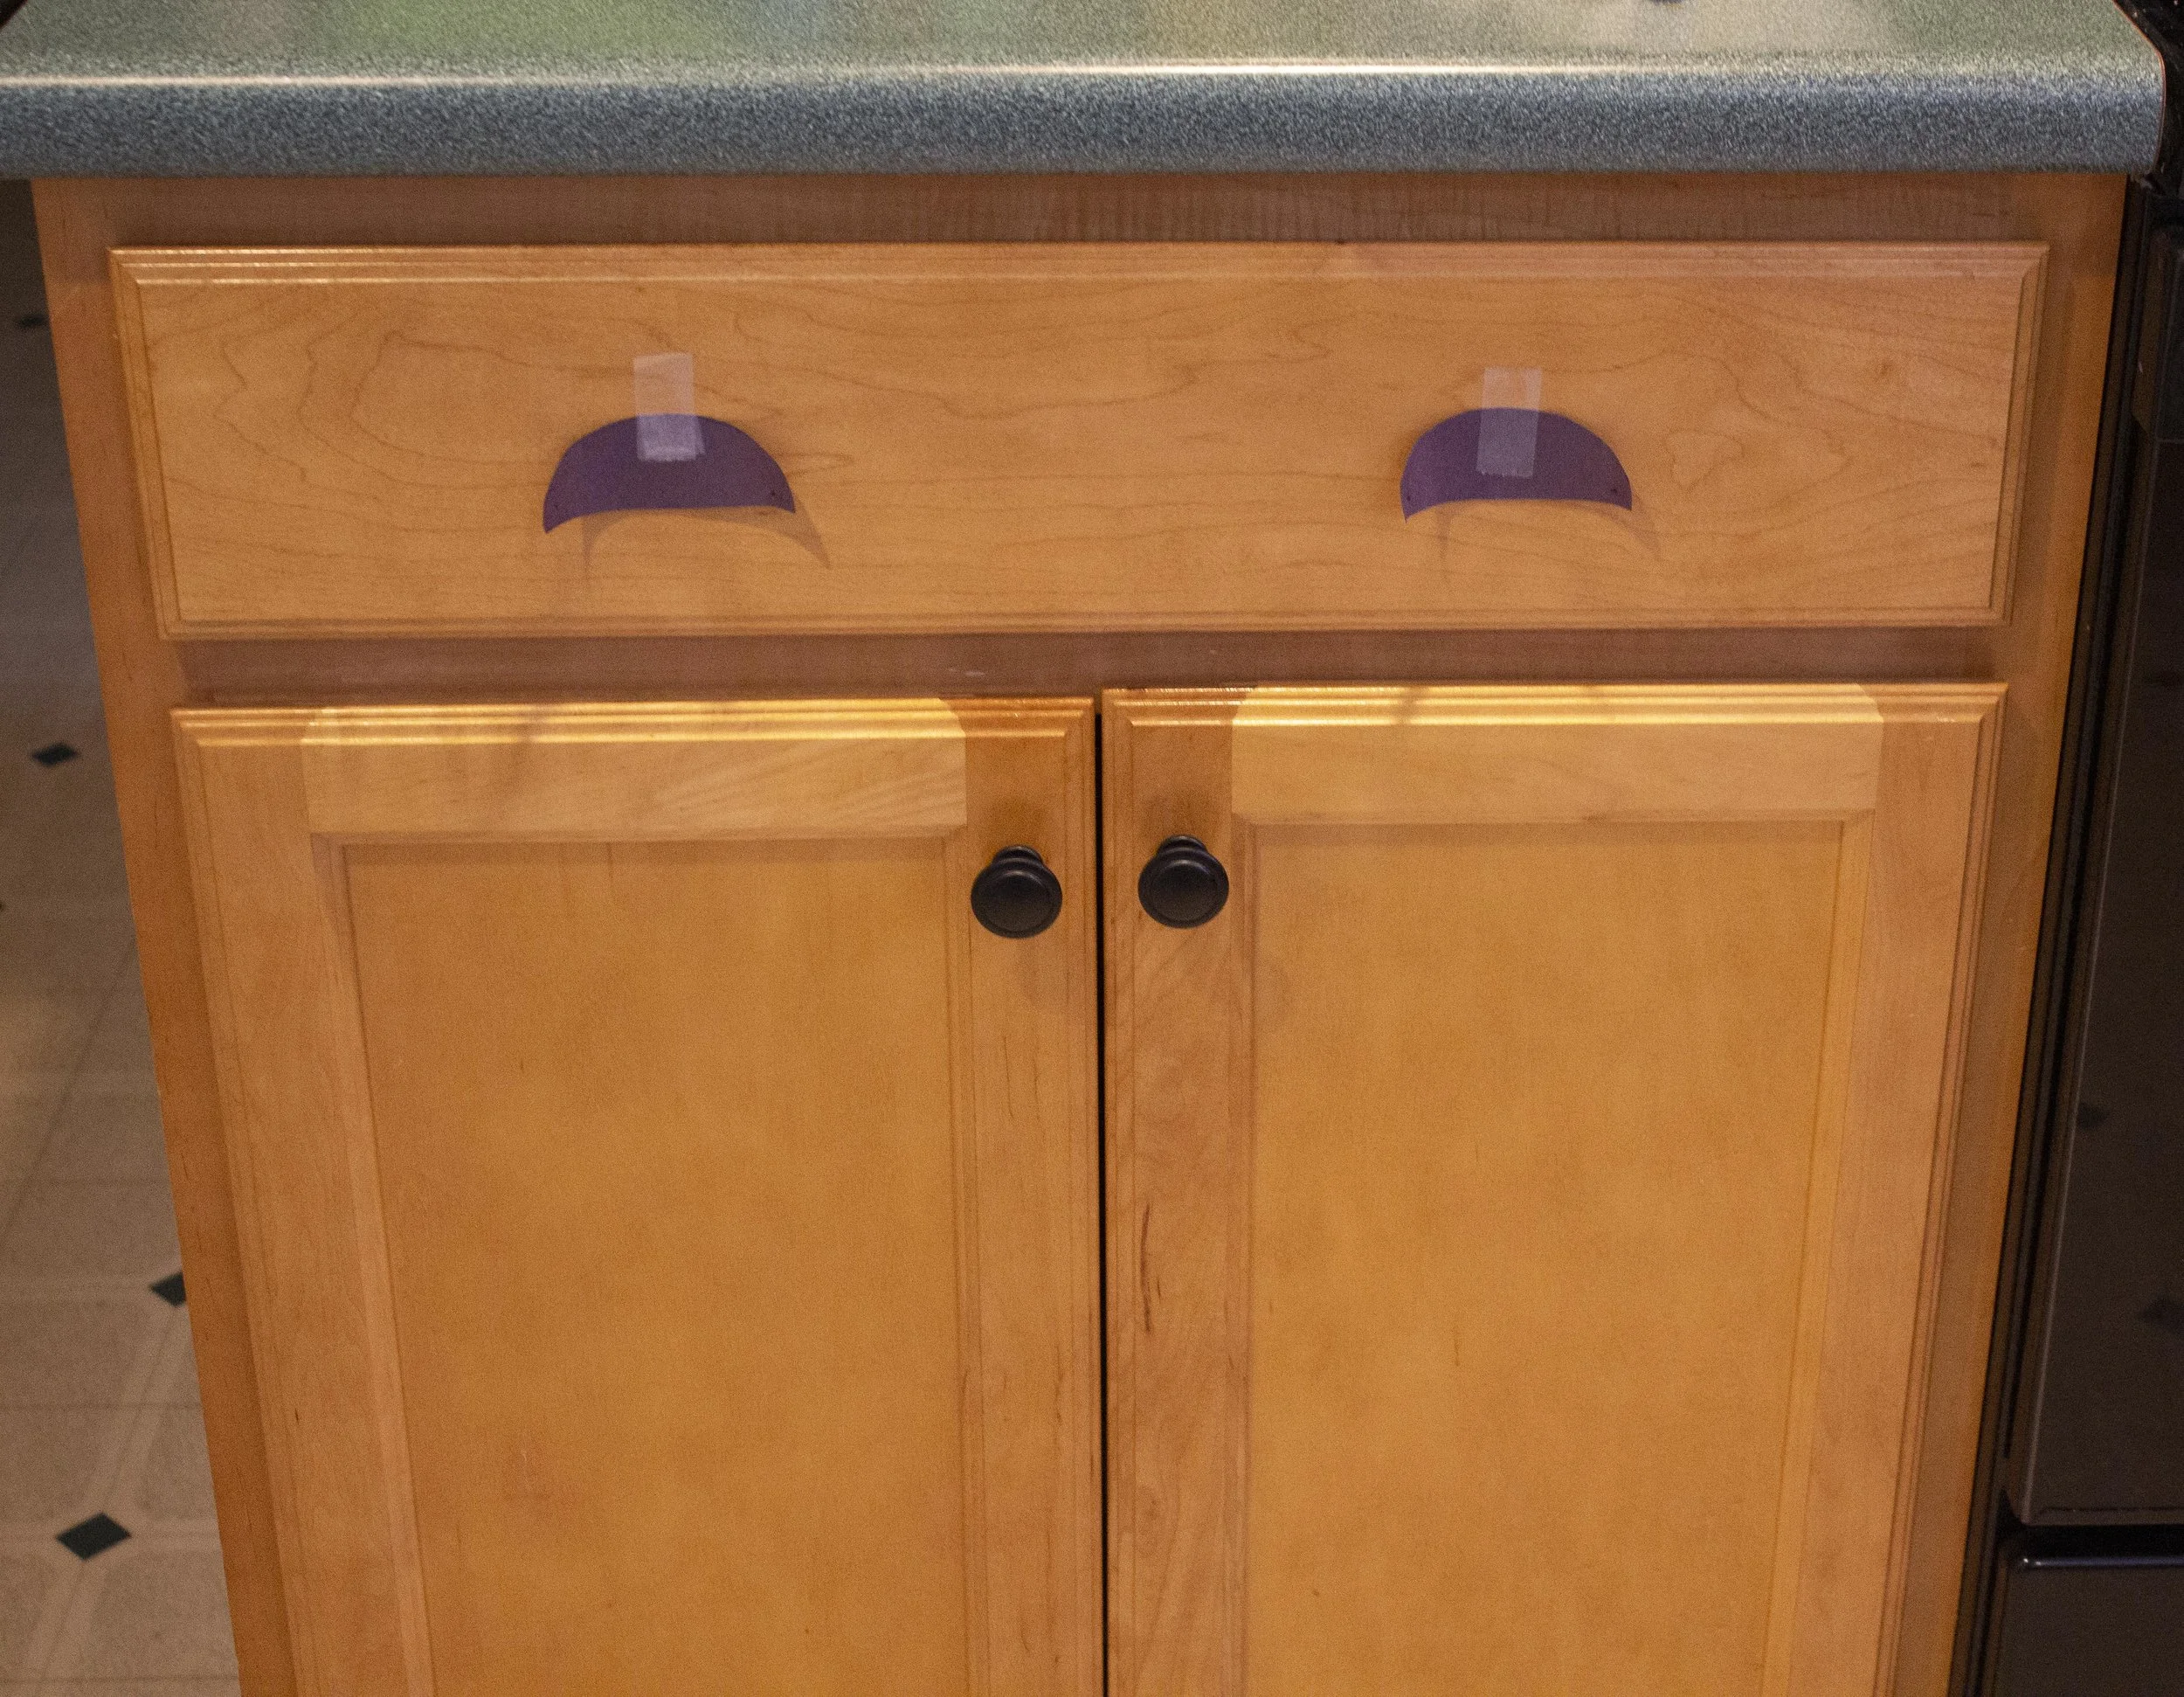
If you’re installing new hardware on a blank cabinet door, the first step is deciding hardware placement. I’m a very visual person so to help me decide on where things would go I first traced the hardware on a piece of black construction paper, cut it out, and taped them to the door and drawer fronts. This way I could step back and play around with the placement before I finalized it.
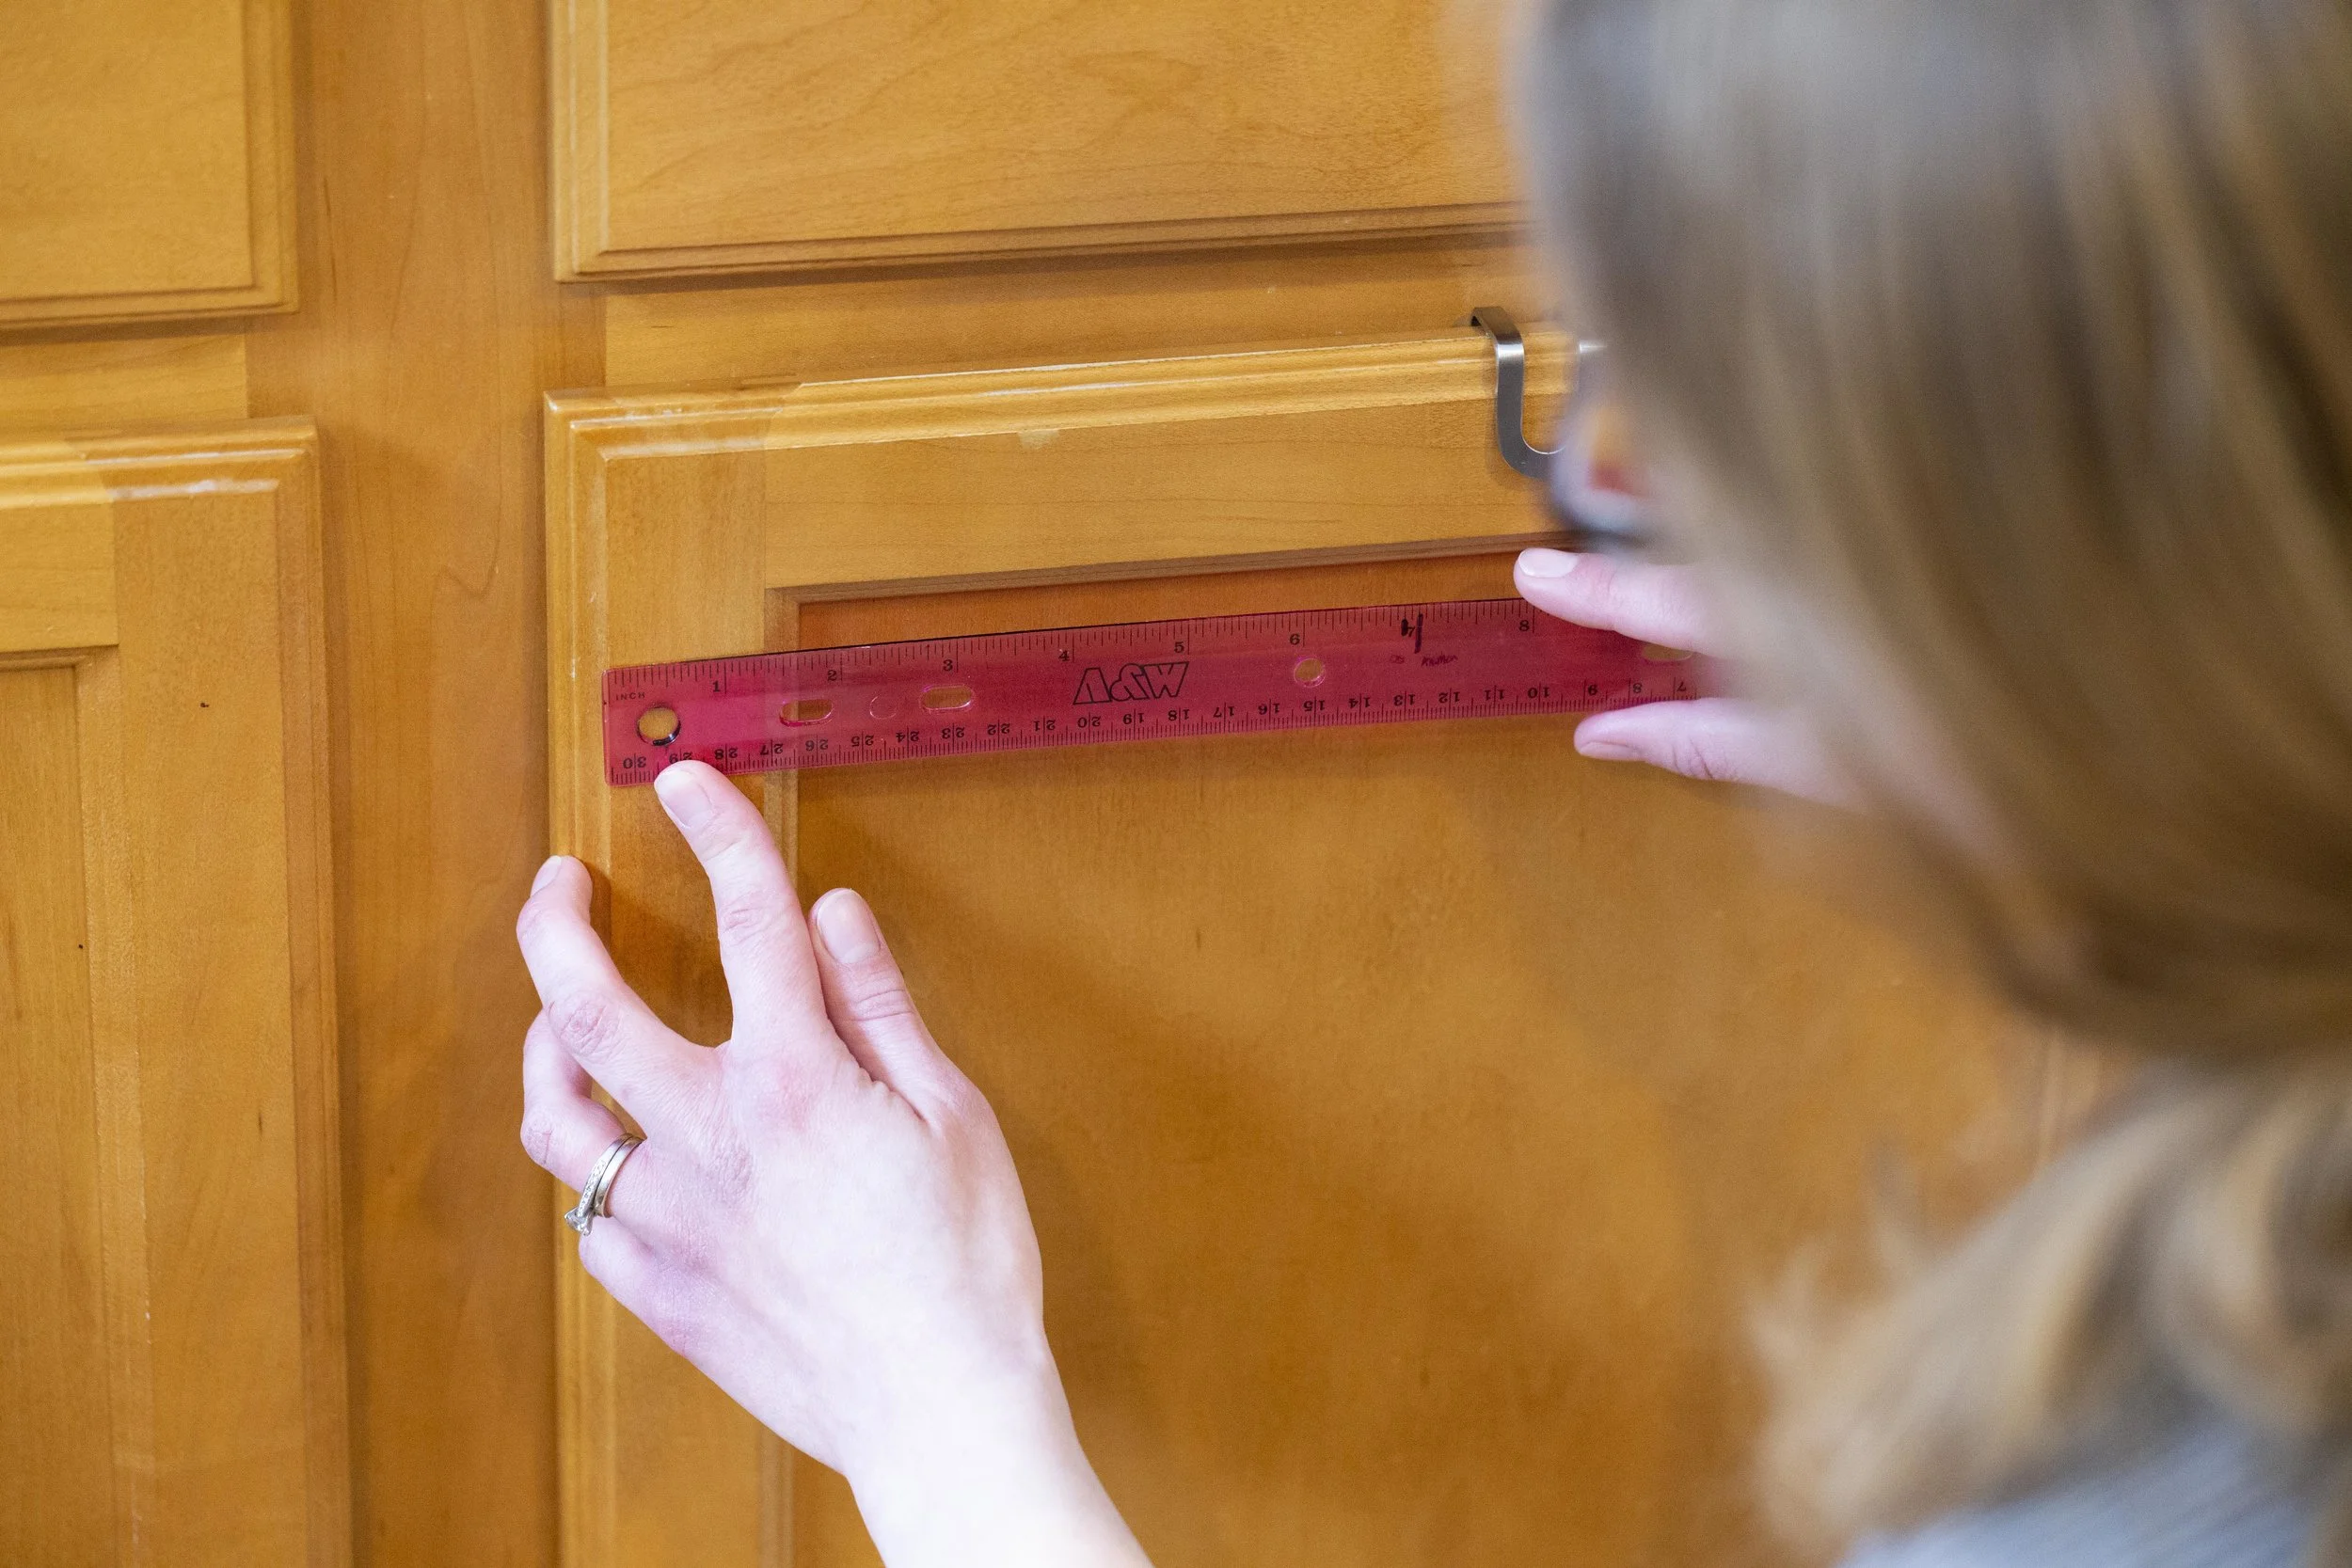
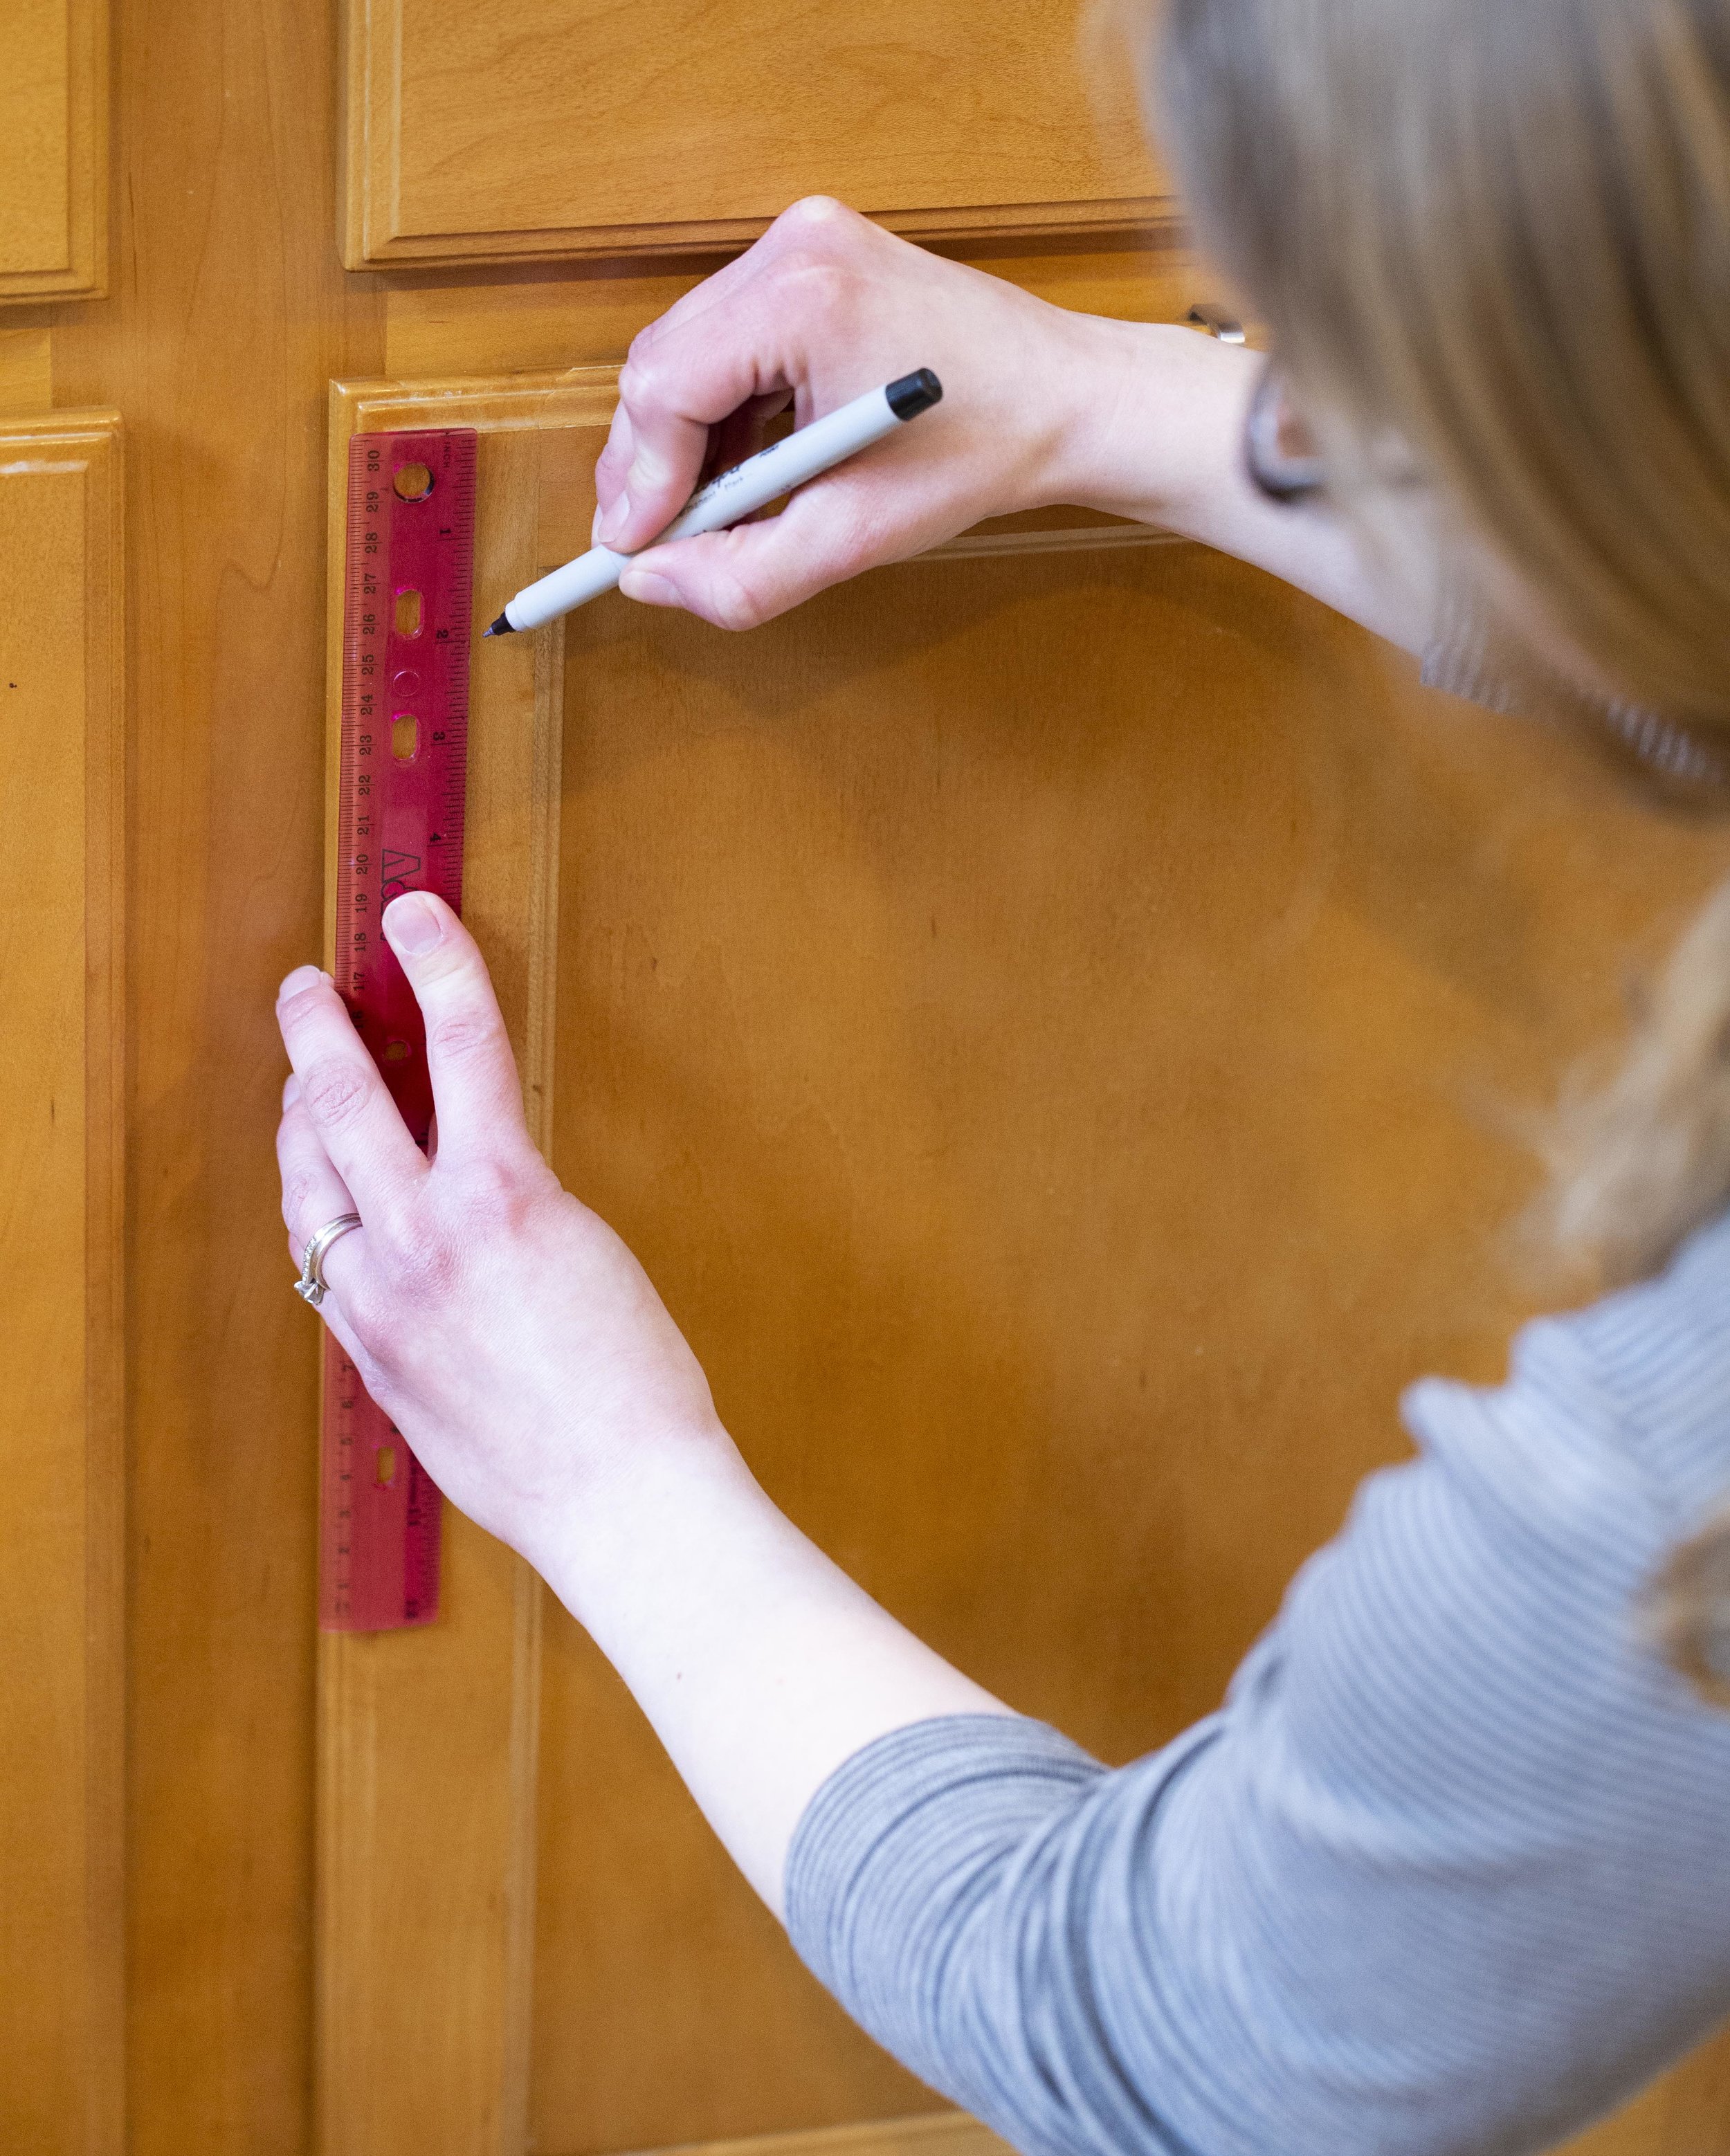
For our cabinets, we decided we liked the knobs two inches from the edge of the cabinet (not including the beveled edge). Once we decided on this placement, it was just a matter of measuring it out on all the cabinet doors so they were centered side-to-side on the trim piece as well as two inches in. Consistency is key to having uniform placement - and I made sure to measure multiple times in both directions before marking it with a pen
It’s important to measure the knobs on each door independently - if the doors aren’t hung evenly, it may look off initially but the hinges can be adjusted later so everything (the doors themselves as well as the hardware) will line up visually.
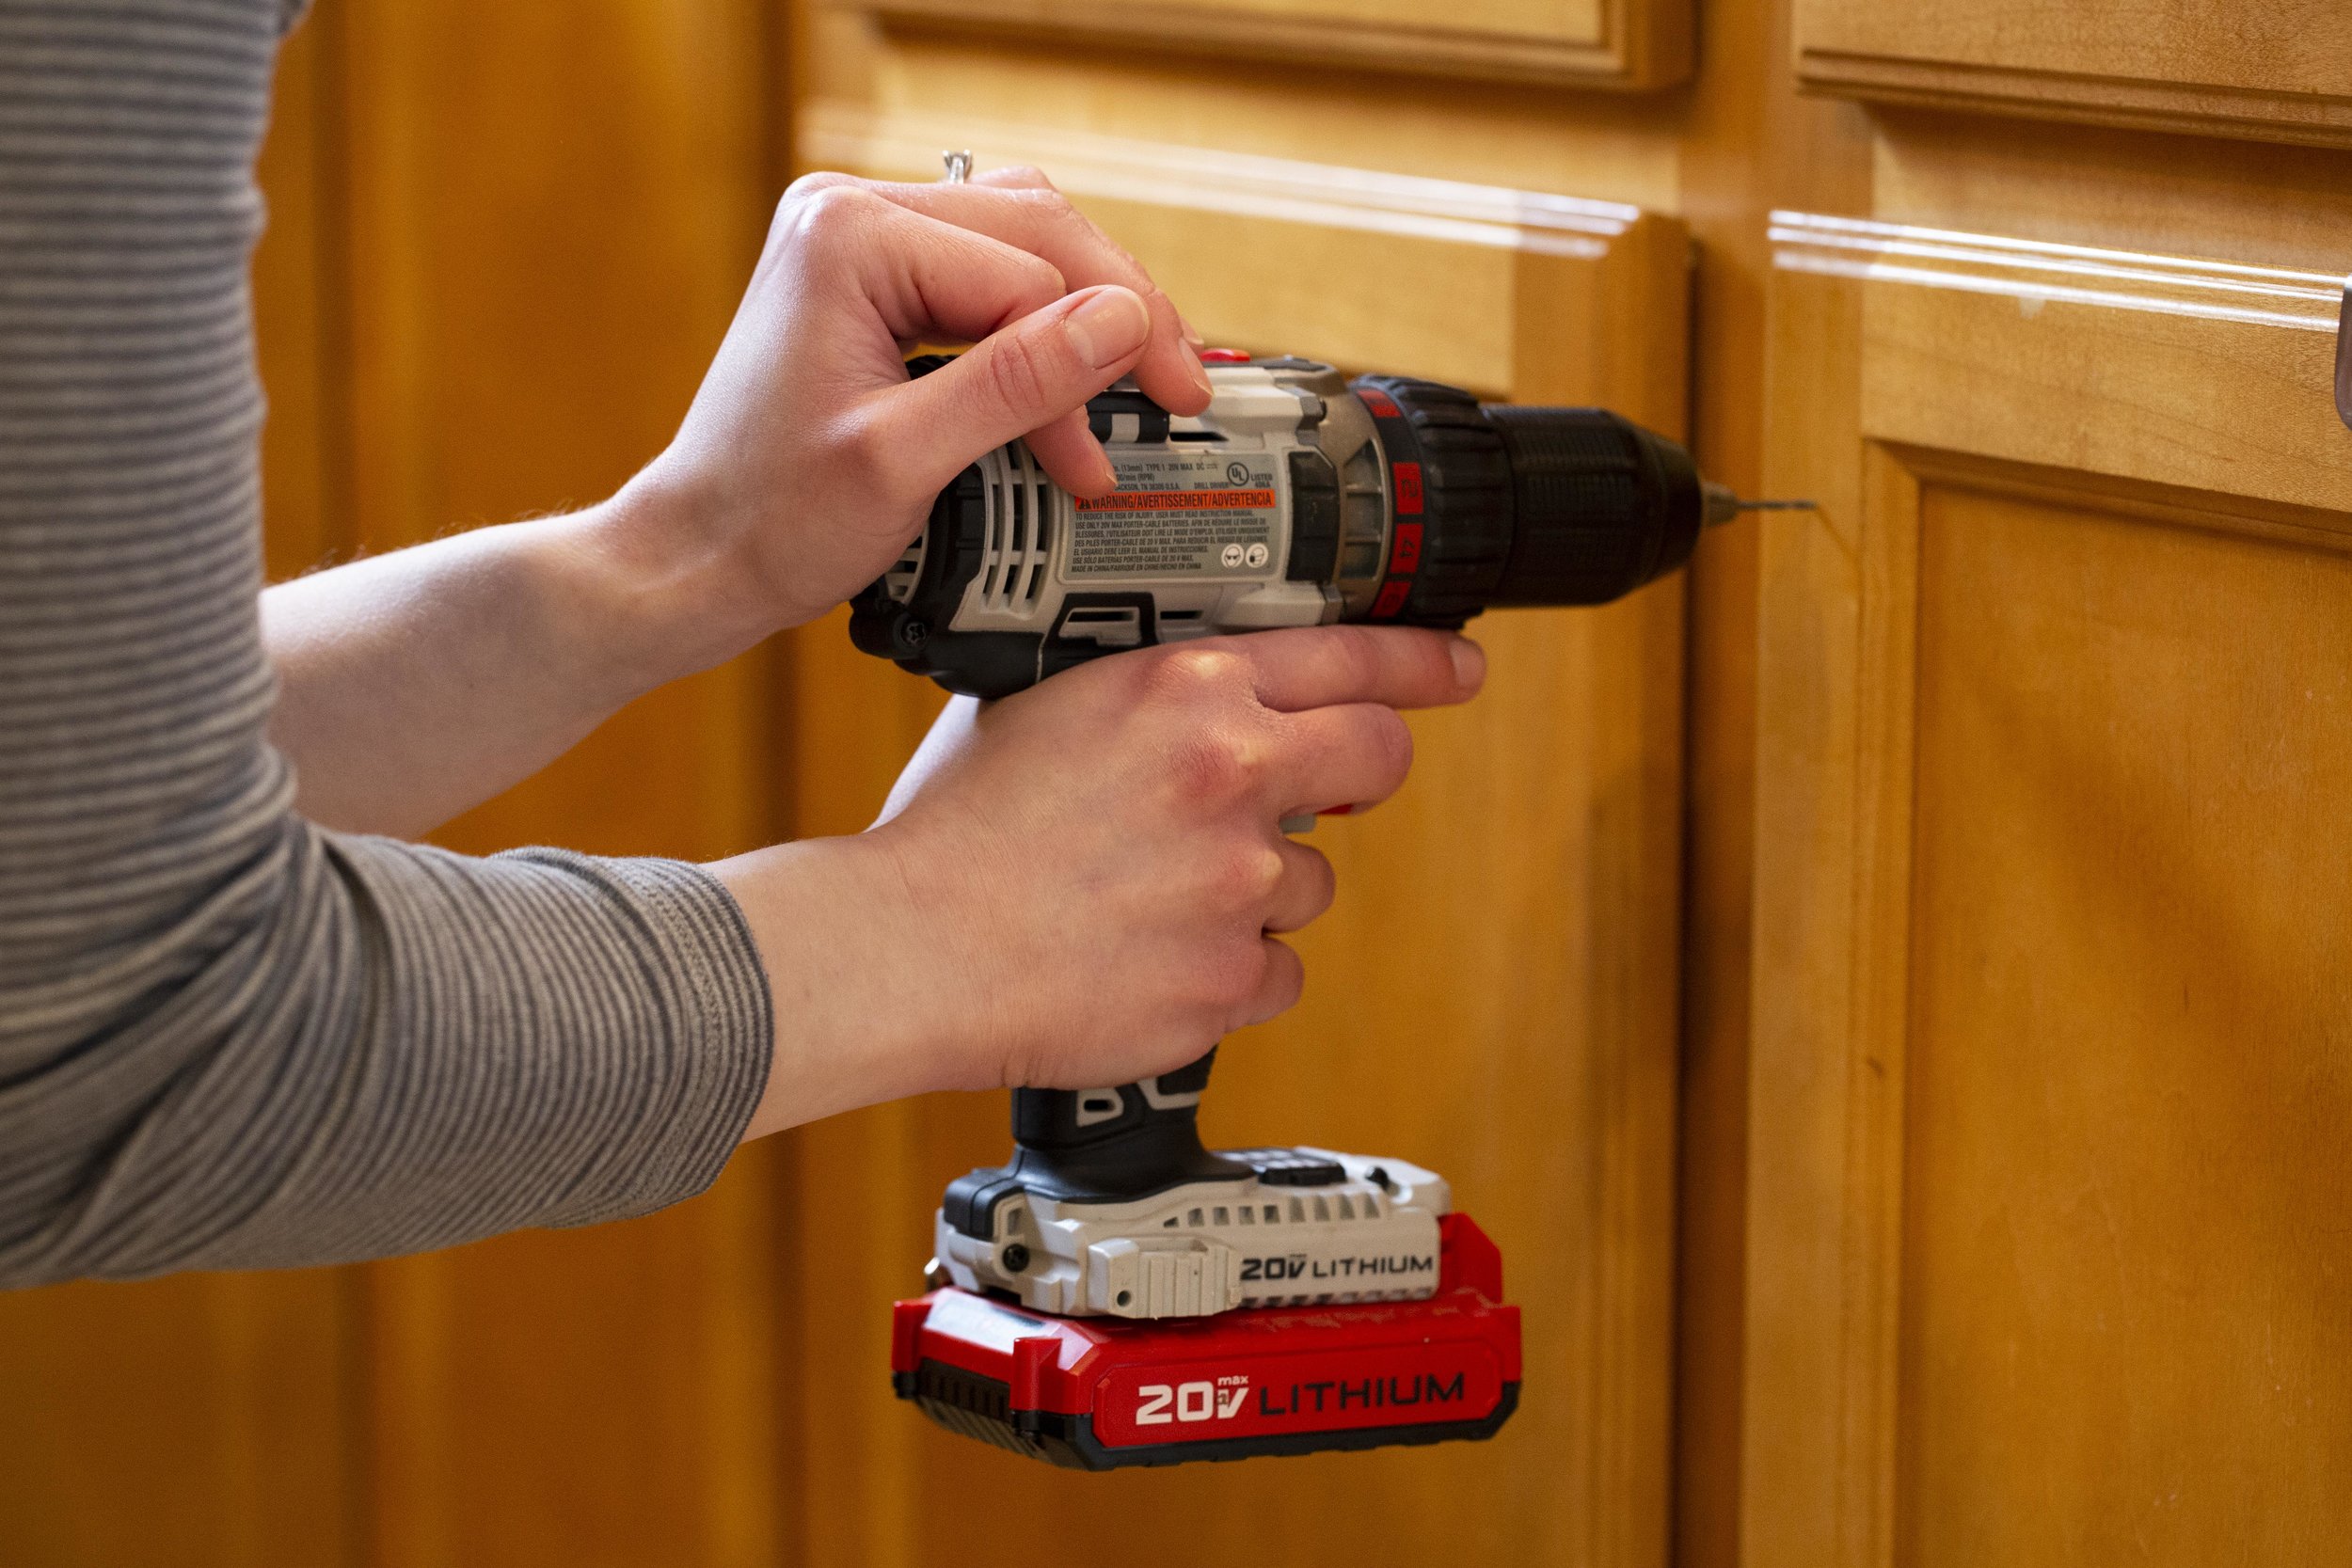
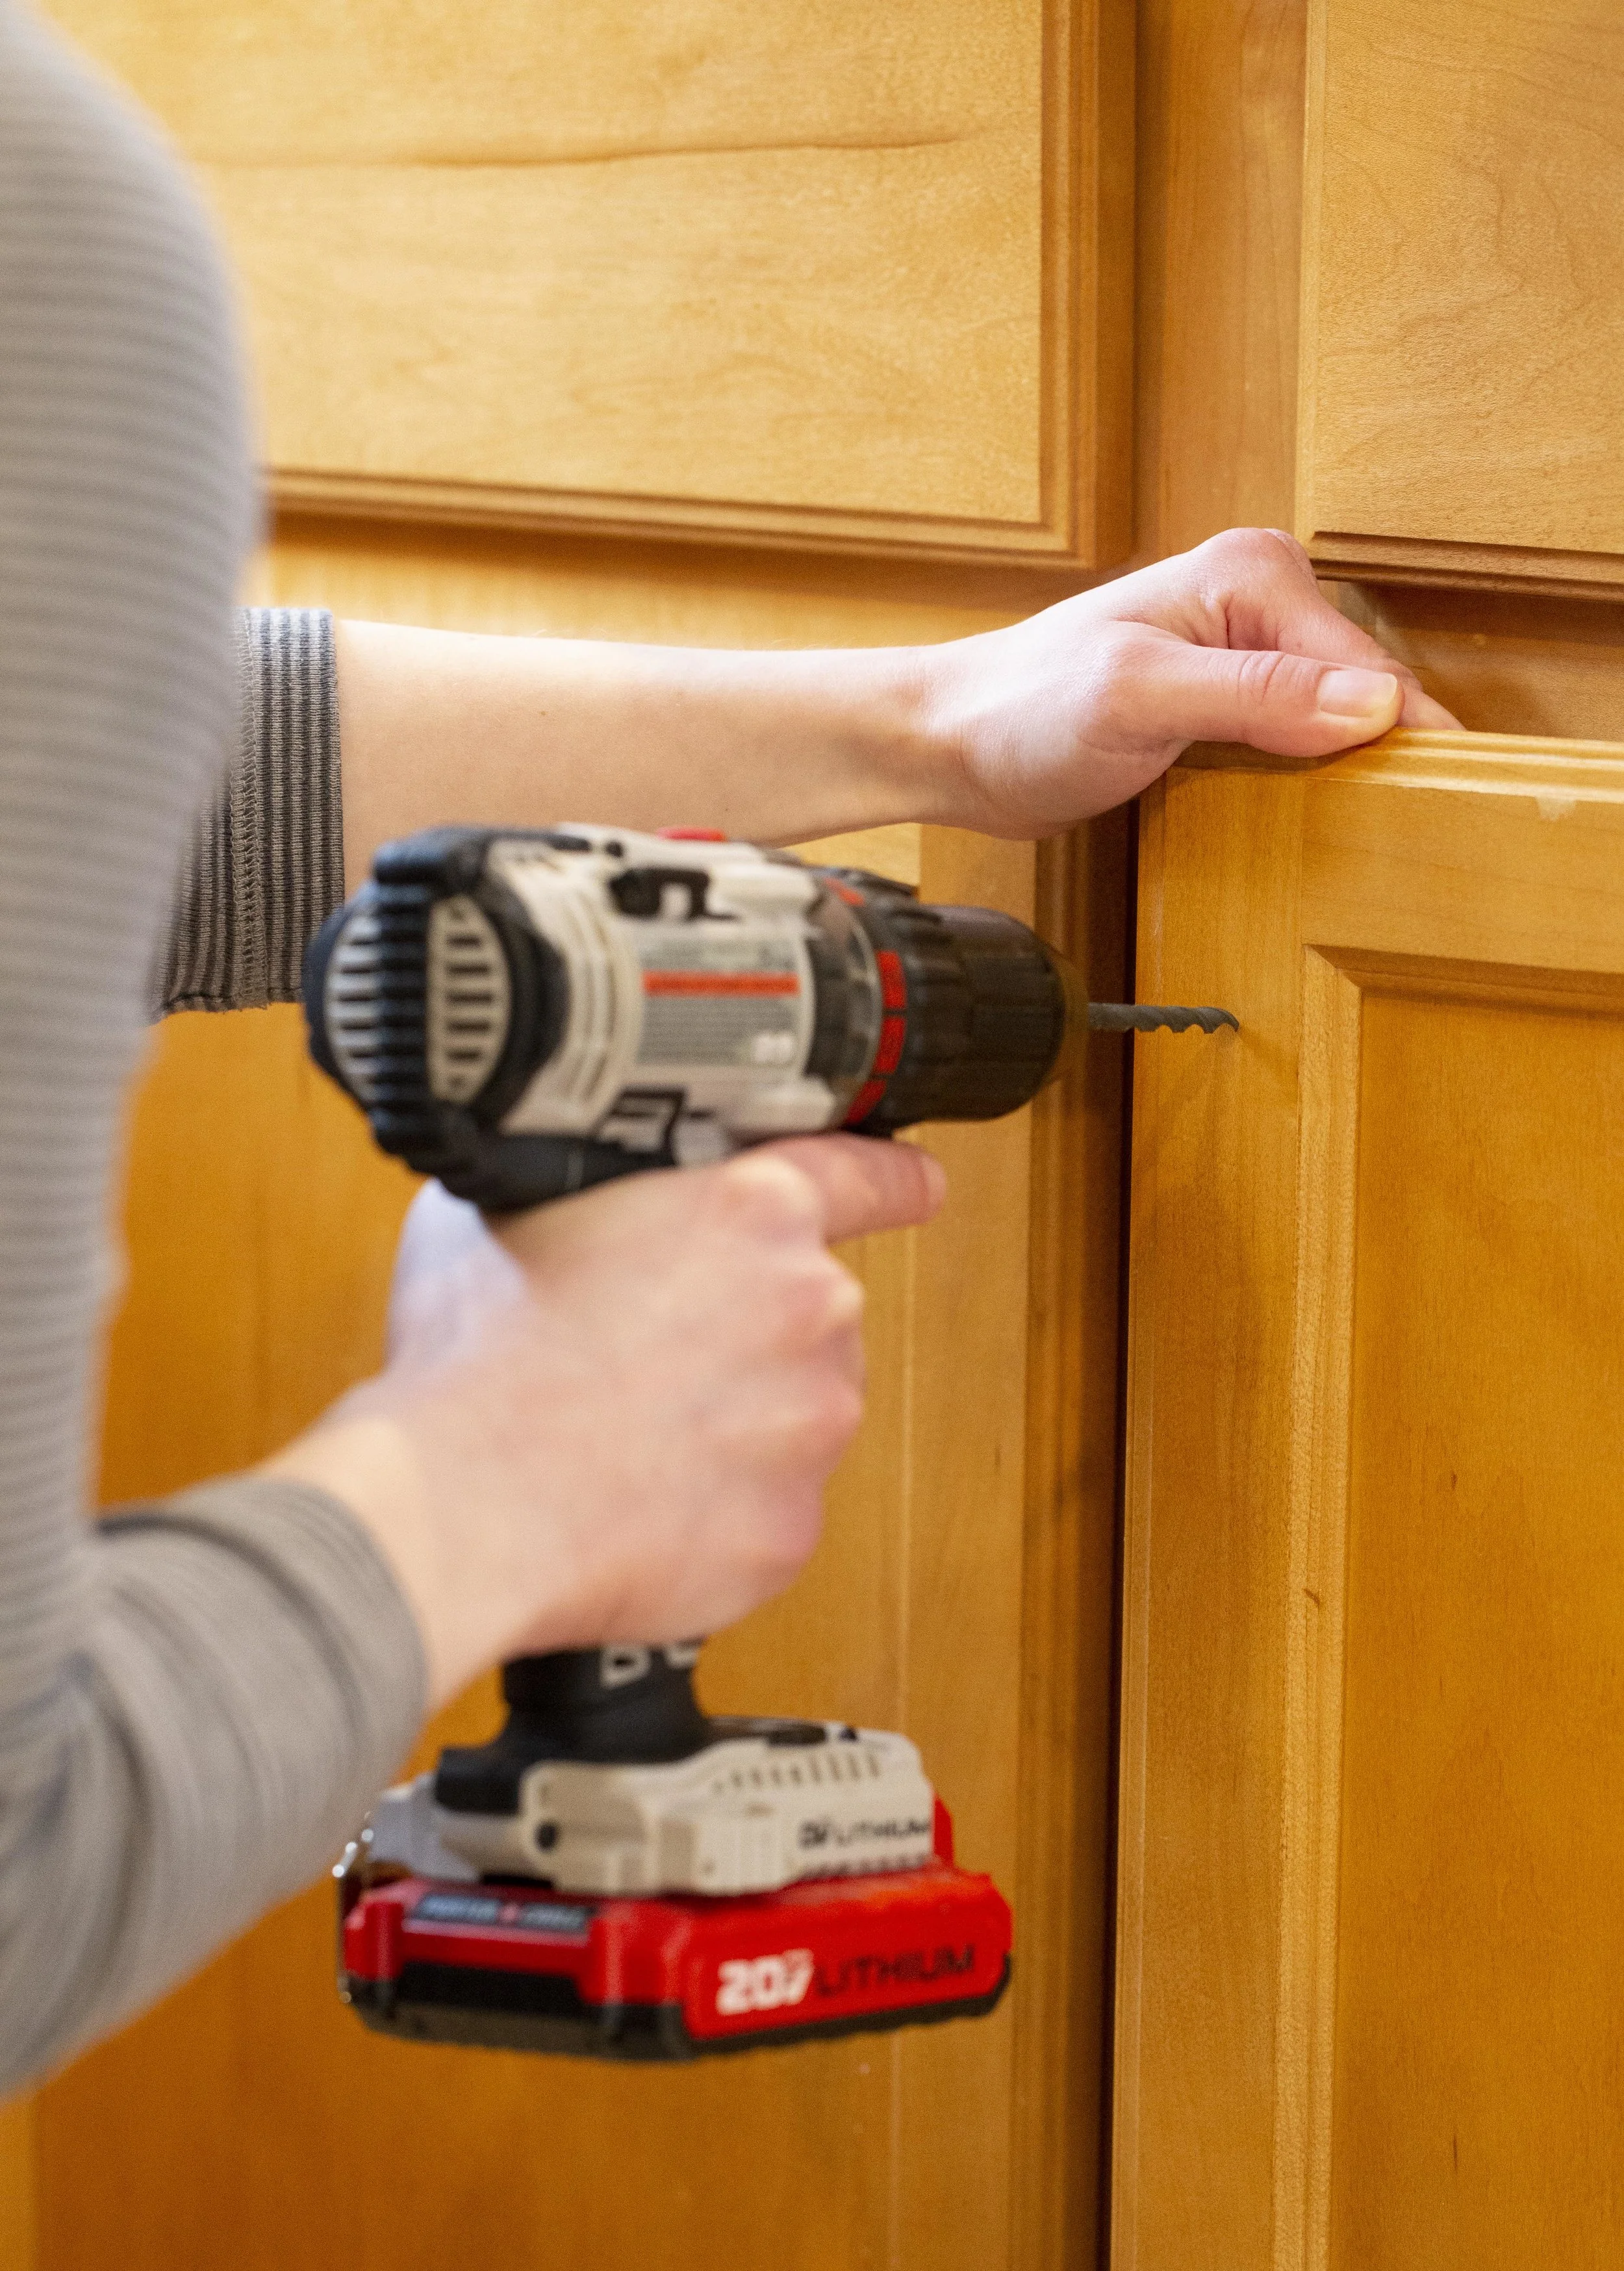
When it comes time to drill the holes, it’s important to make a small pilot (starter) hole before you drill the full size hole. There’s several reasons for this, but the two most important ones being that larger drill bits tend to “walk” when you drill on a smooth surface, and without drilling a pilot hole first you might end up off your mark. The other important reason is that pre-drilling the hole smaller first will help lessen the chance of the wood splitting. Be aware of what’s behind the cabinet front when you drill! Make sure you aren’t drilling into the cabinet frame or dishes that may be in the cabinet behind the door. For the larger hole you’ll want the drill bit diameter to be just barely bigger than the diameter of the screws that come with the hardware.
Once the larger hole is drilled, slide the screw in from the back and use a screwdriver to hold it in place while you thread the knob on snuggly.
Deciding on drawer pull placement. (Note that while the lower cabinet knobs are each in the correct place, they look off since the cabinet doors are uneven - this can be fixed by adjusting the cabinet door hinges, which I did once I was finished installing all the hardware.)
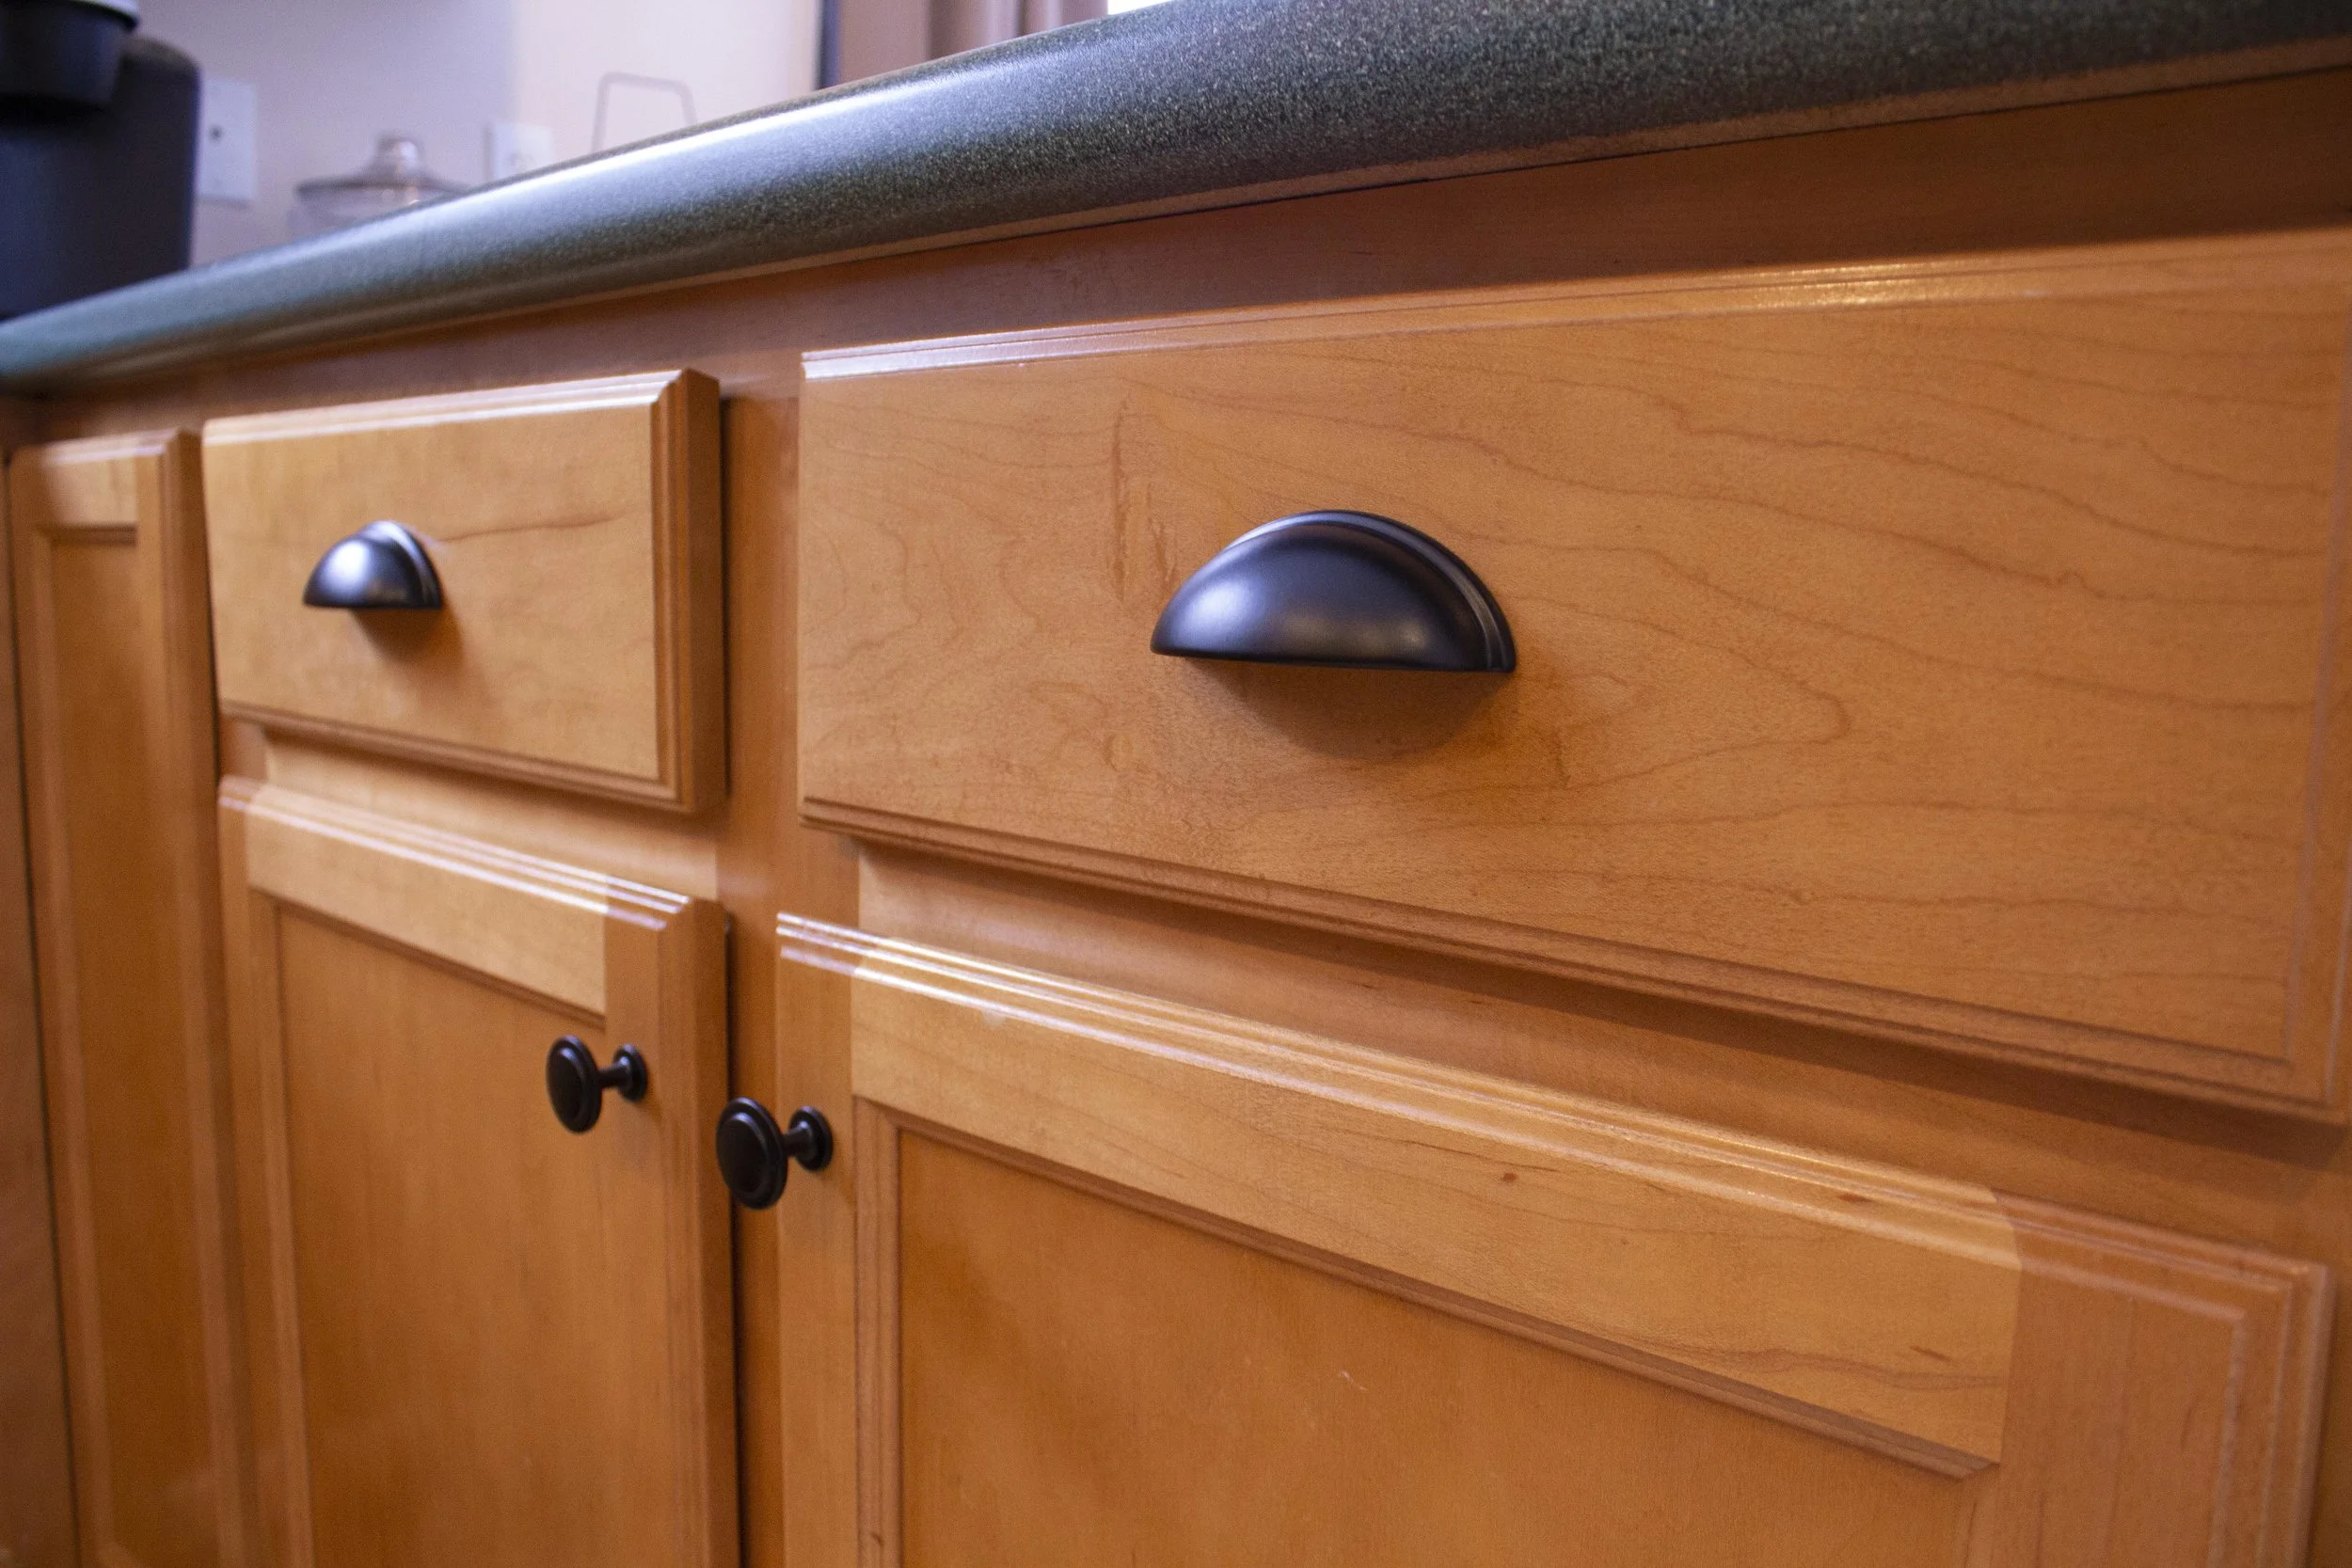
For the drawer pulls I followed a similar procedure as I did for the door fronts. One thing I had to keep in mind though is the drawer pulls I chose aren’t symmetrical top-to-bottom - the mounting screws are towards the bottom of of the pulls. Therefore, playing around with the placement of the drawer pulls was very important - the drawer pulls needed to look centered visually from top to bottom on the drawer fronts, even though that made for the screw placement to be slightly below center.
Once I liked the visual placement of the paper templates I carefully measured out the spacing on each side as well as down from the screw holes to make sure everything was accurate and even. These particular drawer pulls have screws 3” apart so I made sure that the spacing between the screw markings was accurate as well. (Once you get an idea of placement, you could also use a Cabinet Hardware Template here to help mark everything out.) In our kitchen the drawers are three different sizes, so this process needed to be repeated several times - on the shorter drawers I used one pull, and on the longer drawer I used two pulls.
After the hole placements were marked, I remeasured the spacings several times before drilling the pilot holes and then the screw holes. Then it’s simply a matter of screwing the screws in from the backside of the drawers with a screwdriver into the drawer pulls.
AFTER
And that’s it - the whole project took less than an afternoon to do and it really helps our kitchen look more finished. I just love how it came out! Once we replace our countertops with a more modern granite counter the space will really look sharp and the hardware will compliment it beautifully.
GIVEAWAY!
Head on over to our Instagram for details and to enter our Giveaway with Cosmas Hardware for a $50 shop credit so you can update the look of your kitchen too with the hardware of your choice!
- I received these items from Cosmas Hardware but all opinions expressed are my own. Please read our full Disclosure Policy for more information -
Disclaimer: Installing new cabinet hardware from scratch is something that most people can very easily do on their own and here I’ve shared my tips on the easiest way I’ve personally found to measure and install them. However, use your best judgement when installing your hardware - if you’re in doubt of your measuring or drilling skills, there’s no harm in consulting a professional before you tackle this or any project.
Just wanted to share a quick sneak peek of the beautiful knobs and drawer pulls from Cosmas Hardware I’ll be using in an upcoming blog post on how to install cupboard hardware yourself. We’ll also be giving away a credit to Cosmas Hardware too - so stay tuned!
Looking for a super easy way to dress up your budget Christmas cards? Emboss the envelopes! We bought this Embosser on Amazon years ago for our wedding and it’s definitely earned it’s keep.
This would make a great wedding or engagement gift too. We use ours yearly for Christmas cards and throughout the year dressing up otherwise boring stationery.