I'm a wife, stay-at-home mom, crafter, and blogger living in rural New England. As seen in Martha Stewart Living, Food Network Magazine, and more! | Tutorials, DIY, crafts, parenting tips, recipes, money saving tips, product reviews, local product features, New England living, intentional living, and more! |
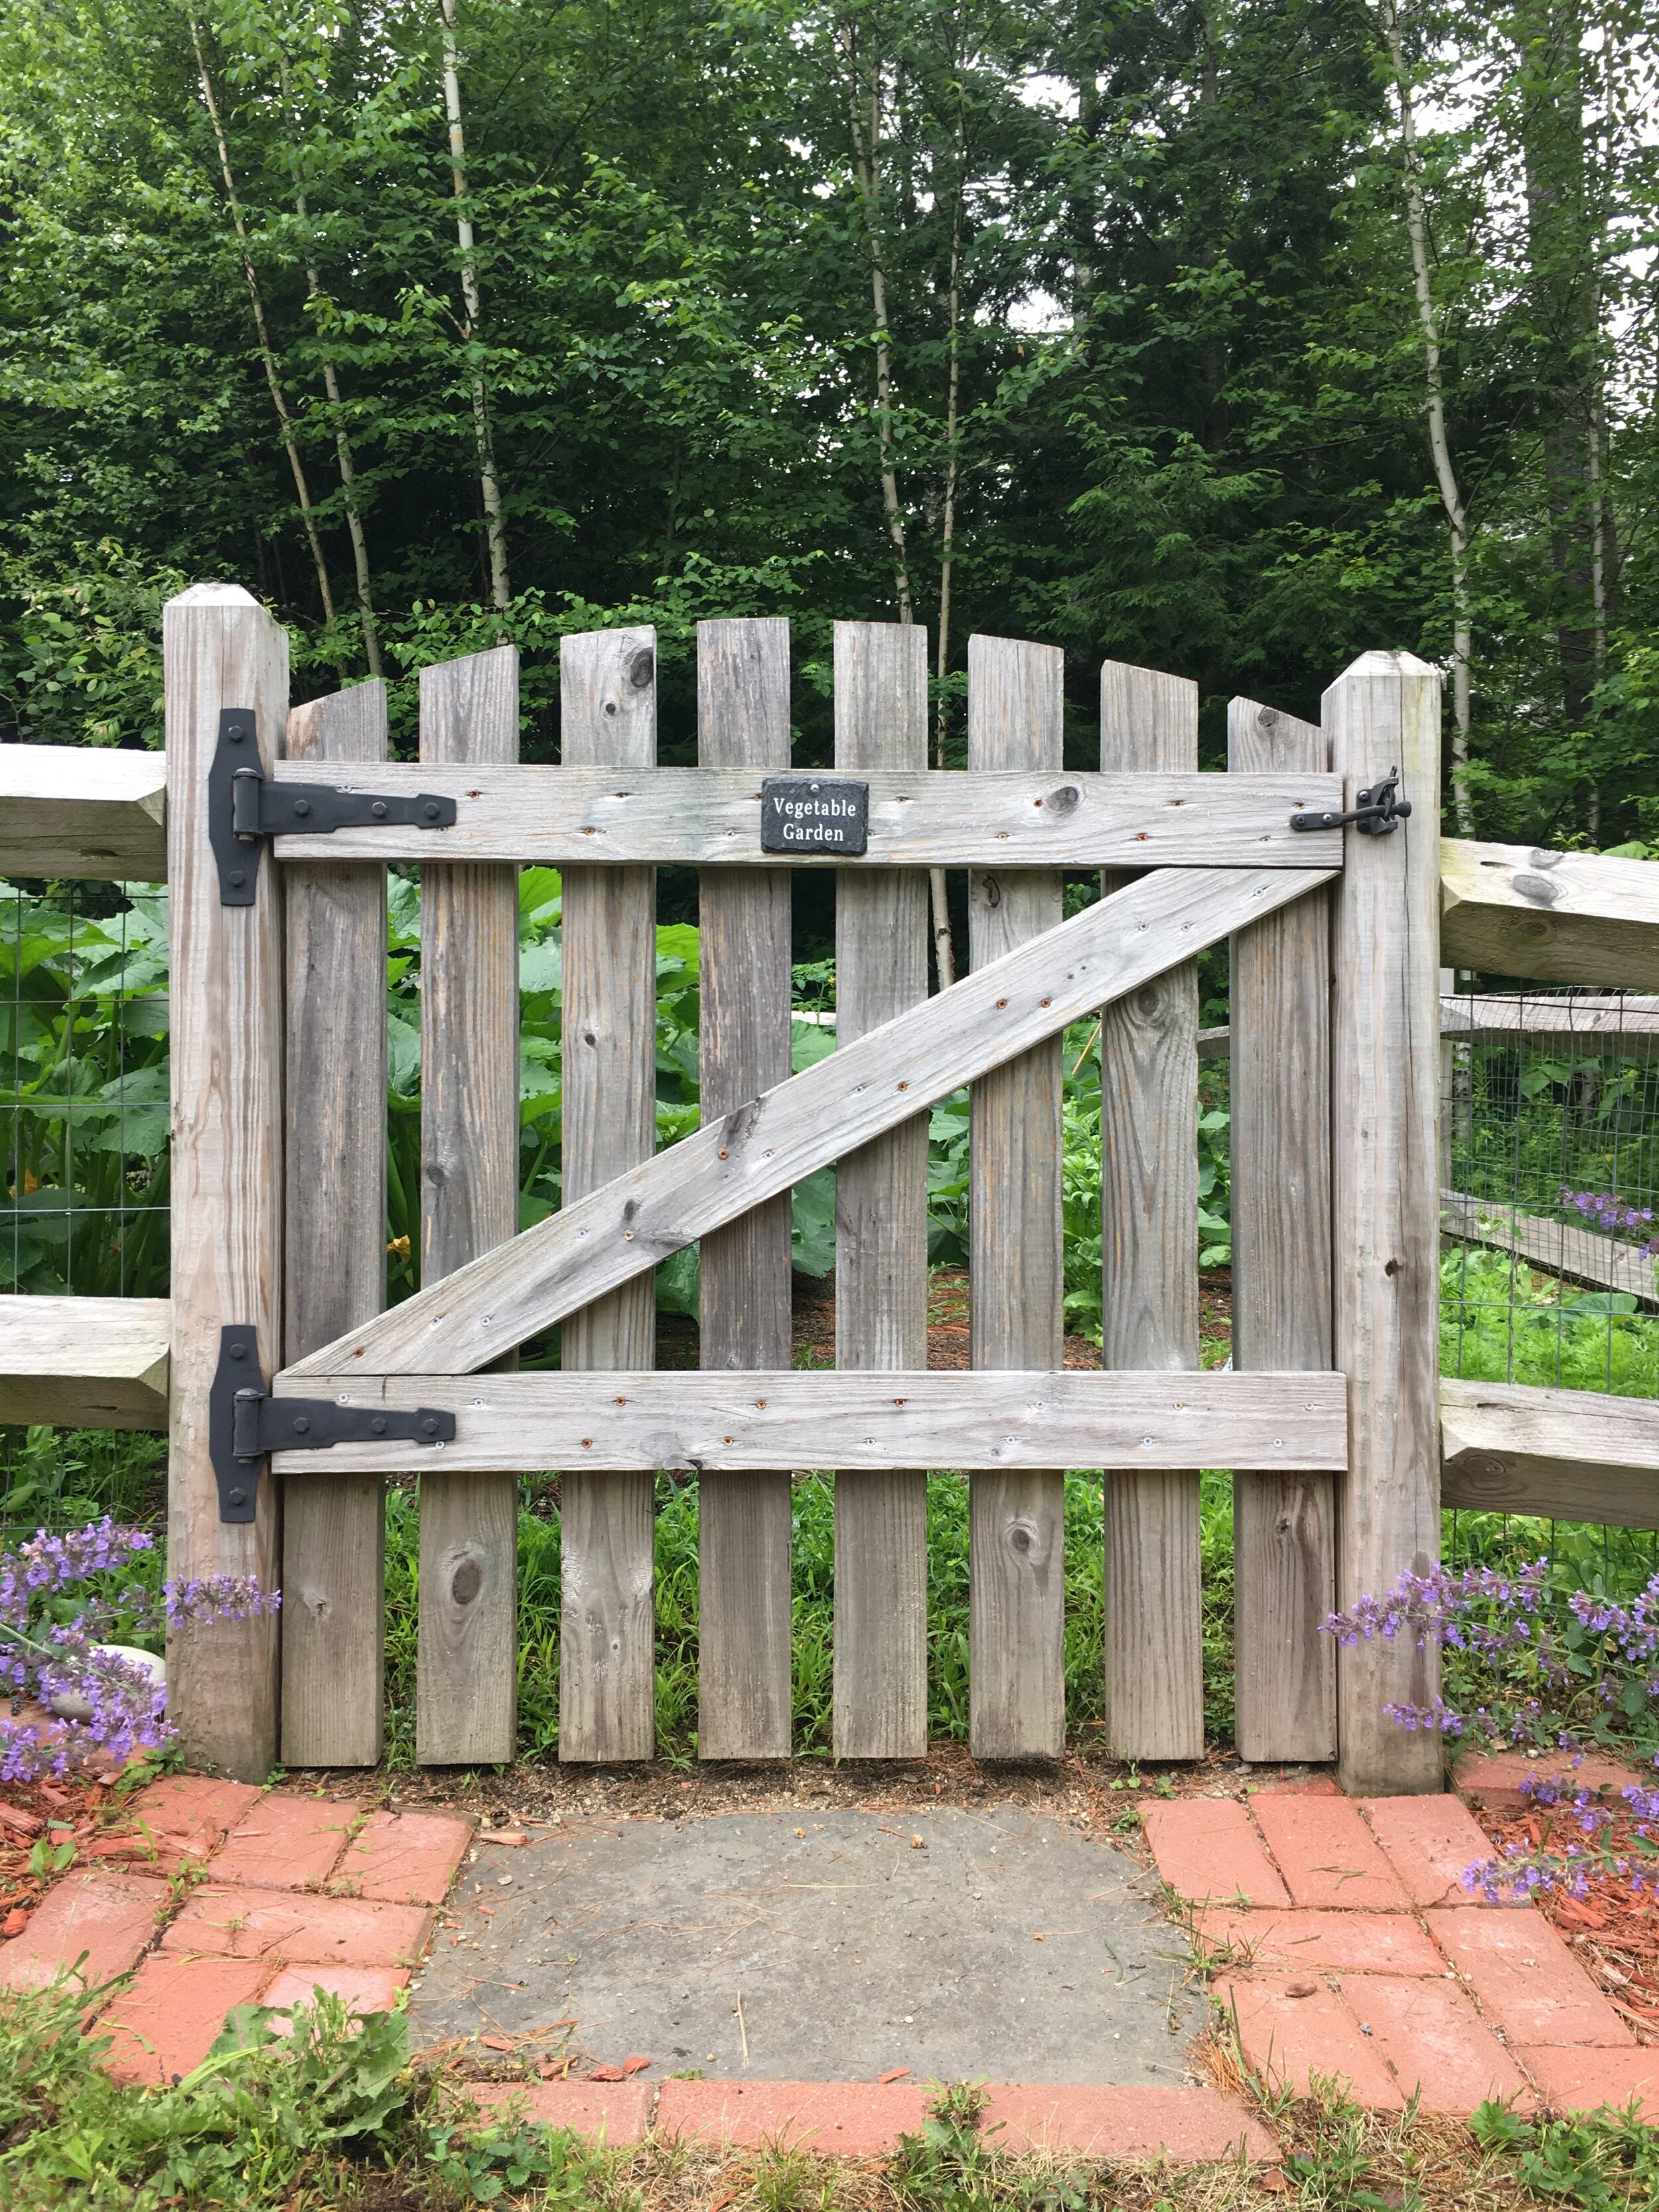
So our garden isn’t magazine-worthy (and it definitely could use a good weeding - the spot by the gate gets so over-run with crab grass I can never seem to keep up) - but it’s been doing really well this year and I thought I would give a quick tour and share some things we’ve been doing in our Victory Garden. New England, Zone 4-5. | This post contains affiliate links |
Our garden is approximately 12x24 feet. My husband built the enclosure seven years ago with split-rail fence lined with garden wire fencing (to help keep critters out) and then designed and built the gate himself - the gate is absolutely my favorite part! At the front of the garden I inlayed bricks and pavers (all of which we had on our property left over from the previous owner years ago) to create a little stepping stone walkway leading up to the entrance of the garden and a small flower bed on each side.
Inside the garden everything was planted from seed and directly sown into the ground mid-May with the exception of the Rhubarb plant (it’s a perennial) and the Tomato plants (I purchased them as seedlings from a local garden center).
For fertilizer we put a few bags of composted cow manure in before rototilling in the spring, and then after planting the seeds I sprinkled a small amount of 10-10-10 Fertilizer across the garden.
In each of the front flower beds I planted Catmint which is a perennial and a great pollinator plant! The blooms attract lots of bees and butterflies and help encourage pollination in the vegetable garden. I also just love how wild and cottage-y they look. They’re also very drought tolerant and hardy - a great no-care plant once they’re established.
Soon I would like to also get some type of Mason Bee House to add to the garden to further ecourage pollinators to come to the garden.
Just inside the garden, along either side of the front, I planted Snap Peas against the fence so they would have something to climb. I also planted Carrots along this front area on each side as well.
When I directly sow the seeds into the ground, I usually stake the empty seed packet with a twig (seen above for the Snap Peas), to mark where I’m planting and so I can reference when the seeds should start to sprout, mature, etc as they grow. Now that my plants are mature I could take all these out but I haven’t just yet.
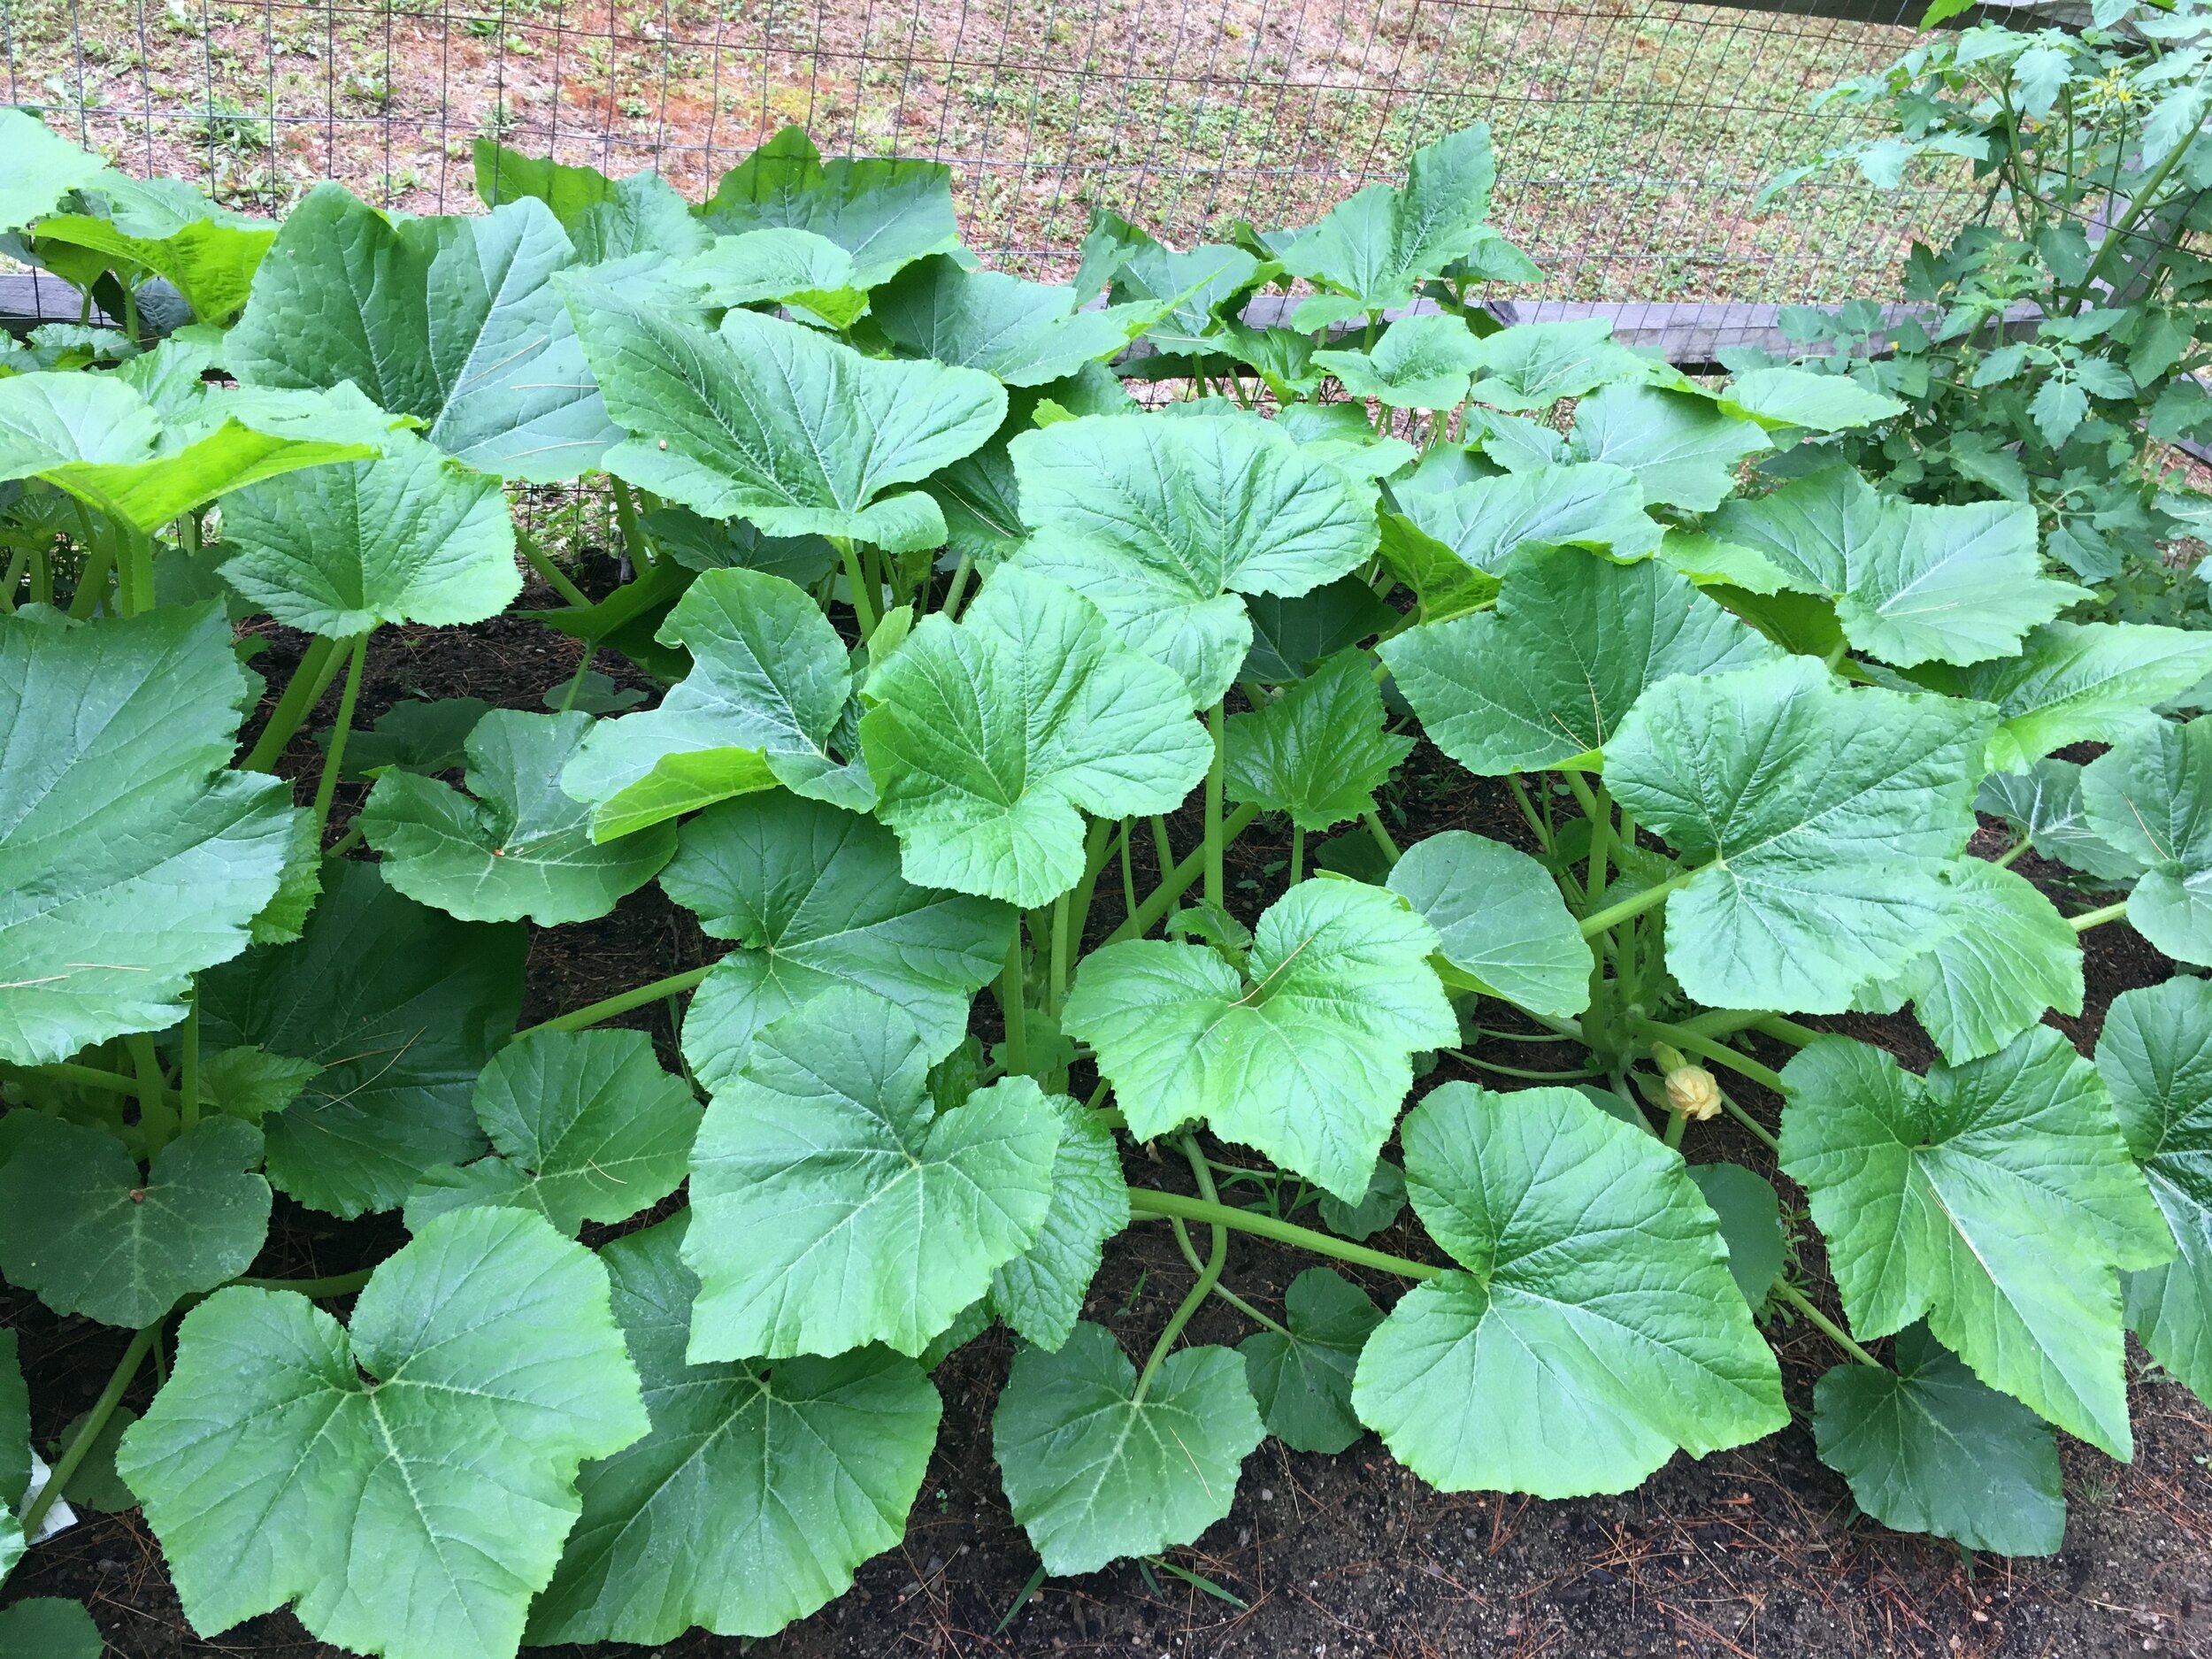
The Zucchini plants are huge this year! Right up to the top of the fence… though I do need to thin out some of the lower leaves on the ground soon for better air flow and access for pollinators (it also can help keep your plants from getting disease/mildew from the ground too).
Here are my Summer Squash plants, which are a bit smaller than the Zucchini ones but doing really well overall. I also need to thin out some of the lower leaves on these as well.
Spinach are cold weather plants and these ones pictured above are sadly done (I actually pulled them out after I took these photos). Once it starts getting hot they tend to “bolt” or grow upwards really fast and flower. Once they do that the leaves are bitter and don’t taste good. This spinach crop is done for now - though I will try to plant more Spinach late summer/early fall to get another harvest in the Fall.
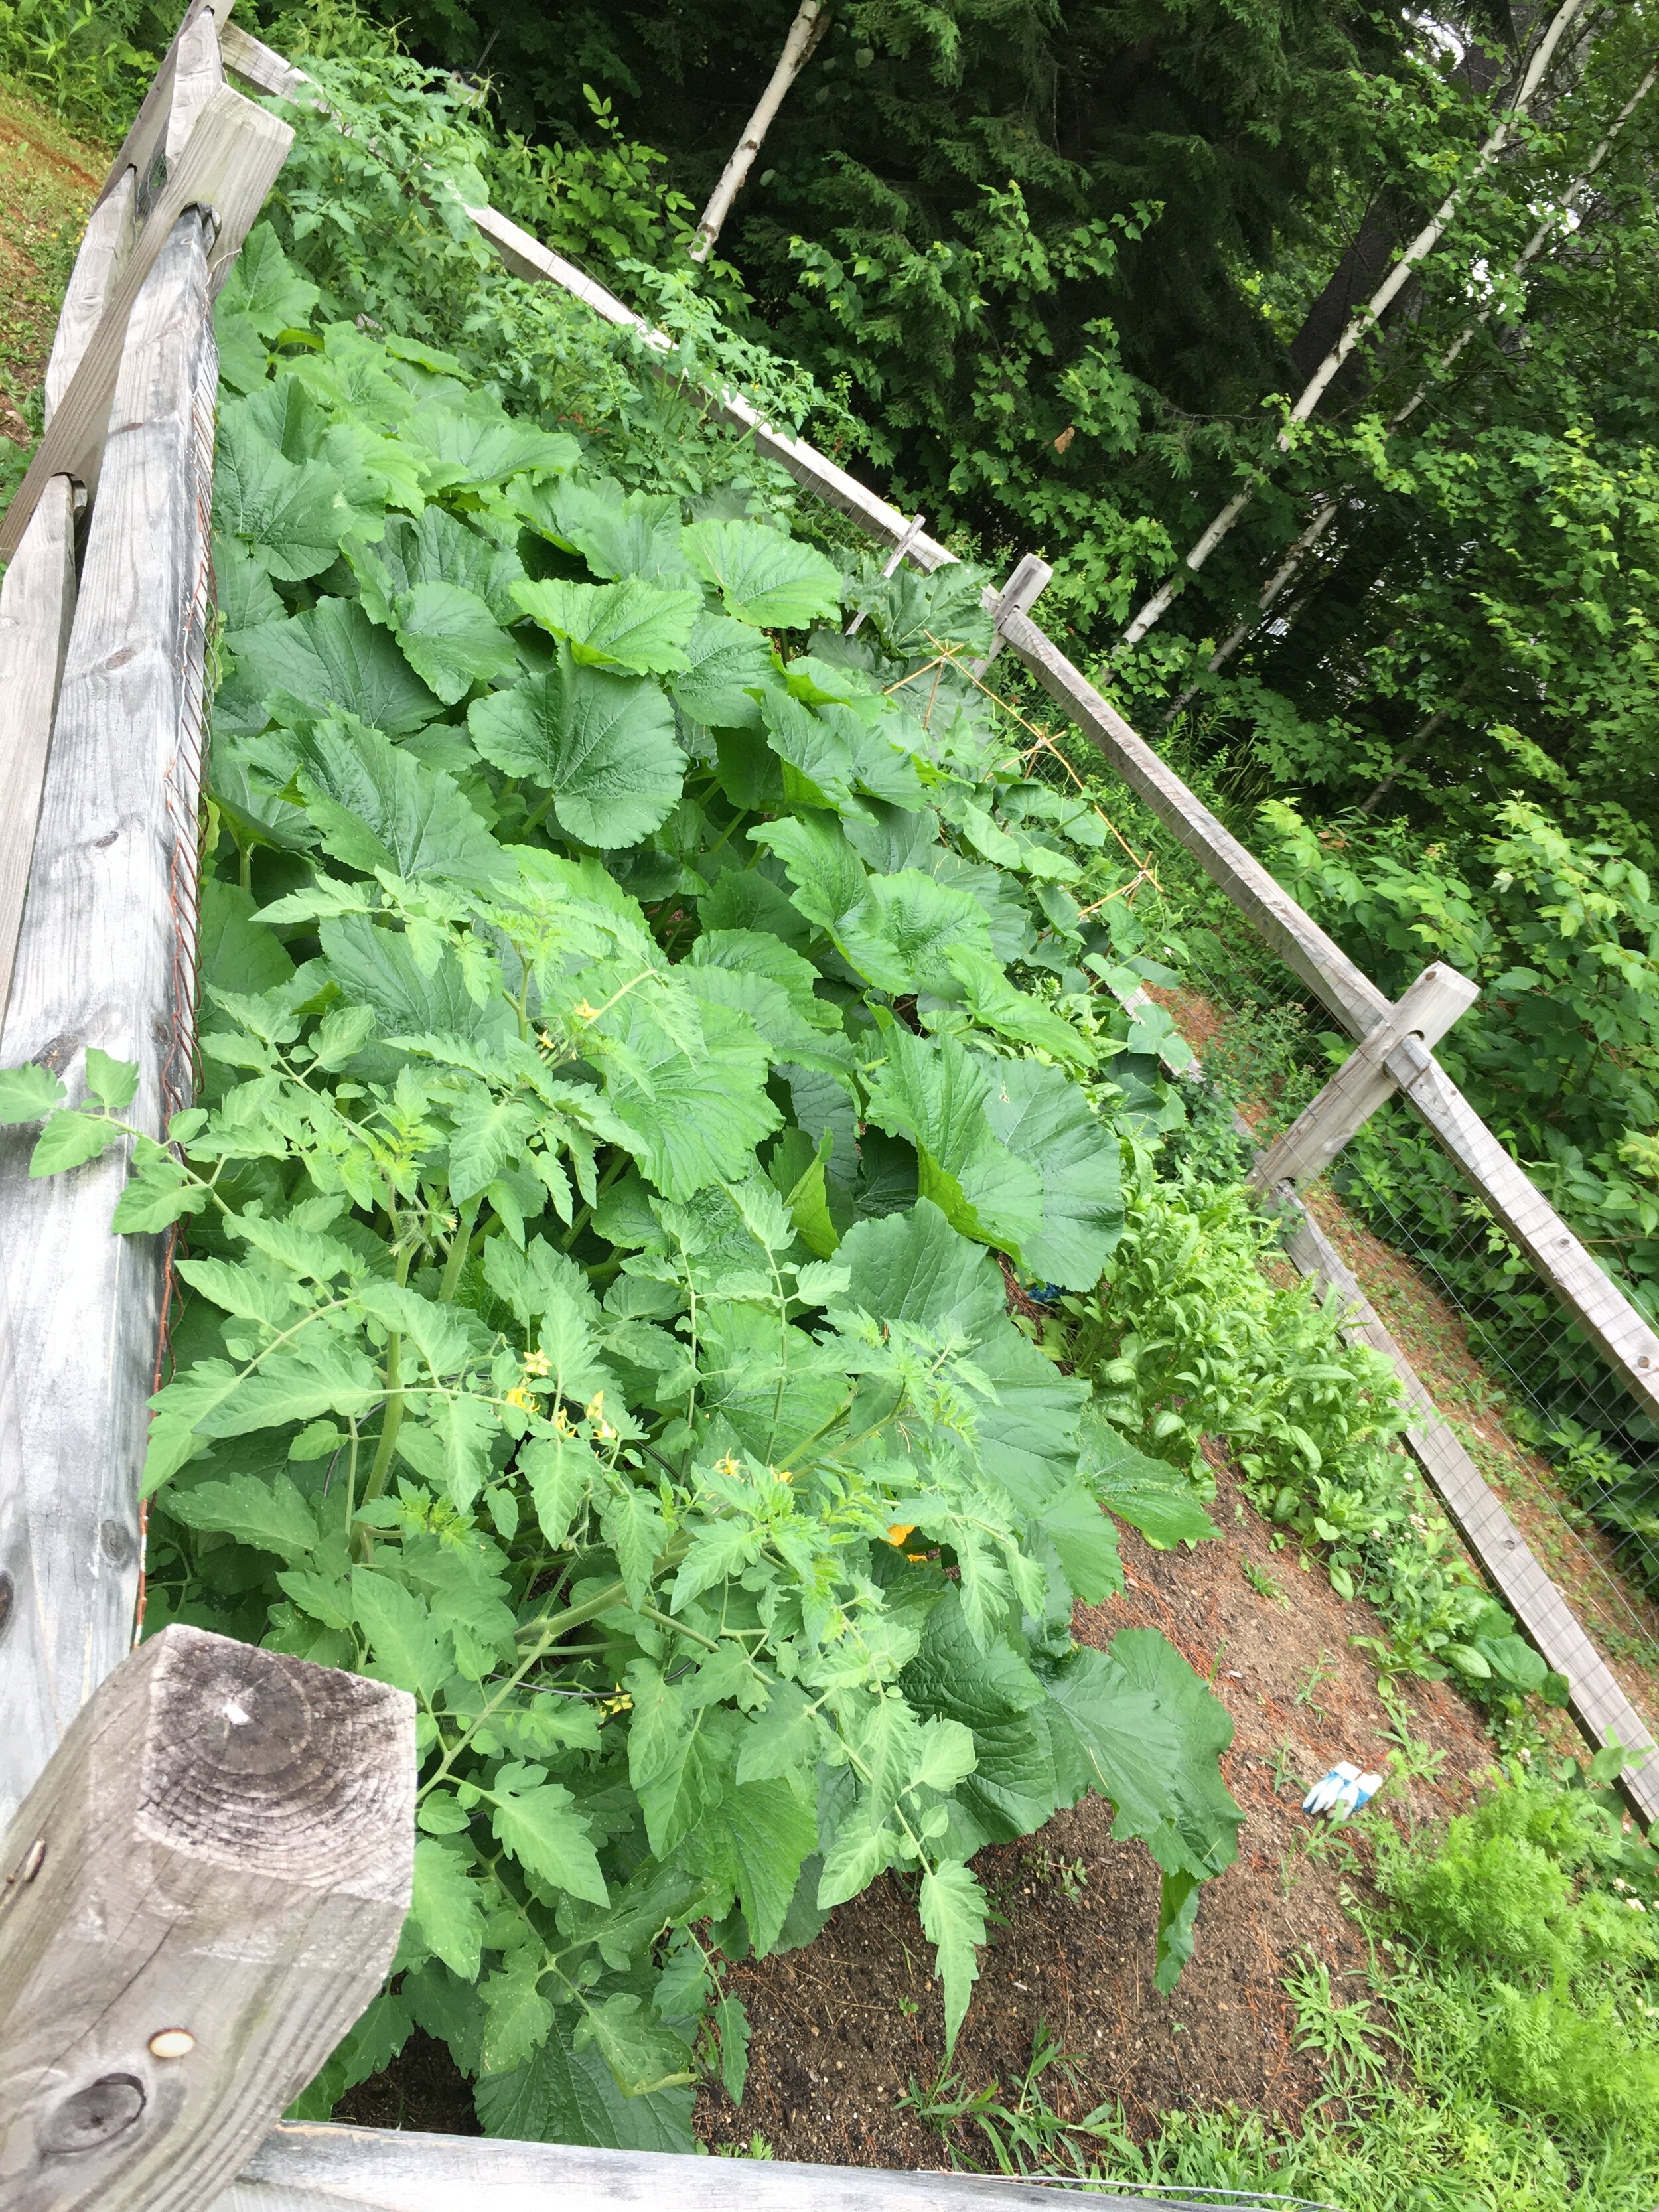
Cucumbers are doing well too. It's a bit hard to see in this photo but I made a small trellis out of Bamboo Stakes and twine for them to grow on. The trellis may look flimsy, but bamboo is actaully really strong (and eco-friendly) so it's great to use in the garden to help support plants.
Along the back I have several Tomato plants growing, both cherry tomato and slicing tomato varieties; behind these along the fence I also have some Sunflowers growing too.
Now for the “showstopper” of the garden - our Rhubarb plant! This is definitely the plant that gets the most interest and questions about in our garden because it’s so big. Rhubarb is a perennial and will come back each year - so make sure to plant it somewhere out of the way where it will have room to grow. We planted this one in the back corner of our garden and marked the area with a stake so we don’t rototill over it in the spring.
While I’m honestly not a huge fan of Rhubarb myself (it’s very sour), growing it is a tradition in our family… when I was growing up we had a very large garden with at least 16 Rhubarb plants. We had so much Rhubarb that we would pick literally garbage bags full of it to give to neighbors and people at Church.
I transplanted this Rhubarb plant from my parents’ garden so I’m not sure on the variety… though from reading around online I’m guessing it’s some type of Canadian or Siberian variety. It can get very large with thick stalks and leaves over two feet across. If you decide to grow Rhubarb, make sure to read up on how to harvest it - you don’t want to over-pick the plant and the leaves are inedible (they’re actually somewhat toxic), it’s just the stalks that can be used.
Across the yard we also have some wine barrels that we’re using for an herb garden. Some of the more hardy herbs (Chives, Garlic Chives, Peppermint, Oregano) come back yearly, despite the fact the wine barrels freeze solid in the winter. I bought the blank slate garden markers on Amazon (and here is the how-to post on how I made them).
This year we also added two blueberry bushes to our landscaping since we didn’t have any fruit trees or bushes yet. It’s recommended to have two different varieties of blueberry bushes to encourage cross-pollinating and better fruit production, so we planted two different kinds near each other. We are already getting a few large berries from them which is very exciting! Here’s hoping they continue to do well in the years to come.
And that’s our little garden tour - thanks so much for following along! I’m no expert by any means, but if you have any questions please let me know.
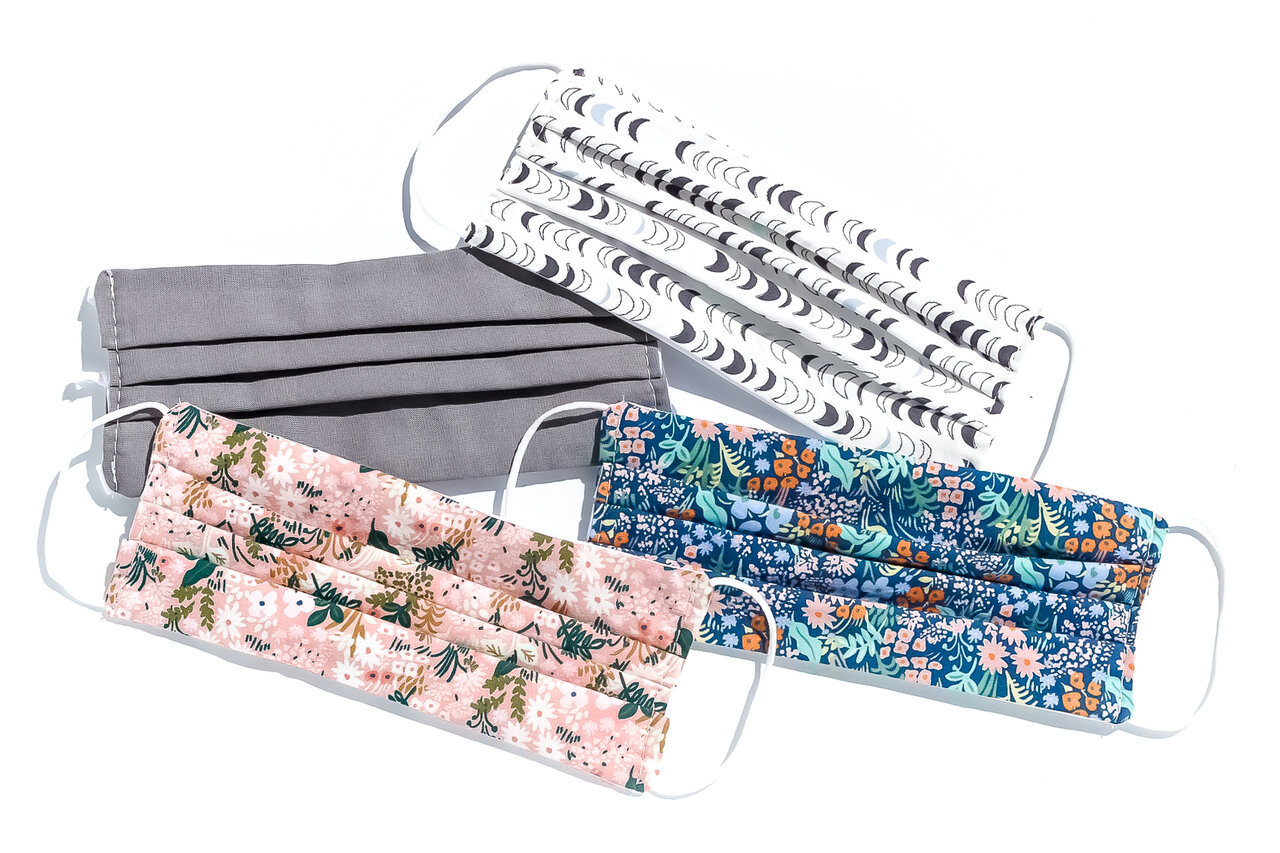
We’re definitely living in different times right now… and it’s becoming clearer that it looks as though we will have to co-exist with this virus for the foreseeable future. Because of that anything we can do that might mitigate the risk of virus transmission, like always wearing face masks or face coverings when outside our homes, are becoming a part of our “new normal.” Today a lot of small businesses are hurting, including small local makers, many of whom have pivoted to also offer masks for sale. As we move forward into our new normal, consider supporting a local maker and purchase masks from them. | This post is not sponsored or an endorsement. Makers are listed in no particular order and I plan to continue to add to this list as I come across more makers who request to be added. |
Masks by New England Makers
Disclaimer: I am not giving medical advice. Make sure to always consult the CDC and local health officials for up-to-date recommendations. These masks are not considered medical grade and should be washed in between each use… please see each individual mask maker regarding details, care instructions, pricing, and current availability.
Scrub Caps for Scholars is an Etsy shop recently started by Marissa of One CrafDIY Girl (who’s also an ICU nurse in Massachusetts) looking to give back to frontline nurses who are struggling to pay their student loans. Proceeds from sales of masks and scrub caps will go towards that fund. Masks are available in different styles in child through adult sizes with different fabrics to choose from; there are also some matching scrub caps available too.
Nicole has created 615+ masks so far - including donations to local businesses and healthcare workers across the country. She has many fabrics to choose from, with masks in tie and elastic styles. (*If there's an essential worker you want to surprise with a free cloth mask, send her a message and she will send it out with a thank you note!)
Think Greene is a Maine-based company best known for their eco-friendly items and apparel. They are offering boldly designed masks in adult and kid sizes made with organic cotton. Masks are tie-style.
Singer Vintage is a Maine-based Etsy stop, which normally sells vintage sewing machine parts, but now offers a wide variety of summer-inspired masks (gingham, chambray, lobsters, etc) in different styles and sizes.
Little Green Pear
| Shop Masks by Little Green Pear (Etsy shop temporarily closed, please order through direct message on Facebook or Instagram) |
Little Green Pear is run by a Vermont-based mom and best known for hair bows and baby accessories, but is now offering a variety of masks in different styles, fabric patterns, and sizes from toddler through adult.
Maine Mom Boutique is a highly-rated shop on Etsy, best known for baby-related items, now offering elastic loop style masks for adults in a variety of fabric patterns.
Maine-based Sea Crow Co. is best known for their popular colorful bags and accessories and is now offering masks too. Masks are pleated-style and available in a variety of fabric patterns and in both ear loop and tie options (child sizes are available upon request).
Miss Harlow VT is a Vermont-based crafter best known for her sewn baby items and gifts and is now offering masks as well in many different fabrics, in both child and adult sizes. To date she has made over 500!
Jackie’s Boutique are two “brick and mortar” shops located in the Lakes Region of New Hampshire known for resort wear and accessories. Right now they are also offering masks with vintage Lake Winnipesaukee map patterns on them. The fabric is made and printed in New England.
The Artsy Fox is New Hampshire-based and known for crocheted and knit items as well as quilted items, and is now also offering masks in different patterns too.
Two Little Beans & Co. is a Maine-based company best known for their baby booties, bibs, and other baby items but is now also offering ear loop style pleated masks in many fabric options, in both kid and adult sizes. She has also been making mask donations for healthcare and frontline workers. (*There is a tutorial on her website if you’re looking for instructions to make your own mask.)
We Fill Good is an eco-friendly shop in Kittery, Maine known for selling reusable products that can help you achieve a low-waste household. Right now they are also offering masks in a variety of fabric pattern options in both adult and kid sizes.
Red House VT is best known for their waxed canvas and leather bags and are now offering simple modern style masks, currently as a wait-list item.
- All photos used with permission -
If you are a New England Maker who is also making masks and would like to be added to this list, please send me a message and I would love to add you. Thank you all for your hard work to help keep our communities a little safer.
Disclaimer: I am not giving medical advice or endorsing any particular seller - purchase at your own risk. Make sure to always consult the CDC and local health officials for up-to-date recommendations. These masks are not considered medical grade and should be washed in between each use… please see each individual mask maker regarding details, care instructions, pricing, and current availability.
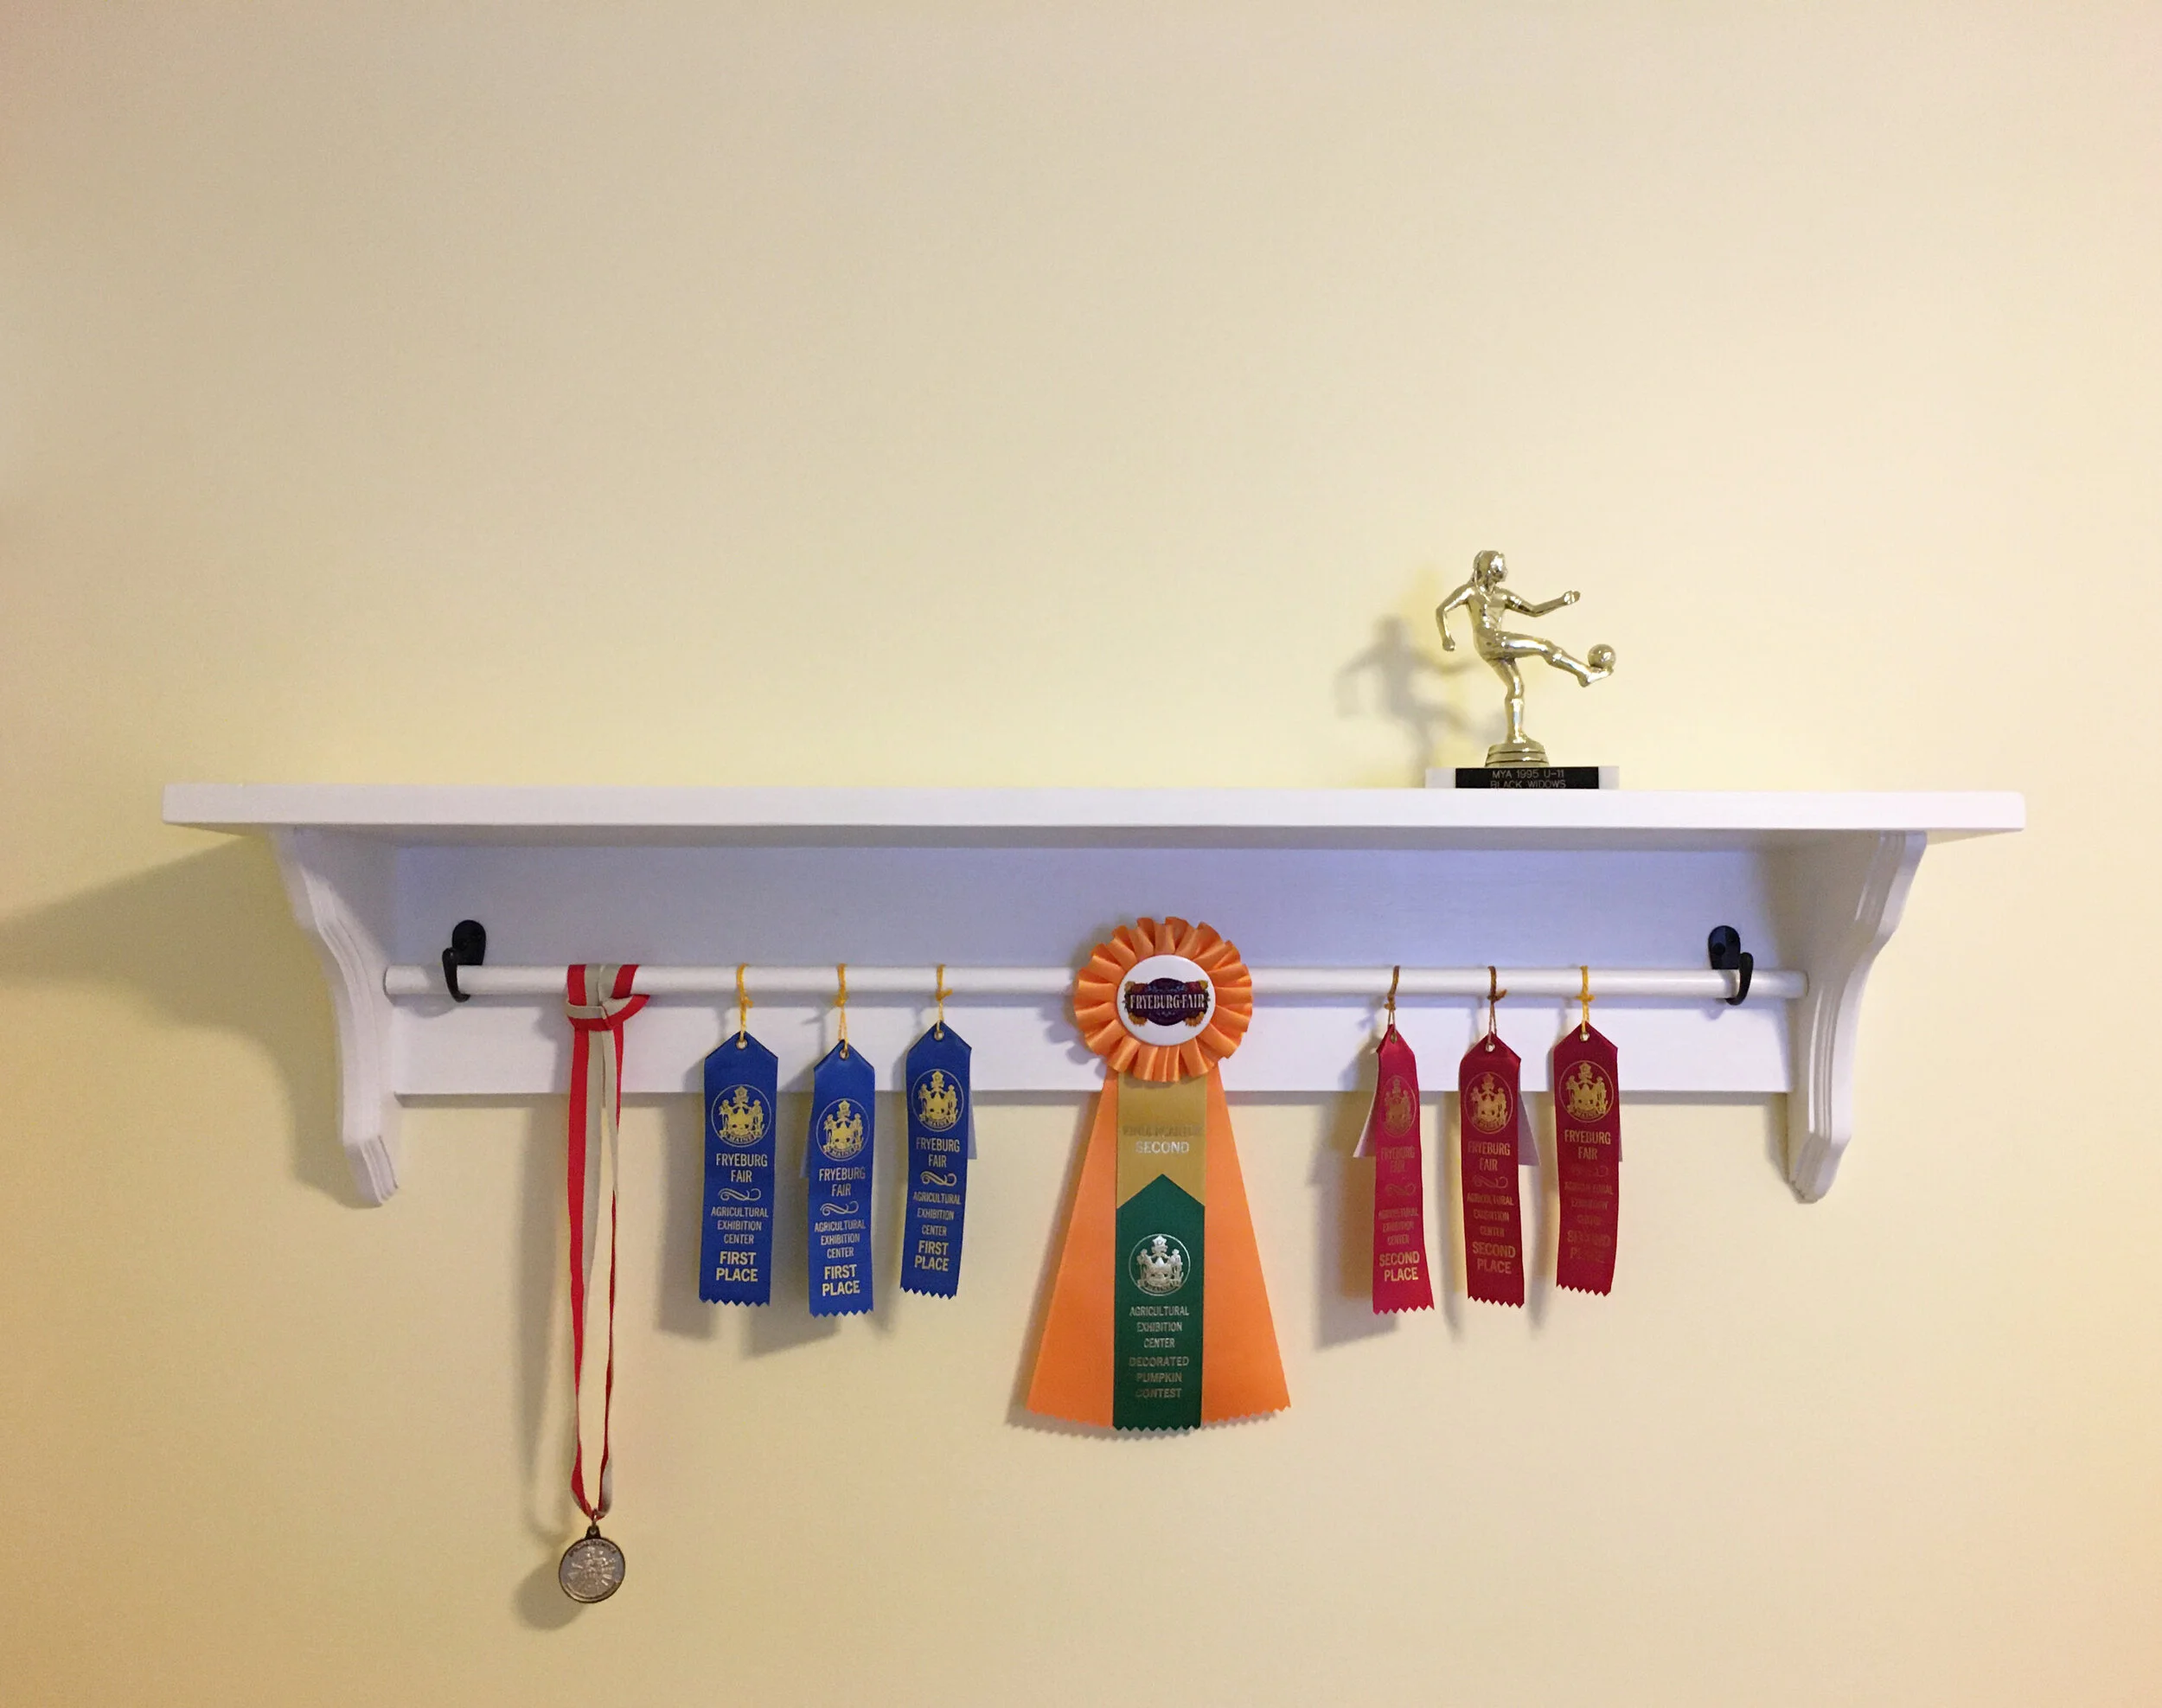
It seems kind of weird and petty to write about fun DIY projects during a Pandemic, but maybe fun projects to work on at home is just what we need right now :) I did this project about two months ago when I was looking for a nice way to display our oldest’s growing collection of award ribbons and medals but couldn’t find a display setup that I liked or was remotely affordable. The whole project was super easy and done start-to-finish within two days. Here’s hoping for things to go back to normal someday soon so she can continue to add to her award collection. | This post contains affiliate links |
Materials:
lumber (I used a 1x8" board for the shelf top and 1x6" board for the back)
two decorative shelf brackets (or two pieces of wood cut at 45 degree angle)
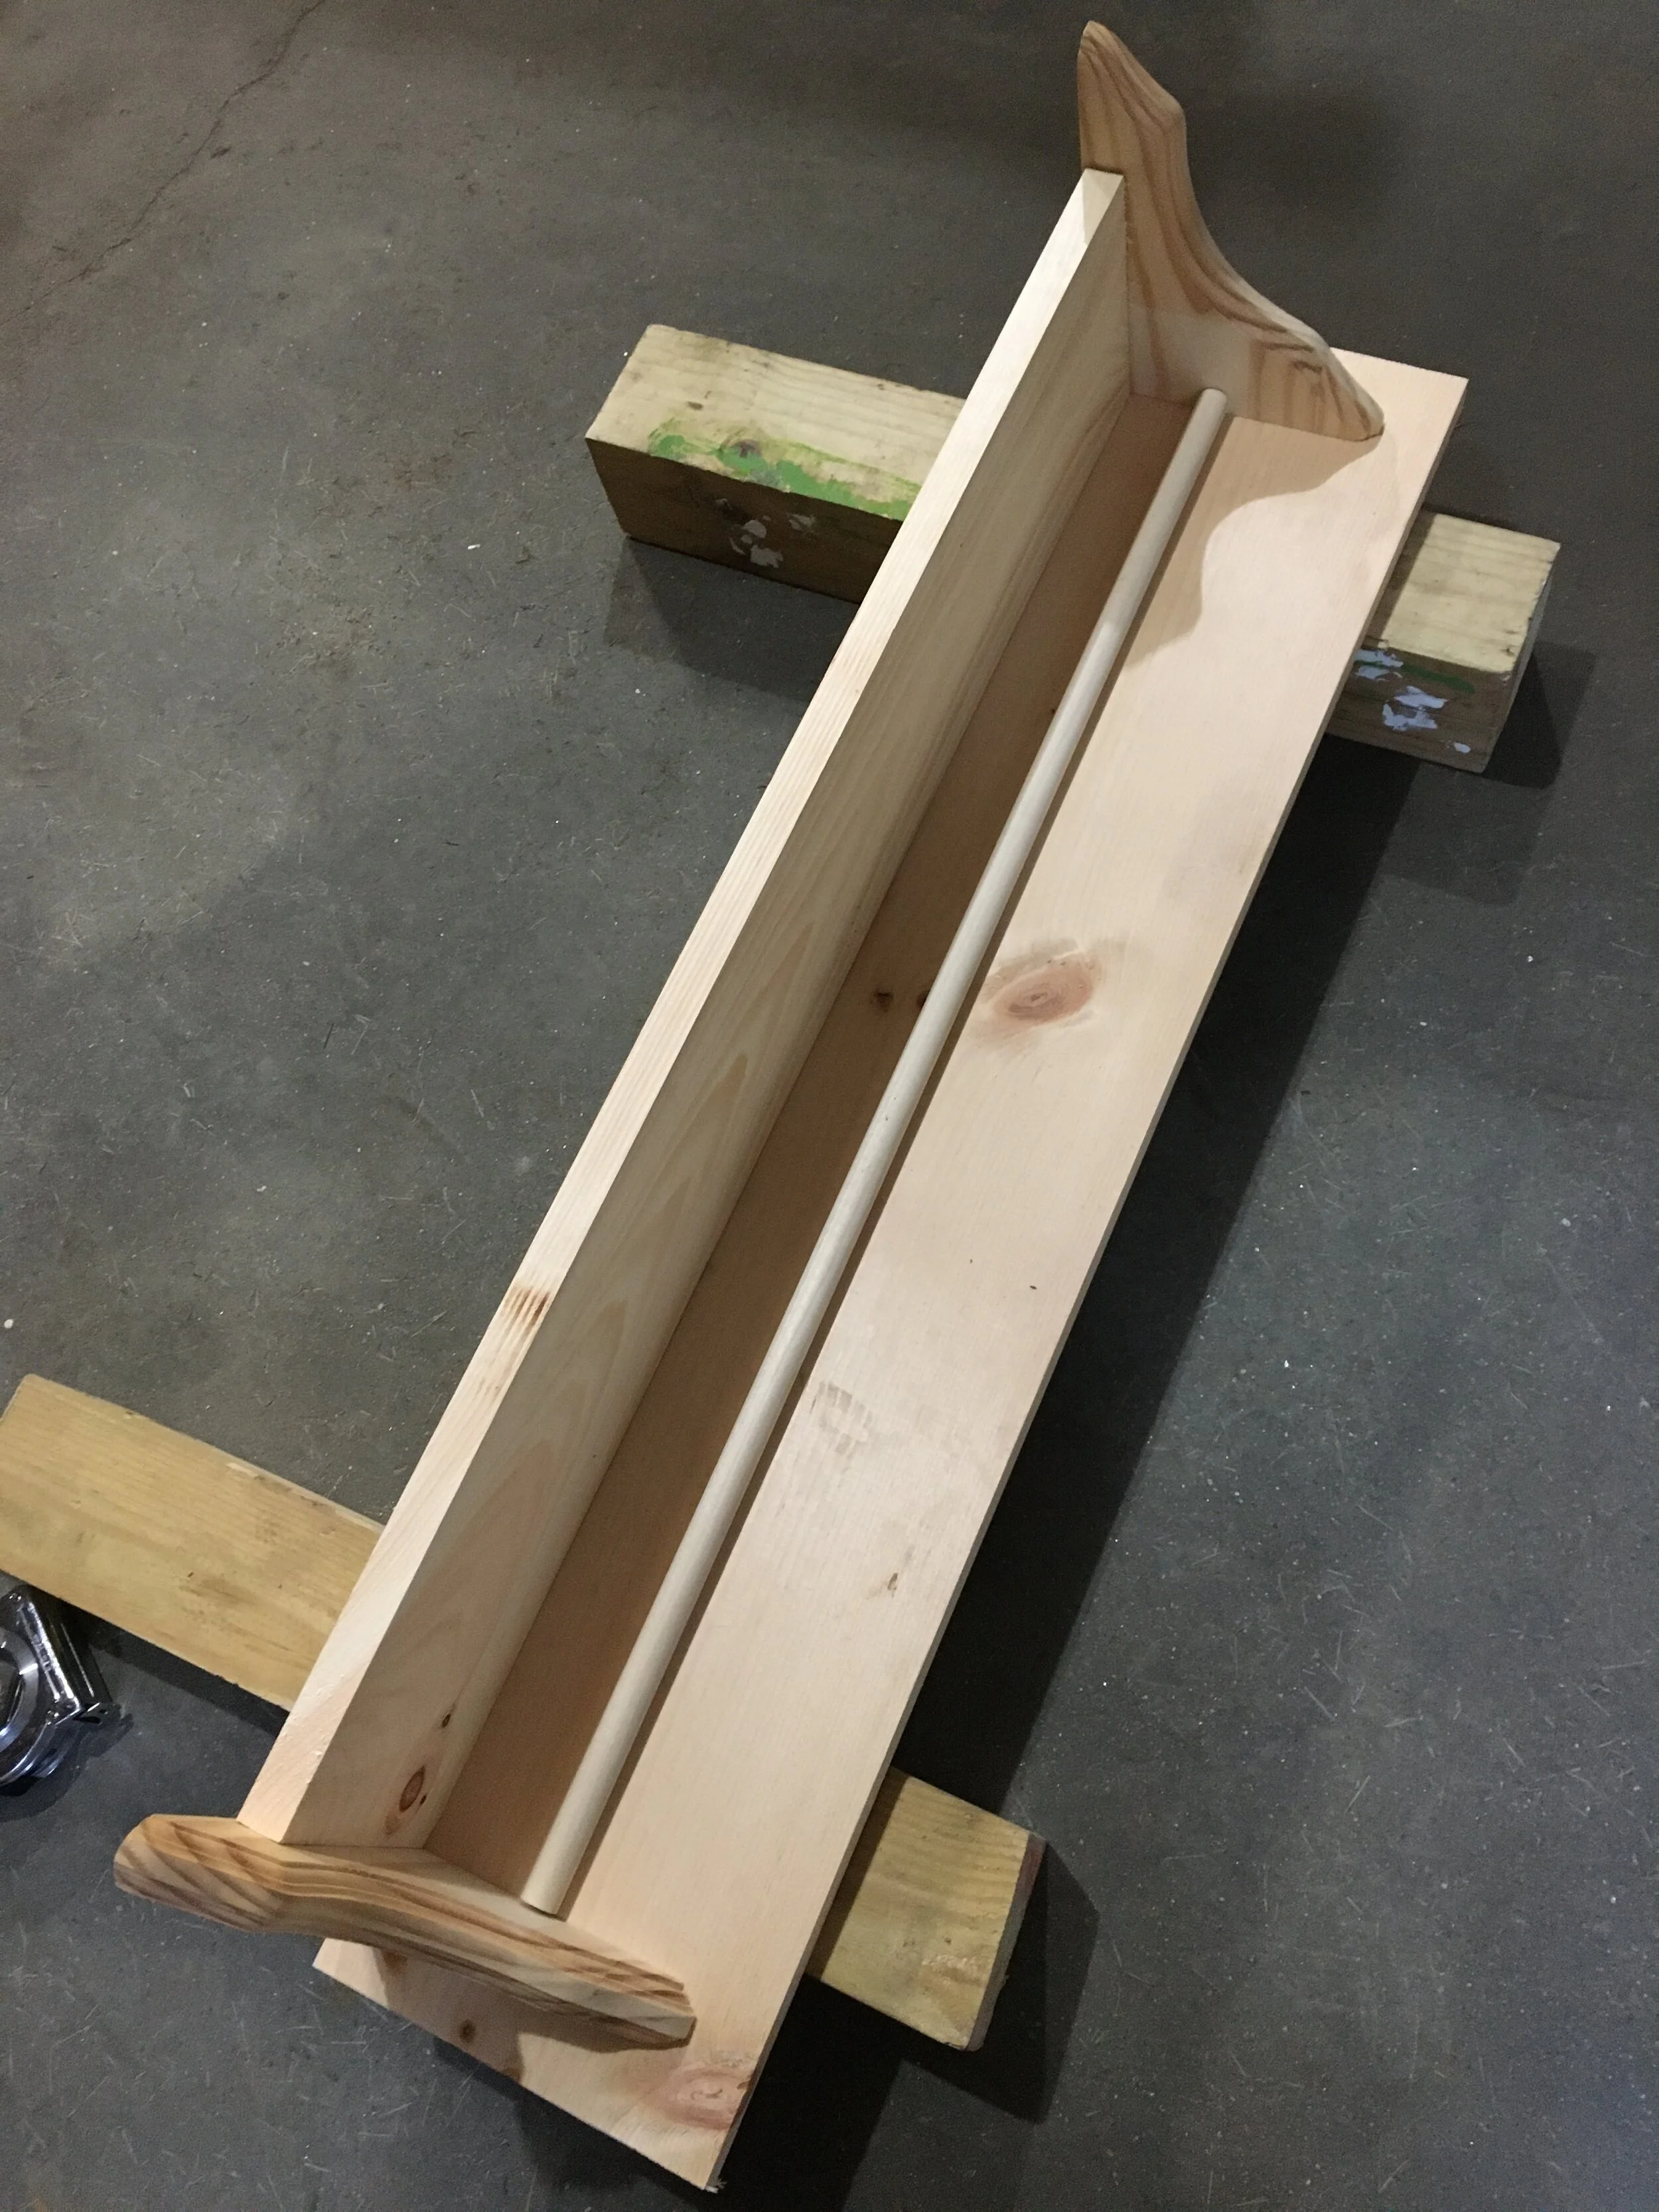
First decide how long you want the overall shelf to be (in our case I decided on making it 3ft wide). Then cut your shelf top to that length.
(Nothing is screwed in yet here… just laying everything out to make sure it will fit like I want it to.)
Next decide how wide you want the shelf back to be - remember that the self back plus the brackets should fall within your overall shelf top length. Ultimately how long you cut the shelf back is your preference though. But visually I think that the shelf back and the brackets look best if they fall within about 2 inches of the shelf top on each side.
(Side note: If you have a router you can cut a dovetail channel along the back of the shelf back now to make for easier hanging… I do not have one of those handy so I skipped this step and will hang our shelf another way.)
Once you have everything laid out, cut your dowel to about 1/8” less than your shelf back length so it will fit comfortably within that space.
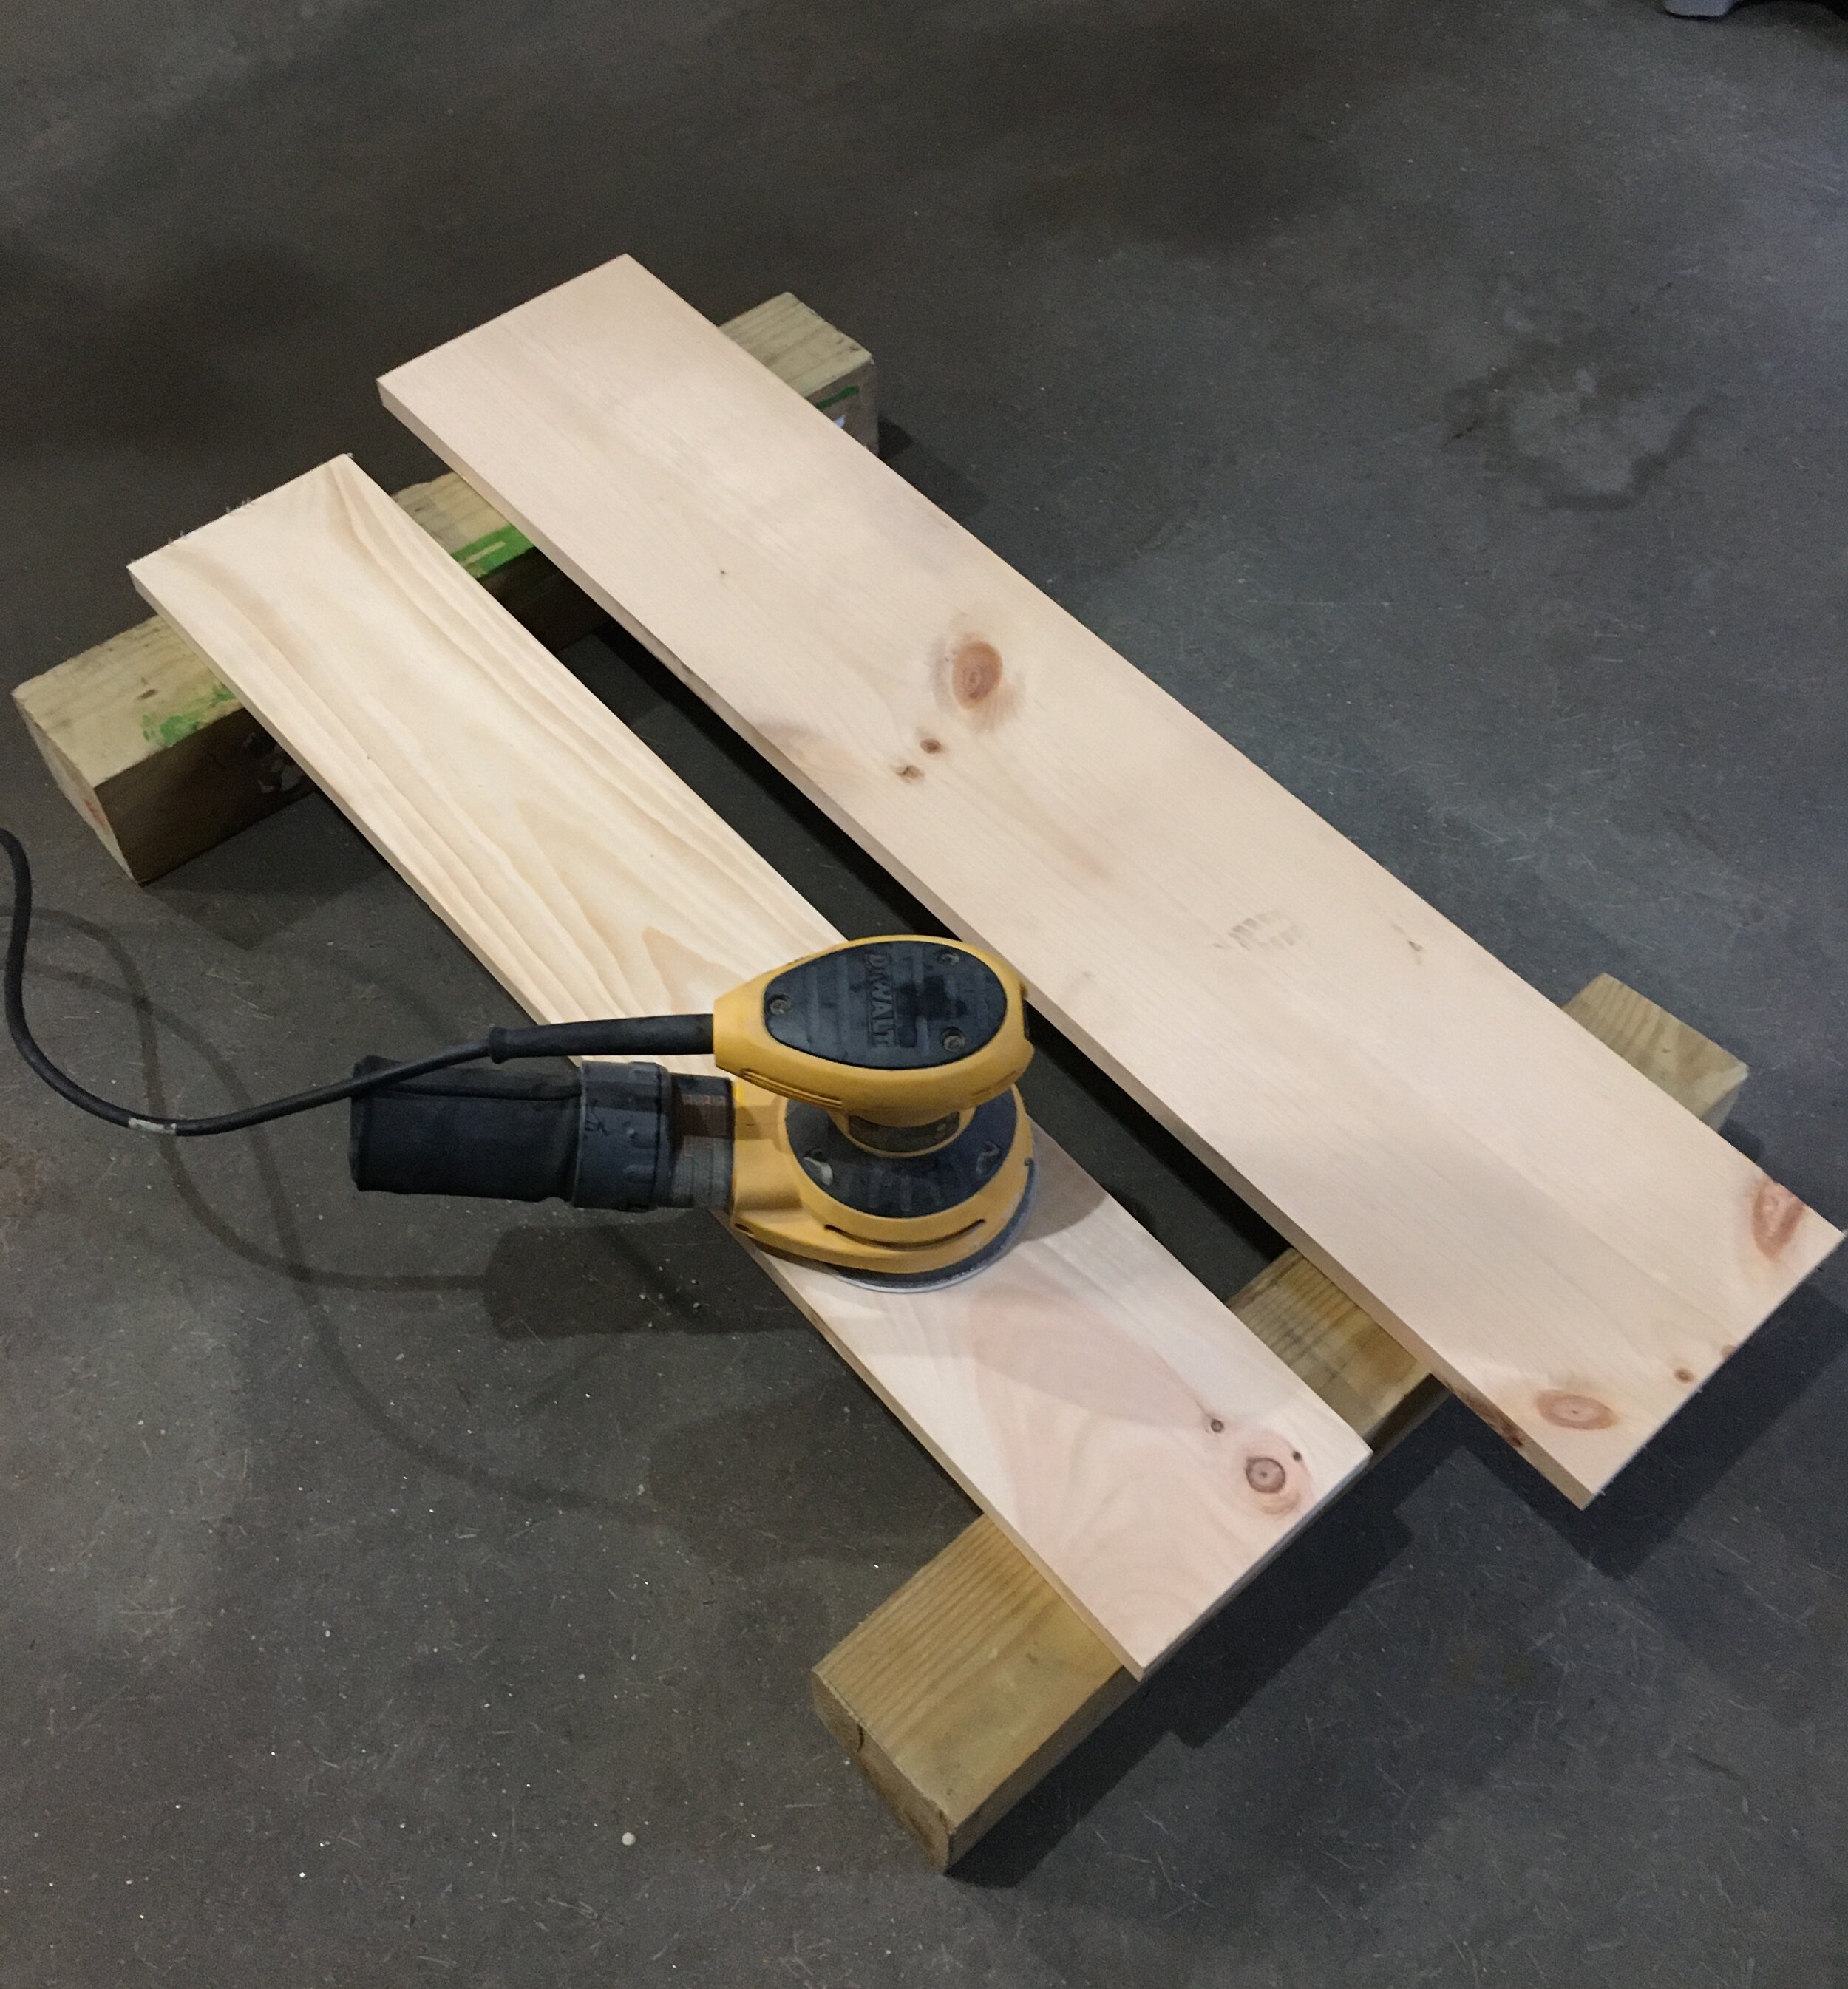
After everything is cut, I recommend sanding everything first before you assemble. I love using our orbital sander - it makes for quick work and does a nice job.
Next start assembling. Screw the shelf supports to the backing first, making sure everything is lined up and flush.
Next carefully center the shelf top, making sure it’s flush with the back and screw in.
Now for the fun part - paint! I did one coat of primer and then three coats of semi-gloss white paint, though you could choose any color you wish. I like semi-gloss paint since it has a slight sheen to it and is easier to dust and keep clean.
For hanging - first I measured this wall side-to-side to figure out where the shelf should fall within that space to be centered. Then I marked the studs with a stud finder.
To be honest I usually use two different kinds of stud finders when I have to hang something - I use a magnetic stud finder first to identify exactly where the stud is and then a digital one to find the edges of the stud. I’ve found that sometimes the digital ones can be finicky so it’s nice to know where the studs are first rather than get a false stud reading when it could be something else (a pipe, a thick area of plaster on the wall, etc).
Then using a level to make sure the shelf was level, I screwed directly into the wall studs through the shelf back making sure to place the screws where they would be hidden by the dowel once I installed it.
Next I hung the dowel by centering it and adding a simple hook to support it on each side, as shown above (this also hides the screws I used to hang it). And now the project is finished and ready to display ribbons, medals, and trophies!
To hang the ribbons and medals you can easily lift the dowel up and string them on, or loop them around the dowel like I did here.
I hope you liked the project and we look forward to when this Pandemic is over and there will be sport and fair ribbon awards again - stay well!
UPDATE:
Years later our kids are still using the DIY Ribbon and Trophy Displays but they’re getting a little full. In order to spread things out a bit I bought these simple medal holders (similar one linked), so they could hang their medals on these and keep the DIY Display just for their ribbons/trophies. It’s working great!
Happy Earth Day! Back in the ‘80’s my Dad bought these Vermont State Parks t-shirts on a camping trip for himself and baby-me... somehow they survived all these years and now me and my kids wear them. Vintage ;)
Hope you have a great Earth Day and can find a safe way to better your household or neighborhood during this Pandemic.
Yesterday the kids finger-painted some big sheets of paper and today we cut hearts out to hang in all our windows as a way to say THANK YOU to all the heroes out there - especially medical personnel, but also mail/package carriers, truck drivers, and our neighbors and community that are staying home.
I hope everyone can find some small way to help spread some hope and gratitude in your neighborhoods too. Thank you all!
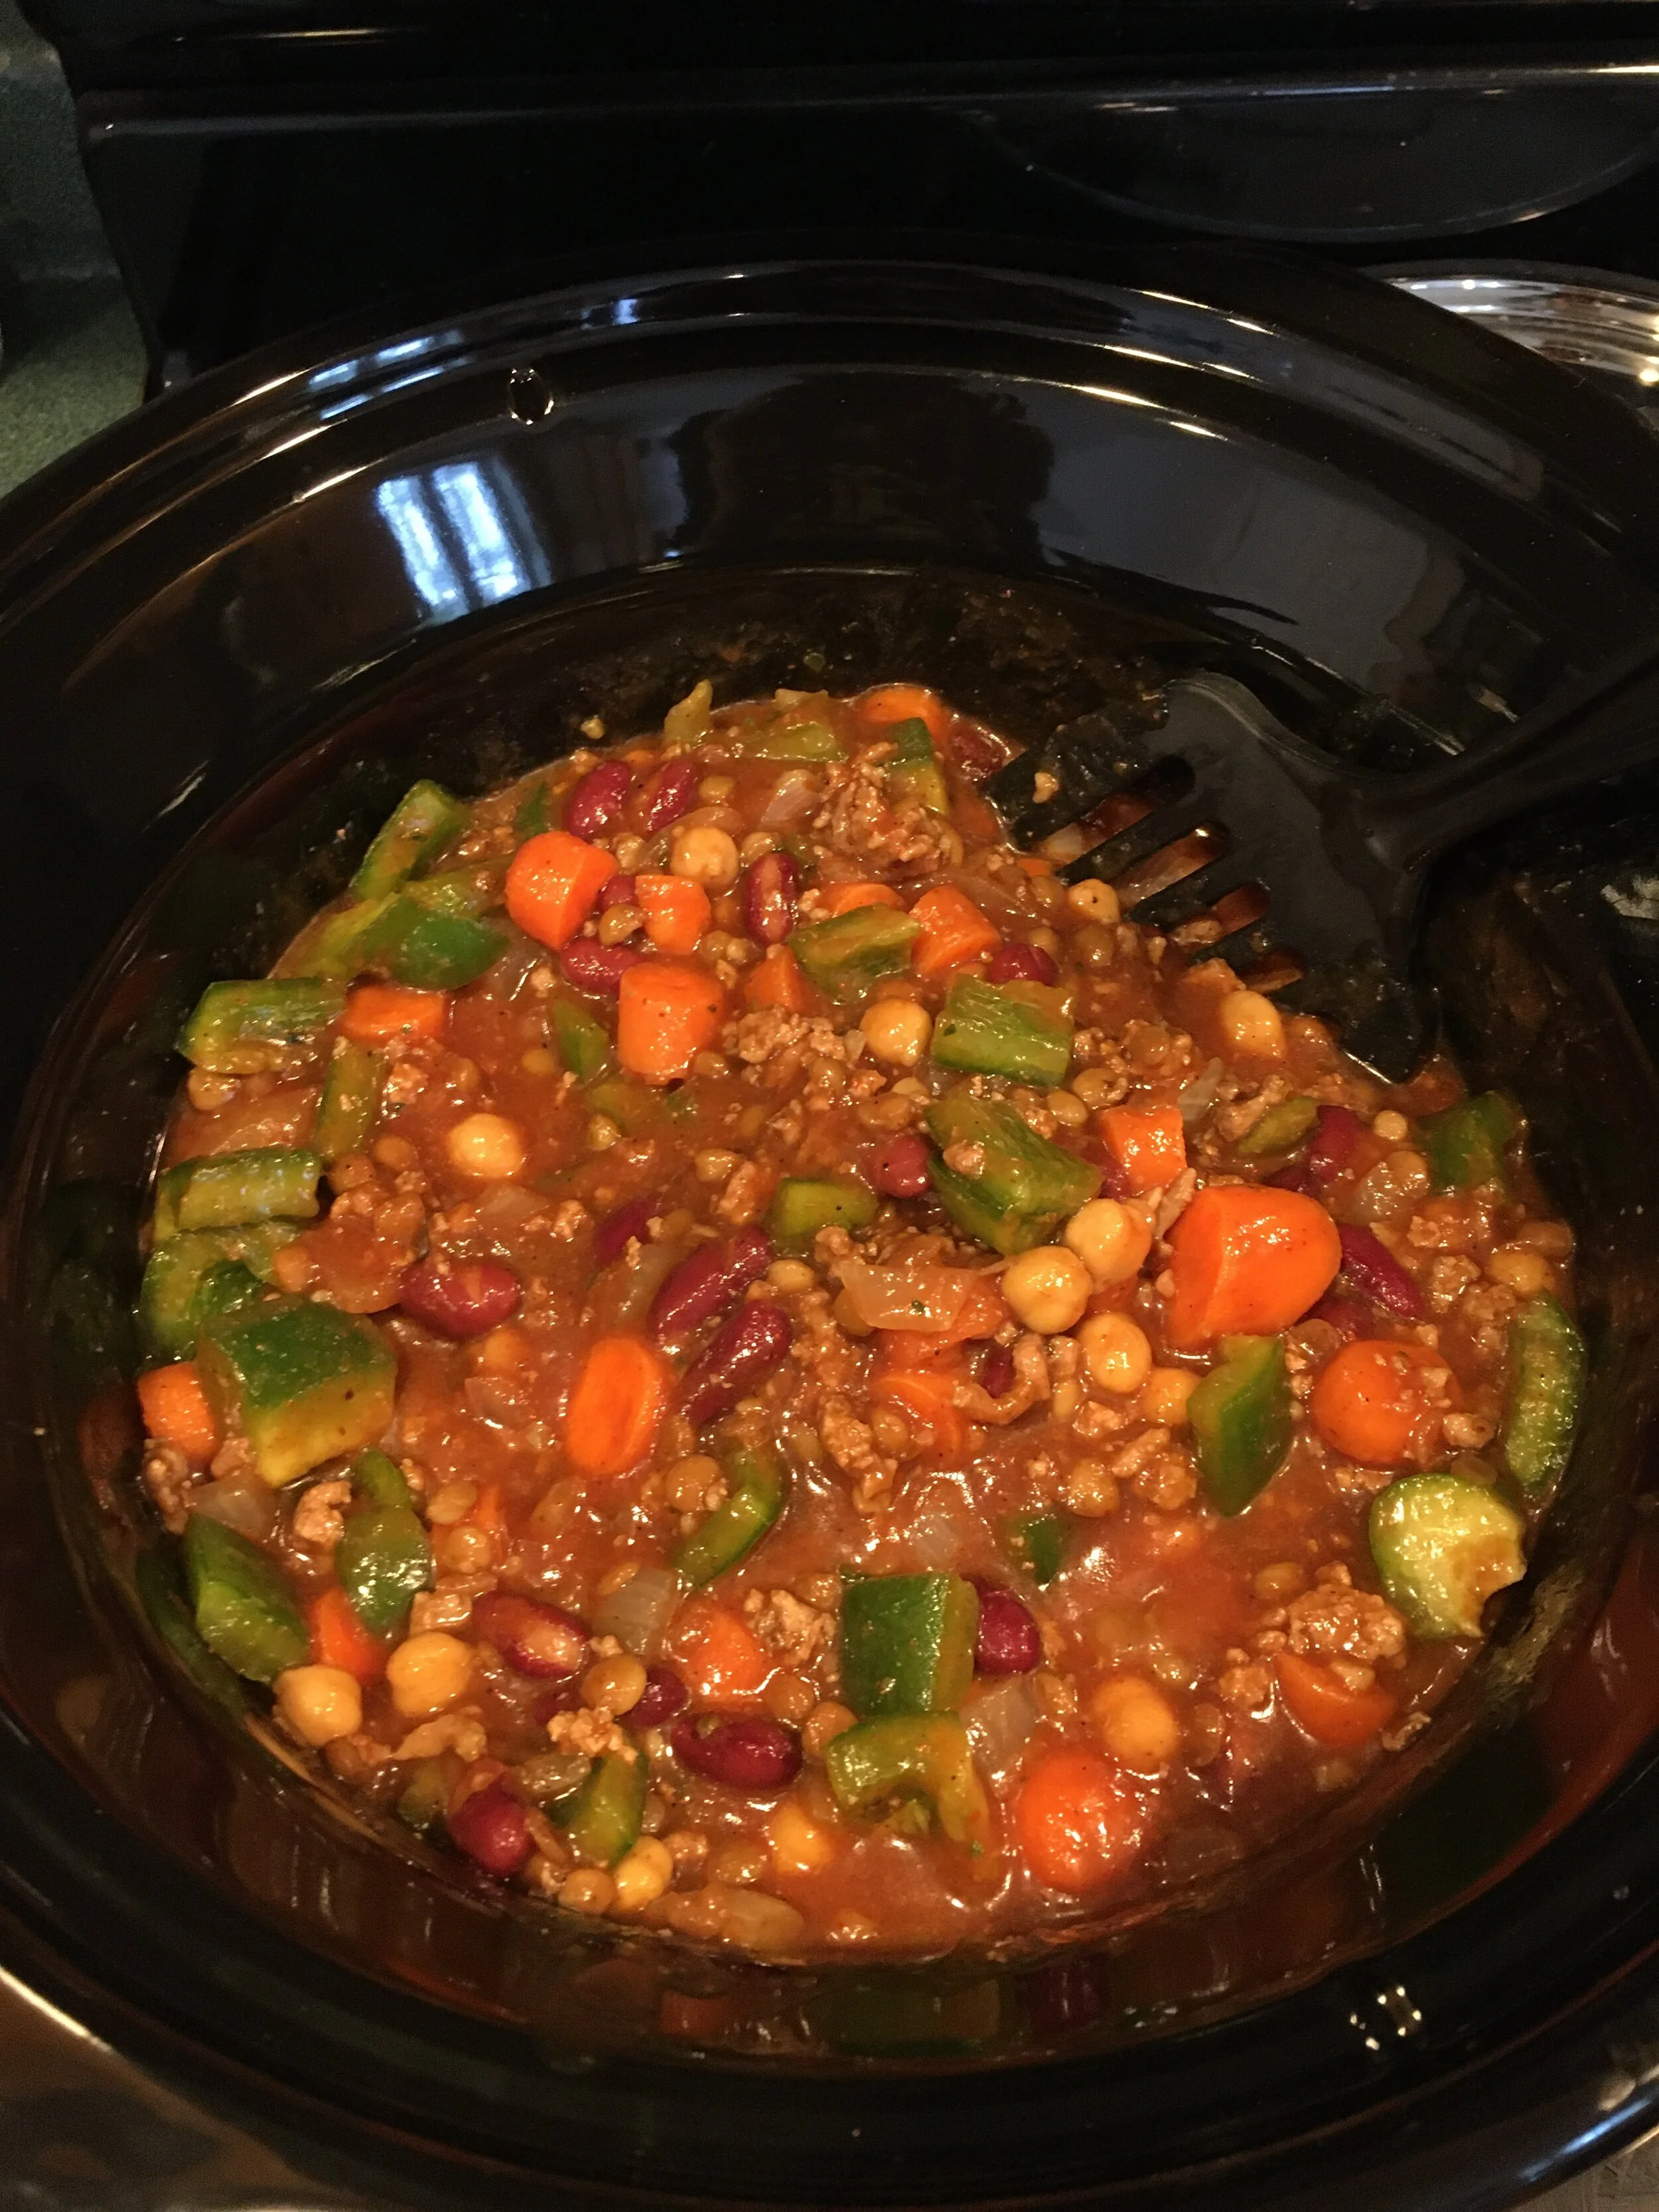
Yesterday I decided to make what I’m going to call “Quarantine Chili.” Now what is the recipe for Quarantine Chili you might ask? Well pretty much you take whatever fresh veggies or meat you have in your fridge that you worry may go to waste soon and throw them into a big crock pot of chili before they go bad. Waste not, want not!
Now for my chili I started with my typical chili “base”:
2 cans of tomato sauce
1 can of red beans (rinsed and drained)
1 can of garbanzo beans (rinsed and drained)
1 can of lentils (rinsed and drained)
2 tablespoons chili powder
1-2 teaspoons of jarred garlic
1 teaspoon of turmeric
1 teaspoon of Italian seasoning
To that I then added all the things I wanted to use up - this will vary depending on what you have in your fridge:
1 lb of cooked ground lamb (lamb is definitely an unusual choice for chili. I had originally planned to make lamb stuffed peppers with it, but by using it in chili I am able to stretch it farther and get more meals out of it… And surprisingly lamb in chili is just fine! I was worried it would taste weird but it’s still great)
a lot of carrots (we had a bag of carrots that have been in the fridge for awhile and were close to being done. I wanted to use them up and not go to waste so I added them to the chili… it was definitely heavy on the carrots but I’m glad we used them up)
handfuls of spinach (we have a big container of spinach that will be getting wet and smelly soon… better use some of it up!)
green pepper (the ones I was originally going to make the stuffed lamb peppers with)
a large onion (that one has been hanging out on the counter for awhile…)
Then combine all ingredients in a large Crock Pot and put on high for several hours until it’s cooked through and ready. We’ll be eating this for dinner for two nights and then I will portion out and freeze the rest to eat later.
Definitely be aware of what you’re using - you don’t want to use any ingredients are actually spoiling (very bad idea!) - but by using up what good ingredients you have by making a healthy, hearty chili you will not let your precious groceries go to waste and will make something nutritious to feed your family during this time.
Definitely a very weird and uncertain time right now, but the sacrifices we make to stay home and away from others will hopefully make a huge (positive) impact in the trajectory of what's going on in the world right now. I hope this time of home-quarantine for much of our society will have some very positive side effects - like quality time with our kids, the wonderful challenge of learning to homeschool, a renewed sense of frugality and being less-wasteful, and using social media as a beneficial tool to stay connected with family and friends. And with the world learning to "work remote," hopefully there will be more work-from-home job opportunities going forward which will lessen society's need for commuting, large office buildings, and pollution.
It definitely will be a very challenging time these next few weeks and months. But I hope we remember what’s truly important, can support and learn from each other (from a safe distance), and realize that the sacrifices we make are for the greater good. We will come out on the other side of this more resilient, self-reliant, and stronger than ever. Stay healthy everyone! <3
Whether you believe the extent of the hype about the Novel Coronavirus (COVID-19) or not, you should still take it very seriously. This is unprecedented for our generation and a lot of people are in denial that something may be so out of our control.
I wanted to share this link to a post by Scientific American that I found - I felt like this was a really calm and helpful perspective on why we should prepare now - and no, you don’t have to go overboard. We personally bought extra groceries this week, along with diapers, dog food, and the OTC medicine our toddler takes daily. I'm also planning on taking this opportunity to potty train her so we hopefully don't run out of diapers. I pray this virus doesn't become a widespread issue but it's best to prepare now.
The whole point of being cautious and complying with “social distancing measures” is to keep our hospitals and medical personnel with their heads above water - because if this outbreak becomes large it will overwhelm our capabilities, which would be bad for everyone but especially our vulnerable populations (elderly, those with chronic illness, etc). So please, I ask you to take it seriously and prepare - then hope and pray for the best. Stay healthy out there! <3