I'm a wife, stay-at-home mom, crafter, and blogger living in rural New England. As seen in Martha Stewart Living, Food Network Magazine, and more! | Tutorials, DIY, crafts, parenting tips, recipes, money saving tips, product reviews, local product features, New England living, intentional living, and more! |
A few years ago we built a detached garage on our property which we nicknamed “the barn.” We were on a tight budget when we had it built so we kept everything very basic - basic windows, basic doors, etc. Now that we’ve lived with it for a few years we’re slowly upgrading what we can with easy and cheap DIYs, like this two minute garage door makeover - no tools needed! | This post contains affiliate links |
The front of our barn just looked so plain and boring... it definitely needed "something" to give it more character and the basic builder-grade garage door just wasn't cutting it. One day while I was on Amazon I came across these magnetic faux hinges and handles with amazing reviews and thought that was perfect!
To install them I wiped down the garage door real quick first to remove any dirt and then just stuck the hinges to the door right from the box. There are several magnets on the back of each item so they’re easy to stick on and reposition as needed.
The faux hinges and handles are made from thick plastic so they won’t rust - but they certainly don’t look plastic! Even up close they have a lot of texture and really look like forged metal. The handles even fooled my kids and they totally thought they were real! And if you want to keep your doors more simple you could easily just put the hinges up or just the handles and leave it at that.
This quick addition to our plain garage door really has made a difference in making our “barn” look more finished and giving it better curb appeal. Hopefully next year we’ll get the driveway paved up to it and add some landscaping and then it really will be done.
Looking for more cheap and easy DIY’s? See our previous Blog Post on how I added “window panes” to our basic builder-grade windows and it’s made such a difference. They’re still up years later and look as good as the day I first put them up.
Recently I realized “Crap. I’m almost in my mid-30’s… and it’s all downhill from here. Time to start proactively taking care of my skin!” Up until this point I was just washing my face and maybe using some moisturizer some days and that was it. Thankfully I don’t really have any wrinkles or fine lines to speak of - yet - but I know they’ll be coming on soon. After some trial and error and consulting some friends that are really into skincare products, I settled on a simple routine that I’m enjoying so far and feel as though I’m getting the best bang for my buck. The best part? Most of these are inexpensive drug store finds, with just a few high-end heavy hitters. | This post contains affiliate links |
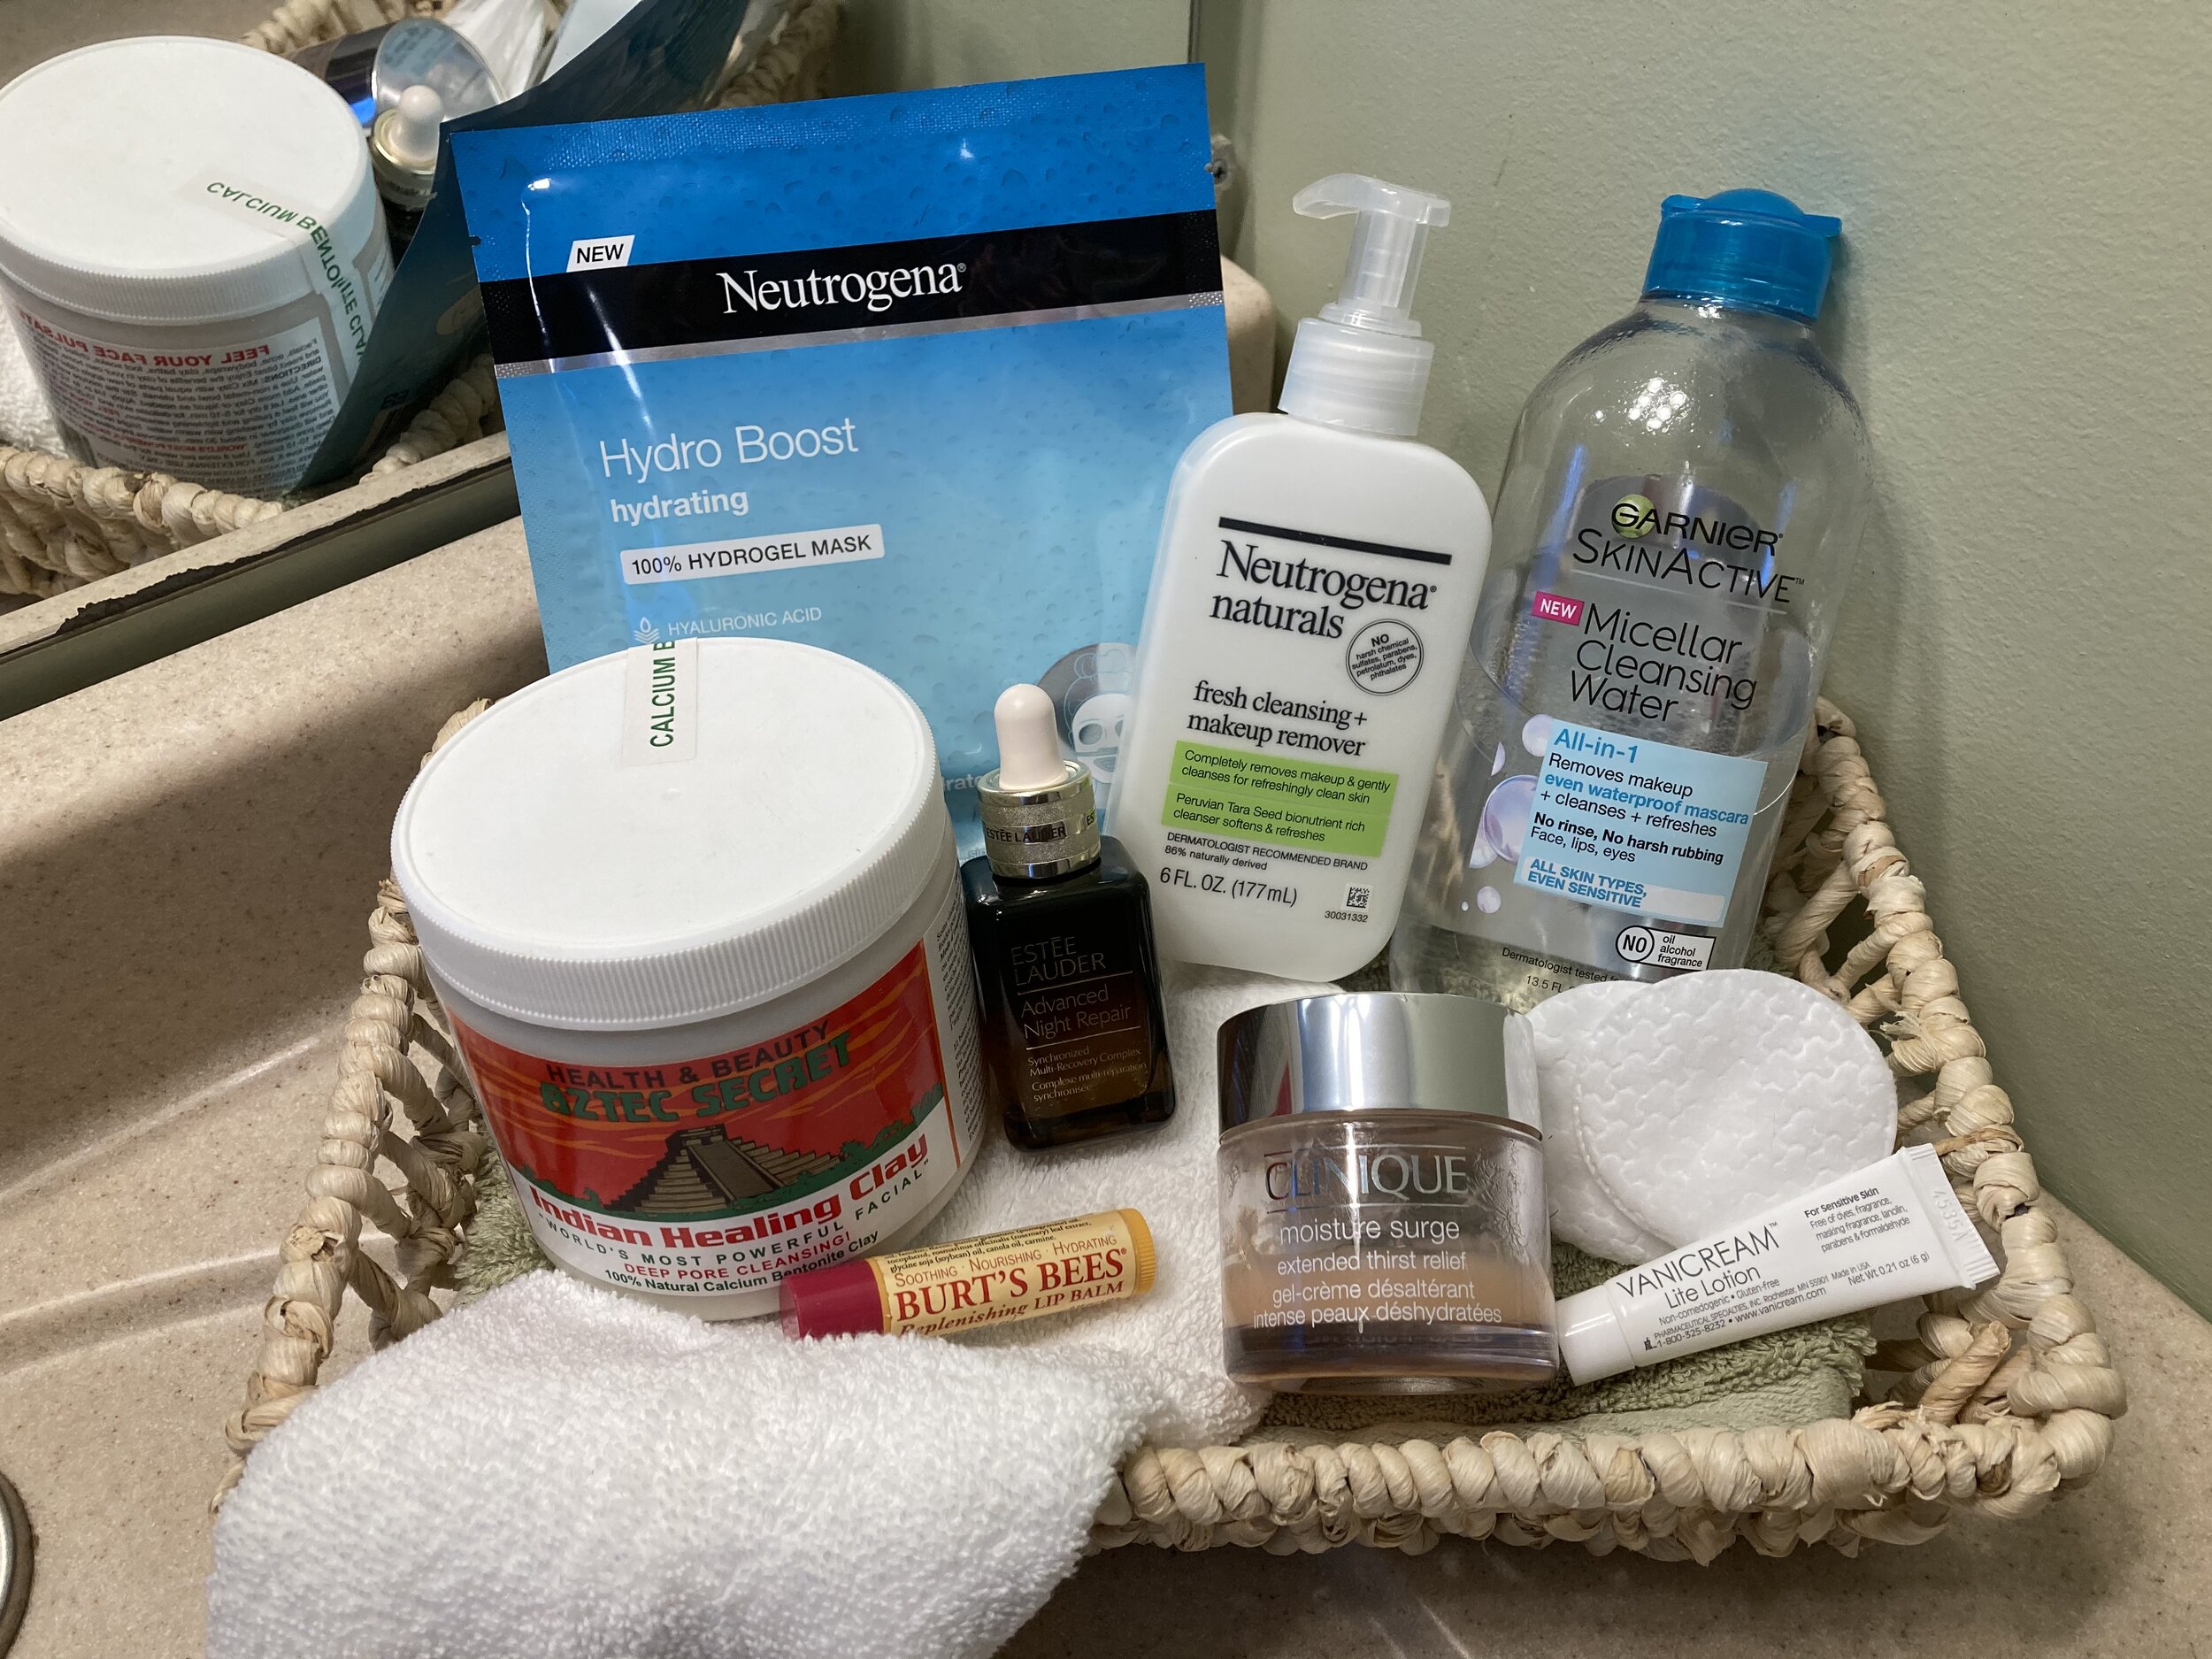
Simple Mid-30's Skincare Routine - Everything I’m using as the moment, including occasional treatments.
Disclaimer: I am not a “beauty blogger” or skincare expert, just sharing what I’m using and loving so far. It’s a good idea to consult your dermatologist or a skincare expert for more specific recommendations for your skin type and lifestyle. Also make sure to consult your doctor if you’re pregnant or breastfeeding, as certain skincare ingredients should not be used during those times.
AM Routine
Simple Mid-30's Skincare Routine - AM
Step One:Neutrogena Naturals Fresh Cleanser Every morning I start with using this Neturogena Naturals Cleanser, I really love this one because it's very gentle on my sensitive skin and smells amazing.
Step Two: CeraVe Vitamin C Serum (not pictured.. I started using this after I first published this post) After I cleanse and before I moisturize I put a little bit of this Vitamin C Serum on my skin. I feel as though it's made a big difference in evening out my skin tone and brightening. I also really love the way it feels!
Step Three: Clinique Moisture Surge Moisturizer I have been using this moisturizer for years and LOVE it. It's so light and a little goes a really long way. While it is a little on the expensive side, one jar lasts me forever so I definitely get a lot bang for my buck with this one.
What I'm Missing:SUNSCREEN This is a huge hole in my daily regimen and I know that... I have been trying to find a light, mineral based sunscreen for daily wear and haven't found the right one just yet. Once I find one I like I will update this post - and if you have any you love, please let me know!
PM Routine
Simple Mid-30's Skincare Routine - PM Routine
Step One: Garnier Micellar Cleansing Water This cleanser is perfect for end-of-day cleansing and removing makeup. I use the Blue verison since I sometimes wear waterproof mascara and it works like a charm to take it all off (the Pink version is reccomended for regular cleansing and non-water proof makeup removal). I just put a little bit on a cotton round and wipe it all away, no rinsing needed.
Step Two: Estée Lauder Advanced Night Repair Serum This serum has come highly reccomended to me by so many people as an important part of their daily skincare routine. It has hyaluronic acid which is supposed to help moisturize your skin and reduce fine lines. While I can't attest to wrinkle reduction (I don't have any yet), it does make my skin feel amazingly smooth afterwards and I'm hoping it will keep fine lines at bay in the future. This serum can be expensive but I find a little goes a long way and I haven't made much of a dent in the bottle at all yet.
These are things I do occasionally, maybe once every 2-4 weeks or whenever I feel like it. I never use both masks in the same weekend though - I spread them out.
Neutrogena Hydro Boost Hydrogel Mask This is a great, refreshing, hydrating mask. Love using this when my skin might be feeling a little dull or dry.
Aztec Secret Indian Healing Clay Mask This mask is amazing for deep cleaning pores! It comes as a powder and you mix a little in a bowl with some warm water to make the mask - you can also mix it with a little bit of Apple Cider Vinegar to give the mask a little more power. Since you mix it yourself you can stretch one jar for a long time.
Vanicream Lite Lotion I got this as a sample and love it for spot treating any extra dry spots that occasionally pop up, especially after doing a mask. It's fragrence-free too which is a nice break when my skin might be feeling sensitive.
Important Buying Tip: When purchasing “higher end” brands (such as Clinique or Estée Lauder), always make sure you’re purchasing directly from the company or from an established department store chain (such as Nordstrom, Macy’s, etc) to make sure you’re getting real, legitimate products. While you may be able to find high-end brands listed for sale on other online retailers (yes, even the big ones), these products are often knock-offs sold by third party sellers and who knows what could be in them.
Being home 24/7 and trying to limit grocery trips and ordering really makes you evaluate how quickly you’re going through supplies in your home. With two little kids, paper products were something we were blowing through and made me wonder how we could change this for the better. | This post is not sponsored but does contain affiliate links |
Now when I say "paper products" in this post I'm talking about paper towels and paper napkins. To greatly reduce our usage of these things we made the switch to reusable "unpaper" towels and aren't looking back. (And before you ask... yes, reusable toilet paper/wipes do exist too - but that's not for us, though if the toilet paper shortage continues who knows...).
“Unpaper” towels are cloths that you can use like paper towels but wash and reuse for a long time. You could really use just about any kind of cloth - wash cloths, tea towels, cloth napkins, pieces of flannel, etc. Hopefully you have something around the house already that you can use, but if you don’t and decide to purchase some we’ve found them to be worth the investment. For the price of a large package of throw-away paper towels, you can purchase of set of reusable ones that will last you a very, very long time and will eventually pay for themselves.
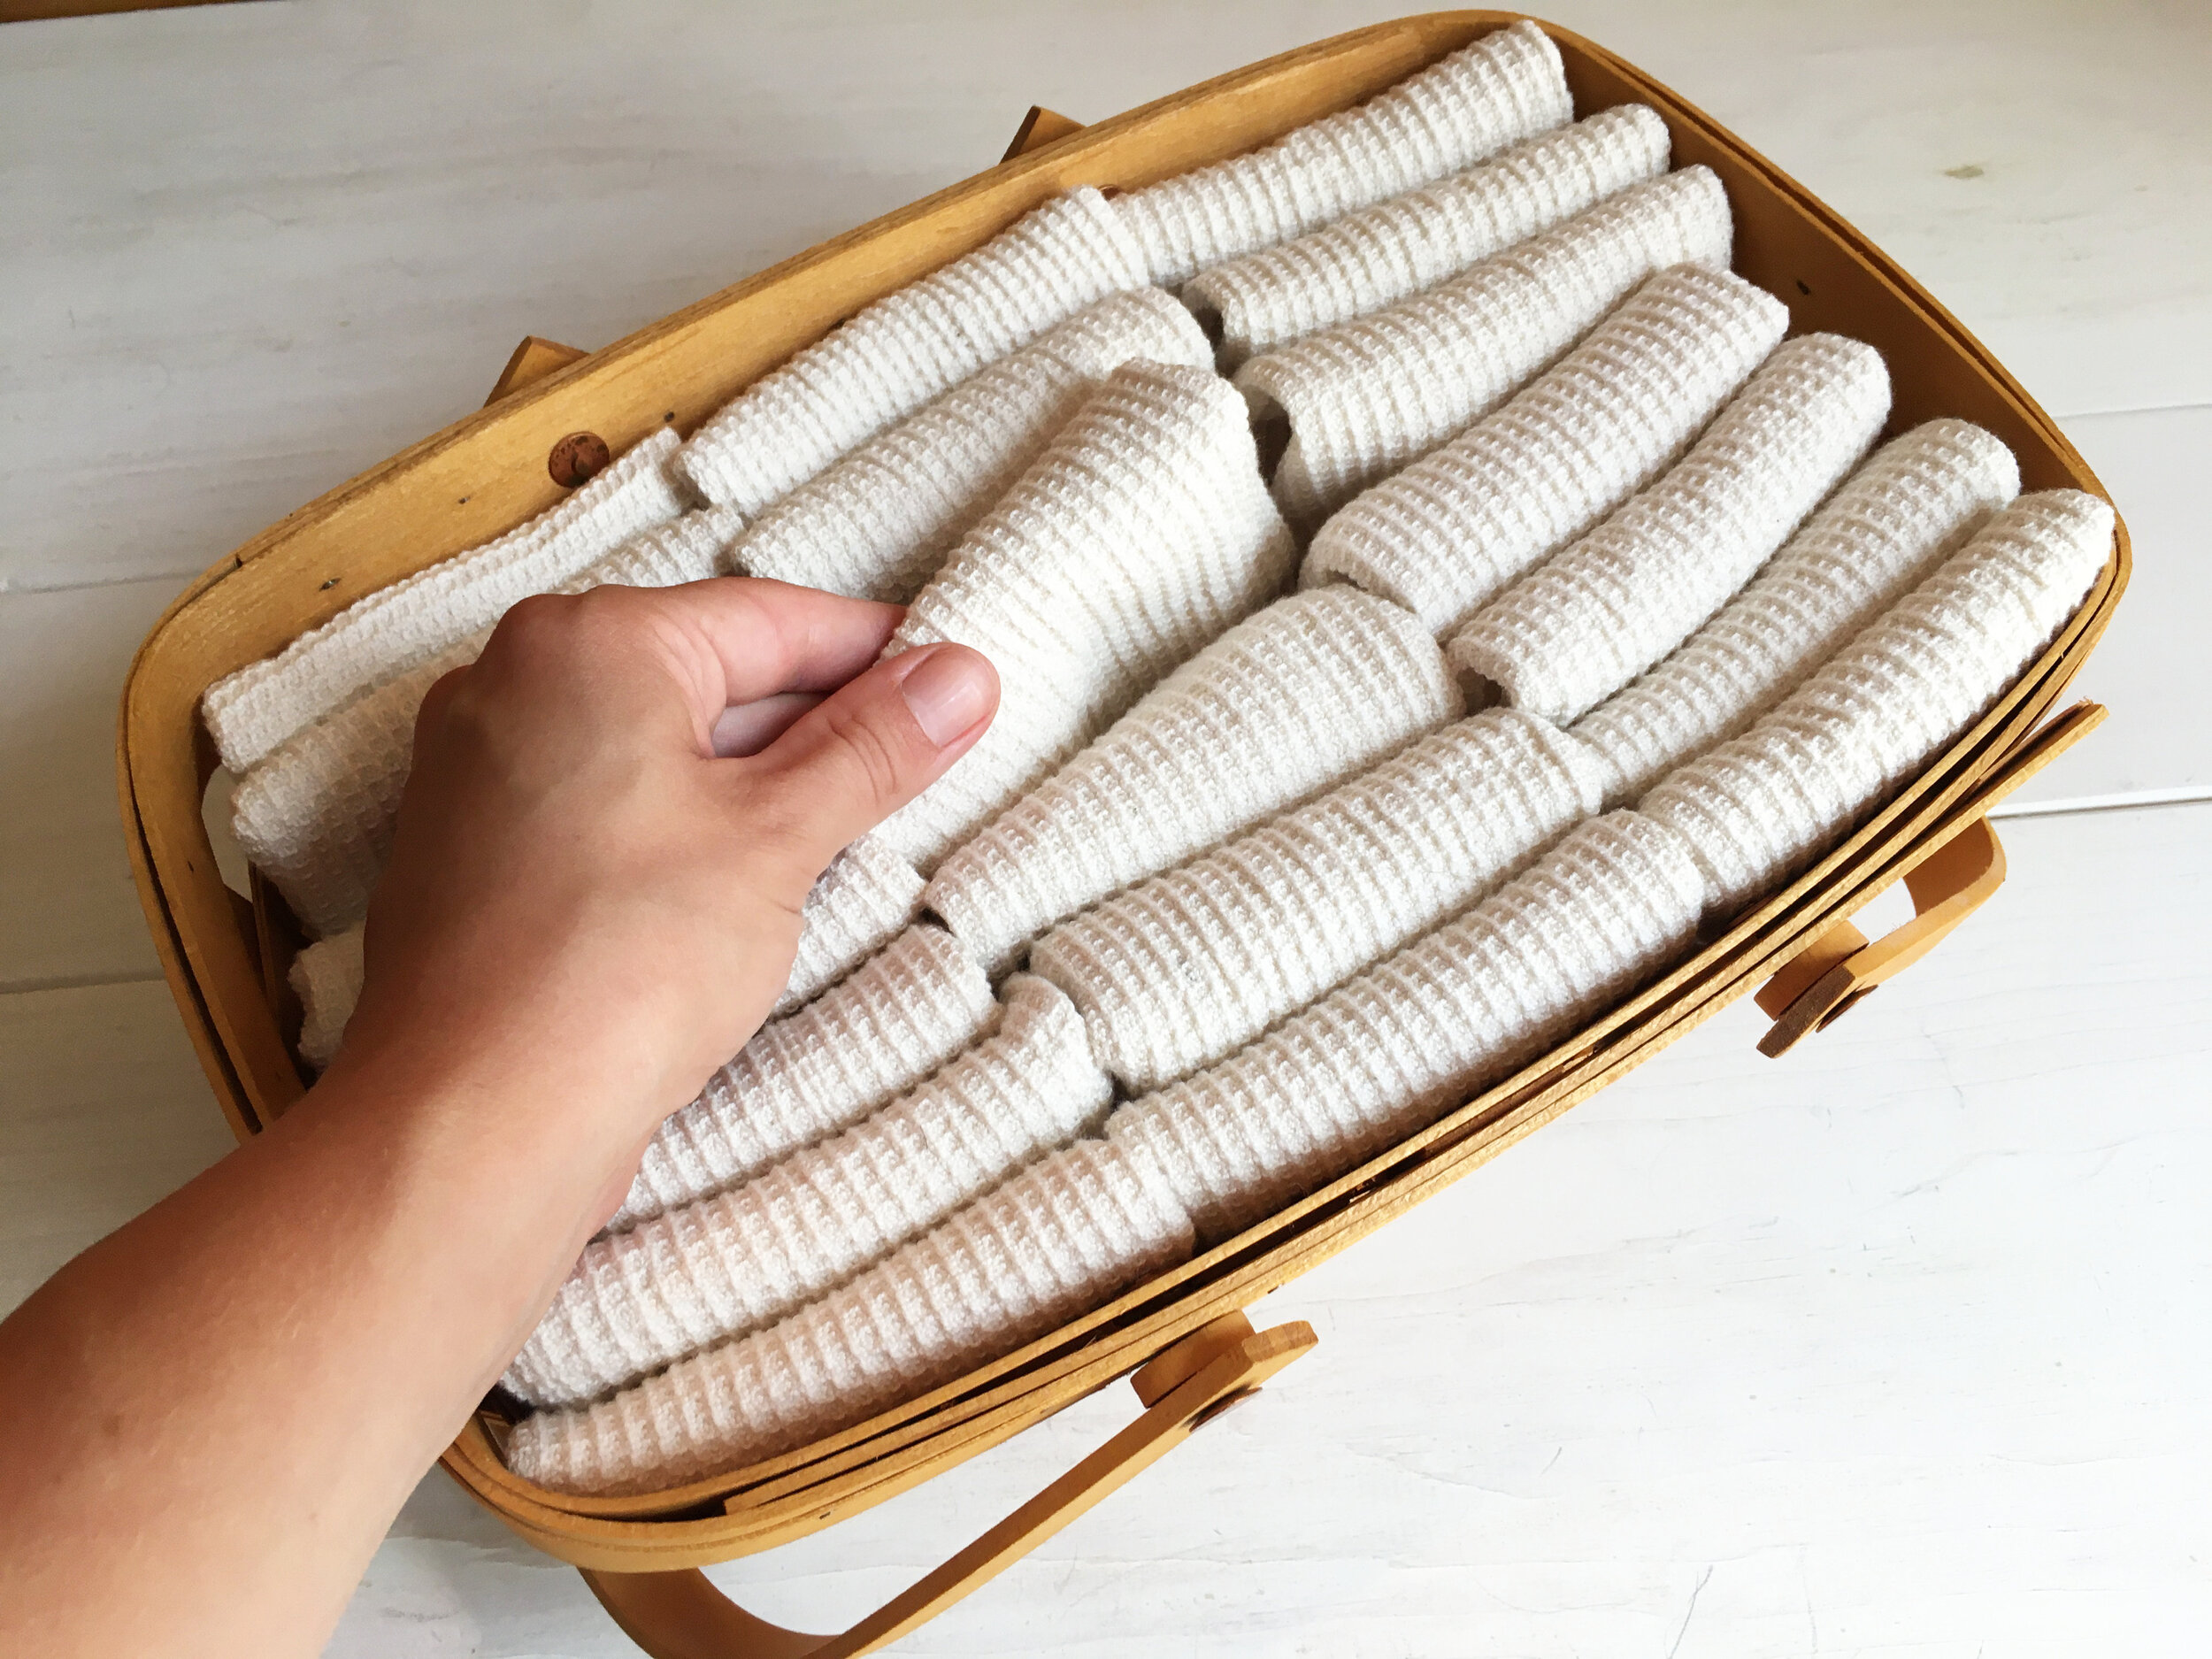
We thought about just using our current dishtowels but we use them regularly already for dishes and big spills (which happen a lot with two small kids). We were primarily looking for something smaller that would function like a paper towel and also wouldn’t fill our washing machine quickly (something else to consider), which is why we settled on these modestly-sized, organic bamboo cloths.
Some people will roll them on a paper towel holder and use them in place of ALL paper towels, completely eliminating paper towels in their home. For our household we decided to fold them and place them in a basket on our counter, next to our roll of paper towels. That way we’d be constantly reminded to grab a cloth instead of a paper towel whenever we had to wipe a dirty face or sticky fingers, but we’d still have paper towels at the ready if we really needed them. I even hung a little note over the paper towel holder to remind us to use less of them.
Since starting this system we’ve cut down on our paper towel usage big time. This has saved us money on our grocery bill and we feel like we’ve made a positive long-term change that’s more eco-friendly.
Cleaning Unpaper Towels: I hung a small mesh laundry bag on the doorknob of our laundry closet, which is conveniently right off the kitchen, to toss the used unpaper towels in to be washed. Whenever I start a load of laundry, I just throw the mesh bag in with the rest of the washing. You could also easily hang a mesh bag or small basket on the inside of a cupboard door with a Command Hook too if that is a more convenient spot.
Hopefully I’ve inspired you to find a reusable, money-saving solution to something in your home like we have found unpaper towels to be for us.
This post is not sponsored but contains my personal opinion as well as affiliate links.
Now that we’re always eating at home and not going out for breakfast it’s great to have a fast and easy no-mess egg sandwich that you can make quicker than than it would take you to sit in the drive-thru line. This trick will make the perfect fluffy egg sandwich start-to-finish in just about ONE MINUTE. For reals. | This post contains affiliate links. |
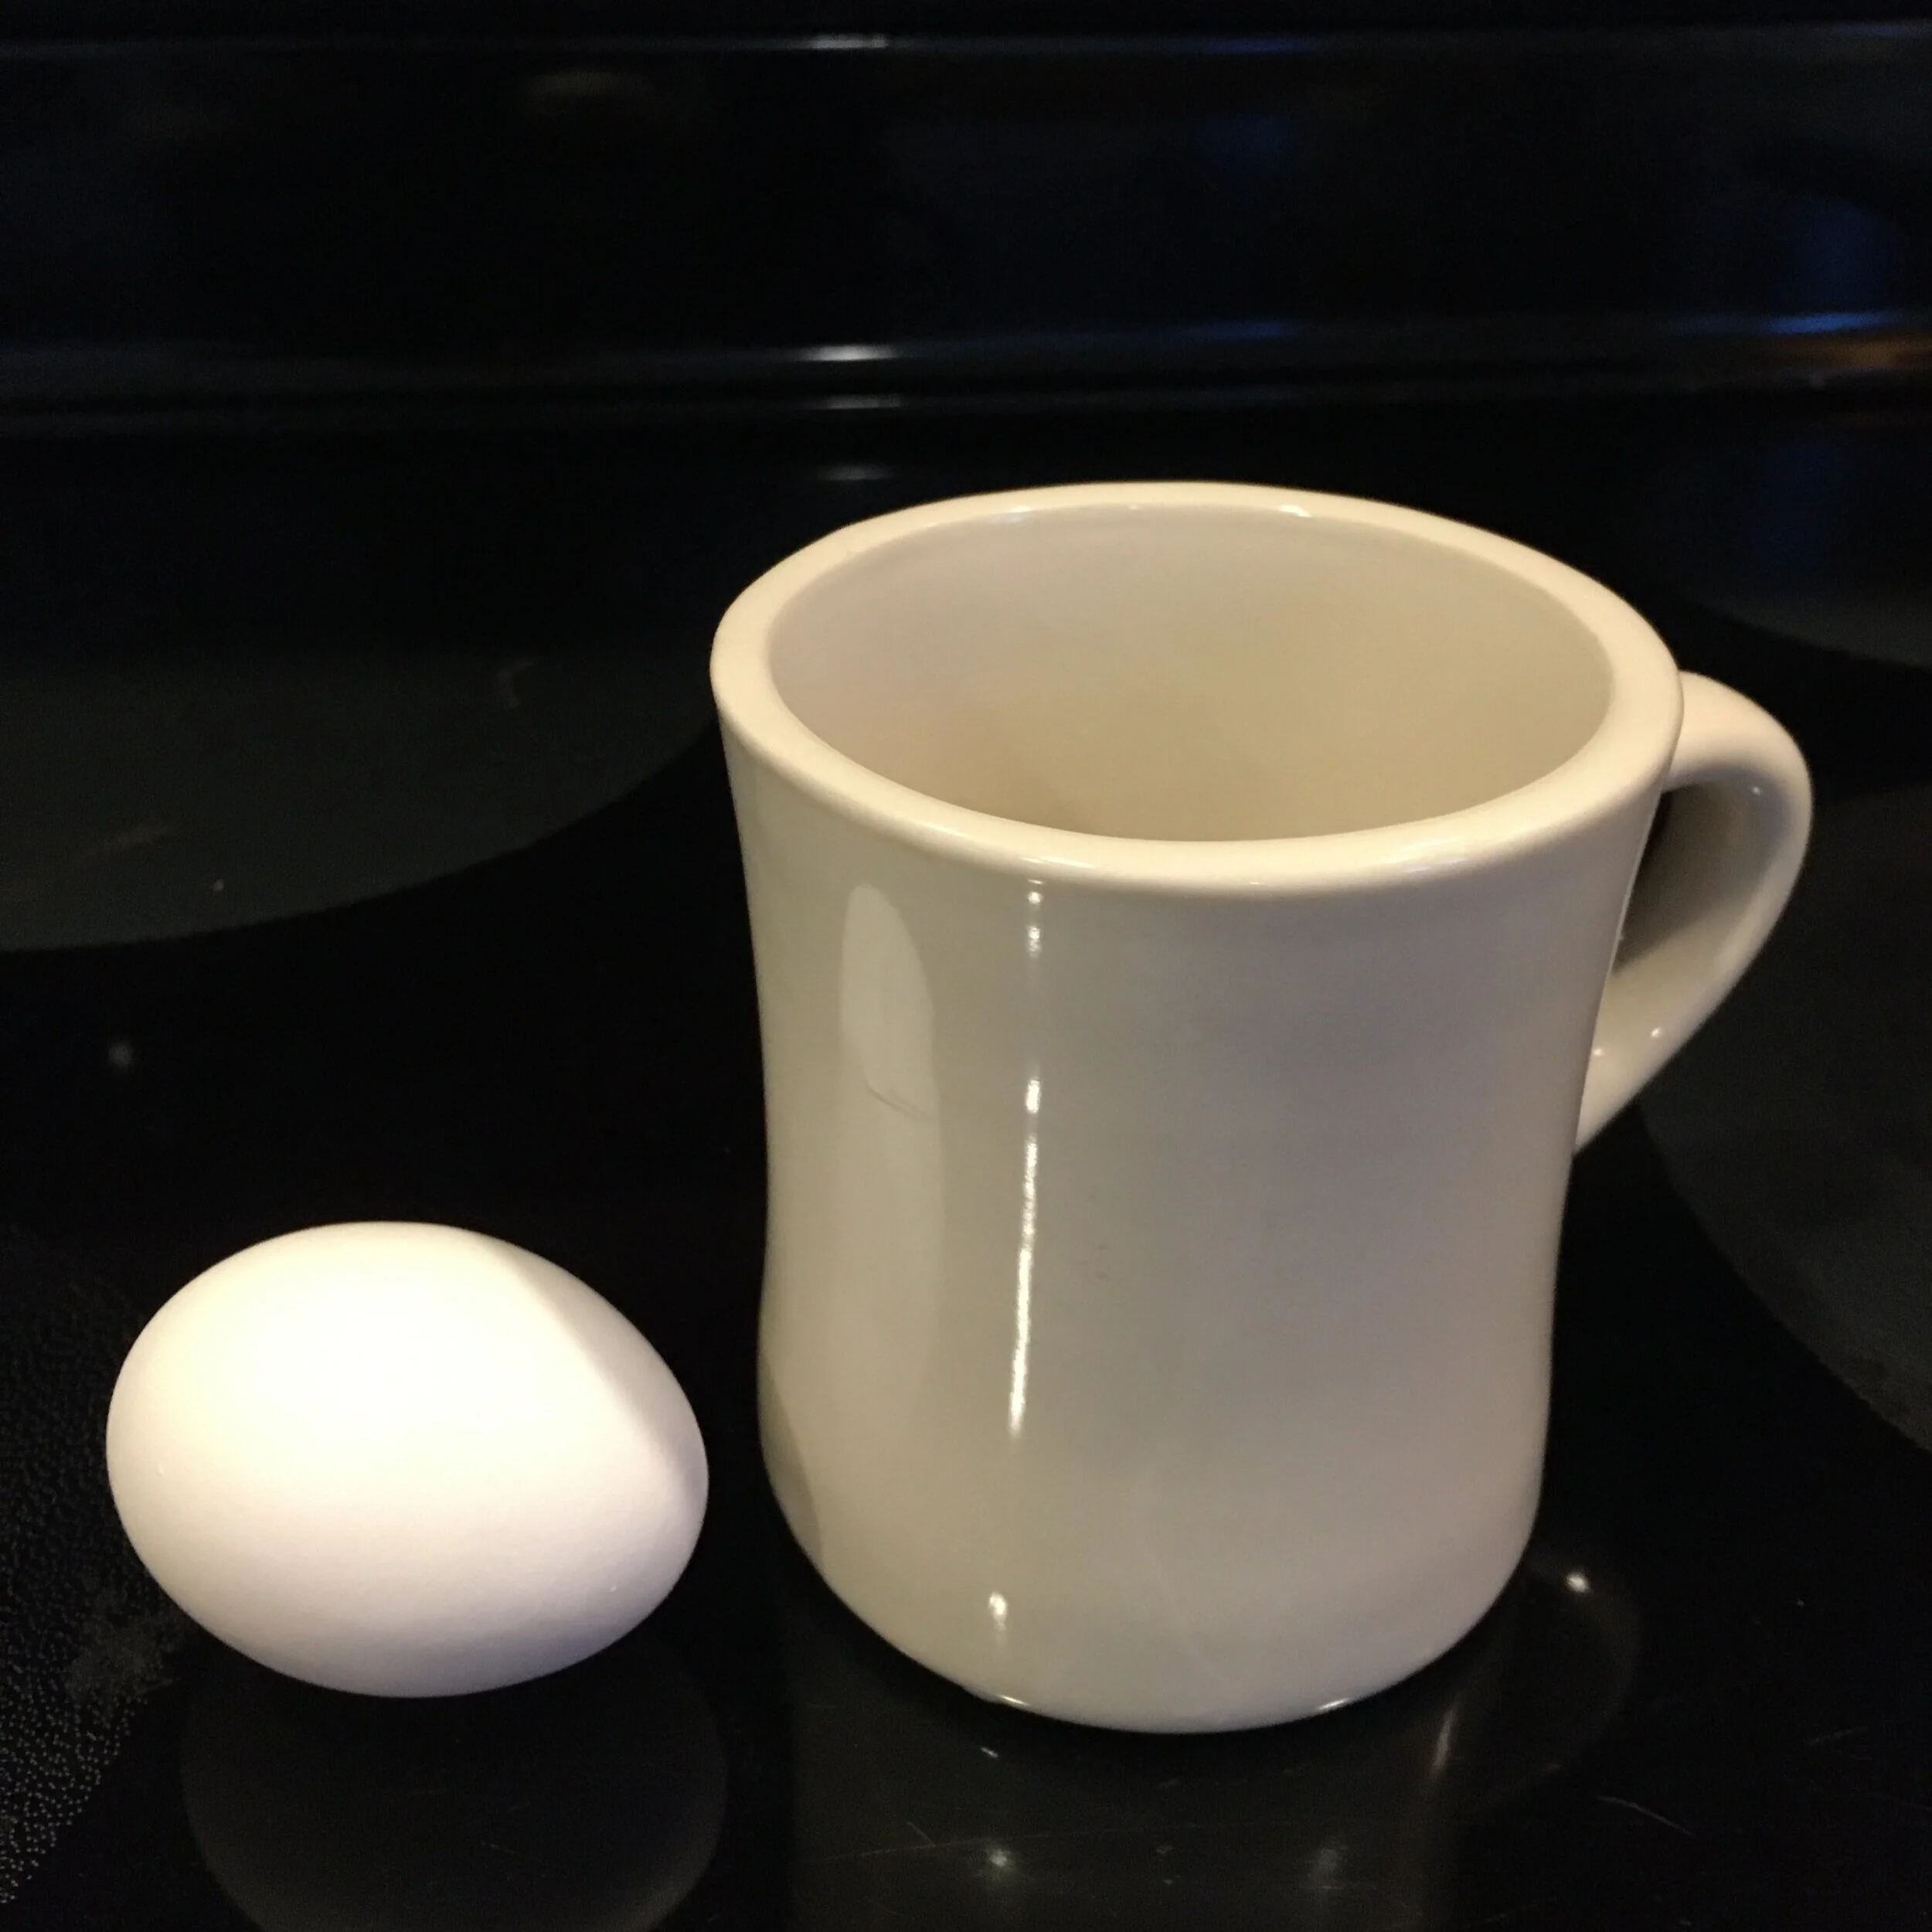
Really, this “recipe” couldn’t be any easier… the bottom line is you will need an egg, an English muffin (or some type of bread), a microwave-safe coffee mug, and a microwave. That’s it!
You might also want some shredded cheese handy, small diced precooked veggies (leftovers from the night before work great), hot sauce - or any other topping of your choice.
First, crack the egg into your microwave-safe coffee mug and “whisk” with a fork to break up the yolk. Now is also the time to add a generous pinch of shredded cheese (shown here) or a small amount of chopped pre-cooked veggies (leftovers work great). Put the mug in the microwave and cook on high/normal for one minute* (*please note that depending on your microwave model and what you add, you may need to adjust your cook time. Also DO NOT microwave fork.) While the egg is cooking you can toast your bread, if desired.
Once the egg is done make sure it is cooked throughly (it’s opaque with no runny spots and steaming all the way through) by checking with a clean fork and loosen it from the mug. Then simply turn the egg out onto your bread and add any condiments you desire - I personally can’t eat eggs without hot sauce.
And that is it! Once the coffee mug cools, just soak it in the sink to loosen any stuck-on egg and run through the dishwasher like normal. No pans to heat up or clean after which is a huge plus in my book. Enjoy your easy breakfast :)
Disclaimer: Please note that depending on your microwave model and what you add, you may need to adjust your cook time. Make sure your egg is fully cooked before eating.
With the Covid-19 Pandemic still persisting and school in our state cancelled for the rest of the school year (and maybe longer), average parents have been thrown into the role of becoming teachers too and most of us weren’t prepared at all. While I have a degree in Art Education, I went a different career route after graduation and my teaching/classroom management skills are now quite rusty. So I pulled from my own classroom and remote teaching experiences - as well as polling many teacher friends, homeschooling parents, and regular now-remote-teaching-parents for ideas on what’s working for them and what supplies have been lifesavers as they navigate this new remote learning world. | This post contains affiliate links |
Give Yourself Grace
This is probably the biggest takeaway from everyone I’ve talked to…. remote learning during a Pandemic is definitely uncharted territory and everyone is trying to figure things out - readjusting roles, schedules, expectations, everything. Most of us weren’t cut out to be teachers, and it can be incredibly hard to motivate and focus your own kids as well as their teachers are able to. Ultimately, it’s a matter of doing the best that you can in the circumstance you’re currently in… and don’t beat yourself up if everything isn’t perfect.
Communicate with Teachers and Administrators
If you have a lot going on at home (working from home yourself, several kids schedules to juggle, other personal hurdles to deal with, etc) or if the teacher’s expectations for remote learning are just unrealistic, definitely reach out to them to voice your concerns and come up with a plan. Maybe deadlines can be extended, or the workload can be reduced to the essential assignments. Maybe the big group Zoom meetings are too overwhelming and frustrating for your young child and they need a one-on-one meeting instead. Maybe the schedule the teacher came up with won’t work for your family with your own work and other school schedules. The point is - if you or your kids are feeling overwhelmed and stressed about about the whole remote learning process, it’s worth discussing with their teachers and administrators so that you can come up with something that works for everyone and still meets all the learning requirements.
Come up With a Schedule that Works for Your Family
This will take some trial-and-error. And if you have older students with a heavier workload, their home school day might just look very similar to a regular school day schedule-wise and time-wise - especially if they can work pretty independently. But for us with younger kids, mom or dad needs to be there to walk them through each assignment, activity, and online meeting.
If you’re also working from home or juggling other kids schedules too this can be particularly challenging and exhausting... if you need something to buy periods of occupation from your kids (maybe so you can do an uninterupted confrence call, or you can concentrate helping one child with an assignment while keeping the other kids busy), consider giving them something they will enjoy doing and keep them safely occupied (but always under some parent supervision of course). Maybe it's educational games on the Kindle, or perhaps low-mess craft projects, or an hour of TV time, or reading a book series on their own that they enjoy, etc. Or maybe you find school work or office work done in fragments at unusual times is what works best for your family.
For us personally with younger kids, we’ve fallen into a good rhythm and schedule over the last two months of remote learning. For our family we’ve found it best to buckle down in the mornings and get the work done first thing when attention spans are at their best and everyone is well rested. So our daughter works through her assignments one-by-one every morning with breaks for snack and classroom meetings. Our goal is to have all her work completed for the day by lunchtime, and while some days that doesn’t happen and things need to be finished after lunch, most of the time she’s done by noon which leaves the afternoons for “free choice fun.” Typically, spending the whole afternoon outside if the weather is nice or inside playing legos or watching a movie if it’s raining (and while the kids are playing I can chip away at whatever work I need to get done too). Our days have consistent expectations and a nice rhythm to them now which helps a lot.
Set Snack and Meal Times
As anyone with kids home 24/7 can tell you, they can and WILL eat you out of house and home if you let them. By having set snack and mealtimes it will help your pantry and wallet by not blowing through all your quarantine snacks in 2 days flat. I’ve seen some parents even pack their kids lunch box every morning, just like they would for school, so the kids have a finite amount of snacks and lunch food for the day.
Designate a School Space and Stay Organized
Having a designated “school space” that has all the supplies your kids will need to complete their assignments at their fingertips can be crucial to success. Ideally having a desk or separate workspace would be ideal, but any designated space can work. For us, we set up one end of our kitchen island - it has a laptop where our daughter completes most of her assignments online and a small basket where we store paper, workbooks, flashcards, and a few ziplock bags containing different supplies that she uses often (markers, counting chips, etc). By having everything ready to go each day, there's no excuse when it's time to get to work.
I polled many friends, both teachers and regular parents who are now remote teaching, and compiled a list of things they have needed or found to be extremely helpful during this time. Younger kids definitely tend to need more learning aides so the list has many items geared to younger students but there are also some items that can be useful for older grade levels listed too. Click the button below to browse our picks, which I will be periodically adding to as I get more suggestions:
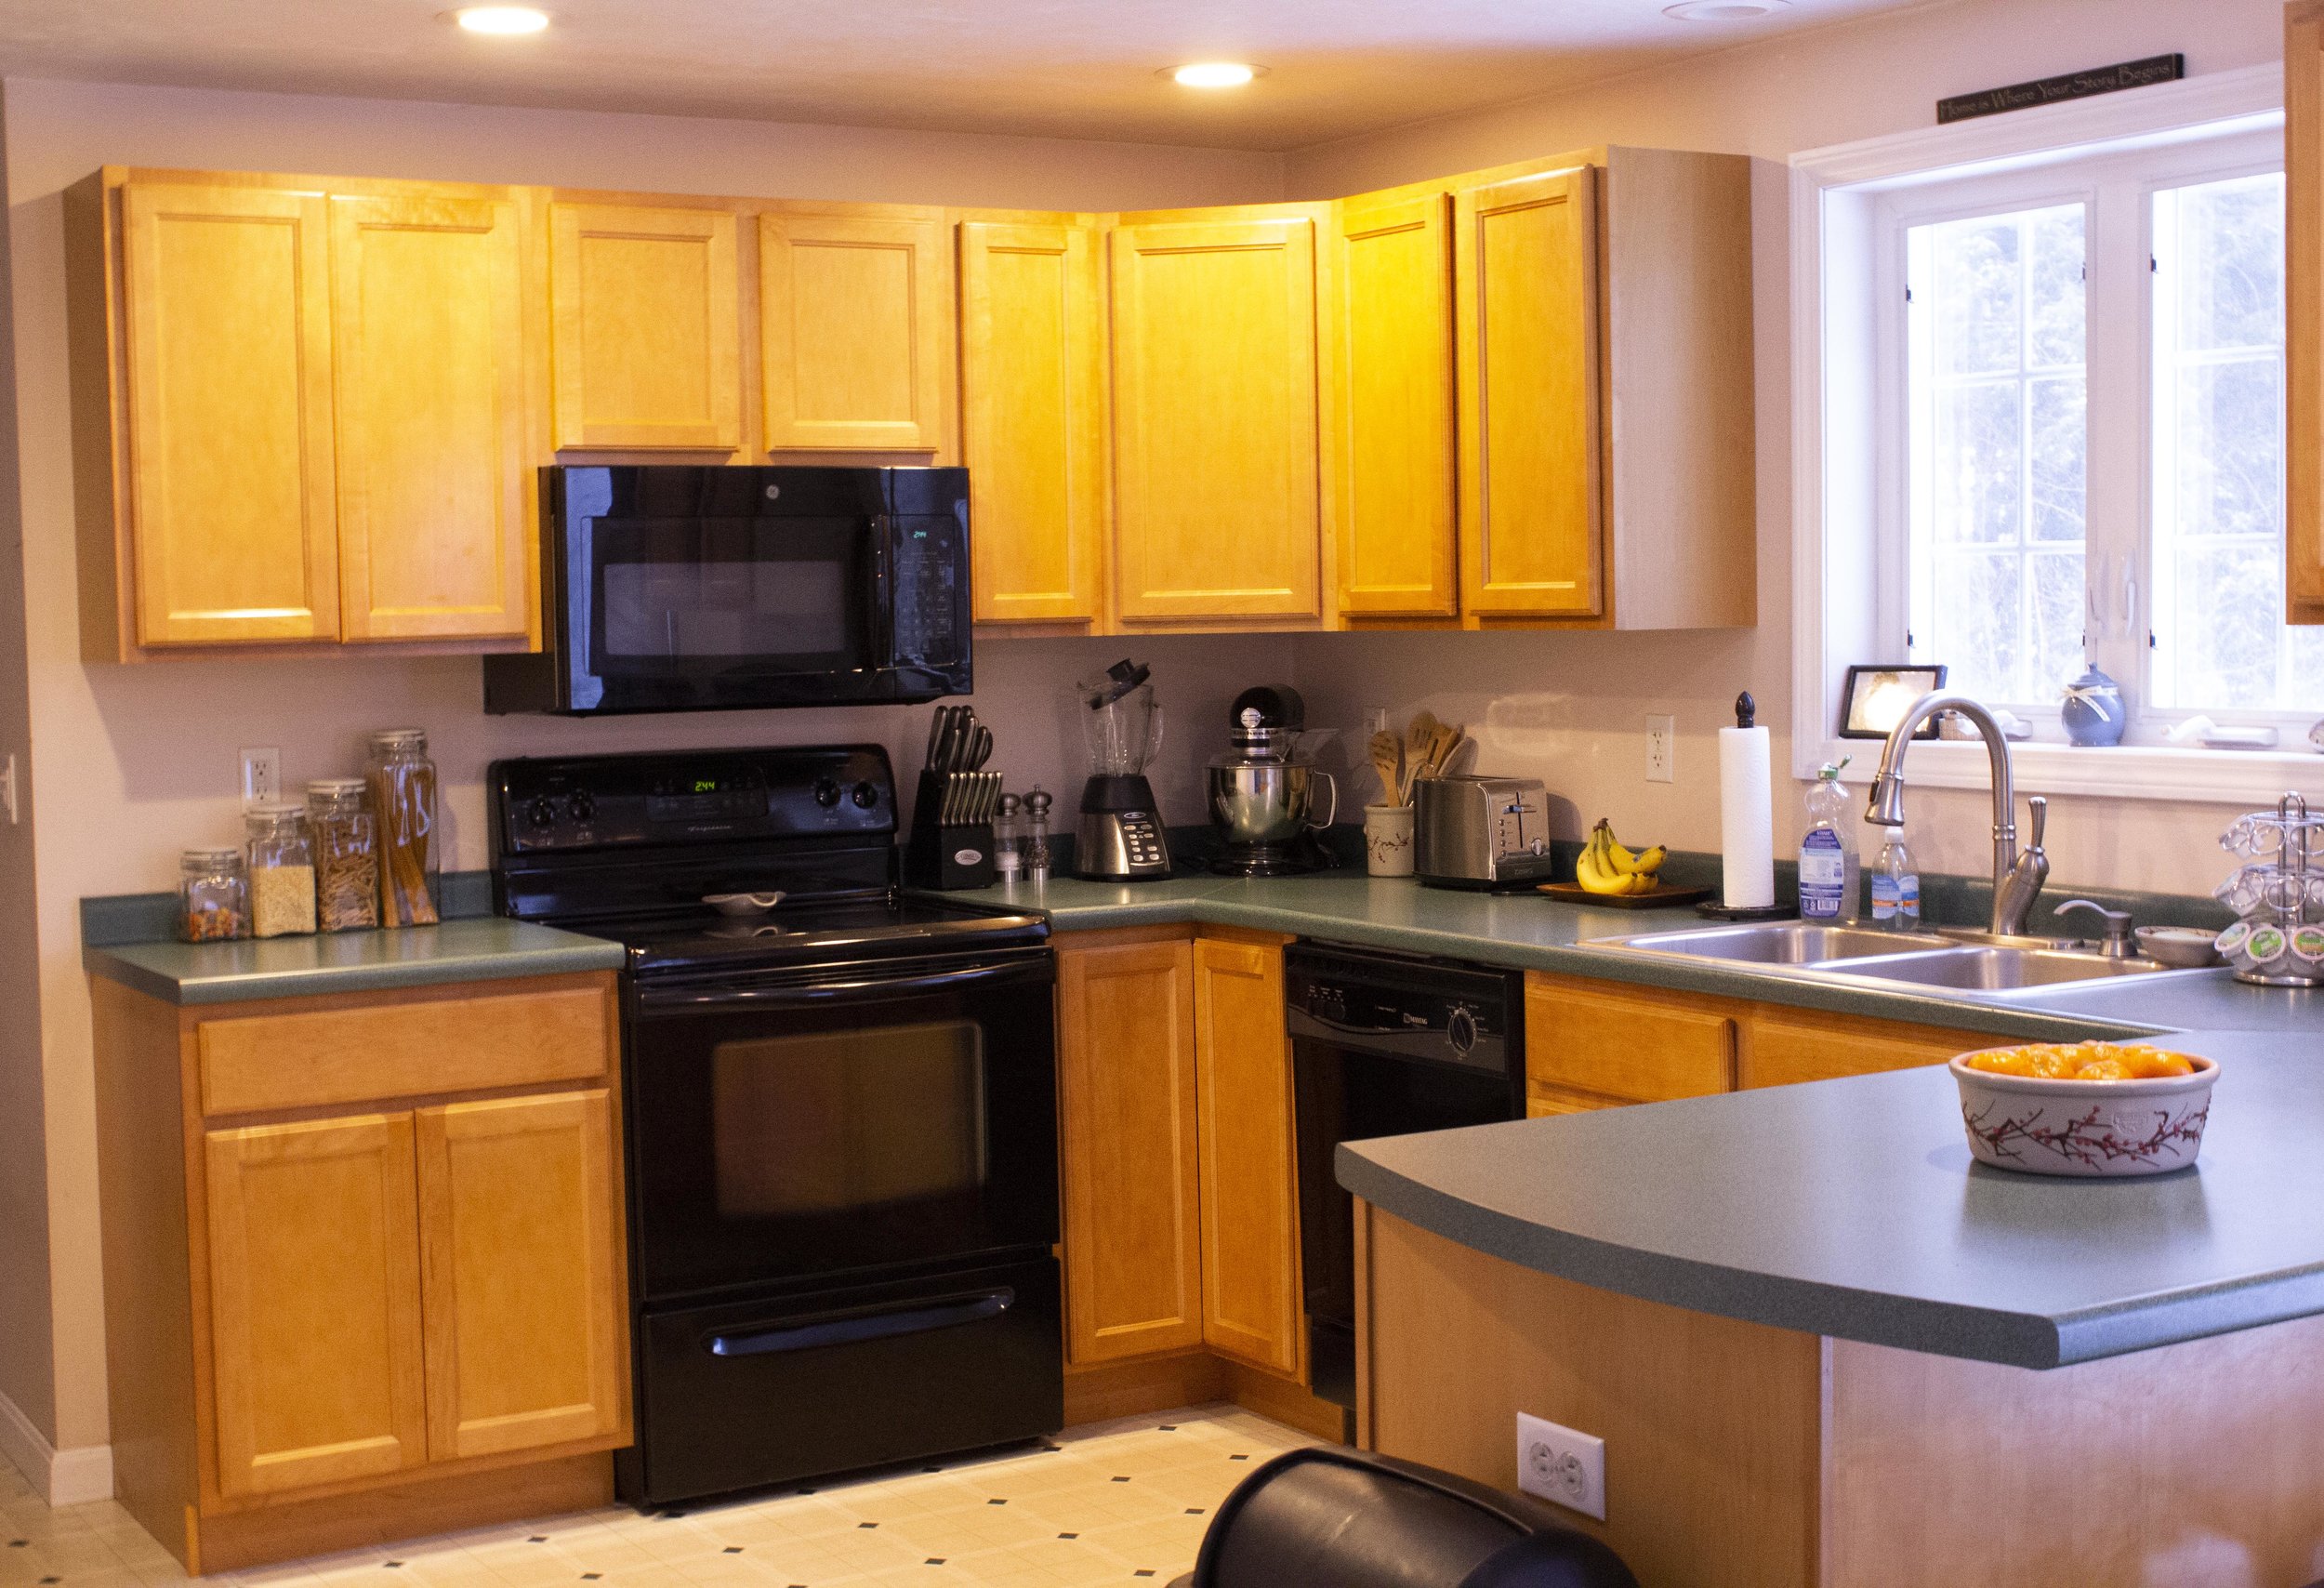
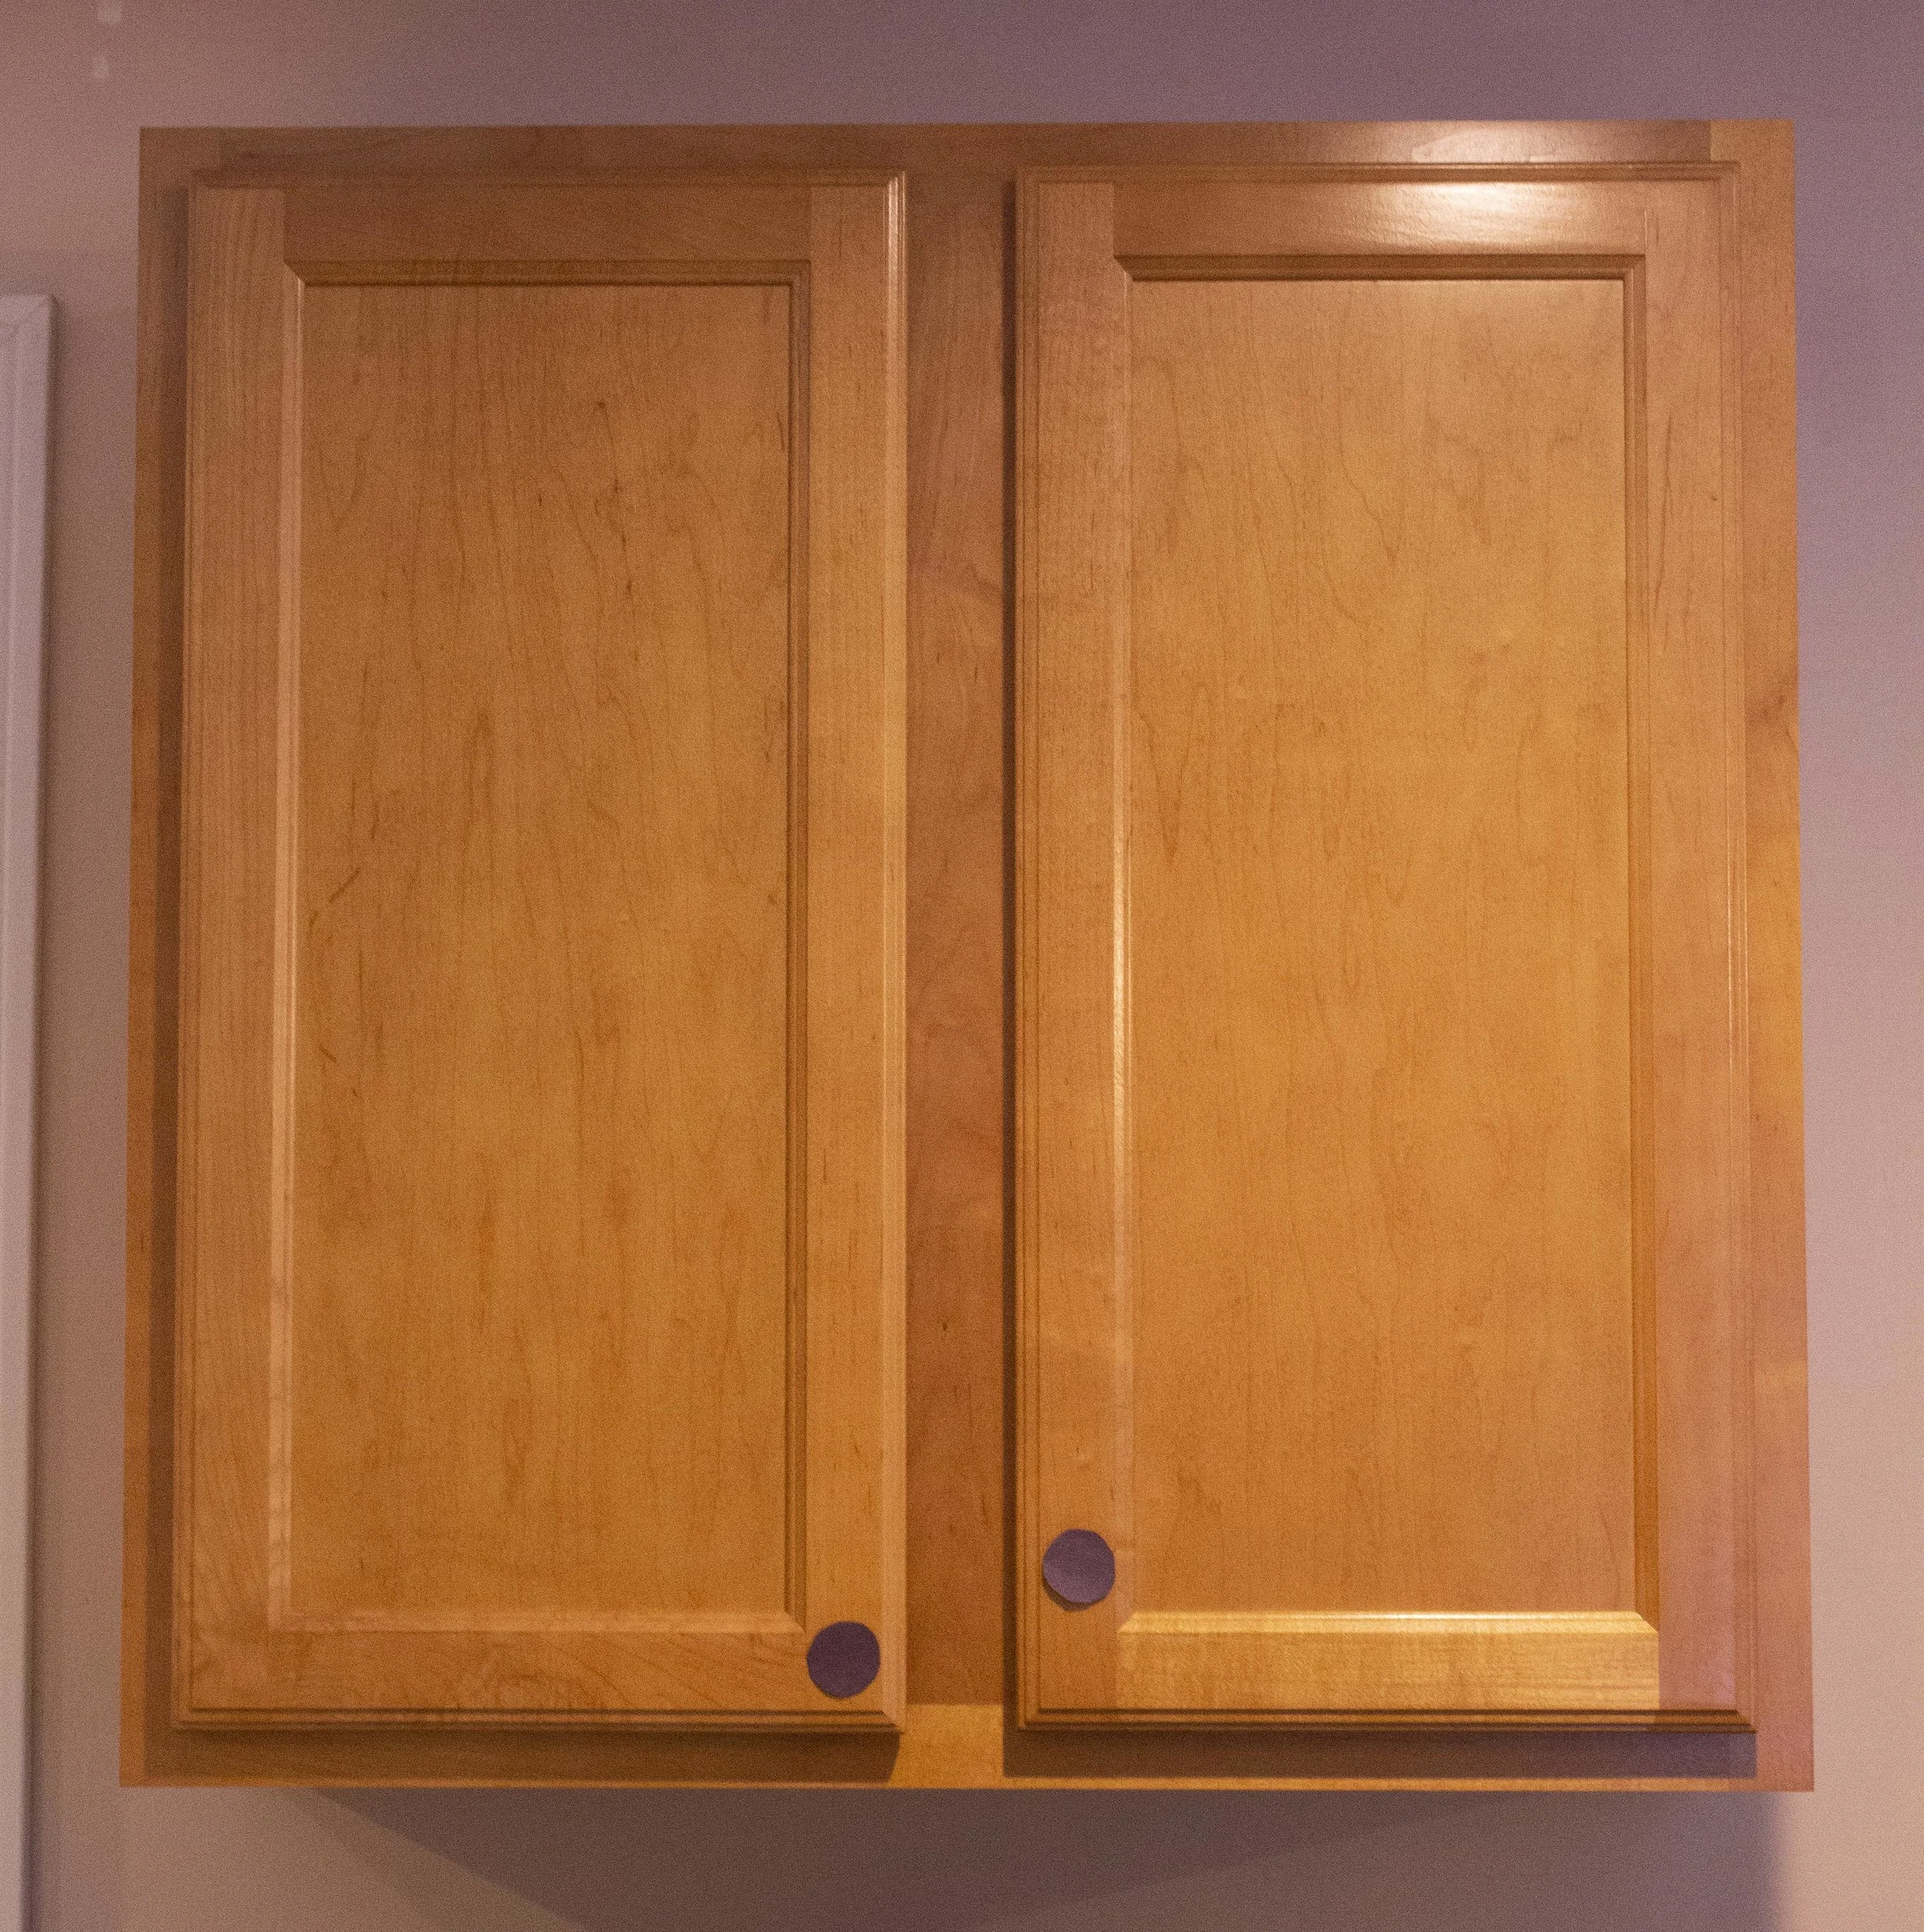
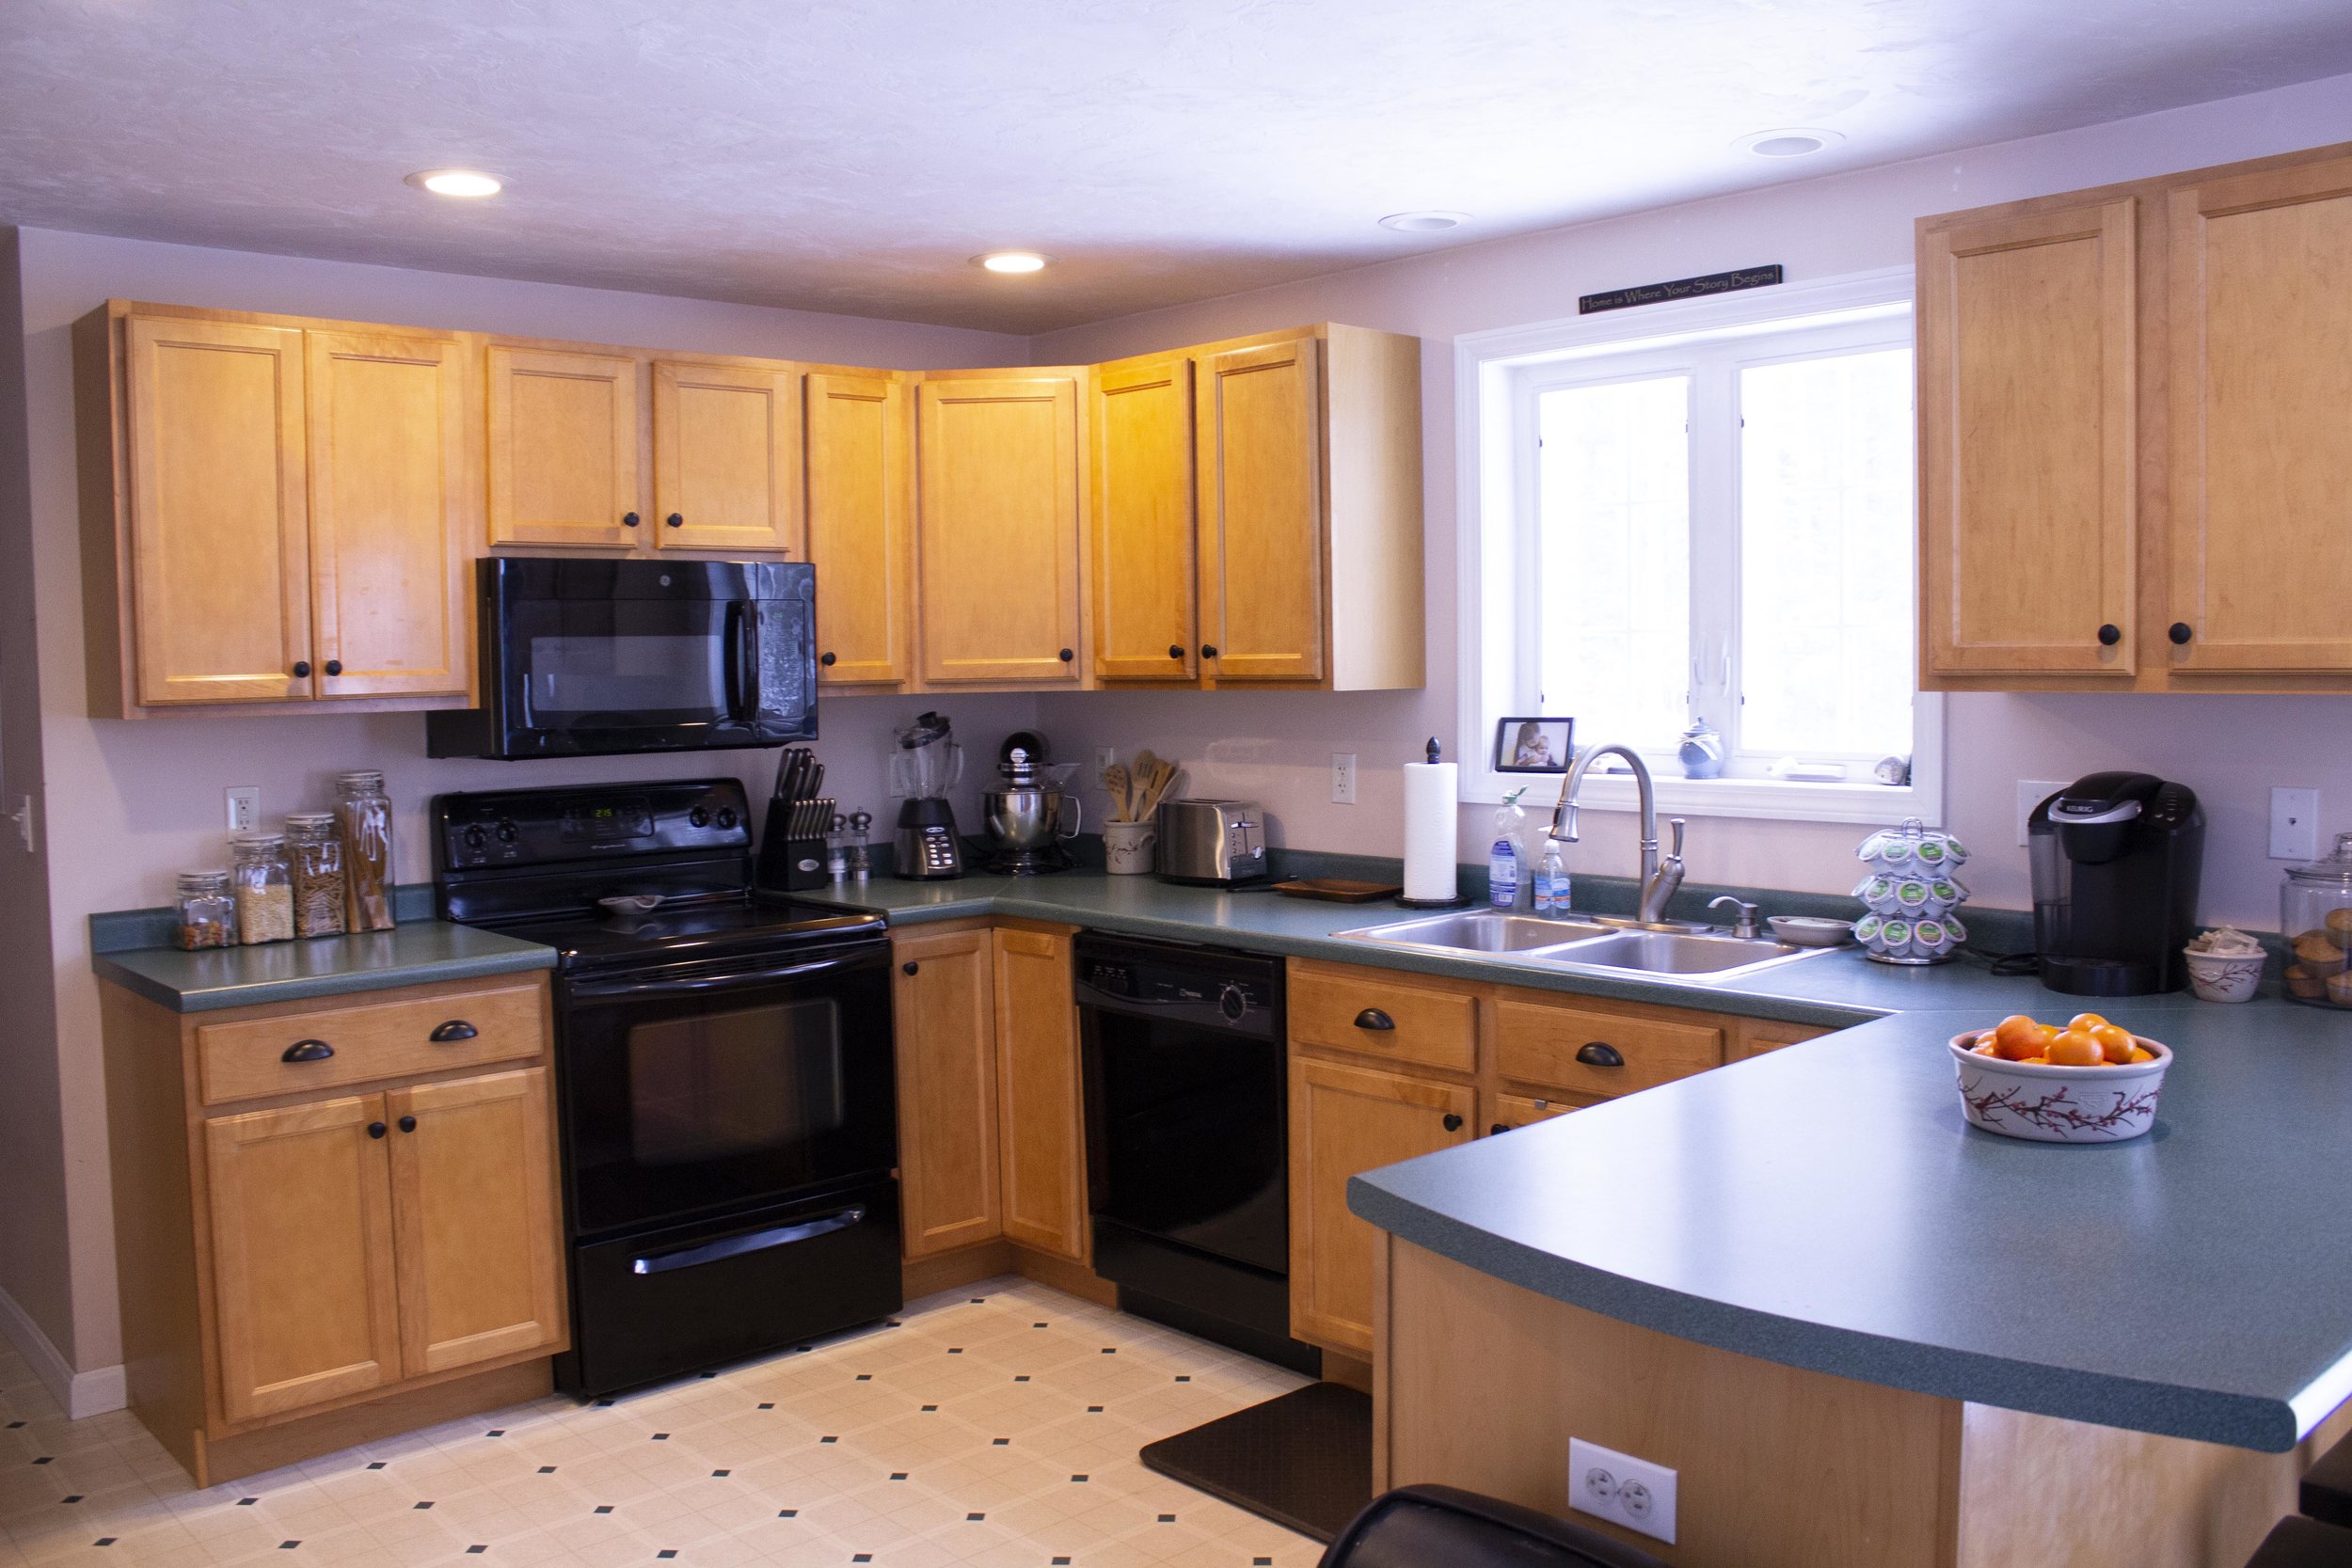
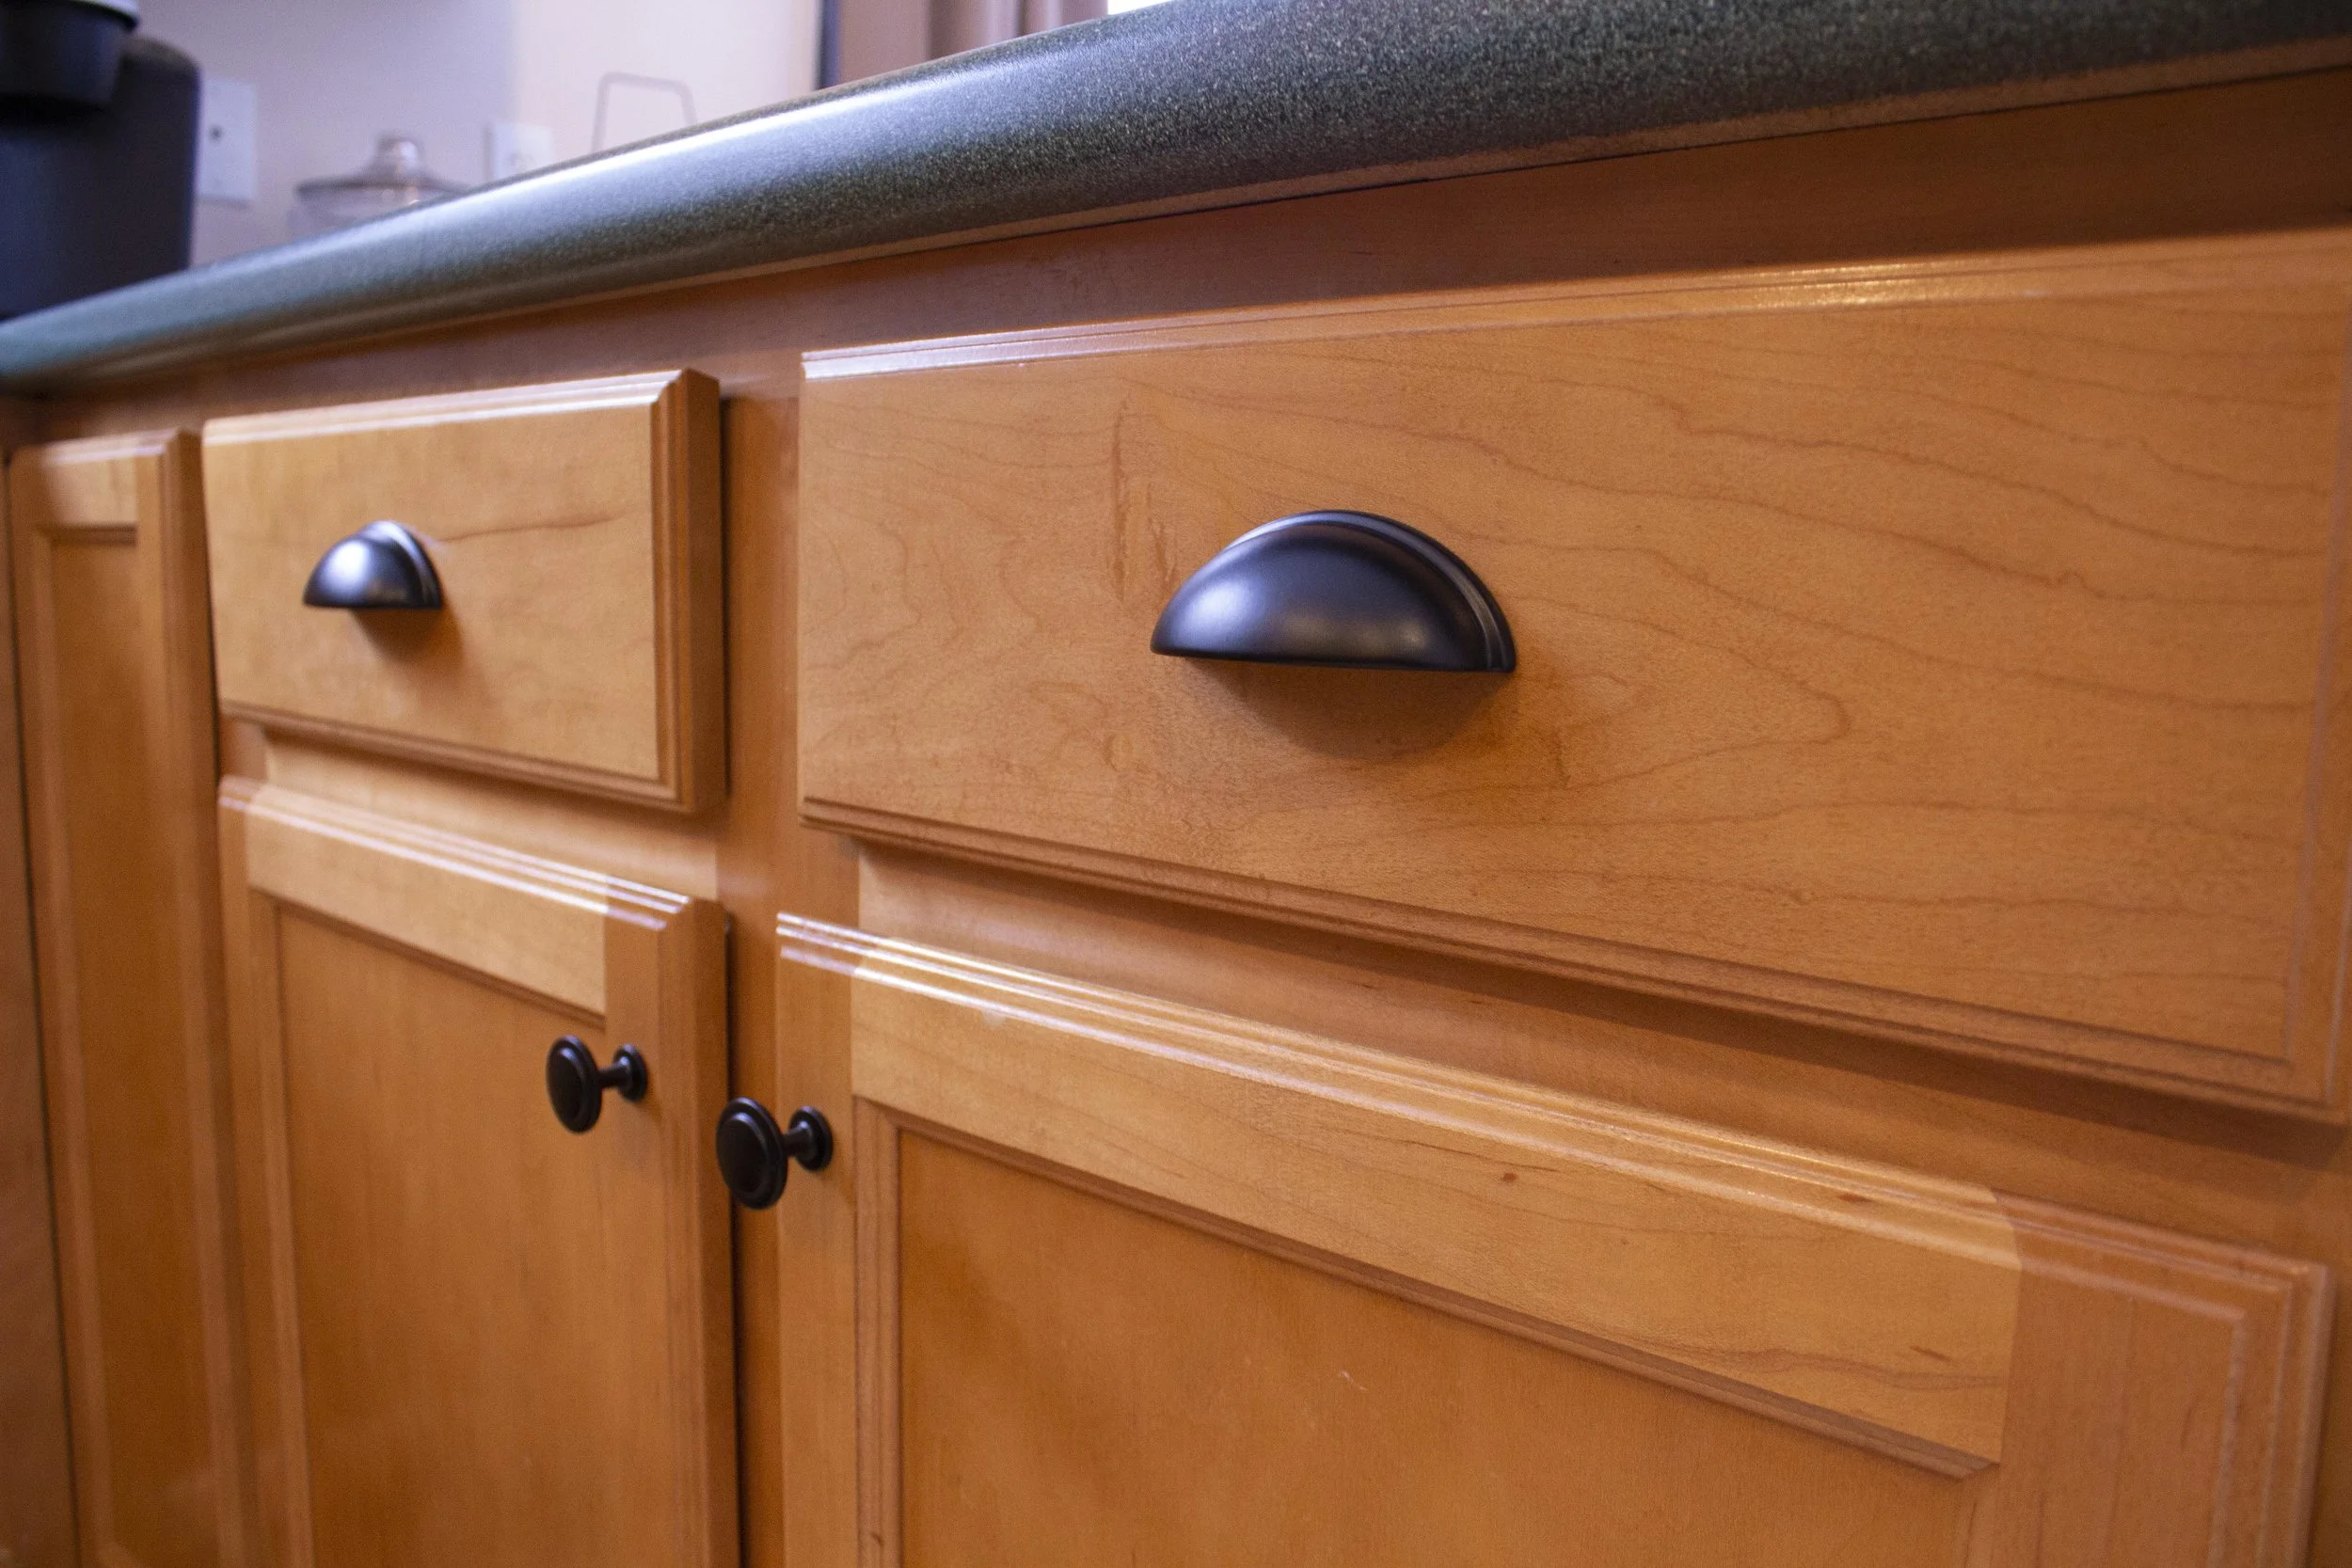
Our home came with a classic late 90’s “builder’s grade kitchen” - you know the type: honey-colored basic cabinets with no hardware and laminate counters. Someday we’d love to totally overhaul the space and paint the cupboards, trim them out, and install granite countertops - however all those things involve a lot of work and money and just aren’t in the budget right now. In the meantime we’re working on making small upgrades ourselves that will make the space look more finished. And what’s the easiest, budget-friendly way to update the look of your cabinets? Replace or install new hardware! If you’re installing new hardware on blank cabinets it can be a bit intimidating, so read on for my tips on installing for the first time. And don’t forget to enter our GIVEAWAY over on Instagram for a $50 Credit to Cosmas Hardware! | This post is sponsored by Cosmas Hardware and affiliate links |
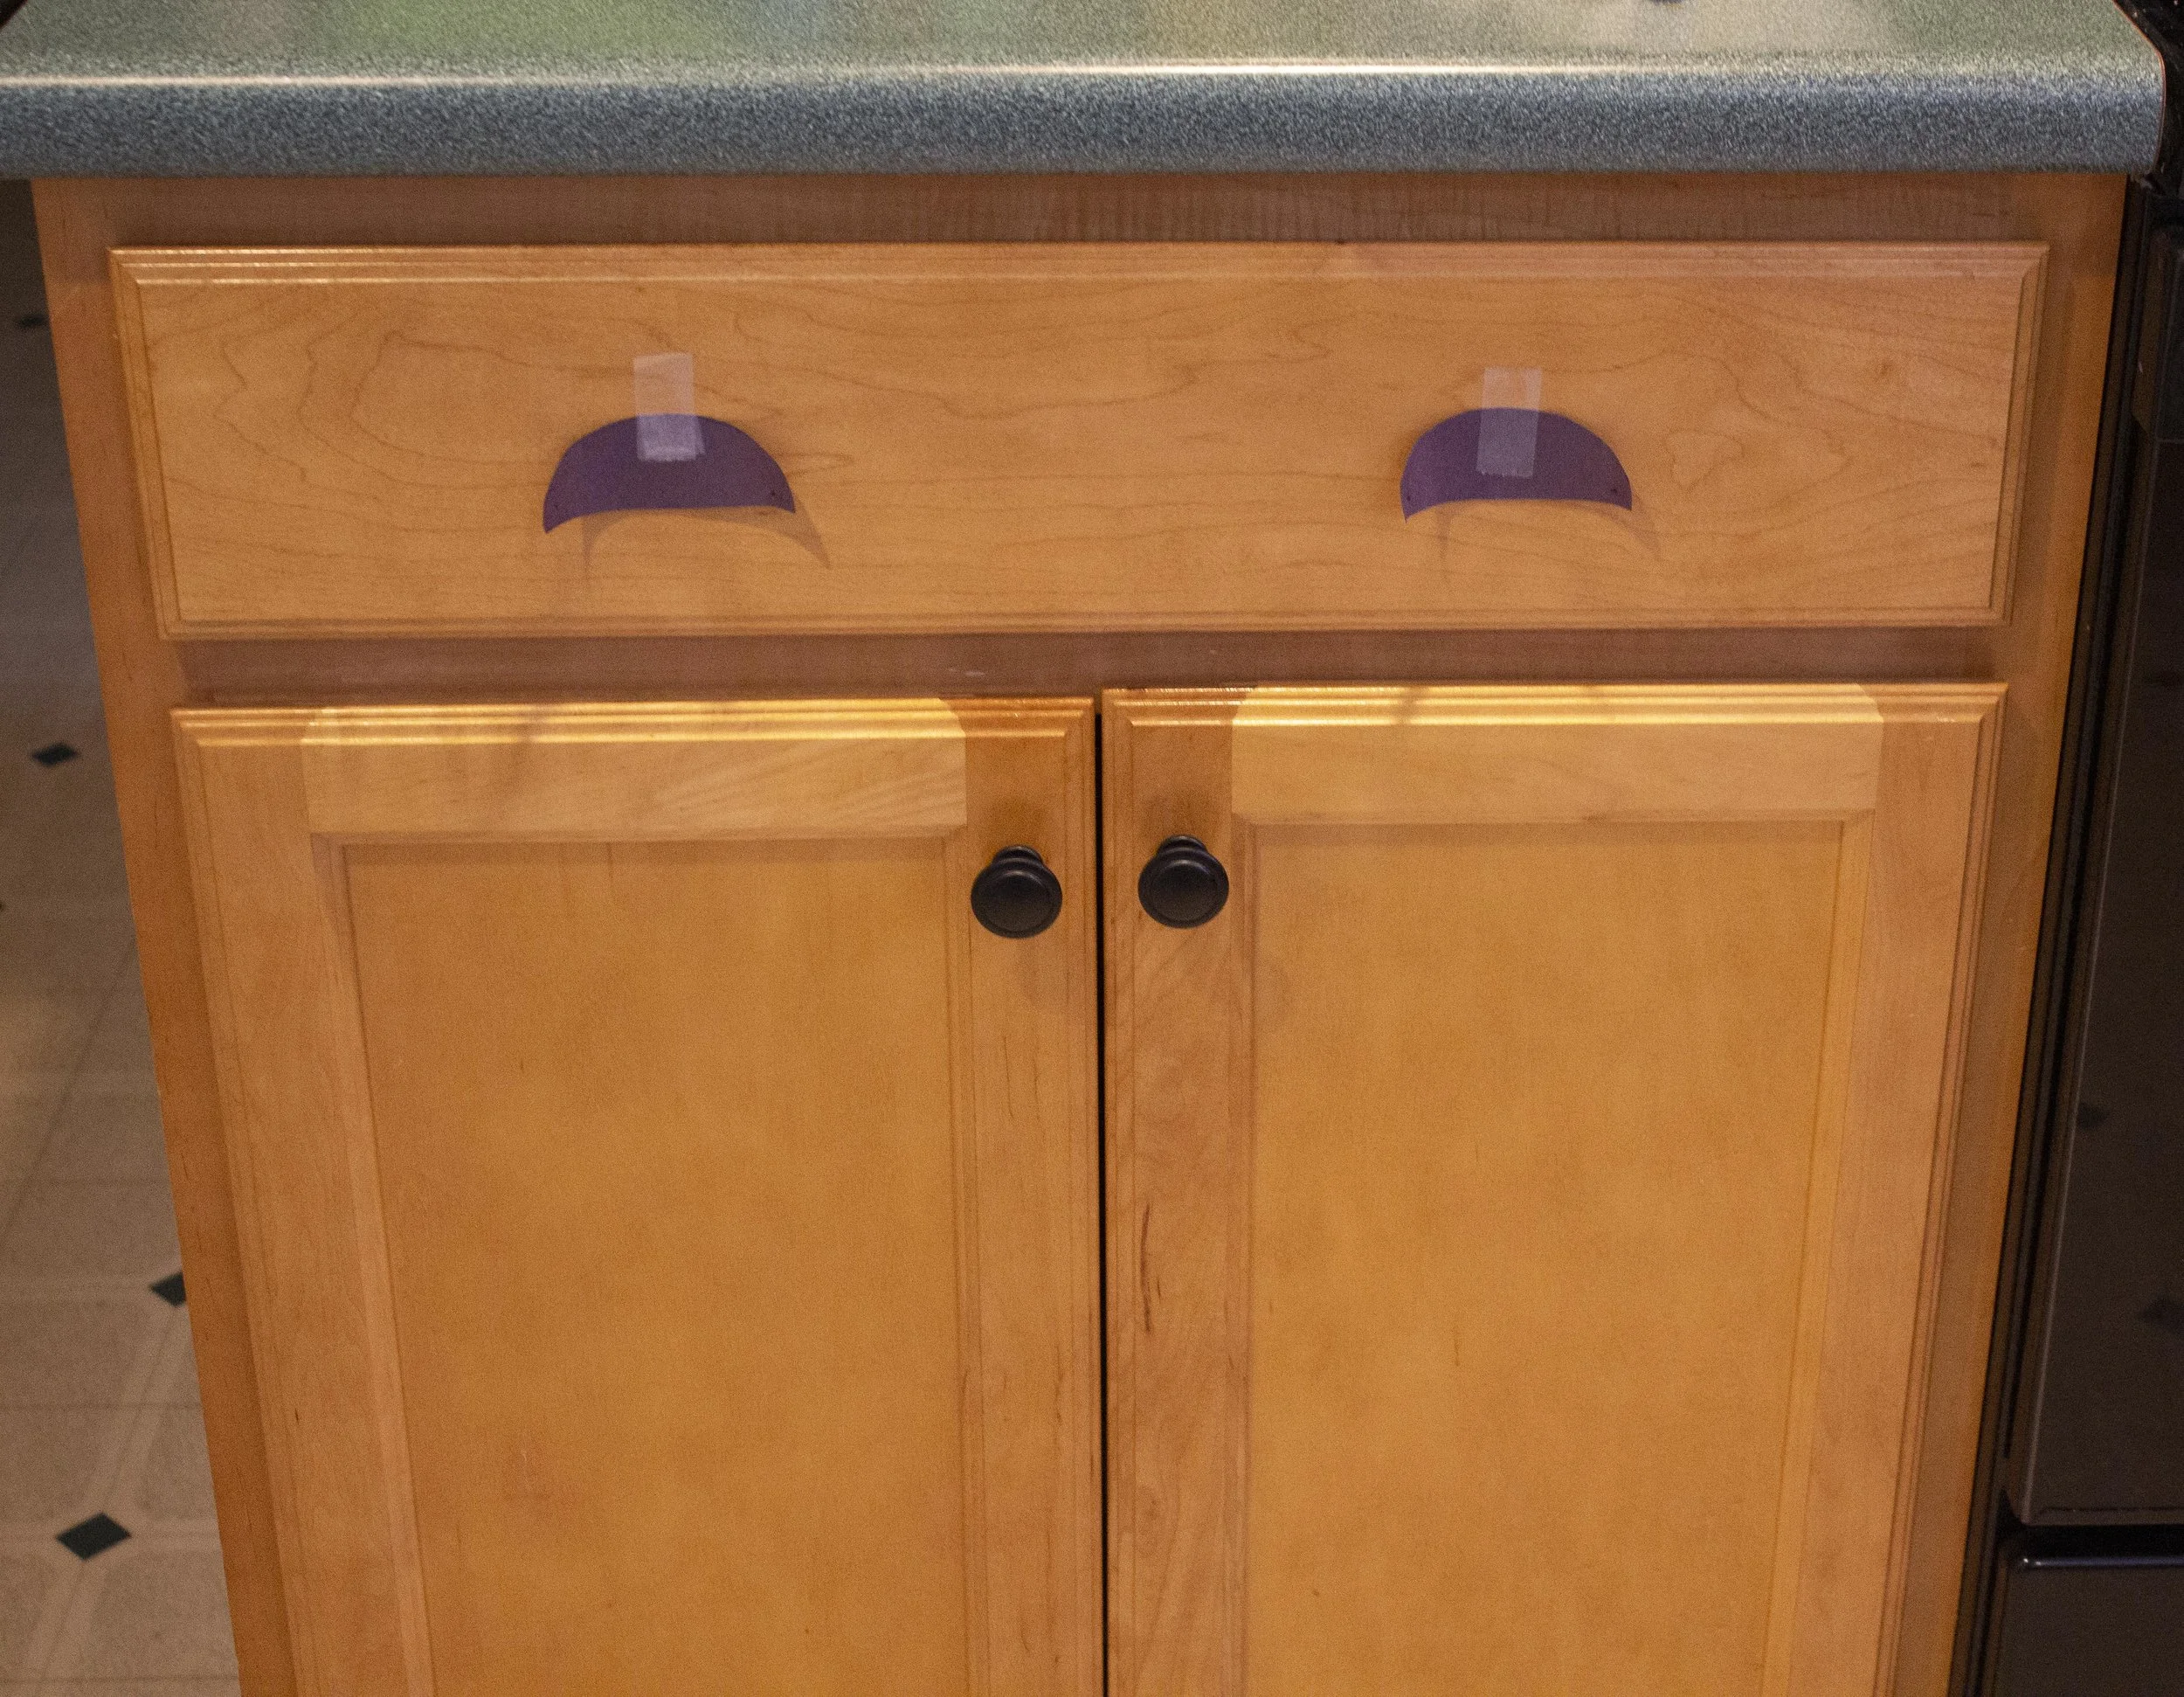
If you’re installing new hardware on a blank cabinet door, the first step is deciding hardware placement. I’m a very visual person so to help me decide on where things would go I first traced the hardware on a piece of black construction paper, cut it out, and taped them to the door and drawer fronts. This way I could step back and play around with the placement before I finalized it.
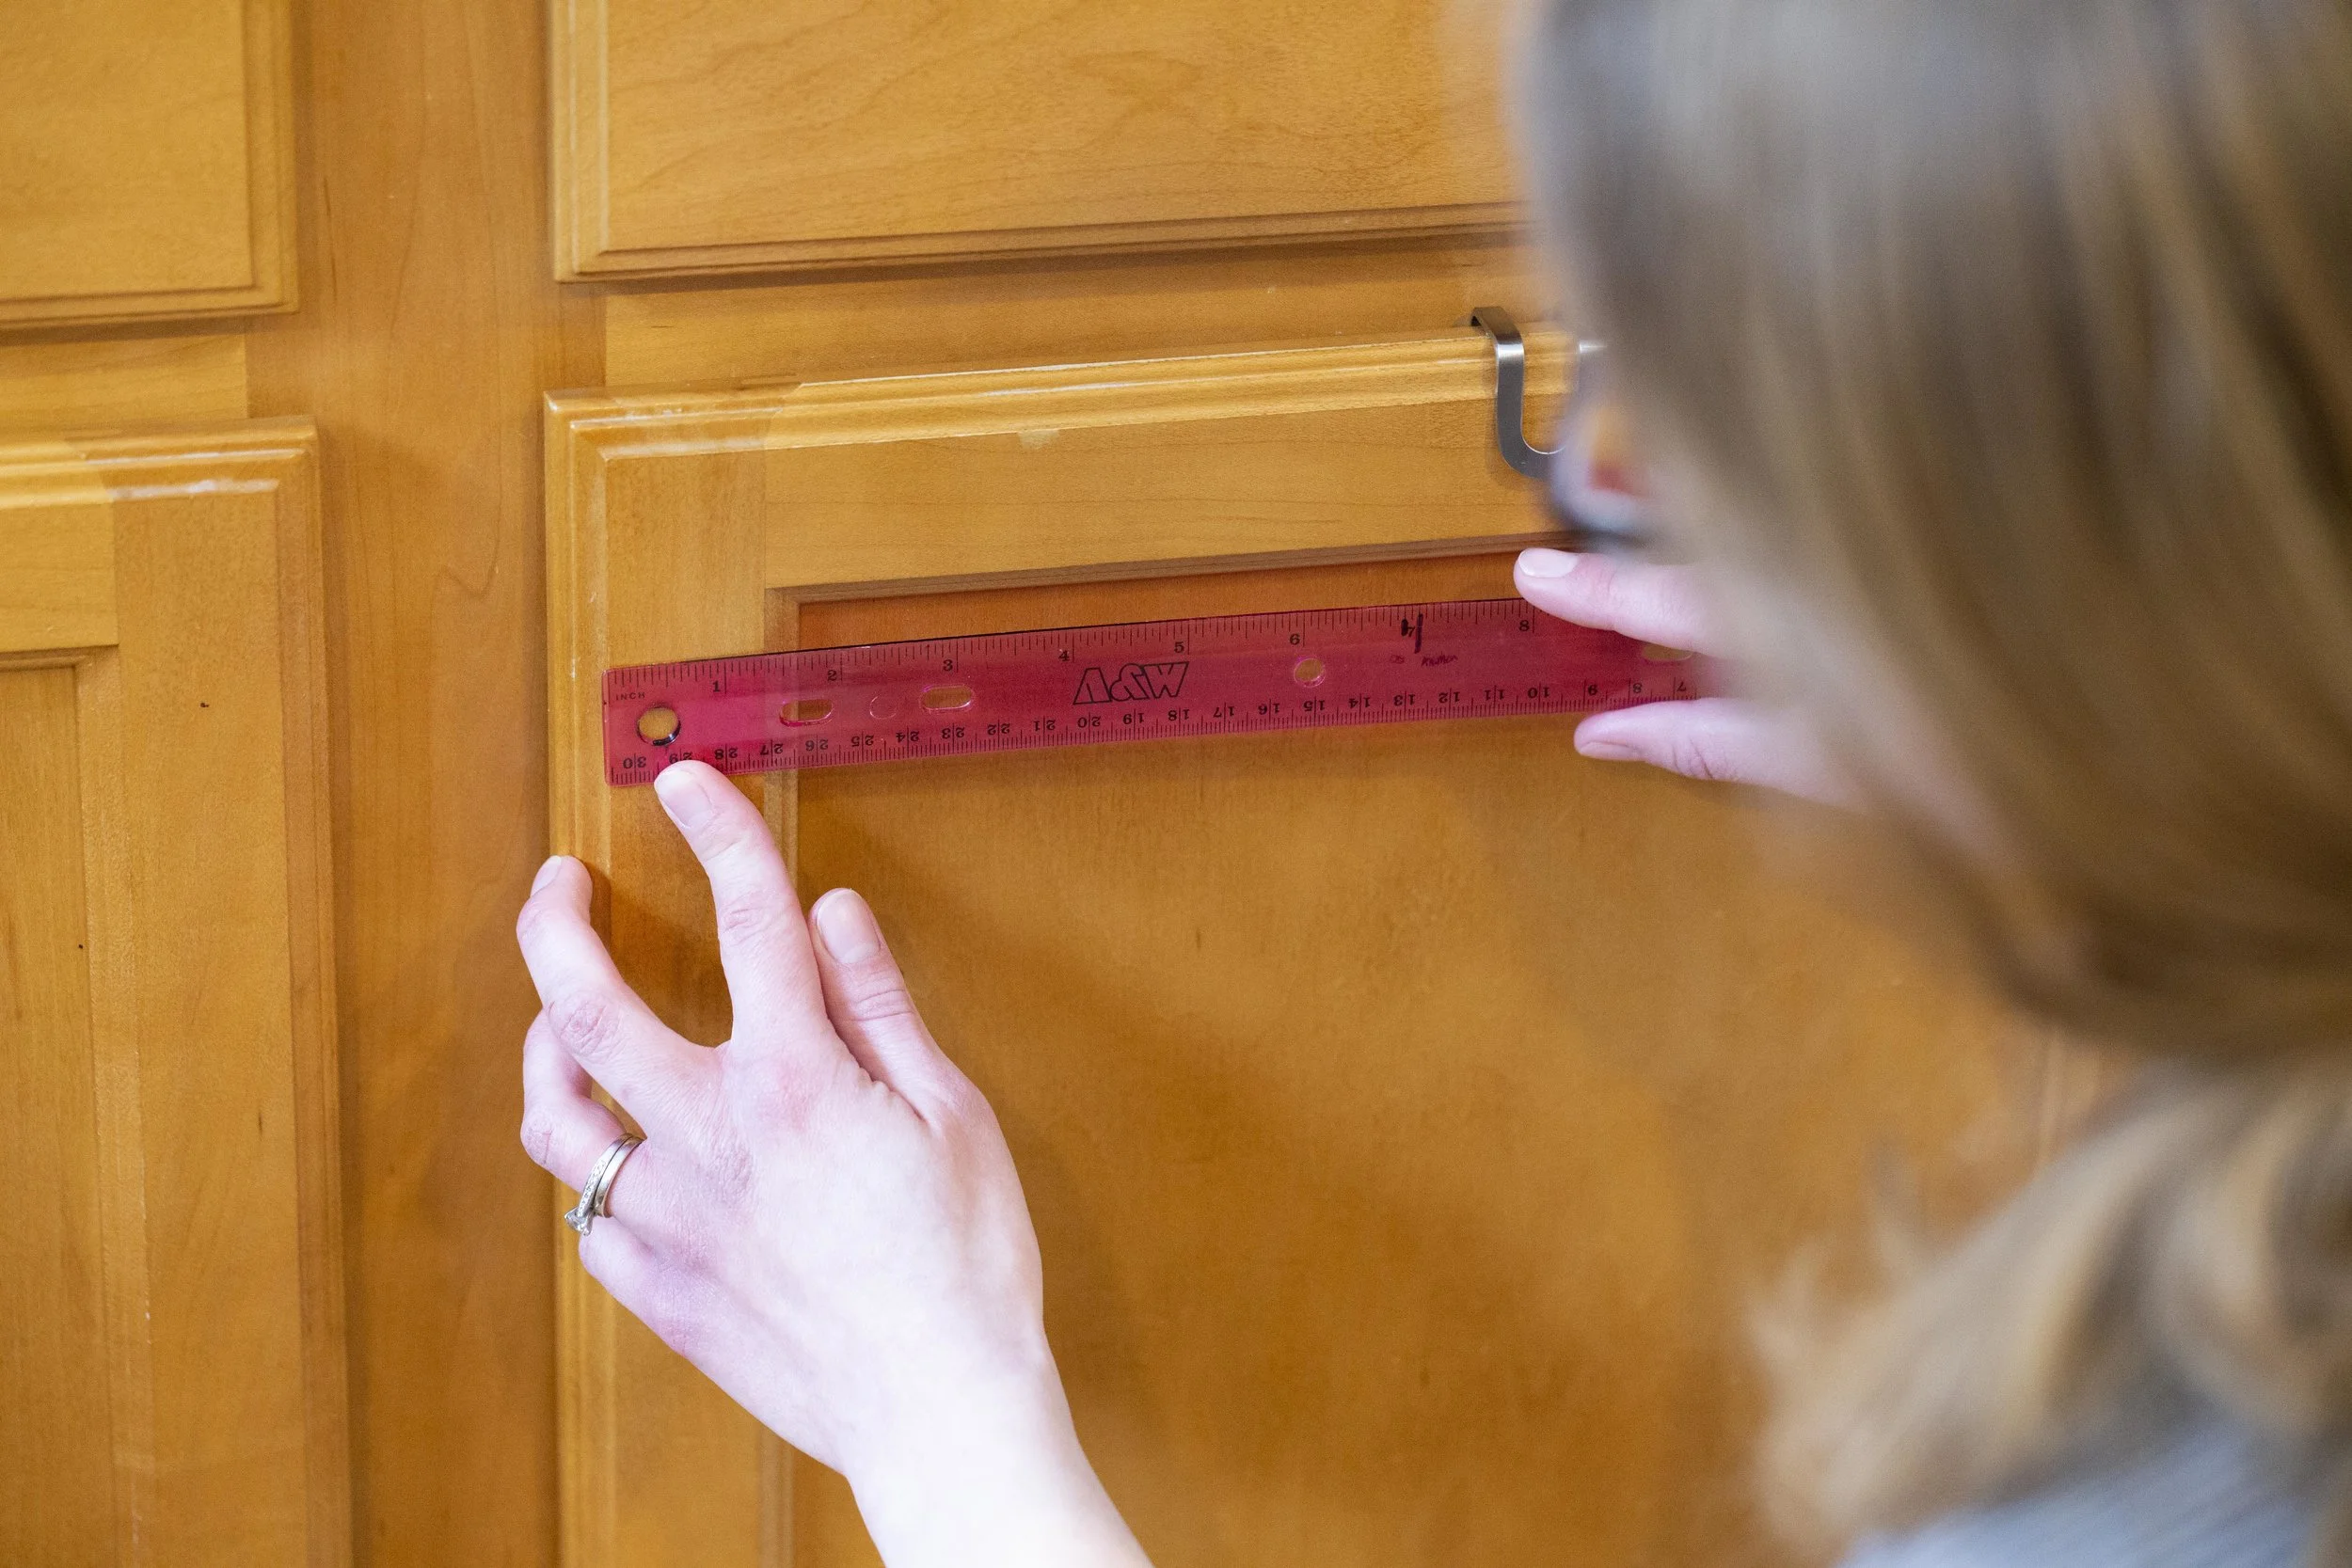
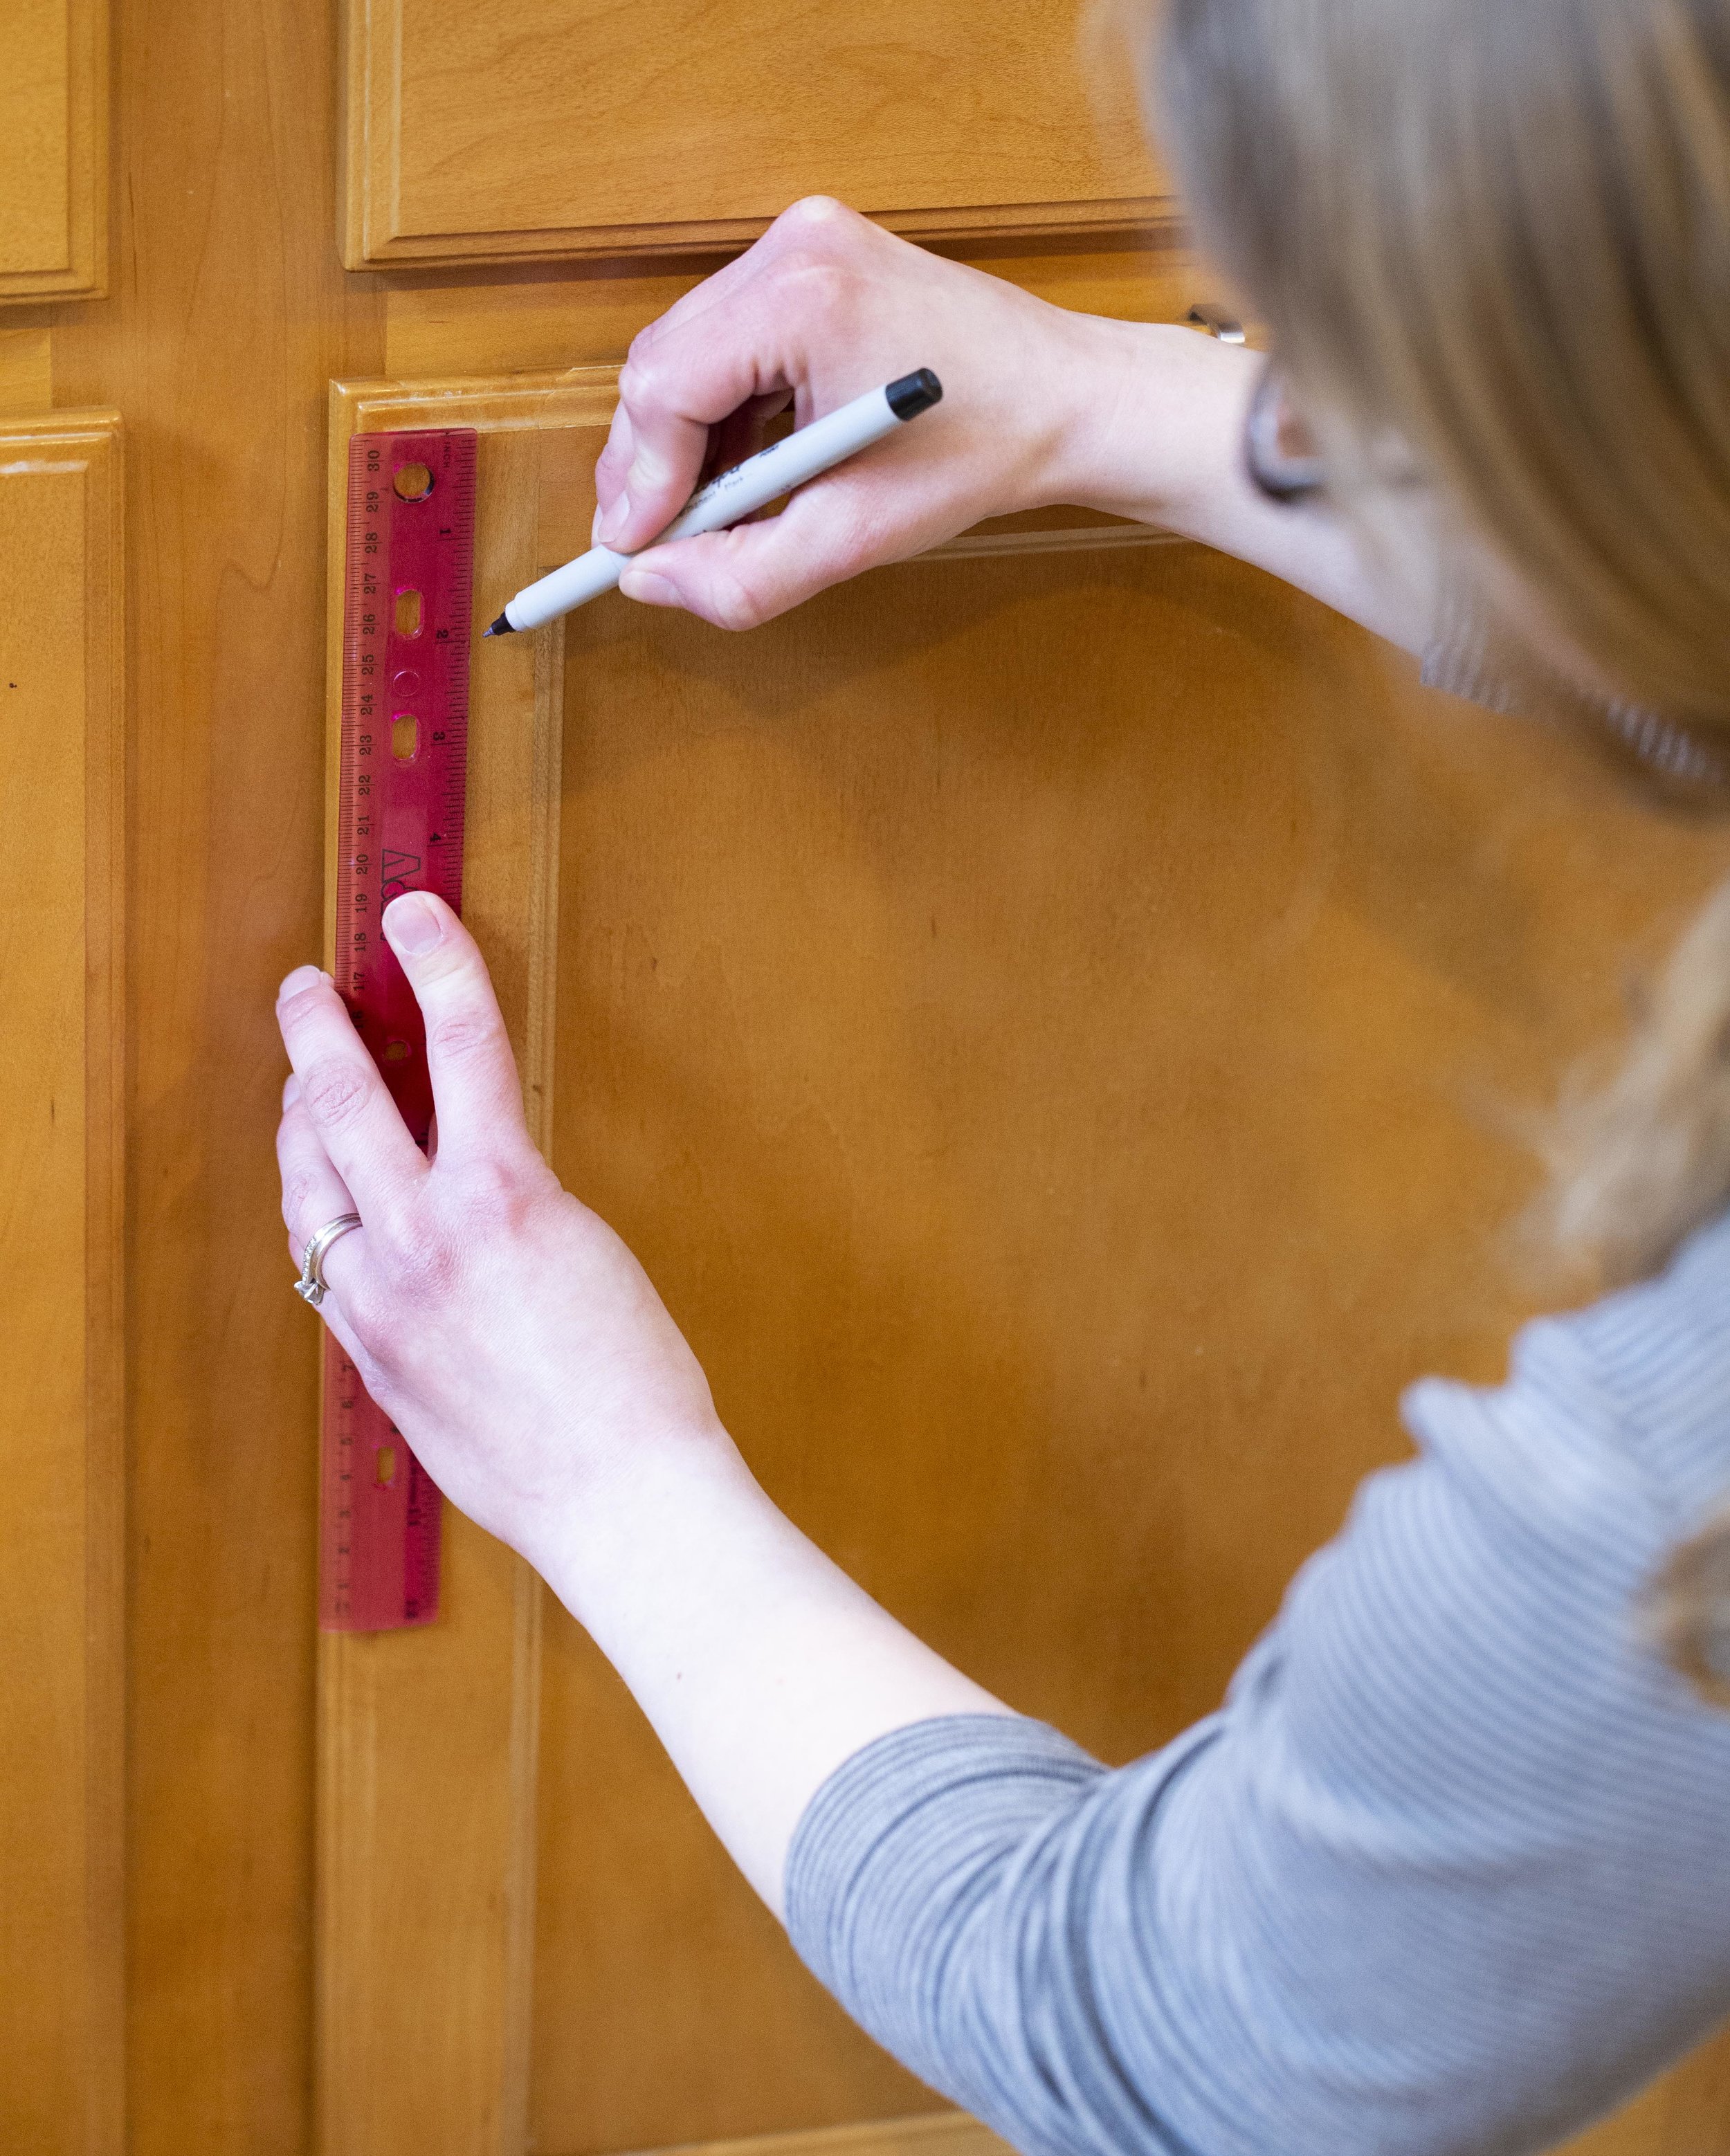
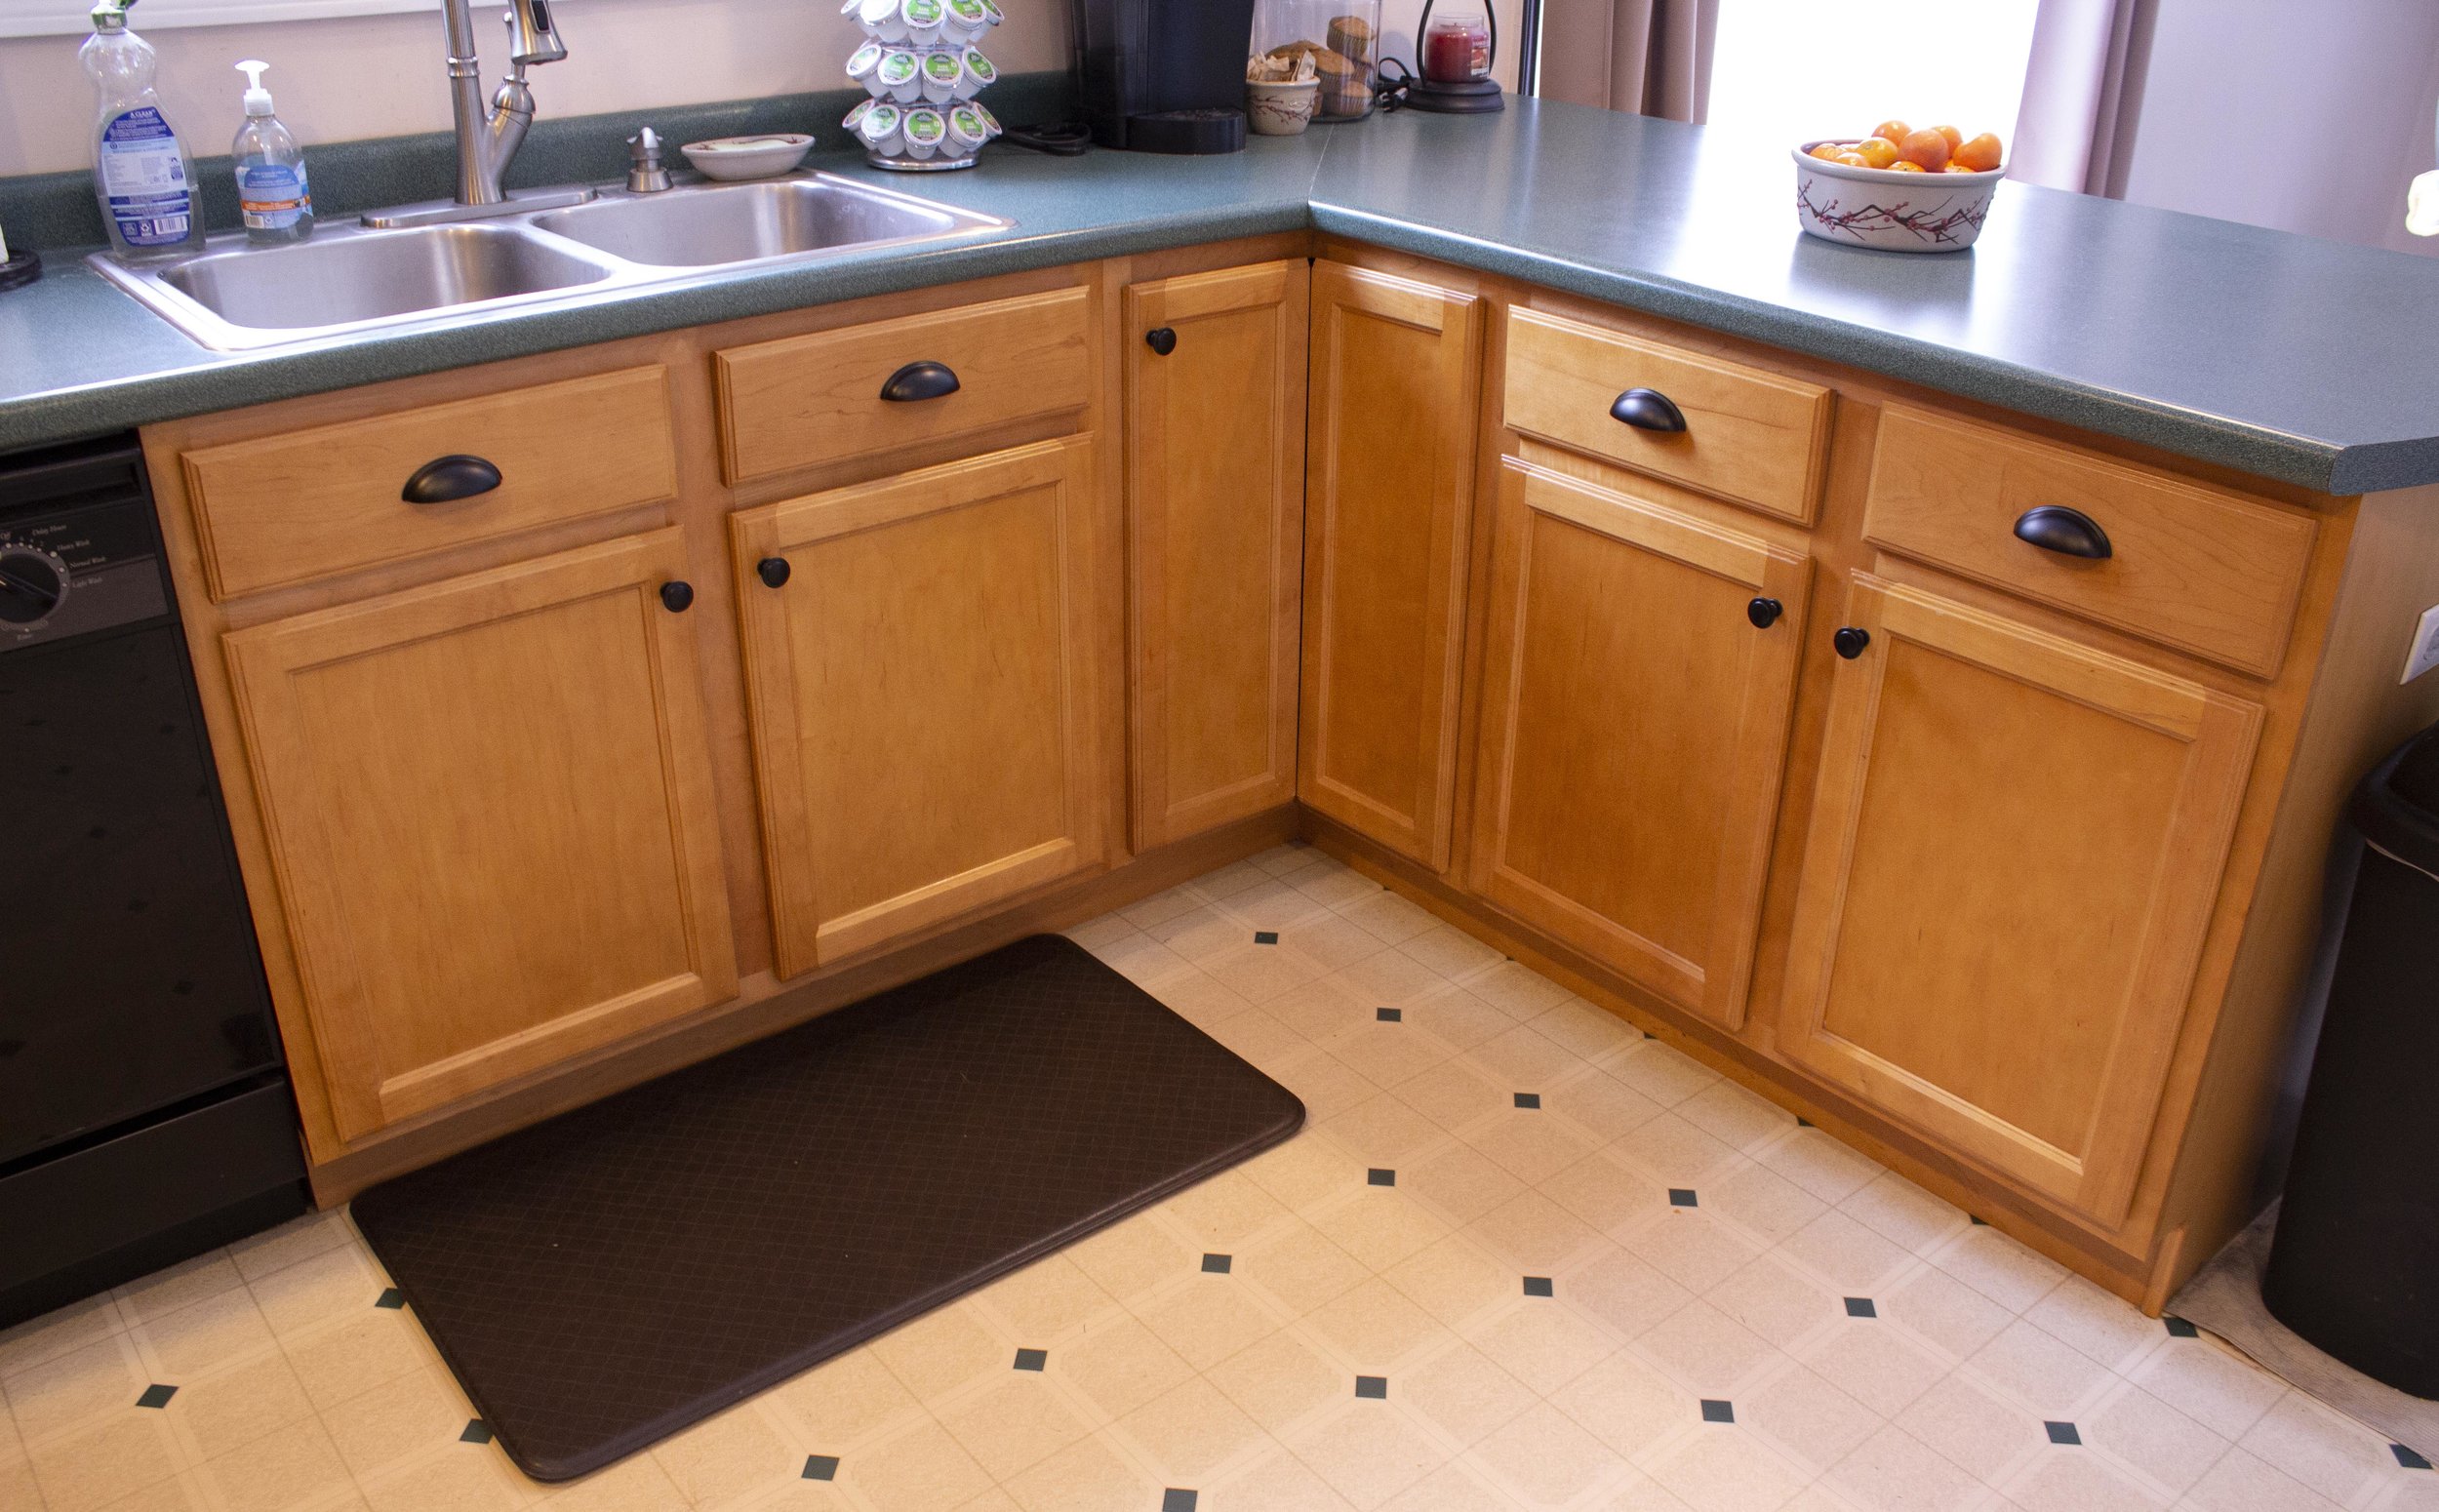
For our cabinets, we decided we liked the knobs two inches from the edge of the cabinet (not including the beveled edge). Once we decided on this placement, it was just a matter of measuring it out on all the cabinet doors so they were centered side-to-side on the trim piece as well as two inches in. Consistency is key to having uniform placement - and I made sure to measure multiple times in both directions before marking it with a pen
It’s important to measure the knobs on each door independently - if the doors aren’t hung evenly, it may look off initially but the hinges can be adjusted later so everything (the doors themselves as well as the hardware) will line up visually.
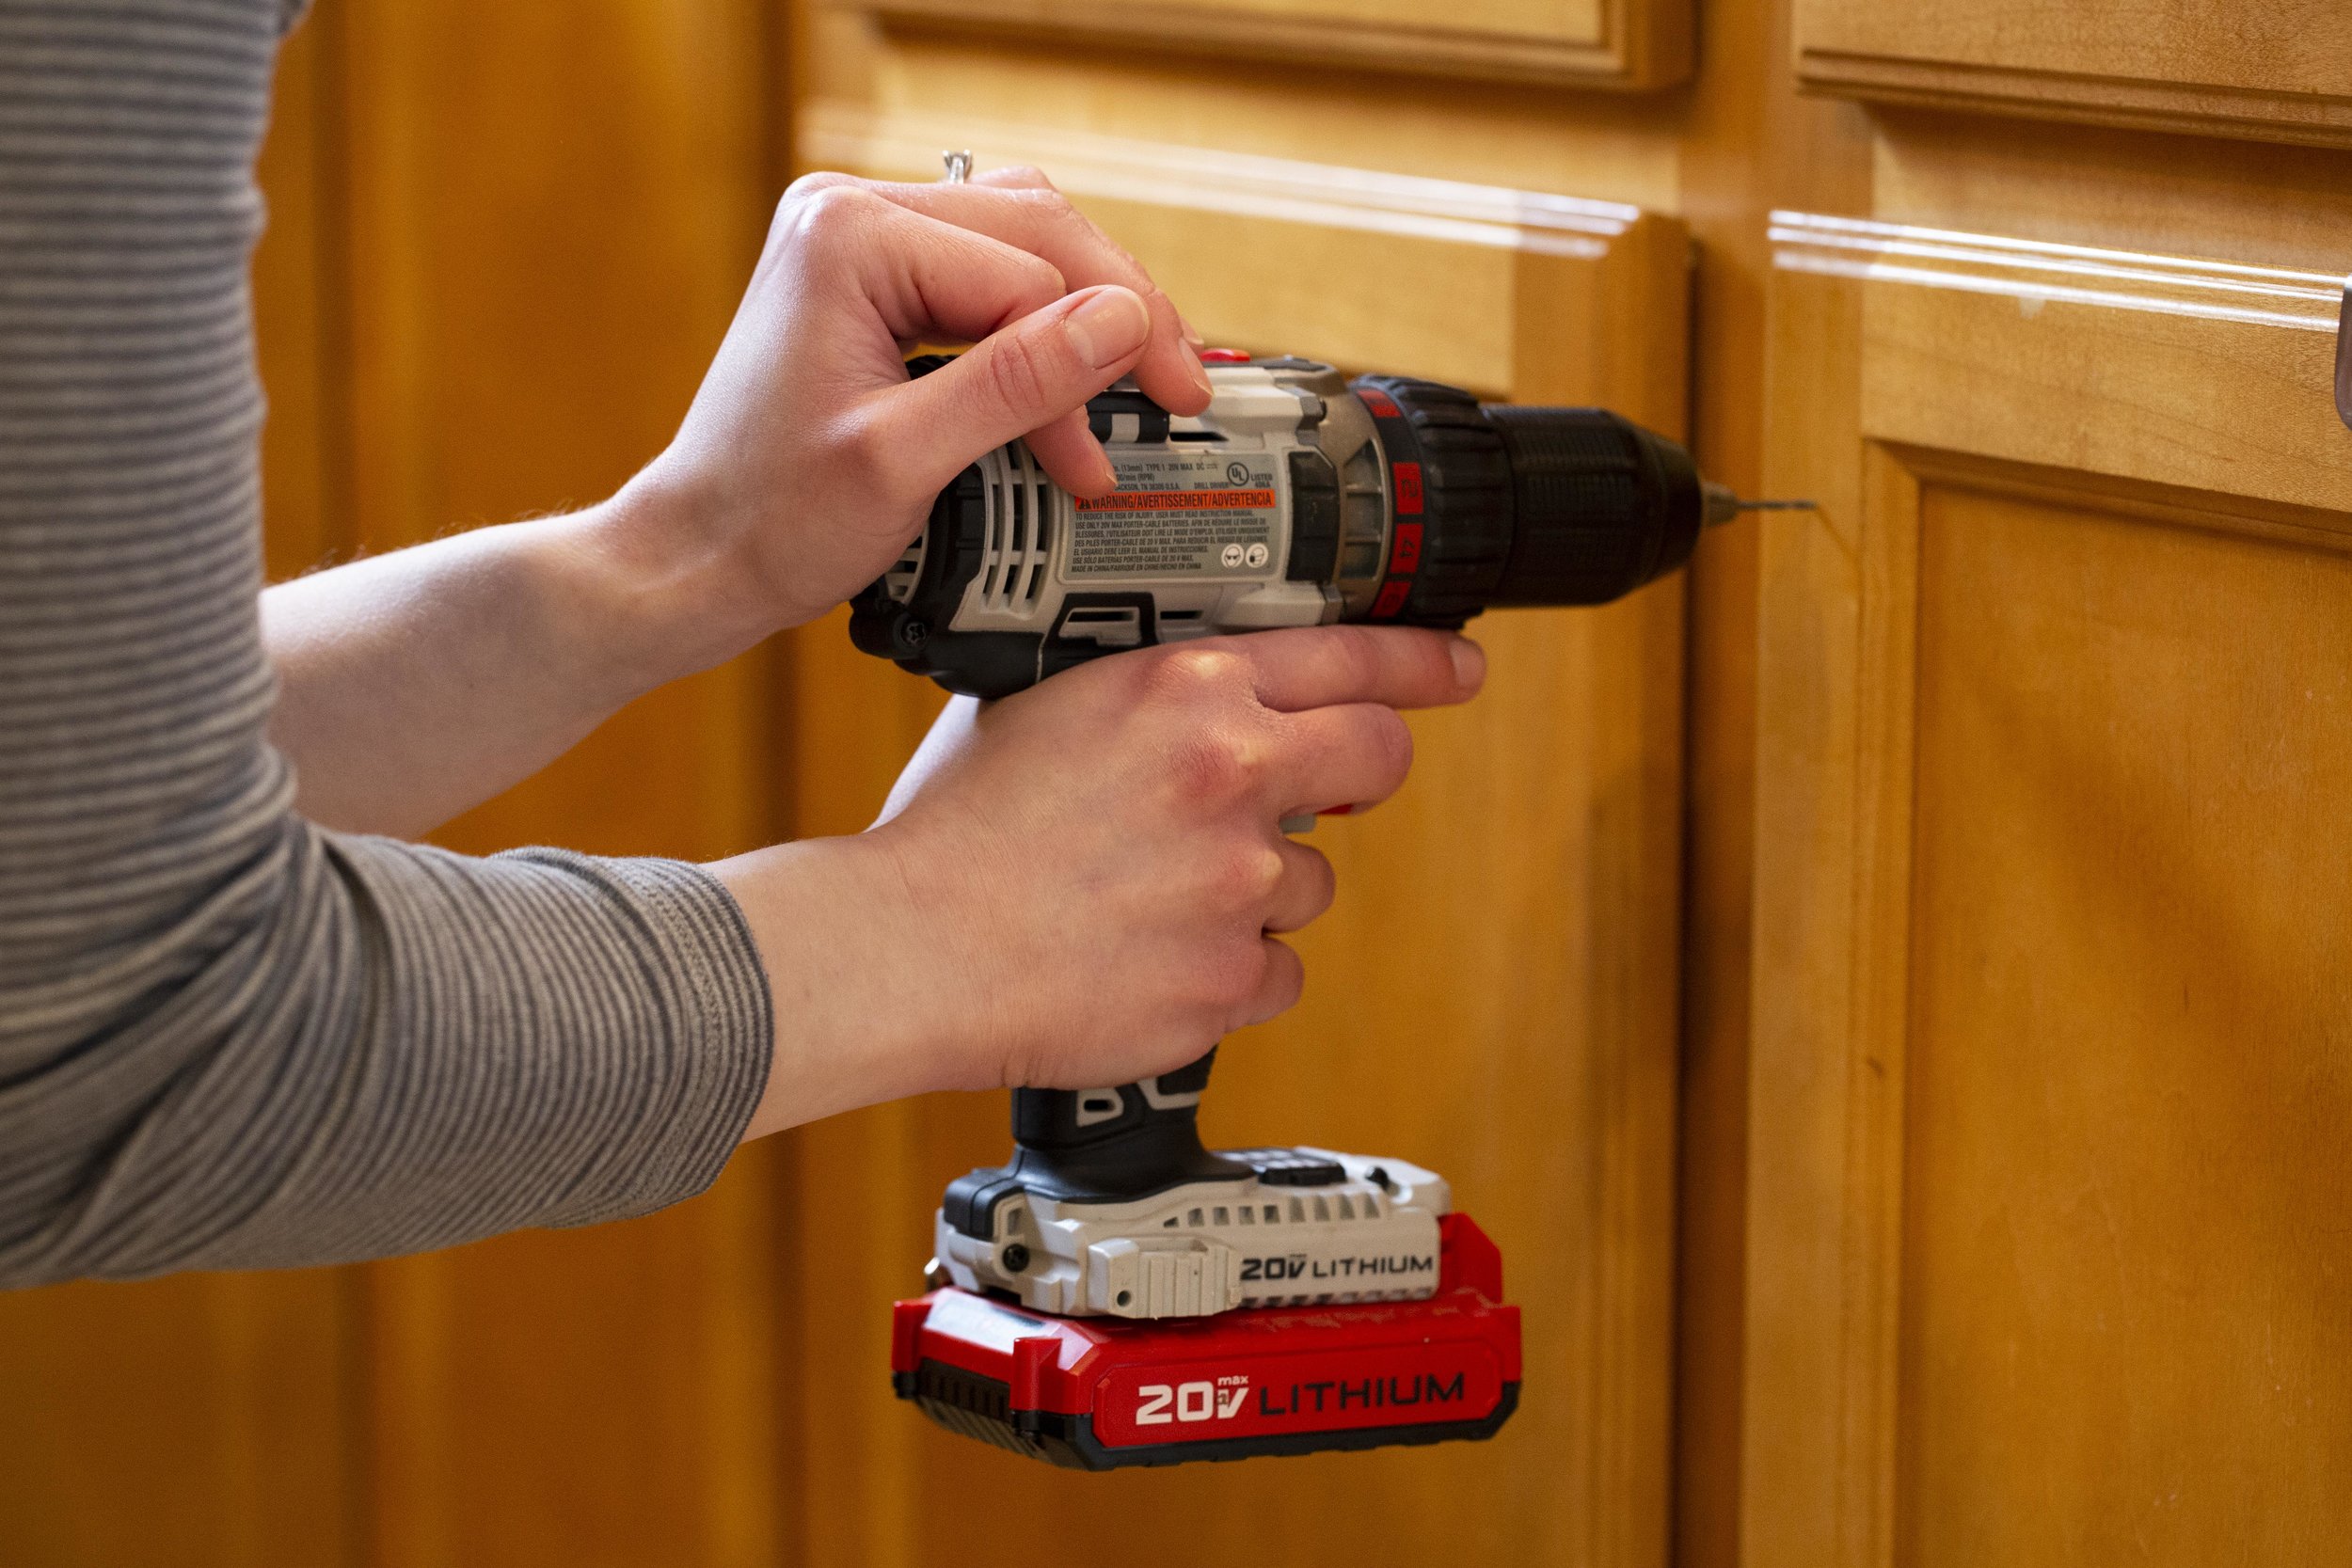
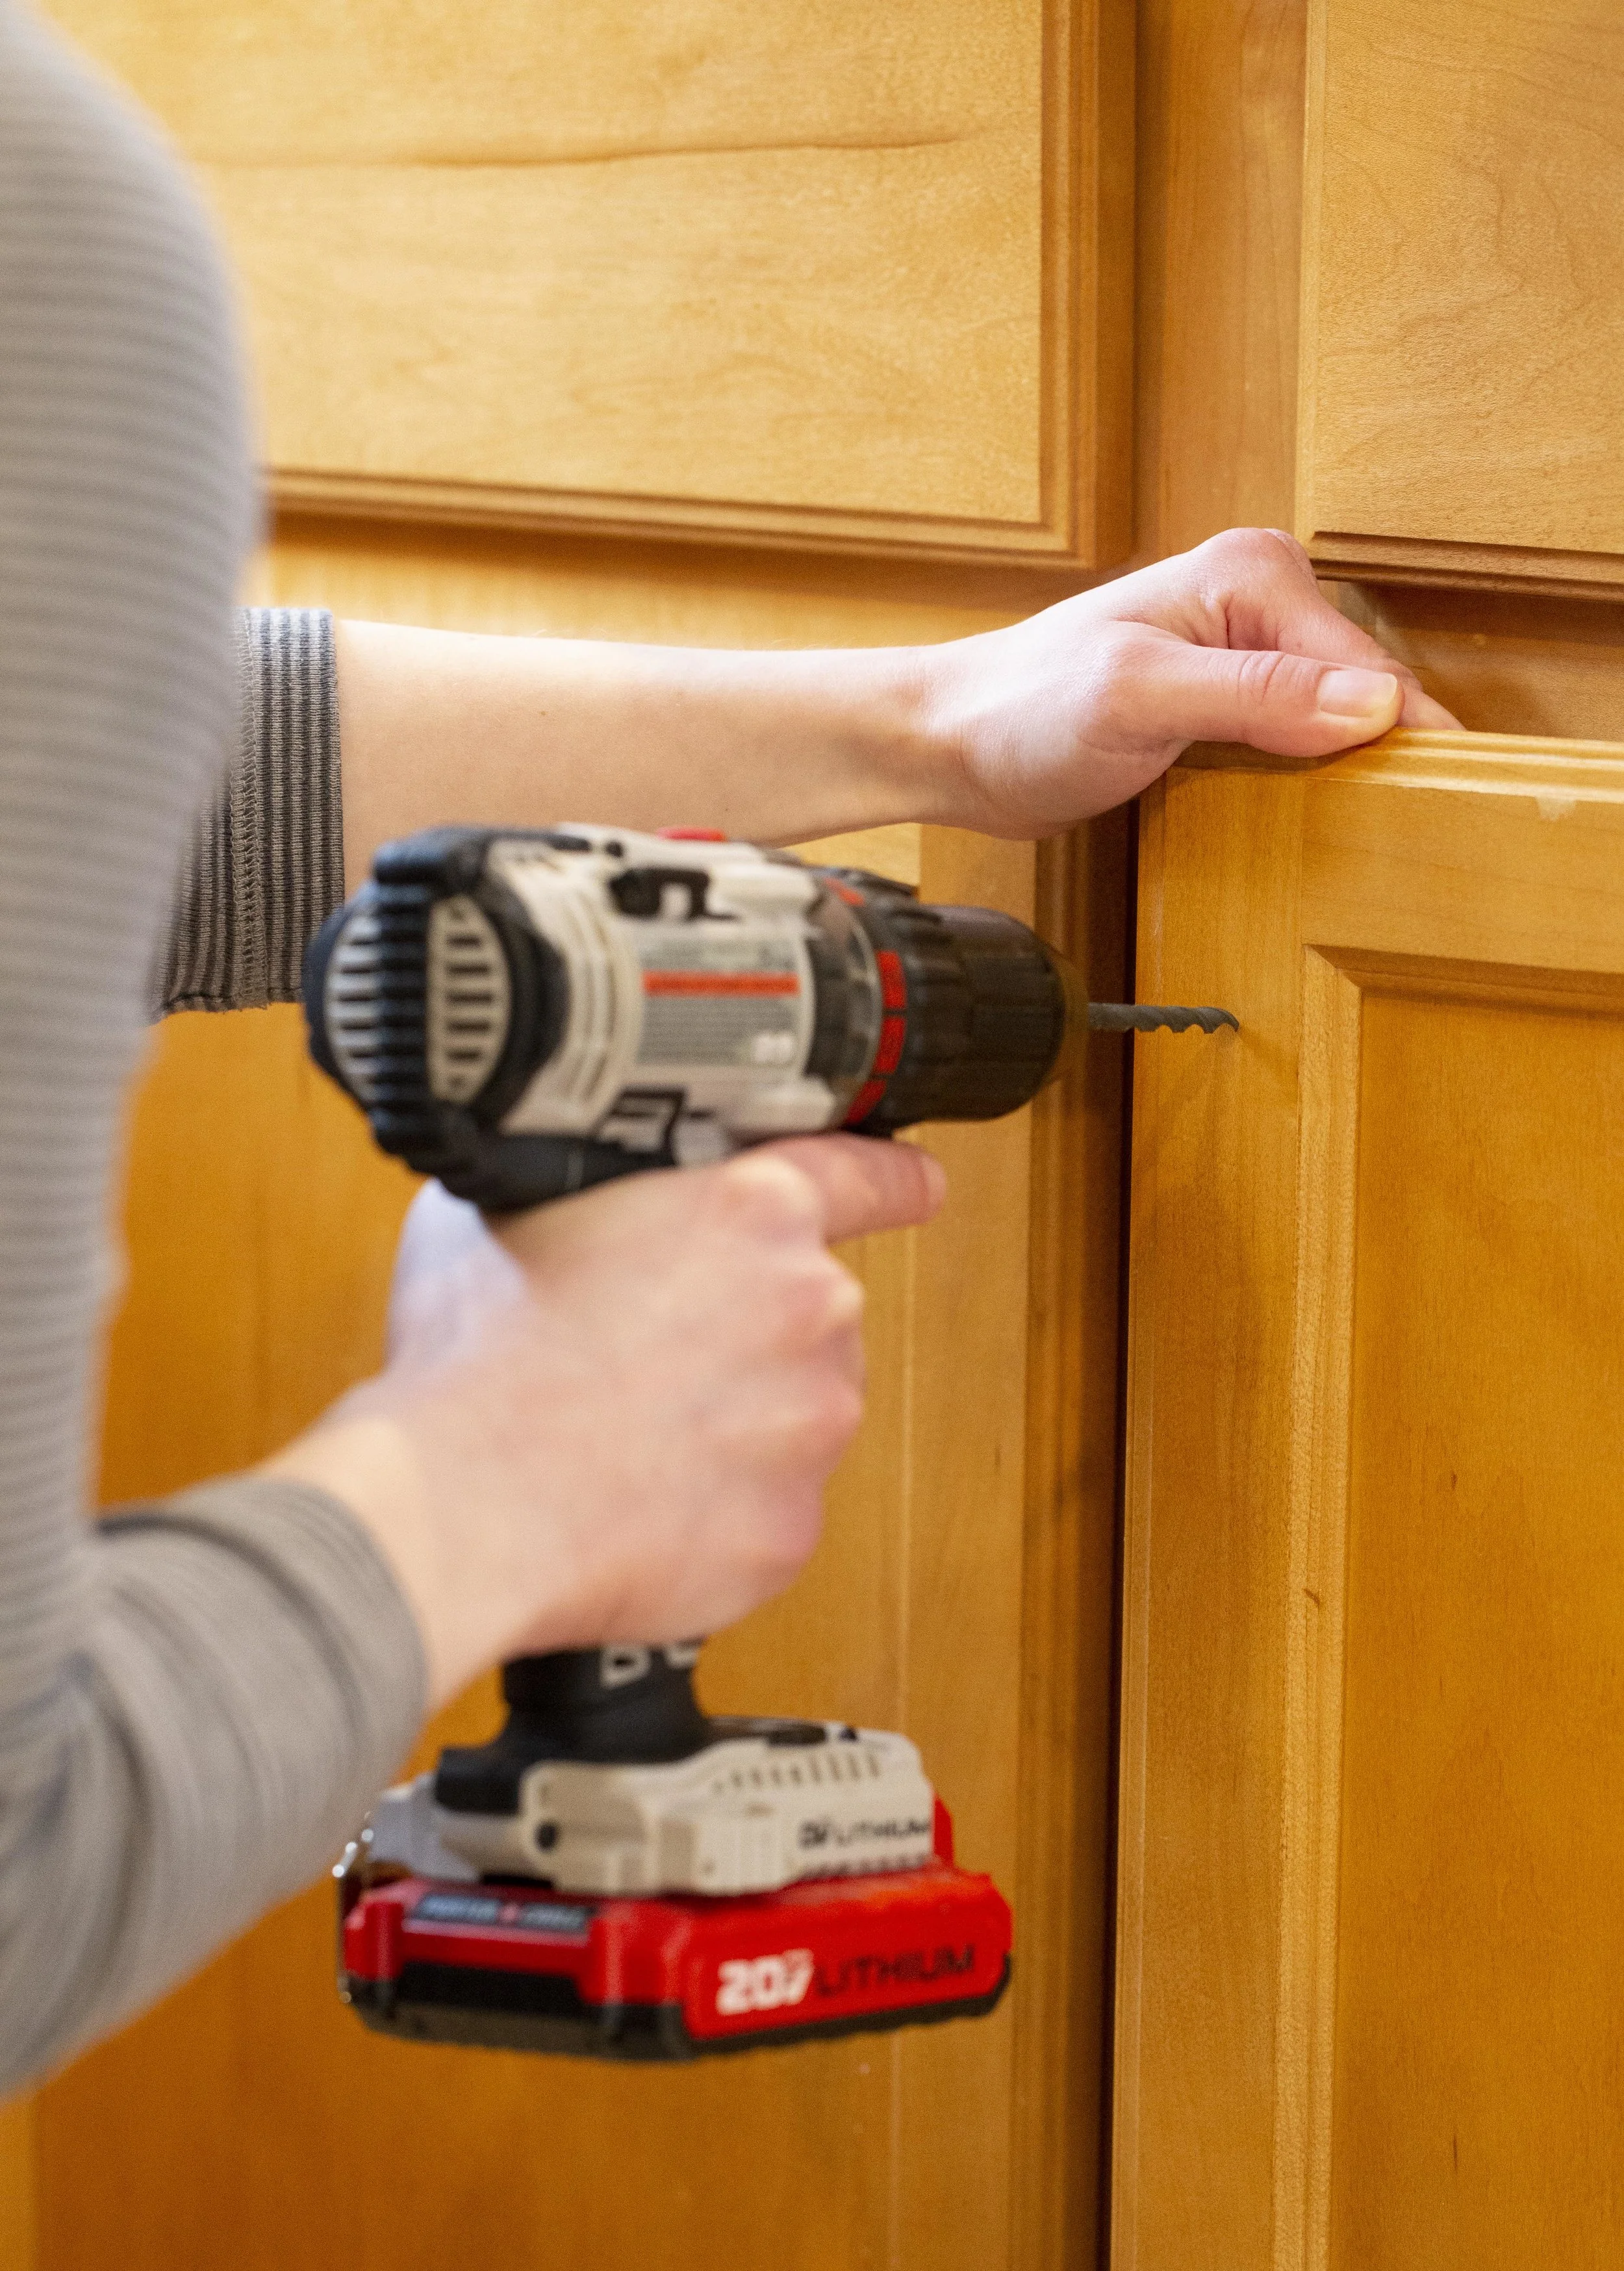
When it comes time to drill the holes, it’s important to make a small pilot (starter) hole before you drill the full size hole. There’s several reasons for this, but the two most important ones being that larger drill bits tend to “walk” when you drill on a smooth surface, and without drilling a pilot hole first you might end up off your mark. The other important reason is that pre-drilling the hole smaller first will help lessen the chance of the wood splitting. Be aware of what’s behind the cabinet front when you drill! Make sure you aren’t drilling into the cabinet frame or dishes that may be in the cabinet behind the door. For the larger hole you’ll want the drill bit diameter to be just barely bigger than the diameter of the screws that come with the hardware.
Once the larger hole is drilled, slide the screw in from the back and use a screwdriver to hold it in place while you thread the knob on snuggly.
Deciding on drawer pull placement. (Note that while the lower cabinet knobs are each in the correct place, they look off since the cabinet doors are uneven - this can be fixed by adjusting the cabinet door hinges, which I did once I was finished installing all the hardware.)
For the drawer pulls I followed a similar procedure as I did for the door fronts. One thing I had to keep in mind though is the drawer pulls I chose aren’t symmetrical top-to-bottom - the mounting screws are towards the bottom of of the pulls. Therefore, playing around with the placement of the drawer pulls was very important - the drawer pulls needed to look centered visually from top to bottom on the drawer fronts, even though that made for the screw placement to be slightly below center.
Once I liked the visual placement of the paper templates I carefully measured out the spacing on each side as well as down from the screw holes to make sure everything was accurate and even. These particular drawer pulls have screws 3” apart so I made sure that the spacing between the screw markings was accurate as well. (Once you get an idea of placement, you could also use a Cabinet Hardware Template here to help mark everything out.) In our kitchen the drawers are three different sizes, so this process needed to be repeated several times - on the shorter drawers I used one pull, and on the longer drawer I used two pulls.
After the hole placements were marked, I remeasured the spacings several times before drilling the pilot holes and then the screw holes. Then it’s simply a matter of screwing the screws in from the backside of the drawers with a screwdriver into the drawer pulls.
AFTER
And that’s it - the whole project took less than an afternoon to do and it really helps our kitchen look more finished. I just love how it came out! Once we replace our countertops with a more modern granite counter the space will really look sharp and the hardware will compliment it beautifully.
GIVEAWAY!
Head on over to our Instagram for details and to enter our Giveaway with Cosmas Hardware for a $50 shop credit so you can update the look of your kitchen too with the hardware of your choice!
- I received these items from Cosmas Hardware but all opinions expressed are my own. Please read our full Disclosure Policy for more information -
Disclaimer: Installing new cabinet hardware from scratch is something that most people can very easily do on their own and here I’ve shared my tips on the easiest way I’ve personally found to measure and install them. However, use your best judgement when installing your hardware - if you’re in doubt of your measuring or drilling skills, there’s no harm in consulting a professional before you tackle this or any project.
Looking for a super easy way to dress up your budget Christmas cards? Emboss the envelopes! We bought this Embosser on Amazon years ago for our wedding and it’s definitely earned it’s keep.
This would make a great wedding or engagement gift too. We use ours yearly for Christmas cards and throughout the year dressing up otherwise boring stationery.
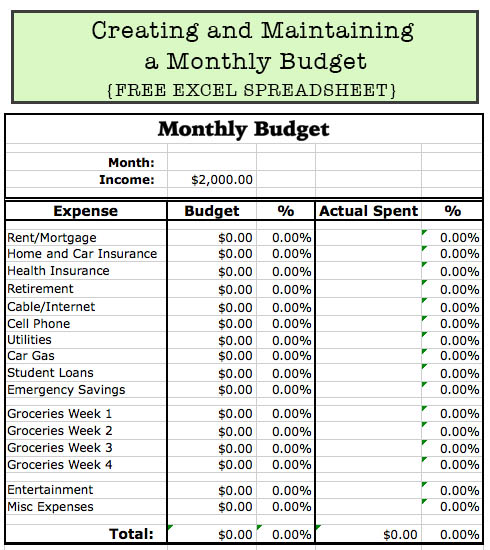
With baby #2 coming, we've been more mindful than ever about where our money is going and working hard to stay on-budget. By closely keeping track of everything we're getting a better idea on where everything is going and where we can shave off a few dollars. With only one income and a lot of expenses (both expected and unexpected) it can make it very challenging to stay on-budget each month. | This post contains affiliate links. |
Here I've shared a more simplified version of the spreadsheet we use (since we're self-employed we also need to set aside money for quarterly taxes and other expenses). You can change the Expense titles in the left hand column to fit your needs, but I've tried to include all the basic expenses that most young adults will have.
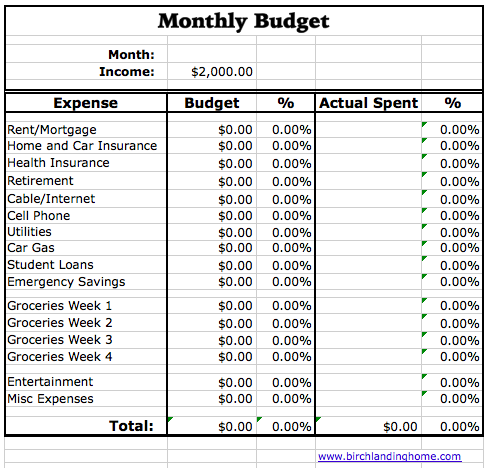
Next replace the monthly Income in the example with your own monthly income (I had to put in a number here as an example so the formulas wouldn't result in error). Then go down the Budget column and fill in what you expect or budget your bills to be. As your bills come in, put in these figures in the Actual Spent column. All of the percentages and totals will auto-update as you fill in the chart.
Over the course of the next few months, you'll see how your expectations (Budget) line up with reality (Actual Spent) and will be able to identify trends. Maybe you spend more for Gas than you thought you did.. or maybe you realize that you spend too much on Entertainment and should put some of that towards other bills...? Keeping track of where everything is going is very eye-opening and will help you stay ahead. The most important thing is writing everything down and sticking to it!
In the event the doing an Excel spreadsheet isn't your thing, there are also many great paper-based Budget Planners/Trackers you can buy out there! I haven't used it myself (yet), but I have heard great things in particular about this highly rated Budget Planner Notebook.