DIY Wooden Teal Pumpkin | Teal Pumpkin Project

Every Halloween we participate in the Teal Pumpkin Project to promote awareness and inclusion of all trick-or-treaters, no matter their dietary restrictions.  Unfortunately a lot of kids have food allergies, ranging from mild to potentially very dangerous.  These allergies can include dairy, chocolate, nuts, soy, gluten, artificial dyes, and more.  These kids either can't participate in trick-or-treat or have to throw out most of what they get - and when you're a kid that's really rough.  
| This post contains affiliate links |

DIY Wooden Teal Pumpkin | Teal Pumpkin Project

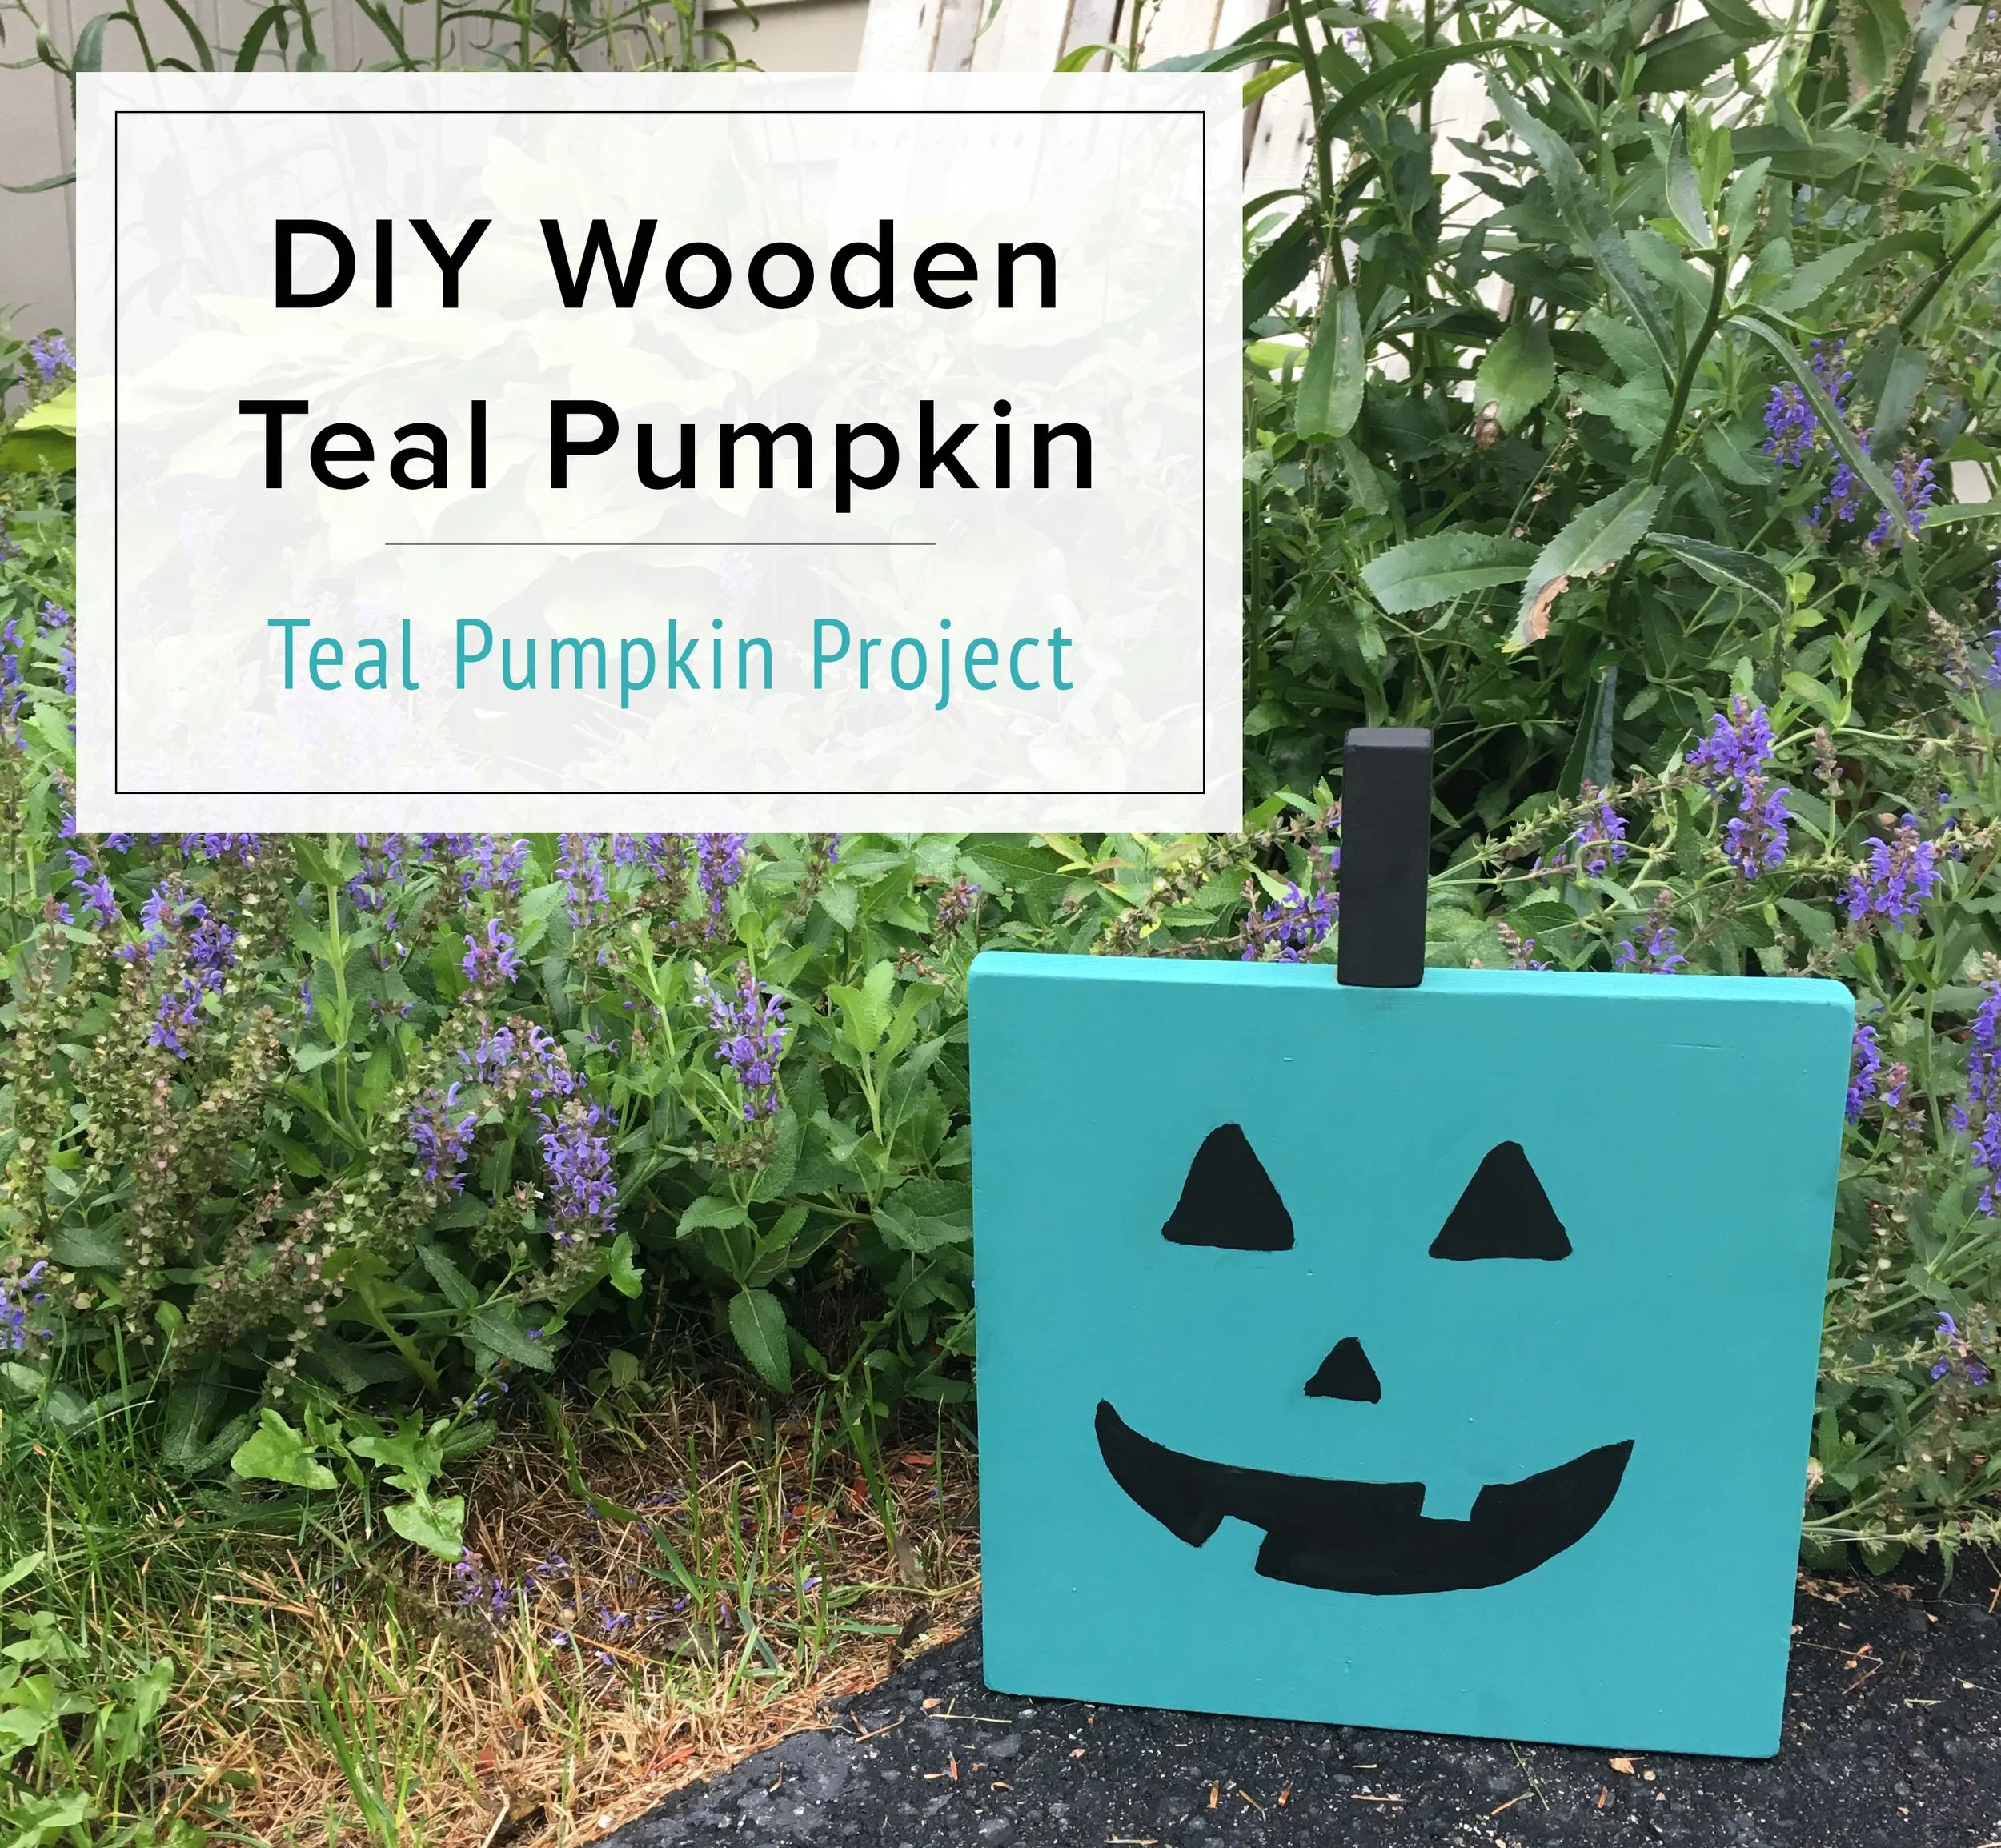
By having a teal pumpkin out, you're letting kids and their parents know that your house is a safe place to trick-or-treat and you have non-food items available. These can be things like novelty pencils, erasers, stickers, bubbles, crayons, small toys, etc.  You can still give out the usual candy, but it's a good idea to keep the non-food items separate.  This is a great project to allow all kids a chance to feel included in trick-or-treat on Halloween. 

We usually paint a real pumpkin teal each year, but this year the squirrels and chipmunks have been eating all the decorations we put out on our porch (*shakes fist*). So yesterday afternoon during nap time I whipped up a Wooden Teal Pumpkin that can be used for many years to come. And the best part? It cost me NOTHING! I made it all with scraps from our wood bin and paint we already had.

Materials:

How to:

1. Cut your wood scraps down to size if necessary. You need one larger piece for the face, one small piece for the stem, and a piece for the support at the back (the support piece does not have to be triangular, that’s what I happened to have though).

FullSizeRender.jpg

2. Next attach the support piece of wood to the back of the large piece with a screw or nail.

IMG_9594.JPG

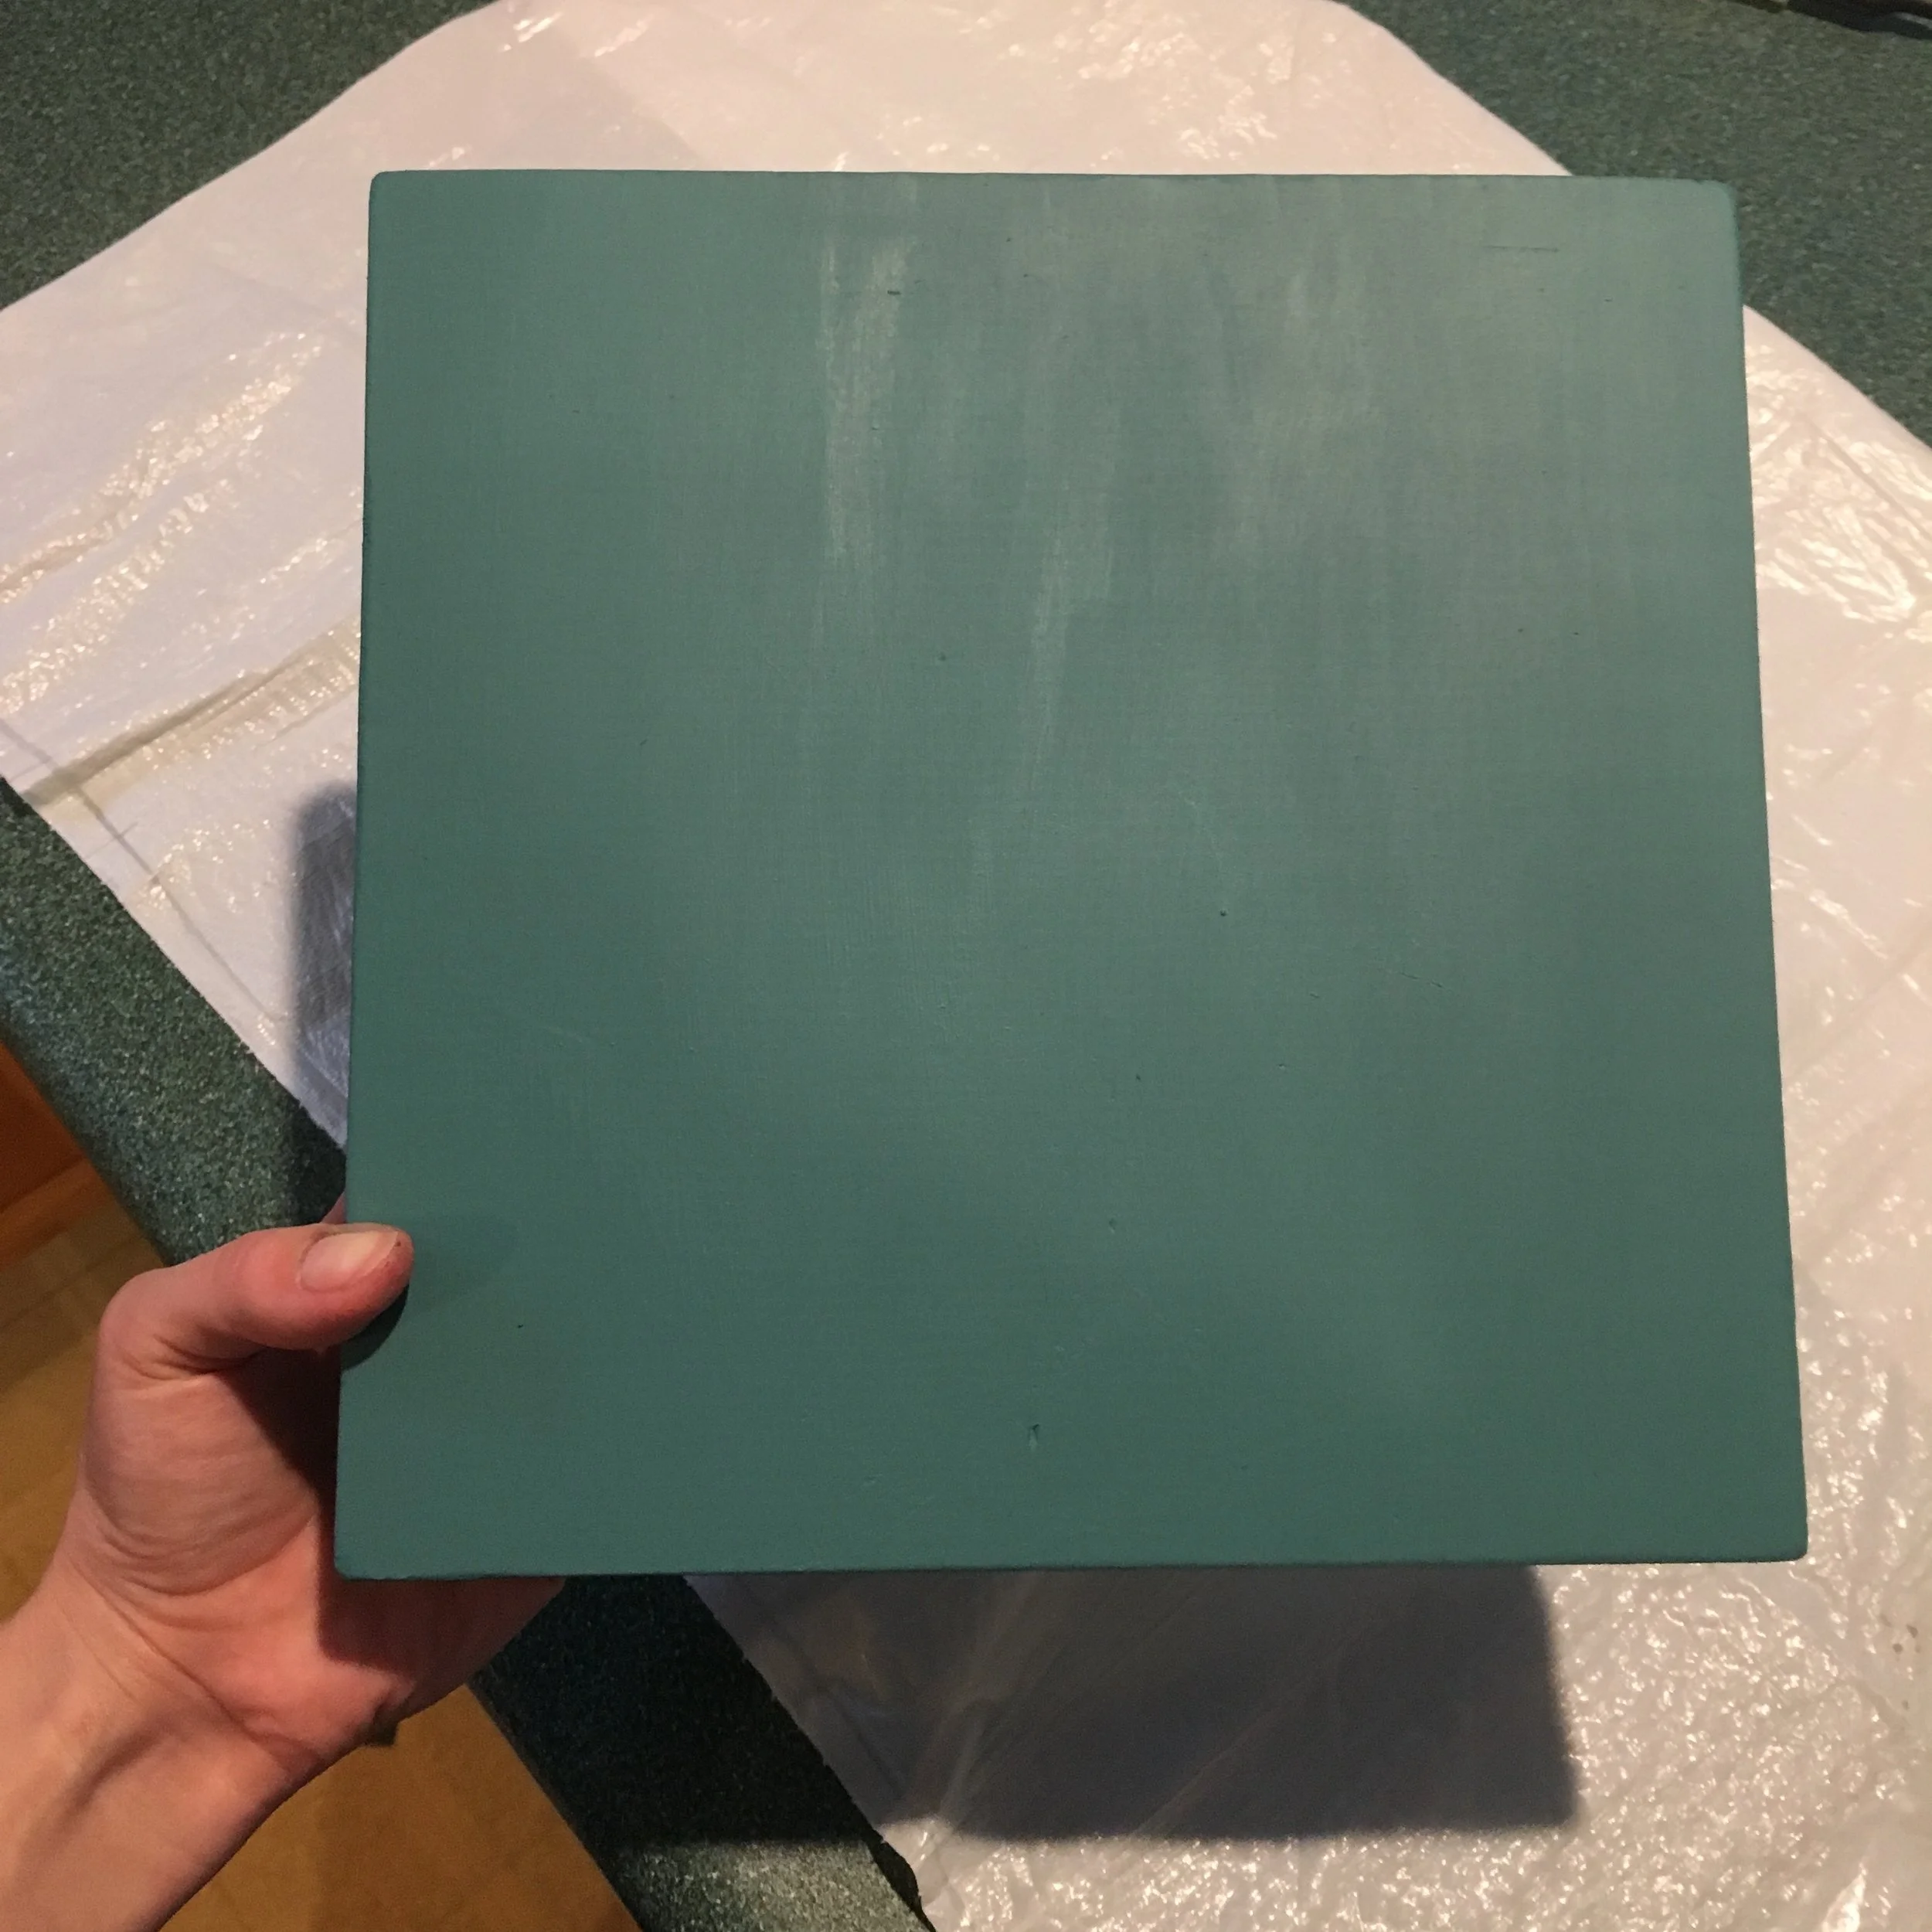
3. After that, give it at least two coats of teal paint. Paint it all over, including the sides and back.

IMG_9595.JPG
IMG_9597.JPG

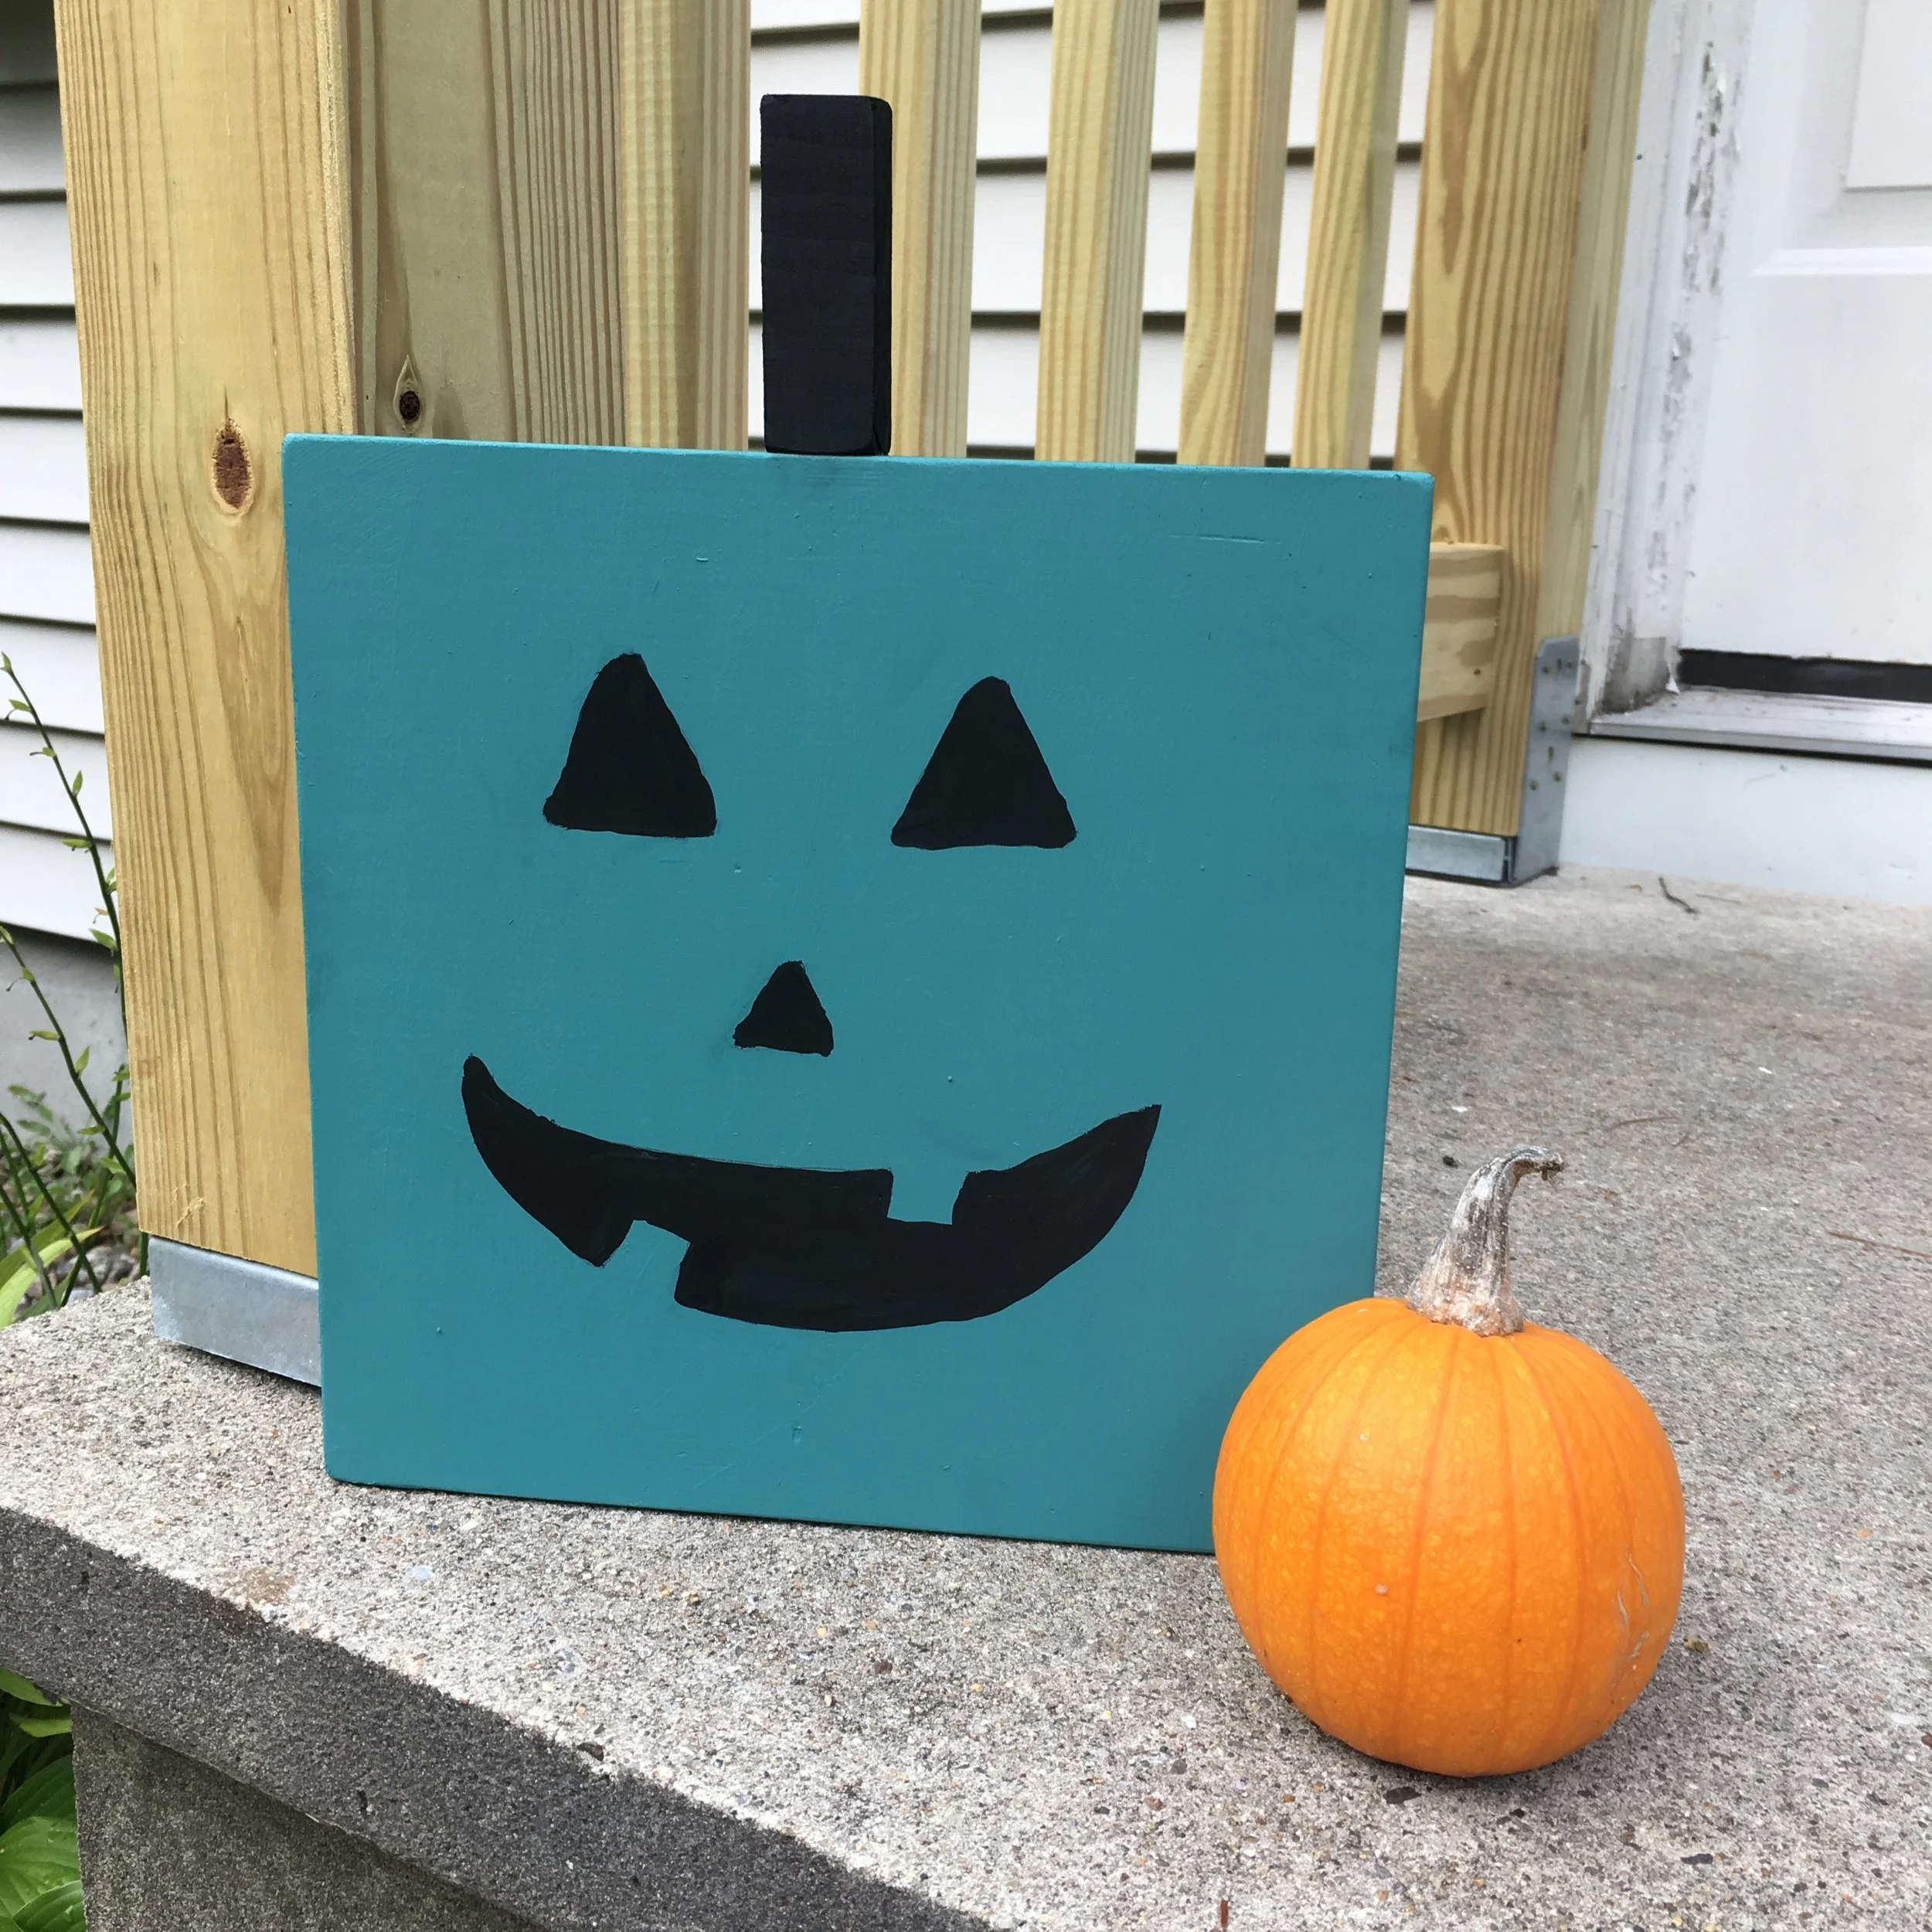
4. Once that’s dry, use black paint to paint a jack-o-lantern face on it and paint the stem piece black as well.

5. Once everything is dry use wood glue to attach the stem to the top of the pumpkin and give a good spray of clear sealer if you’ll be putting it out not under the cover of a porch, etc.

And that’s it! Now you’re ready to put your teal pumpkin out to welcome all kids for Halloween. Happy Halloween!

IMG_9603.JPG

FARE (Food Allergy Research & Education) has some wonderful resources on their website - including crowdsourcing maps to identify participating houses, printables you can use to proudly show your support and educate others, and fundraising opportunities to help fund food allergy research and awareness.

KEEP UP WITH BIRCH LANDING HOME
|  Etsy  |  Facebook  |  Instagram  |  Pinterest  |  Bloglovin'  |  Hometalk  |

Going “KonMari” on my Daughter’s Bureau

Our daughter’s bureau was a train wreck and I just couldn’t take it anymore. She’s been very much into picking out her own clothes lately and tends to dig around in her drawers until she finds what she wants, without putting anything back the way it was. Today I finally decided to tackle the disaster and emptied her bureau, folded everything in the “KonMari” style, and put it back with order.

BEFORE

BEFORE

What’s the KonMari style? Well, technically the first step is to only keep what you truly love or use, and purge the rest (I pulled out a few items that she was starting to outgrow, but most of her clothes stayed). Then you fold everything uniformly so it can stand up in the drawers and be “filed,” allowing you to see everything at once. This is a great way to fold your clothes as you can see everything all at once and keeps you from falling into the rut of constantly wearing just what’s on top.

AFTER

AFTER

As you can see I came up with a basic system for the drawer too - I grouped all her t-shirts together, then long-sleeve shirts, then sweatshirts and tank tops. (This folding technique also seems to be a lot more efficient as there’s even some empty space now!) I also tackled her other drawers too and tidied up her jeans, pants, and PJs. Overall I think it looks great and should help make getting ready for school in the morning a breeze.

How I organized it:

Going "KonMari" on my Daughter's Bureau:  AFTER

I already had my own drawers folded in the KonMari style and love it - it’s so nice being able to see all your options at once when you’re getting dressed in the morning. As for our daughter, I explained the new setup to her and she understands it (she was honestly really excited about her neat drawers when I first showed them to her) - but the reality is she’s five years old and there’s no way it’s going to stay this organized on it’s own. I also don’t think it’s worth nagging her over it to keep it this way, it’s really not a fair expectation for a five year old. So, we’ll see how long this lasts… I’ll do my best to tidy it up when I can and try to keep some semblance of order but it won’t always be picture-perfect and that’s okay. That’s life ;)

One Week Update: She actually kept the system perfectly! Just a few things had fallen over and one item was crumpled up and put back, but 95% of it was still perfect. I’m super impressed that an almost 5-year-old can keep the system that neat. But it goes to show, that if she can do it - so can you!

Related Post:

KEEP UP WITH BIRCH LANDING HOME
|  Etsy  |  Facebook  |  Instagram  |  Pinterest  |  Bloglovin'  |  Hometalk  |

Favorite Find: "Find Momo" Books

We’ve been huge fans of Momo for years (in fact he’s my celebrity crush! haha). If you’re on Instagram you likely know exactly who Momo is - he’s a sweet border collie who’s always playfully hiding while out on adventures with owner Andrew Knapp. | This post contains affiliate links |

“Find Momo” became an incredibly successful series on Andrew's Instagram that turned into three, and soon to be four, books. These books are great for grown ups and kids alike; our girls LOVE Momo, especially our 4 year old. She really enjoys looking through the pictures, trying to find Momo. It’s just like Where’s Waldo, but a whole lot cuter! When she was just learning to talk, she got a great sense of accomplishment finding him, pointing him out, and declaring "MOMO!"
We’re really looking forward to the fourth book, "Find Momo Across Europe" coming out later this winter and can't wait to see all the cool places Momo and Andrew have adventured to.

Favorite Finds:  "Find Momo" Books are perfect for all ages!

Shop “Find Momo” Books:

KEEP UP WITH BIRCH LANDING HOME
|  Etsy  |  Facebook  |  Instagram  |  Pinterest  |  Bloglovin'  |  Hometalk  |

Money Saving Tips for Back-to-School

Sending the kids back to school usually means shelling out a lot of money on school supplies, clothes, and more.  Here are some of my tips on how NOT to go broke this fall.  | This post contains affiliate links | 

Money Saving Tips for Back-to-School

Invest in a Good, Basic Backpack and Lunchbox

Question:  How many parents buy their kids new backpacks and lunchboxes every single year? 
Answer:  Wayyyy too many! 

There's really no reason to shell out money that often on items that can can stand the test of time if you pick them right. I highly suggest NOT picking a character or crazy pattern backpack or lunchbox. Kids' tastes change from year to year (and sometimes week to week), and if you pick themed or cheaply made items they will not last. Our general guideline is upgrading backpacks once every "big transition" in school - so one backpack to last kindergarten through elementary school, a new one to last through middle school, and then finally a new one for high school. We love solid-color backpacks from high-quality companies like LL Bean - you just know they're going to last and never go out of style. (Pro-tip: check out the Outlets to get great, name-brand backpacks for less!)

Consignment Shop for Back-to-School Clothes

If you've been following the blog for any amount of time now, you know I'm a big fan of consignment selling and shopping.  It's a great way to get rid of any clothes or shoes your kids might have outgrown or refuse to wear and make some money back to use on gently used, name-brand "new" items.  That way you're essentially "trading up" for new clothes, and spend a lot less out of pocket. 
{You can read more on my Consignment Selling and Shopping Tips HERE}

Quality backpack and clothes from a consignment shop stretch your back to school budget farther!

Buy Snacks in Bulk and/or Store Brand

If you pack your child's snacks and lunches the cost can definitely can add up over time.  One way to save is to buy in bulk whenever possible.  If you can buy prepackaged snacks in larger quantities the price-per-item is a lot lower.  Buying store brand items over name brand is another great way to save.  

Reusable Water Bottle

Juice boxes are expensive (and arguably unhealthy), so having your child take a reusable water bottle to school saves a lot of money and also helps keep their sugar intake in-check.

Reuse Last Year's School Supplies

Money Saving Tips for Back to School

A lot of times the school supply list will include things like a set of binders, markers, glue, a pencil case, etc.  Many times there's no reason to repurchase these things - they can often be reused from year-to-year.  Empty out the old papers from last years binders and reuse those.  And the makers, crayons, glue sticks, etc?  They likely have plenty of life left - no need to buy more just yet!  

Coupon and Rebate Apps

And of course, a great way to save if you need to buy items is to use coupons or rebates whenever you can. We really love Coupons.com for printing coupons and the rebate app Ibotta for earning money back on purchases. At the beginning of the school year, coupons and rebates on back-to-school items are usually plentiful, but make sure to only buy what you really need!

KEEP UP WITH BIRCH LANDING HOME
|  Etsy  |  Facebook  |  Instagram  |  Pinterest  |  Bloglovin'  |  Hometalk  |

Back-to-School Amazon Picks

It's almost that time!  Are you ready for back to school yet?  
I've put together a list of some of my favorite Amazon back-to-school finds for all ages and grade levels.  | This post contains affiliate links |

Back-to-School Amazon Favorites!

KEEP UP WITH BIRCH LANDING HOME
|  Etsy  |  Facebook  |  Instagram  |  Pinterest  |  Bloglovin'  |  Hometalk  |

Shop my Amazon Favorite Finds with Ease!

Amazon Influencers now have categories which makes browsing my Favorite Finds so much easier!  Check out my lists and let me know if you have any questions on the products - I have different lists for Home, Kitchen Favorites, DIY Supplies + Tools, Fashion + Beauty, Outdoors, and Baby + Kid Items. 
| This post contains affiliate links |

Shop Birch Landing Home's Amazon Favorites with Ease!

KEEP UP WITH BIRCH LANDING HOME
|  Etsy  |  Facebook  |  Instagram  |  Pinterest  |  Bloglovin'  |  Hometalk  |

Pain-Free Childbirth: My Hypnobirthing Experience

When you're a first-time mom, the idea of childbirth can be pretty terrifying.  Of course it doesn't help that everyone is always quick to share their horror stories with you which just adds to the stress and the fear of the unknown.  The bottom line though is that everyone's labor and birth experience is different - and yours doesn't have to be stressful, painful, or scary.  It IS possible to have a pain-free natural labor and delivery.  | This post contains affiliate links | 
Disclaimer:  This post shares my personal experience and is not medical advice - please always consult with your doctors for what's best for you and know that everyone's birth experience is different.

Pain-Free Childbirth:  My Hypnobirthing Experience

For our first baby, I was induced (she was a week late) and through guided relaxation and trusting my body to do it's job I can honestly say I felt no pain during labor or her birth.  The whole experience was still absolutely exhausting, draining, and overwhelming at times - but I never felt anything I can describe as pain.  In fact, towards the end of my labor I stopped feeling the contractions and even dozed through some of them.  It's incredible what a woman's body is capable of, and how much you can control mind-over-matter.  

Here is how I was able to have a pain-free, natural delivery:  

Do Your Homework

During your pregnancy read up on labor and delivery techniques. Know that anything is possible and learn all your options, but really focus on learning and practicing all of the relaxation techniques. I particularly liked The Pregnancy Book and The Birth Book. Both books had overall very positive messages and covered everything from natural birth to epidurals to c-sections, but The Birth Book especially talked about natural birth coping techniques. Doing this homework really lays the groundwork to mentally prepare yourself for labor and birth, and being mentally prepared is most of the battle.

Tune out Negative, Seek out Positive Stories

When you're pregnant, everyone will give you unsolicited advice - from your friends and family to total strangers in the grocery store - and probably 95% of these stories will be negative.  It's hard not to let all the horror stories get to you after awhile but really try to tune these out because your birth experience doesn't have to be like that.  When someone has a positive story to share, pay attention - viewing the whole process with a more positive mindset will help you see that a wonderful birth story can be possible.  

Take a Hypnobirthing Class

This was something I actually did not do... I lucked out being able to hypnobirth without formal training (being mentally prepared, having wonderful support people, and a little luck allowed me to be successful without training, but I'm probably an exception).  By taking a hypnobirthing class you will learn about all the natural coping techniques and be given time to practice and visualize how you hope your birth to go.  All of this will help you be more mentally and physically prepared for delivery day.  

Hire a Doula

When you go to the hospital to deliver, you have no choice on which nurse you will get.. and for all you know you might get the one that will just rub you the wrong way.  The L&D nurses also tend to come and go throughout your labor.. they will check on you and stay with you if necessary, but otherwise you'll labor a lot on your own especially in the beginning.  A Doula is your own personal labor support person - someone who has experience and training attending births and helping the laboring mother.  A Doula is not a doctor or a nurse, and will not make medical decisions, give medical advice, or deliver the baby.  She is strictly there to be your personal cheerleader and coach you on ways to make your labor more comfortable.  By choosing your doula, you decide who will be there to support you and can pick someone you feel comfortable with and enjoy.  

Our Doula came armed with a bag of "labor tricks" - which included aromatherapy, relaxing music, spiky rubber handles for you to squeeze (the discomfort of squeezing them with your hands is supposed to help distract you from the discomfort of your contractions), tennis balls to massage your back, and LED candles to give the room a relaxing atmosphere.  She also was a certified lactation consultant and had a certificate in hypnobirthing so she knew all the relaxation techniques.  

Create a "Birth Wishes" List

I say Birth Wishes instead of Birth Plan here because nothing about your labor and delivery may go "to plan."  If you have a "plan" that tends to fall in the mindset of expecting your birth to go exactly a certain way and that's almost never the case... but by having "wishes" you set yourself up to be more flexible with the whole situation.  When you write your Birth Wishes list make sure to phrase it all as wishes too, in order to keep that flexible mindset (for example, don't write "I will not have an epidural" or "I will do skin-to-skin", but instead say "I would like to labor all naturally for as long as possible, hopefully the entire time.  I hope to have a natural birth" or "I would like to do skin-to-skin immediately after the birth").  

Definitely write out a "Birth Wishes" list as it will help you visualize how you'd like things to go, and will give your medical team an idea of what things you do/do not want to do - but keep in mind it can all change at any time, some things are just beyond your control.  

Start Relaxing from the First Contraction

In the beginning of labor your contractions can start out slow and not bothersome.  You may be able to move and talk through them at first or at least stop and easily let them pass over you.  Even if they're easy to deal with in the beginning it's important to set yourself up for success for the remainder of your labor and start relaxing now.  Relaxing when something hurts seems counterintuitive (after all, if you stub your toe you tend to tense up, right?), but by totally relaxing during contractions they will actually hurt less because you're not fighting it and you're letting your body do it's job.  The best way I can describe this total relaxation is letting yourself "melt."  When you're having a contraction just let yourself become a puddle on the bed or in your chair, etc.  And if you're standing, have your husband support you and just let yourself melt.. let your knees go soft and your arms and head drop and have him hold you.  It's so important to not hold any tension anywhere in your body during the contractions, and the more you're able to relax the easier it should be.  Having a Doula really helps here because she can help coach you through the relaxation ("relax your jaw, relax your fingers, let your shoulders drop...").  After a few hours of coached relaxation, my body went on autopilot and I honestly didn't even feel the contractions anymore and was even able to doze through some of them.  

Don't Watch the Clock

Once you're safely laboring in the hospital, put your phone away and pay no attention to the clock.  Time means nothing in labor... some women labor for minutes, some for hours, and yes.. some even labor for days.  The important thing is to take each contraction one at a time - it doesn't matter how many contractions you've had or how many more are to come, all that matters is the moment you're in now.  Taking it one contraction at a time is the easiest way not to feel discouraged or overwhelmed, just take it one step at a time.  

Save the Tub as your Last Resort

If you have access to a labor tub, it's heaven.  The warm water and being able to let yourself float during contractions is just such a huge relief.  However, you don't want to play that card early in your labor since the relaxing effects of the tub tend to wear off the longer you're in it.  Instead save the tub until you just can't take the contractions anymore (like during the Transition Phase of labor), then savor all the warm relaxation the labor tub has to offer - it'll feel like heaven.  

Realize that Sometimes Decisions are Made For You

Above all, go in with a positive mindset and ready to relax yourself through labor but understand that ultimately sometimes decisions will be made for you in the best interest of you and your baby's health.  For us, I was lucky enough to successfully hypnobirth our first baby and have the incredible all-natural birth experience I always wanted.  However, for our second pregnancy baby #2 stayed breech and just would not turn.  For us this time, I did not get the opportunity for an all-natural birth but instead had a planned c-section - and guess what?  It was still incredible!  No matter how your baby is delivered it's an amazing experience - enjoy and savor it.  

Best of luck, Mamas!!  


Disclaimer:  This post shares my personal experience and is not medical advice - please always consult with your doctors for what's best for you and know that everyone's birth experience is different.

KEEP UP WITH BIRCH LANDING HOME
|  Etsy  |  Facebook  |  Instagram  |  Pinterest  |  Bloglovin'  |  Hometalk  |

Bottle Feeding Tips with Nûby

Introducing a bottle can be difficult at first, especially if your baby had been exclusively breastfed.  Here are a few quick tips on ways to make bottle feeding easier.  | This post contains affiliate links and an honest review on products provided by Nuby |

Bottle Feeding Tips with Nuby

When our little one was about 3.5 months old we had no choice but to make the switch from exclusively breastfed to formula fed because she was unable to digest my breastmilk (if you'd like, you can read more about that HERE).  Going cold turkey from breast to bottle was hard on everyone and I definitely learned some lessons along the way.  

Bottle Feeding Tips

Use a "natural-shaped" bottle

In the beginning we tried a lot of different kinds of bottles to see what our baby would take. It was a lot of trial-and-error at first but we quickly found that she took best to bottles in a natural shape that mimics the shape of a breast, like Nuby's Natural Touch Bottles - rather than the traditionally-shaped narrow bottles. For her, latching on to a natural bottle was easier and more instinctive.

Nuby's Natural Touch Infant Bottle

Use bottles with fewer pieces to clean

One of the first bottles we had tried was a specialty bottle that literally had 7 pieces to it that had to be taken apart and cleaned every time you used it.  It was such a daunting and tedious process and ain't nobody got time for that!  Thankfully using a simpler bottle system (like Nuby's Natural Touch Bottles), was a lot easier since they only have three easy-to-clean pieces - the bottle, the nipple, and the collar.  

Using Nuby's Natural Touch Infant Bottle

Find a comfortable and consistent place to feed in the beginning

When we first introduced the bottle, our baby just wouldn't have it.  I initially tried bottle feeding her in the rocking chair I always nursed in but it just made her so mad because she was reminded of nursing.  I quickly realized that in our case she needed somewhere new and comfortable to be her new feeding spot so we switched to a little bouncy chair on the floor which really helped.  She sits in the chair at a comfortable, somewhat upright angle that's perfect for her and I sit on the floor facing her to feed her.  

Introduce the bottle when baby is well rested and not starving

When you first start introducing a bottle to your baby, it can be very overwhelming to them so it's best to set yourself up for the highest chance of success!  Your baby will likely get easily frustrated because it's something new, so try not to push the matter when they're overtired or starving.  A calm baby will be more likely to try to figure out the bottle rather than just melt down at the first sign of frustration.  

Be Consistent

Consistency is key.  Even if your baby hates bottle feeding, keep trying and keep offering it regularly until they get the hang of it.  It can be so hard in the beginning but hang in there!  

Nuby Natural Touch Bottles - 3 Pack
Nuby Parent Blogger

- I received this item for review from Nûby but all opinions expressed are my own.  Please read our full Disclosure Policy for more information - 

Nûby's Natural Touch Infant Bottle with Easy Latch Nipple can be found at Wal-Mart, Babies 'R Us, and Amazon.  

KEEP UP WITH BIRCH LANDING HOME
|  Etsy  |  Facebook  |  Instagram  |  Pinterest  |  Bloglovin'  |  Hometalk  |