One Minute Fluffy Egg Sandwich Hack

Now that we’re always eating at home and not going out for breakfast it’s great to have a fast and easy no-mess egg sandwich that you can make quicker than than it would take you to sit in the drive-thru line. This trick will make the perfect fluffy egg sandwich start-to-finish in just about ONE MINUTE. For reals. | This post contains affiliate links. |

One Minute Fluffy Egg Sandwich Hack
One+Minute+Fluffy+Egg+Sandwich+Hack

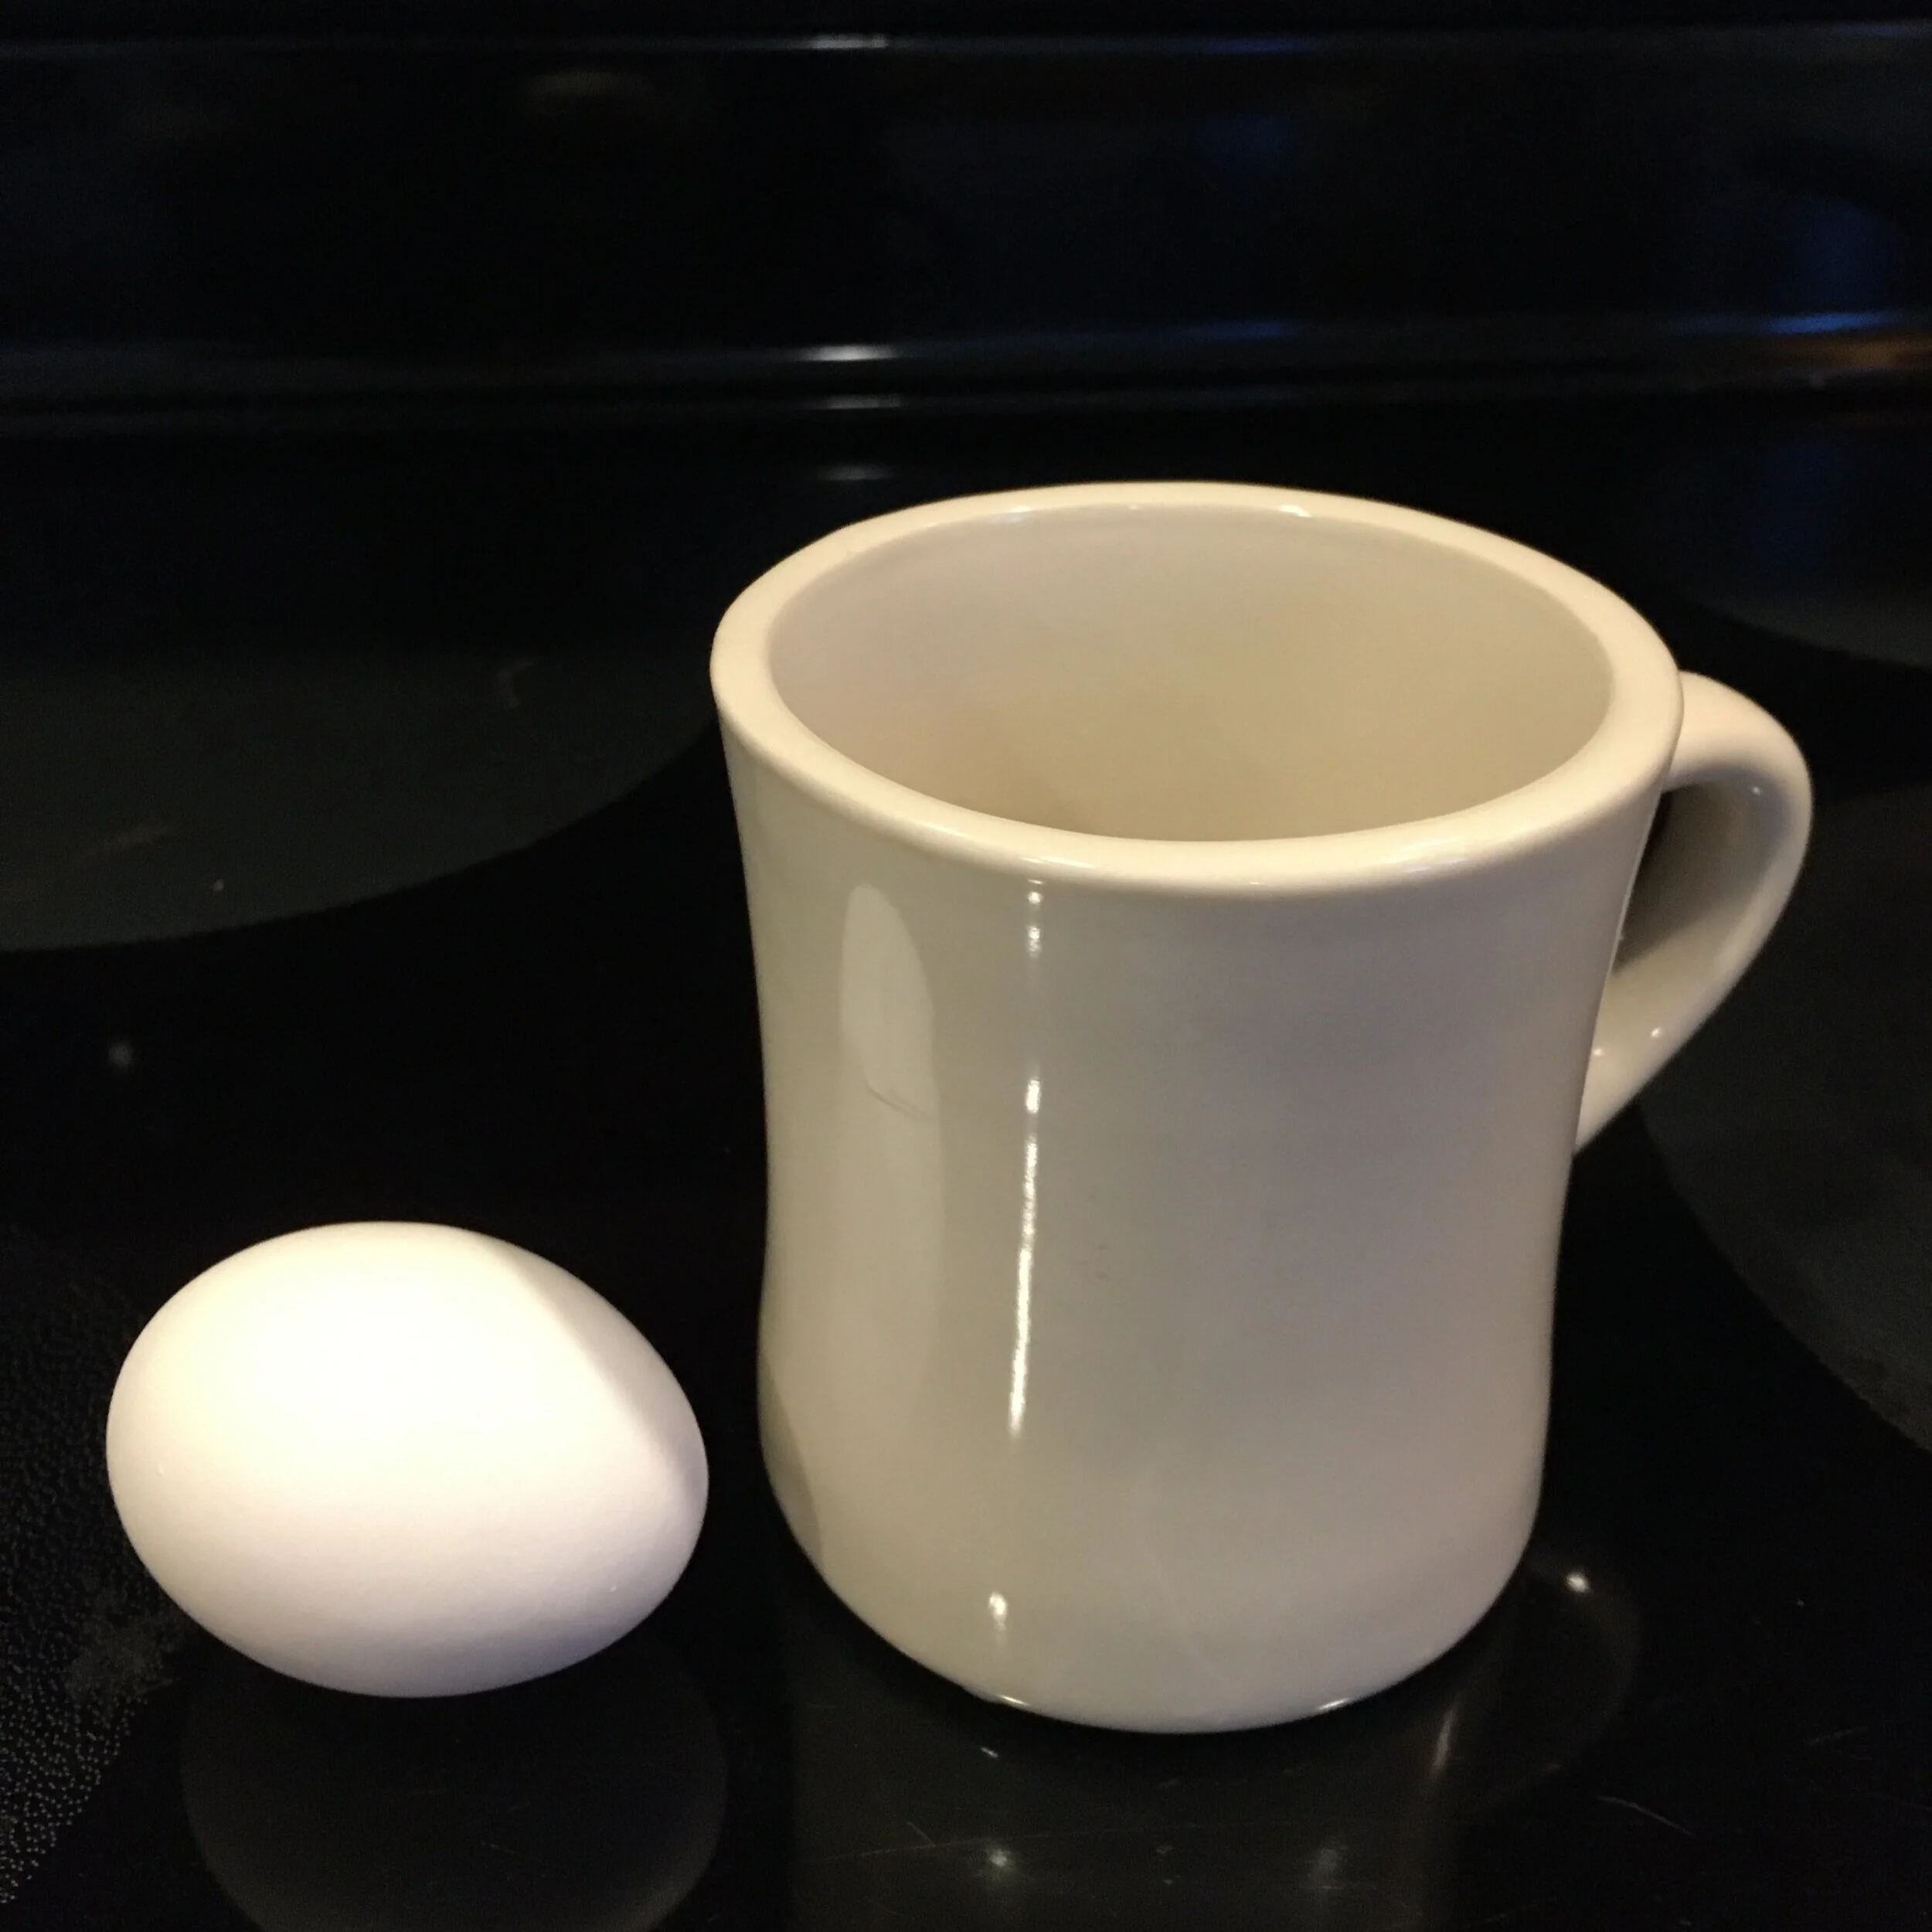
Really, this “recipe” couldn’t be any easier… the bottom line is you will need an egg, an English muffin (or some type of bread), a microwave-safe coffee mug, and a microwave. That’s it!

You might also want some shredded cheese handy, small diced precooked veggies (leftovers from the night before work great), hot sauce - or any other topping of your choice.

One Minute Fluffy Egg Sandwich Hack

First, crack the egg into your microwave-safe coffee mug and “whisk” with a fork to break up the yolk. Now is also the time to add a generous pinch of shredded cheese (shown here) or a small amount of chopped pre-cooked veggies (leftovers work great). Put the mug in the microwave and cook on high/normal for one minute* (*please note that depending on your microwave model and what you add, you may need to adjust your cook time. Also DO NOT microwave fork.) While the egg is cooking you can toast your bread, if desired.

One Minute Fluffy Egg Sandwich Hack

Once the egg is done make sure it is cooked throughly (it’s opaque with no runny spots and steaming all the way through) by checking with a clean fork and loosen it from the mug. Then simply turn the egg out onto your bread and add any condiments you desire - I personally can’t eat eggs without hot sauce.

And that is it! Once the coffee mug cools, just soak it in the sink to loosen any stuck-on egg and run through the dishwasher like normal. No pans to heat up or clean after which is a huge plus in my book. Enjoy your easy breakfast :)

One Minute Fluffy Egg Sandwich Hack

Disclaimer: Please note that depending on your microwave model and what you add, you may need to adjust your cook time. Make sure your egg is fully cooked before eating.


KEEP UP WITH BIRCH LANDING HOME
|  Etsy  |  Facebook  |  Instagram  |  Pinterest  |  Bloglovin'  |  Hometalk  |

Sheet and Towel Stripping How-To

While home for Quarantine, I’ve seen a lot of people posting about “stripping” their towels and bedsheets and showing disgusting After photos of dirty water - I was intrigued! Stripping the linens is supposed to get rid of any kind of build-up on them (whether that’s laundry detergent, body oil/sweat, hard water mineral deposits, etc). So I decided to give it a try myself and share the easy process - and let me tell you, it was a disgusting and oddly satisfying Quarantine Project. | This post contains affiliate links |

Sheet and Towel Stripping How-To

Apparently one should consider stripping their linens when they aren’t as absorbent as they used to be, they look or feel dingy, or they start to smell musty.

Supplies:

Everyone seems to be using more or less the same supplies, which are:

  • 1/4 cup Borax Powder
  • 1/4 cup washing soda (or 1/4 cup baking soda if you're in a pinch and don't have washing soda.. I used baking soda)
  • 1/2 cup laundry detergent

How-To:

Fill a bath tub with hot water and dissolve the Borax, washing soda or baking soda, and laundry detergent in it. Next add your towels and sheets (make sure to only do similar colors together… in some cases it can cause some colors to run. We only have done our white and light colored linens so far.)

Then leave them to soak for the next four or so hours, stirring occasionally. You should see the water turn from clear to a gross yellowish-dirty color.

Once the water cools, drain the tub and squeeze the water from the linens, rinsing them with some fresh water. Then put in the washing machine (with no detergent - your items will already have absorbed detergent and Borax and you want to rinse everything out, not add more soap at this point), and run through the “wash” cycle to rinse everything out thoroughly.

After that you can put them in the dryer, or re-run the washing machine with detergent like you normally would to give them a fresh wash before drying.

Draining the dirty water after stripping. Ew.

Draining the dirty water after stripping. Ew.

Our Personal Results:

So it wasn’t the magical night-and-day change across the board that I was expecting, visually anyways - and some items definitely had better results than others. OVERALL - Our linens definitely felt cleaner, and looked a little brighter - however, our old white towels (which have turned very off-white over the years), did not magically turn luminous white again like I was hoping. But again, that’s probably too much to expect as they are 10+ years old and have had many years to get discolored in the regular laundry. Nevertheless, just SEEING the dirty water after we stripped the linens makes me feel a lot better about doing this process - visually not everything looks perfectly white again, but I KNOW it’s cleaner after removing all that invisible gunk and that makes me feel a lot better.

Okay, so the old white towels are still off-white, but I know they’re cleaner than before after seeing the dirty water after the stripping process.

Okay, so the old white towels are still off-white, but I know they’re cleaner than before after seeing the dirty water after the stripping process.

It’s my understanding that you can repeat this process as needed, and I can see myself doing this maybe up to 2-4x per year going forward to try to keep build-up at bay.

Disclaimer: Try at your own risk. In some cases this process may make colored fabrics run and may not be suitable for all fabrics.

Want to see another satisfyingly gross example…?

Here’s a photo my sister sent me after she did her sheets - wow!

Here’s a photo my sister sent me after she did her sheets - wow!


KEEP UP WITH BIRCH LANDING HOME
|  Etsy  |  Facebook  |  Instagram  |  Pinterest  |  Bloglovin'  |  Hometalk  |

Bathing Suit Drying Hack

Living by the lake, we constantly have wet bathing suits all summer that need to be hung to dry, At first we used a drying rack in our shower but it was rather cumbersome and a pain to constantly set it up and take it out, until I had a revelation and found these awesome plastic hooks that hang from our glass shower walls. | This post contains affiliate links |

These plastic hooks fit perfectly over the shower wall, won’t rust, are easy to clean, and are perfect for hanging wet bathing suits from to drip dry into the shower. They have been the perfect bathing suit drying solution for us!

Bathing Suit Drying Hack

KEEP UP WITH BIRCH LANDING HOME
|  Etsy  |  Facebook  |  Instagram  |  Pinterest  |  Bloglovin'  |  Hometalk  |

Money Saving Tips for Back-to-School

Sending the kids back to school usually means shelling out a lot of money on school supplies, clothes, and more.  Here are some of my tips on how NOT to go broke this fall.  | This post contains affiliate links | 

Money Saving Tips for Back-to-School

Invest in a Good, Basic Backpack and Lunchbox

Question:  How many parents buy their kids new backpacks and lunchboxes every single year? 
Answer:  Wayyyy too many! 

There's really no reason to shell out money that often on items that can can stand the test of time if you pick them right. I highly suggest NOT picking a character or crazy pattern backpack or lunchbox. Kids' tastes change from year to year (and sometimes week to week), and if you pick themed or cheaply made items they will not last. Our general guideline is upgrading backpacks once every "big transition" in school - so one backpack to last kindergarten through elementary school, a new one to last through middle school, and then finally a new one for high school. We love solid-color backpacks from high-quality companies like LL Bean - you just know they're going to last and never go out of style. (Pro-tip: check out the Outlets to get great, name-brand backpacks for less!)

Consignment Shop for Back-to-School Clothes

If you've been following the blog for any amount of time now, you know I'm a big fan of consignment selling and shopping.  It's a great way to get rid of any clothes or shoes your kids might have outgrown or refuse to wear and make some money back to use on gently used, name-brand "new" items.  That way you're essentially "trading up" for new clothes, and spend a lot less out of pocket. 
{You can read more on my Consignment Selling and Shopping Tips HERE}

Quality backpack and clothes from a consignment shop stretch your back to school budget farther!

Buy Snacks in Bulk and/or Store Brand

If you pack your child's snacks and lunches the cost can definitely can add up over time.  One way to save is to buy in bulk whenever possible.  If you can buy prepackaged snacks in larger quantities the price-per-item is a lot lower.  Buying store brand items over name brand is another great way to save.  

Reusable Water Bottle

Juice boxes are expensive (and arguably unhealthy), so having your child take a reusable water bottle to school saves a lot of money and also helps keep their sugar intake in-check.

Reuse Last Year's School Supplies

Money Saving Tips for Back to School

A lot of times the school supply list will include things like a set of binders, markers, glue, a pencil case, etc.  Many times there's no reason to repurchase these things - they can often be reused from year-to-year.  Empty out the old papers from last years binders and reuse those.  And the makers, crayons, glue sticks, etc?  They likely have plenty of life left - no need to buy more just yet!  

Coupon and Rebate Apps

And of course, a great way to save if you need to buy items is to use coupons or rebates whenever you can. We really love Coupons.com for printing coupons and the rebate app Ibotta for earning money back on purchases. At the beginning of the school year, coupons and rebates on back-to-school items are usually plentiful, but make sure to only buy what you really need!

KEEP UP WITH BIRCH LANDING HOME
|  Etsy  |  Facebook  |  Instagram  |  Pinterest  |  Bloglovin'  |  Hometalk  |

Mom Hack: Creating a Nursing Nest

For those new mamas that breastfeed, it can be an exhausting and draining ordeal at the beginning.  Expectations are high but reality is that's it's often much harder than expected.  One way to make it easier on yourself is to set up a "nursing nest" to make those marathon nursing sessions at 2AM (and all other hours of the day and night) easier to handle.  | This post contains affiliate links |

Mom Hack:  Creating a "Nursing Nest"

First you'll need to set up somewhere convenient and quiet.  I set up my "nest" in a corner of our master bedroom since our baby will be sleeping in a co-sleeper next to us and I wouldn't have to go far to nurse in the middle of the night. 

Then outfit this area with all that you need for nursing:

  • cozy rocking chair with footrest
  • side table within easy reach
  • nursing pillow
  • blanket
  • water bottle
  • extra pillow
  • snacks (mine are tucked away in the drawer)
  • clock
  • phone charger
  • lanolin cream
  • books, magazines, kindle
  • phone (watching Netflix on my phone was sometimes the only way I could keep myself awake)
Mom Hack:  Creating a Nursing Nest - set yourself up for success!

By setting yourself up to make it as easy as possible, you can help make those super-tough early weeks a bit more bearable.  Breastfeeding can be one of the most challenging - and rewarding - things you'll ever do.  Hang in there Mama - you got this!  

Mom Hack:  Creating a Nursing Nest

Log Cabin pillow c/o Hills & Trails

KEEP UP WITH BIRCH LANDING HOME
|  Etsy  |  Facebook  |  Instagram  |  Pinterest  |  Bloglovin'  |  Hometalk  |

Easy Flashcard Organization Hack

Our toddler loves flash cards... well, loves dumping them all over the living room mostly.  After getting tired of constantly picking them up I decided it was time to do something about it.  

Easy Flashcard Organization Hack!

After buying some $1 packs of flashcards from Target Dollar Spot (love Dollar Spot!), I punched a hole in each one and reinforced them with hole reinforcement stickers before stringing them together with binder rings.  If you don't have binder rings, you could also use a piece of ribbon or string.  

Easy Flashcard Organization Hack

And that was it - easy-as-can-be!  Now I don't have a couple hundred flashcards thrown all over the living room, and they're super-easy to pack for car trips and travel!  

Easy Flashcard Organization Hack

KEEP UP WITH BIRCH LANDING HOME
|  Etsy  |  Facebook  |  Instagram  |  Pinterest  |  Bloglovin'  |  Hometalk  |