DIY Simple Snowman Kit

Just wanted to share this easy, cute homemade gift idea for anyone with small kids in a snowy climate - DIY Simple Snowman Kits! Since we aren’t able to get together with a lot of family and friends again this year (thanks Covid), we decided to make and send these little kits so our kids could “help” their friends make their own snowmen from afar. | This post contains affiliate links |

Really there isn’t too much to explain for this project — we gathered some basic materials, painted them, and then packaged them together before including a little note from the kids.

EYES: For the eyes we used wooden toy wheels from a craft store (similar ones linked) that we painted black - but you could use just about anything, including painted rocks or scrap wood.
NOSE: For the nose I whittled down some pieces of scrap wood into a rough carrot shape, then painted them orange.
HEART: For the hearts we glued together two layers of pre-cut balsa wood hearts we had picked up at a craft store (similiar ones linked), then painted them red.
BUTTONS (OPTIONAL): We did not include buttons in our kits but you can include painted rocks, small pieces of scrap wood, or actual large buttons in your kits to be used as buttons.
GIFT BAG: We packaged our kits up in some organza gift bags I had on hand (similar ones linked), but you could wrap them up in a number of ways including using a piece of fabric that could double as a scarf!

Then I had the kids make the gift tags and write notes to their friends - they loved coming up with special drawings and messages! Our friends really enjoyed getting these kits and I’m excited to see how their snowmen turn out. Hopefully these Snowmen supplies will be something they can reuse for future winters too! Just add snow… ;)

PS - I have a few kits left over listed for sale in my Etsy Shop if you would like to check them out. Just click the button below to shop:

KEEP UP WITH BIRCH LANDING HOME
|  Etsy  |  Facebook  |  Instagram  |  Pinterest  |  Bloglovin'  |  Hometalk  |

Why I Purged Who I'm Following on Social Media (And Why You Might Want to Too)

If you’re like me you probably get sucked into your phone too often, falling down the rabbit hole of continuously scrolling Instagram and Facebook. But it’s a New Year, new beginnings right? I recently took a good look at who I’m following on my personal and blog Instagram accounts and did some purging… in fact between my accounts I unfollowed thousands (previous to this I had never really unfollowed anyone!) and in doing so it greatly simplified my social media checking routine, spending less time online.

Why I Purged My Social Media (And Why You Might Want to Too)

Who I Unfollowed

First, I know I personally feel a little hurt when I realize someone unfollowed me (why don’t they like me??) - but if you’re reading this and I unfollowed you please realize it’s nothing personal at all. Over the many years I’ve had social media I have followed thousands of accounts, but I’ve never actually reevaluated their relevancy to me as time went on and cleaning house was long, long overdue.

Here are some types of accounts that I unfollowed:

Accounts that are “Dead”: As I went through my lists, I found hundreds of accounts that have been “dead” for years… blogs or business accounts that have gone out of business or people that for one reason or another have just stopped updating a particular account. While these accounts aren’t cluttering up my feed, they aren’t doing anything for me either so I unfollowed them.

Accounts that Don’t Reflect Our Current Stage in Life: And then there’s accounts that used to be relevant to me but aren’t anymore… for example years ago when we were first starting our family I followed lots of baby-centric accounts and businesses. However our kids are all past the baby stage now and I just don’t need to know about the newest bottles or baby carriers these days. It’s definitely bittersweet closing the door on that stage in our lives but the practical reasoning is we just don’t need to be up-to-date on baby trends anymore. So any irrelevant accounts to our current place in life were unfollowed too.

Accounts that I was Following “Because Everyone Else Is”: There were plenty of accounts I was following strictly because they were big-name brands/companies or ultra-popular influencers or bloggers. I was mostly following them because I felt like I should be, even though most of their posts were essentially ads and I didn’t find following them enjoyable myself. I’m personally not a huge fan of impersonal/overly-commercialized posts so I unfollowed a lot of these types of accounts too.

Accounts that I Follow in More than One Place: I have both a personal and blog-related Instagram account and realized there were quite a few accounts that I was following in both places… this was kind of redundant as I was often seeing the same posts twice. I really didn’t want or need to see the same things over and over so I would decide where made the most sense for me to follow an account and would then unfollow it from my other account.

Accounts that Bring Me Down: Do what’s best for your mental health and your self esteem! Are there accounts that you follow that are too pessimistic? Or too perfect and it makes you devalue yourself subconsciously? Get rid of them. You don’t need that kind of negativity in your life - only follow accounts that raise you up or inspire you in a positive way.

Accounts that I Don’t Enjoy: As I went through my lists of who I’m following I realized something - I honestly don’t enjoy fashion bloggers (no offense to any fashion bloggers out there!). As much as I love a good outfit inspiration I am not into “fast fashion” and I’m not someone who constantly buys clothes or the latest styles. I actually think it’s really bad for the environment to constantly consume clothing and accessories that will only be worn a few times (and a lot of these influencers will only wear items for a post or two then get rid of them). Fast fashion isn’t something I condone or enjoy so I won’t passively support it by following all those influencers.

Important Note: Don’t Try to Purge in One Day!

I made this mistake myself… when I first decided to clean house I stayed up really late one night and was determined to work my way through my list and clean it out in one go - but then Instagram blocked my account for 24 hours. If you do too much of one action in a short amount of time (like unfollowing other accounts), Instagram will flag your account as spam and lock you out temporarily… and apparently if you keep it up they will keep locking you out for longer each time, potentially banning you permanently (so scary!). Getting locked out for 24 hours was very frustrating, but it made me realize I have to tread lightly moving forward. When you’re purging, make sure to never unfollow more than a few accounts at a time and make sure to continue to use Instagram as you normally would (liking, commenting, engaging with others like usual). Purging your feed will be a work-in-progress for a while and will take time.

Who I Muted

Did you know you can “mute” accounts too? That way they don’t show up in your feed but you’re still following them. There were some accounts that I was following that I still wanted to follow to show some support, but were totally cluttering up my feed and driving me nuts… for example maybe you have an old school friend who has taken an endeavor into MLM sales. As much as you might love this friend and want to support her, you don’t want to see ten posts a day on essential oils, or fake nails, or eyelash serum or whatever it is that she’s constantly pushing. You’ll still show as a follower to her and it would be good idea to make a note to occasionally hop on over to her account to engage in a post here and there - but it’s not going to constantly fill your feed with stuff you’re not interested in anymore.

Turn Notifications OFF

If you haven’t already, it’s also a great idea to turn off Notifications Off across all your platforms. Seeing those little “dings” constantly come up when friends post, like, or comment can be overwhelming and drag you into checking your phone every few minutes. If you turn these off you’ll be less tempted to constantly check your phone - and make a point to only check it at certain times during the day. I have already had my notifications turned off for years now (it’s something I made a point to do a long time ago), and I will continue to keep them off.

Why My Social Media Experience is Better and More Efficient Now

After you’ve made sufficient progress purging who you’re following, you’ll notice that your feed is full of things that you actually want to see - no more “junk” that you used to waste time scrolling past everyday. Your feed will be full of accounts that you find positive, intentional, and inspiring - not to mention following less accounts will make it quicker and easier to catch up on recent posts every day.

And another positive side effect of my purge? It seems to have reset the algorithm for what I typically see in my feed. There were a lot of accounts I was following that I honestly had totally forgotten about because I hadn’t seen any posts by them in my feed FOR YEARS. But as I made progress purging who I was following I started to see those long-lost-to-me accounts in my feed again and it was so refreshing! I was able to re-discover a lot of accounts that I used to love following and it’s wonderful to finally see their posts again in my feed and reconnect with them. (And if you rediscover an account you want to see in your feed again, make sure to like and engage in their posts so Instagram will learn to continue to show them.)

Going Forward

Going forward this is something I definitely want to keep up with. I had neglected reevaluating who I was following for years and since I had let it get out of hand it took weeks for me to slowly purge since I had so much catching up to do. From now on this is something I’ll plan on revisiting at least once a year (I even put a reminder in my calendar for next January as part of my New Year’s Resolutions). Your social media feed should be enjoyable and inspiring, and it should be more efficient to check - by actively managing it hopefully you will see an improvement in your social media experience too.

So far I’ve really only tackled Instagram but I am planning on working to purge who I’m following on my other social media accounts too (especially Facebook and Pinterest) for the same reasons.



KEEP UP WITH BIRCH LANDING HOME
|  Etsy  |  Facebook  |  Instagram  |  Pinterest  |  Bloglovin'  |  Hometalk  |

How we Turned a Coat Closet into a Functional, Organized Pantry

Our kitchen was lacking a pantry, so we often kept canned goods and backstock on a shelving unit at the foot of our stairs in the basement. But because half of our food and snacks were downstairs and half were upstairs it made for frequent mistakes when buying groceries… it was hard to visualize exactly what we had and where so we often ended up overbuying certain things and forgetting to buy others. Tired of wasting money, food, and time running up and down the stairs I decided to make over a coat closet into a functional pantry. | This post contains affiliate links |

How we Turned a Coat Closet into a Functional Pantry

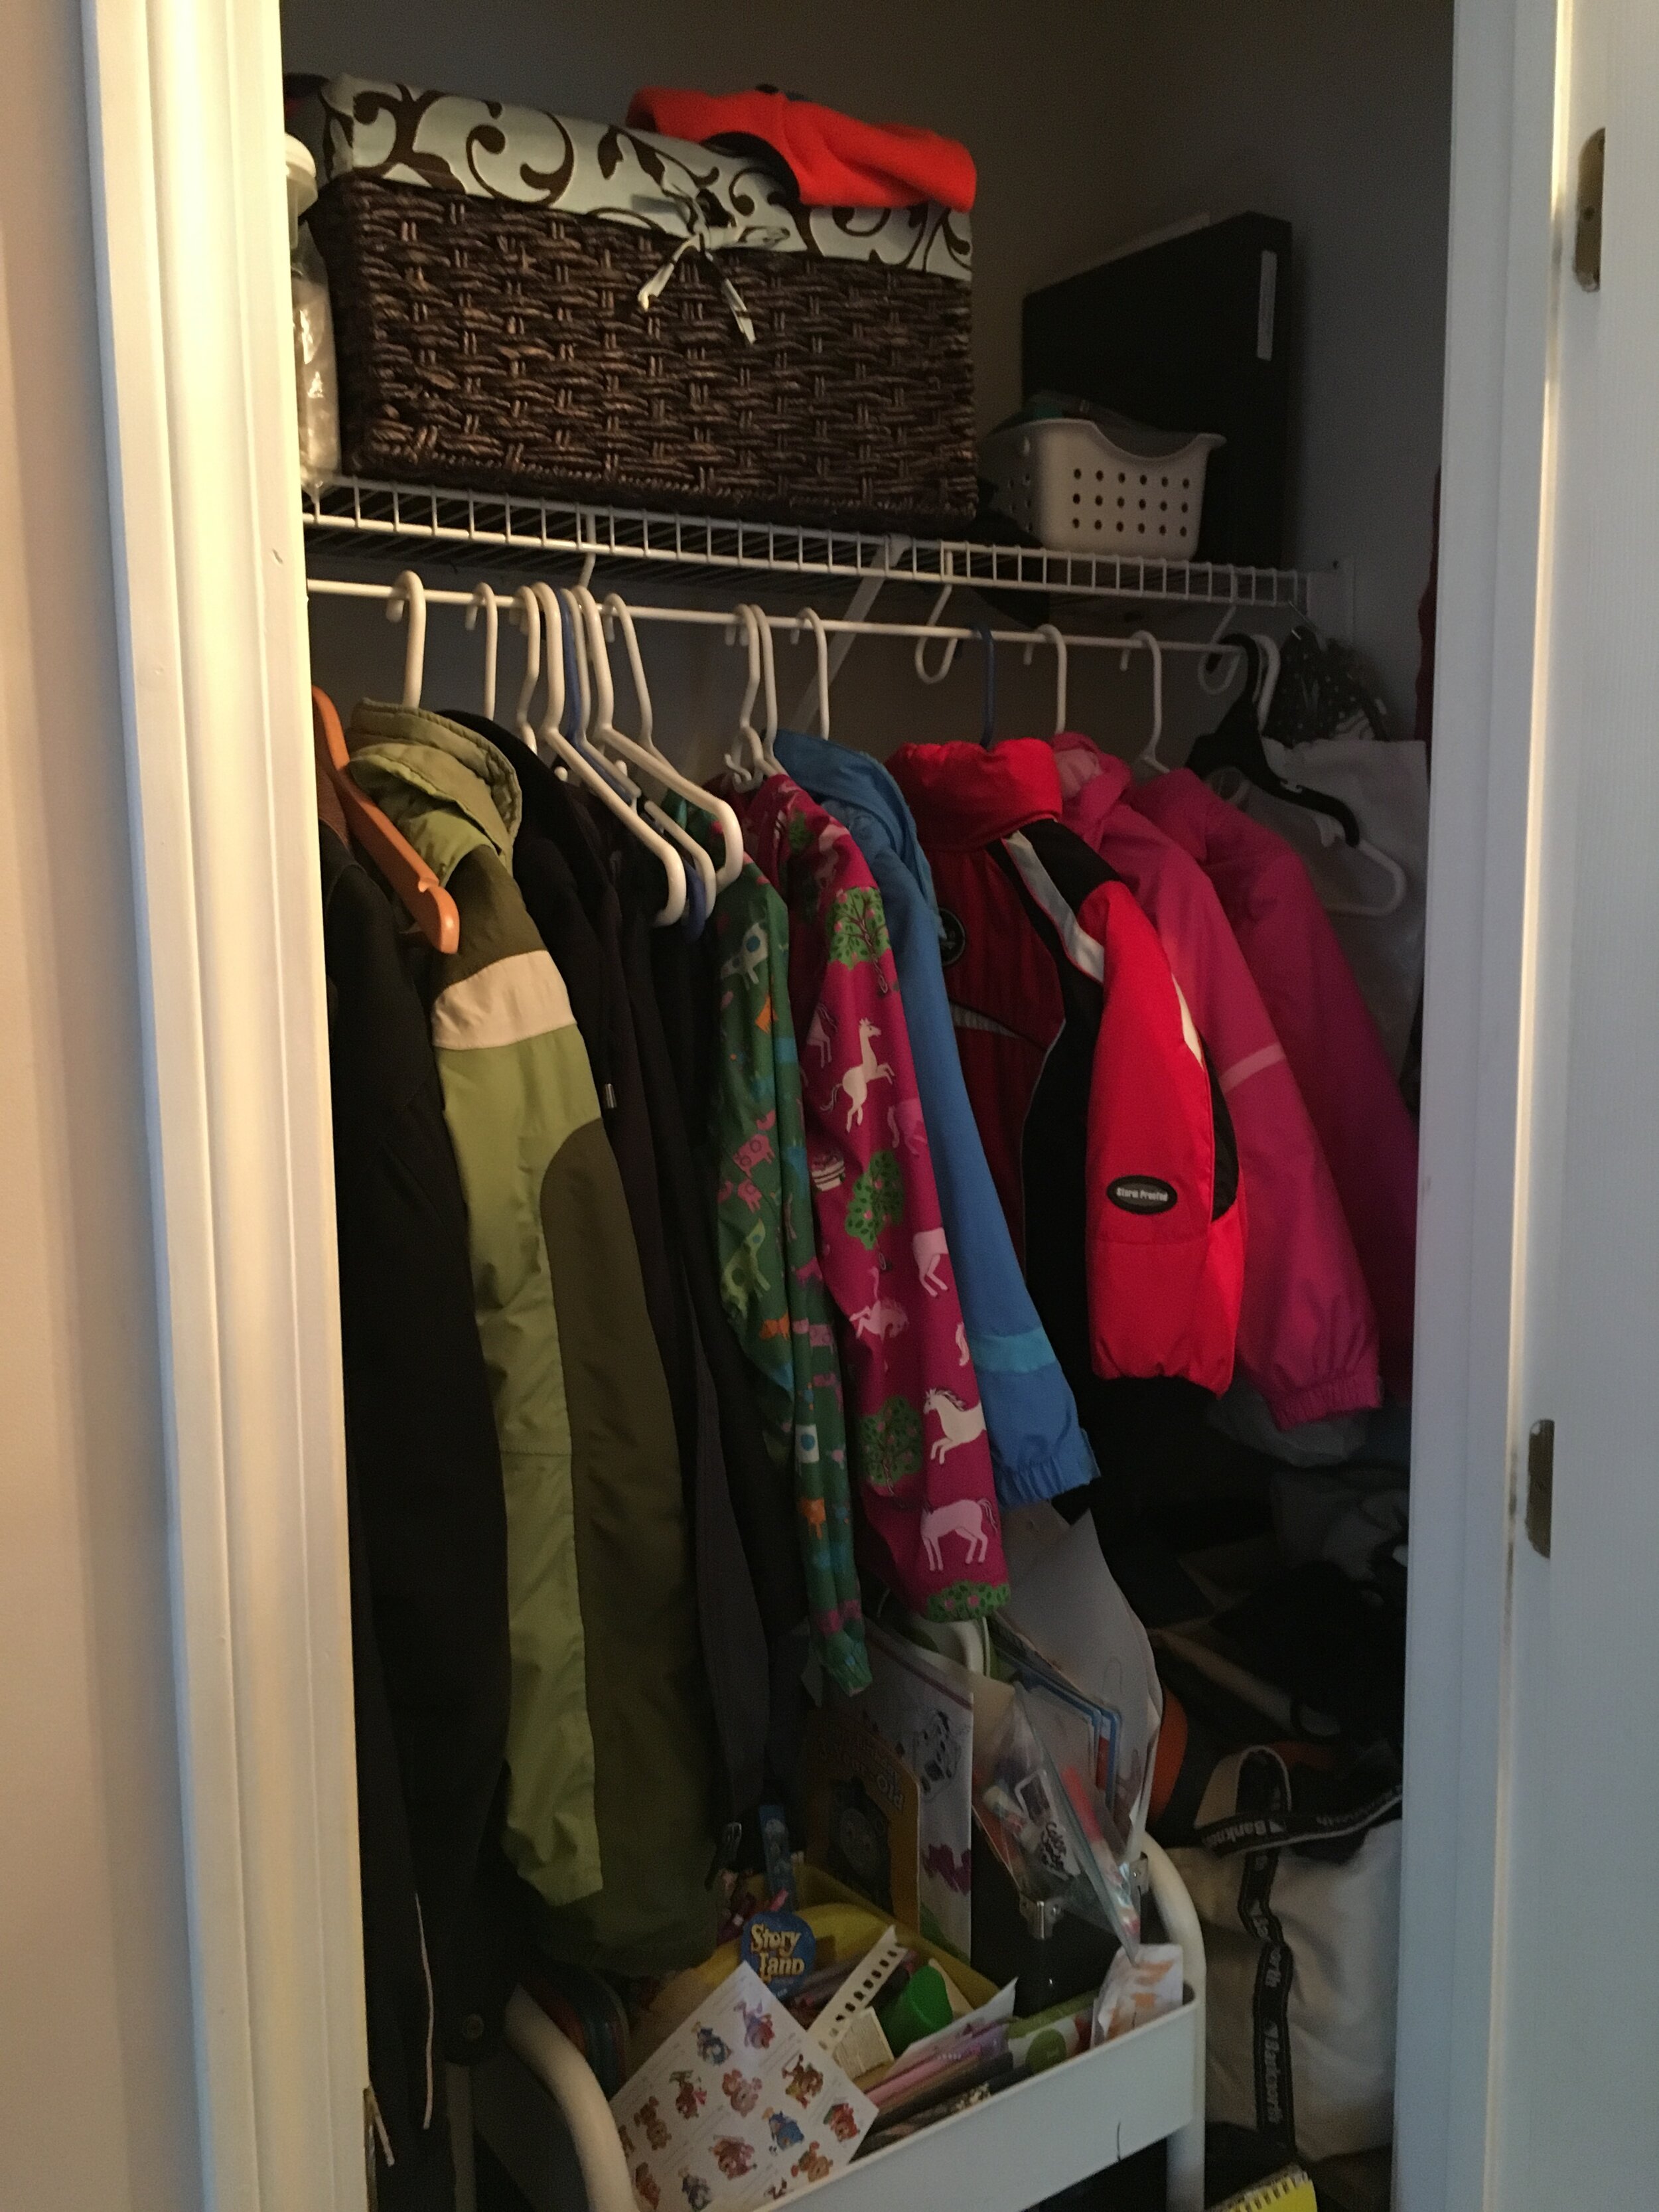
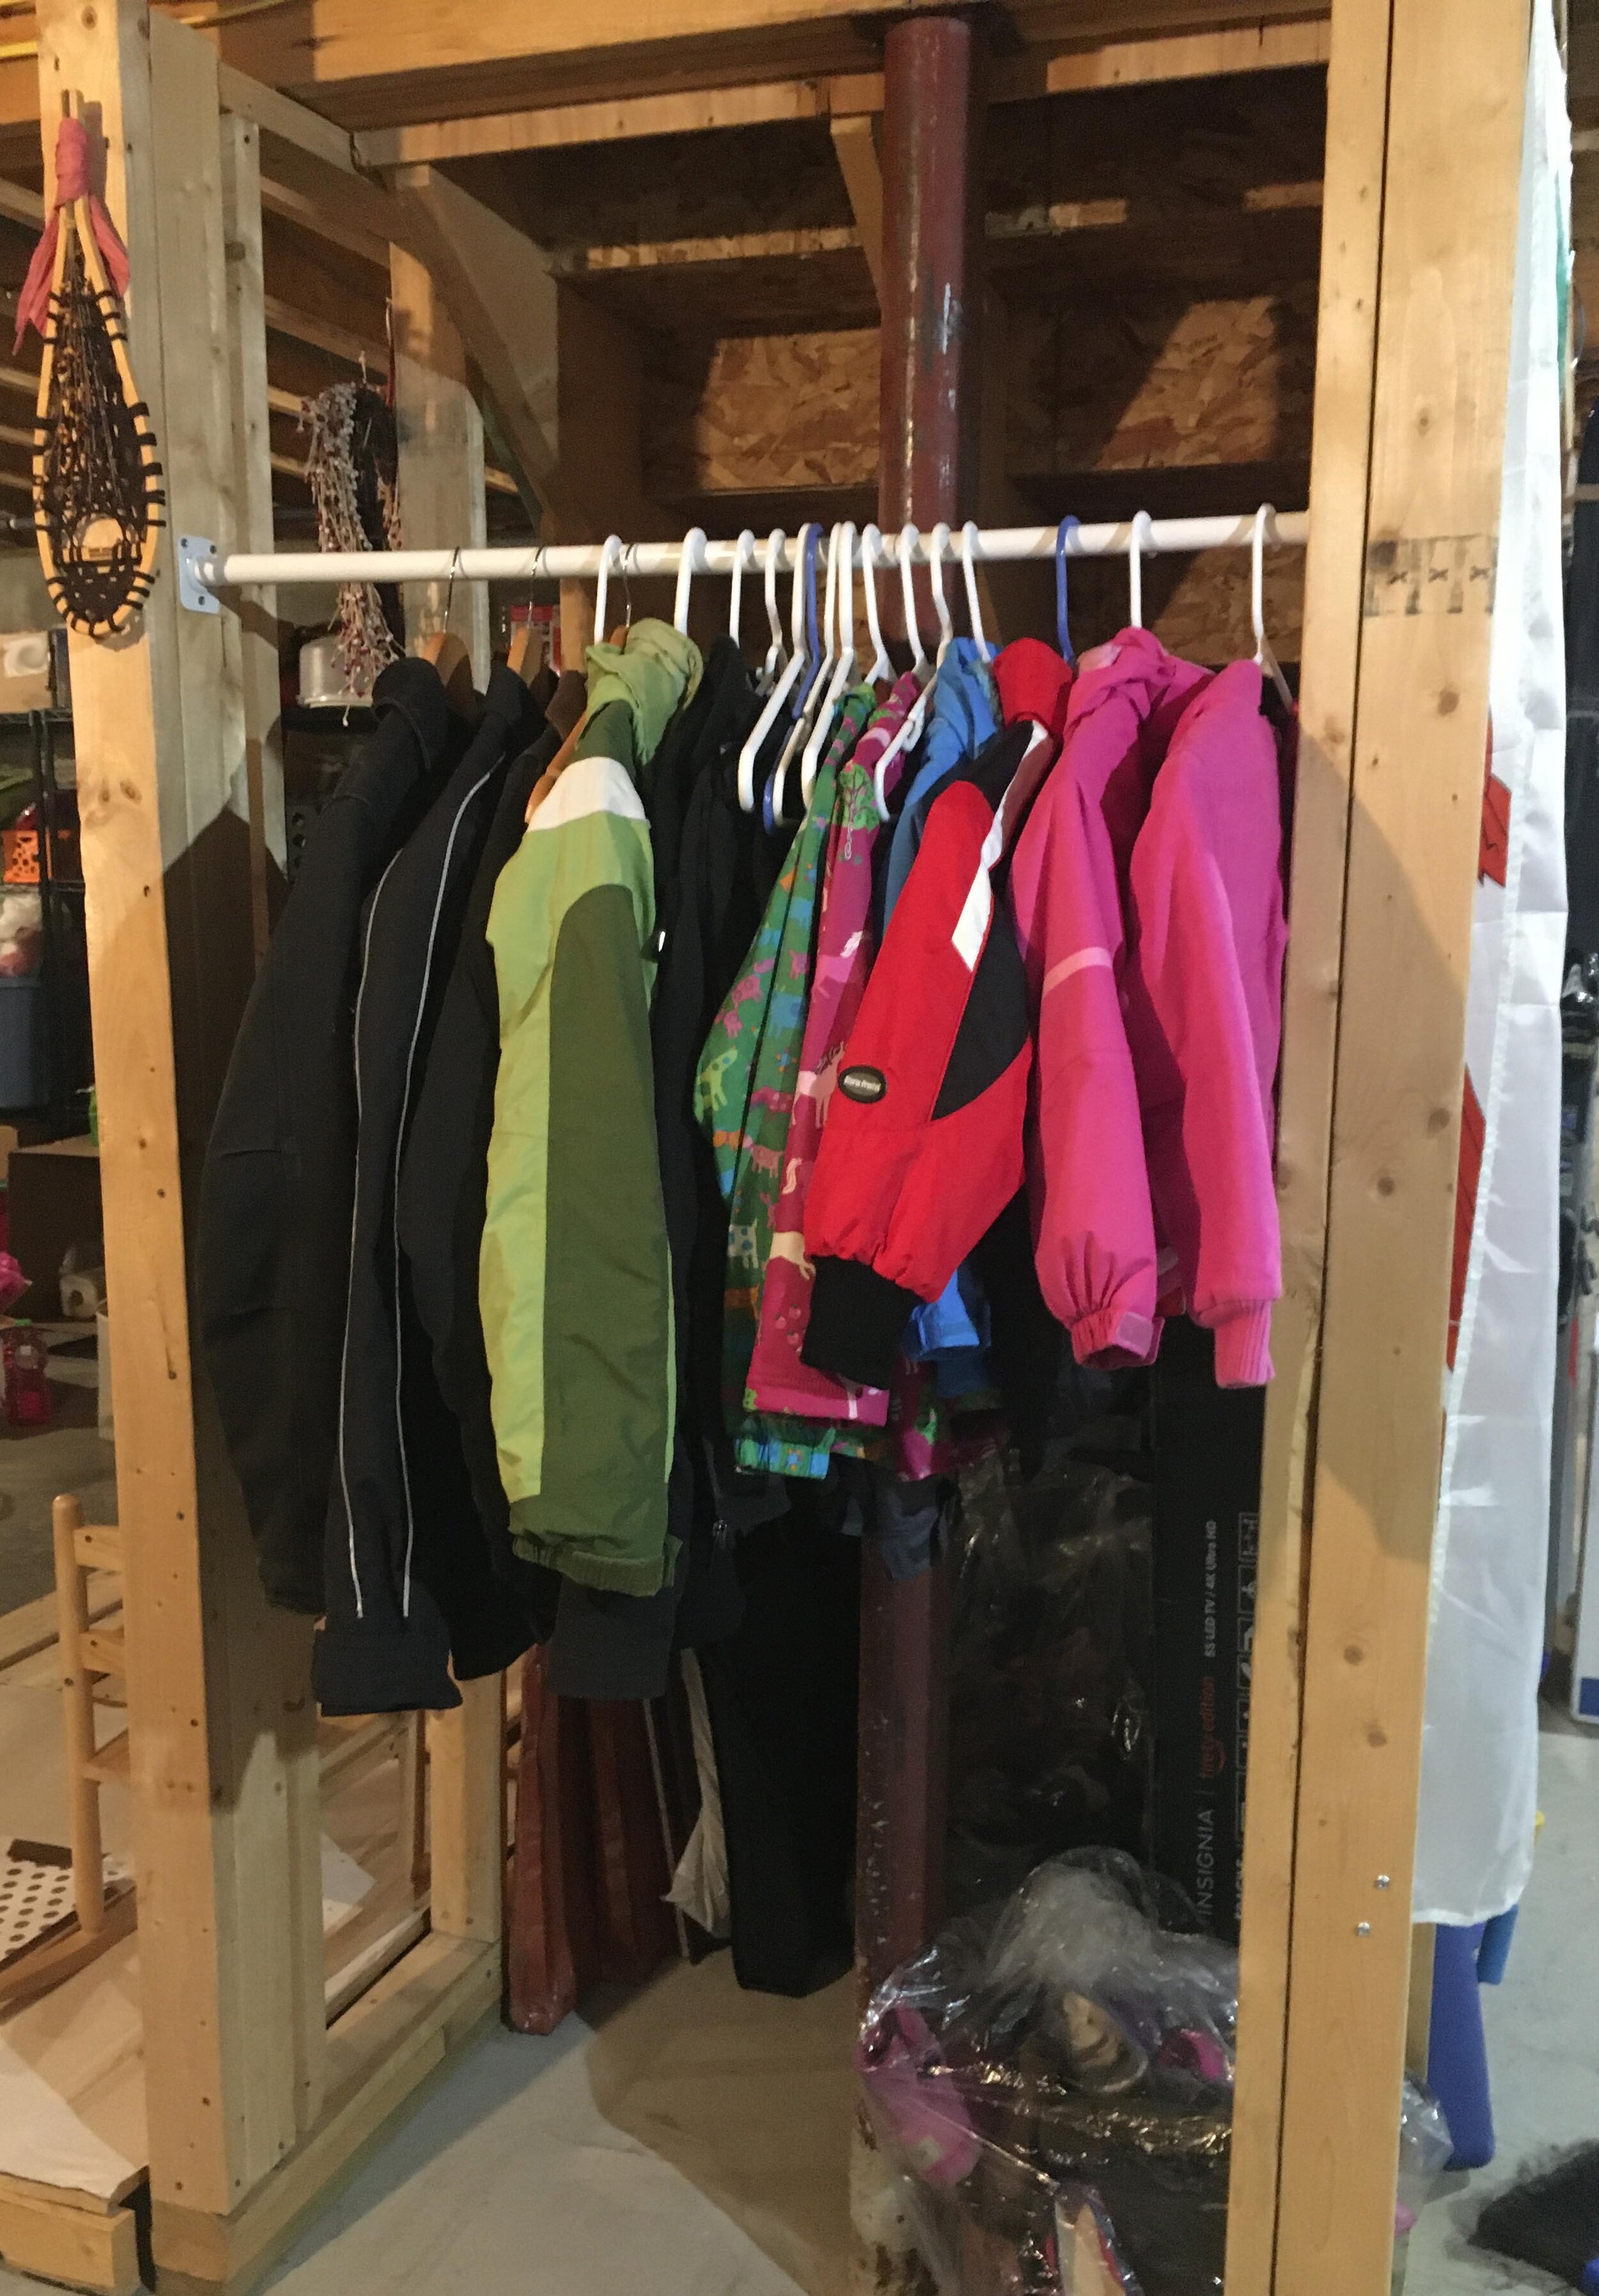
Now while this coat closet (pictured below) was pretty jammed full, it was very underutilized. It’s where we kept our off-season coats, hats, and boots as well as some hiking gear and my daughters’ Art Cart - most things we did not need to use daily, or often at all. My solution to this was to relocate all these items to our basement - I hung a closet rod under the basement stairs and moved all our off-season clothing and gear to this new space where it was still easily accessible but out of the way.

How we Turned a Coat Closet into a Functional Pantry

The next step was to pull out the old wire shelf and closet rod system, patch the holes, and repaint the inside of the closet. Thankfully I already had spackle and some leftover white paint so I was able to get the closet to a clean slate easily and it didn’t cost a dime.

How we Turned a Coat Closet into a Functional Pantry

Now for the fun part! I got to decide how many shelves I wanted and the spacing, so I laid it out with painters tape to play with how I wanted it before I made a final decision. For our setup I decided on four shelves starting at about waist-height. I wanted to leave the bottom open to accommodate the dog food bin, the Art Cart, step stool, etc. Then I screwed in 1x3 inch “runners” that would support the shelves along the back wall. I used a stud finder to make sure I was screwing the runners into studs and a level to make sure everything was square.

How we Turned a Coat Closet into a Functional Pantry

Then I added runners to one side of the closet next, following the same routine - but with these pieces I had pre-drilled pocket holes with our Kreg Jig first so it would make for a clean and secure joint in the corners.

How we Turned a Coat Closet into a Functional Pantry

Before installing the runners on the opposite side of the closet, it’s wise to keep in mind how you will be able to maneuver the shelf boards in once all the runners are in place (it would be very difficult to get the top shelf in with all the runners installed, for example). So before installing the opposite side’s runners I slipped some of the trickier shelf boards into place first (I used 1x12”s cut to length for the shelves) before I finished screwing in all the side runners.

How we Turned a Coat Closet into a Functional Pantry

I secured the shelves into place with some finishing nails, then taped off the shelves and runners to get ready for paint. I used primer and then several coats of white semi-gloss paint since it’s a little easier to wipe down and keep clean.

How we Turned a Coat Closet into a Functional Pantry

I just love how farmhouse and “Shaker” the exposed rails on the sides look and I wanted to play it up. Once the paint was dry I added some functional hooks to hang aprons, lunchboxes, etc on the side rails.

How we Turned a Coat Closet into a Functional Pantry

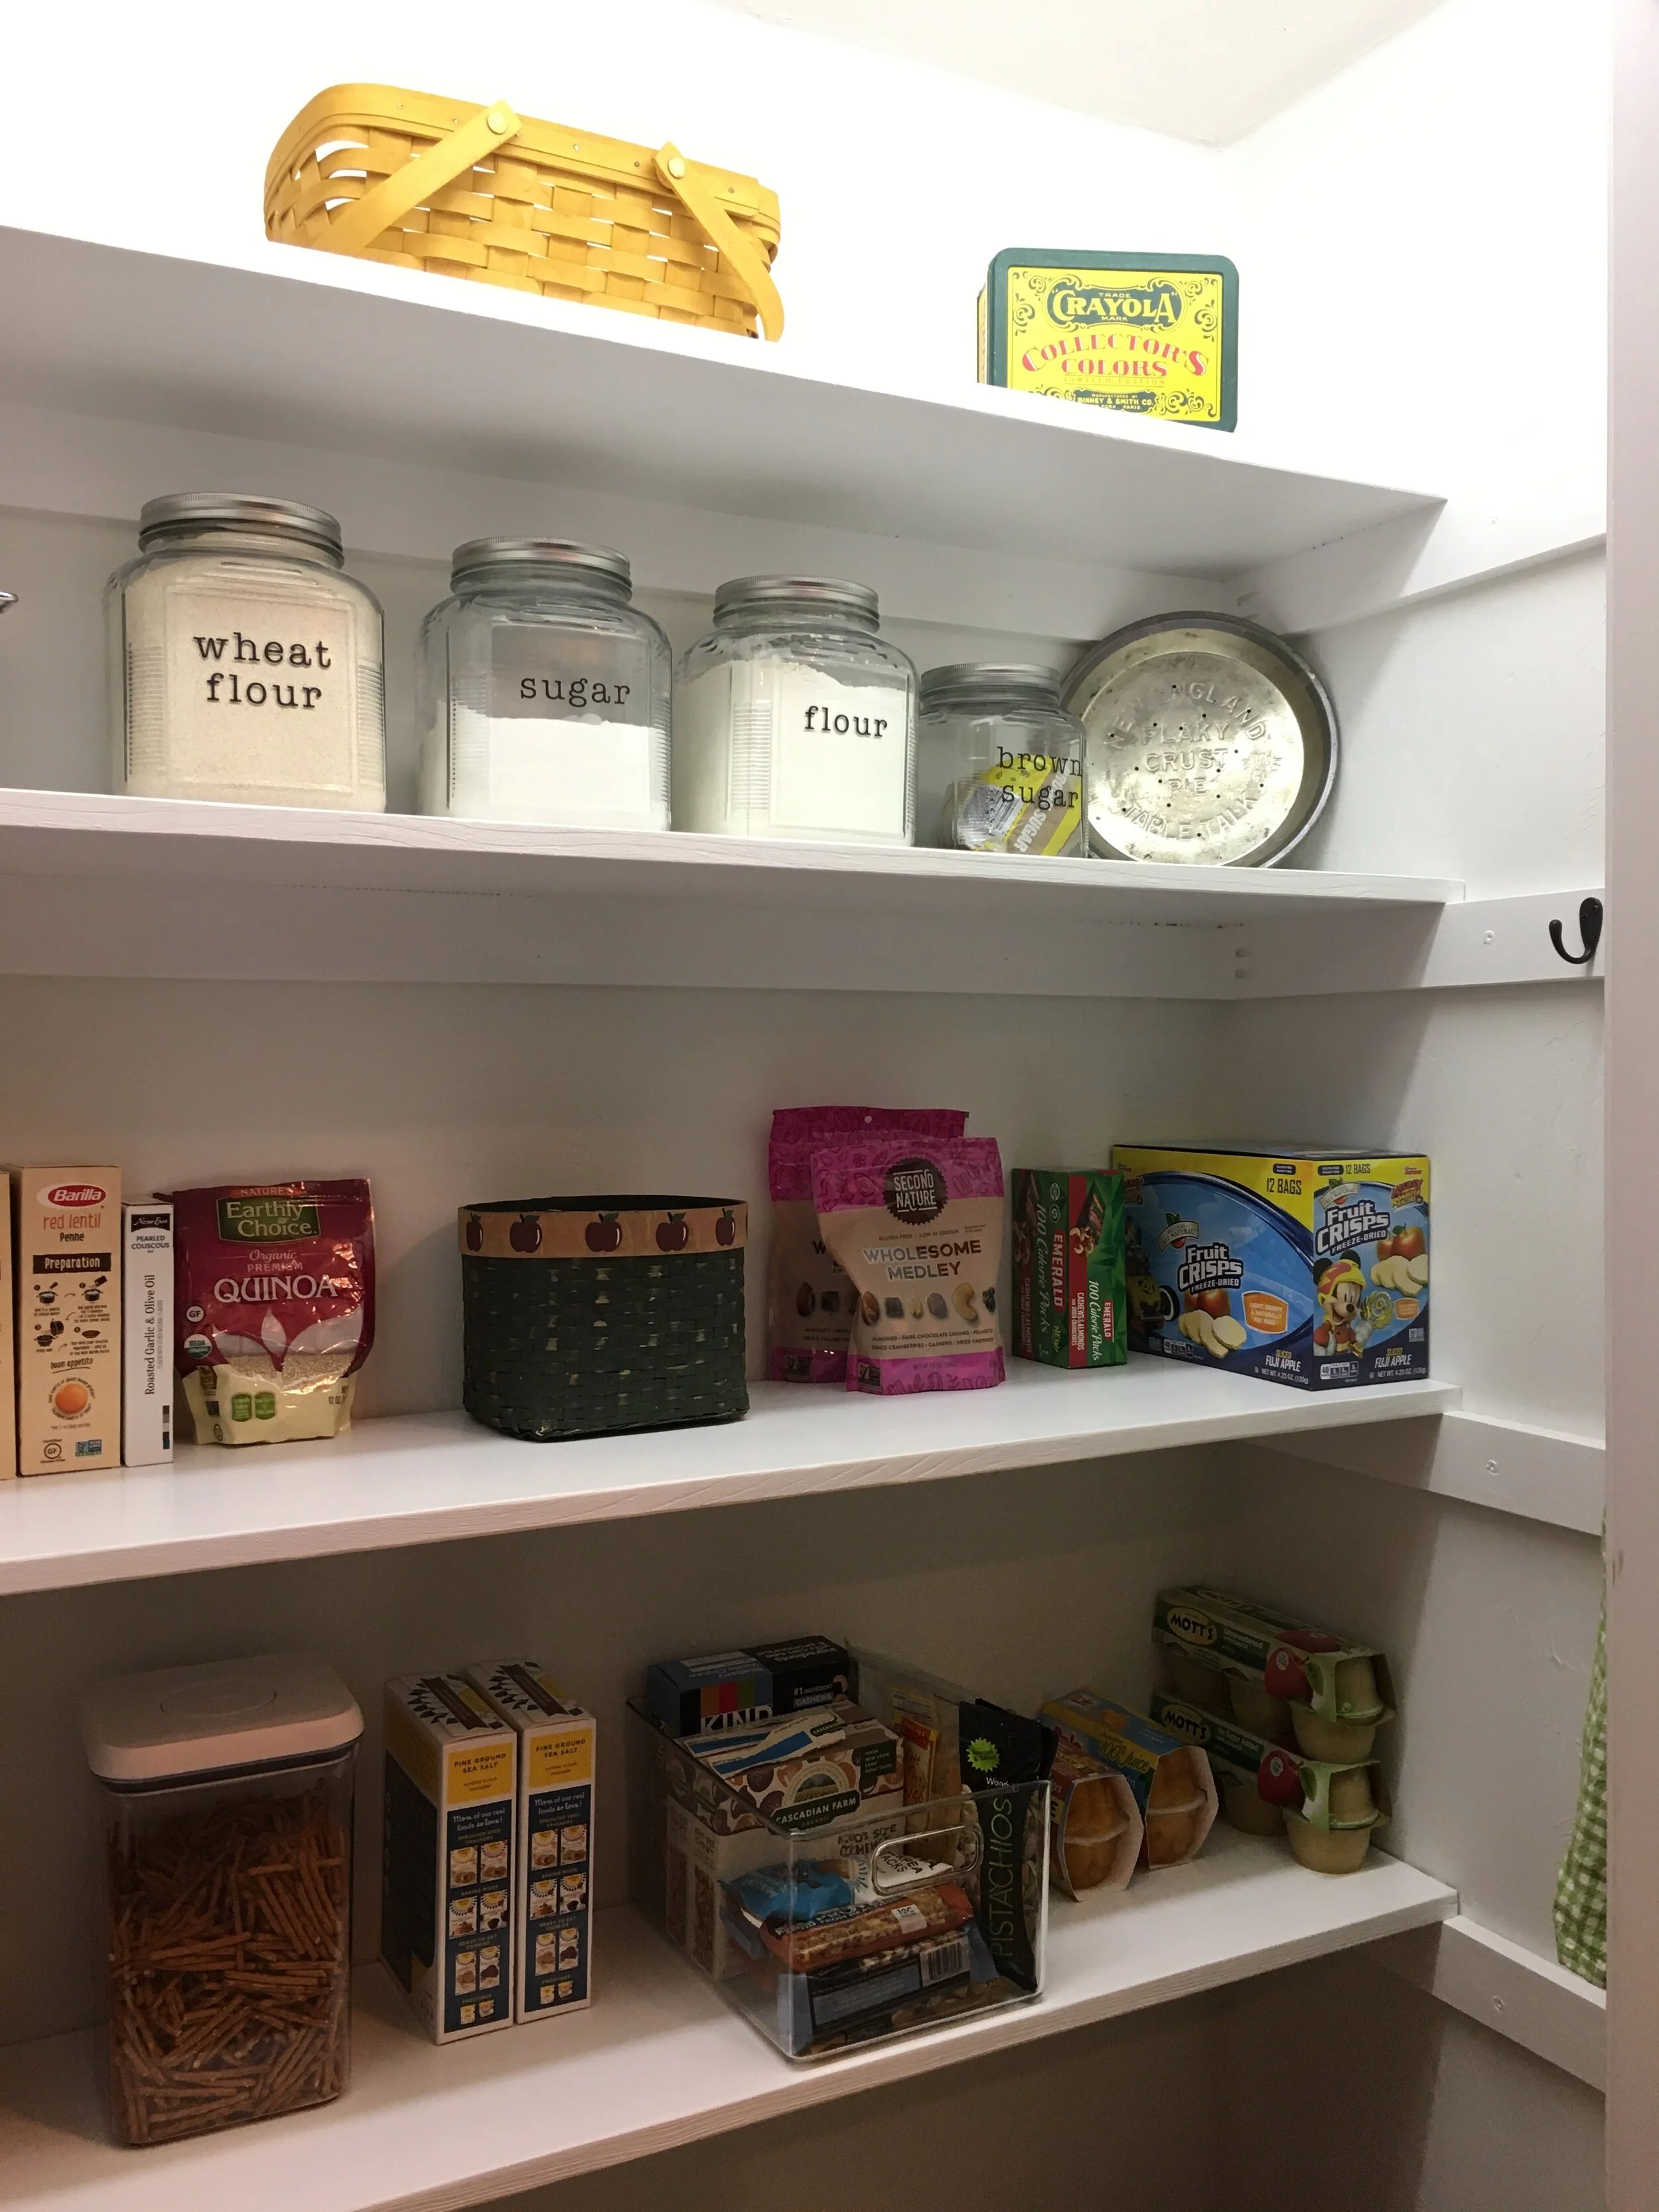
And now the project is complete! I am so happy with how it turned out and it’s wonderful to have everything in one place. I can see this project saving us money on groceries in the long run now as everything will be in one place now and we’ll be less apt to waste food.

Eventually, I would love to replace the closet door with a fun screen door and get some more glass jars and baskets for a cleaner looking pantry - but all in good time.

How we Turned a Coat Closet into a Functional Pantry

| Similar Clear Plastic Storage Bins | Dog Food Container (on the floor, just out of the picture) |

How we Turned a Coat Closet into a Functional Pantry

| Flour, etc. jars were made using Cracker Jars with custom vinyl labels I made on my Cricut | Vintage Pie Tins |

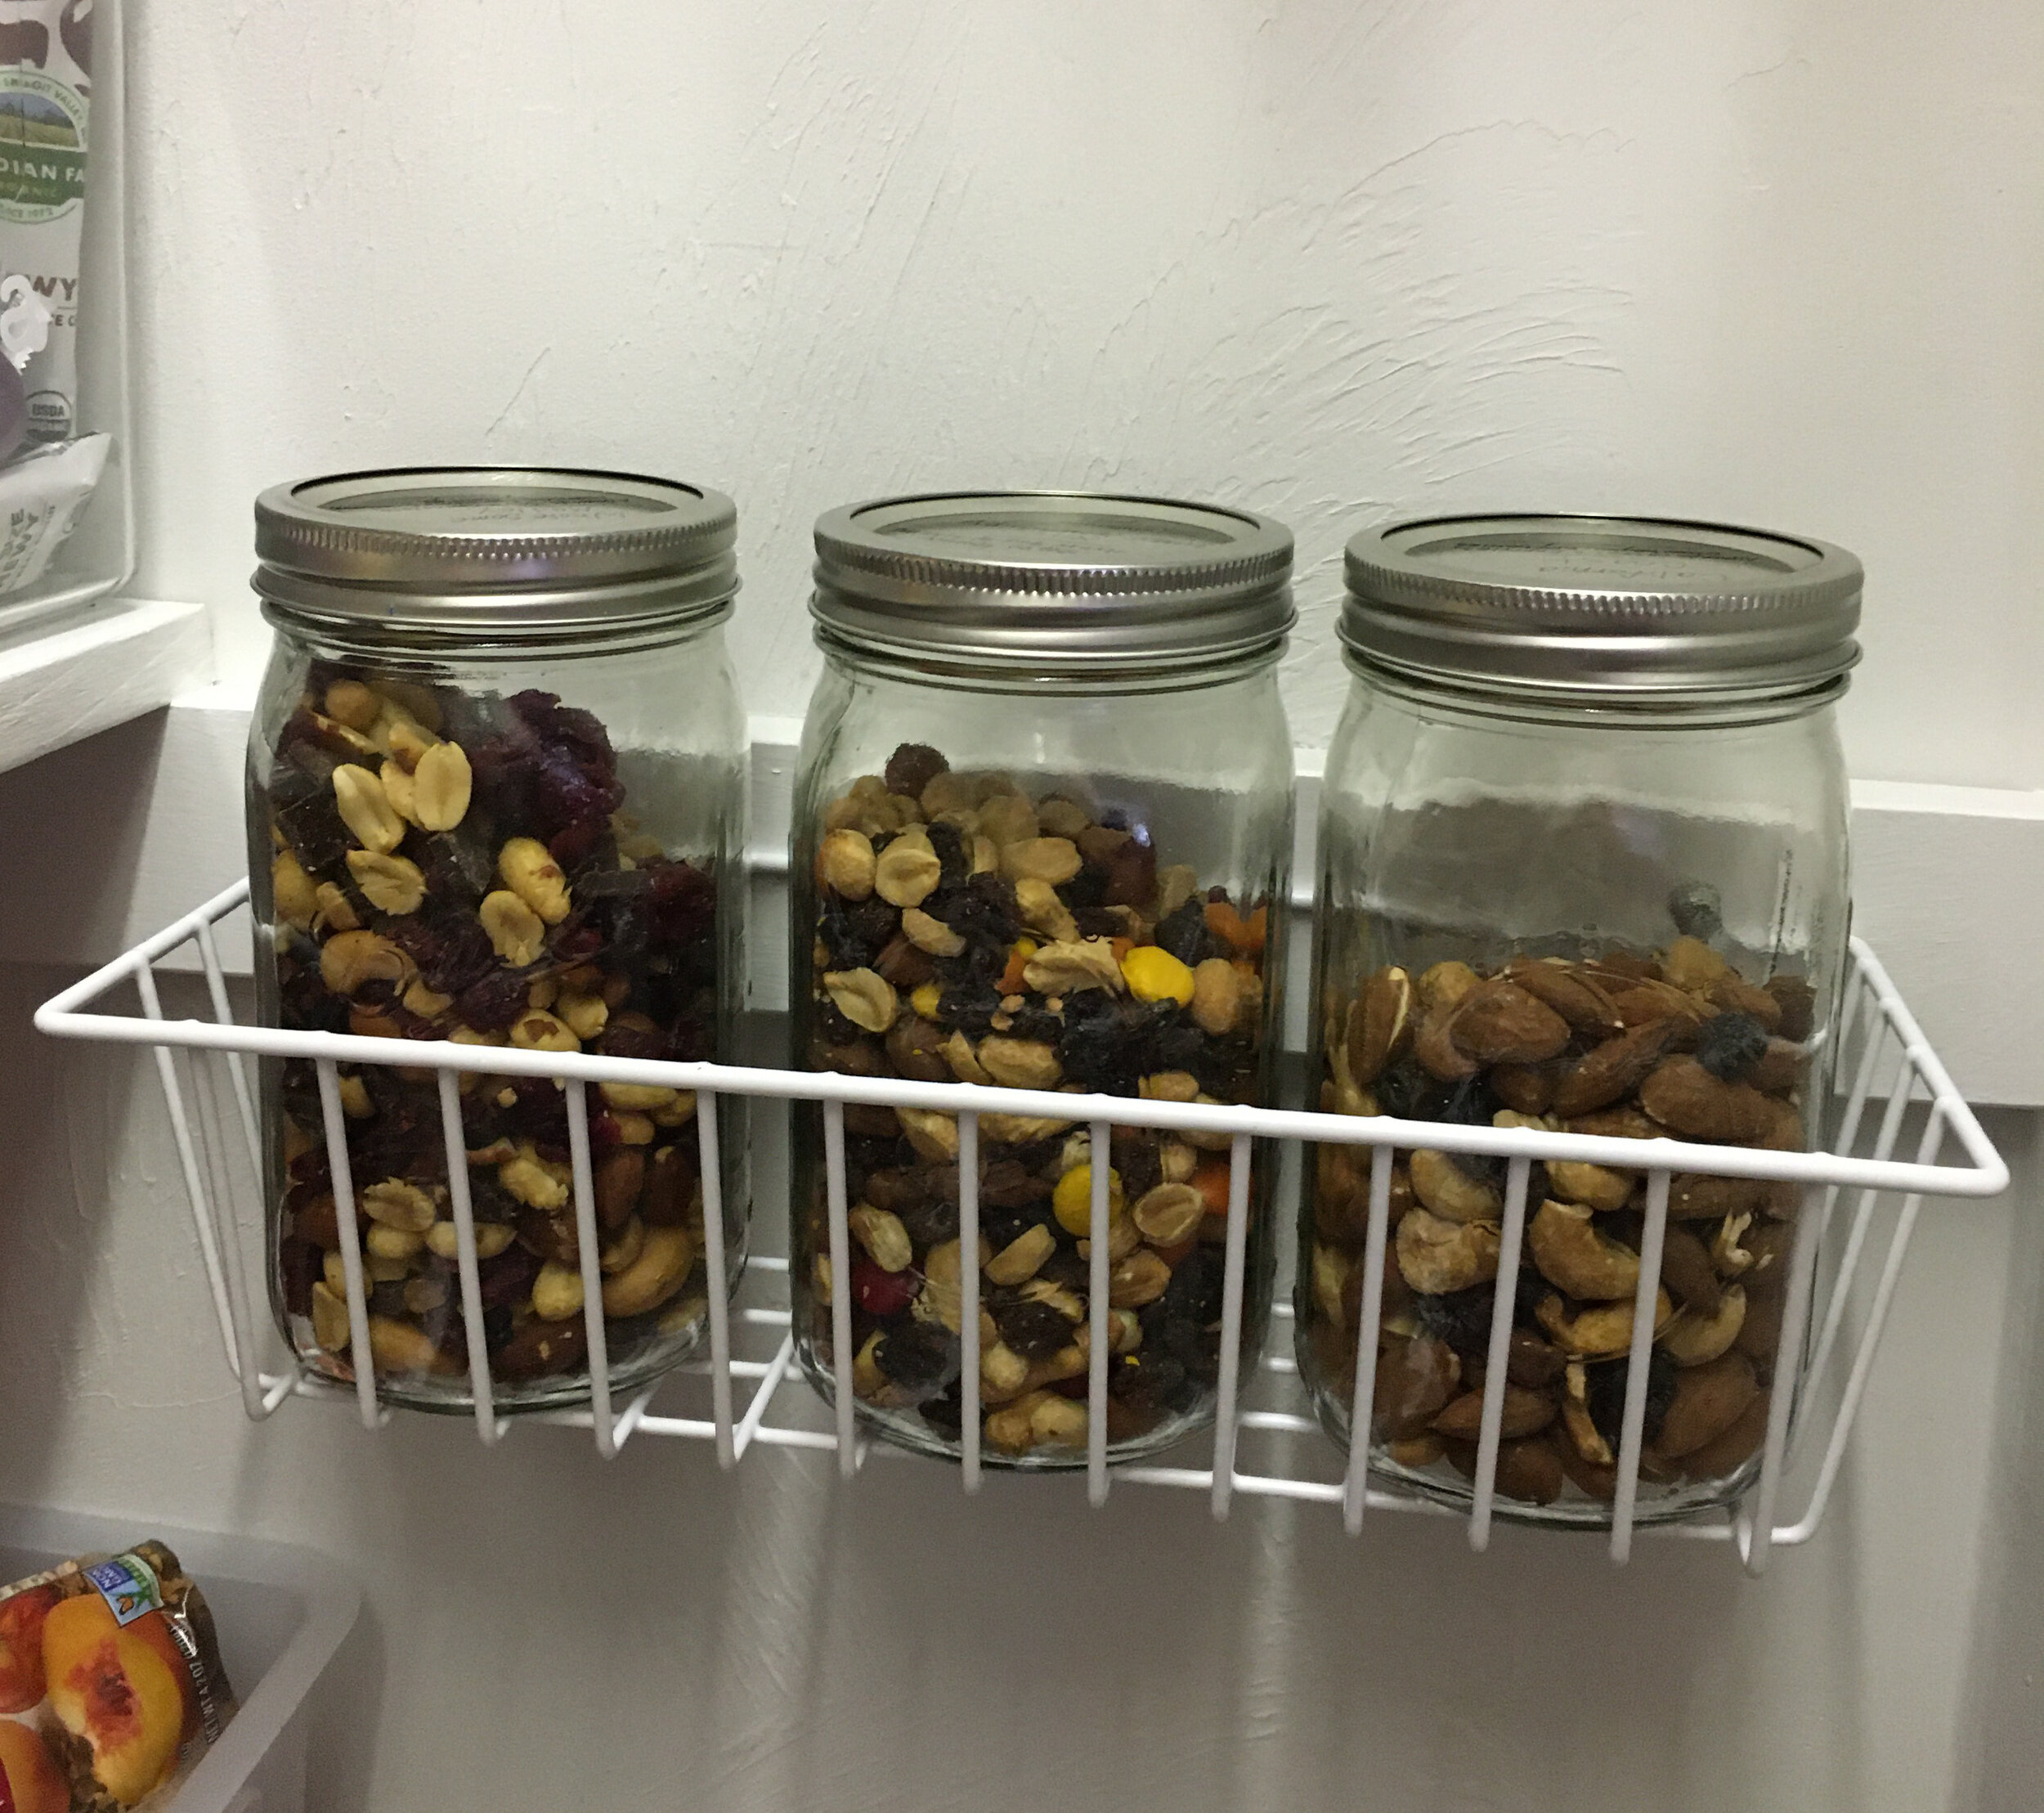
Over this past winter I added a few simple add-on organizers to our pantry to maximize the space and love how functional they are. Here they are below (and please excuse the glimpses of clutter in the pantry… as it now holds extra groceries and our family board games too - because, real life):

Additional Storage for the Walls

How We Turned a Coat Closet into a Functional Pantry

| Similar Wire Wall Basket | Mason Jars to store Trail Mix |

Under-Shelf Storage

How We Turned a Coat Closet into a Functional Pantry

| Wire Under-Shelf Basket - Perfect for Storing Potatoes! |

Decal for Pantry Door

How we Turned a Coat Closet into a Functional, Organized Pantry

It turns out our door is an odd size and in order to get a screen door for it we would have to custom order one (at a cost of about $300+! Yikes). So instead I decided to cut a custom vinyl label to stick to the door to make it more finished. I could have designed my own but I found a design I really liked on Etsy and bought the digital design file. After purchasing the design file, I used my Cricut and 651 Permanent Vinyl to make the label and then transferred it to the door. In hindsight I probably should have made it slightly smaller, but overall I love how it came out and how budget-friendly it was since I already owned a Cricut Machine and the vinyl.

| Pantry Digitial Design File | Cricut Machine | 651 Permanent Vinyl in Matte Black |

Back of Door Organizer

How+we+Turned+a+Coat+Closet+into+a+Functional%2C+Organized+Pantry

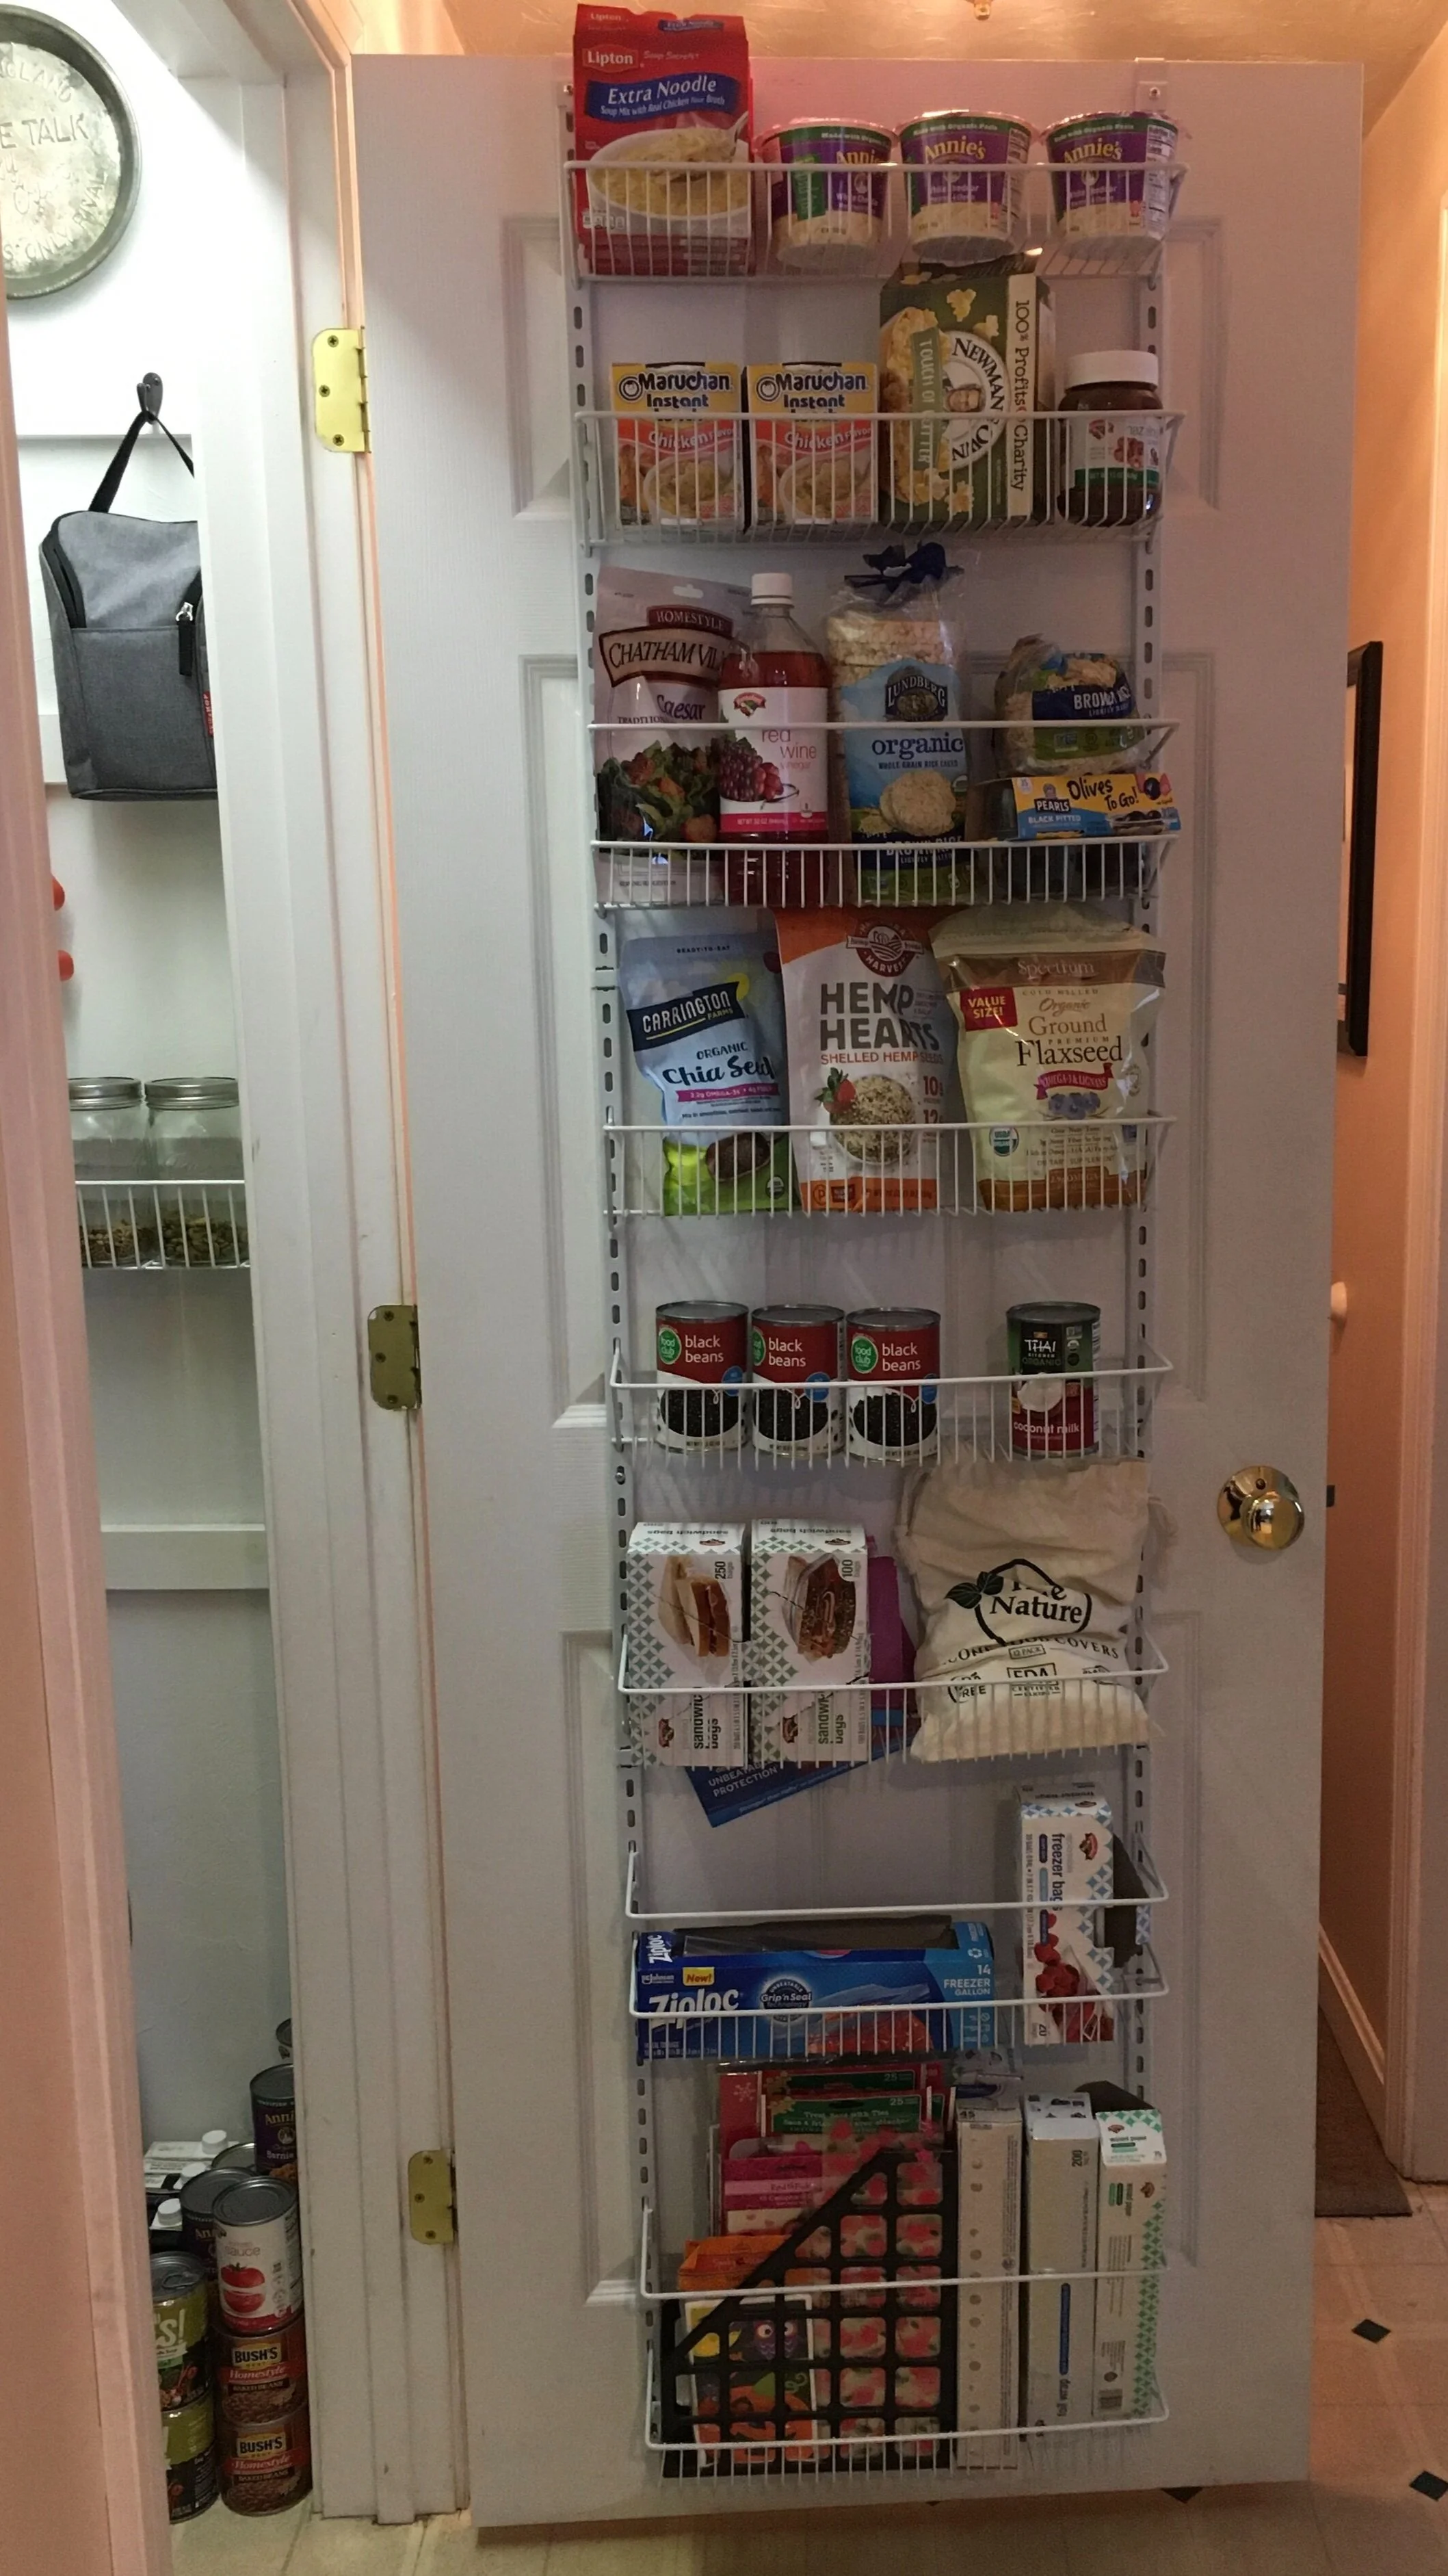
Finally, we decided to add a ClosetMaid Adjustable Organizer to the back of the pantry door to fully utilize the space. It was very simple to install and I am impressed with how sturdy it is once it's assembled and screwed in. We used the lower baskets for foil, parchement paper, ziplocks, silicone bowl covers, etc. The middle baskets we designated for frequently used canned goods, smoothie mix-ins, as well as salad fixings and rice cakes. Finally on the top two baskets we put convenience foods that we rarely use since I'm so short. Note: If you have a hollow-core door, you might want to use a specialty set of anchors/screws to attach it to the door for stability, rather than just screw into the door with regular screws.

| ClosetMaid Adjustable Organizer (18 inch) | True Nature Silicone Food Covers |

Stackable Canned Goods Organizer

Another later addition to our pantry organization are these amazing stackable can racks for organizing canned goods. Before I had quite a few canned goods just sitting on the floor of the pantry and in a separate kitchen cupboard, but I never could see everything at once and often cans in the back got forgotten -- Now everything is in one spot where I can see them and I can meal plan more efficiently.

| Stackable Can Rack Organizer (I have two racks stacked here) |

OXO POP Containers with Scoops for Snacks

OXO Containers with Scoop

Another thing that's been a huge game changer is moving dry snacks into OXO POP Food Storage Containers. We love these for our snack crackers and pretzels. They keep everything fresh and it's easy to see if you're starting to run low on these staples. To keep the kids from going too wild with serving sizes we added clear OXO 1/2 Cup Scoops in each container too - making it easy to grab a serving.
I used my Brother Label Maker to make labels for the containers. These can easily be peeled off and relabeled as needed.

| OXO POP Food Storage Containers | OXO 1/2 Cup Scoops | Brother Label Maker |

Disclaimer

This website shares personal opinions and experiences regarding a variety of topics. Please do your own research regarding all things and use information/opinions stated here at your own discretion and risk.


Check out our Related Posts:

KEEP UP WITH BIRCH LANDING HOME
|  Etsy  |  Facebook  |  Instagram  |  Pinterest  |  Bloglovin'  |  Hometalk  |

Christmas Garland Storage Hack

I love Christmas as much as anyone, but once the holidays are over I’m ready to pack it all up and start the New Year fresh with a clean house! Some of the most annoying decorations to pack up for me has been garland or string lights… they just get tangled so easily which makes unpacking them next Christmas equally as aggravating.

A simple solution? Cut out a piece of cardboard in a “spool shape” and wrap the garland or lights around it. This packs neatly away and keeps things from getting tangled. Trust me, you’ll thank me next Christmas ;)

Christmas Garland Storage Hack

KEEP UP WITH BIRCH LANDING HOME
|  Etsy  |  Facebook  |  Instagram  |  Pinterest  |  Bloglovin'  |  Hometalk  |

New Year, New Resolutions to Save Money

New Year means time for new Resolutions.  Usually they boil down to a lot of the same things, and a big one for us is always saving more where we can.  Every year everything gets more expensive - groceries, gas, clothes, healthcare, etc but our paychecks always seem to stay the same.  
I decided to compile some of my best blog posts on saving money and I hope it will help you jumpstart your savings too!  


Saving on Groceries


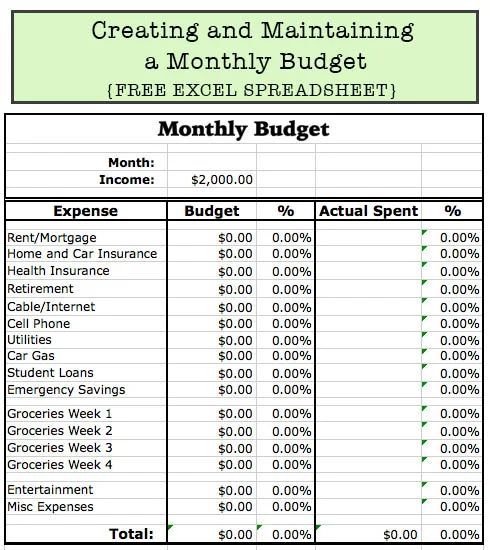
Budgeting


Saving on Health Insurance & Medical Bills


Clean House, Make Money


Save on Special Events


KEEP UP WITH BIRCH LANDING HOME
|  Etsy  |  Facebook  |  Instagram  |  Pinterest  |  Bloglovin'  |  Hometalk  |

Reusable Weekly Planner - Plan your week, meals, and goals! {Free Printable}

For a while now I've been striving to get better about meal planning, so a few months ago I designed this weekly planner to keep in our kitchen and see if it helped.  After using this method for several months I'm happy to report that it has been a HUGE success and wanted to share it with all of you who may have staying organized, planning meals ahead of time, or reducing your grocery bill as goals for 2016!  

Reusable Weekly Planner Free Printable - to-do list, menu and meal planning, weekly goals

This weekly planner can either be printed and written on directly - or you can print, frame it, and simply write on the glass to keep reusing it (which is what I have done).  I love having it under glass because it means it's always on display and easy to refer to, and it saves a lot of paper and ink.  I didn't include too many photos of it it in our kitchen because it was so hard to photograph.. the glare from the glass makes a decent photograph nearly impossible.  

Reusable Weekly Planner in the kitchen
Pro-tip:  Write on the glass with a Sharpie to avoid smudges, then erase with a little 91% rubbing alcohol.  

Pro-tip:  Write on the glass with a Sharpie to avoid smudges, then erase with a little 91% rubbing alcohol.  

To write on the glass, you can use a fine-tip dry erase marker or a Sharpie marker.  I prefer the Sharpie because it writes cleaner and won't smudge.  

"But how to erase it!" you ask?  

No problem at all:  simply put a little 91% rubbing alcohol on a paper towel and it wipes off with no problem and no residue.  

Example

Example

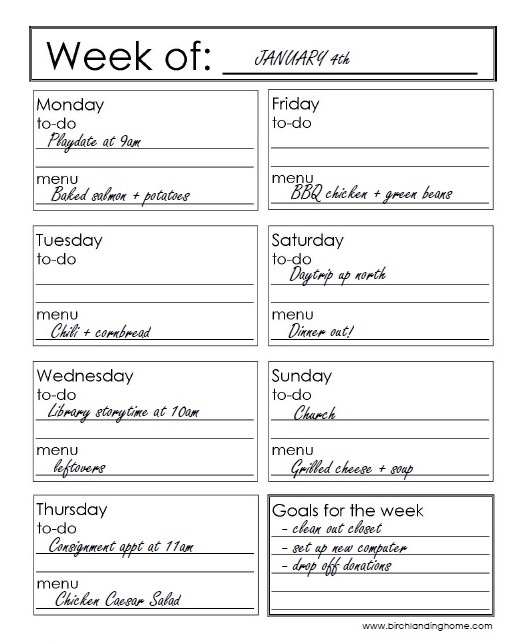
Every Sunday I sit down and first fill in all the daily "to-dos" for the week.  These are things that have to happen that day, like appointments.  This gives me a sense of what the week will look like and how much time I may have to cook dinner that day, etc.  Days we won't be home means I don't have to cook (wahoo!).  Because I lay it all out ahead of time I can plan ahead for groceries... leftover potatoes from Monday can be thrown into Tuesday's chili.  The chicken I buy can be portioned out for dinner on Thursday and Friday.  Planning ahead means less waste and saving money in the long run (and you know how hard I try to save money on groceries).  
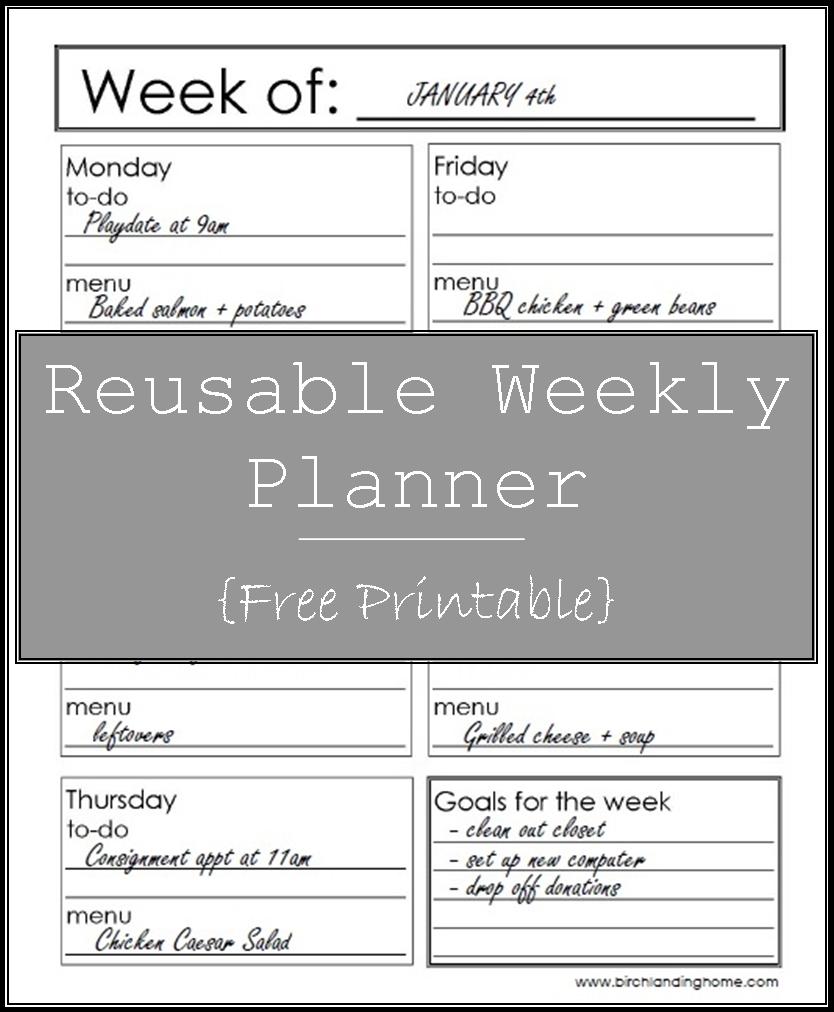
"Goals for the week" is where you put in projects and goals you can pick at over the course of the week when you get spare moments.  I feel like this list makes me more motivated (and accountable) to be productive when I have down time.  

Reusable Weekly Planner

{Download free PDF of our Reusable Weekly Planner HERE}

Reusable Weekly Planner Free Printable - to do list, menu planning, weekly goals

So that's my Reusable Weekly Planner!  It's been a huge help to keep me more organized, more motivated, and save more money on groceries.  I hope that it will be as helpful for you!  

KEEP UP WITH BIRCH LANDING HOME
|  Etsy  |  Facebook  |  Instagram  |  Pinterest  |  Bloglovin'  |  Hometalk  |

Merry Christmas from Birch Landing Home!

Hope everyone had a very Merry Christmas with family and friends!

It felt more like spring than December here in New England today, but it was still a wonderful Christmas.

Lake living - Christmas tree by the lake.  Merry Christmas!

I'll be taking a little break from the Etsy shop until the end of January and am hoping to get some projects finished around the house in the meantime (like my annual New Years Resolution closet purge).  I'm also hoping to expand the Etsy shop in the New Year with more New England-inspired home decor items like painted signs and handmade boxes. 

Merry Christmas and Happy New Year Everyone! 

KEEP UP WITH BIRCH LANDING HOME
|  Etsy  |  Facebook  |  Instagram  |  Pinterest  |  Bloglovin'  |  Hometalk  |

New Years Sale Extended!

I've decided to extend my big New Years Sale through this Friday, January 16th!  Please check out my shop and take advantage of the sale before I bring in new items for the New Year.  

Don't forget, once the jewelry listings expire I won't be renewing them so get them while you can!  ;)  

Coupon Code Expires 01/16/15

Coupon Code Expires 01/16/15

KEEP UP WITH BIRCH LANDING HOME
|  Etsy  |  Facebook  |  Instagram  |  Pinterest  |  Bloglovin'  |  Hometalk  |