I'm a wife, stay-at-home mom, crafter, and blogger living in rural New England. As seen in Martha Stewart Living, Food Network Magazine, and more! | Tutorials, DIY, crafts, parenting tips, recipes, money saving tips, product reviews, local product features, New England living, intentional living, and more! |
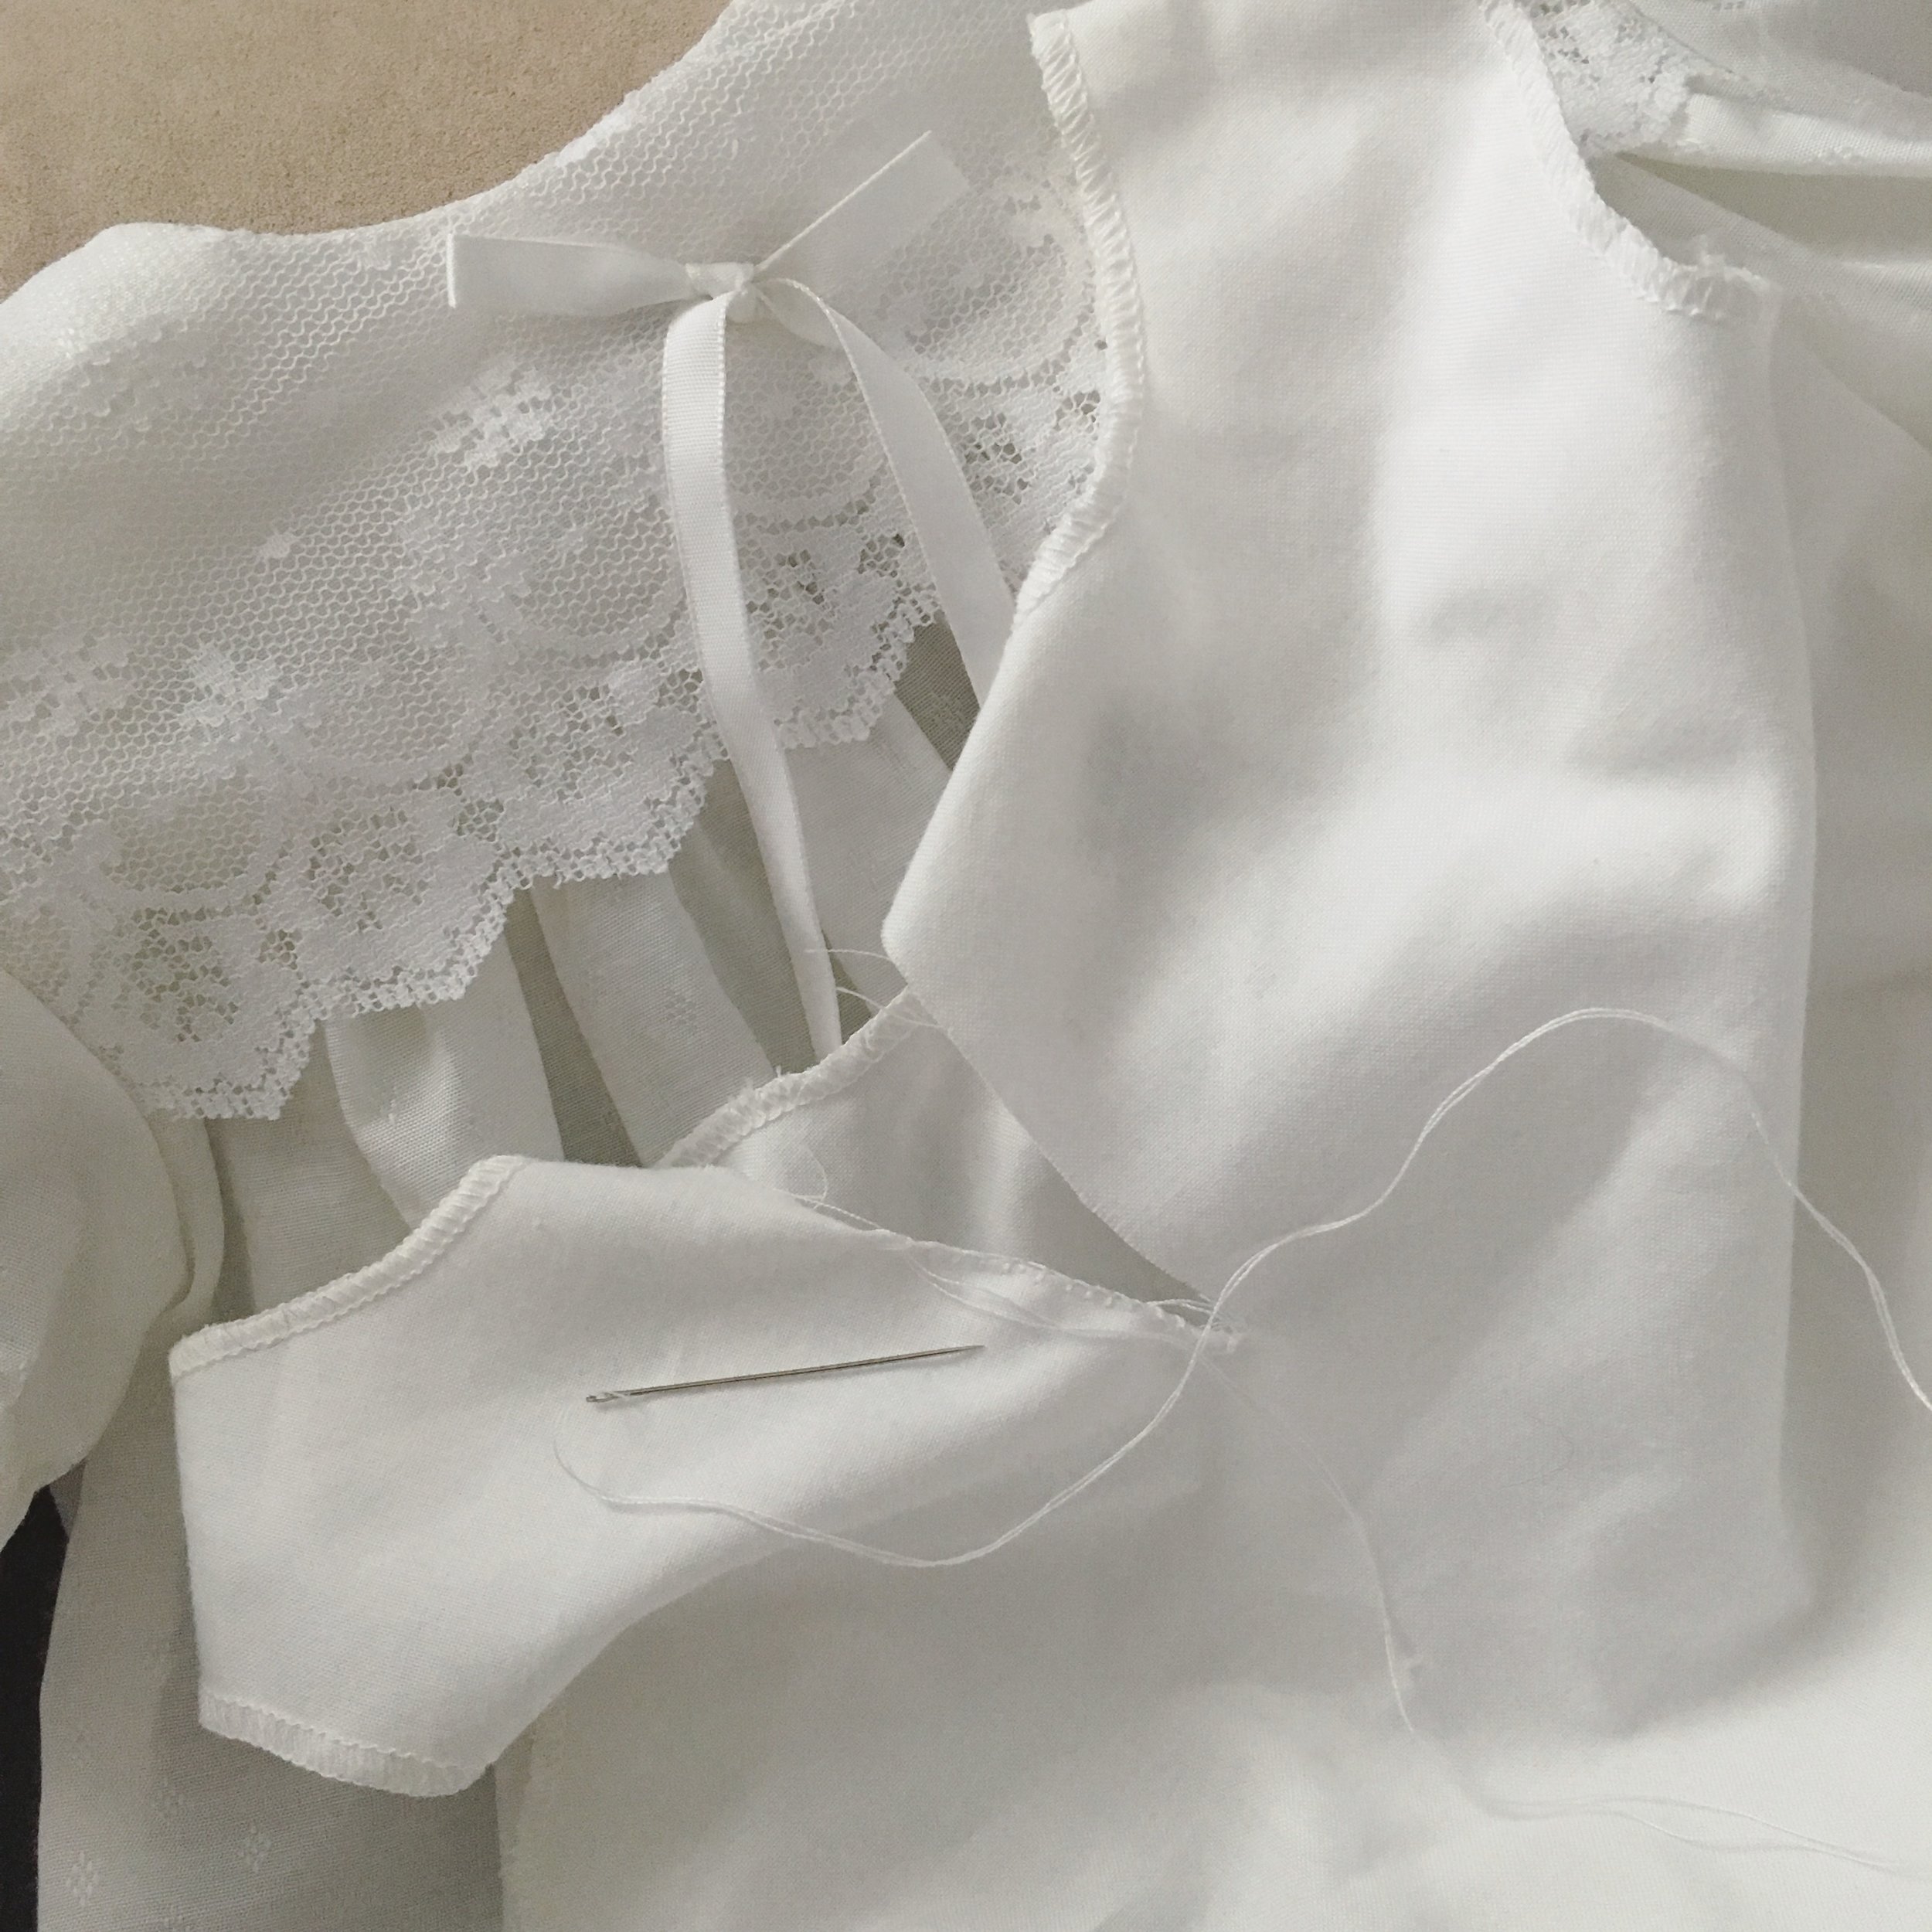
A week ago our youngest got Baptized. She wore the same Baptism Dress I did and big sister did, which is so special! ...However I did have to cut a slit in the slip to get it over her head that morning (she's a big baby!). So now I’m hemming that, and the dress will be cleaned and put away for their own kids someday.
Do you have any heirloom clothing in your family? We also have my Grandmother's wedding veil/crown from the 1940's that both my sister and I wore for our First Communions - so very special.
So excited to say that our ornaments are now being carried at the beautiful farm + table in Kennebunkport, Maine! This eclectic gift shop features lots of handmade and small-batch goods made by artisans all over the country and I’m so honored to be included.
Make sure to stop in next time you’re in the area!
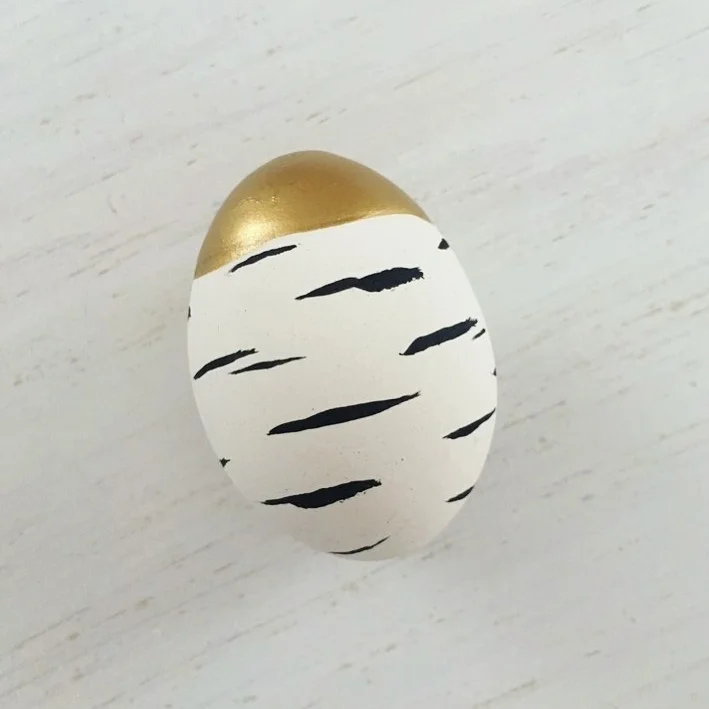
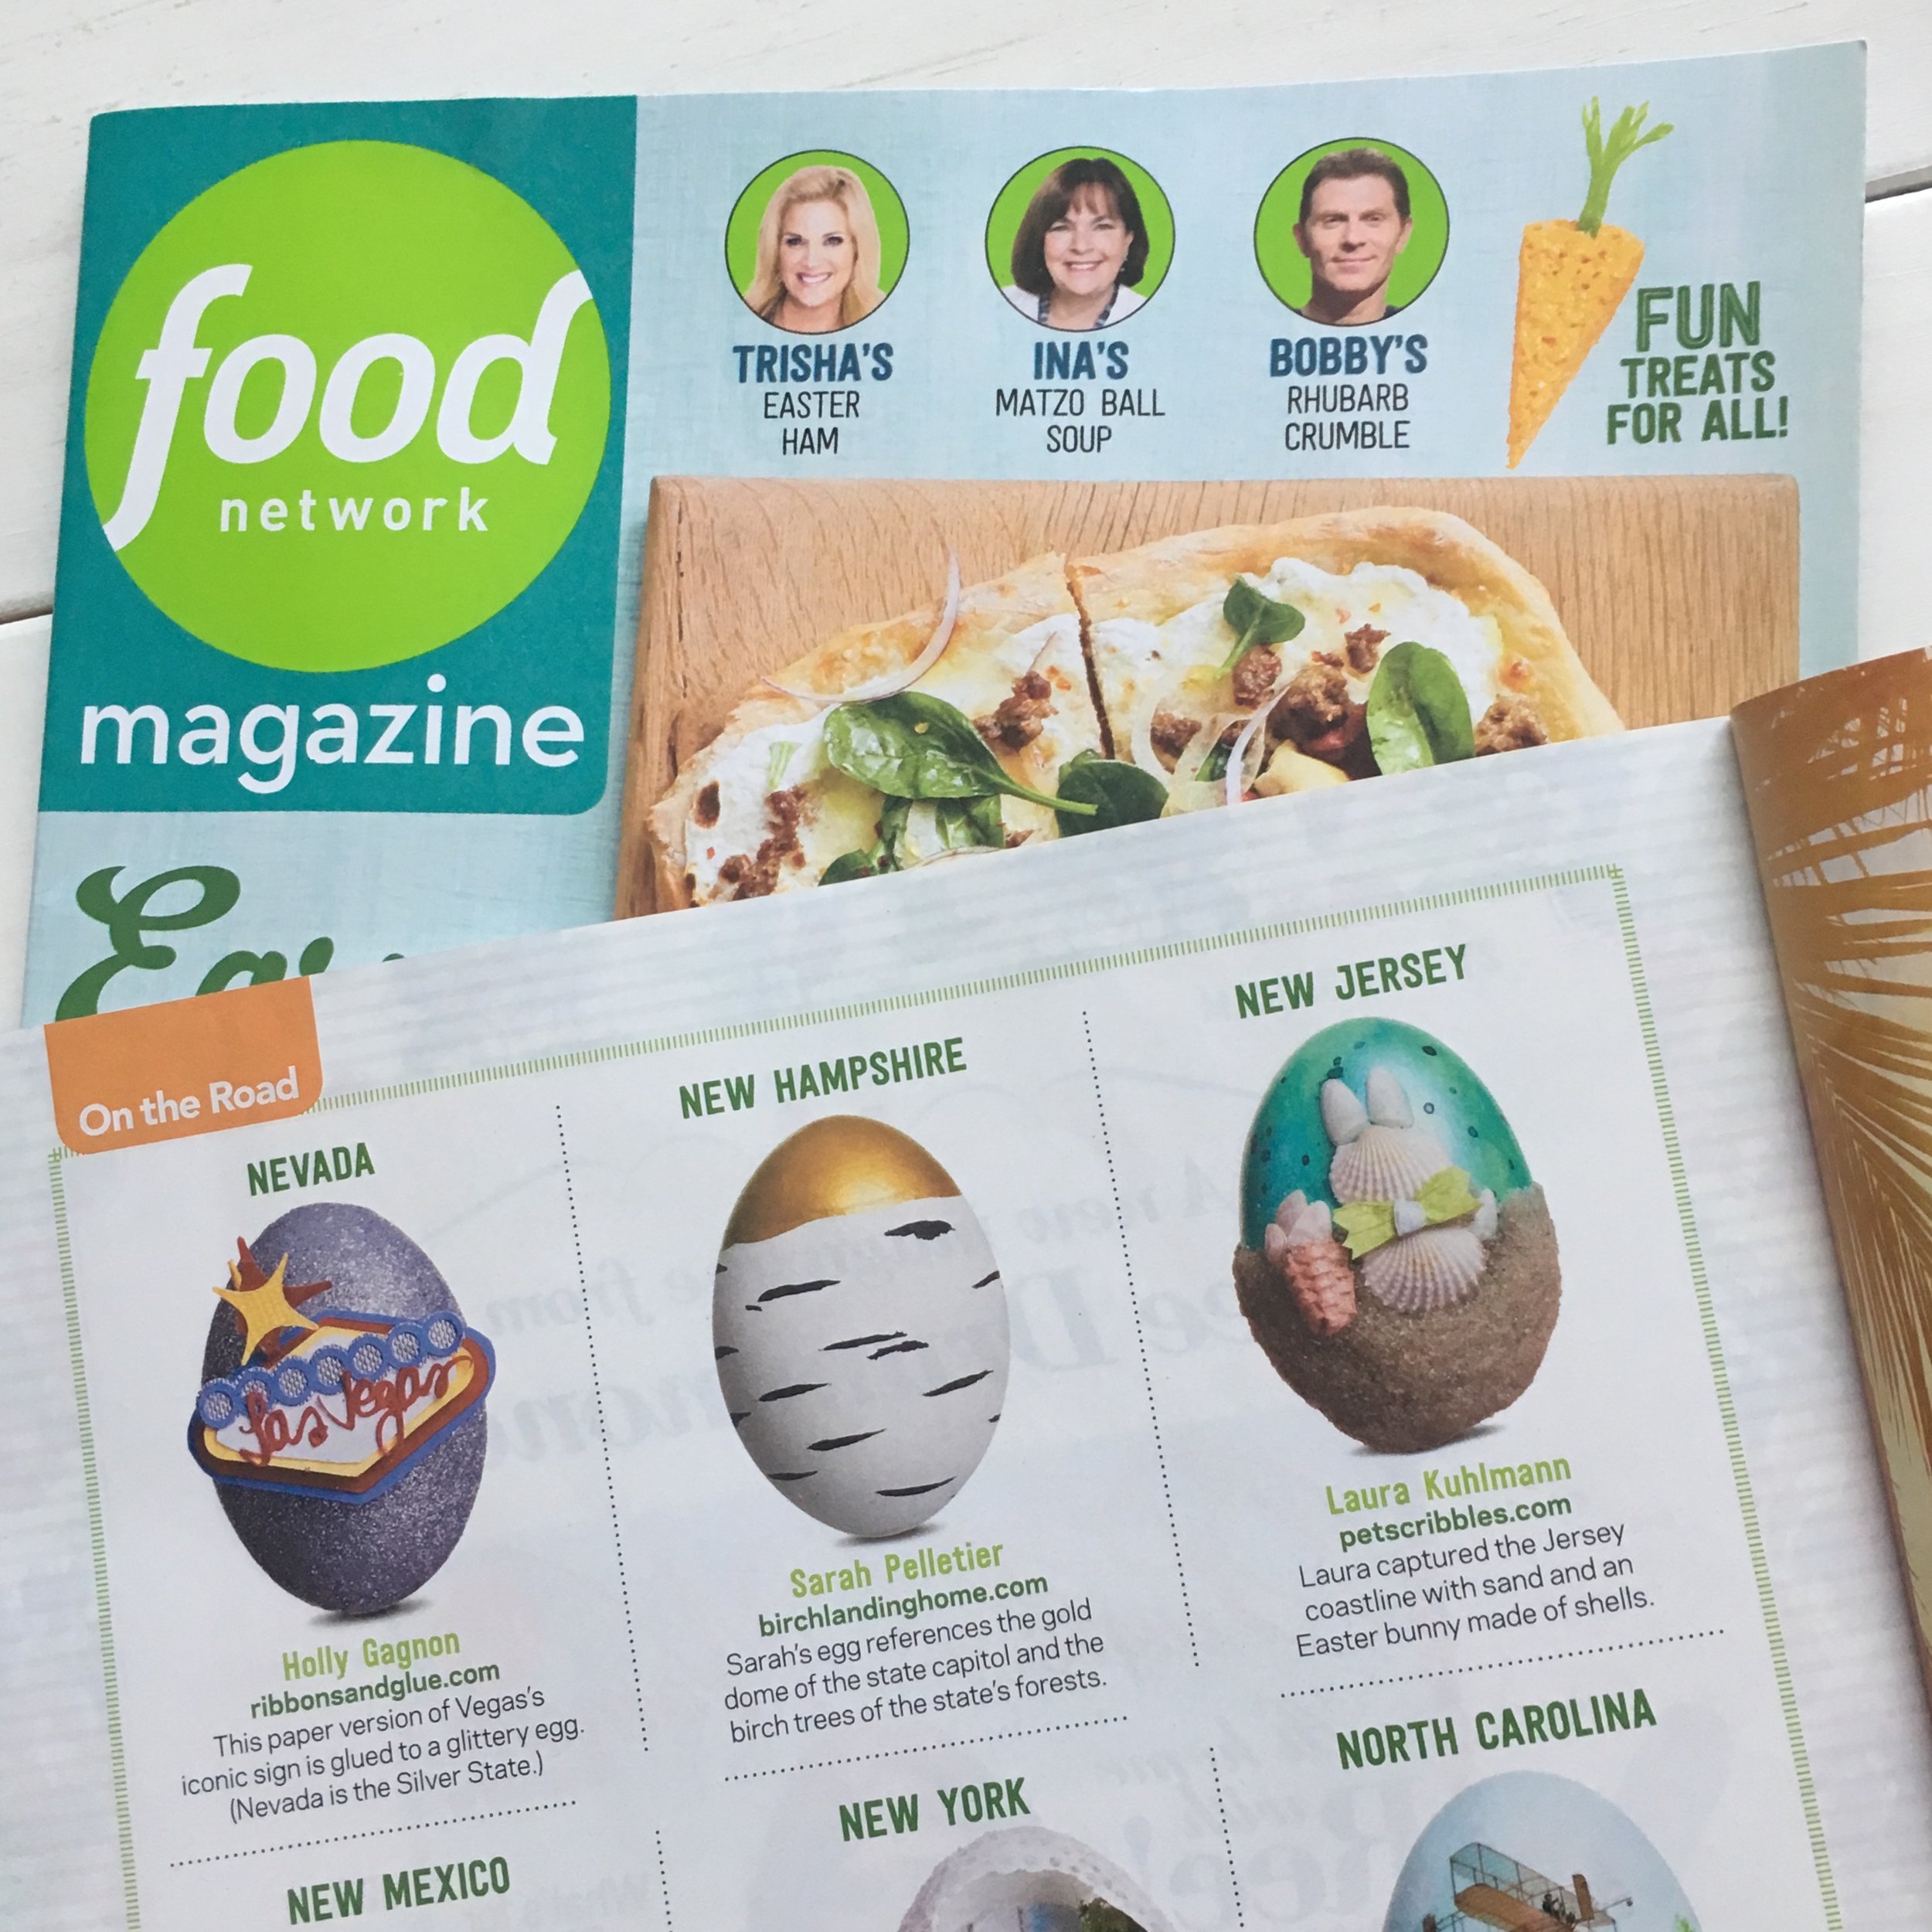
A few months ago, Food Network Magazine emailed me and asked if I'd be interested in designing a New Hampshire-themed egg for their Easter issue! I was completely blown away and honored for the opportunity. My New Hampshire egg design was a gold-dipped, faux birch bark egg - gold-dipped to represent our State House with it's golden dome, and the birch bark paint finish to represent our our state tree, the white birch. Fun Fact: My great-grandfather was a steeplejack and did the gold leaf on the New Hampshire capitol dome back in the 1920's! | This post contains affiliate links |
Creating one of these gold-dipped birch eggs for yourself is pretty simple! Here's the full how-to:
Materials:
faux egg (for the Food Network Magazine example and most of the photos in this how-to, I used an Eggnot, a fake ceramic egg - but you could also use a wooden egg. If you use real hardboiled eggs I would not recommend eating them after painting)
white acrylic paint (if your fake egg isn't already white to begin with)
paper cup
thin paintbrush
tinfoil to make a stand for the egg to dry on
How-to:
1. First, make a tinfoil ring to hold your egg while it dries between steps. Then if your egg isn't already white, paint white and allow to dry between coats. It may need several coats of paint.
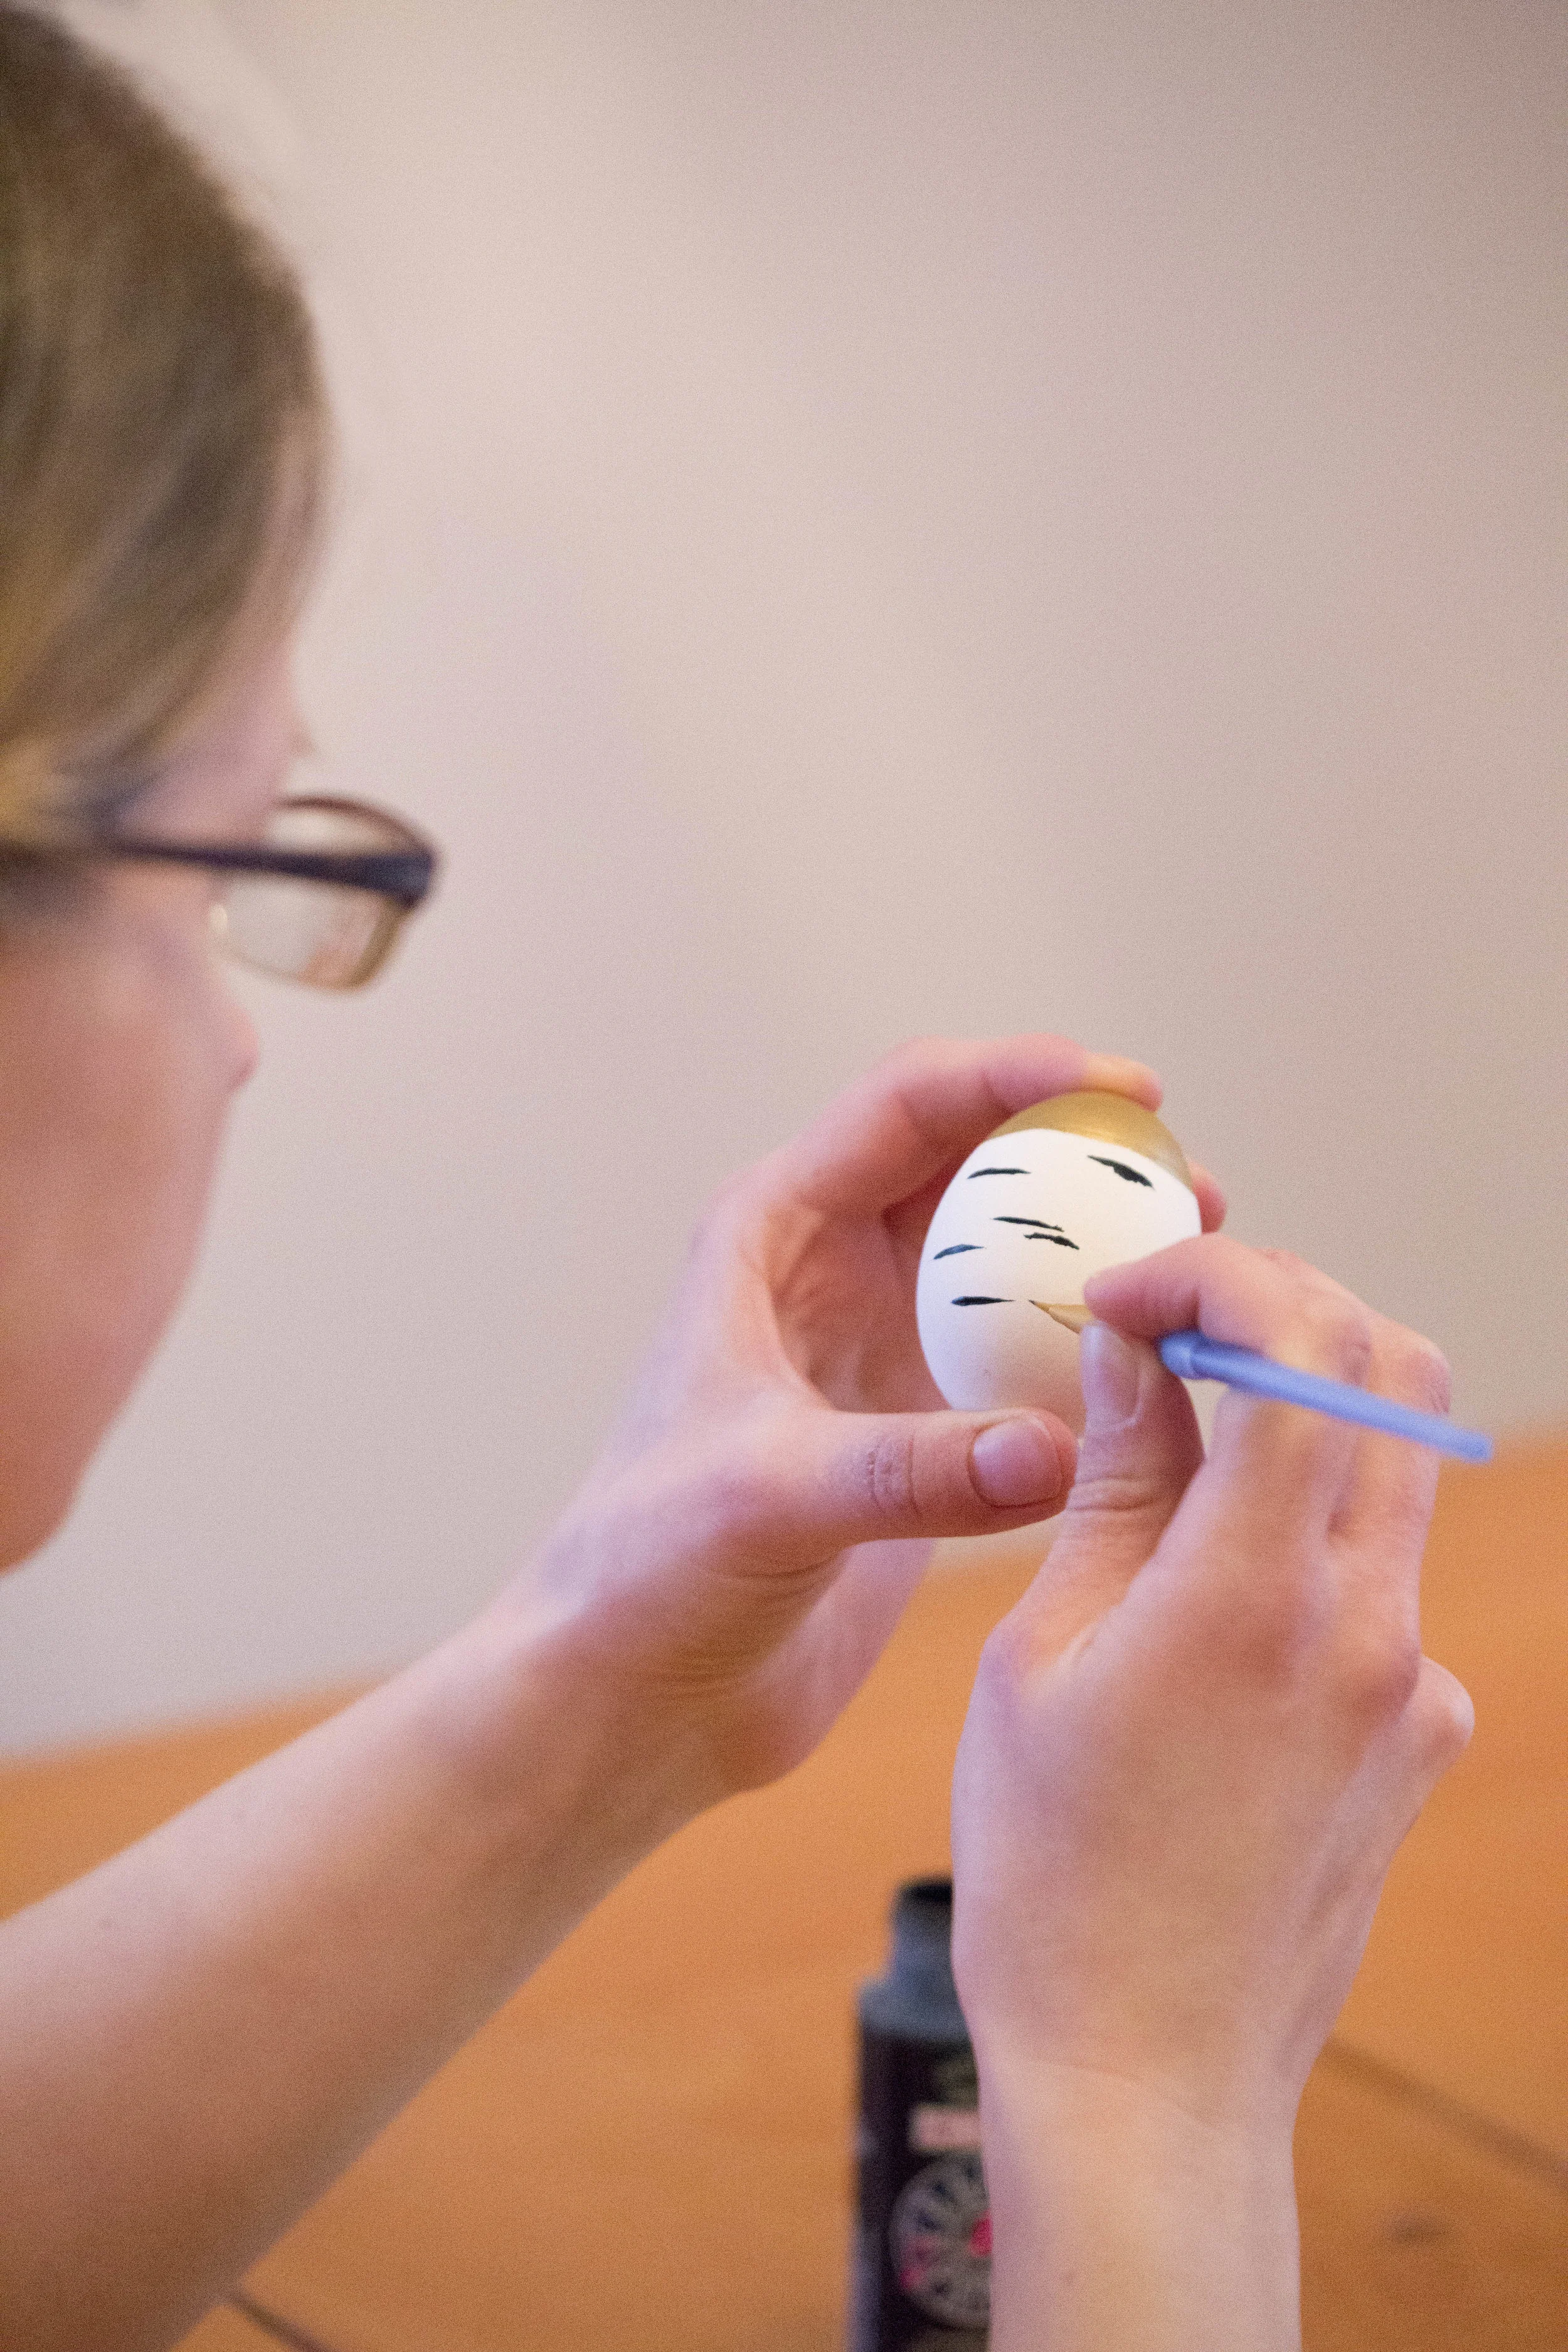
2. Next shake the gold acrylic paint well and pour about half an inch of it into a small paper cup. Dip the top of the egg carefully into the cup. (I found it best to to do the gold-dip first, then paint the bark pattern after since sometimes the black lines were visible under the gold-dip.) Gold paint tends to be thick and you may have some swirling or thick drips after dipping. You can try to smooth these out a bit with a paintbrush but it usually looks cleaner if you just leave it as-is, even if you end up with a thick spot within the dip. After the gold dip, carefully place the egg in the tinfoil ring to dry.
3. Once the gold-dip is dry, use a thin paint brush to paint horizontal black lines on the egg, all the way around. Vary the placement and thickness of the lines a bit to mimic the look of birch bark. You may have to carefully hold the egg for a few minutes to let it air dry a bit before carefully setting it, gold top down, into the tinfoil ring to finish drying.
And that's it! While making them can be tedious with the drying time between steps, it's really quite easy. And in the event you don't feel like tackling this project yourself, I have a limited supply of painted Wooden Gold-Dipped Birch Eggs in my Etsy Shop!
Incredibly honored and excited to say that I designed and painted the New Hampshire egg for the latest issue of Food Network Magazine! I was completely blown away when they sent me an email last November, asking if I wanted to be a contributor for this piece (um, YES!) and it’s so exciting to finally see it in print! Thank you, Food Network Magazine!
If you want to make your own NH-inspired egg, please check out my full tutorial HERE.
PS - Make sure to pick up a copy, so many creative eggs from every state - not to mention all the yummy recipes!
It's been cold and snowy here in New England these last two weeks (like 3 Nor'easters in two weeks snowy!), so what better way to warm up than with a bowl of hearty and healthy chili! This recipe was done in our crockpot but could be made in less time in an Instapot. Don't have an Instapot? You're in luck - I've teamed up with several other bloggers to give one away! {Scroll down to enter the givewaway}
This chili is super easy to make and can be adjusted to your taste with whatever veggies you'd like to add. I often make chili as an excuse to use up all the extra veggies we have in the fridge - once all the flavors meld together you can hide just about any vegetable in there (perfect for picky toddlers or husbands). While not in this current batch, I've often added things like mushrooms, spinach, sweet potatoes, zucchini, tomatoes, carrots, squash, etc. As far as using canned beans and tomato sauce I always buy store-brand organic varieties when I can - they tend to have less additives and salt than non-organic and are cheaper than the name brand ones!
Ingredients
1 lb of lean ground turkey (can also use lean ground beef if you prefer)
2 cans of low sodium tomato sauce
1 can of red kidney beans
1 can of garbanzo beans
1 can of lentils (adds a lot of protein and you won't even notice them mixed in with the ground meat!)
2/3 cup of frozen corn (using frozen veggies is a great shortcut)
1/2 cup of frozen chopped peppers
2 tablespoons chili powder
1 teaspoon chopped jarred garlic
1 teaspoon turmeric (turmeric has great anti-inflammatory properties)
1 teaspoon Italian seasoning
salt and pepper to taste
shredded cheese and/or crackers to garnish
Directions
Brown ground meat in a skillet, pouring off excess fat.
Add meat and all remaining ingredients (except for garnishes) to crockpot.
Cook on low in crockpot for 8 hours or high for 4 hours, until veggies are soft and flavors have melded.
Garnish with shredded cheese and crackers, if desired.
Looking for a way to make this yummy recipe faster? Use an Instapot! I've teamed up with several other bloggers to give one away to a lucky follower. Enter below for a chance to win - good luck!
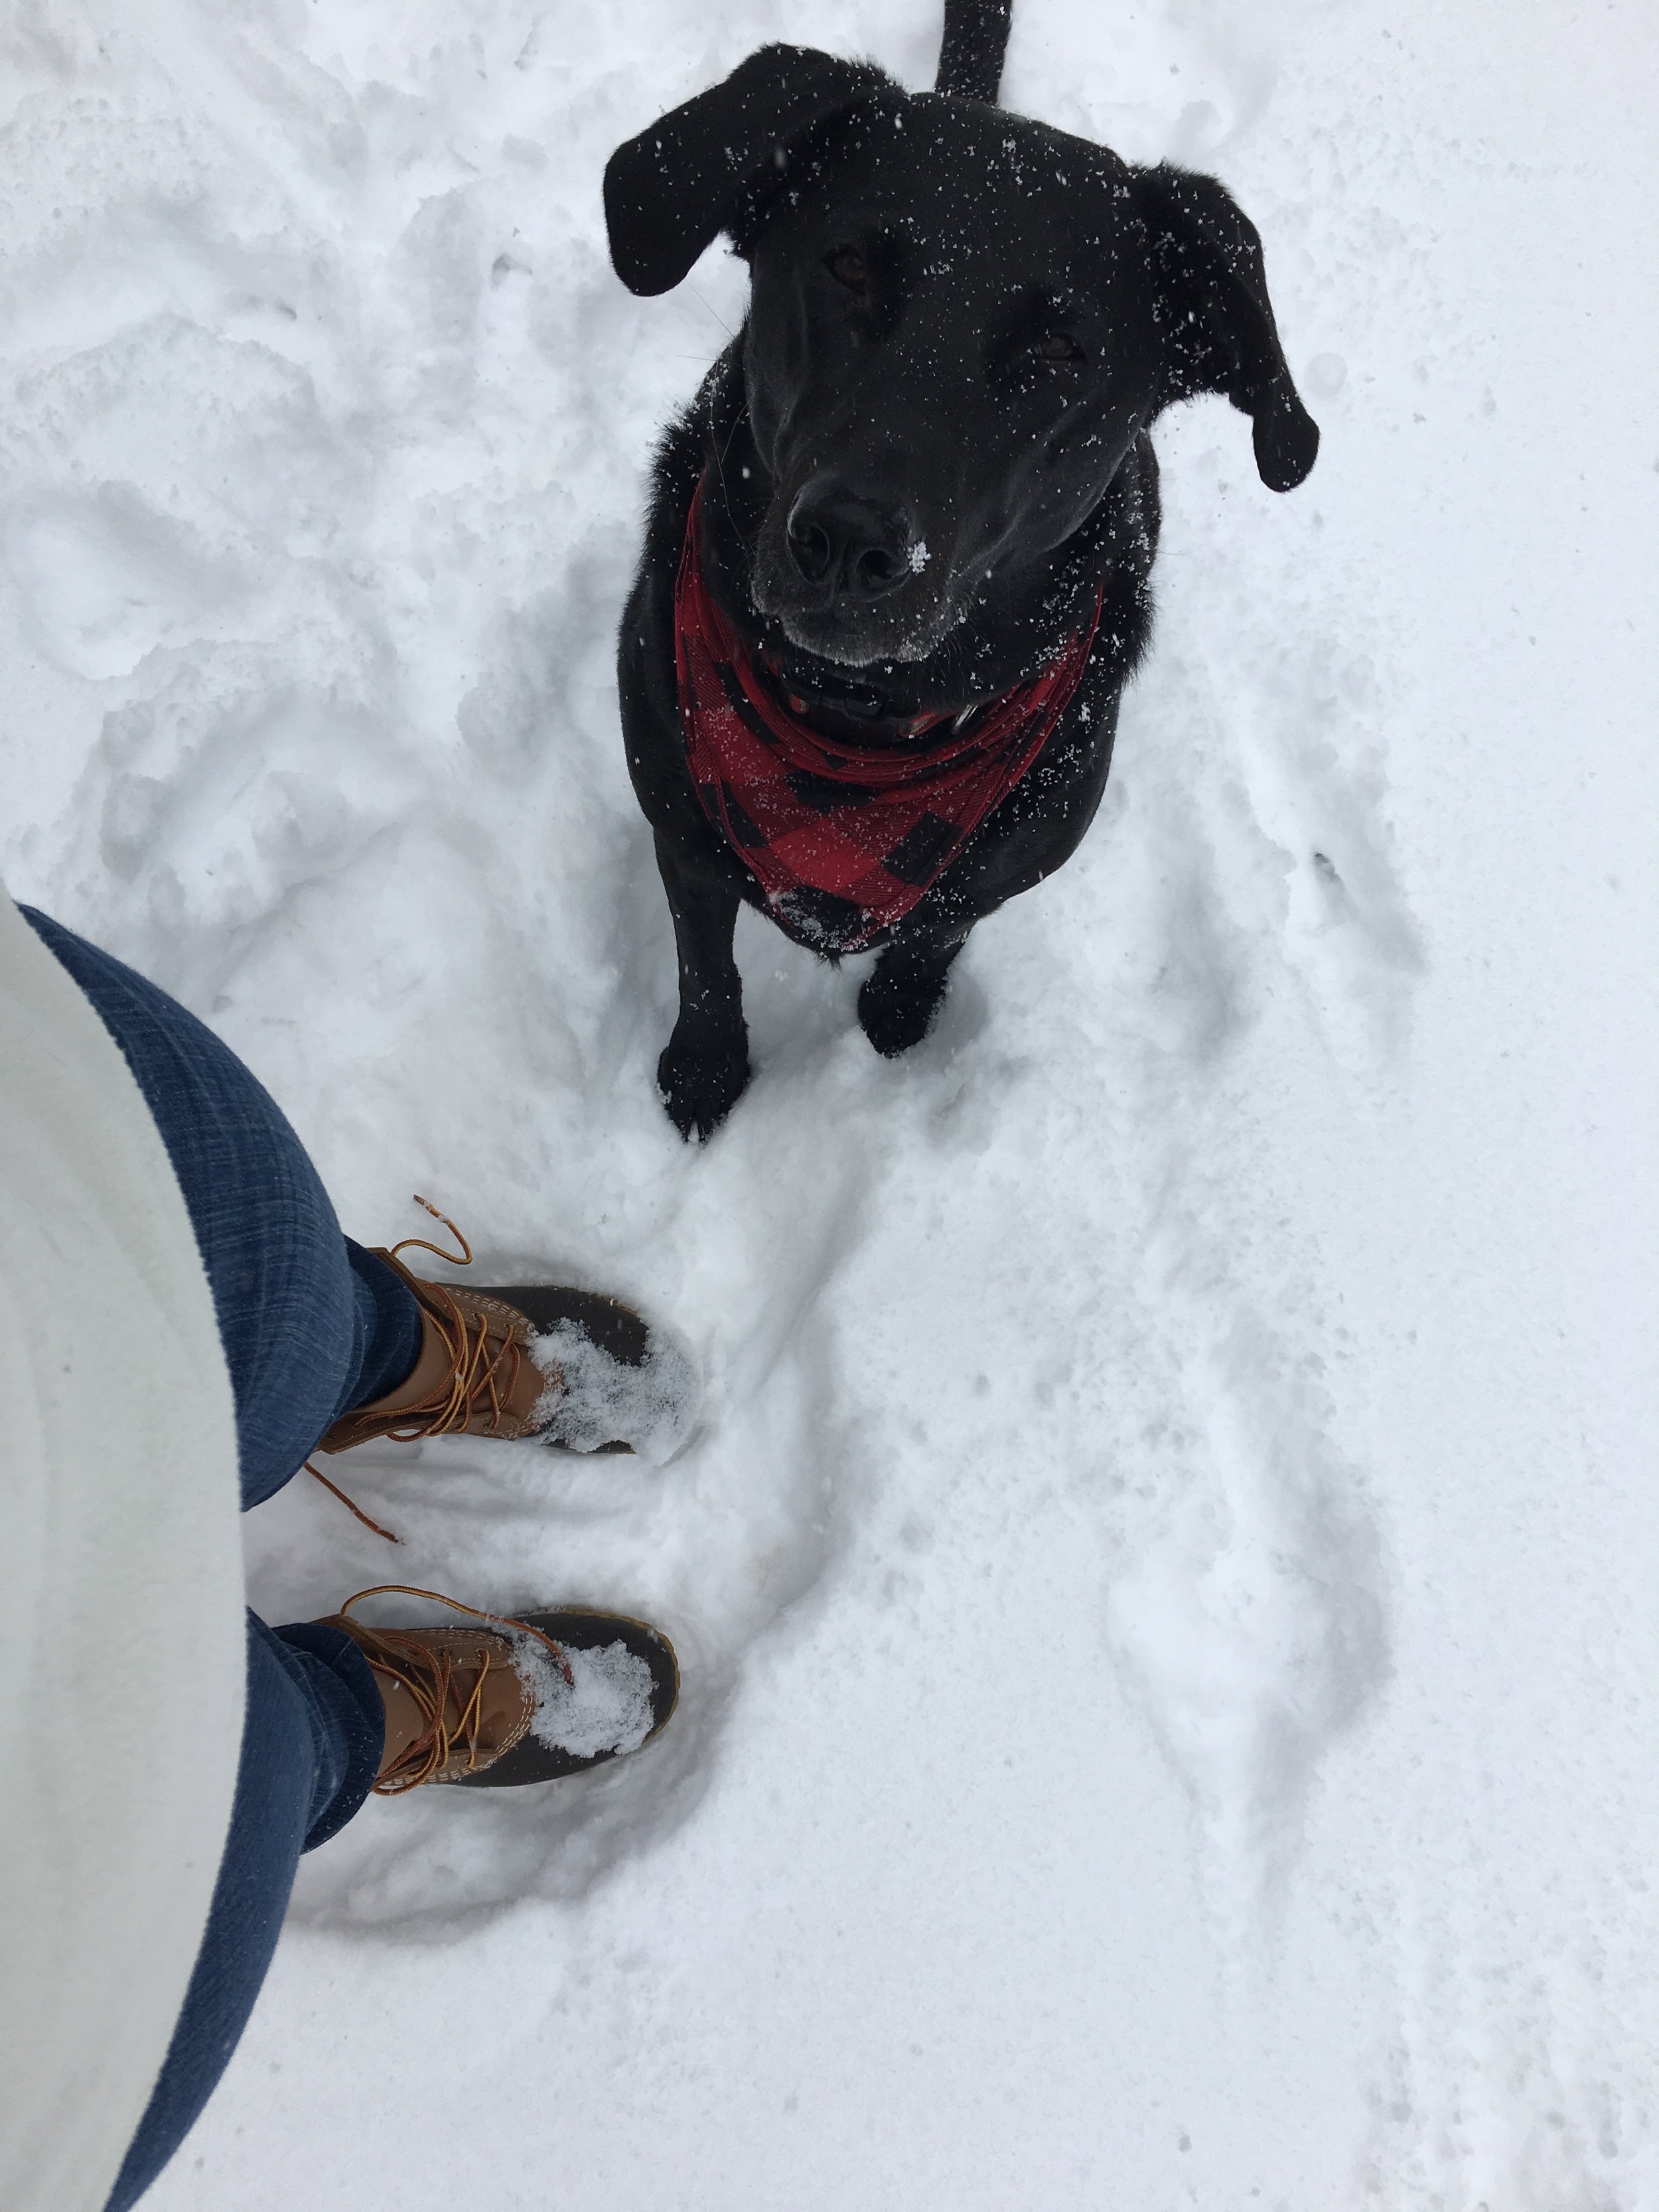
I think this makes the third Nor'easter in two weeks for us here in New England. As pretty as the snow is, I'm sure ready for warmer weather and gardening! At least Harley is loving the snow :) Now, if you'll excuse me - we have about two feet of snow to snowblow and shovel.
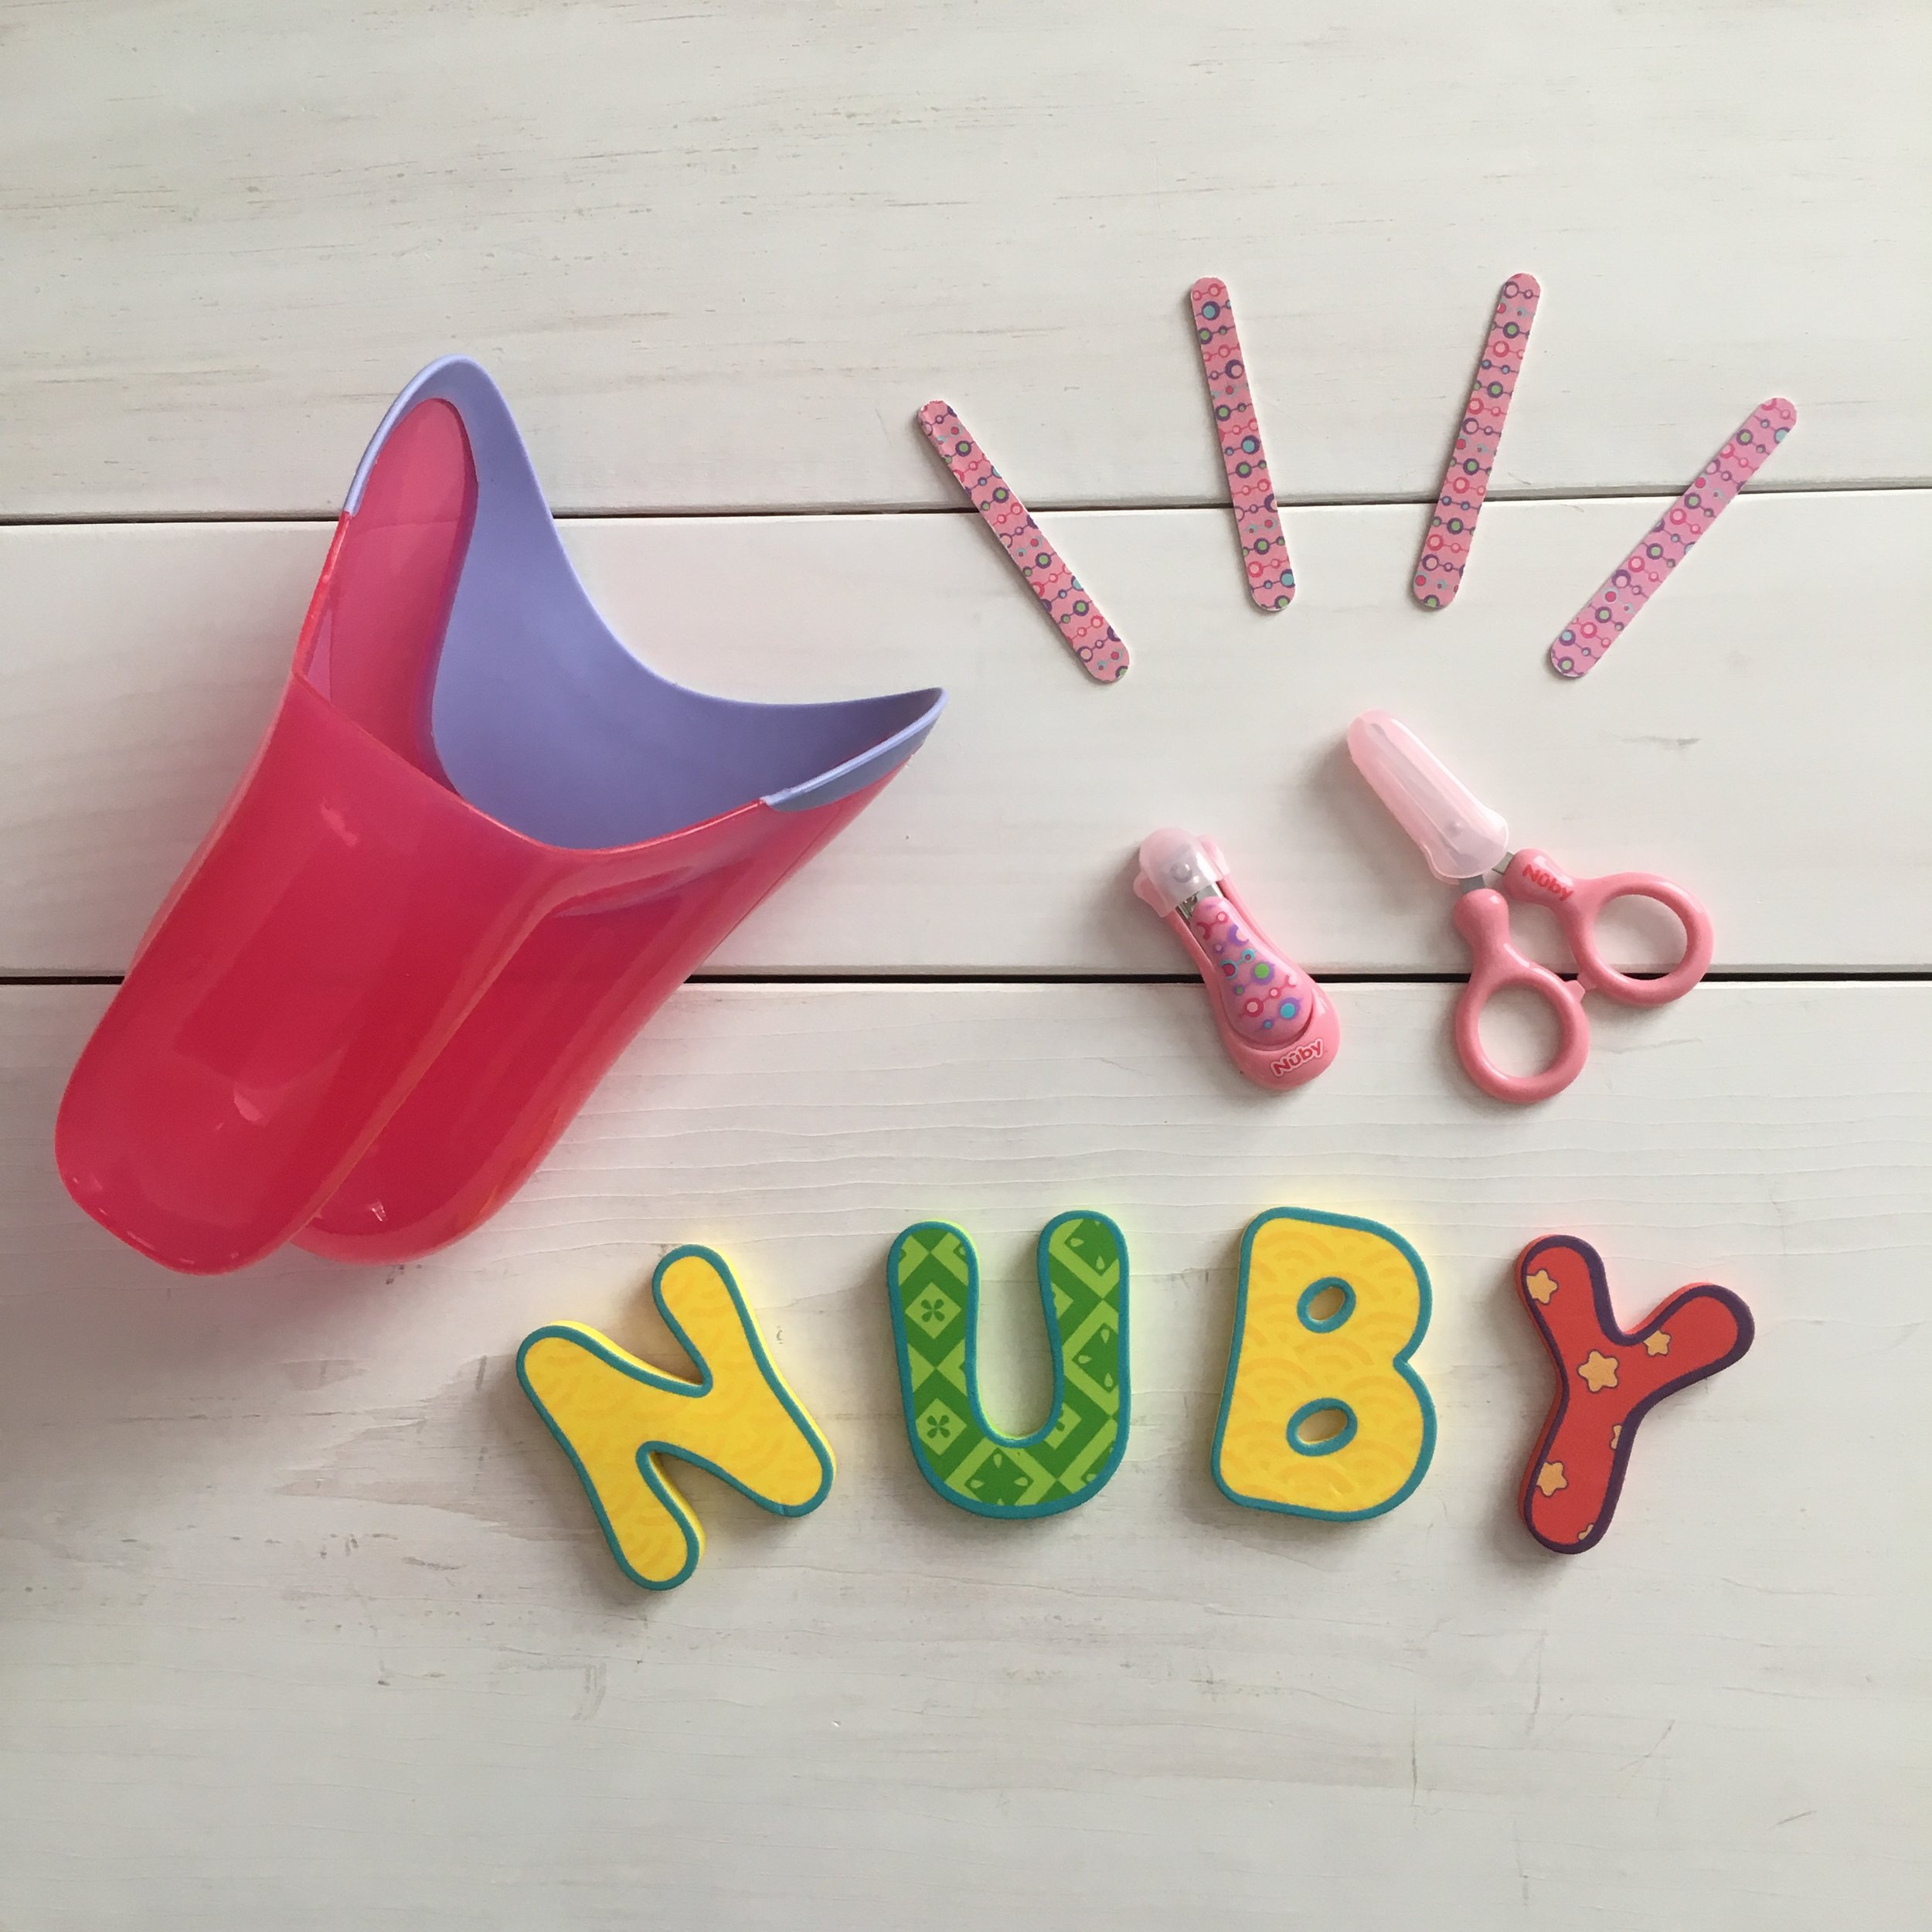
As a mom, I'm always looking for ways to make the everyday must-dos a little easier and more fun. So I was so excited when Nûby offered to let us try out some of their bath time staples - and give away a set to a lucky follower too! | This post contains affiliate links as well as an honest review of Nûby products |
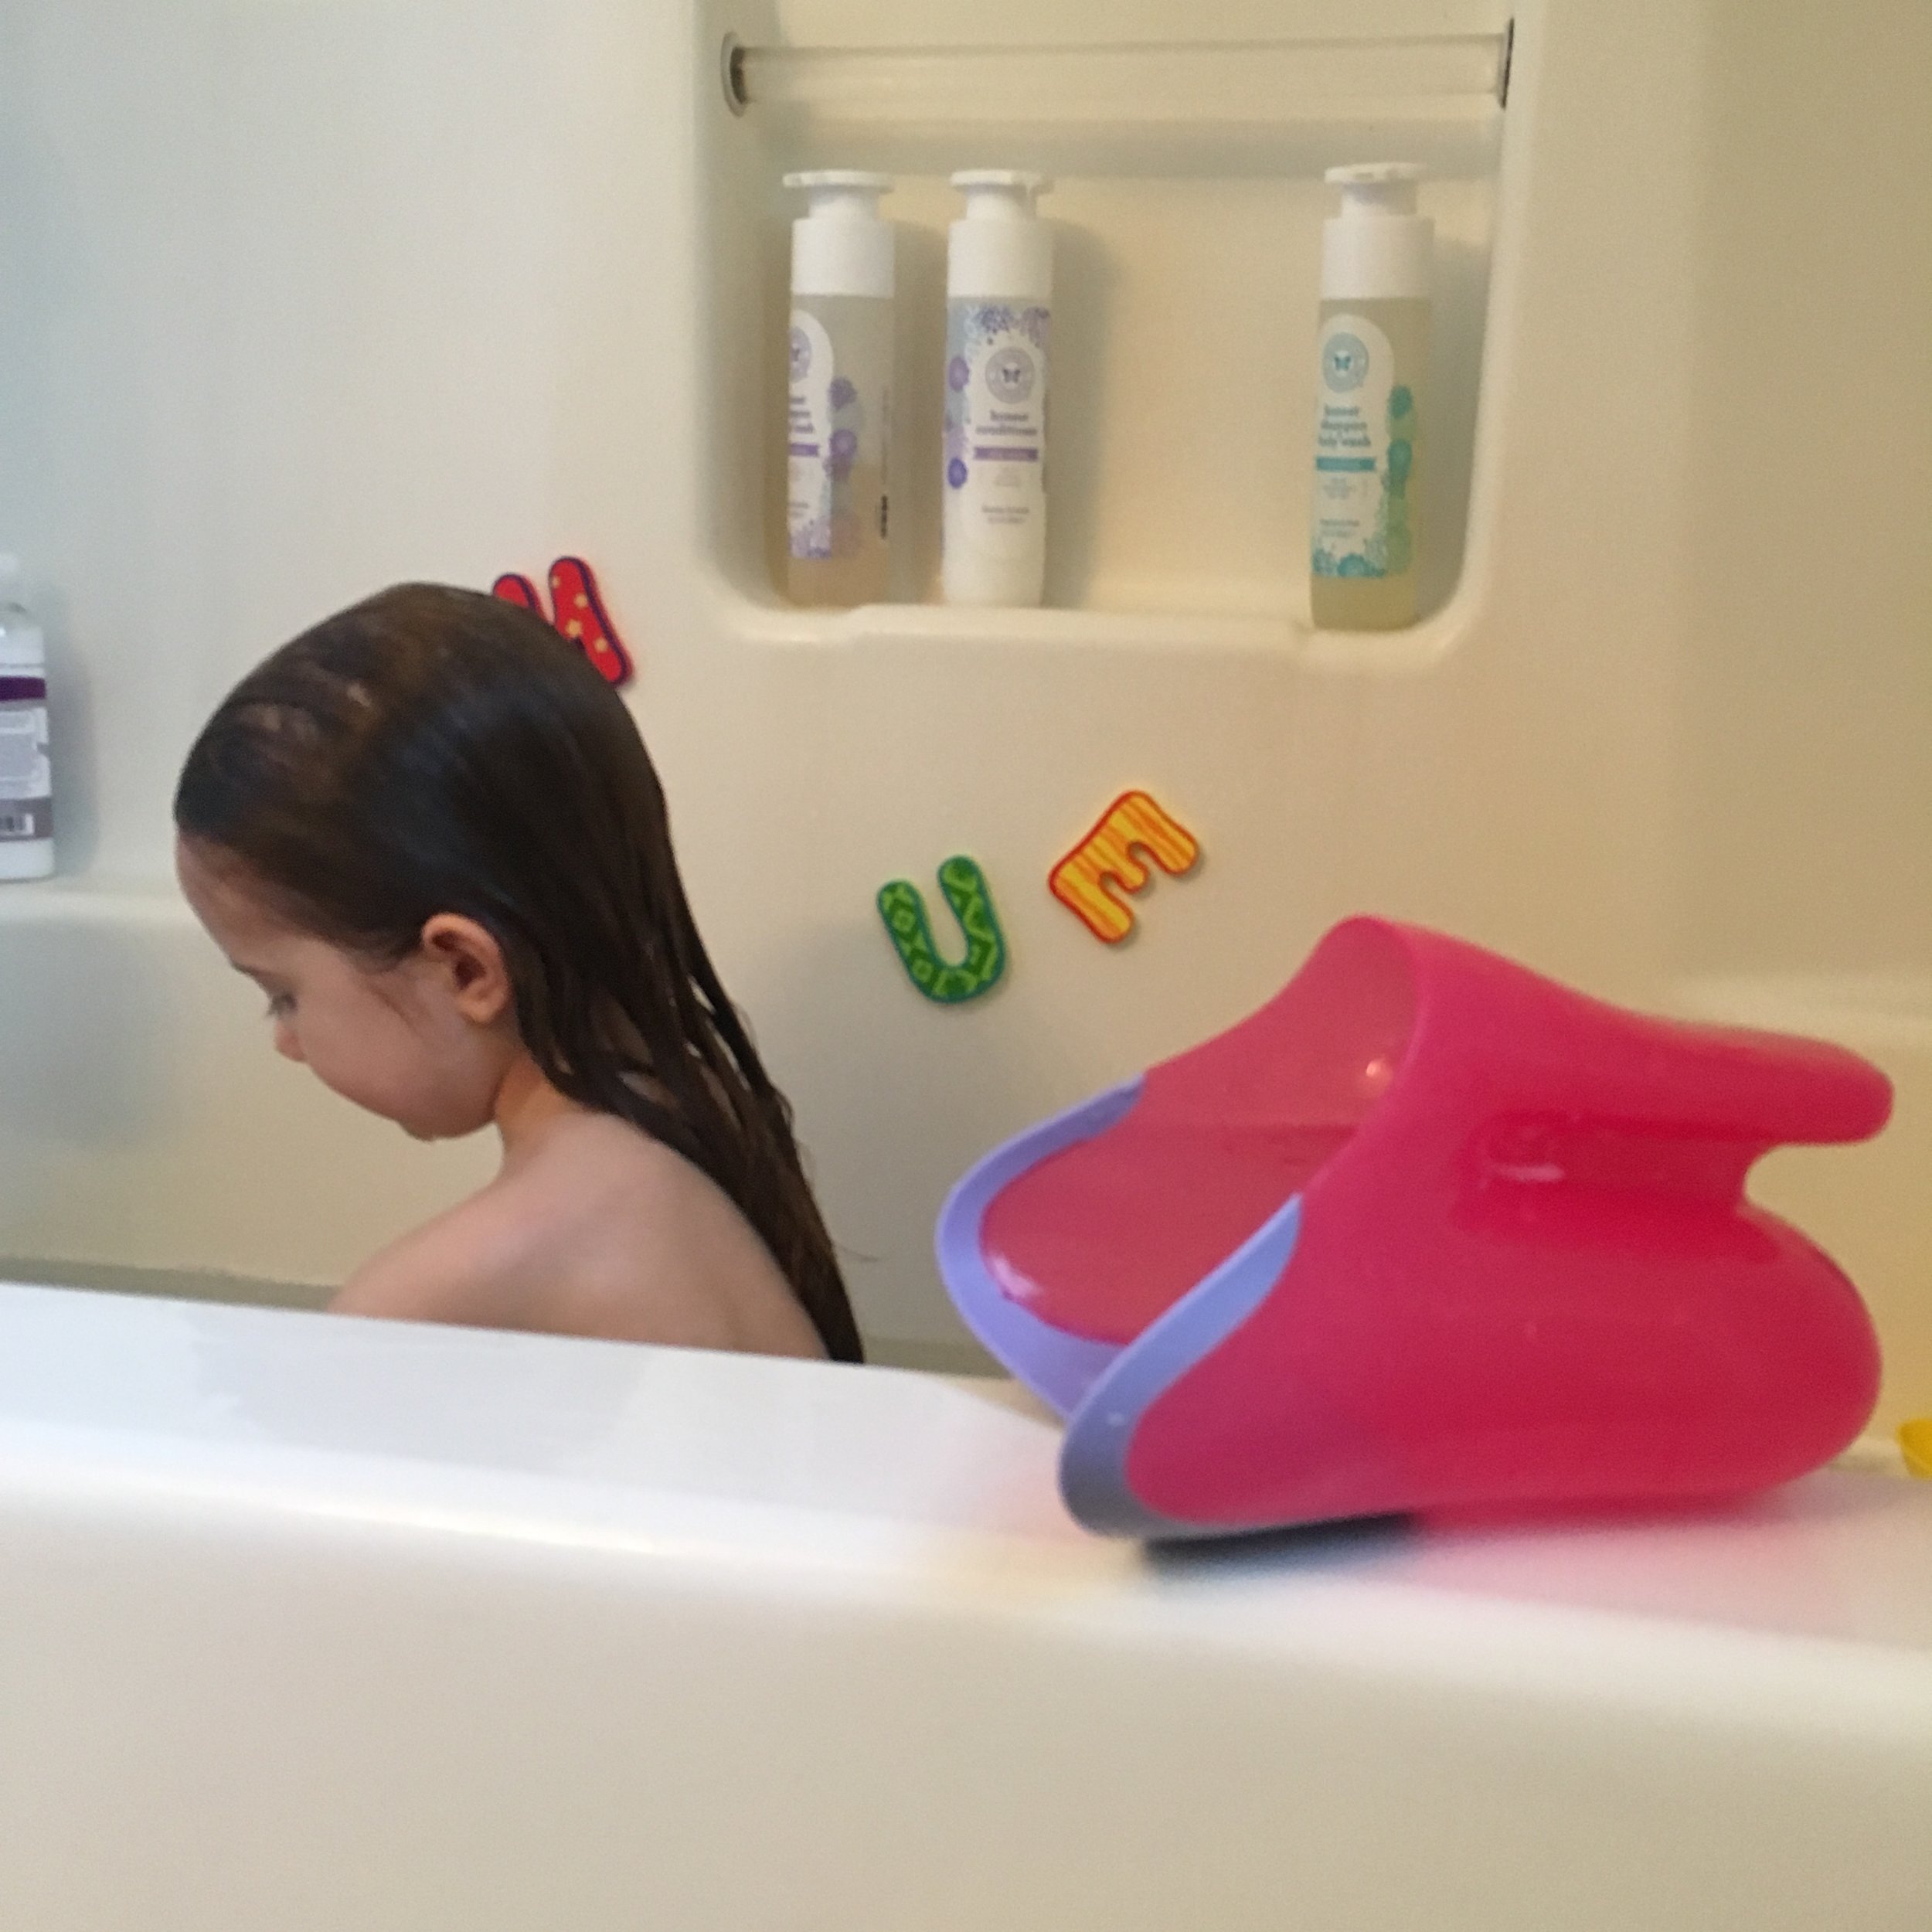
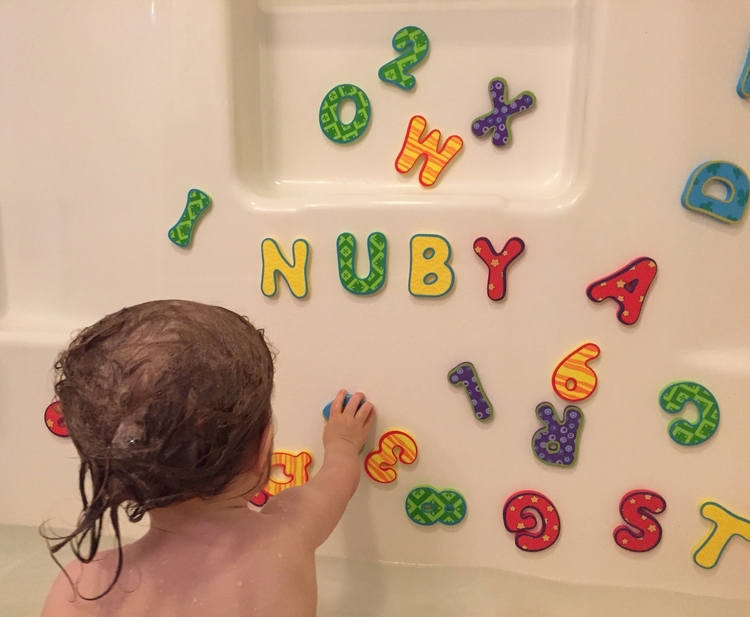
With both a toddler and a baby, I feel like we're constantly doing baths or trimming nails and any way we can make these chores easier is a huge help. Our toddler really loves Nûby's Foam Bath Letters and Numbers set - she's really into spelling and loves putting random letters together and asking "what does that spell?", even when it doesn't make a real word. She's really starting to get the hang of it though, and can spell several short words all on her own!
The Tear-Free Rinse Pail has also been a huge help at bath time, for both our toddler and our baby. No one likes getting soap or water in their eyes - especially little ones. So it's great that we can easily rinse the shampoo away without any tears. The rinse pail is BPA-free and features a soft rubber edge so you can comfortably fit it against your little one's forehead. It also holds a generous amount of water for quick rinsing!
Finally nail cutting... ugh. Probably one of the most nerve wracking tasks a parent has to do for their baby! Thankfully Nûby's 6-Piece Nail Care Set has everything you need including scissors, nail clippers, and four emery boards sized for taking care of baby and toddler nails. Their perfect size helps make taking care of your wiggly baby's nails a little less intimidating.
*Giveaway!*
Make sure to enter our Giveaway over on Instagram for the chance to win this great Bath Bundle from Nûby! The winner will receive Nûby’s Tear-Free Rinse Pail, Nail Care Set, and Foam Bath Letters and Numbers Set. Just look for this photo in my Instagram feed and follow the directions to enter! Good luck!
- I received this item for review from Nûby but all opinions expressed are my own. Please see our full Disclosure Policy for more information -
Nûby's Foam Bath Letters & Numbers, Nail Care Set, and Tear-Free Rinse Pail can be found at many retailers including Amazon, Buy Baby Direct, and Babies 'R Us.