Weekly Blog Posts!

Hello again.. it's been a busy week, but I just wanted to make sure you all knew that it will be my goal to bring you one new blog post every week (at least)!  I'm planning on making Wednesdays when I will publish my latest post.  

Though this doesn't mean that new things and posts won't be added at other times during the week too!  So make sure to tune in often (or at the very least every Wednesday) to see what's new at Birch Landing Home.  Thanks, friends!

KEEP UP WITH BIRCH LANDING HOME
|  Etsy  |  Facebook  |  Instagram  |  Pinterest  |  Bloglovin'  |  Hometalk  |

DIY Steel Wool + Vinegar Stain

I'd heard that you can make your own stain using just steel wool and regular vinegar.  I was intrigued and had to give it a try myself.  

DIY Steel Wool + Vinegar Stain Tutorial

Materials:  

  • glass jar

  • ball of fine steel wool

  • white vinegar

  • rubber gloves

  • sponge brush or rag

  • wood

How to: 

Put a ball of fine steel wool in a glass jar and fill with white vinegar to about 1-2 inches from the top.  Replace the lid and let sit for a few days until the steel wool has dissolved or nearly dissolved, giving the jar a shake once or twice a day.  

Making steel wool and vinegar stain at home

Yep, that's it.*  It's just that easy.  

*I'd recommend leaving the jar on a paper towel and carefully opening and closing the jar before shaking it.  We noticed that our jar built up quite a bit of pressure from the chemical reaction of the steel wool dissolving in vinegar and the pressure needed to be released a few times a day.  

Two days later, after having been shaken up. Gross, huh?

Two days later, after having been shaken up. Gross, huh?

Once the steel wool has dissolved, put on some rubber gloves, give the jar one last shake and start staining!  

How to make and use DIY Steel Wool and Vinegar Stain

The stain is very deceiving at first.. when you initially put it on it just looks like you're putting dirty water on the wood - it doesn't look significantly changed.  However, as it's exposed to the air and dries it rusts and gives the wood a beautifully rustic, warm color.  Once it's completely dry, take a rag to rub the loose rust off - you're done!  

Using steel wool and vinegar stain - after one coat
After drying.

After drying.

If you're using this process for a sign or something that won't be touched when finished I'd leave the wood raw like this.  If you're thinking of using it for a table or something you will come in contact with, I'd strongly suggest sealing the wood to keep you from getting rust stains.  

After using steel wool and vinegar stain.  DIY tutorial.

I didn't have a project in mind for this process, but I love how rich the color turned out!  I think I'll be staining the edges of this board and turning it into something.  

KEEP UP WITH BIRCH LANDING HOME
|  Etsy  |  Facebook  |  Instagram  |  Pinterest  |  Bloglovin'  |  Hometalk  |

Simple + Efficient Bib Storage

If you have a little one then you likely have a pile of bibs somewhere, probably taking up a drawer in the kitchen.  For us, using a drawer wasn't an option - we only have three.  Yes, three drawers in the entire kitchen.. ugh.  So I tried to think of another way to store the bibs out-of-sight but still accessible.  

Simple and efficient bib storage.  Baby organization.  Kitchen storage.

| Bib Hook | Chrome Basket for kids cups + dishes |

My solution was to pick up one of those "over the cupboard door" towel hooks. I made sure to get one that had a good-sized hook on it to accommodate all the bibs. Then I just put it facing into the cupboard where we keep all the kid dishes and hung all the bibs from there - done!


KEEP UP WITH BIRCH LANDING HOME
|  Etsy  |  Facebook  |  Instagram  |  Pinterest  |  Bloglovin'  |  Hometalk  |

Simple Chore List {Free Printable}

The easiest way to tackle household chores?  Get caught up and stay caught up. 

I’ve been able to stay on top of things (more or less) by making a simple chore list to follow during the week.  Once you get into the groove, it won’t take you much more than 20 minutes to accomplish most days’ chores.  

Simple everyday chore list to keep your home clean and organized - Free Printable

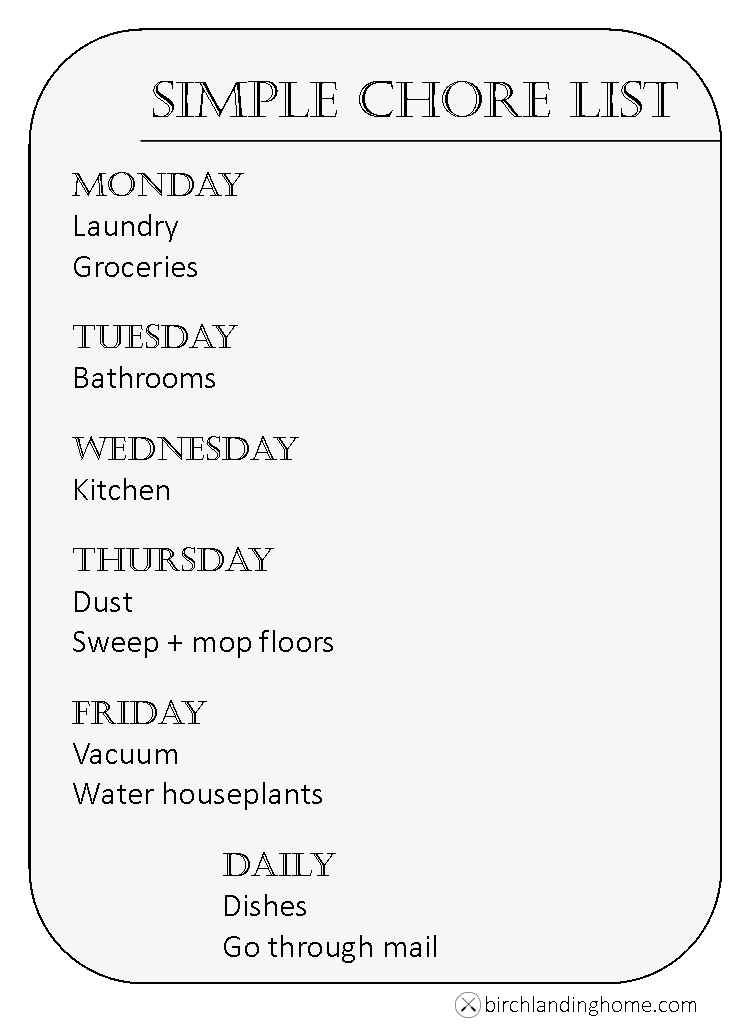
Monday – Laundry, Groceries
Usually I’ll throw a load of laundry in, then head to the grocery store.  By the time we get home, it’s time to switch loads. 

Tuesday – Bathrooms
Wipe down all surfaces, clean all the places no one ever likes cleaning, make sure there’s toilet paper stocked – you know, all that glamorous stuff. 

Wednesday – Kitchen
Wipe down the inside of the microwave, clean out the crumbs from the toaster, de-clutter the counter, make sure that last week’s leftovers have been thrown out or frozen (if it’s not too late). 

Thursday – Dust, Sweep + Mop Floors
Dust the TV and bookcases, sweep the kitchen and dining room and give it a quick mop. 

Friday – Vacuum, Water Houseplants
Give upstairs and downstairs a quick vacuum, water houseplants. 

Daily – Dishes, Go through mail
Staying on top of dishes and mail is key!  They tend to be the worst culprits for piling up fast and bringing you down.  I try not to go to bed with dirty dishes in the sink.

Obviously some days are busier than others and a particular day’s chores might get skipped.  Sometimes I’ll try to make them up the next day, other times I may just skip those chores entirely for that week - but trying to stick to this schedule as much as possible means that even when you skip something it’s not hard to pick up the slack the following day or week and catch back up.  

KEEP UP WITH BIRCH LANDING HOME
|  Etsy  |  Facebook  |  Instagram  |  Pinterest  |  Bloglovin'  |  Hometalk  |

DIY Button Easter Basket

I've never really liked the cheesy Easter baskets they push at the big box stores.  You know, the cheaply-made dyed ones.. the ones you always seem to need to re-buy every year because they're so easily damaged?  Not to mention, they're pretty boring.  This year I decided to make a special one for our daughter.  I LOVE buttons and thought that would make a very adorable theme for decorating an Easter basket.  | This post contains affiliate links |
 

DIY Button Easter Basket - perfect Easter basket for a little girl

Materials: 

How-to:

I started with a sturdy willow basket (we purchased ours off Amazon, but you could get one just about anywhere), and used a needle strung with heavy button thread to "sew" the buttons to the basket.  Really I'm just tying them on, but the needle makes it a lot easier to thread the string around a few times.  

"Sewing" the buttons to the basket.

"Sewing" the buttons to the basket.

Once I felt as though the button was good and secure (we don't want them coming off, remember they can be a choking hazard), I tied off the thread with a couple knots and cut off the excess string.  

Sewing one of the last buttons on. 

Sewing one of the last buttons on. 


This project took less than half an hour and now we have a cute, special Easter basket to use for years to come!  

Looking for more Easter ideas?  Check out our other Easter posts:  

KEEP UP WITH BIRCH LANDING HOME
|  Etsy  |  Facebook  |  Instagram  |  Pinterest  |  Bloglovin'  |  Hometalk  |

DIY Mail Basket

This is an old project, and while I don't have photos of the process I'd still like to share it with all of you. 

DIY Mail basket organization

Like most people, when it comes time to mail something we've got to hunt down the stamps, and the return address labels.. or maybe it was the thank-you cards we can't seem to find.  To combat this, I wanted to make a little catch-all to keep in the kitchen and corral all these necessities in one place.  

Materials:  

  • basket
  • scrap wood
  • saw
  • paint
  • stencils
  • Dremel tool or small drill
  • wire

How-to:  

I already had a cute little chicken-wire basket I found at the dollar bins in Target (yes!), but you could use any kind of small basket or bin.  The bottom of my basket was slatted so I needed to make a new bottom in order for the contents to stay in, to do this I cut a scrap of wood down to size and painted it black to match the basket.  

To make the "Mail" sign, I took another small scrap of wood and cut it to size.  I painted it black and used some stencils (I used a Martha Stewart stencil set) to stencil MAIL in white.  

After everything was dry, I lined up the sign where I wanted it on the basket and marked where I needed to drill the holes for the wire.  Once they were drilled I threaded some wire through and twisted it in the back to secure the sign to the basket.  Done!  


KEEP UP WITH BIRCH LANDING HOME
|  Etsy  |  Facebook  |  Instagram  |  Pinterest  |  Bloglovin'  |  Hometalk  |

Welcome to Birch Landing Home!

Today there are so many stay-at-home moms with successful blogs and Etsy shops and I figured, why not?!  I know there's a lot of competition out there, and I still have so much to do to get this site and my Etsy shop to where I want them to be.  This is still very much a work-in-progress, but I would love to hear what you think of everything so far!  

The website/blog aspect will mainly follow along what I've been working on, give tutorials, and follow my Pinterest-inspired experiments; the Etsy shop will be where finished products will be available for purchase.  I'm also looking forward to expanding my products on Etsy to include more things for the home. 

So please take a look around, leave some feedback, and be sure to visit again - thanks so much for stopping by Birch Landing Home!  

Birch Landing Home - Handmade Goods for You and Your Home

KEEP UP WITH BIRCH LANDING HOME
|  Etsy  |  Facebook  |  Instagram  |  Pinterest  |  Bloglovin'  |  Hometalk  |