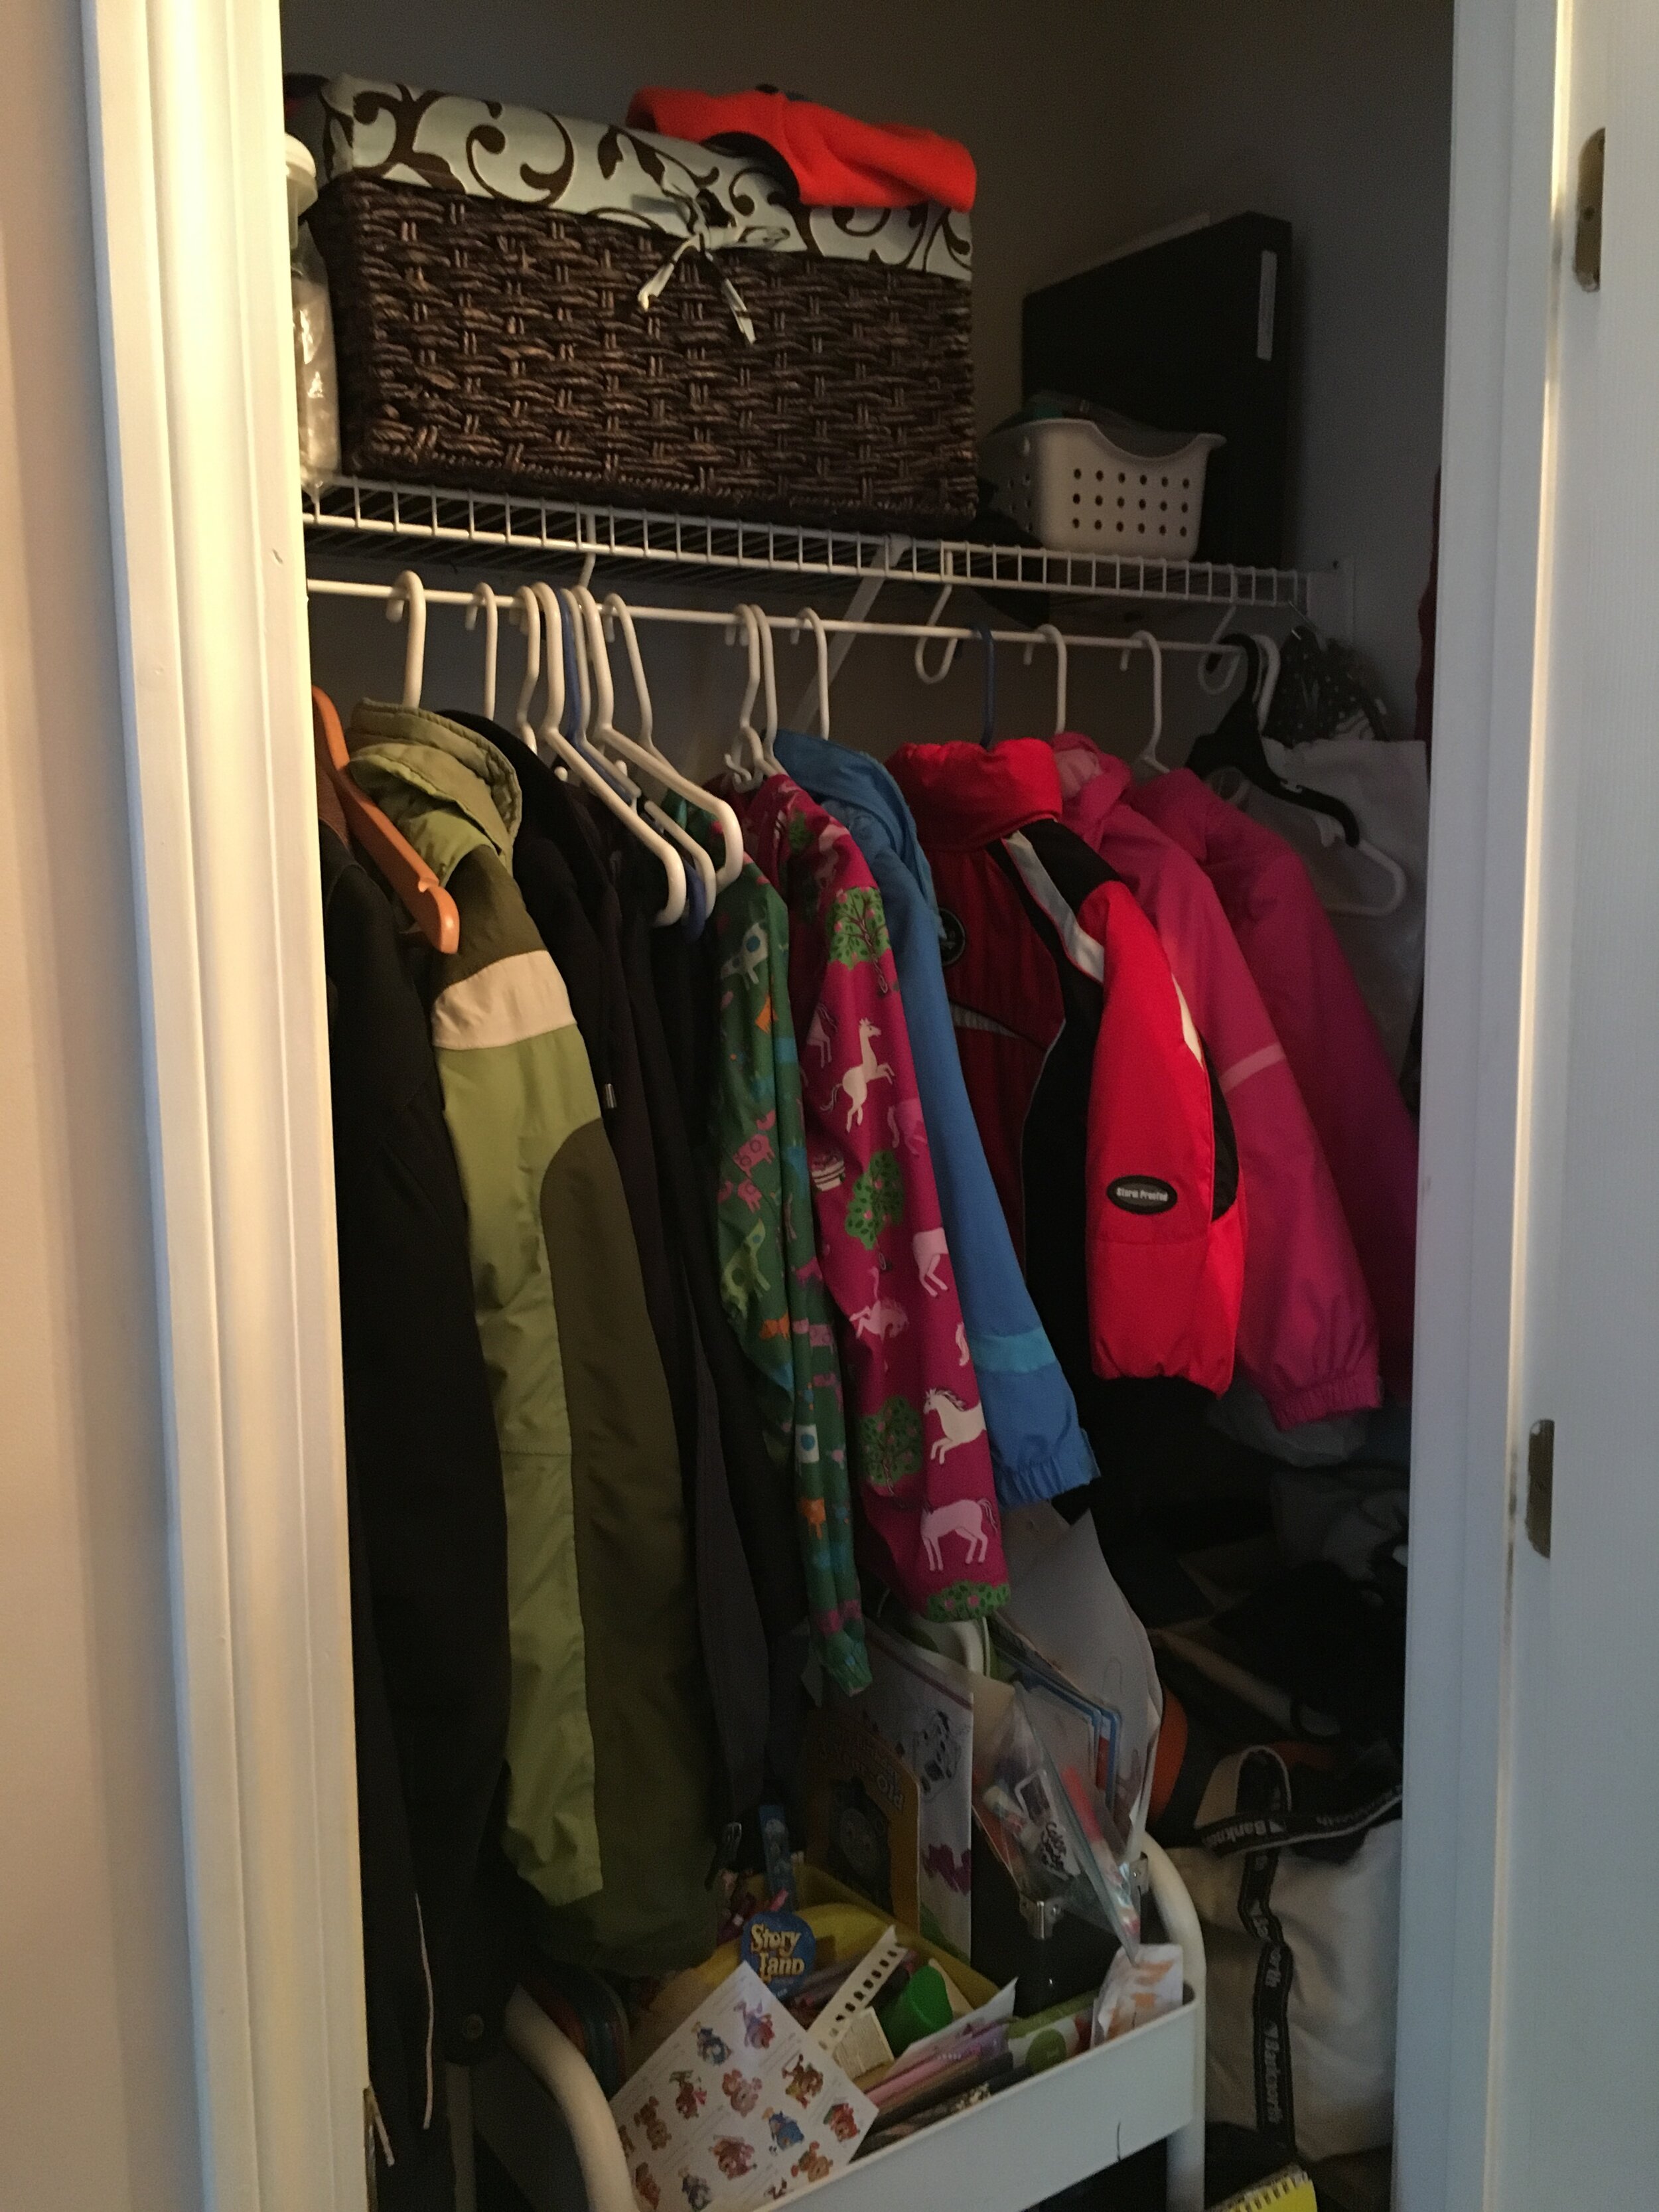
Our kitchen was lacking a pantry, so we often kept canned goods and backstock on a shelving unit at the foot of our stairs in the basement. But because half of our food and snacks were downstairs and half were upstairs it made for frequent mistakes when buying groceries… it was hard to visualize exactly what we had and where so we often ended up overbuying certain things and forgetting to buy others. Tired of wasting money, food, and time running up and down the stairs I decided to make over a coat closet into a functional pantry. | This post contains affiliate links |
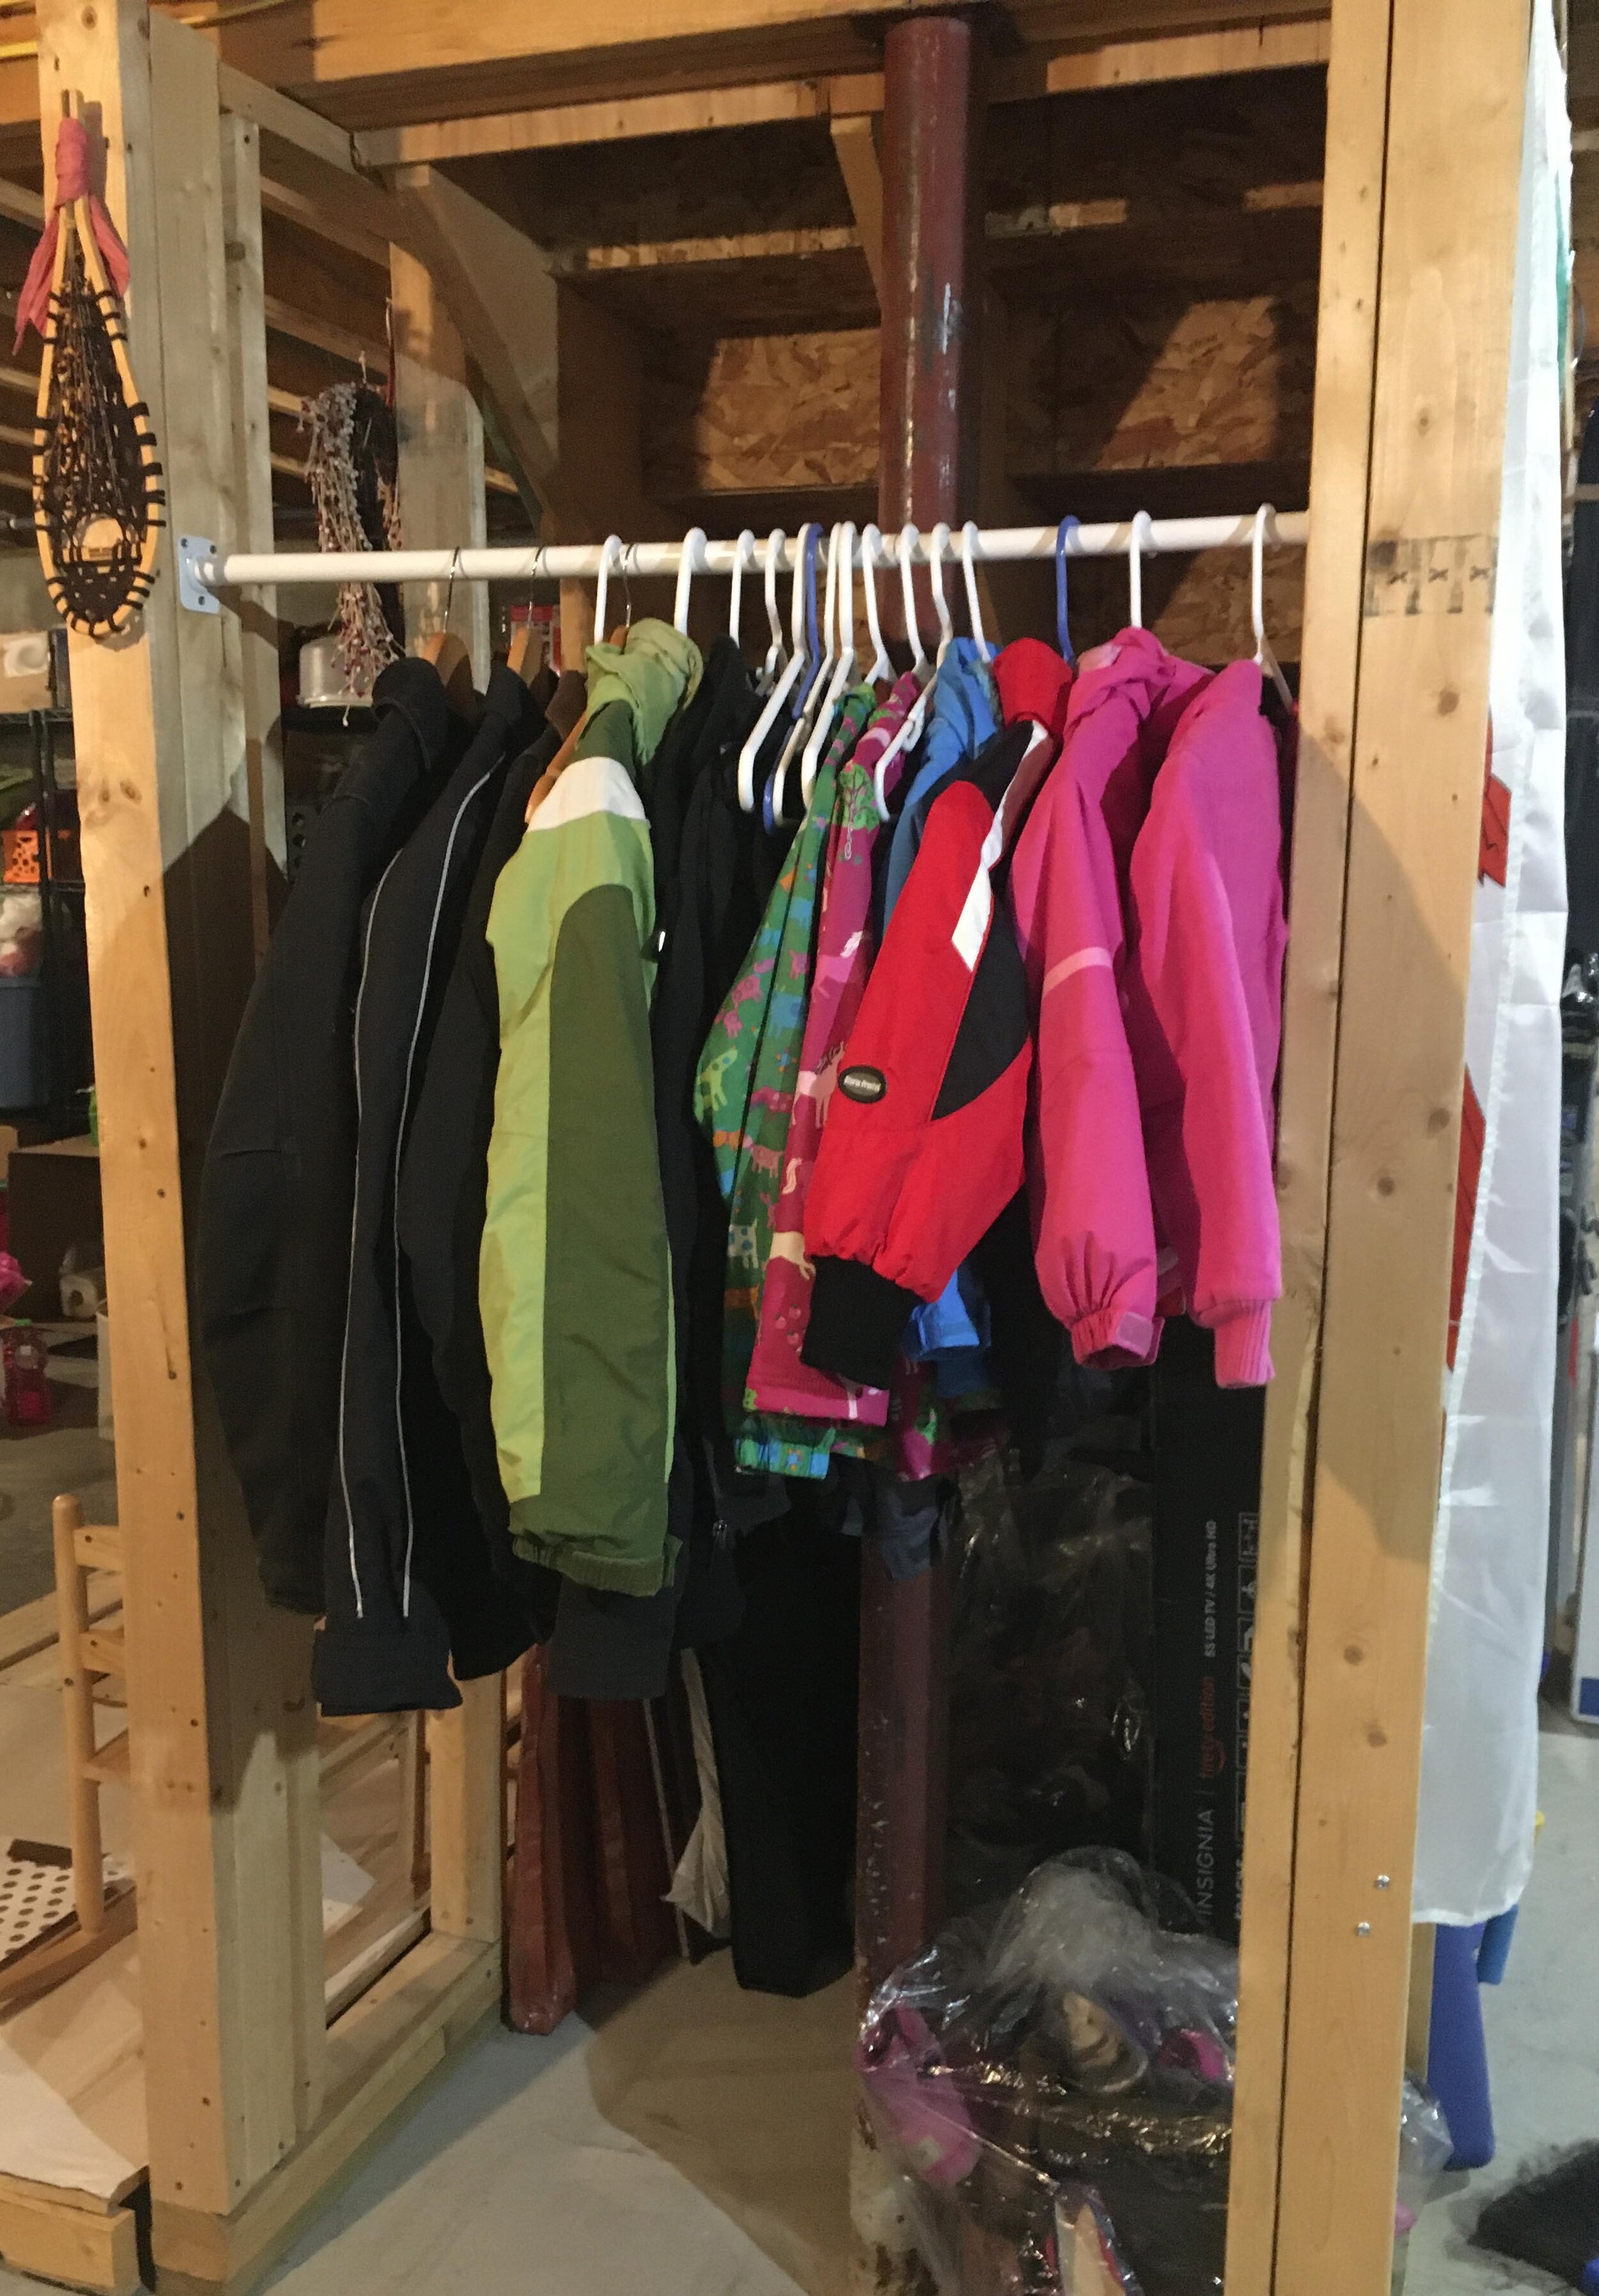
Now while this coat closet (pictured below) was pretty jammed full, it was very underutilized. It’s where we kept our off-season coats, hats, and boots as well as some hiking gear and my daughters’ Art Cart - most things we did not need to use daily, or often at all. My solution to this was to relocate all these items to our basement - I hung a closet rod under the basement stairs and moved all our off-season clothing and gear to this new space where it was still easily accessible but out of the way.
The next step was to pull out the old wire shelf and closet rod system, patch the holes, and repaint the inside of the closet. Thankfully I already had spackle and some leftover white paint so I was able to get the closet to a clean slate easily and it didn’t cost a dime.
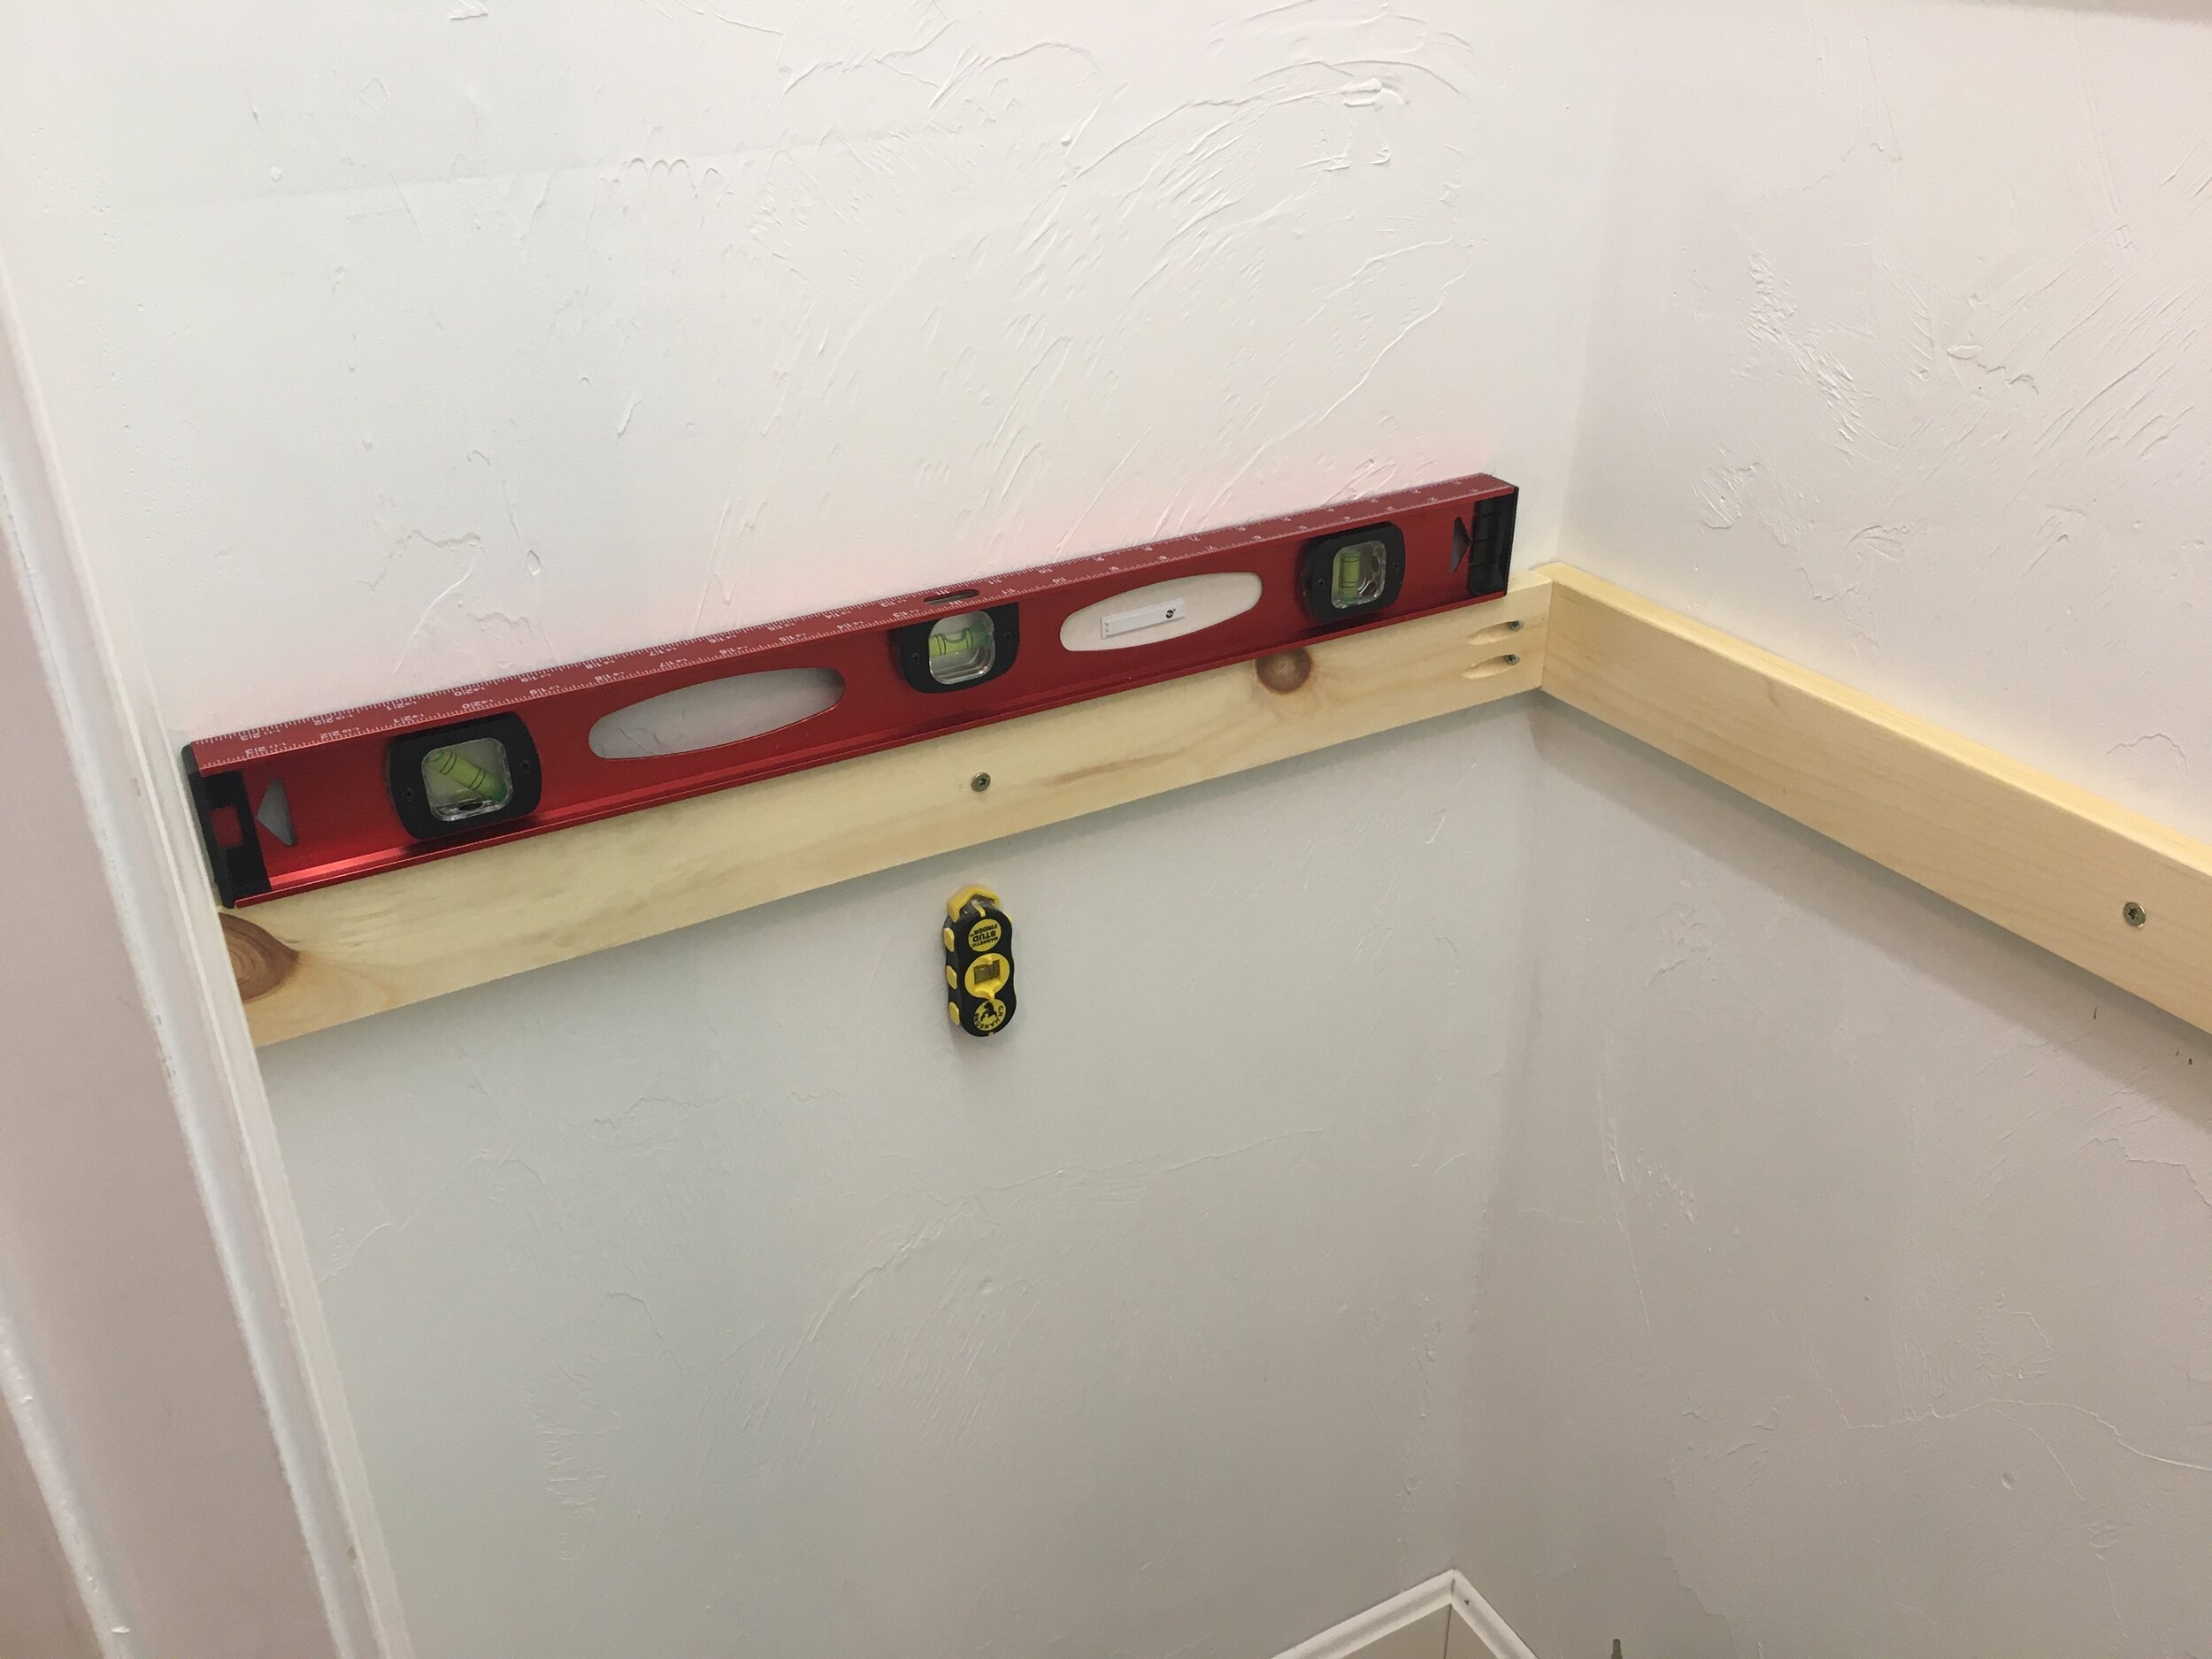
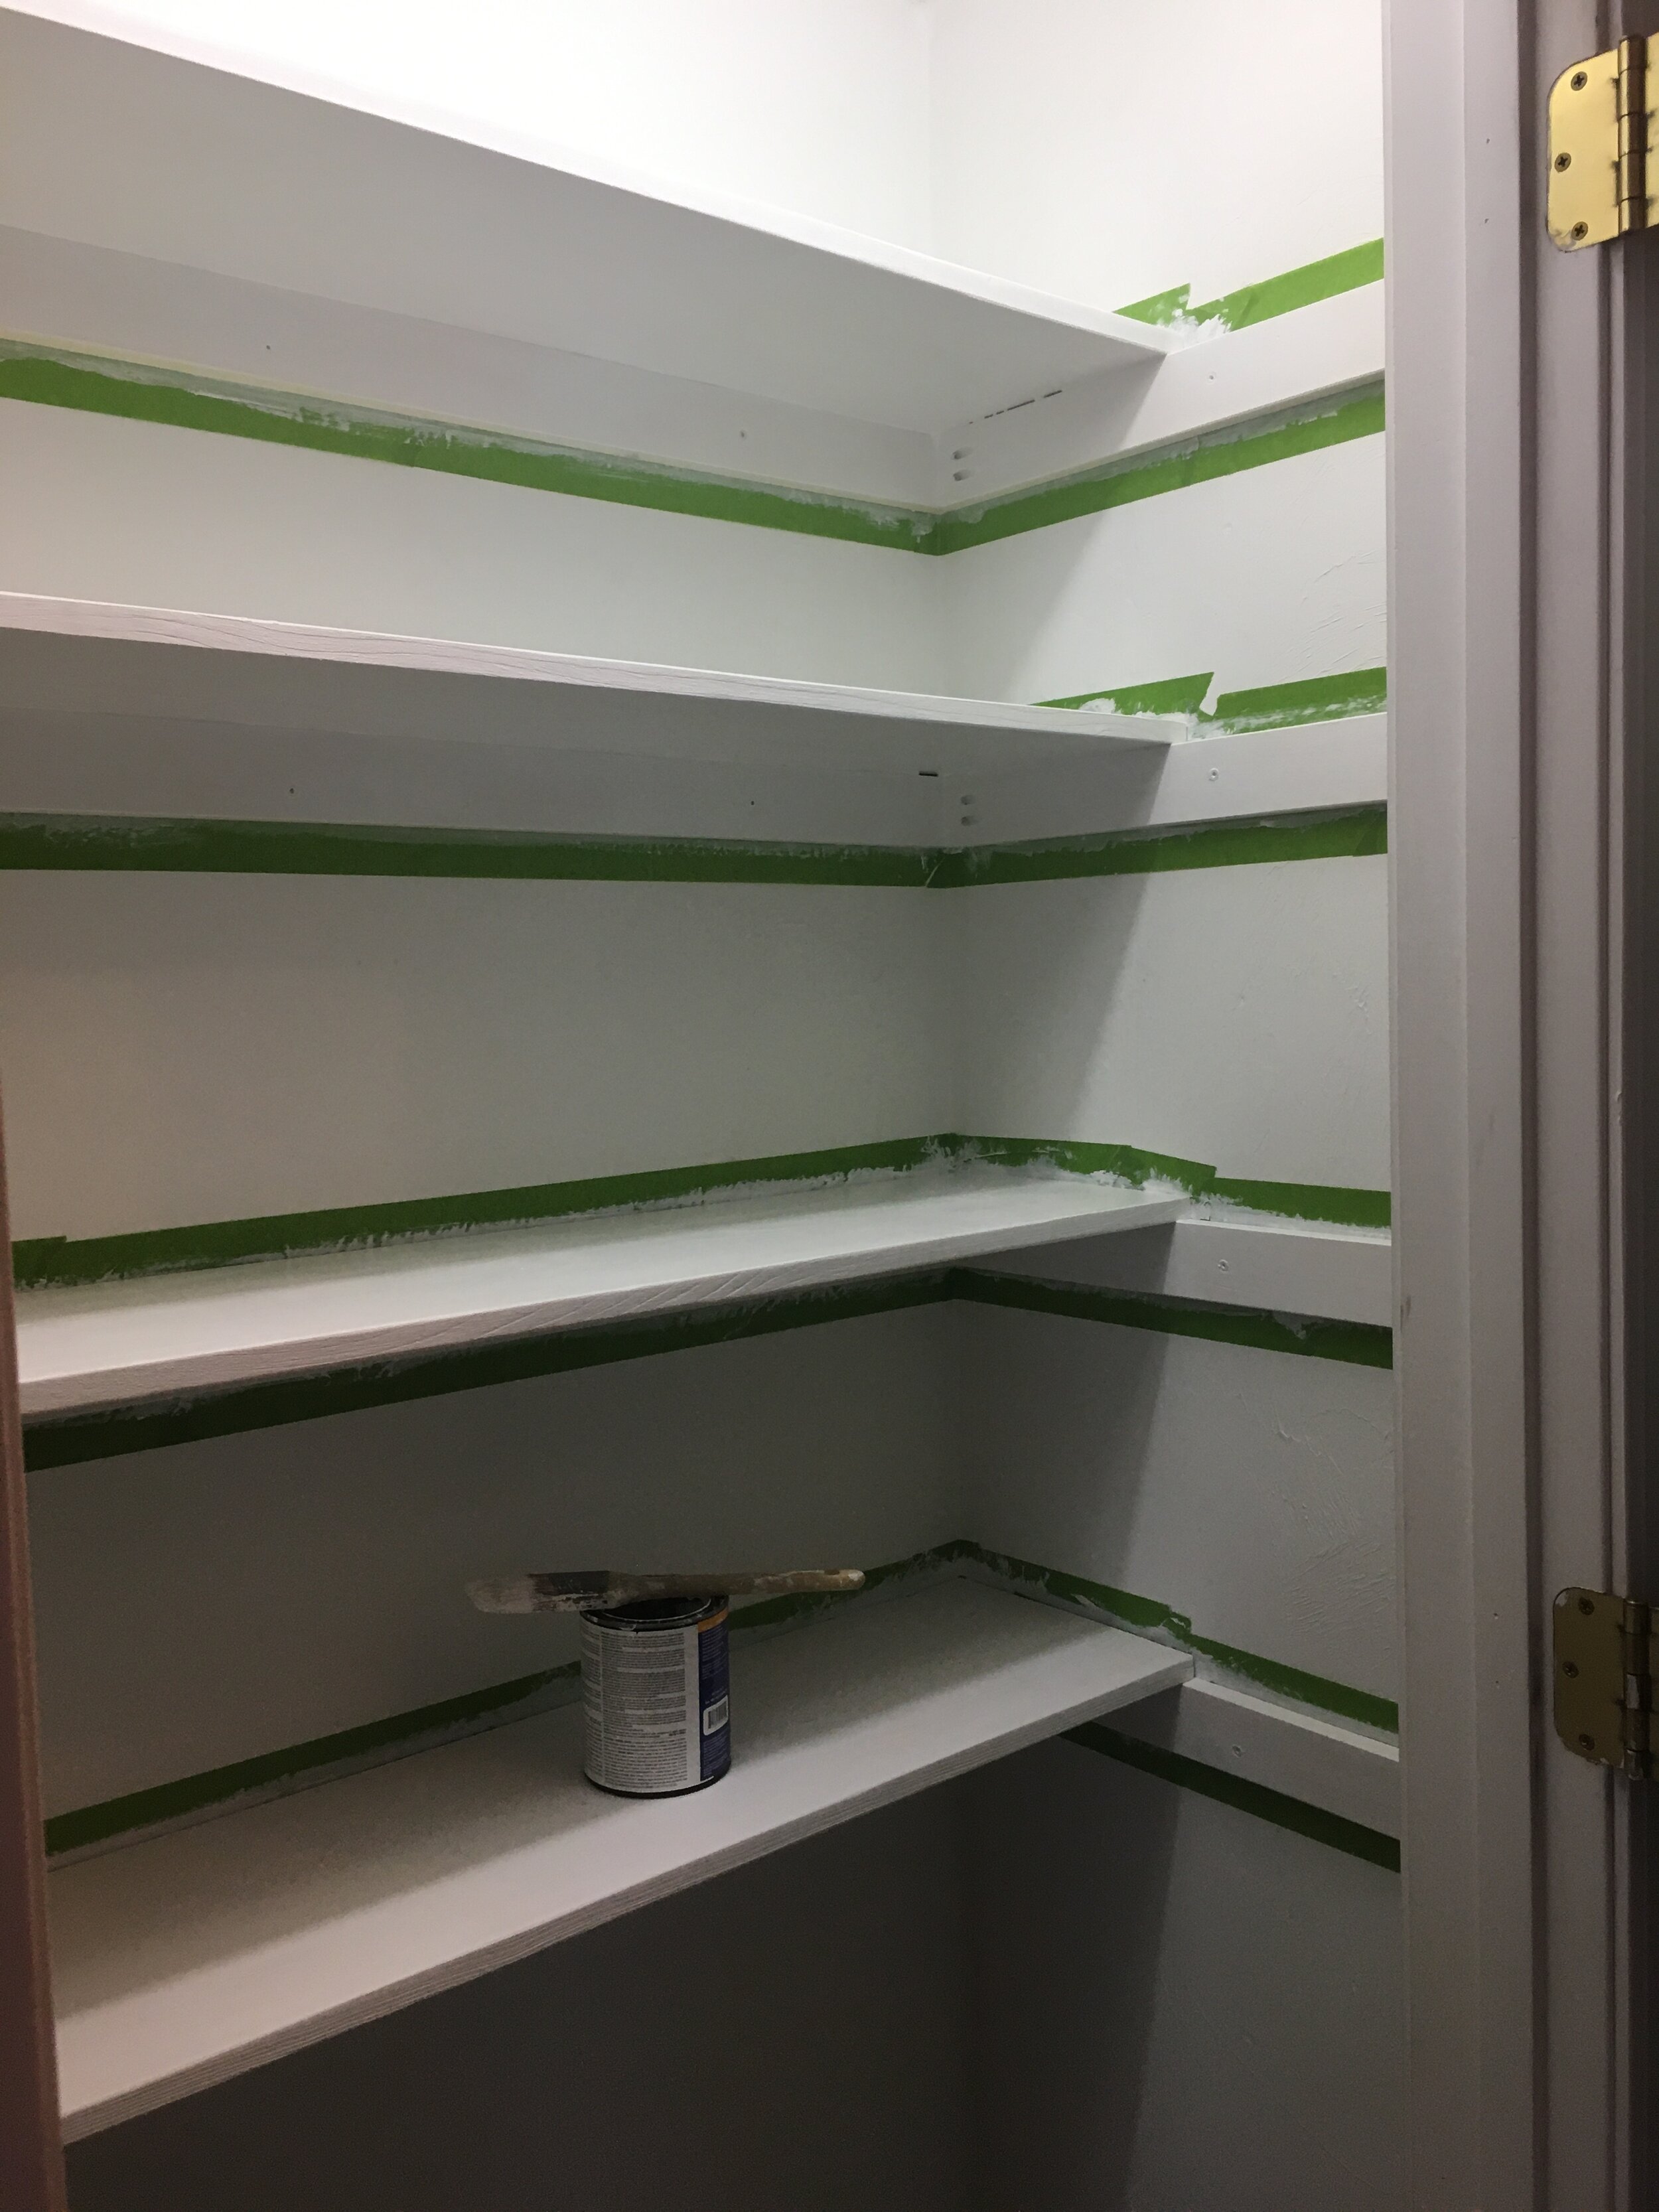
Now for the fun part! I got to decide how many shelves I wanted and the spacing, so I laid it out with painters tape to play with how I wanted it before I made a final decision. For our setup I decided on four shelves starting at about waist-height. I wanted to leave the bottom open to accommodate the dog food bin, the Art Cart, step stool, etc. Then I screwed in 1x3 inch “runners” that would support the shelves along the back wall. I used a stud finder to make sure I was screwing the runners into studs and a level to make sure everything was square.
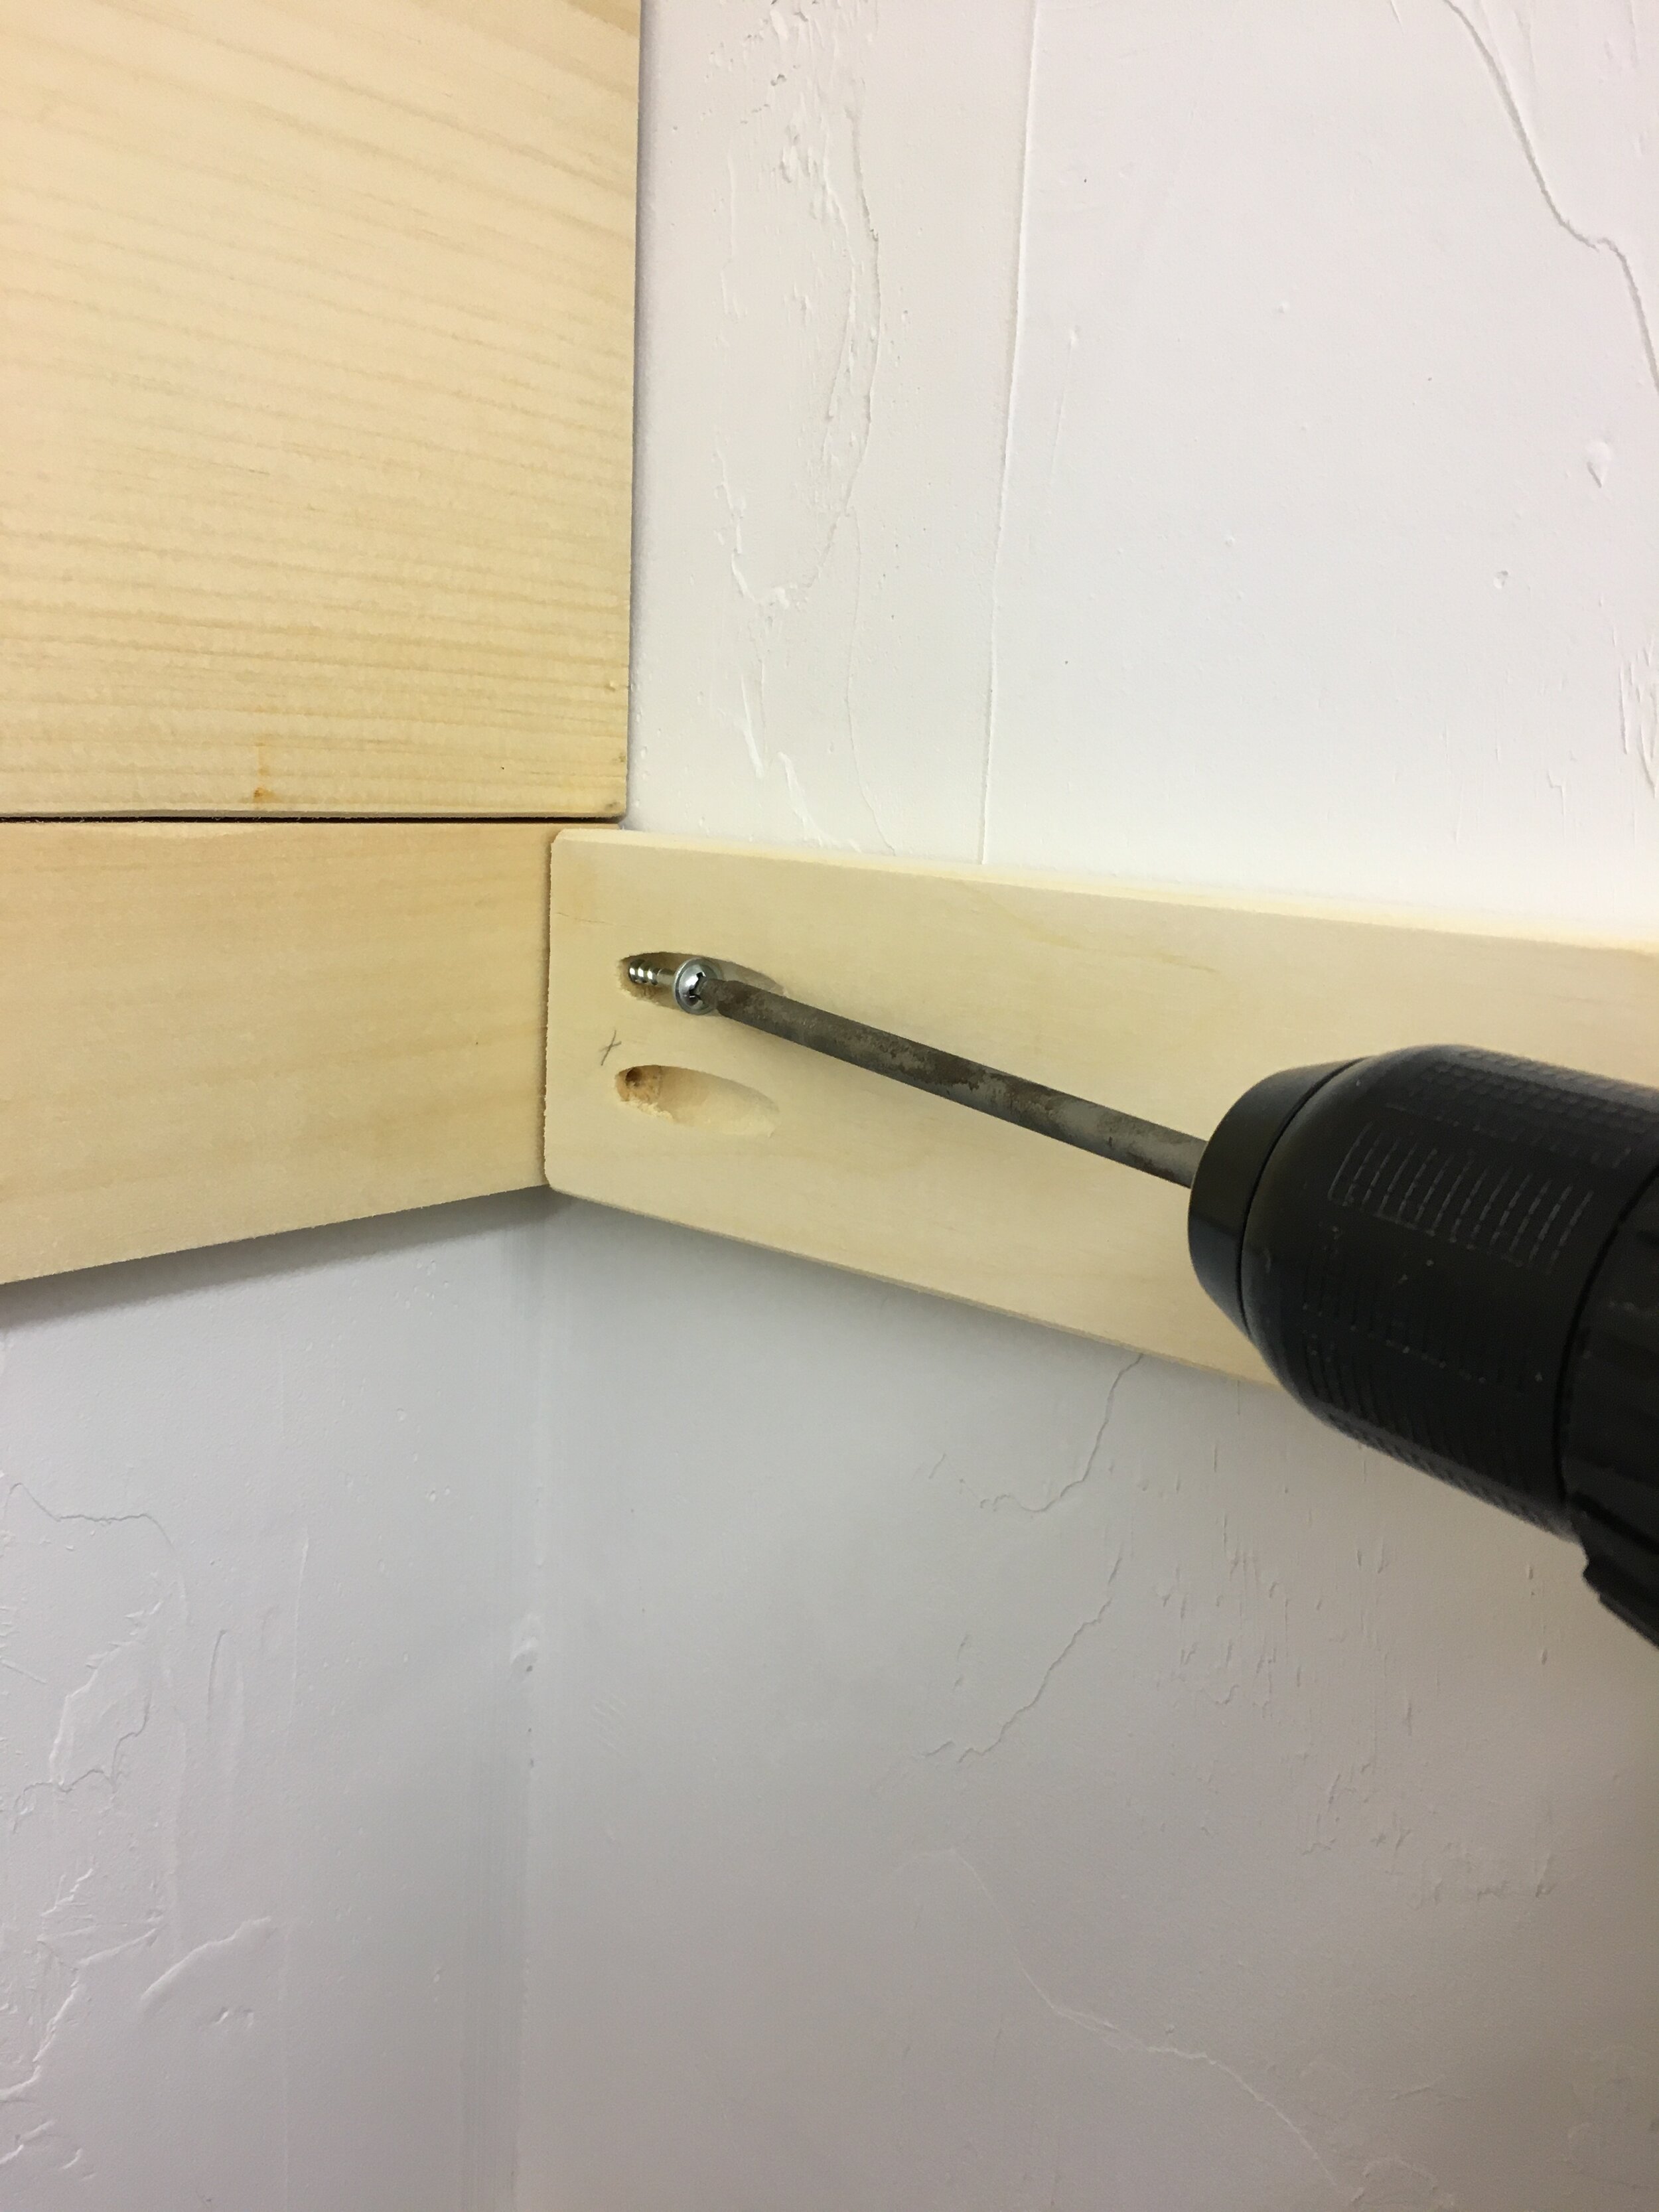
Then I added runners to one side of the closet next, following the same routine - but with these pieces I had pre-drilled pocket holes with our Kreg Jig first so it would make for a clean and secure joint in the corners.
Before installing the runners on the opposite side of the closet, it’s wise to keep in mind how you will be able to maneuver the shelf boards in once all the runners are in place (it would be very difficult to get the top shelf in with all the runners installed, for example). So before installing the opposite side’s runners I slipped some of the trickier shelf boards into place first (I used 1x12”s cut to length for the shelves) before I finished screwing in all the side runners.
I secured the shelves into place with some finishing nails, then taped off the shelves and runners to get ready for paint. I used primer and then several coats of white semi-gloss paint since it’s a little easier to wipe down and keep clean.
I just love how farmhouse and “Shaker” the exposed rails on the sides look and I wanted to play it up. Once the paint was dry I added some functional hooks to hang aprons, lunchboxes, etc on the side rails.
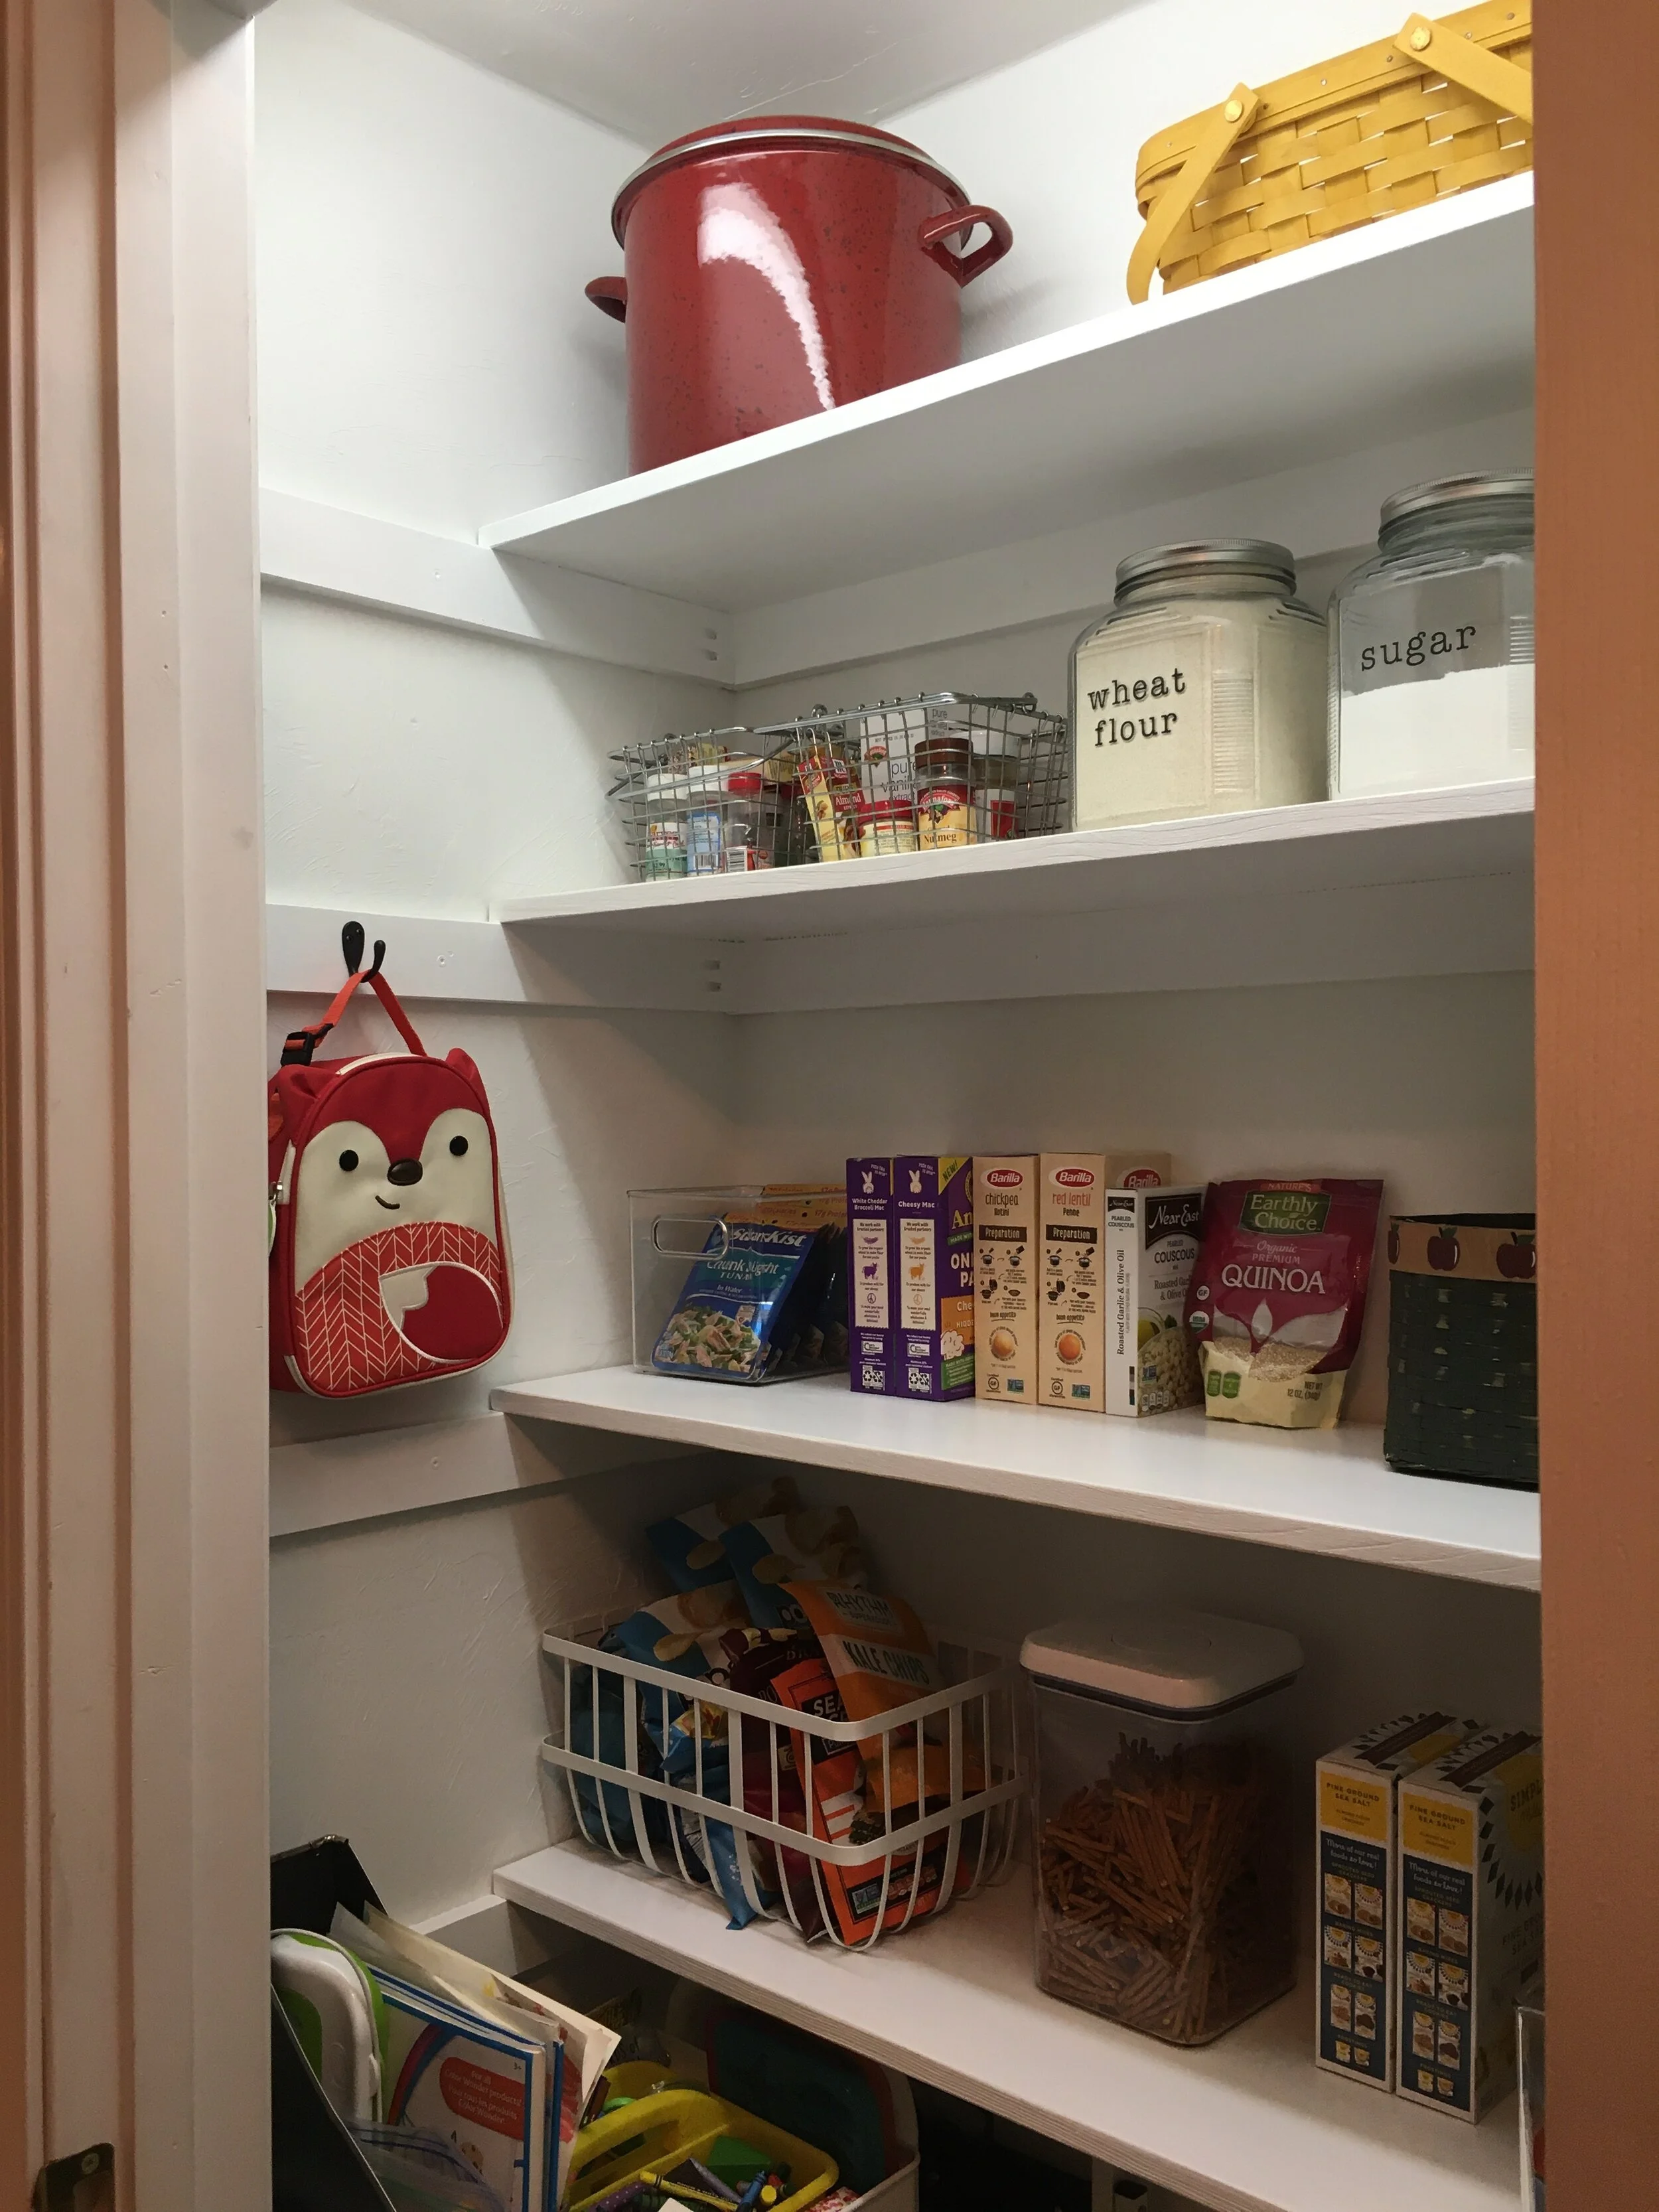
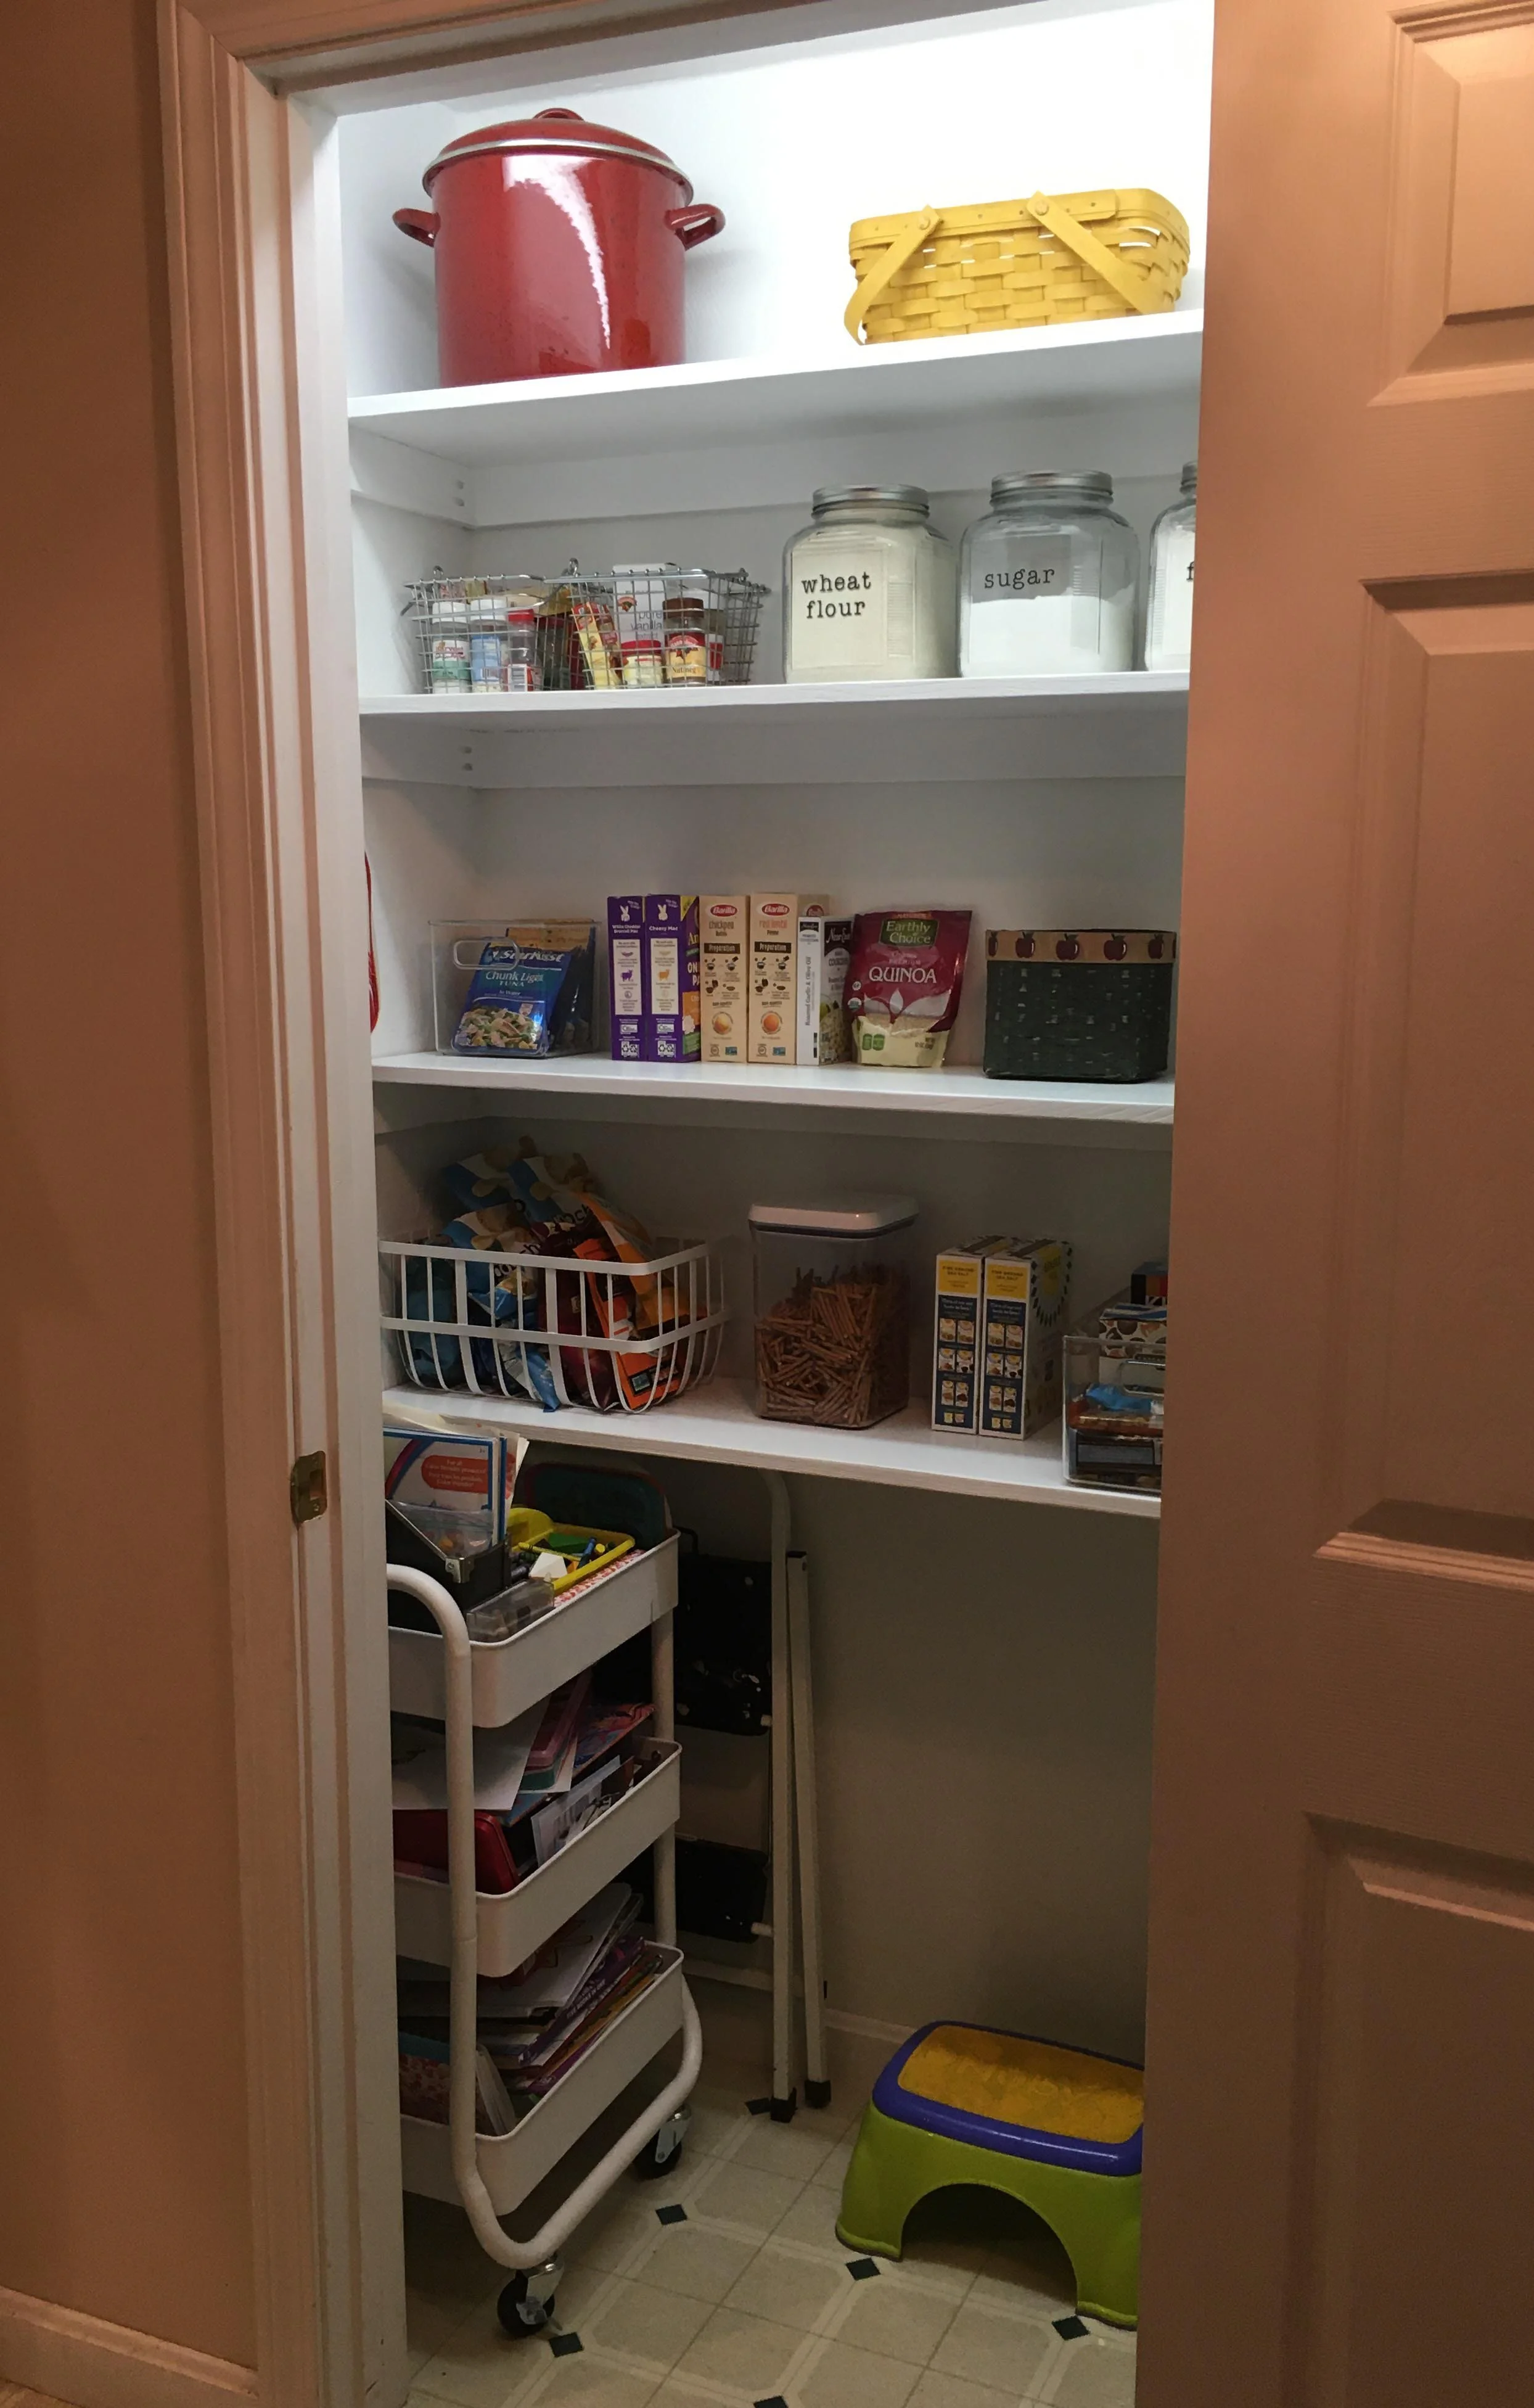
And now the project is complete! I am so happy with how it turned out and it’s wonderful to have everything in one place. I can see this project saving us money on groceries in the long run now as everything will be in one place now and we’ll be less apt to waste food.
Eventually, I would love to replace the closet door with a fun screen door and get some more glass jars and baskets for a cleaner looking pantry - but all in good time.
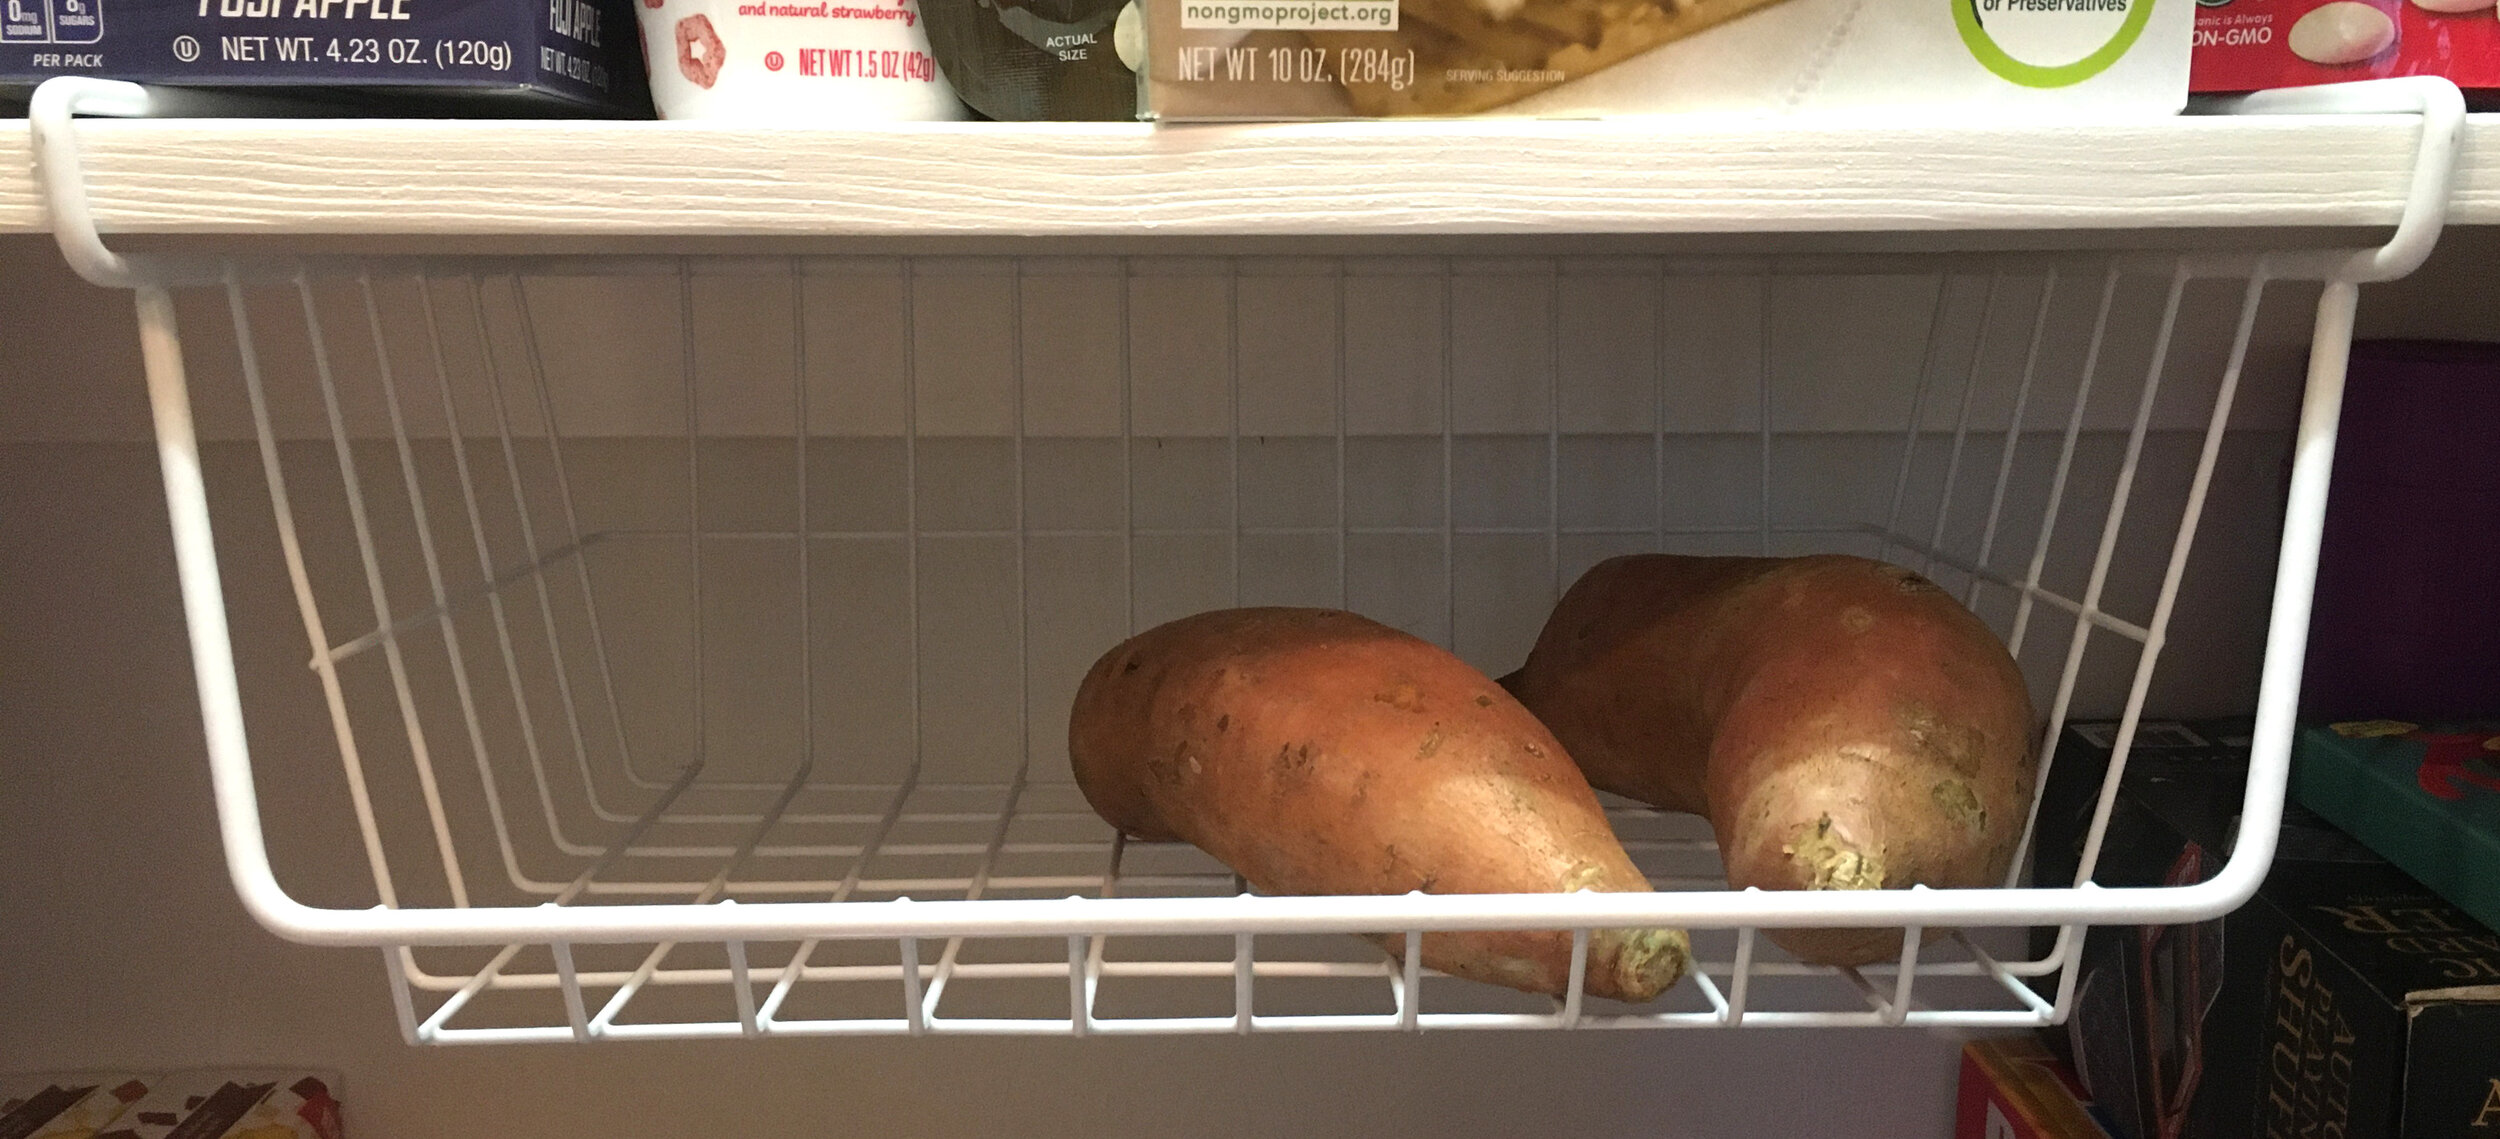
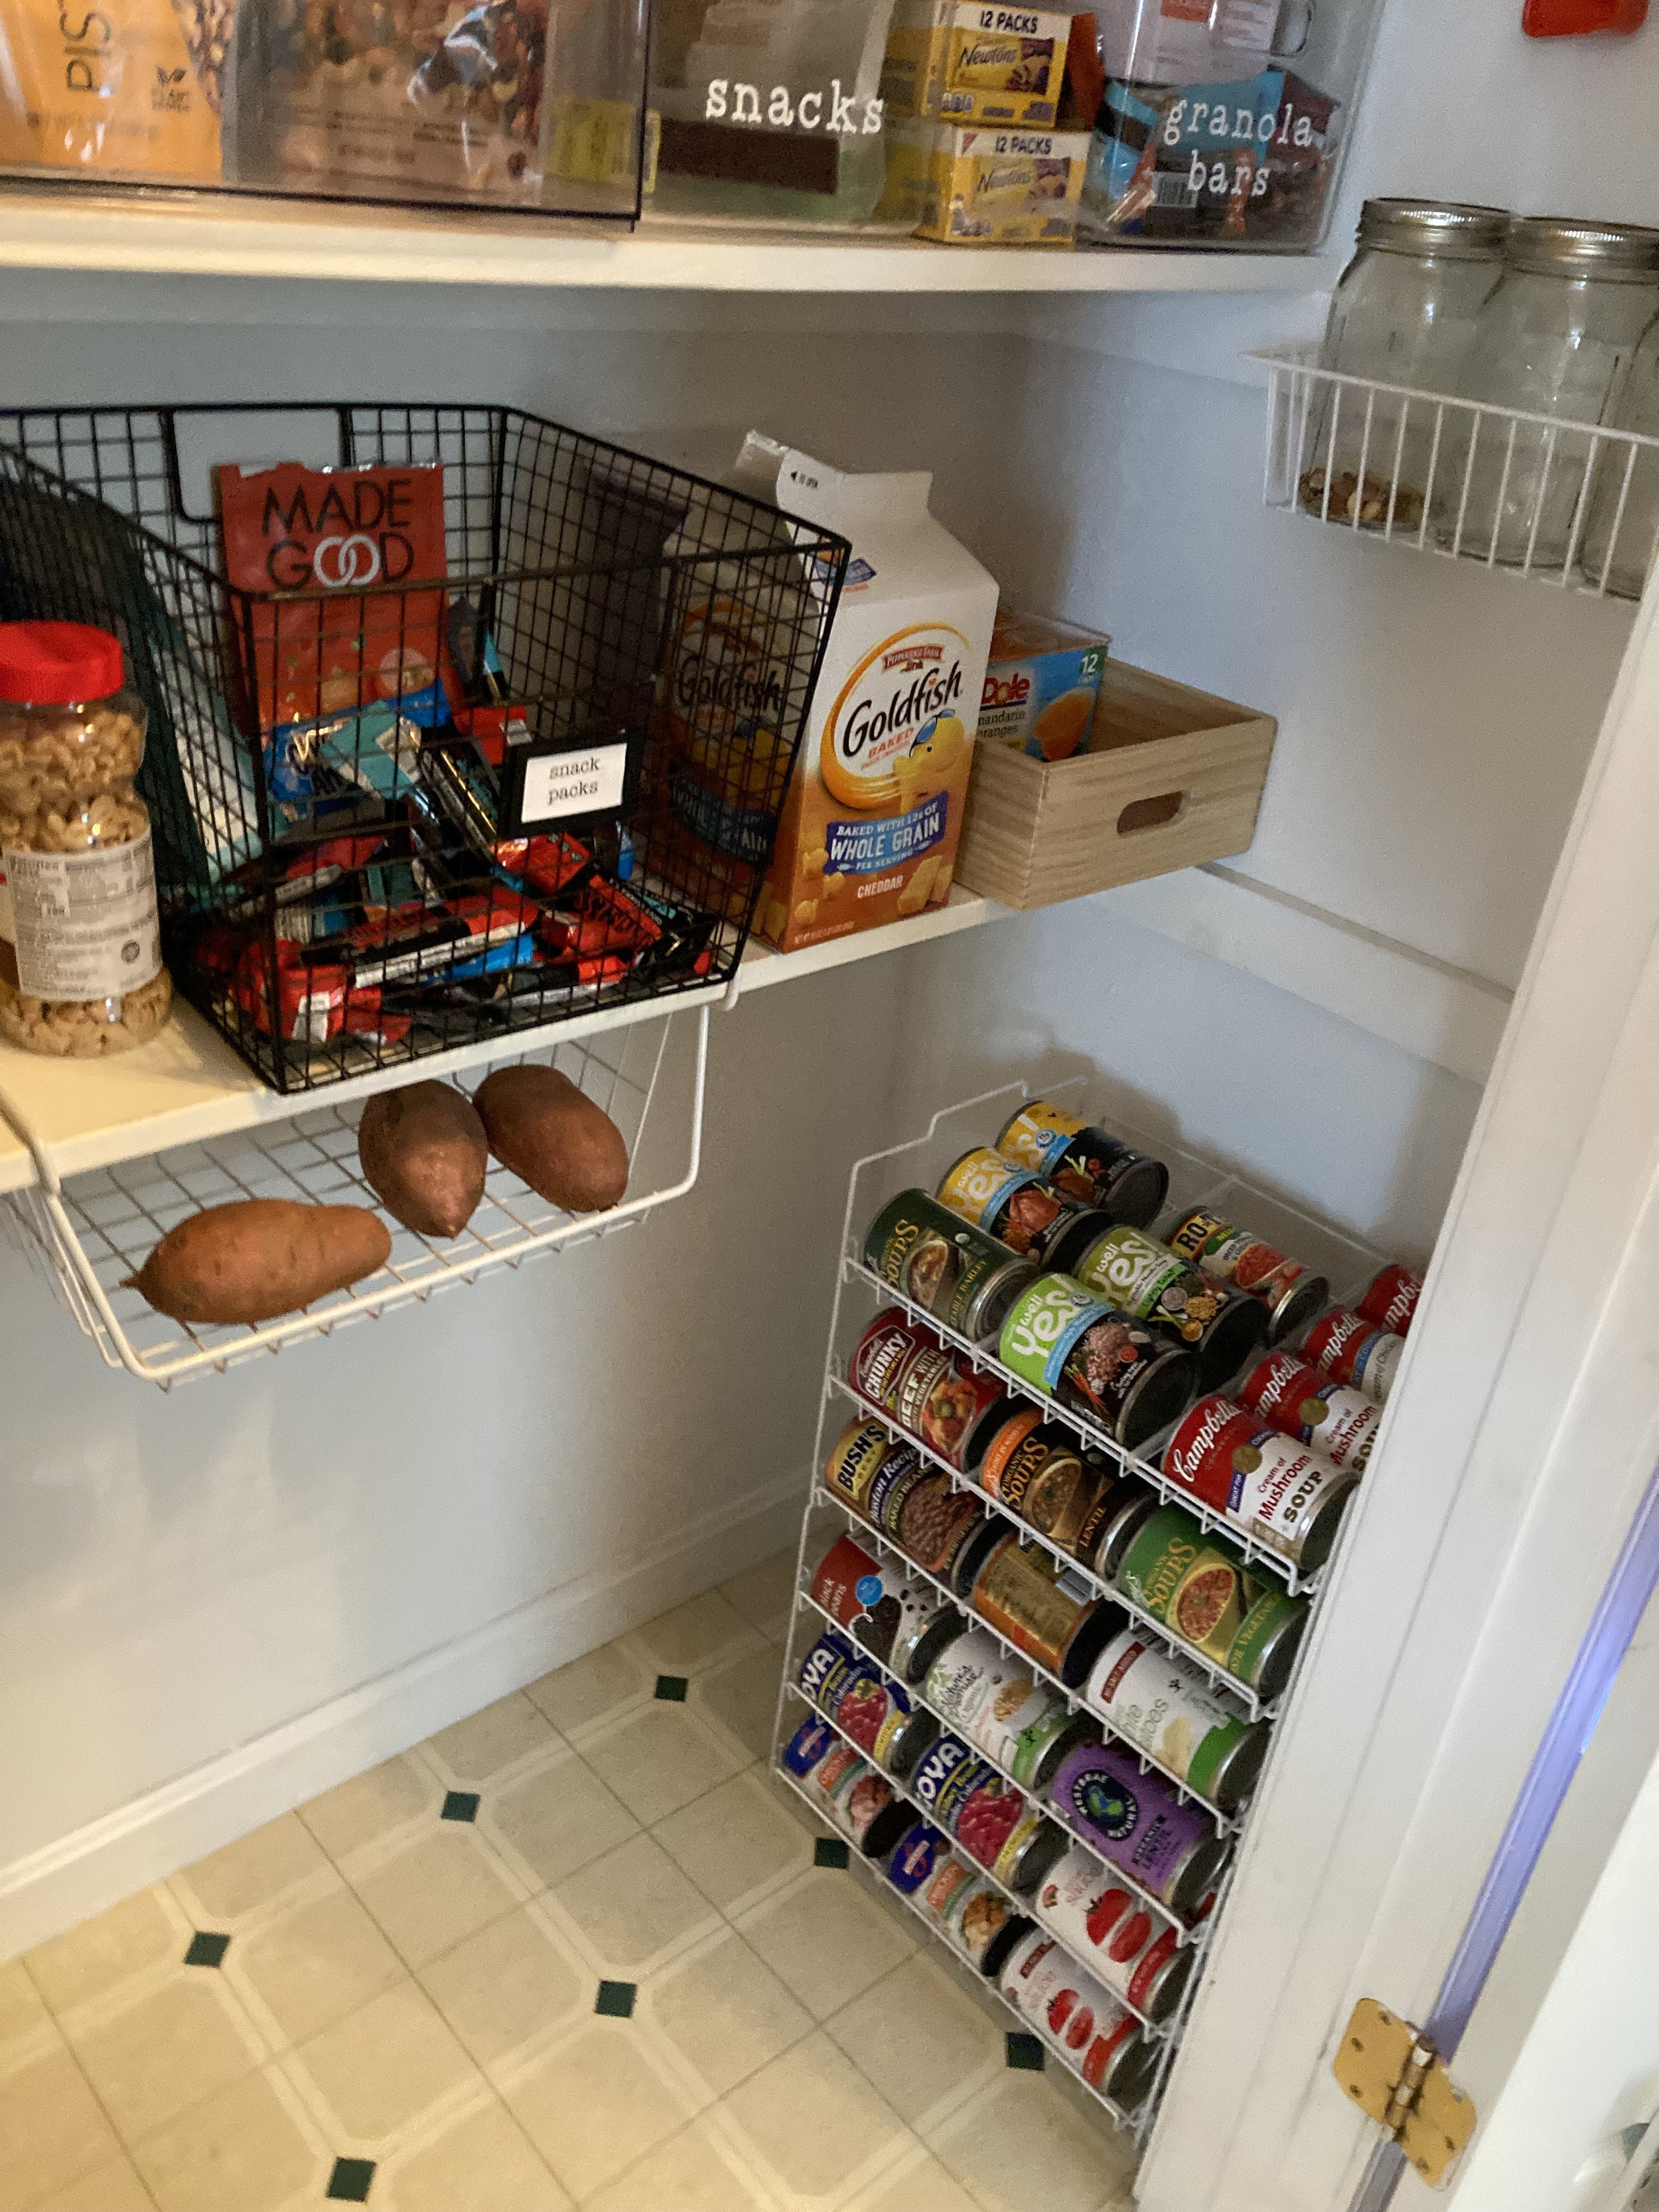
Over this past winter I added a few simple add-on organizers to our pantry to maximize the space and love how functional they are. Here they are below (and please excuse the glimpses of clutter in the pantry… as it now holds extra groceries and our family board games too - because, real life):
Additional Storage for the Walls
It turns out our door is an odd size and in order to get a screen door for it we would have to custom order one (at a cost of about $300+! Yikes). So instead I decided to cut a custom vinyl label to stick to the door to make it more finished. I could have designed my own but I found a design I really liked on
Etsy
and bought the digital design file. After purchasing the design file, I used my
Cricut
and
651 Permanent Vinyl
to make the label and then transferred it to the door. In hindsight I probably should have made it slightly smaller, but overall I love how it came out and how budget-friendly it was since I already owned a Cricut Machine and the vinyl.
|
Pantry Digitial Design File
|
Cricut Machine
|
651 Permanent Vinyl in Matte Black
|
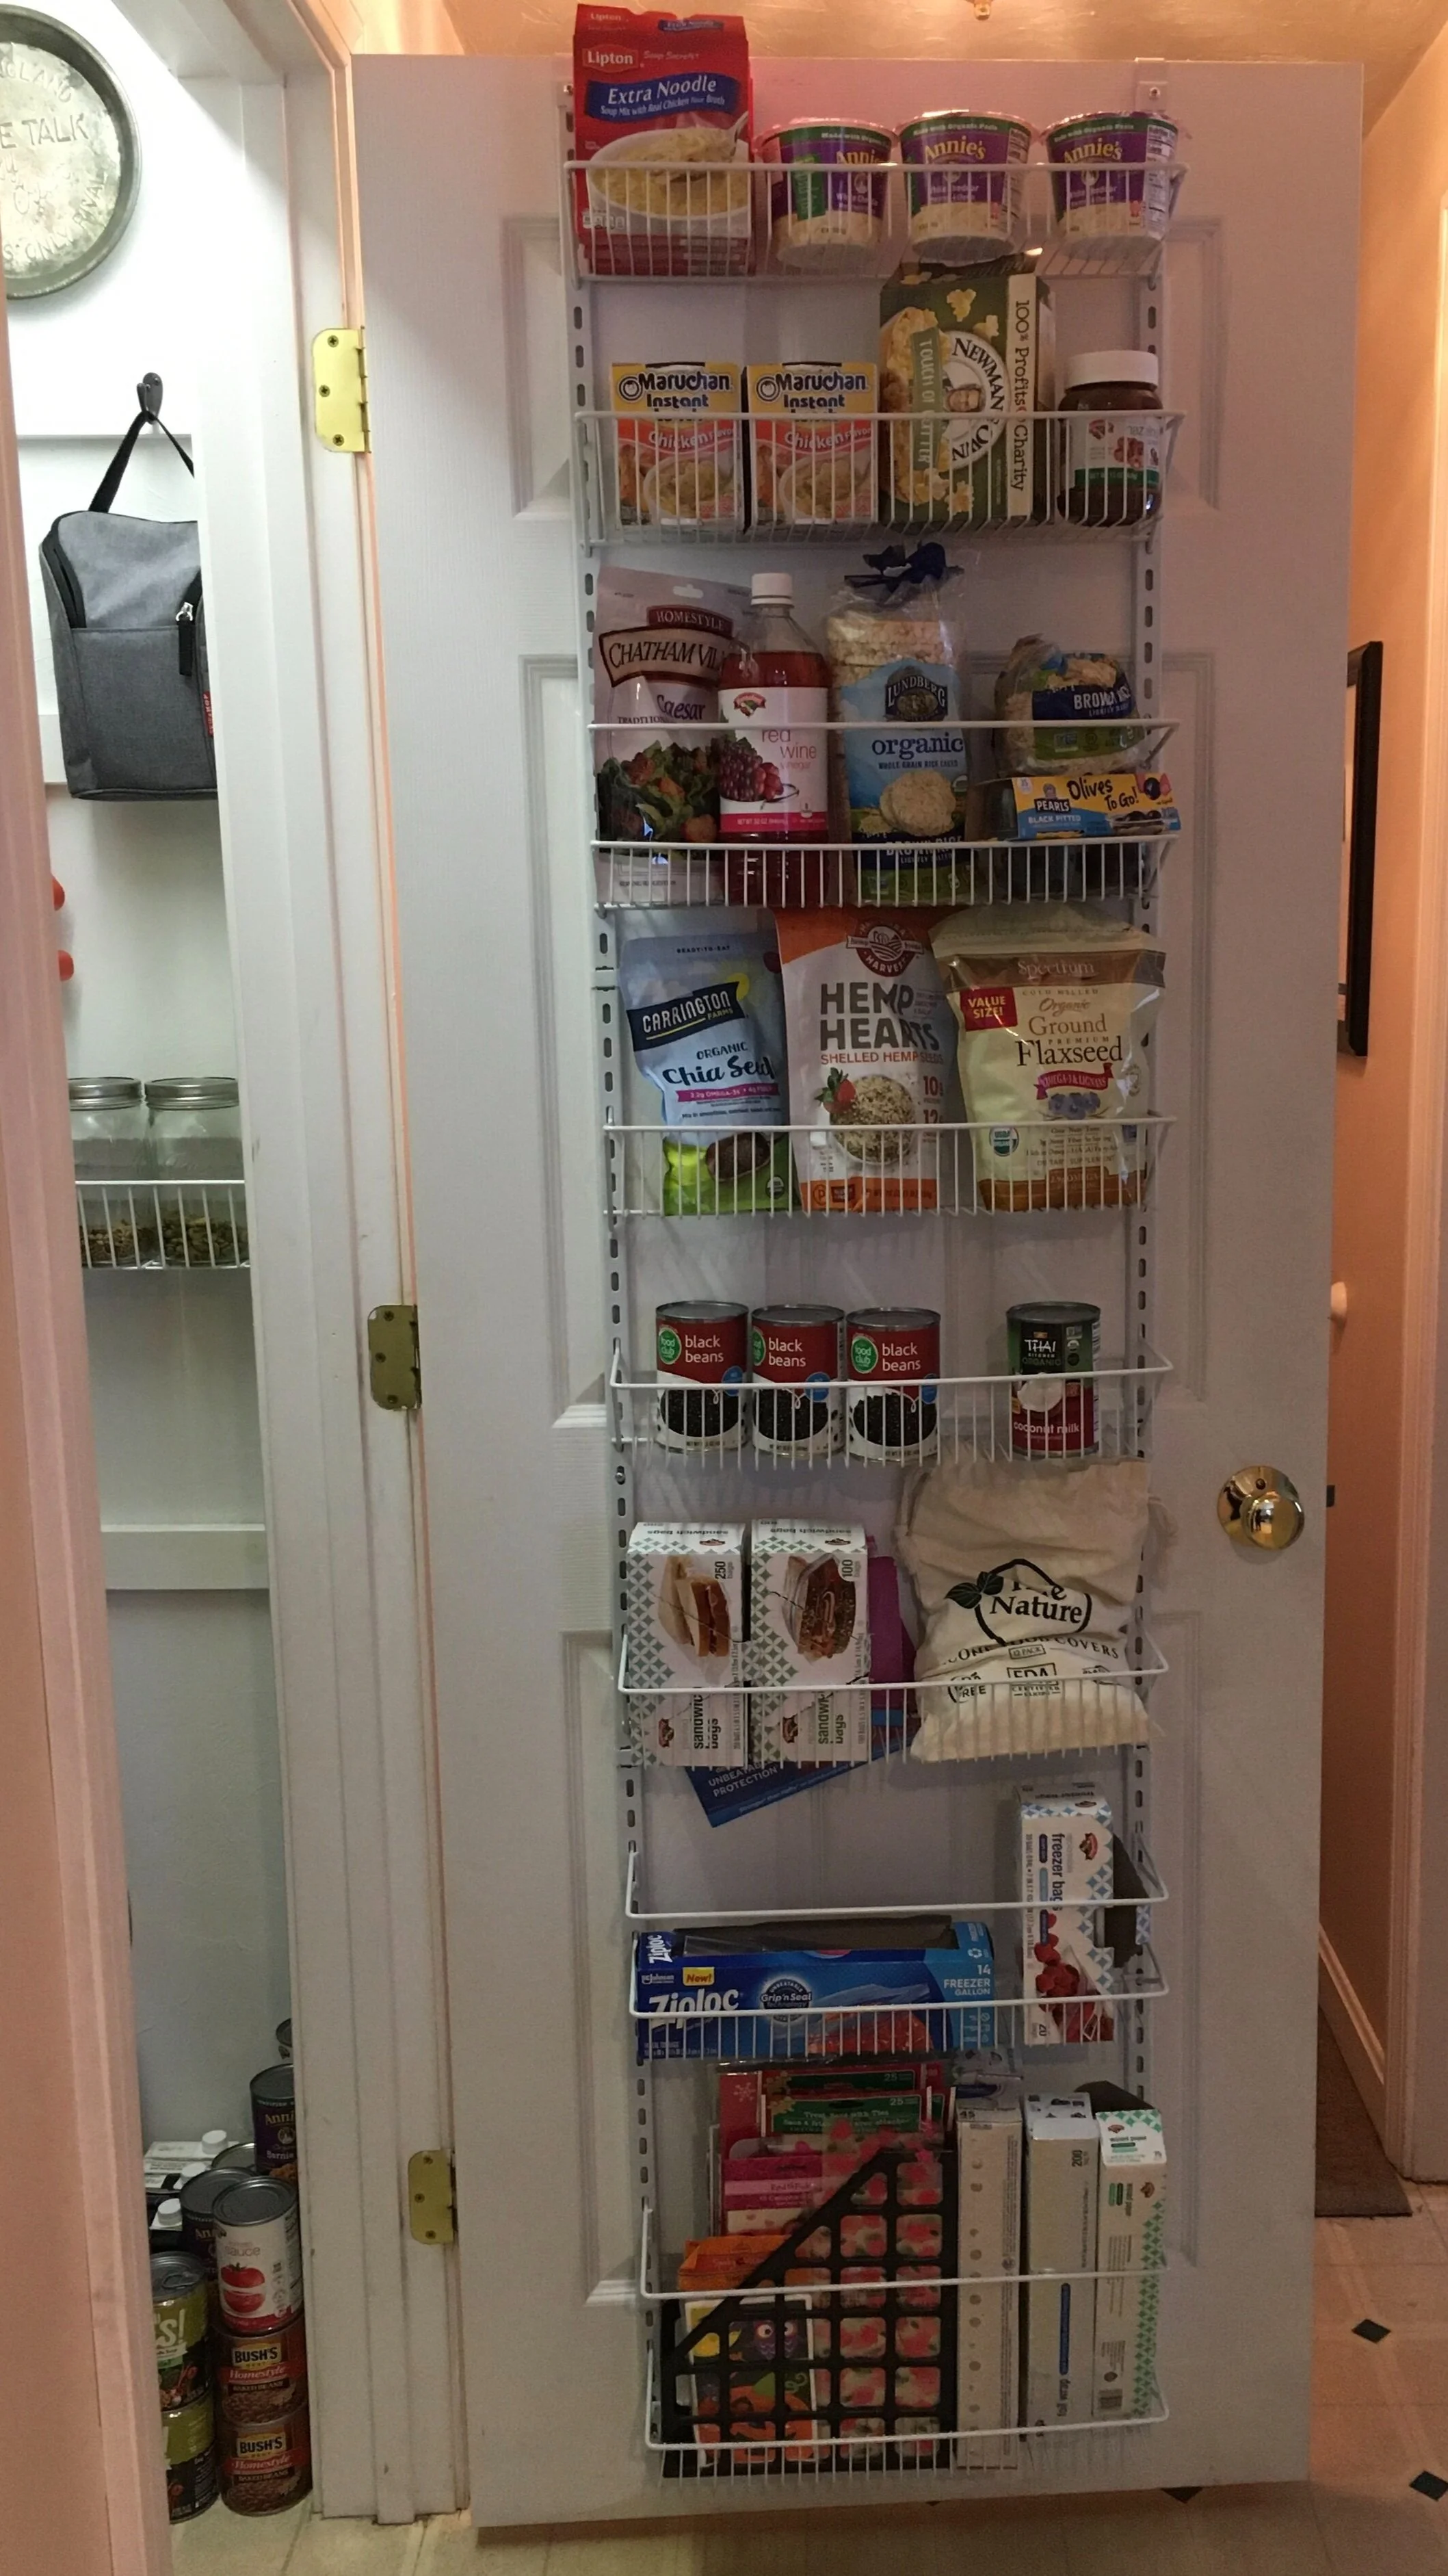
Finally, we decided to add a
ClosetMaid Adjustable Organizer
to the back of the pantry door to fully utilize the space. It was very simple to install and I am impressed with how sturdy it is once it's assembled and screwed in. We used the lower baskets for foil, parchement paper, ziplocks, silicone bowl covers, etc. The middle baskets we designated for frequently used canned goods, smoothie mix-ins, as well as salad fixings and rice cakes. Finally on the top two baskets we put convenience foods that we rarely use since I'm so short. Note: If you have a hollow-core door, you might want to use a specialty set of anchors/screws to attach it to the door for stability, rather than just screw into the door with regular screws.
|
ClosetMaid Adjustable Organizer (18 inch)
|
True Nature Silicone Food Covers
|
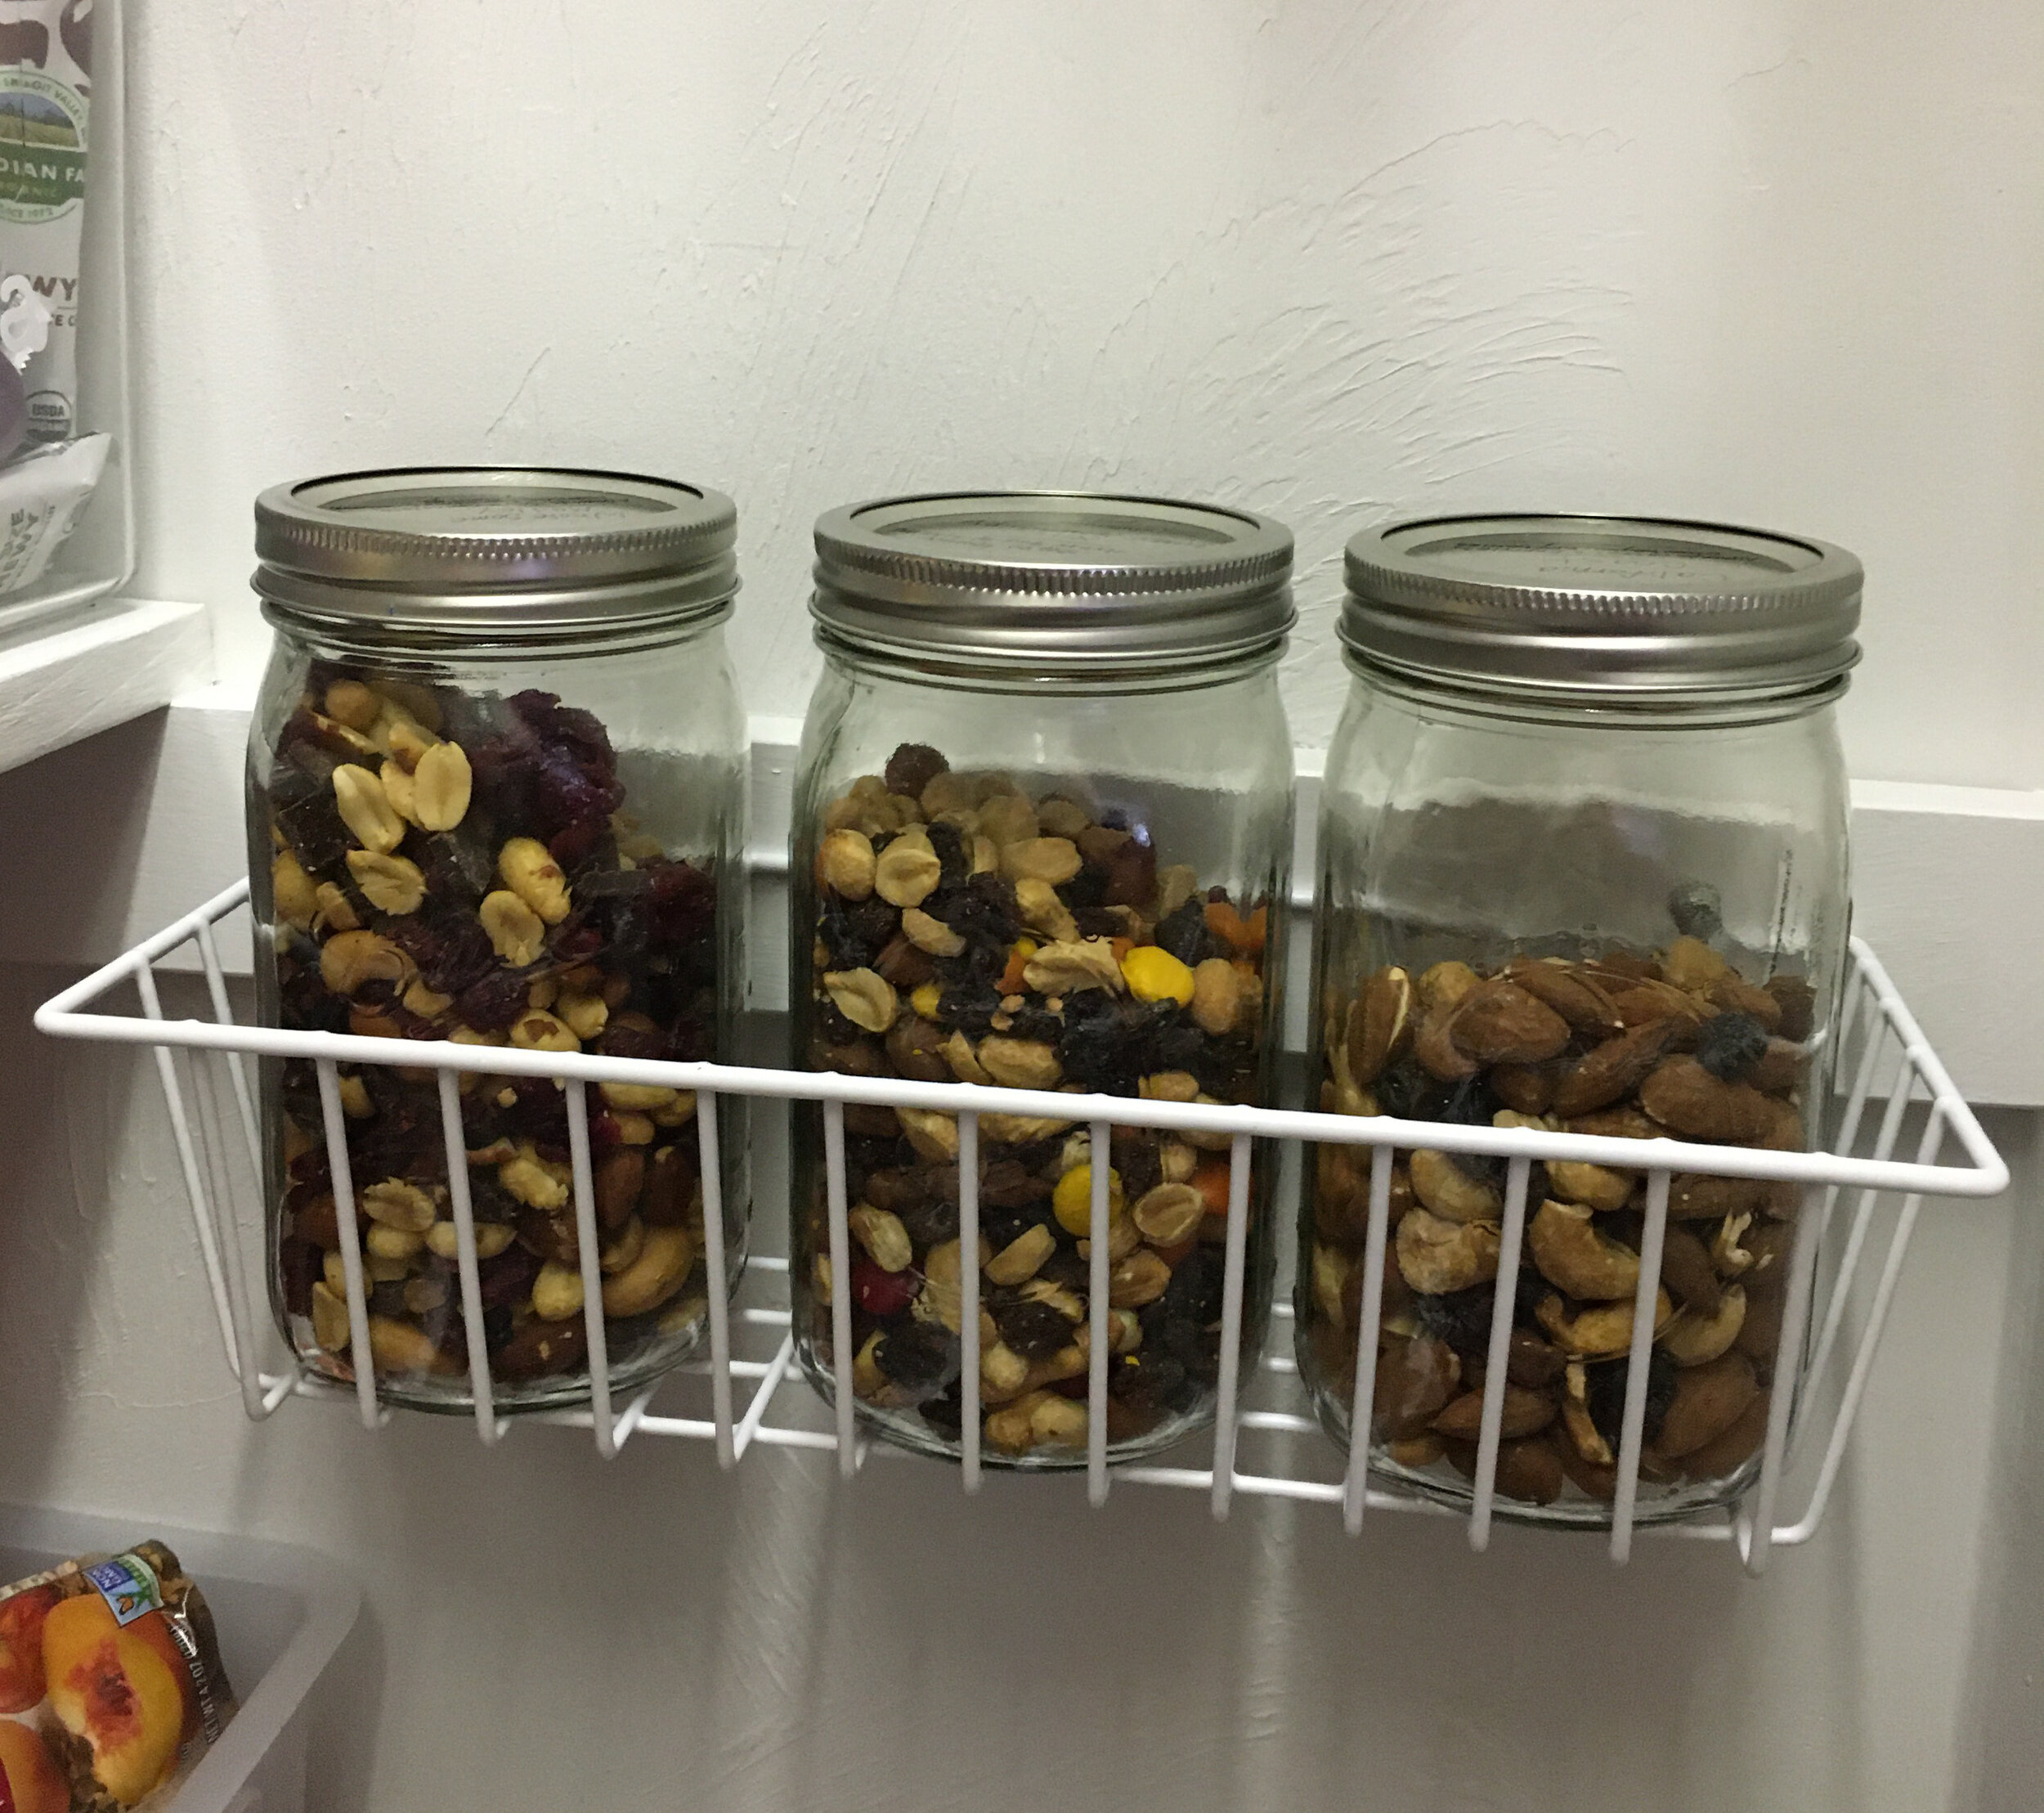
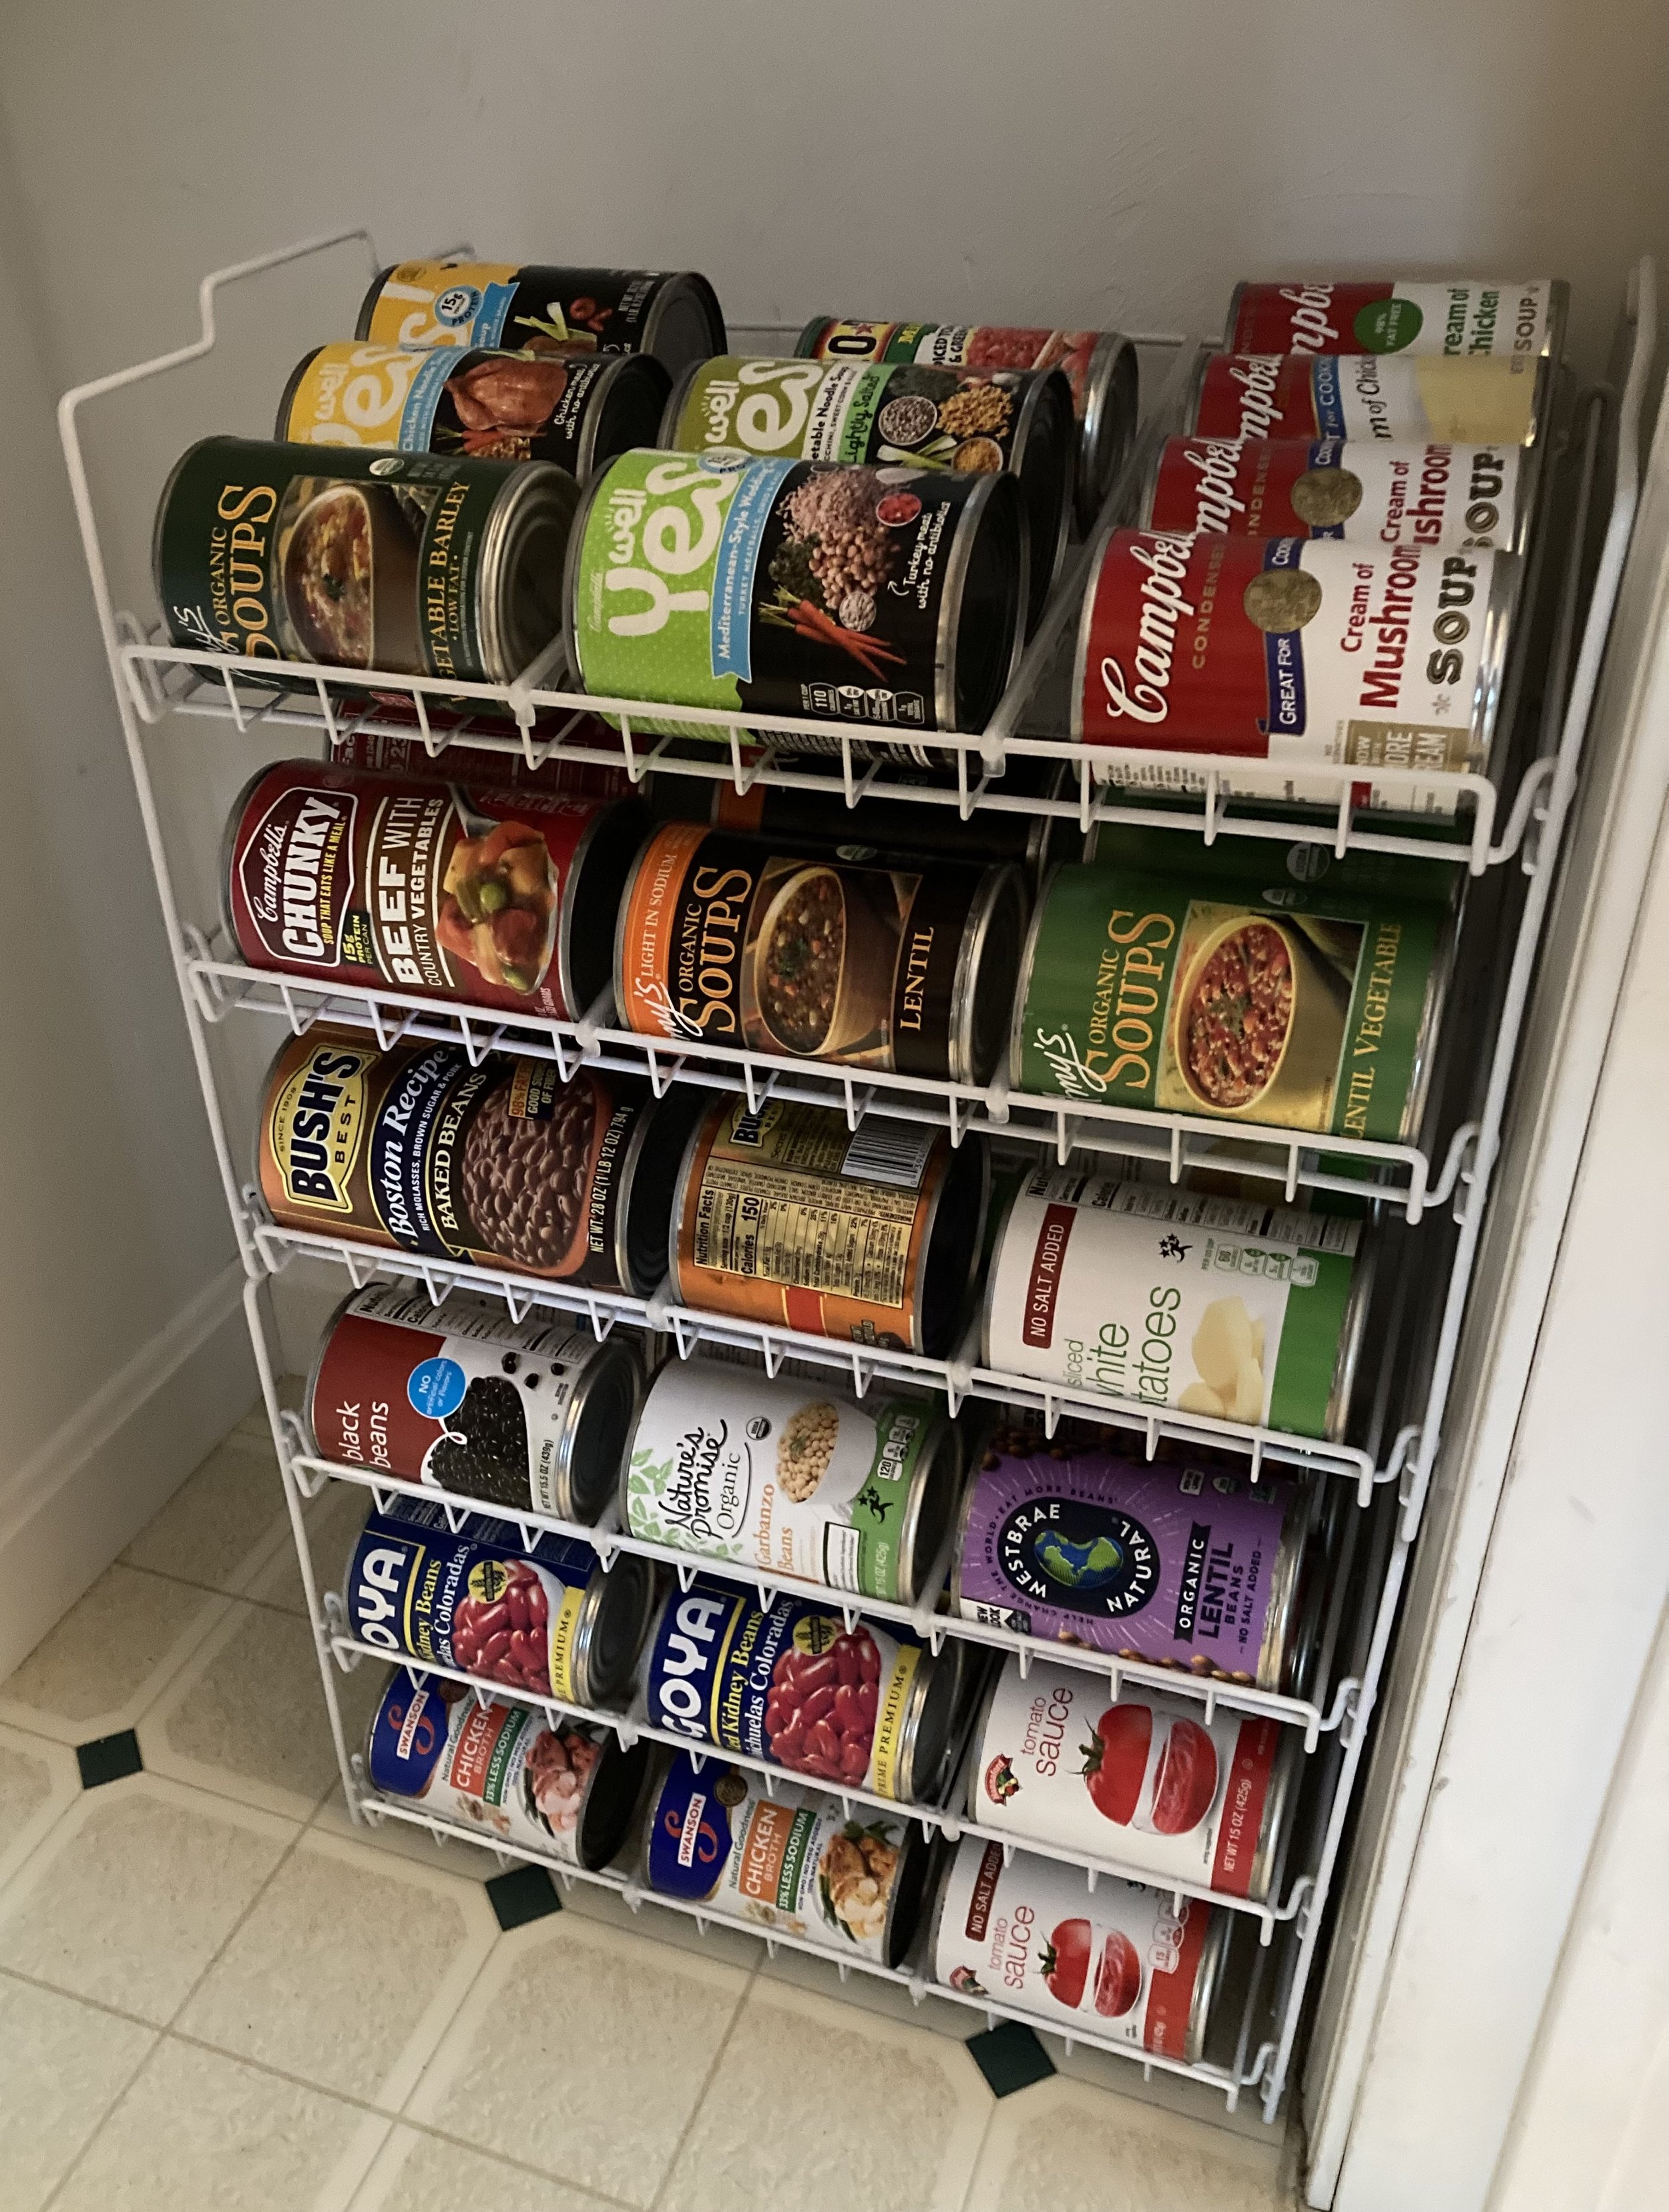
Stackable Canned Goods Organizer
Another later addition to our pantry organization are these amazing stackable can racks for organizing canned goods. Before I had quite a few canned goods just sitting on the floor of the pantry and in a separate kitchen cupboard, but I never could see everything at once and often cans in the back got forgotten -- Now everything is in one spot where I can see them and I can meal plan more efficiently.
| Stackable Can Rack Organizer (I have two racks stacked here) |
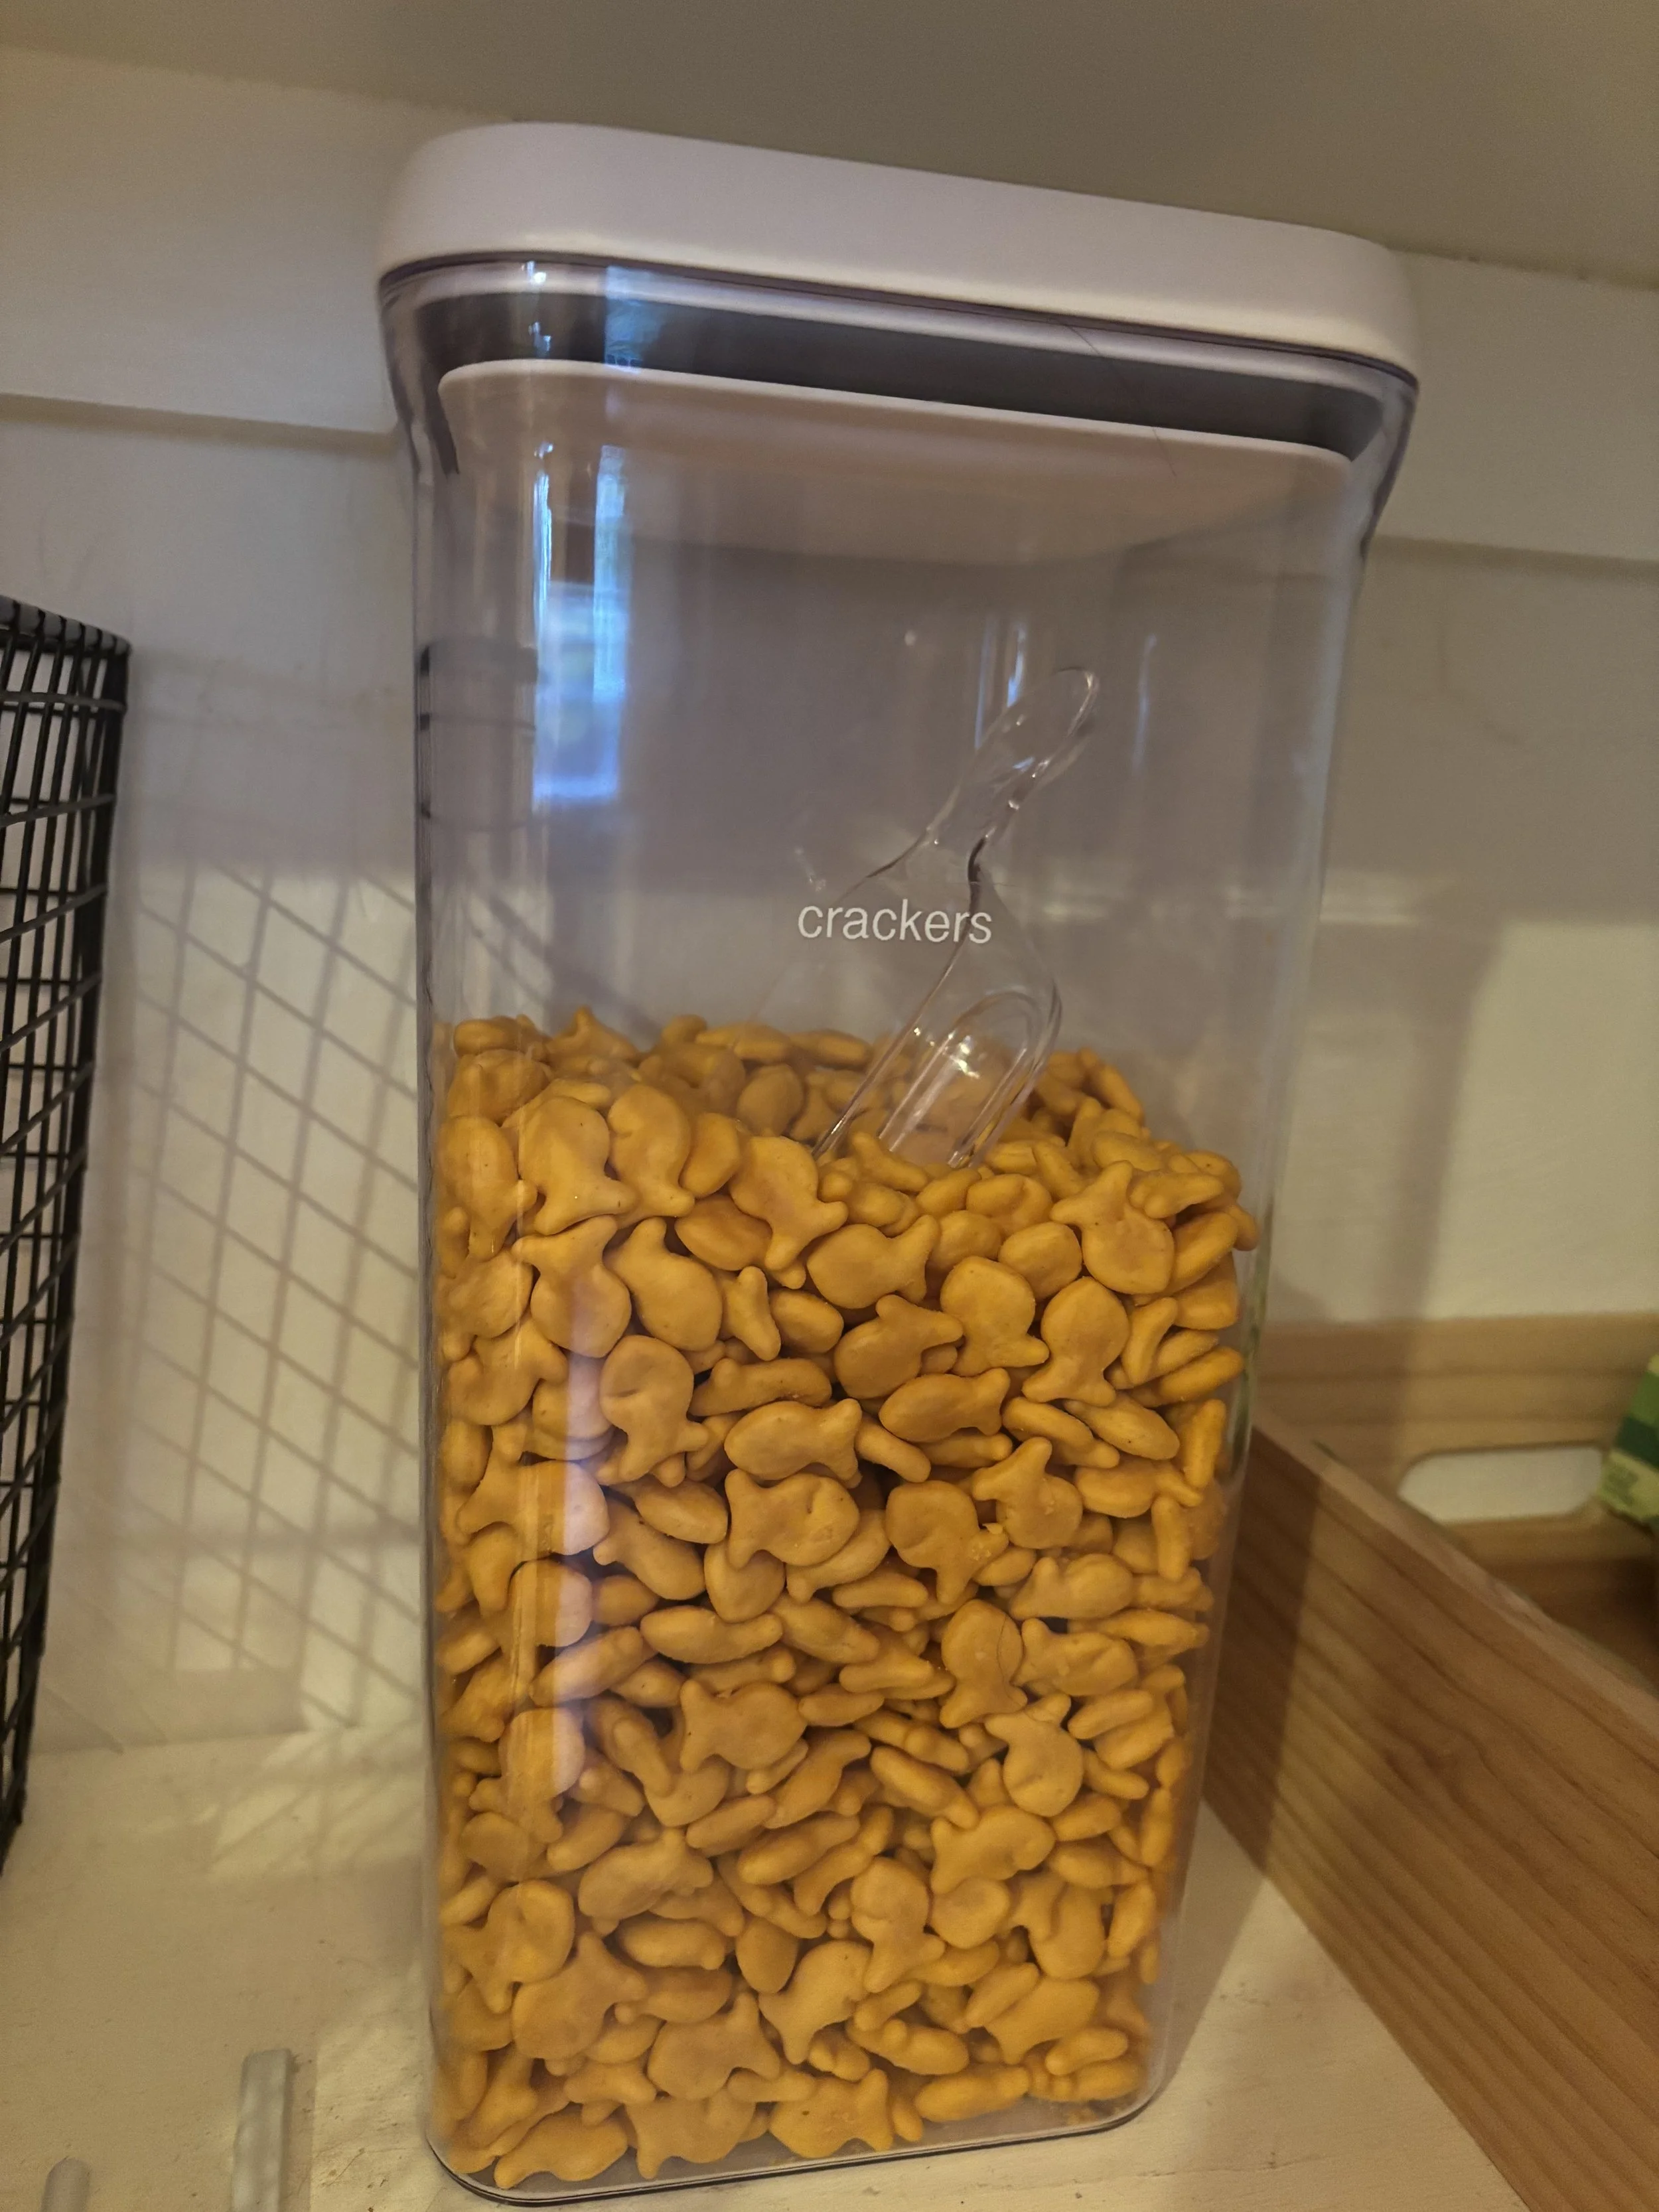
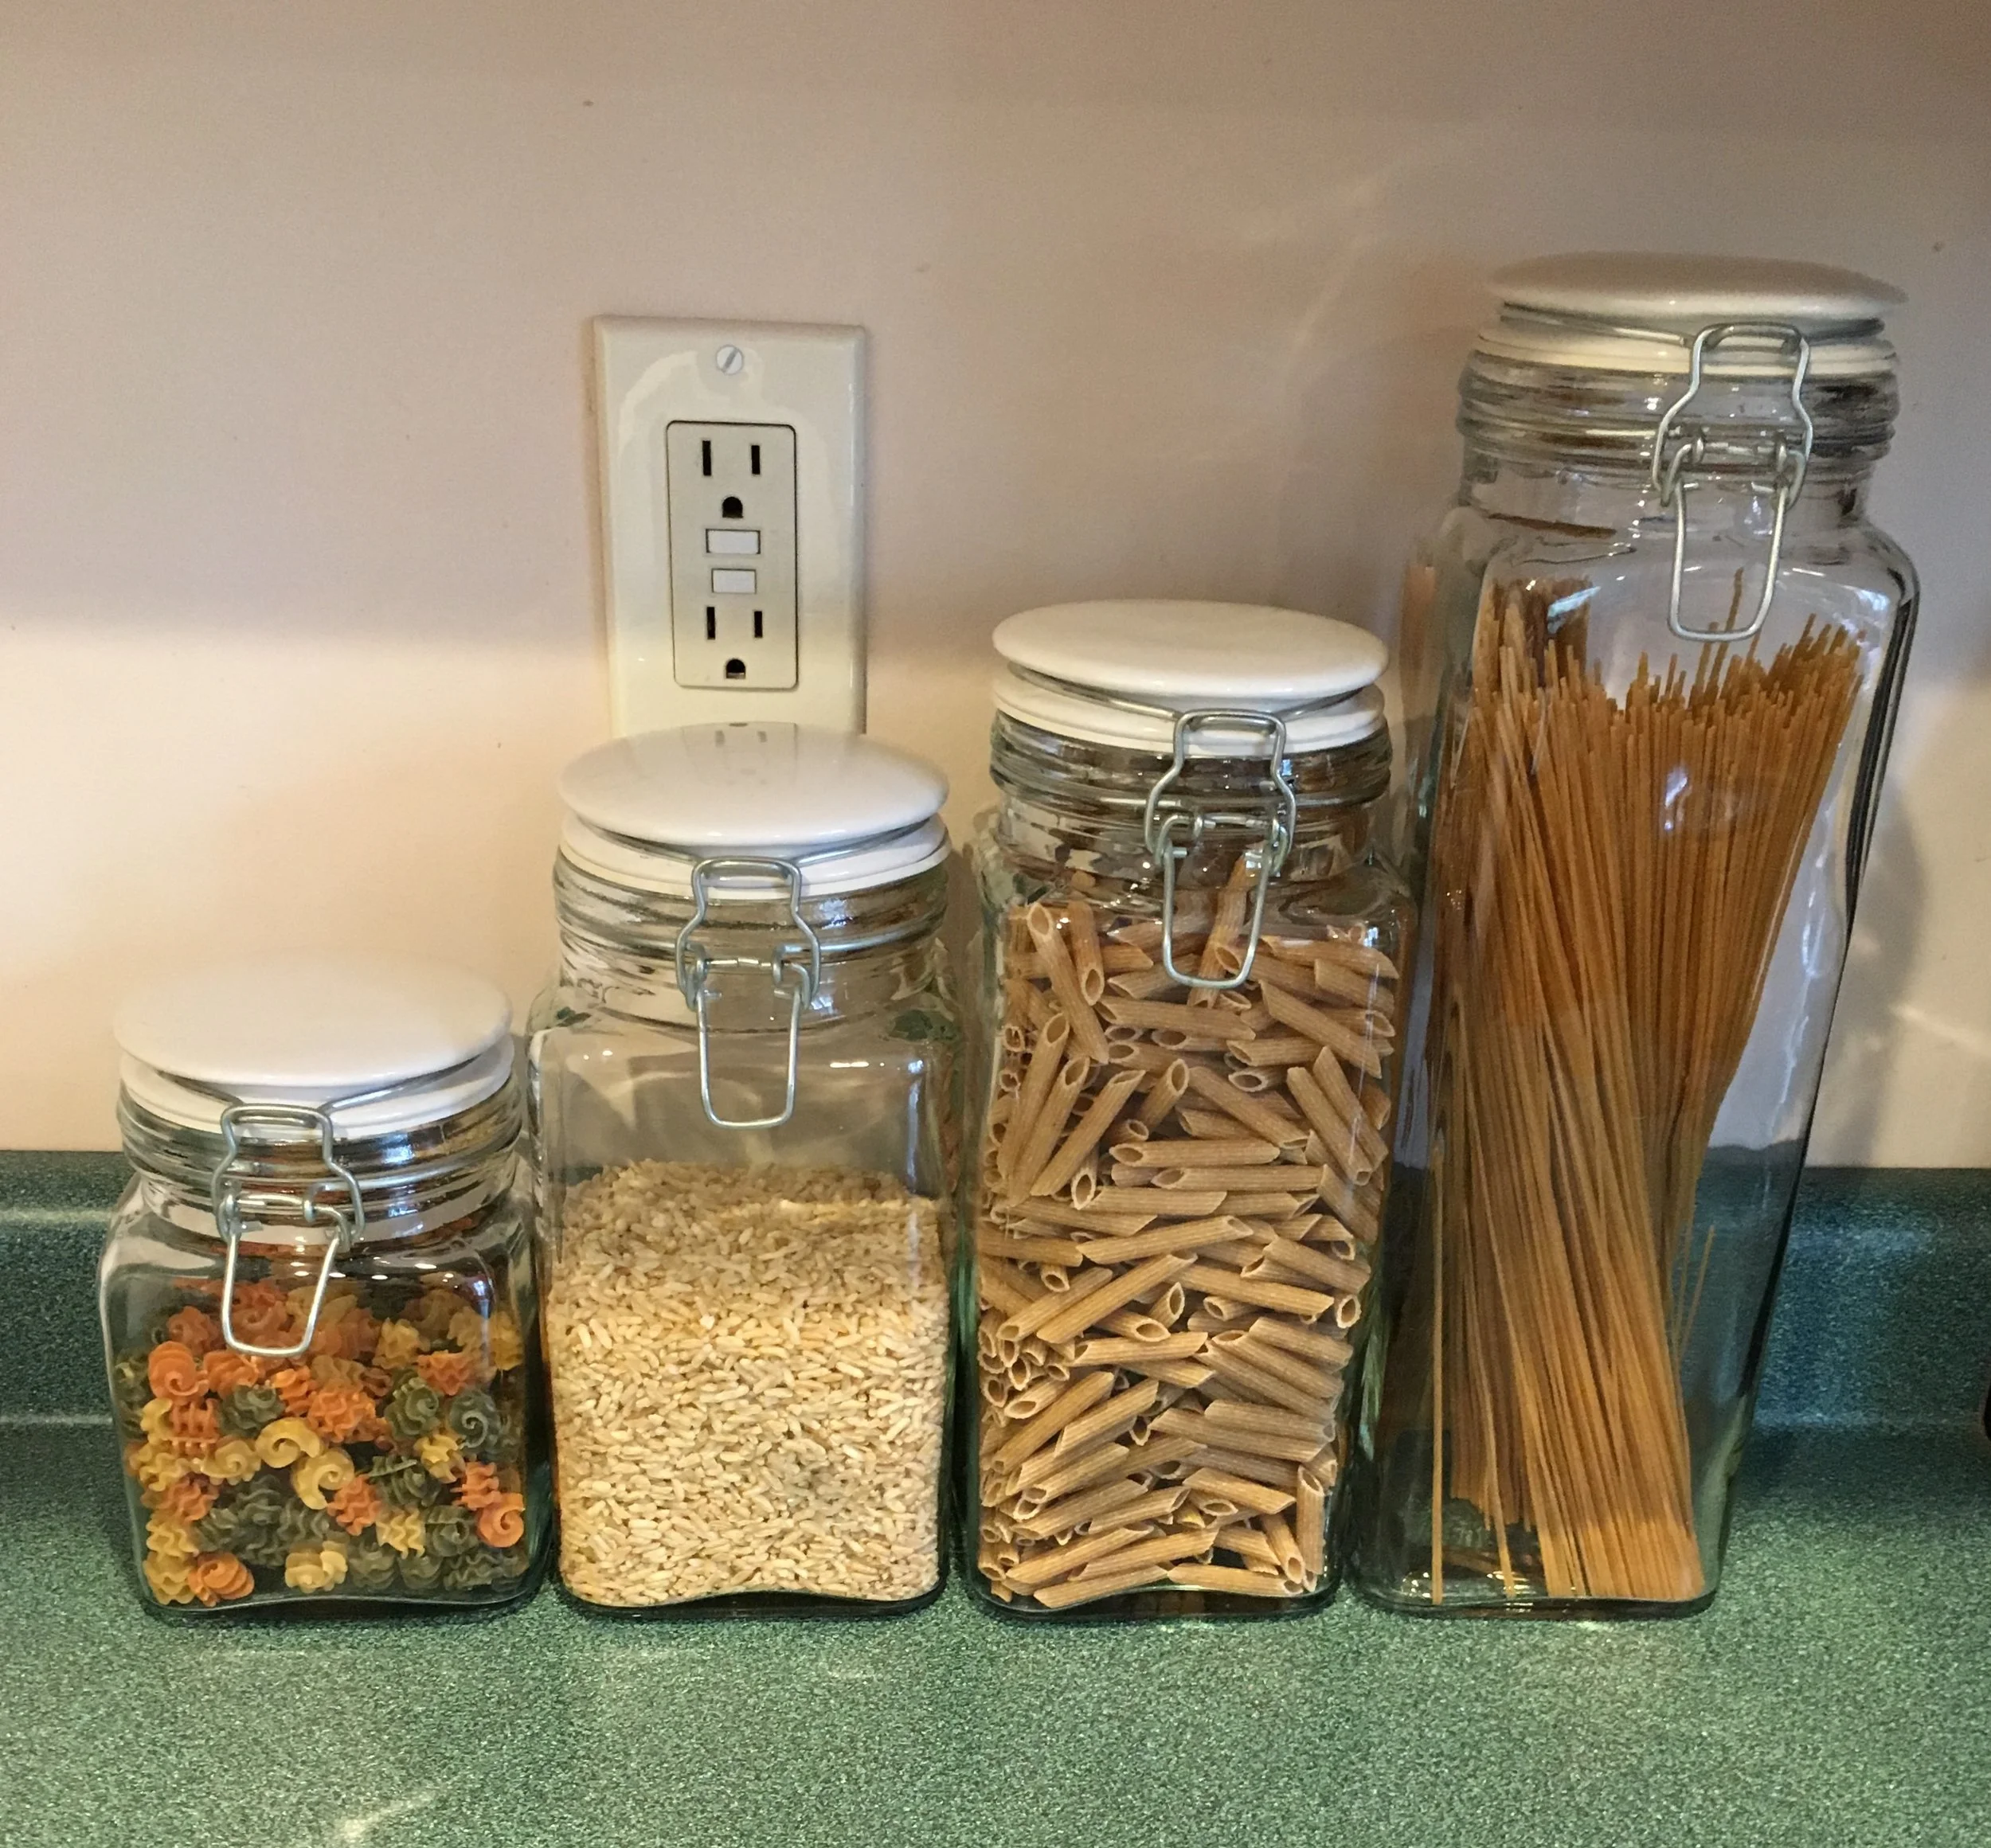
OXO POP Containers with Scoops for Snacks
Disclaimer
This website shares personal opinions and experiences regarding a variety of topics. Please do your own research regarding all things and use information/opinions stated here at your own discretion and risk.
Shop Some of my Picks for Home:
Scroll sideways to see more —>
Check out our Related Posts:
KEEP UP WITH BIRCH LANDING HOME
| Etsy | Facebook | Instagram | Pinterest | Bloglovin' | Hometalk |
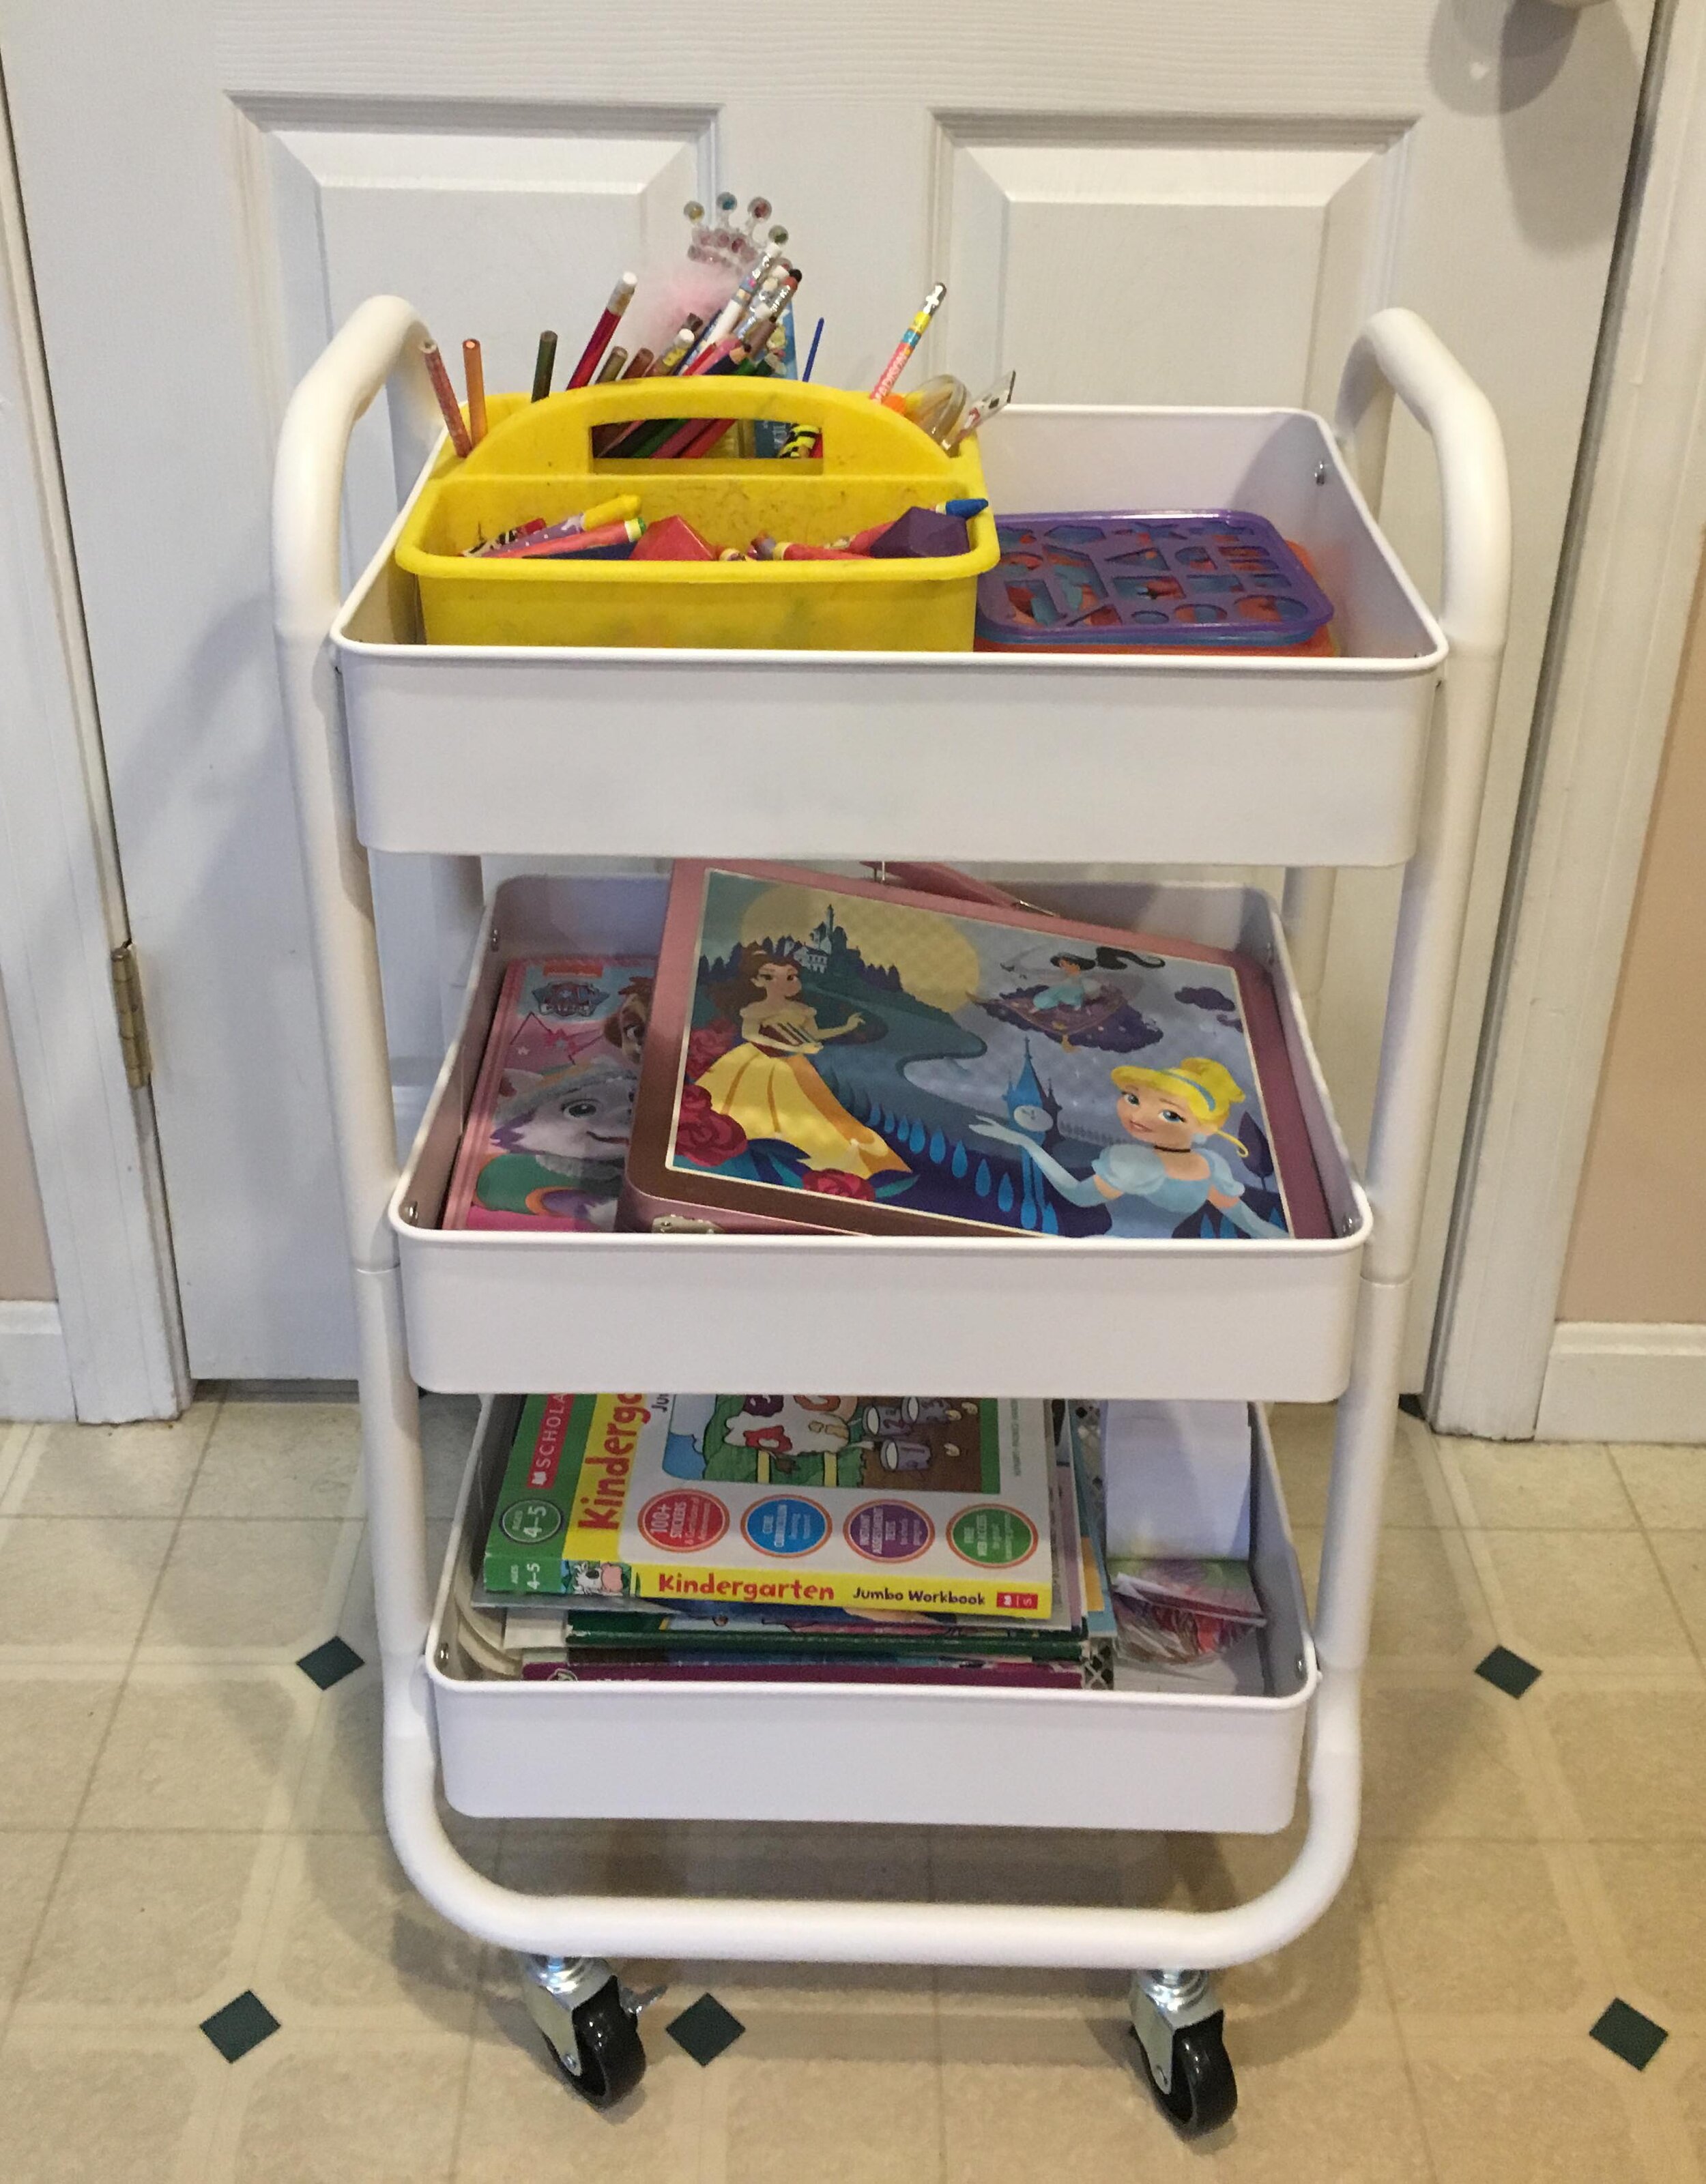
Our kids love arts and crafts, and at this age, they particularly love coloring and coloring books - however, the art supplies were totally taking over the house. In order to contain the chaos, I decided an “Art Cart” would be the perfect storage and organizational solution. | This post contains affiliate links |
I picked up this cart at Target, but I've linked a very similar one here from Amazon. We decided to stash the coloring books on the bottom shelf, then the tins full of stickers and art kits on the second shelf, and finally the top shelf was reserved for our Art Supply Caddy full of crayons, colored pencils, stencils, etc.
Finally to store everything, the Art Cart tucks neatly into our pantry where it’s easily accessible but still out of the way. The kids can go in and help themselves to craft supplies whenever they like, and when we want to do a big project the whole thing can wheel out for even easier access. This storage hack has been a game changer in our home and I hope it does the same for you too :)
KEEP UP WITH BIRCH LANDING HOME
| Etsy | Facebook | Instagram | Pinterest | Bloglovin' | Hometalk |
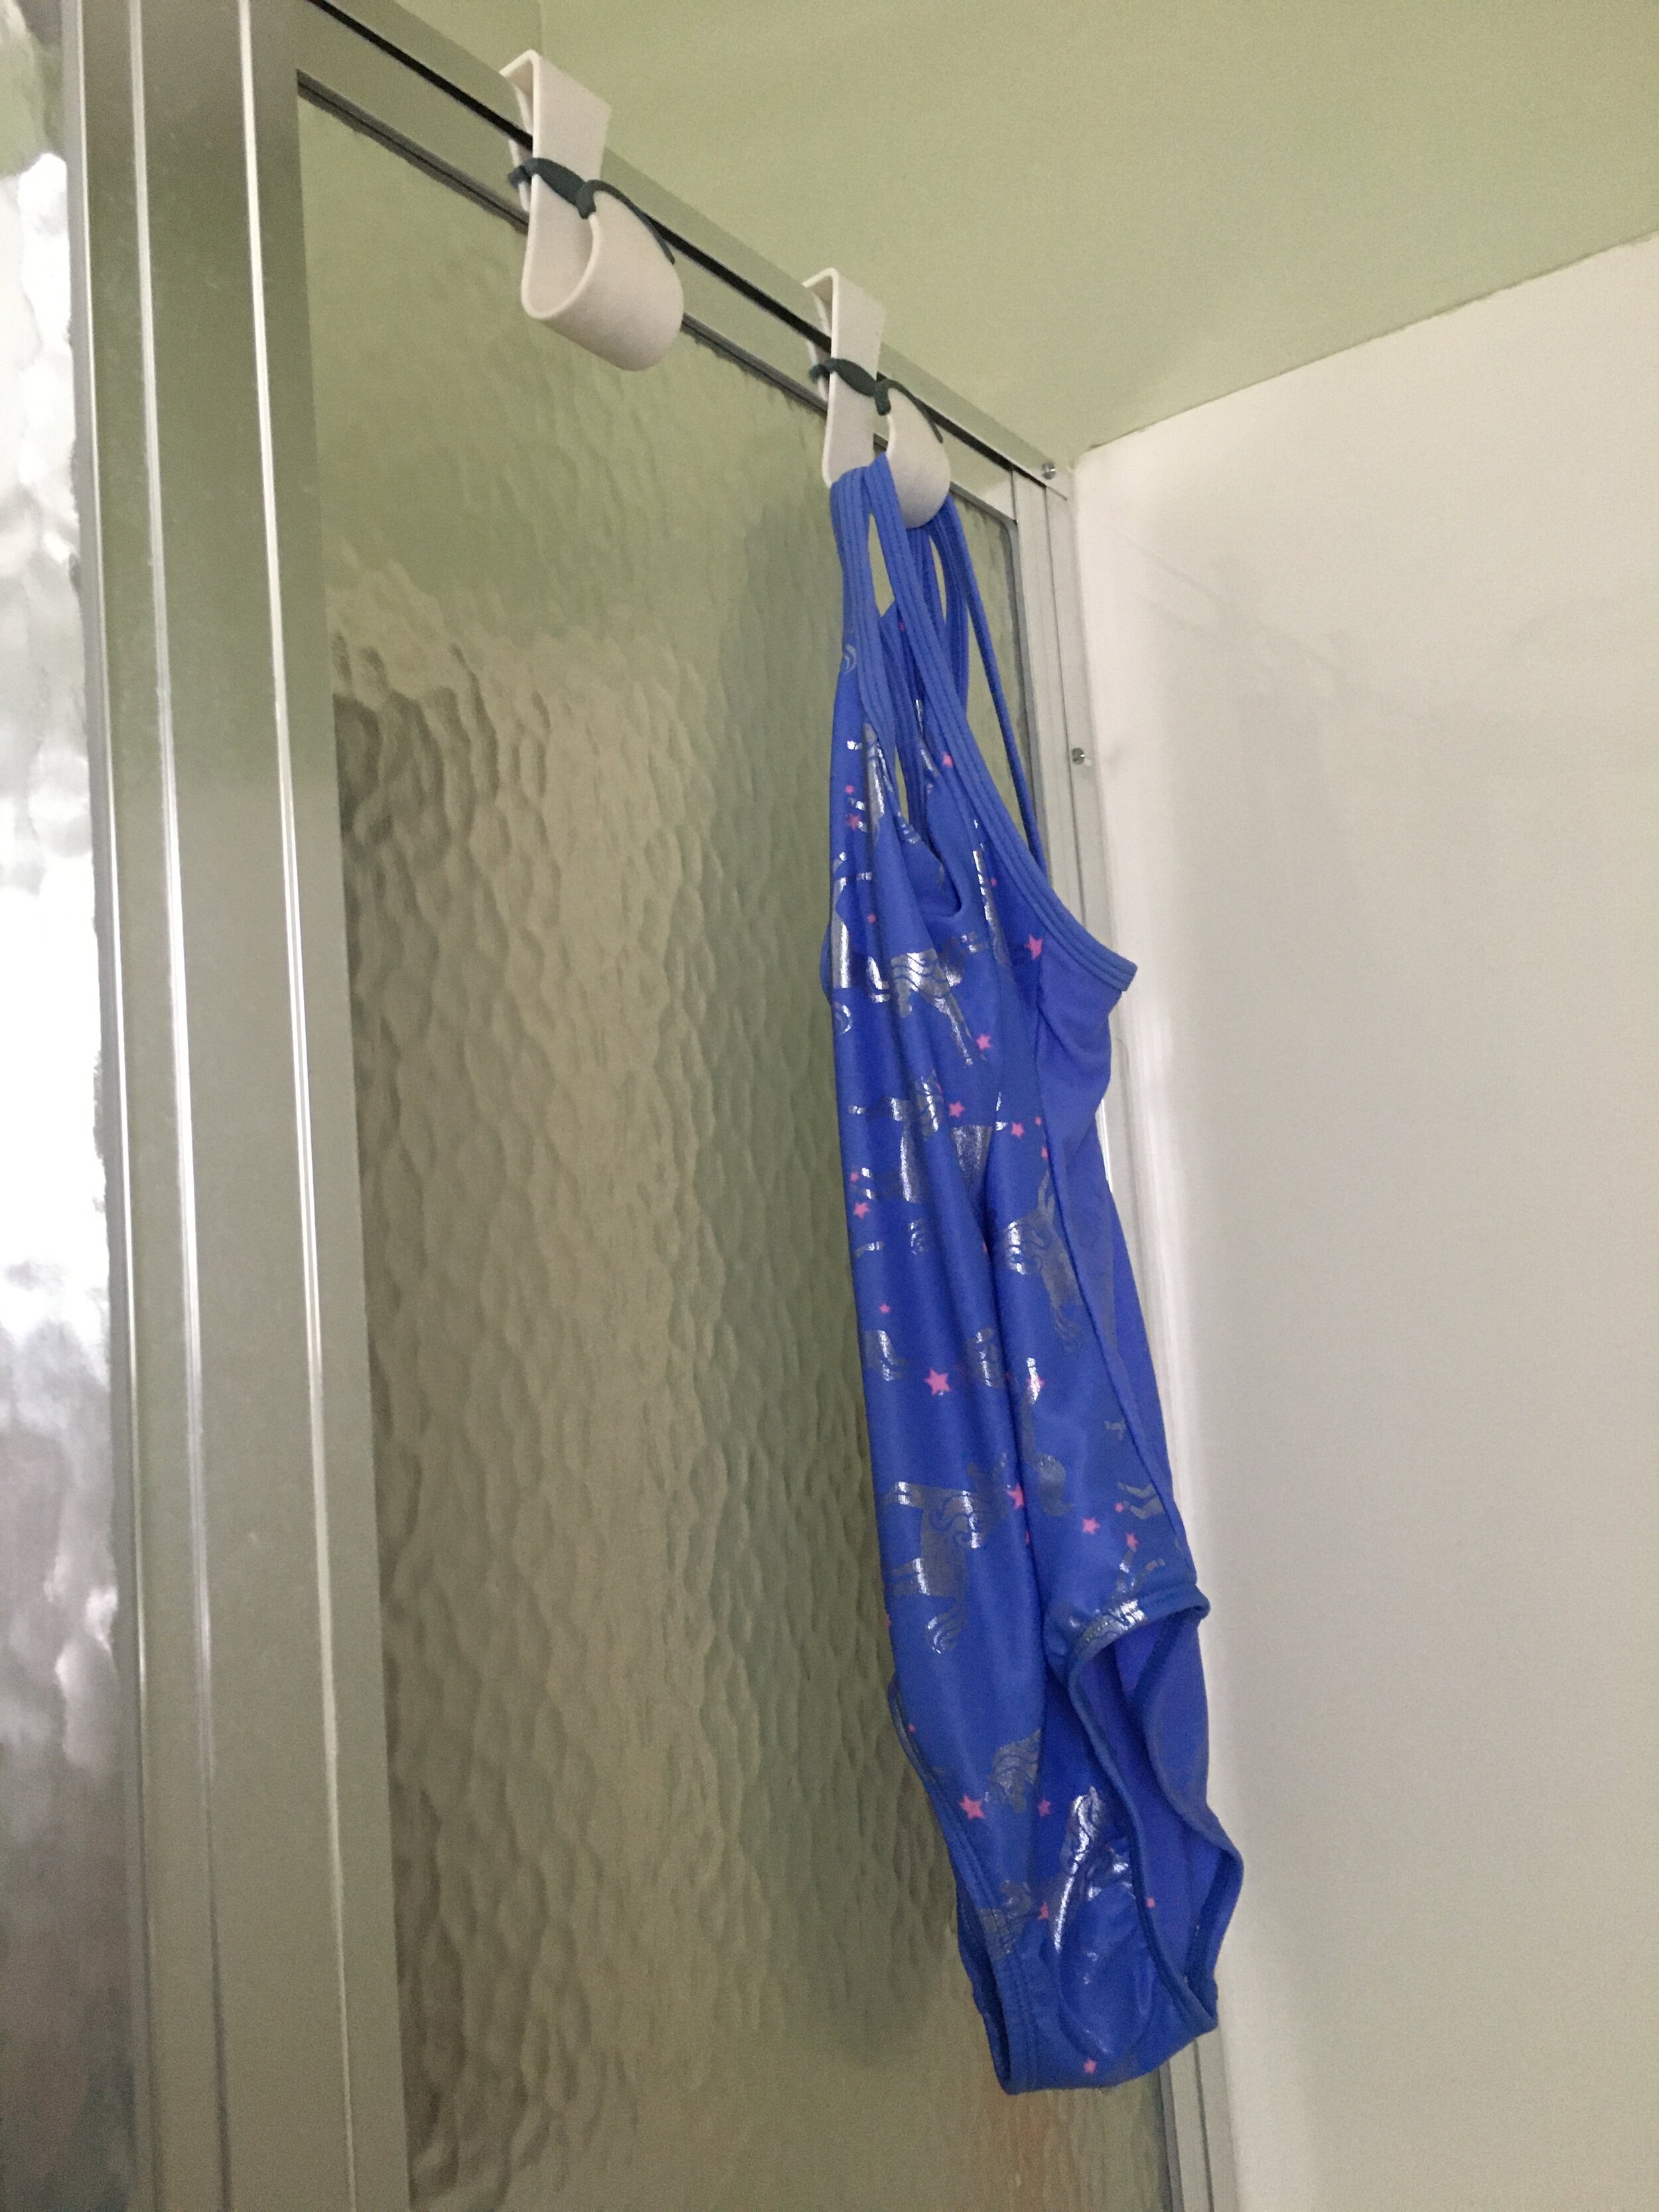
Living by the lake, we constantly have wet bathing suits all summer that need to be hung to dry, At first we used a drying rack in our shower but it was rather cumbersome and a pain to constantly set it up and take it out, until I had a revelation and found these awesome plastic hooks that hang from our glass shower walls. | This post contains affiliate links |
These plastic hooks fit perfectly over our shower wall, won’t rust, are easy to clean, and are perfect for hanging wet bathing suits from to drip dry into the shower. They have been the perfect bathing suit drying solution for us!
Bonus tip: Always rinse your bathing suits out in the sink with fresh water before hanging to drip dry. You don’t want them to sit and dry with dirty lake water or harsh chlorine from the pool on them. Rinsing them out with clean water helps keep your bathing suits looking good and lasting longer.
KEEP UP WITH BIRCH LANDING HOME
| Etsy | Facebook | Instagram | Pinterest | Bloglovin' | Hometalk |
We LOVE going camping, but camping with kids definitely adds to the amount of stuff you need to bring… like several complete changes of clothes per day for each kid, just in case. In order to keep our tent more organized and to help make outfit changes quick and easy (even in the middle of the night), we love using packing cubes! | This post contains affiliate links |
Each kid gets their own packing cube which makes finding clothes easy - no more digging to the bottom of a dark duffle bag to find a tiny pair of socks. I highly reccomend giving packing cubes a try on your next overnight trip, whether it's camping or a hotel stay, they're a game-changer!
KEEP UP WITH BIRCH LANDING HOME
| Etsy | Facebook | Instagram | Pinterest | Bloglovin' | Hometalk |
I love Christmas as much as anyone, but once the holidays are over I’m ready to pack it all up and start the New Year fresh with a clean house! Some of the most annoying decorations to pack up for me has been garland or string lights… they just get tangled so easily which makes unpacking them next Christmas equally as aggravating.
A simple solution? Cut out a piece of cardboard in a “spool shape” and wrap the garland or lights around it. This packs neatly away and keeps things from getting tangled. Trust me, you’ll thank me next Christmas ;)
KEEP UP WITH BIRCH LANDING HOME
| Etsy | Facebook | Instagram | Pinterest | Bloglovin' | Hometalk |
Our daughter’s bureau was a train wreck and I just couldn’t take it anymore. She’s been very much into picking out her own clothes lately and tends to dig around in her drawers until she finds what she wants, without putting anything back the way it was. Today I finally decided to tackle the disaster and emptied her bureau, folded everything in the “KonMari” style, and put it back with order.
What’s the KonMari style? Well, technically the first step is to only keep what you truly love or use, and purge the rest (I pulled out a few items that she was starting to outgrow, but most of her clothes stayed). Then you fold everything uniformly so it can stand up in the drawers and be “filed,” allowing you to see everything at once. This is a great way to fold your clothes as you can see everything all at once and keeps you from falling into the rut of constantly wearing just what’s on top.
As you can see I came up with a basic system for the drawer too - I grouped all her t-shirts together, then long-sleeve shirts, then sweatshirts and tank tops. (This folding technique also seems to be a lot more efficient as there’s even some empty space now!) I also tackled her other drawers too and tidied up her jeans, pants, and PJs. Overall I think it looks great and should help make getting ready for school in the morning a breeze.
How I organized it:
I already had my own drawers folded in the KonMari style and love it - it’s so nice being able to see all your options at once when you’re getting dressed in the morning. As for our daughter, I explained the new setup to her and she understands it (she was honestly really excited about her neat drawers when I first showed them to her) - but the reality is she’s five years old and there’s no way it’s going to stay this organized on it’s own. I also don’t think it’s worth nagging her over it to keep it this way, it’s really not a fair expectation for a five year old. So, we’ll see how long this lasts… I’ll do my best to tidy it up when I can and try to keep some semblance of order but it won’t always be picture-perfect and that’s okay. That’s life ;)
One Week Update: She actually kept the system perfectly! Just a few things had fallen over and one item was crumpled up and put back, but 95% of it was still perfect. I’m super impressed that an almost 5-year-old can keep the system that neat. But it goes to show, that if she can do it - so can you!
Related Post:
KEEP UP WITH BIRCH LANDING HOME
| Etsy | Facebook | Instagram | Pinterest | Bloglovin' | Hometalk |
Okay, okay - so saying a hashtag "changed my life" is a bit dramatic, but let me explain...
As a Mom, you spend your entire day cleaning up after others... toys, food, diapers, everything - and at the end of the day the last thing you want to do is clean up more. Before kids I used to be good about keeping an empty sink and clean counters, but these days once the kids were in bed I just wanted to be done and the kitchen was left in disarray almost every night. However after seeing An Organized Life's Instagram hashtag #cleankitchenatnight, I was inspired and had to try it!
| This post contains affiliate links |
The whole point of "clean kitchen at night" is that it's a great motivator. Having a clean kitchen and clean slate to wake up to in the morning helps set a less-stressful and more motivated tone for the rest of your day, in all aspects of your life. It's so refreshing to see clean counters and an empty sink. Making meals throughout the day is so much easier too when all of the dishes, pans, and silverware are ready to go! I don't know how many times before I would go to make a meal, only to realize a specific pan, measuring cup, or casserole dish I needed was still dirty from the day before. Now meal prep is so much easier and quicker, simply because everything is already clean.
Now, we don’t have an “Instagram-worthy” kitchen… it still has the honey-colored maple cabinets and green (yes, green) builder-grade laminate counters. But trust me in that you don’t need a picture-perfect kitchen to feel the sense of accomplishment and motivation in leaving everything in a clean and organized state each and every night.
As cheesy as it sounds, having a clean kitchen really does reduce stress and brings some peace to normally chaotic mornings. And I’ve found this motivation snowballs into all other areas of my life too - I feel so much more productive in work and efficient in accomplishing my to-do list every day. There's a saying that goes something like "cluttered house, cluttered mind" - and it's true... if you surround yourself with messes and clutter you feel it. If you have a sense of control over your house, even if it's just the kitchen, it makes you feel like you have life together (even if you don't, haha).
Don’t believe me that “Clean Kitchen at Night” really makes a difference?
I challenge you to give it a try! For the next week, I challenge you to make a point to clear out the sink, clean the clutter off the countertops, and wipe down your whole kitchen every night. It can be hard work at first, but once you get in the rhythm it goes quick - especially when you’re only picking up that day’s mess and not messes from previous days too. Try it for a week and let me know if you feel less stressed and more motivated across all aspects of your life - I hope you do!
#cleankitchenatnight #resetyourspace #progressnotperfection
Related Posts:
KEEP UP WITH BIRCH LANDING HOME
| Etsy | Facebook | Instagram | Pinterest | Bloglovin' | Hometalk |
Sending the kids back to school usually means shelling out a lot of money on school supplies, clothes, and more. Here are some of my tips on how NOT to go broke this fall. | This post contains affiliate links |
Invest in a Good, Basic Backpack and Lunchbox
Question: How many parents buy their kids new backpacks and lunchboxes every single year?
Answer: Wayyyy too many!
There's really no reason to shell out money that often on items that can can stand the test of time if you pick them right. I highly suggest NOT picking a character or crazy pattern backpack or lunchbox. Kids' tastes change from year to year (and sometimes week to week), and if you pick themed or cheaply made items they will not last. Our general guideline is upgrading backpacks once every "big transition" in school - so one backpack to last kindergarten through elementary school, a new one to last through middle school, and then finally a new one for high school. We love solid-color backpacks from high-quality companies like LL Bean - you just know they're going to last and never go out of style. (Pro-tip: check out the Outlets to get great, name-brand backpacks for less!)
Consignment Shop for Back-to-School Clothes
If you've been following the blog for any amount of time now, you know I'm a big fan of consignment selling and shopping. It's a great way to get rid of any clothes or shoes your kids might have outgrown or refuse to wear and make some money back to use on gently used, name-brand "new" items. That way you're essentially "trading up" for new clothes, and spend a lot less out of pocket.
{You can read more on my Consignment Selling and Shopping Tips HERE}
Buy Snacks in Bulk and/or Store Brand
If you pack your child's snacks and lunches the cost can definitely can add up over time. One way to save is to buy in bulk whenever possible. If you can buy prepackaged snacks in larger quantities the price-per-item is a lot lower. Buying store brand items over name brand is another great way to save.
Juice boxes are expensive (and arguably unhealthy), so having your child take a reusable water bottle to school saves a lot of money and also helps keep their sugar intake in-check.
Reuse Last Year's School Supplies
A lot of times the school supply list will include things like a set of binders, markers, glue, a pencil case, etc. Many times there's no reason to repurchase these things - they can often be reused from year-to-year. Empty out the old papers from last years binders and reuse those. And the makers, crayons, glue sticks, etc? They likely have plenty of life left - no need to buy more just yet!
Coupon and Rebate Apps
And of course, a great way to save if you need to buy items is to use coupons or rebates whenever you can. We really love Coupons.com for printing coupons and the rebate app Ibotta for earning money back on purchases. At the beginning of the school year, coupons and rebates on back-to-school items are usually plentiful, but make sure to only buy what you really need!
KEEP UP WITH BIRCH LANDING HOME
| Etsy | Facebook | Instagram | Pinterest | Bloglovin' | Hometalk |