I'm a wife, stay-at-home mom, crafter, and blogger living in rural New England. As seen in Martha Stewart Living, Food Network Magazine, and more! | Tutorials, DIY, crafts, parenting tips, recipes, money saving tips, product reviews, local product features, New England living, intentional living, and more! |
After reading some articles about the amount of microplastics the average person gets exposed to and consumes I knew we had to make some changes in our household. Here are some easy and simple swaps and replacements we made in the kitchen to try to reduce our exposure to plastics. | This post contains affiliate links |
Disclaimer: I am not an expert, just sharing some swaps and changes we made to try to be more intentional and reduce plastic exposure in our home.Please make sure to do your own research on this matter.
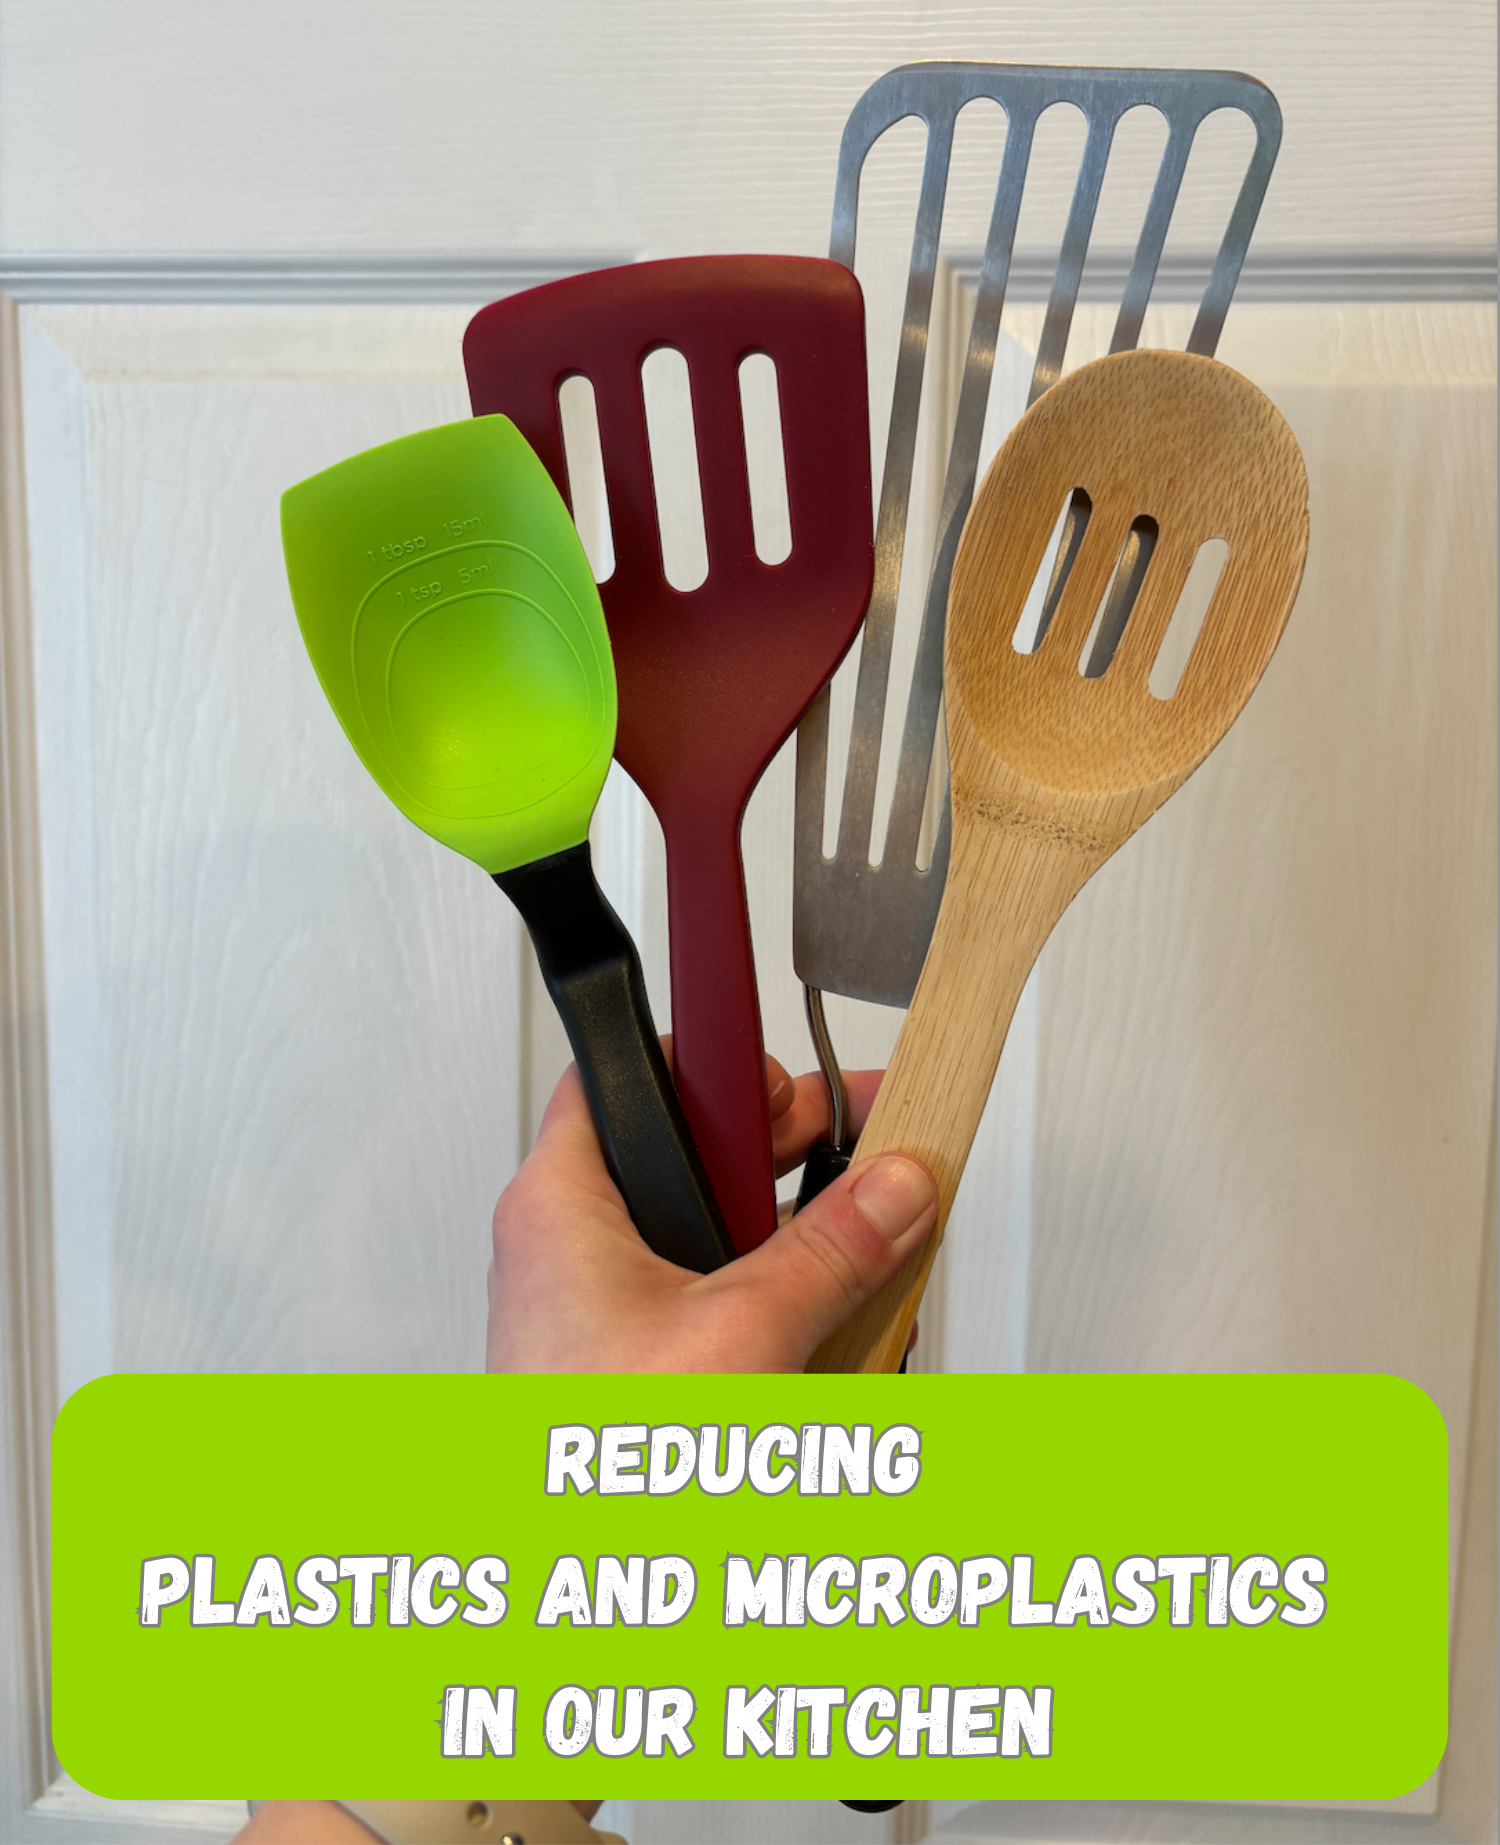
Get Rid of All the Plastic Cooking Utensils
The first step was getting rid of ALL the plastic cooking utensils we had in our home (I just recycled or tossed them all to make sure I wouldn't continue to reach for them). These utensils are constantly getting heated and scraped on pans, contributing microplastics. I thoughtfully replaced all the plastic utensils with a combination of bamboo, wood, silicone, and stainless steel cooking utensils.
Replace Plastic Cutting Boards
This is supposedly one of the biggest sources of microplastics in the kitchen - a plastic cutting board! If you think about it, every time you cut with a knife you’re cutting and scraping the plastic board, adding microscopic (and not so microscopic) plastic shavings to your food. We replaced our cutting board with a quality hardwood one made by a local craftsman, but you could also use a bamboo cutting board.
Get Rid of Non-Stick Cookware
This is a big change we made several years ago - we got rid of all of our non-stick cookware in order to reduce microplastics and PFOAs exposures. Instead of using non-stick pans, we switched to quality stainless-steel cookware and have never looked back!
Never Heat Plastic
Make sure to never reheat food in plastic containers - always use glass!
Never Cut on Plastic Dishes
This goes right along with never using plastic cutting boards - but to take it a step further, don’t cut on plastic dishware (like kids’ dishes) either - and for the same reasons. Always make sure to cut on a cutting board or glass plate before transferring the food to your kids’ dishes.
Use More Glass and Stainless Steel Dishware
This one is pretty self-explanatory - use glass or stainless steel dishware more and try to phase out your plastic ones. We have been working towards slowly replacing our plastic Tupperware with glass and stainless steel varieties.
When You Must Use Plastic, Use High Quality
When you must use plastic dishware in your kitchen (like for kids’ dishes), always use high quality ones. Avoid cheap plastic dishes, especially if you don’t know if they’re BPA-free or lead-free, etc. And if they seem to be breaking down with just normal use (fading, scratching easily, discolor easily, etc) definitely get rid of them.
Silicone Food Covers
Rather than use plastic wrap for leftovers we switched to silicone food covers years ago. We love that they’re reusable (better for the environment!) and not plastic.
Air Purifier
To take it a step further for general home health we also added several air purifiers in our home. This helps reduce dust and allergens we breathe in and we feel better knowing the air in our home is being filtered.
Disclaimer: I am not an expert, just sharing some swaps and changes we made to try to be more intentional and reduce plastic exposure in our home.Please make sure to do your own research on this matter.
My husband and I have been married for nearly five years now but it seems like our wedding was just yesterday. We got married before Pinterest was a thing and so it was up to us to figure out all the details on our own. It was a learning process and we came up with some great ways to cut costs and still have our dream wedding. | This post contains affiliate links |
From the start we knew exactly where we wanted to get married - a beautiful historic mansion overlooking the lakes and mountains we love (it was also where my husband proposed). So that helped narrow things down quite a bit. But the downside? It was expensive and didn't include much of anything. In order to have our wedding where we wanted, we had to cut costs in other parts of the budget and in doing so we saved thousands of dollars.
Tips for Saving Big on Your Dream Wedding
Start planning as early as you can. We started planning our wedding about 13 months out; we thought we had plenty of time but we were shocked at how many dates were already taken at our venue of choice, how many DJs/photographers were already booked, etc - even more than a year out. Starting early means you have the most options to choose from and are more likely to find affordable vendors that you like. Waiting until the last minute can leave you stuck with expensive options or ones you aren't happy with.
All photos by Steve Holmes Photography
Find a venue that includes a lot. Okay, so this tip did not really apply to us (our venue included little other than the physical ceremony location, reception hall, and a day-of wedding coordinator). But many venues include at least something, and some include a lot more than others. Some items that may be included in the venue cost include: the wedding cake, toasting champagne, linens, DJ, flowers, cake cutting fee, bar credit, coffee service, hors devours, or even all of the food/catering. If you can find a nice venue that includes at least some of these items, it can save you big in the long run.
Pick a venue that's beautiful in itself. If you can find a venue that looks pretty as-is, you don't have spend a lot (or anything) on decor costs! An outdoor wedding with a pretty view means you don't need anything for the ceremony. And a pretty looking old hall with a lot of character means you can get away with little or no decorating for the reception. We spent almost nothing on decor costs since we felt our ceremony location was so beautiful already.
Use details of the wedding venue to your advantage. One of the little touches that people remembered most about our wedding? The wishing fountain! Our venue had a beautiful fountain in the middle of the ceremony location and we decided to use this feature as part of our day. We put out a jar of brand new shiny pennies dated our wedding year (which cost $2 - literally), and put a little note in our wedding program about throwing pennies in the fountain for happy wishes for the bride and groom.
Don't get married on the weekend. I know this sounds strange but many locations offer a great discount if you get married on any day other than a Saturday or a Sunday (and some locations offer off-season discounts as well if you get married in the winter). The date we really wanted for our wedding had already been booked (even though it was over a year out!), and so when were deciding on a new date we chose to have our wedding on a Friday evening. By having it on a Friday we saved around $750 just on the venue cost!
Opt for the buffet. When selecting a caterer (presuming it's not included with your venue), look for ones that also offer a buffet option and compare that price to their "plated meal" price. Buffets generally cost about 1/3 less than having the meal plated and served to your guests. We choose the buffet option for our wedding and saved a lot on meal costs!
Make your own invitations - or at the very least assemble them. Originally we wanted to design, print, cut, and assemble our invitations ourselves. But with all the time and stress going into wedding planning on top of regular work, we decided to forgo the stress of designing and sourcing paper/printing services and order our invitations. We found a beautiful invitation design that fit our theme and colors perfectly and it was all printed on thick, gorgeous paper. The best part? It was from a small designer/paper goods company that was priced really reasonably and also had the option of sending all your invitation materials uncut and unassembled for $150 less which was a great savings.
Don't get sucked into buying "wedding-specific" items. Next time you're at a bridal shop or craft store, check out wedding day items like guest books and flower girl baskets and you'll be in for some sticker-shock. I still remember looking at a flower girl basket and not believing it cost over $25! Because of that we decided to for-go the (ugly in my opinion) while silk flower girl basket and get a basic woven basket at a craft store for $5 and tied a piece of coordinating ribbon to the handle. We also skipped the traditional guest book and had guests sign the photo mat of one of our favorite engagement pictures - this keepsake is now hanging in our master where we can see and appreciate it every day. These days with Pinterest the alternative guest book ideas are endless!
Borrow your petticoat. If your wedding dress calls for a petticoat, see if any of your friends or family has one you could borrow for your wedding. (If they do, make sure to try it on with your dress before your dress is altered to make sure it will work.) No one sees the petticoat and it's not a sentimental part of the day, so there's no need to actually buy one.
Offer to do the leg work. If you're working with a vendor and have some extra (and very reliable!) hands willing to help on the day of the wedding, offer to do the leg work for the vendors - in exchange for a discounted rate of course. For example, the cost of our linen rental included delivery and pick-up of the linens but my husband's parents offered to take care of it since they lived nearby. By having them pick up the linens the day before the wedding, and then drop them back off the day after the wedding it saved us $100. Also, our florist was about half a mile from the hair dresser where we all were getting our hair done - so, rather than pay the delivery fee for our bouquets my mother-in-law ran over and picked them up for us.
Take advantage of family and friends' talents. If you know someone that has a great talent or hobby, feel them out to see if they'd be willing to help you with an aspect of your wedding. My sister-in-law is super-crafty and an AMAZING baker. She made our gorgeous custom wedding cake for us and my brother-in-law made the cake base, saving us hundreds of dollars - not to mention it's much more meaningful knowing it's made with love by someone we know.
DIY wedding centerpieces. If you choose flowers for your centerpieces each arrangement can easily cost $80+ and that adds up to a lot, fast. We decided to make our centerpieces ourselves and save this money. My husband and I opted for flower-free centerpieces that we could make way ahead of time; we used birch logs with hearts and table numbers carved into them (a nod to when we carved our initials into a tree while dating), along with river rocks and some other natural elements. Everything we choose for our centerpieces meant something to us which made our them very personal. In order to make them we only had to purchase the candles and some river rocks - for all 10 centerpieces it cost us about $35. (My only other piece of advice for making your own centerpieces would be to bring it to your venue and see it on one of their tables ahead of time, if possible. Our centerpieces looked awesome on our kitchen table and we thought they were the perfect size, but once they were set up at the venue we realized they didn't fill in the center of the tables quite enough and we should have brought some smaller elements to fill in around it.)
Simplify the bouquet. Florists charge more for having to source out more flowers.. if you have mixed bouquets they can cost a lot more than a bouquet the same size that contains just one type of flower. We wanted to keep it simple anyways and decided to stick with straight yellow roses for all the bouquets and that saved us a lot of money in itself.
Borrow a fun car instead of renting a limo. We had the advantage of having our ceremony and reception at the same location, so we didn't need to transport the wedding party from one place to another. Even still, we wanted a fun "getaway" car to leave in at the end of the night. Luckily for us, our family is into restoring cars as a hobby and we got to use a '66 Chevelle that we all helped fix up - definitely made it more fun and more meaningful than using a limo service.
The One Thing Worth Splurging On
A great photographer. Seriously folks, hire a great photographer and you won't regret it!! Your wedding photos will be what you look back on to remember the details of your day, and it's so important to have ones you're proud of and that truly capture all the magic. A great photographer can also do wonders with what they have - even if you don't have the most ideal backdrop for a photo they can make it look amazing with some artful focus or composition.
When hiring a photographer make sure to look at their full portfolio; see if you like their style, if they're consistent with editing techniques, if the overall mood of the photos fits your personal taste. It's also a good idea to hire a photographer that comes with an assistant photographer - this way you get double the photos and more angles of the ceremony. It also allows the photographers to be in two places at once, especially helpful for taking getting-ready photos.
You also want to find a photographer that gives you full rights to your photos - after all you want to be able to print as many copies as you like, make photobooks, send photos to your local newspaper for your announcement, post them on Facebook and other social media, or even possibly submit them to be featured in bridal magazines. Without a letter stating you have full ownership and publishing rights to your photos you'd be unable to do any of that without going through your photographer every time (and doing so would cost you extra money each time).
And don't forget to quiz any potential photographer on things that may go awry and how they'd handle it... just in case. A personal emergency came up and they were unable to photograph your wedding at the last minute? (They should have some photographer associates of equal or better caliber they can call on to fill in for them at no additional cost to you) If a camera or lens gets dropped on the big day? (They should have backup equipment with them as well as extra fully-charged batteries). A great, experienced photographer should have a game plan for anything that may come up and still get you beautiful photos of the day despite any challenges that may arise.
Disclaimer: Please note this post shares my opinion and prices and information mentioned are based on our experience of planning our wedding five years ago. *Prices and packages from vendors that we used may have changed.*