Tips for Selling on Facebook Marketplace

Lately I’ve been on a huge decluttering kick. I really want to pare down what we have in our home so we only have stuff we love, use, or is sentimental/important to us. Everything else can go. I’ve been taking my time with this process but it’s been really freeing to open up some space in our home. I try to throw away as little as possible and have been either donating items locally or selling them on Facebook Marketplace. Read on for my tips on how to sell your unwanted items on Facebook.
| Disclaimer: These are suggestions. Sell/buy on Facebook at your own risk. |

| Disclaimer: These are suggestions. Sell/buy on Facebook at your own risk. |

Tips for Selling on Facebook Marketplace

Clean Your Items Before Taking Photograpshs

Oh my gosh - this is the most obvious one that I feel like so many people neglect to do. They will post a picture of a table for example, still covered with magazines and cups - or the table will be filthy with dust. Kids’ shoes is another big example - make sure to take a little time and clean kids’ shoes. Get any stains/dirt you can off up the uppers and take an old toothbrush and clean the mud out of the treads. No one is interested in your dirty items - clean them up!

Consider the Backdrop of Your Photos

Don’t take photos somewhere messy or that looks unclean (like a basement or garage - unless you’re selling something that really belongs there like sports equipment or tools). For example, if you’re selling a nice piece of furniture, dress, kids’ toys, etc make sure the backdrop is somewhere clean and nice inside your home - don’t take a sketchy looking photo in a dirty/damp-looking basement because that implies the items weren’t well-cared for.

Price Your Items Well

Keep in mind this is a “yard sale.” And while things are typically priced a little higher than they would be at an actual yard sale, don’t be unreasonable. I usually price my items at the higher-end of reasonable, and then decrease my price periodically. If it doesn’t sell in a few weeks, it typically gets donated.

Be Safe

Be really wary with selling/buying on Facebook. Always check out the profile of who’s interested in the item to make sure it looks like it’s a real account with some history (it wasn’t just made in the last few months). Also never give out your phone number.. a lot of scammers will send you a message that says something like “I’m working, what’s your phone number so I can text you about this item? -or- Here’s my number, please text me.” Always decline to give out your number and say you only do correspondence through Facebook Messenger. It’s also a good idea to never accept electronic payments (Venmo, PayPal, etc) - stick to cash-only. (And if you’re a buyer never send an electronic payment as a “deposit to hold an item” - that’s a very common scam and a big red flag.)

And the biggest one - ALWAYS MEET IN A PUBLIC PLACE THAT ISN’T YOUR HOUSE. I strictly will only meet at local Police Department parking lots. Our surrounding town police departments all have designated parking spots under video surveillance that are meant for online sale exchanges. Several times someone has messaged me asking to meet for an item but instantly declined once they found out I only meet at the Police Station - that’s a huge red flag if they won’t meet at the Police Station and you want nothing to do with that person.. block them and move on.

Send a Reminder Message about an Hour Before the Meet

No-shows are the worst, and unfortunately fairly common. To help reduce no-shows, send a one-line reminder message about an hour before you’re supposed to meet the person.. something like “See you at XXX Police Department at 3PM.” Most of the time if they forgot or weren’t going to show up they will message you back and say “whoops, I won’t be there” and you’ll save yourself the trip. I also try really hard to line up my yard sale meets with other errands so I’m in that area anyways and it’s not as much of an inconvenience if I get stood up.

What Generally Sells Really Well:

  • Kids’ toys

  • Kids’ shoes & clothing (clothing typically sells better in big lots by size)

  • Sporting equipment

  • Tools

  • Furniture

  • Garden Items

I’ve found that some items in particular (like books and women’s clothing) do not generally sell well. Also make sure to try to sell items seasonally - don’t list snow pants for sale in April, they probably won’t sell. List them for sale in Fall when people are looking for them.

And always - make sure to follow Facebook guidelines on what is allowed for sale or not.

Good luck with your decluttering journey!

KEEP UP WITH BIRCH LANDING HOME
|  Etsy  |  Facebook  |  Instagram  |  Pinterest  |  Bloglovin'  |  Hometalk  |

How We Keep Our Family Car Organized

When you have kids, the chaos of their stuff seems to follow you everywhere - including into your car. I accept that our cars will never be pristine (dirt, crumbs, and dog hair will always be present), but I make sure that despite that we have a simple system to keep our things organized and to make sure we always have our essentials at hand. | This post contains affiliate links |

Disclaimer: Use organizers and other items at own risk. Make sure they are properly installed and compatible with your vehicle.

Keeping Toys in Check

I got tired of loose books and small toys spilling all over the back seat and the floor, so I got a backseat organizer to corral the kids’ items and keep them within easy reach for long car rides. In the organizer we always have some small books, an electronic kids toy, and some puzzles like a Rubik's Cube, as well as sunglasses for each kid in the small pockets in the front. I like this organizer because it fits between the car seats and can also buckle in so it doesn't slide around. (Side note: Where's Waldo has become a favorite car read and keeps the kids entertained for a long time.)

Trunk Organizer

With young kids we always carry supplies like a first aid kit, full change of clothing for each child, trash bags for wet/dirty clothes, extra towel and blanket, etc. For awhile all those items lived in a diaper bag in the trunk, but we are past the diaper stage now and it was time to retire the diaper bag and upgrade to something sleeker and space-saving. I am really loving this sturdy SUV trunk organizer for keeping everything hidden but still within reach.

The Infamous Car Potty

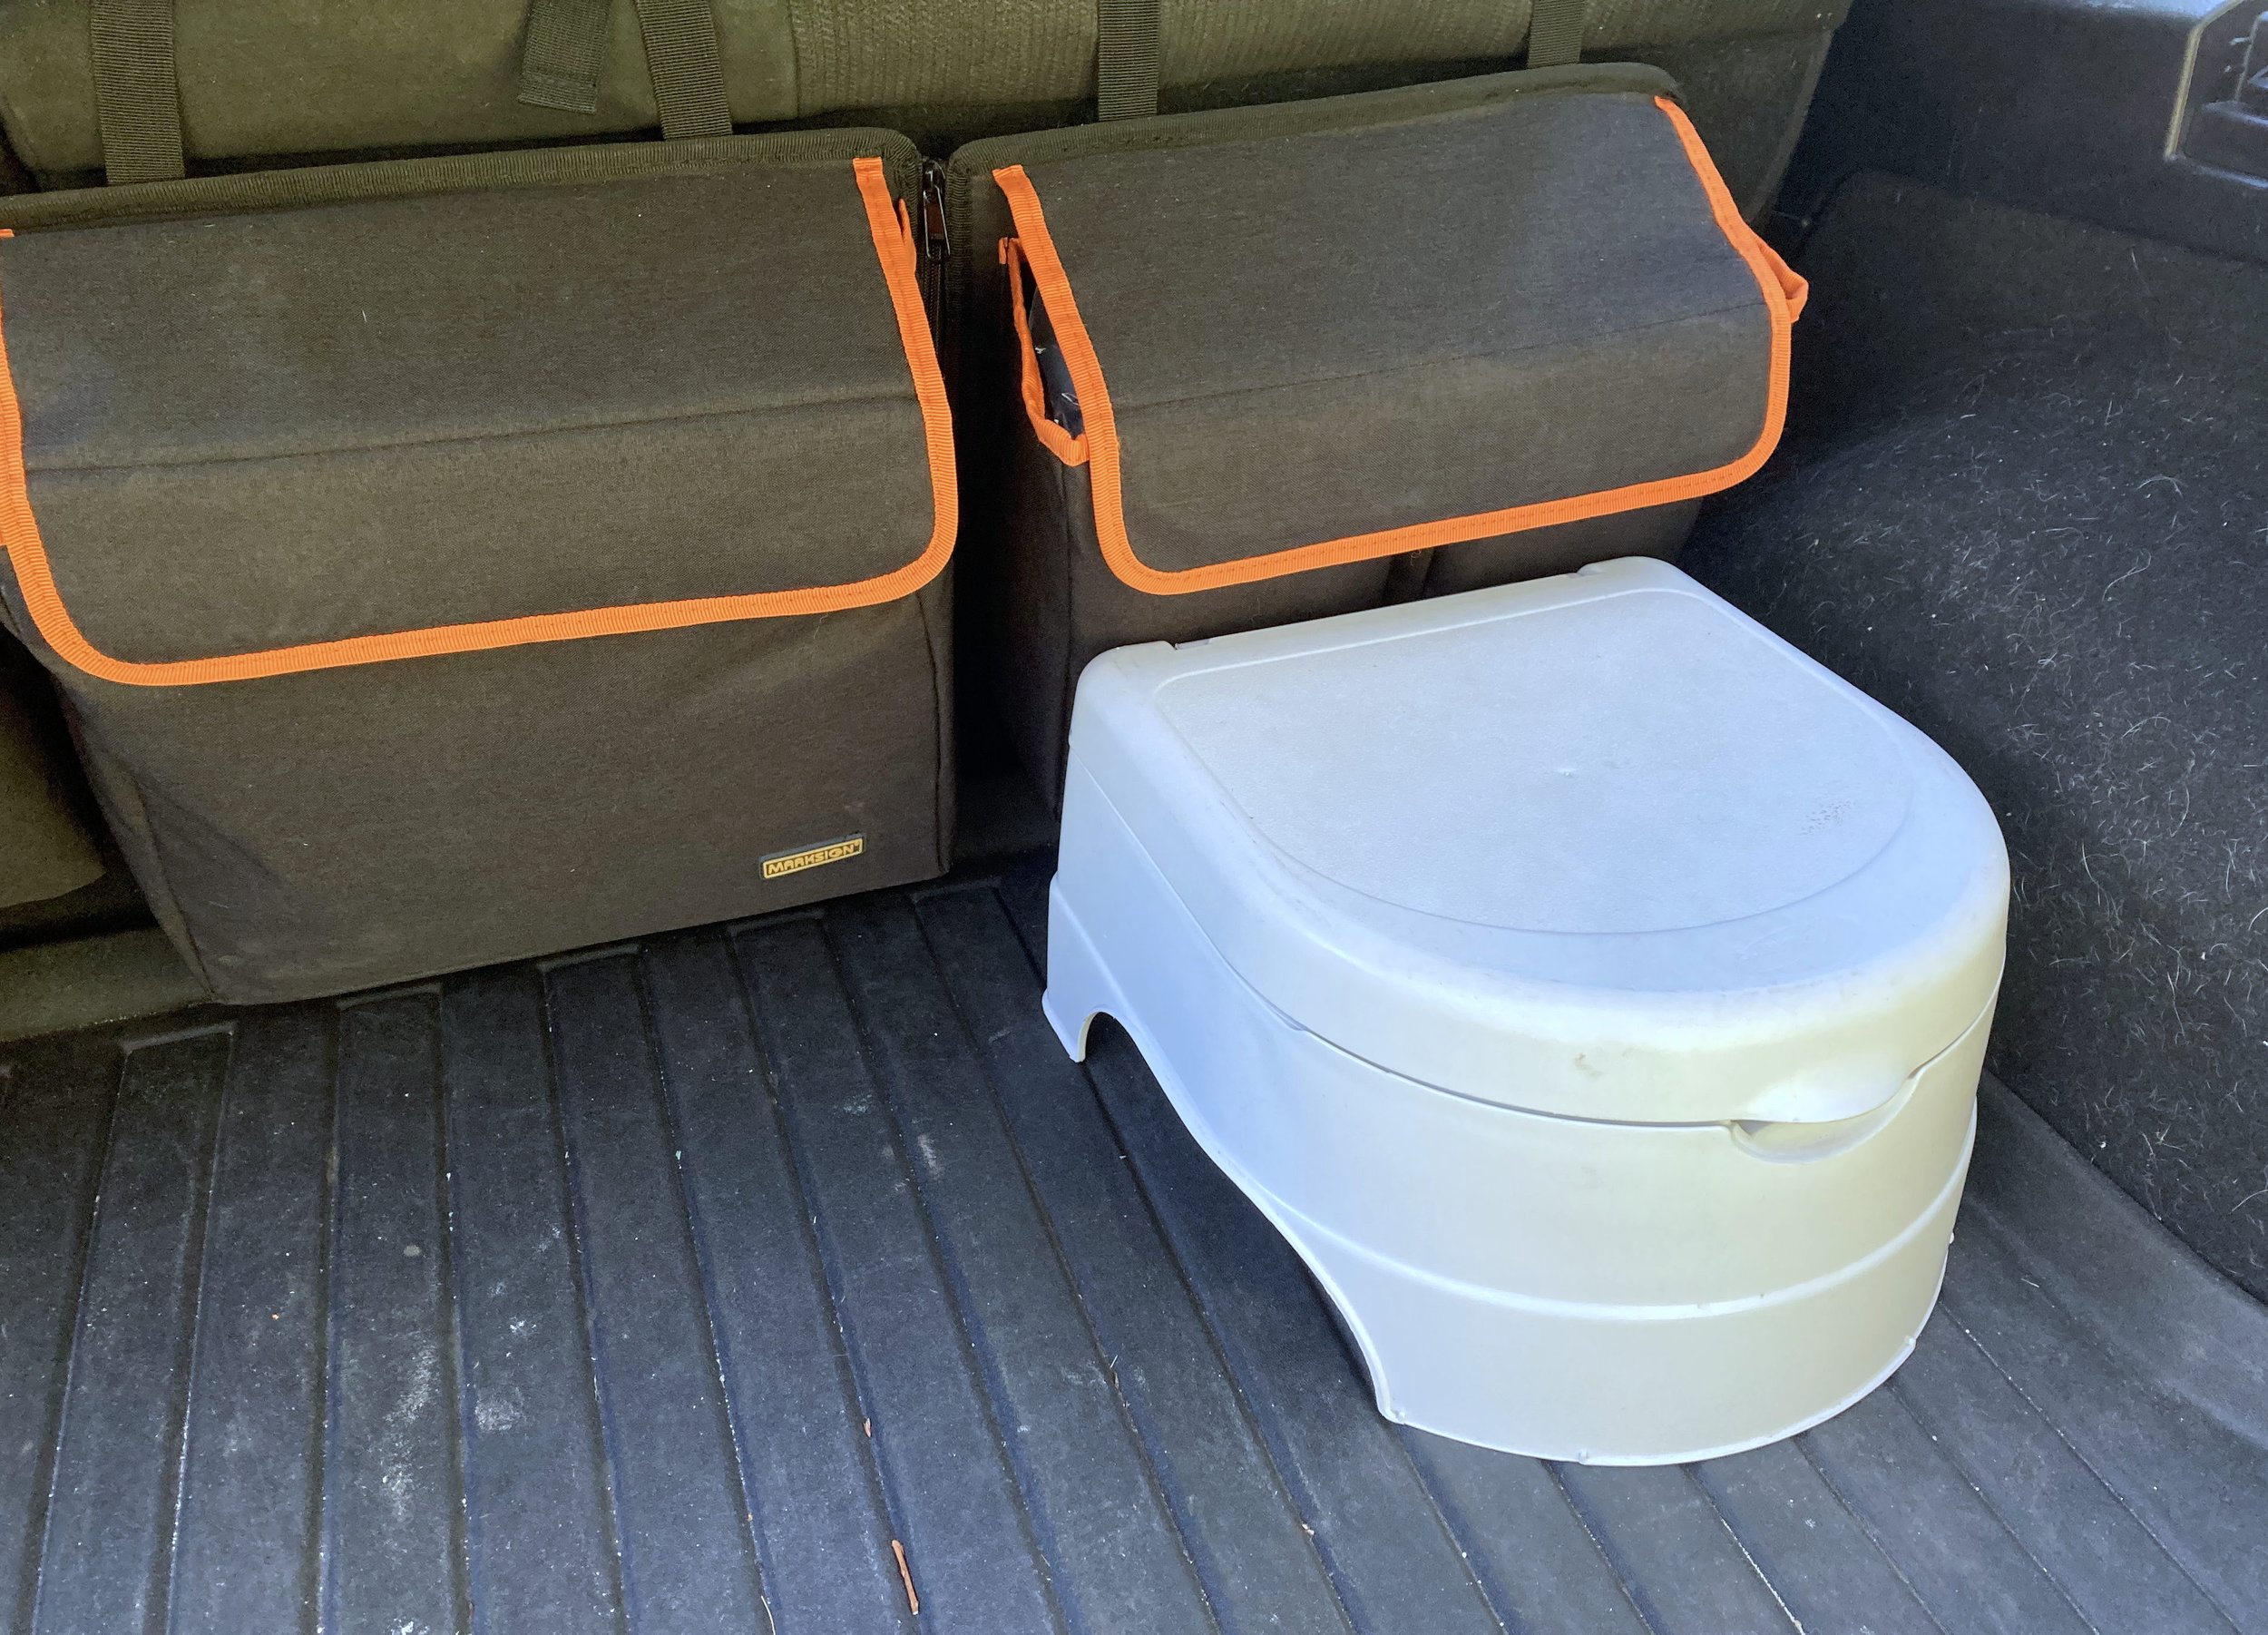
If you know, you know… With small kids traveling with a potty is a must, even for awhile once they’re past potty training age. You never know when an urgent bathroom request will happen, and these days with the pandemic it’s great to have a clean personal potty for your kid to use, rather than a dirty rest stop bathroom. Pro tip: We line our car potty with an open diaper to absorb liquid and waste and reduce the risk of a spill (makes for easier clean up too!).

Registration/Insurance Holder

It’s a good idea to keep all your car paperwork handy and organized in the glove box, because if you need it you don’t want to have to go digging for it - especially if it’s of an urgent nature (if you got pulled over, fender bender, etc). I personally like the little portfolios that keep everything ready and easy to find.

Roadside Kit / First Aid Kit

Always keep a roadside emergency kit and first aid kit in your car in the event you break down or have an accident. You may be able to find a kit that covers all your bases, but often you may have to purchase these separately or at least supplement with some additional tools or first aid items. Our trunk area has a hidden compartment underneath where we store all our roadside and first aid gear.

Extra Masks

It’s a sign of the times… make sure you always keep a spare set of extra masks in your car for the whole family. That way you’re never caught without one if you need it. We made our mask case using a slim wipes container (similar container linked here).

Disclaimer: Use organizers and other items at own risk. Make sure they are properly installed and compatible with your vehicle.

KEEP UP WITH BIRCH LANDING HOME
|  Etsy  |  Facebook  |  Instagram  |  Pinterest  |  Bloglovin'  |  Hometalk  |
DIY Library Tote Bag {FREE Printables for Iron-On Transfer!}

If you have kids you know how tricky it can be to keep track of library books in your home… you bring them home, read them on the couch, and then before you know it they’re mixed in with your own books and quickly forgotten… until you get that late notice from the library (ooops). The best way to keep track of them is to have a designated place to keep them - for us we made a special library tote that has served us well. We use it to bring home books from the library, and as we read them we make sure to return them to the tote so they’re never misplaced. I’ll show you exactly how I made ours, along with two free printables so you can make your own! | This post contains affiliate links |

DIY Library Tote {FREE Printable Designs for Iron-On Transfer!}

Materials:

How-To:

1. First, run your canvas tote bag through the washer and dryer - you need to make sure it’s clean and there’s no more sizing on it from manufacturing which might keep the iron-on transfer from adhering well.

2. Print out your design on the transfer paper. (Please note that the designs I have available for download are ready-to-print PDFs for printing on iron-on transfers, therefore they are already in mirror image - aka backwards.)
*You can find links to download our designs at the end of this post - there are two different designs to choose from!*

DIY Library Tote {FREE Printable Designs for Iron-On Transfer!}

3. Cut out the iron-on transfer design, leaving a border around the edge of the design to help ensure the design will adhere well to the fabric and not lift at the edges.

DIY Library Tote {FREE Printable Designs for Iron-On Transfer!}

4. Make sure to read the instructions for your particular brand of iron-on transfers as these next steps may vary slightly from brand to brand. For the transfers we used, the next step is to heat up the iron then pre-iron the bag to get rid of wrinkles and preheat the fabric for the transfer. Our directions recommend working on a hard surface with a piece of scrap fabric underneath.

5. Carefully place your design face down on the bag and iron it on using a LOT of pressure. I actually stand on a chair to put my full body weight down on it too. You want to iron over the whole design, paying particular attention to the edges to make sure it really adheres well.

DIY Library Tote {FREE Printable Designs for Iron-On Transfer!}

6. After going over your design like a thousand times (an exaggeration, but make sure you go over it a lot to adhere it well). Let it cool completely before carefully pulling the paper backing off and you’re done. Time to go to the library!

DIY Library Tote {FREE Printable Designs for Iron-On Transfer!}

Download FREE Printables for Iron-On Transfer Here:

Explore Books Logo (prints to approximately 4”x5”)

Explore Books Logo (prints to approximately 4”x5”)

Go on an Adventure Logo (prints to approximately 4.5”x4.75”)

Go on an Adventure Logo (prints to approximately 4.5”x4.75”)

*Please note that the downloaded PDF files will have the logos in MIRROR IMAGE (aka backwards), since it needs to be printed in reverse on the iron-on transfers.


Want to make a Custom Design?

Build Interactive on Creative Market

I made the designs for these library tote logos by using design files from my husband's Creative Market Shop. If you want to edit these designs or make your own, you can purchase the files from Creative Market and personalize them yourself!

The designs I used were from his Vintage Outdoor Travel Logos and Retro Industrial Logos, Volume 2 series.


KEEP UP WITH BIRCH LANDING HOME
|  Etsy  |  Facebook  |  Instagram  |  Pinterest  |  Bloglovin'  |  Hometalk  |

Easy DIY Book Rails

In our daughter's small bedroom, space is at a premium.  We try hard to make the most of the space and keep the floor as open as possible to help the room feel a little bigger and give her more area to play.  On one wall of her room, there is a very shallow nook I wasn't sure what to do with but wanted to make it an efficient use of space.  After some thought, I decided building some custom book storage would be the perfect solution.  

DIY Book Rails, Book Ledge, Storage.  Kids Room / Nursery

Materials:  

IMG_8626.JPG
  • 1x3 boards

  • 1x2 boards

  • screws

  • wood glue

  • spackle

  • level

  • painters tape

How-To:  

1.  Cut the wood the desired length of the rail shelf.  You will need two 1x3 boards and one 1x2 board for each rail.  

2.  Line up the boards as shown below (the wide ones on the bottom and back, and the narrow one at the front).  Pre-drill, then glue the edges, and secure with wood screws.  

IMG_8625.JPG
IMG_8641.JPG

3.  Once it's dried and secure, spackle the screw holes, let dry, and then apply 3 coats of paint (I used semi-gloss trim paint).  

IMG_8752.JPG

4.  Next mark the location of the studs and the approximate spacing of the book rails.  I could have easily put three rails in this space but I didn't want our toddler trying to climb it like a ladder, so I decided to only do two.  

IMG_8764.JPG

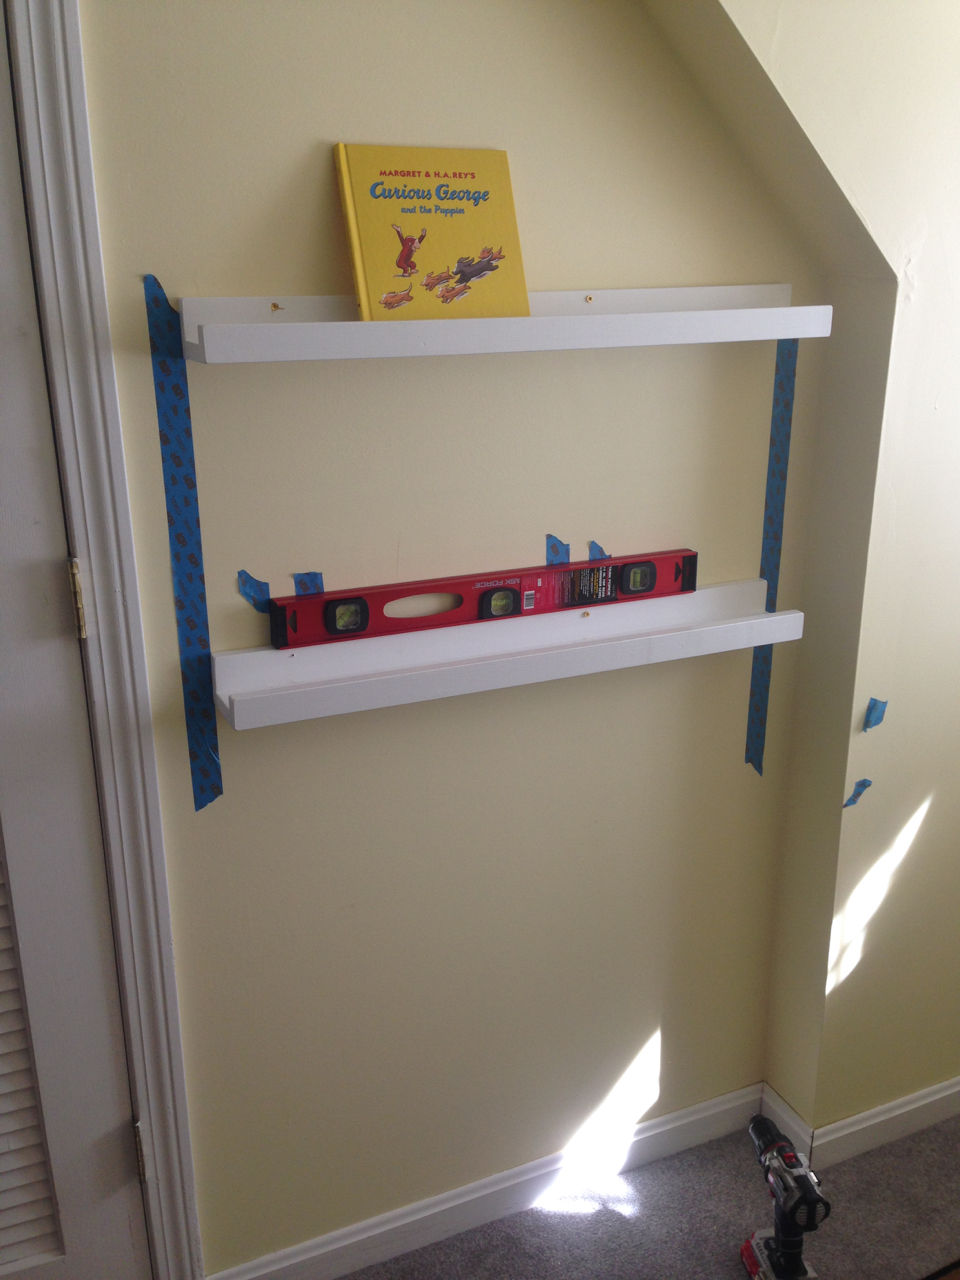
5.  Center the book rails in the space and use a level to hang the book rails, pre-drilling and screwing the book rails into the wall studs.  

Leveling the book rails for hanging.

6.  Decorate and add your books!  While these are pretty sturdy, I would recommend being mindful of the weight put on the rails - don't put too many books or large, heavy books on them, especially since your little one will be reaching up to pull books off and you don't want anything heavy to topple off.  

And finally I decided to build a simple, sturdy narrow crate to hold our daughter's bigger, heavier books.  


IMG_9328.JPG

KEEP UP WITH BIRCH LANDING HOME
|  Etsy  |  Facebook  |  Instagram  |  Pinterest  |  Bloglovin'  |  Hometalk  |

Sneak Peek: Kids Book Rails

Making over our daughter's room has been slow-going to say the least.   We had a busy, wonderful summer and now I'm already deep into Christmas ornament orders so finding time to work on the whole makeover has been tricky. 

In progress

Today I finally hung the book rails I made in this tiny nook and I think it will help make this space functional.  Now I need to make something to hold the large, heavy books on the floor - and finish the rest of the room - and then I will share the whole project!  ;)

KEEP UP WITH BIRCH LANDING HOME
|  Etsy  |  Facebook  |  Instagram  |  Pinterest  |  Bloglovin'  |  Hometalk  |

Paper Pizza Craft

Our little one made this Paper Pizza at story time at the public library the other day and I thought it was so cute I wanted to show you all.  The story time lady read several pizza-related stories and then had the kids make their own paper pizzas to bring home.  The kids really enjoyed this project and I think it would make a great activity for a pizza-themed kids' party.  

Fun + Easy Paper Pizza Craft - great for a kids' pizza party

They gave the kids paper plates and a brown crayon to color the "crust" (our daughter skipped this part), then a paper red circle "tomato sauce" to glue down, shredded yellow paper "cheese", as well as paper mushrooms, pepperonis, and meatballs.  After the pizzas were done, the kids took them home in actual pizza boxes which was the perfect finishing touch to the project.  These brand new boxes had been bought ahead of time at the local pizza shop for a few cents each.  

I don't remember the actual books she read before the project, but I've linked some cute-looking pizza stories here (affiliate links):  

KEEP UP WITH BIRCH LANDING HOME
|  Etsy  |  Facebook  |  Instagram  |  Pinterest  |  Bloglovin'  |  Hometalk  |