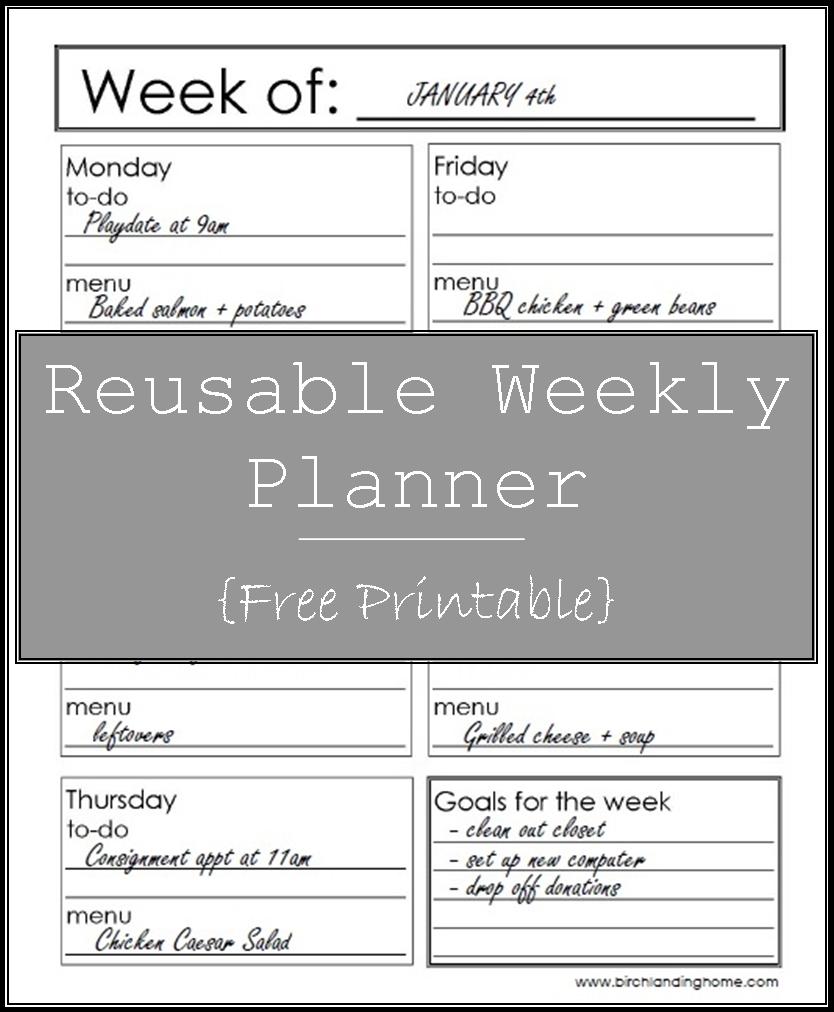
Reusable Weekly Planner - Plan your week, meals, and goals! {Free Printable}

For a while now I've been striving to get better about meal planning, so a few months ago I designed this weekly planner to keep in our kitchen and see if it helped.  After using this method for several months I'm happy to report that it has been a HUGE success and wanted to share it with all of you who may have staying organized, planning meals ahead of time, or reducing your grocery bill as goals for 2016!  

Reusable Weekly Planner Free Printable - to-do list, menu and meal planning, weekly goals

This weekly planner can either be printed and written on directly - or you can print, frame it, and simply write on the glass to keep reusing it (which is what I have done).  I love having it under glass because it means it's always on display and easy to refer to, and it saves a lot of paper and ink.  I didn't include too many photos of it it in our kitchen because it was so hard to photograph.. the glare from the glass makes a decent photograph nearly impossible.  

Reusable Weekly Planner in the kitchen
Pro-tip:  Write on the glass with a Sharpie to avoid smudges, then erase with a little 91% rubbing alcohol.  

Pro-tip:  Write on the glass with a Sharpie to avoid smudges, then erase with a little 91% rubbing alcohol.  

To write on the glass, you can use a fine-tip dry erase marker or a Sharpie marker.  I prefer the Sharpie because it writes cleaner and won't smudge.  

"But how to erase it!" you ask?  

No problem at all:  simply put a little 91% rubbing alcohol on a paper towel and it wipes off with no problem and no residue.  
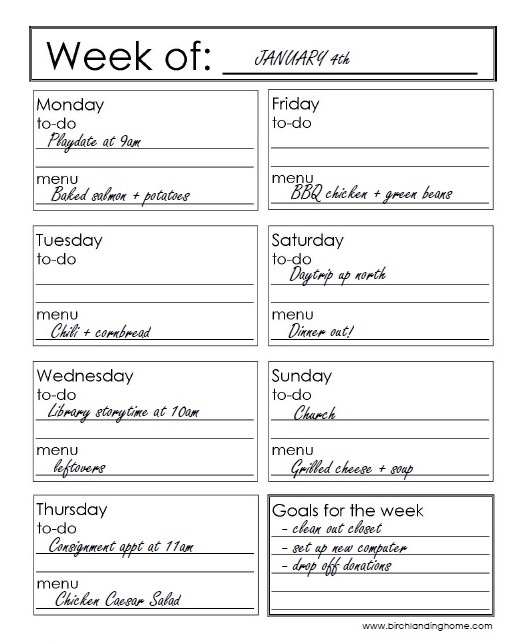
Example

Example

Every Sunday I sit down and first fill in all the daily "to-dos" for the week.  These are things that have to happen that day, like appointments.  This gives me a sense of what the week will look like and how much time I may have to cook dinner that day, etc.  Days we won't be home means I don't have to cook (wahoo!).  Because I lay it all out ahead of time I can plan ahead for groceries... leftover potatoes from Monday can be thrown into Tuesday's chili.  The chicken I buy can be portioned out for dinner on Thursday and Friday.  Planning ahead means less waste and saving money in the long run (and you know how hard I try to save money on groceries).  

"Goals for the week" is where you put in projects and goals you can pick at over the course of the week when you get spare moments.  I feel like this list makes me more motivated (and accountable) to be productive when I have down time.  

Reusable Weekly Planner

{Download free PDF of our Reusable Weekly Planner HERE}

Reusable Weekly Planner Free Printable - to do list, menu planning, weekly goals

So that's my Reusable Weekly Planner!  It's been a huge help to keep me more organized, more motivated, and save more money on groceries.  I hope that it will be as helpful for you!  

KEEP UP WITH BIRCH LANDING HOME
|  Etsy  |  Facebook  |  Instagram  |  Pinterest  |  Bloglovin'  |  Hometalk  |

Cheers to 2016!

Every time the New Year comes around it really gets me motivated.  I want to overhaul everything in the house, with Birch Landing Home, and my fitness goals and this year is no different.  

Happy New Year!  Time to make resolutions.

I've decided to take most of January to focus on our home:  it's time to do our yearly closet purge, deep clean all the carpets, and reorganize the dumping ground that our basement has become.  While I haven't read the book myself yet, I have read a lot of articles on The Life-Changing Magic of Tidying Up, and I'd like to try to use these techniques to purge more unused items from our home.  Though I can't make too many promises on this front.. I can be pretty sentimental about little things so we'll see how far I get.

I have big goals for Birch Landing Home too and I want to grow my Etsy shop and blog in many ways.  I'm planning on expanding to more New England-inspired decor in the shop including signs, handmade boxes, and painted sap buckets (don't worry, we'll still have our signature hand-etched ornaments available).  I'd also like to get our products carried at more local retailers too.  
The blog will still be a mix of DIY projects, product reviews, and lessons learned as first-time parents but there will a be a stronger underlying New England vibe to it.  I'd like to blog more about our favorite places to visit in NE as a family as well as showcase more great local products and makers (by the way, if you're a New England-based maker and want to collaborate this year please send me a message).  

And then there's fitness goals.. every year I say I want to get back into running and while I did run a lot more this year than I have in a while, I still didn't get to where I want to be.  So this year I want to make the push to finally run a half-marathon!  For those of you who aren't familiar with my running backstory, I was training for a half-marathon about six years ago when I suffered a couple stress fractures, mostly due to a structural issue with my foot (which I now wear orthotics for).  
We're hoping to expand our family again within the next year or two and so I feel this year will be my last chance to try for a half marathon again before I'm too pregnant or busy with a newborn to seriously run for awhile.  

Start your New Year's Resolutions now!

Whew, so those are my top goals for 2016!  Wishing everyone lots of health, happiness, and success in the New Year - cheers!  

KEEP UP WITH BIRCH LANDING HOME
|  Etsy  |  Facebook  |  Instagram  |  Pinterest  |  Bloglovin'  |  Hometalk  |

Closet Turned into Mudroom for Cheap!

Okay, so I struggled for a bit whether to blog about this little DIY closet makeover.  I really loved the project and I think it came out great, but it was just SO impossible to photograph.  This closet is at the end of a narrow hallway with no natural light, and there's no way to photograph the whole thing in a single picture.  So please forgive me for the poor photos - they aren't to the standard I like to try to keep for the blog but the project and message were just too good not to share.  | This post contains affiliate links |

Closet into Mudroom for less than $30!

When we moved into our home we quickly realized we needed a "drop zone" by the back door.  It was really the only door we used and we needed a place to put all our stuff as we came and went.  Thankfully there was an under-utilized pantry here and while we can always use more storage, for us it was more important have a mudroom/drop zone.  After surfing Pinterest we decided to turn it into a mini mudroom complete with beadboard, a shelf, hooks, a built-in bench with metal baskets underneath for shoes, mail organizer - the works.  And so within weeks of moving in we took the door off the pantry and it became our temporary drop zone while we planned... and there it stayed for three years (yikes).  

Embarrassing, right?

Embarrassing, right?

You see, our dream mini mudroom would have cost big bucks and we kept sidelining it for other, more important things (furnace fixes, putting in a vegetable garden, repairing the driveway..).  And then we got a puppy.  And then we had a baby.  And then spending big bucks on a teeny mudroom was just absurd.  And the closet stayed the way it was, and just looked ugly and cluttered.  

Then we realized:  it's great to dream big for make-overs and remodels but what's more important is to assess what's realistic now.  Realistically we couldn't afford now what we wanted to do originally but we still needed a mudroom - so the design got cut to the very basics.  We needed a shelf, hooks, and mail/key organizer; the beadboard, bench, baskets, and accessories would have to wait.  

The first step was removing the Closet Maid shelving system. To do this, I used a flat head screwdriver and needle nose pliers to pull out the pins and drywall anchors that held the shelves and supports in place. We saved all the shelves and supports in case we want to add more shelving to another closet down the road. We were left with a ton of holes to fill, but some drywall patch and light sanding filled the holes in fine. 

Empty closet, mid-remodel.  Soon to be a mudroom!

Afterwards I repainted the walls of the closet with some white ceiling paint we had in the basement. My goal was to use as much materials as we had already and I didn't want to buy a new can of paint just to do this little area. The ceiling paint covered great and it only needed one coat. 

Then I marked the studs with painters tape and cut a 1x12 (given to us by my father-in-law who had scrap boards in his basement) down to the length of the back of the closet, attaching it into the studs with long screws.  

Leveling the board for the coat hooks in the closet

I cut the angled side supports down and cut another board to make the top shelf (all cuts were made with just a chopsaw).  Everything was glued, screwed, and nailed into place so it was nice and sturdy.  Then I patched all the screw holes and lightly sanded before painting the shelf with trim paint, which we already had on-hand.

Building the shelf for the mudroom in the closet

Once the paint was dry, I added the hardware - the only items we actually had to buy for this project!  The four coat hooks were from Lowes and cost about $4 each, the two accessory hooks were also from Lowes and were less than $1.50 each, and the mail/key organizer was from Amazon and cost about $10.  All-in-all since we reused paint and wood we already had we spent around $30 for everything!  Someday I'd still like to add a bench, baskets, and cover the textured walls with beadboard but in the meantime we have a functional, simple, efficient mudroom which is what we really needed from the beginning.  I'm kicking myself for living with the messy old closet for so long when doing a simplified mudroom was so achievable this whole time! 

Ta-da!

Ta-da!

The coatrack and mail/key organizer.

The coatrack and mail/key organizer.

The small accessory hooks on the opposite wall for hats and leashes.

The small accessory hooks on the opposite wall for hats and leashes.

Totally unstyled, real-life photo right here. Definitely not magazine-worthy, but perfect and functional for our family.

Totally unstyled, real-life photo right here. Definitely not magazine-worthy, but perfect and functional for our family.

Lesson learned:  sometimes settling for less is best. 

Product Links:  
|  Coat Hooks  |  Accessory Hooks  |  Mail + Key Organizer  |

KEEP UP WITH BIRCH LANDING HOME
|  Etsy  |  Facebook  |  Instagram  |  Pinterest  |  Bloglovin'  |  Hometalk  |

The Easiest Way to Clean Your Shower Curtain Liner

The other day I heard someone say you can clean your plastic shower curtain liner by putting it in the washing machine and I thought she was crazy.  But now that I've tried it maybe I was crazy for not knowing this sooner!  

The Easiest Way to Clean your Shower Curtain Liner

In the past I've fought the uphill battle of scrubbing and wiping down the curtain periodically and then replacing it when I let it get ahead of me. Buying a new liner always hurts because we only buy the eco-friendly, PVC-free ones and they're a little more expensive. So after I heard it can be cleaned in the washing machine I decided to try this for myself and never again have to buy a new shower curtain liner.

Harley trying to help clean the shower curtain.. I think.

I had planned to take before and after photos of our frosted shower curtain but it just didn't photograph well and maybe that's for the best, I don't think you all wanted to see our soap-scum anyways.  It also didn't help that our pup Harley kept trying to "help."

To clean your shower curtain liner all you need is white vinegar, laundry detergent, and a washing machine

How to:  

Now to clean the liner, it's pretty darn simple - just stick it in the washing machine with one or two bath towels, 1 cup of white vinegar and your regular detergent (we use Seventh Generation Free & Clear), then wash on the delicate cycle.  When it's done hang the curtain back up to dry -- DO NOT put in the dryer.  The curtain will be a bit wrinkly at first but as clean as the day you bought it!  

Clean shower curtain liner

Ah, nice and clean - I wish I had known this sooner!  


KEEP UP WITH BIRCH LANDING HOME
|  Etsy  |  Facebook  |  Instagram  |  Pinterest  |  Bloglovin'  |  Hometalk  |

Art Caddy

A few weeks ago my mom picked up this Longaberger silverware caddy for me from a yard sale for $1.  I couldn't find the exact item on their website, but a different style of silverware caddy is listed on there for $65.  Gotta love yard sales.  

I didn't really see myself using it as a silverware caddy though so I decided to ditch the fabric insert and use it as an art caddy on my little craft desk and I absolutely love it.  It's great for corralling brushes, markers, pens, and scissors - not to mention it looks really nice against the yellow walls.  I have to say, I'm pretty happy with this re-purpose!  

Art caddy from Longaberger basket

KEEP UP WITH BIRCH LANDING HOME
|  Etsy  |  Facebook  |  Instagram  |  Pinterest  |  Bloglovin'  |  Hometalk  |

5 Tips to Make the Most Money from Consigning Clothes and Household Items

I love consigning - it's so refreshing to clean out the closets, get rid of some of that stuff that's been weighing you down and get a little money back in return.  Here I share the basics as well as my 5 top tips on making the most from your consigned items.  

Make the most money from consigning unwanted and unused clothing and items from your home

What is consigning?

Consigning is bringing your used or new items to a shop that will sell them for you and give you a cut of what it sells for.  Yes, you could have a yard sale and keep all the money yourself but consigning is great because you don't need a yard full of stuff and a free Saturday to make a little extra money - and you also don't have to worry about meeting potentially creepy strangers from Craigslist or Facebook Yard Sale groups.  With consigning, you can sell as little or as much as you want with no work involved - perfect for all those busy folks out there.  

There are lots of different types of consignment shops - some only do clothes or kid items, others do antiques and decor items, and some do a combination.  There are even really specific shops out there for things like bridal and formal wear, so no matter what you're looking to get rid of there's most likely a consignment shop for that.  

The format for all these types of shops usually goes something like this:  Items are generally consigned for 90 days.  If the item sells you get a percentage of what it sells for, usually 40-60%, and some stores offer you a higher percentage if you take the amount in store credit rather than cash.  Some consignment shops cut checks to you once a month, others keep tally using a computer system and you can even check in online to see how your items are doing.  If the item doesn't sell within it's allotted time you often get the choice to donate it to charity or come and pick it up.  We always do the charity option, that way we get the chance to make a little money back but if something doesn't sell it goes on to help someone else - it's just win-win.  

My 5 top tips on making the most from your consigned items:  

  1. Keep with the seasons.
    Most consignment shops will only take what's in-season - if they don't, make sure to bring in only what's current or will be soon. Bringing in a snowsuit in May will get you no where - it likely won't sell in the allotted time and you will lose the sale and therefore the extra cash you were hoping to make.

  2. Make sure your items look their best.
    This means making sure your clothes are clean, have no stains or heavy wear-and-tear, loose threads are cut off, and it's wrinkle-free. If you're consigning decor items, make sure they have no damage and are dust-free.
    Consignment shops won't take anything that doesn't look clean and ready to sell.

  3. Know your market (consignment shop + audience).
    Some consignment shops are more "high-end" than others so it's important to know what kinds of items and brands they take and what they're looking for (there will be places that only take premium clothing brands like GAP, J-Crew, etc). Some shops will even post a list online of what they are looking for or no longer taking at this time.
    Once you get to know your local consignment shops, you'll soon learn where your items do best and you can decide where to bring what and when.

  4. Always be ready to consign.
    Always have a designated space (a plastic tote, box, or even a paper bag) to put items you'd like to consign. How many times have you passed over that sweater in your closet? (a million) Put it in the box. A well-meaning relative sent you an outfit for your little one that's already two sizes too small? Put it in the box. You don't have to do a big purge to consign (though that's always a good thing), you can consign as you go.

  5. Shop where you consign.
    If your consignment shop offers you a higher percentage back if you take your cut as store credit, definitely consider doing that - your money will go further for you.
    One of my favorite consignment shops is one of those "higher-end" boutique places where they sell a mix of consigned and new items. I love consigning and shopping there because they give me a higher percentage back as store credit and I can put it towards gently used premium-brand clothing or new clothes and gifts.

Where to start?

Ask around, Google around.  See what's near you, then give those consignment shops a call or send them an e-mail to get more information.  Make sure to find out what their policies are and if you need an appointment to drop off items.  

Happy consigning!  

A glimpse at our glamorous "To Be Consigned" system.  I have three consignment shops I use regularly: one for premium brand clothing, one that will take any brand of clothing, and one for decor items.  I write the initials of the consignment shop on each bag/box and leave them tucked away but still easily accessible.  Then whenever I have an item I want to consign I drop it into the box for the correct consignment shop.  The next time I know I'll be going by a particular place, I make sure to bring those items with me and drop them off - it couldn't be easier!

A glimpse at our glamorous "To Be Consigned" system.
I have three consignment shops I use regularly: one for premium brand clothing, one that will take any brand of clothing, and one for decor items. I write the initials of the consignment shop on each bag/box and leave them tucked away but still easily accessible. Then whenever I have an item I want to consign I drop it into the box for the correct consignment shop. The next time I know I'll be going by a particular place, I make sure to bring those items with me and drop them off - it couldn't be easier!

KEEP UP WITH BIRCH LANDING HOME
|  Etsy  |  Facebook  |  Instagram  |  Pinterest  |  Bloglovin'  |  Hometalk  |

Simple + Efficient Bib Storage

If you have a little one then you likely have a pile of bibs somewhere, probably taking up a drawer in the kitchen.  For us, using a drawer wasn't an option - we only have three.  Yes, three drawers in the entire kitchen.. ugh.  So I tried to think of another way to store the bibs out-of-sight but still accessible.  

Simple and efficient bib storage.  Baby organization.  Kitchen storage.

| Bib Hook | Chrome Basket for kids cups + dishes |

My solution was to pick up one of those "over the cupboard door" towel hooks. I made sure to get one that had a good-sized hook on it to accommodate all the bibs. Then I just put it facing into the cupboard where we keep all the kid dishes and hung all the bibs from there - done!


KEEP UP WITH BIRCH LANDING HOME
|  Etsy  |  Facebook  |  Instagram  |  Pinterest  |  Bloglovin'  |  Hometalk  |