Our daughter’s bureau was a train wreck and I just couldn’t take it anymore. She’s been very much into picking out her own clothes lately and tends to dig around in her drawers until she finds what she wants, without putting anything back the way it was. Today I finally decided to tackle the disaster and emptied her bureau, folded everything in the “KonMari” style, and put it back with order.
What’s the KonMari style? Well, technically the first step is to only keep what you truly love or use, and purge the rest (I pulled out a few items that she was starting to outgrow, but most of her clothes stayed). Then you fold everything uniformly so it can stand up in the drawers and be “filed,” allowing you to see everything at once. This is a great way to fold your clothes as you can see everything all at once and keeps you from falling into the rut of constantly wearing just what’s on top.
As you can see I came up with a basic system for the drawer too - I grouped all her t-shirts together, then long-sleeve shirts, then sweatshirts and tank tops. (This folding technique also seems to be a lot more efficient as there’s even some empty space now!) I also tackled her other drawers too and tidied up her jeans, pants, and PJs. Overall I think it looks great and should help make getting ready for school in the morning a breeze.
How I organized it:
I already had my own drawers folded in the KonMari style and love it - it’s so nice being able to see all your options at once when you’re getting dressed in the morning. As for our daughter, I explained the new setup to her and she understands it (she was honestly really excited about her neat drawers when I first showed them to her) - but the reality is she’s five years old and there’s no way it’s going to stay this organized on it’s own. I also don’t think it’s worth nagging her over it to keep it this way, it’s really not a fair expectation for a five year old. So, we’ll see how long this lasts… I’ll do my best to tidy it up when I can and try to keep some semblance of order but it won’t always be picture-perfect and that’s okay. That’s life ;)
One Week Update: She actually kept the system perfectly! Just a few things had fallen over and one item was crumpled up and put back, but 95% of it was still perfect. I’m super impressed that an almost 5-year-old can keep the system that neat. But it goes to show, that if she can do it - so can you!
Related Post:
KEEP UP WITH BIRCH LANDING HOME
| Etsy | Facebook | Instagram | Pinterest | Bloglovin' | Hometalk |
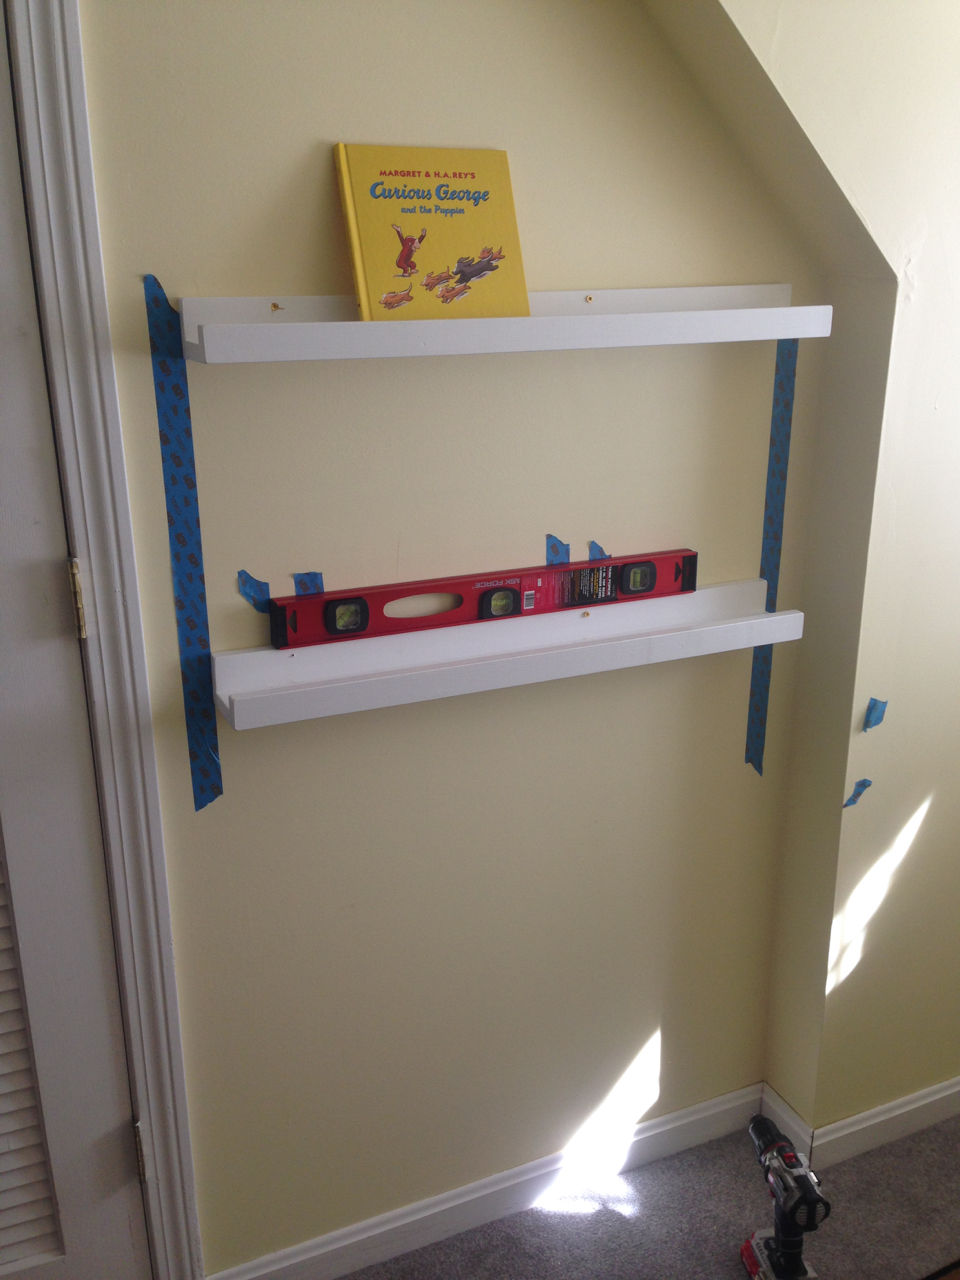
In our daughter's small bedroom, space is at a premium. We try hard to make the most of the space and keep the floor as open as possible to help the room feel a little bigger and give her more area to play. On one wall of her room, there is a very shallow nook I wasn't sure what to do with but wanted to make it an efficient use of space. After some thought, I decided building some custom book storage would be the perfect solution.
1x3 boards
1x2 boards
screws
wood glue
spackle
level
painters tape
How-To:
1. Cut the wood the desired length of the rail shelf. You will need two 1x3 boards and one 1x2 board for each rail.
2. Line up the boards as shown below (the wide ones on the bottom and back, and the narrow one at the front). Pre-drill, then glue the edges, and secure with wood screws.
3. Once it's dried and secure, spackle the screw holes, let dry, and then apply 3 coats of paint (I used semi-gloss trim paint).
4. Next mark the location of the studs and the approximate spacing of the book rails. I could have easily put three rails in this space but I didn't want our toddler trying to climb it like a ladder, so I decided to only do two.
5. Center the book rails in the space and use a level to hang the book rails, pre-drilling and screwing the book rails into the wall studs.
6. Decorate and add your books! While these are pretty sturdy, I would recommend being mindful of the weight put on the rails - don't put too many books or large, heavy books on them, especially since your little one will be reaching up to pull books off and you don't want anything heavy to topple off.
And finally I decided to build a simple, sturdy narrow crate to hold our daughter's bigger, heavier books.
Other posts you might enjoy from Birch Landing Home:
KEEP UP WITH BIRCH LANDING HOME
| Etsy | Facebook | Instagram | Pinterest | Bloglovin' | Hometalk |
How's this for a super-easy project? I love the idea of a monogram on the door of our little girl's room, but wanted to keep it simple and subtle and easy to take down if we decide to change things up.
This project really couldn't be easier. The letter I bought was a pre-painted small white one from Hobby Lobby because I wanted it to be subtle, but it could easily be repainted another color if you wanted it to stand out more.
To hang it, I used some light-weight Command strips so it can easily be removed later if we decide to do something different on the door.
Just love the finishing touch it adds!
KEEP UP WITH BIRCH LANDING HOME
| Etsy | Facebook | Instagram | Pinterest | Bloglovin' | Hometalk |
Coming (soon I hope) to the Etsy shop - signs!
I've been wanting to add signs to the shop for forever but ornaments have been keeping me too busy. For now I'll be listing an occasional sign in the shop here and there, but after the Christmas ornament rush you can expect to see a lot more! Designs will mostly be New England-inspired and some nursery/children's room designs (like the one pictured).
KEEP UP WITH BIRCH LANDING HOME
| Etsy | Facebook | Instagram | Pinterest | Bloglovin' | Hometalk |
Making over our daughter's room has been slow-going to say the least. We had a busy, wonderful summer and now I'm already deep into Christmas ornament orders so finding time to work on the whole makeover has been tricky.
Today I finally hung the book rails I made in this tiny nook and I think it will help make this space functional. Now I need to make something to hold the large, heavy books on the floor - and finish the rest of the room - and then I will share the whole project! ;)
KEEP UP WITH BIRCH LANDING HOME
| Etsy | Facebook | Instagram | Pinterest | Bloglovin' | Hometalk |