"Thanks for Helping me GROW" DIY Teacher Gift + Free Printable Tag

Teacher gift ideas are always tough… I always want to do something thoughtful, useful, but still affordable. This year we decided to make ruler painted flower pots to go with the “Thanks for helping me GROW” theme. In them we planted small aloe vera plants which will come in handy for soothing sunburns over summer vacation. | This post contains affiliate links |

"Thanks for Helping me GROW" DIY Teacher Gift Idea + Free Printable Tag

Materials:

How-To:

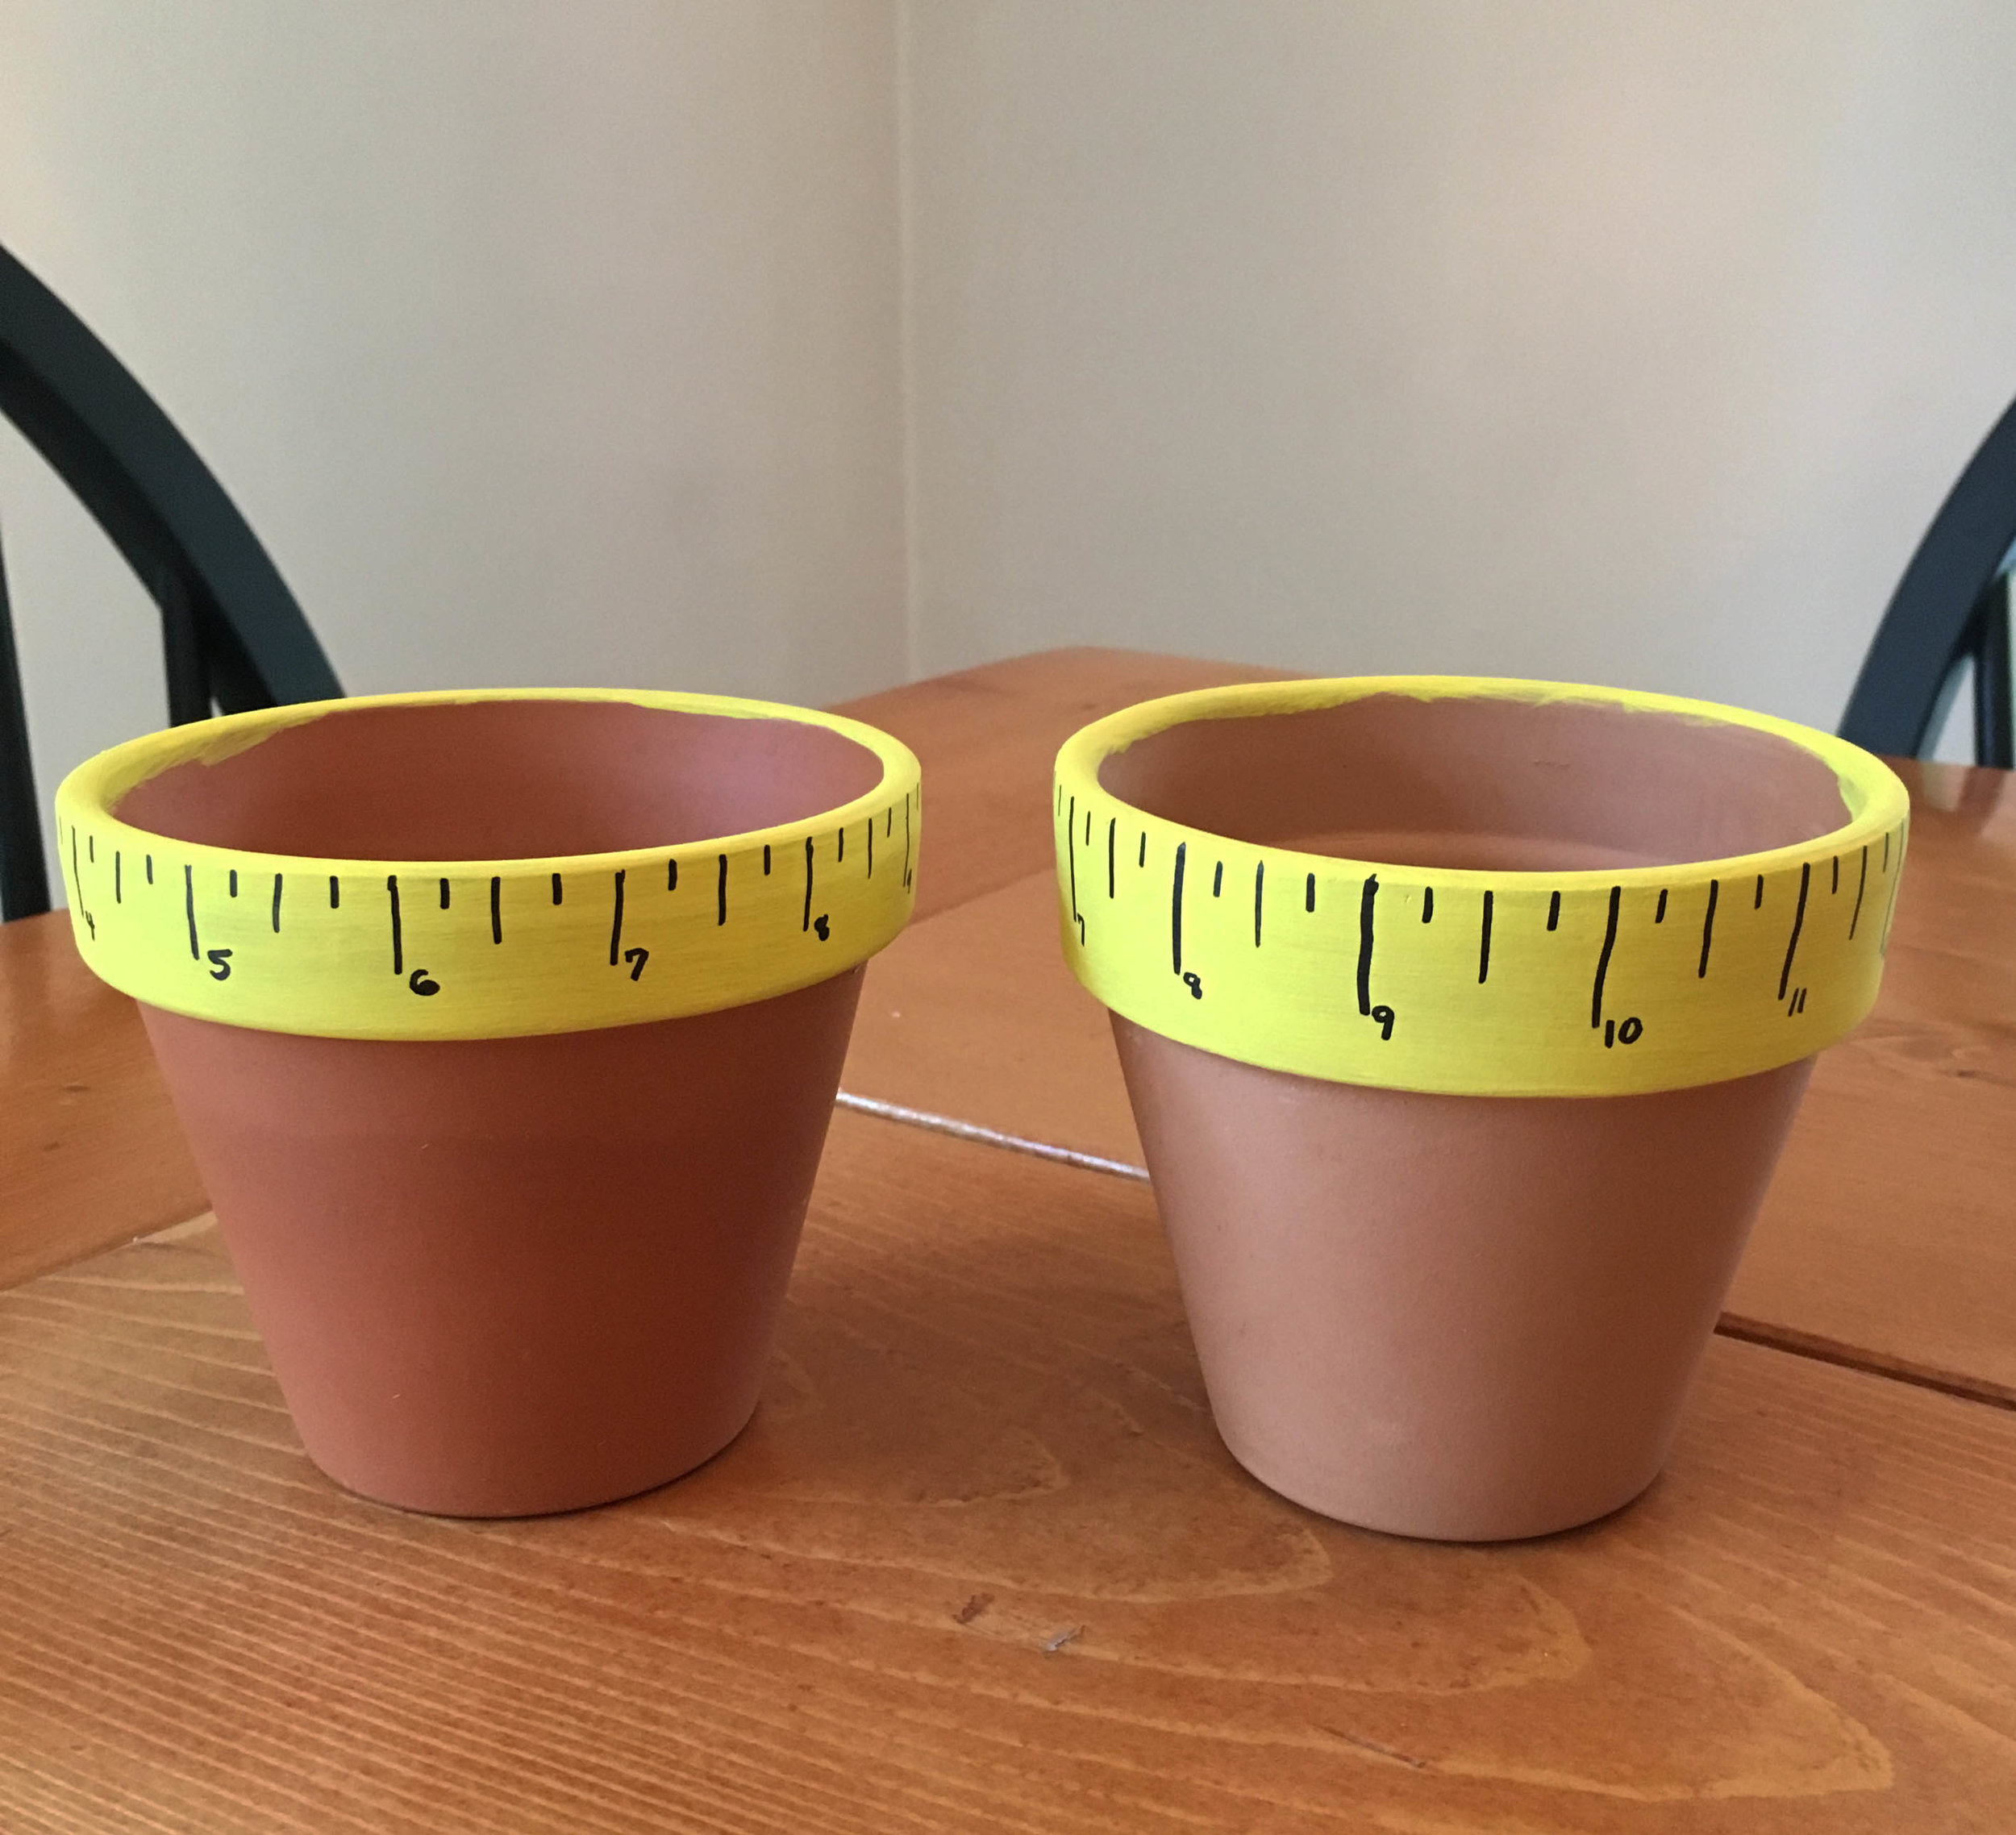
First paint the lip of the pot with the yellow acrylic paint, you might need to do several coats to get good coverage.

"Thanks for Helping me GROW" DIY Teacher Gift Idea + Free Printable Tag

Then mark inch lines evenly around the rim (I made a template with a piece of scrap paper). It may not come out evenly when they meet up so feel free to take artistic license with the spacing.

"Thanks for Helping me GROW" DIY Teacher Gift Idea + Free Printable Tag

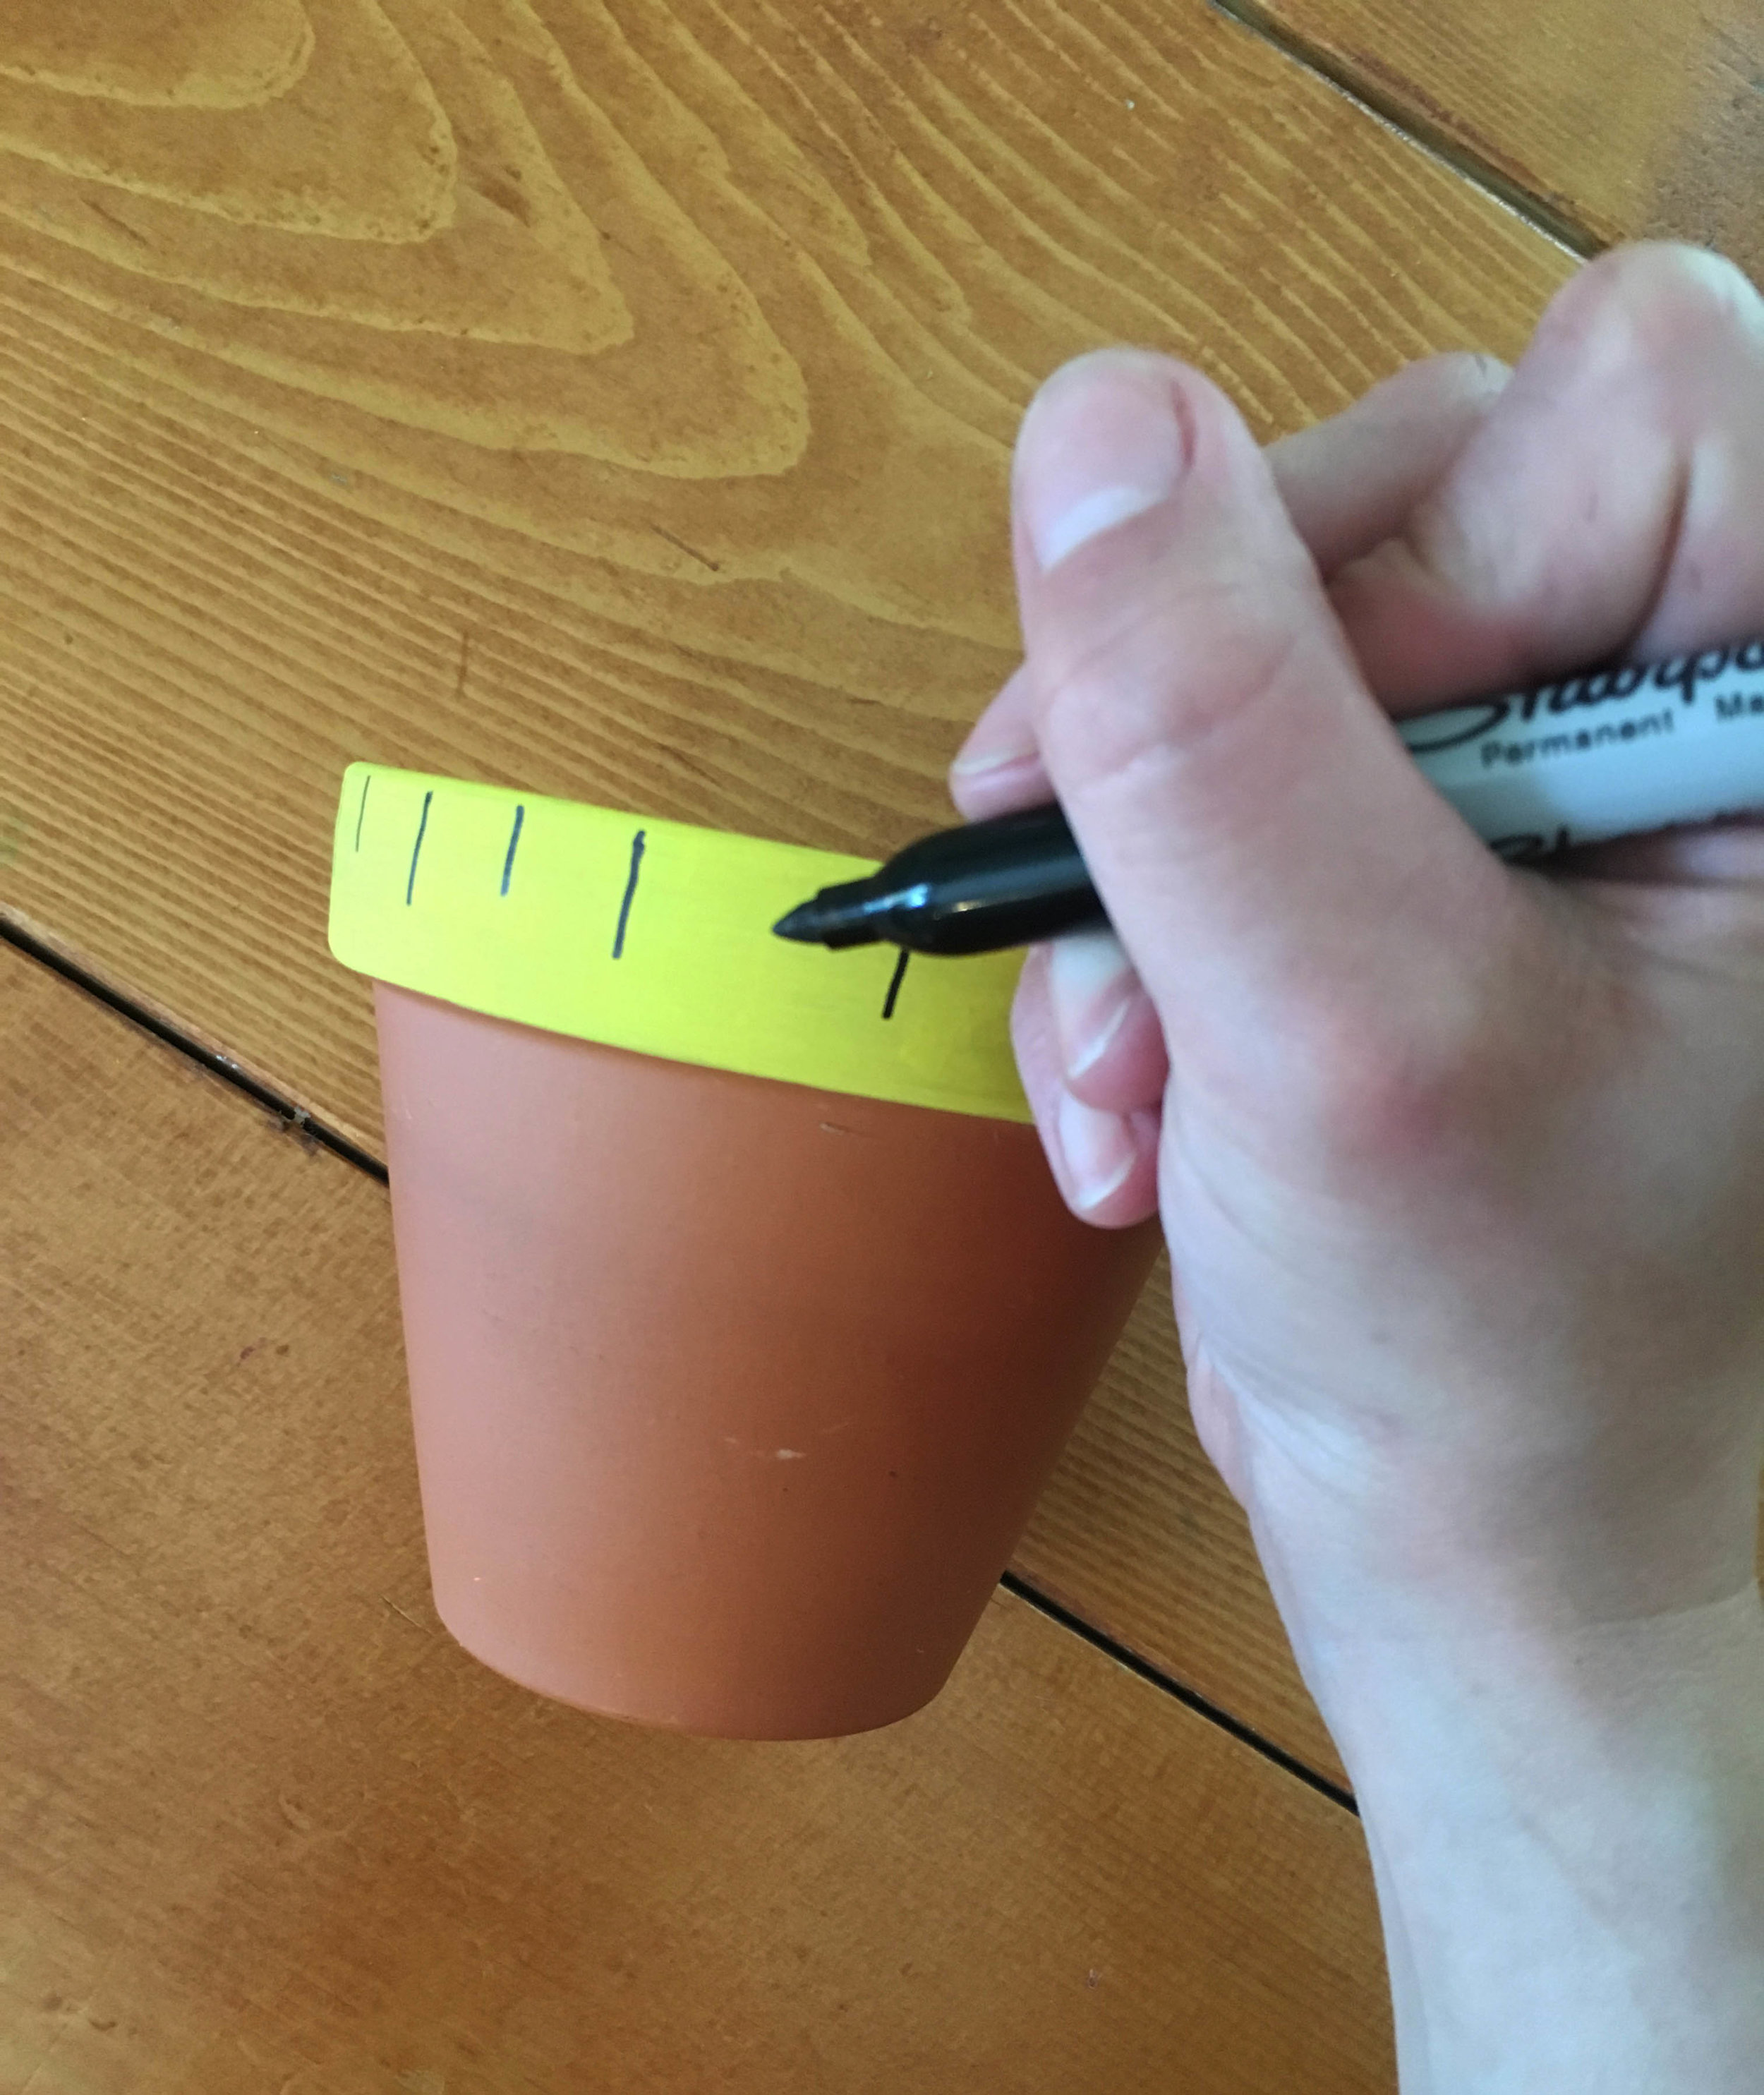
Then using a sharpie or black paint and a fine paintbrush, paint the lines of the ruler (whole, half, and quarter lines) as well as the numbers.

IMG_4932ED.jpg"Thanks for Helping me GROW" DIY Teacher Gift Idea + Free Printable Tag

Once everything is dry, fill with soil and a plant of your choice. We decided on aloe vera since it’s a useful plant as well - the teachers will be able to use it to soothe any sunburns that may happen over summer vacation.

IMG_4935ED.jpg"Thanks for Helping me GROW" DIY Teacher Gift Idea + Free Printable Tag

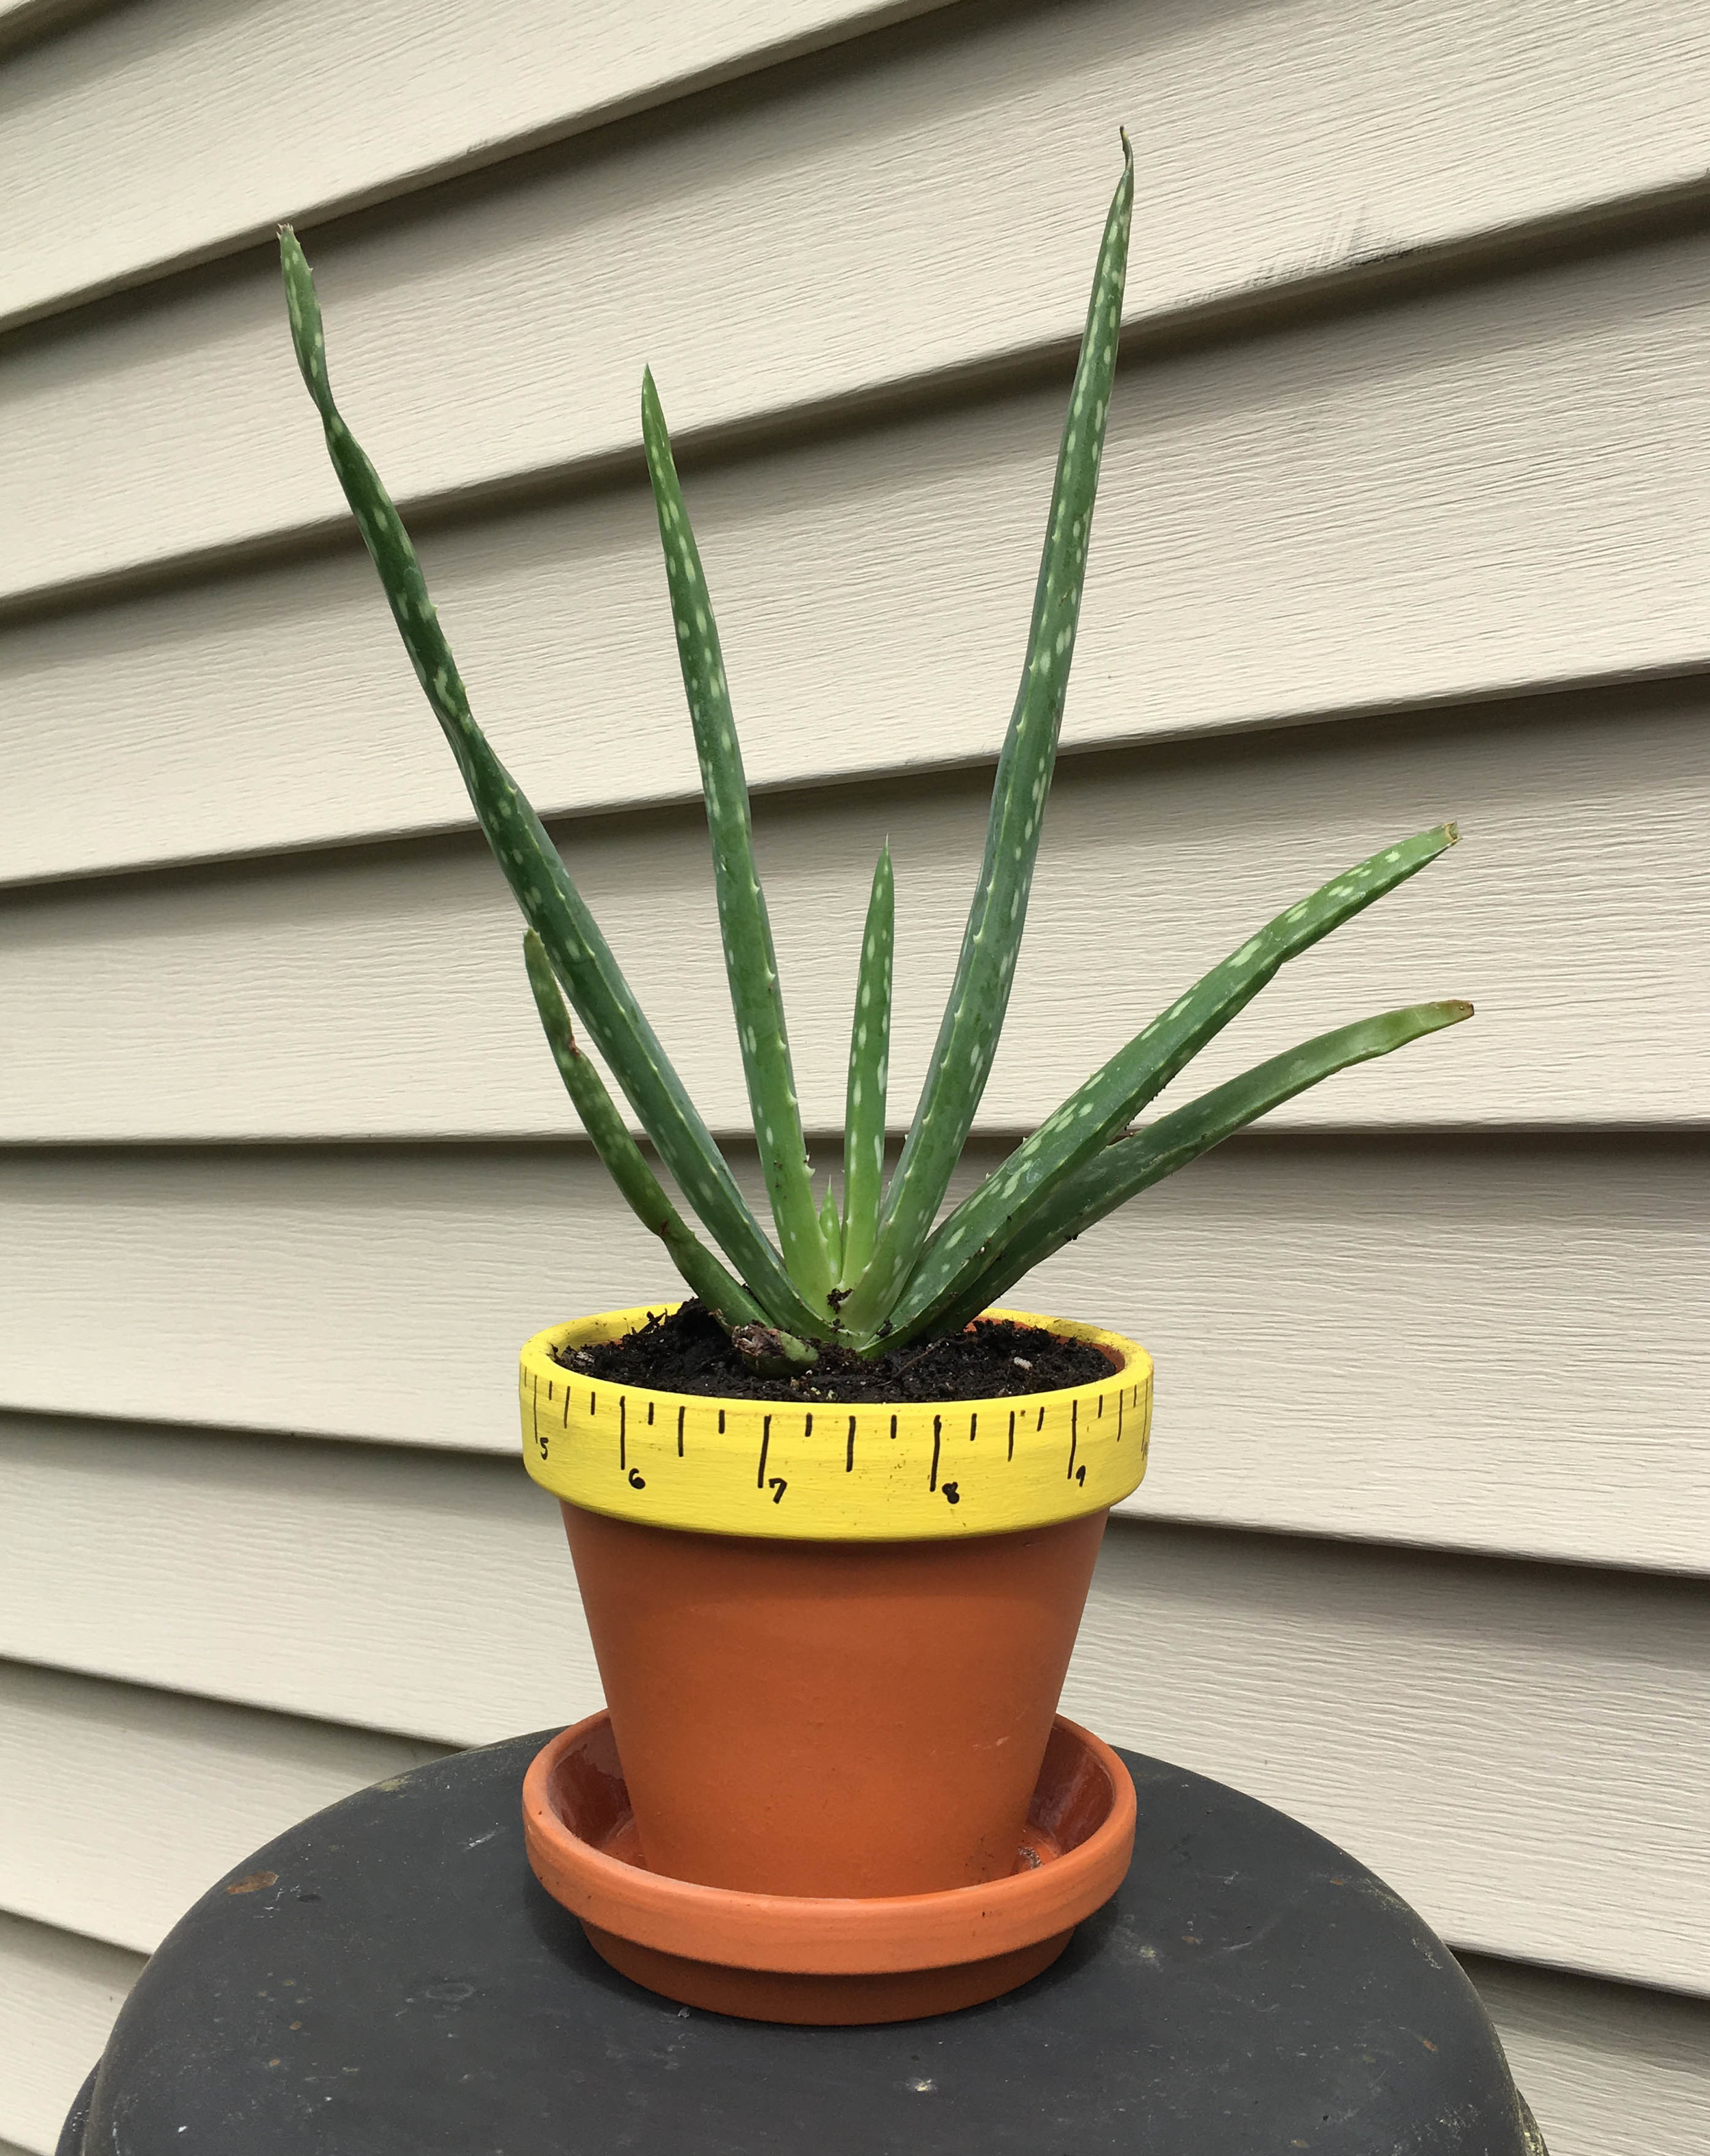
All that’s left is to add a card or a gift tag and a message of thanks!

FREE PRINTABLE TAG

"Thanks for Helping me GROW" DIY Teacher Gift Idea + Free Printable Tag

KEEP UP WITH BIRCH LANDING HOME
|  Etsy  |  Facebook  |  Instagram  |  Pinterest  |  Bloglovin'  |  Hometalk  |

DIY Library Tote Bag {FREE Printables for Iron-On Transfer!}

If you have kids you know how tricky it can be to keep track of library books in your home… you bring them home, read them on the couch, and then before you know it they’re mixed in with your own books and quickly forgotten… until you get that late notice from the library (ooops). The best way to keep track of them is to have a designated place to keep them - for us we made a special library tote that has served us well. We use it to bring home books from the library, and as we read them we make sure to return them to the tote so they’re never misplaced. I’ll show you exactly how I made ours, along with two free printables so you can make your own! | This post contains affiliate links |

DIY Library Tote {FREE Printable Designs for Iron-On Transfer!}

Materials:

How-To:

1. First, run your canvas tote bag through the washer and dryer - you need to make sure it’s clean and there’s no more sizing on it from manufacturing which might keep the iron-on transfer from adhering well.

2. Print out your design on the transfer paper. (Please note that the designs I have available for download are ready-to-print PDFs for printing on iron-on transfers, therefore they are already in mirror image - aka backwards.)
*You can find links to download our designs at the end of this post - there are two different designs to choose from!*

DIY Library Tote {FREE Printable Designs for Iron-On Transfer!}

3. Cut out the iron-on transfer design, leaving a border around the edge of the design to help ensure the design will adhere well to the fabric and not lift at the edges.

DIY Library Tote {FREE Printable Designs for Iron-On Transfer!}

4. Make sure to read the instructions for your particular brand of iron-on transfers as these next steps may vary slightly from brand to brand. For the transfers we used, the next step is to heat up the iron then pre-iron the bag to get rid of wrinkles and preheat the fabric for the transfer. Our directions recommend working on a hard surface with a piece of scrap fabric underneath.

5. Carefully place your design face down on the bag and iron it on using a LOT of pressure. I actually stand on a chair to put my full body weight down on it too. You want to iron over the whole design, paying particular attention to the edges to make sure it really adheres well.

DIY Library Tote {FREE Printable Designs for Iron-On Transfer!}

6. After going over your design like a thousand times (an exaggeration, but make sure you go over it a lot to adhere it well). Let it cool completely before carefully pulling the paper backing off and you’re done. Time to go to the library!

DIY Library Tote {FREE Printable Designs for Iron-On Transfer!}

Download FREE Printables for Iron-On Transfer Here:

Explore Books Logo (prints to approximately 4”x5”)

Explore Books Logo (prints to approximately 4”x5”)

Go on an Adventure Logo (prints to approximately 4.5”x4.75”)

Go on an Adventure Logo (prints to approximately 4.5”x4.75”)

*Please note that the downloaded PDF files will have the logos in MIRROR IMAGE (aka backwards), since it needs to be printed in reverse on the iron-on transfers.


Want to make a Custom Design?

Build Interactive on Creative Market

I made the designs for these library tote logos by using design files from my husband's Creative Market Shop. If you want to edit these designs or make your own, you can purchase the files from Creative Market and personalize them yourself!

The designs I used were from his Vintage Outdoor Travel Logos and Retro Industrial Logos, Volume 2 series.


KEEP UP WITH BIRCH LANDING HOME
|  Etsy  |  Facebook  |  Instagram  |  Pinterest  |  Bloglovin'  |  Hometalk  |

Creating and Maintaining a Monthly Budget {Free Excel Spreadsheet}

With baby #2 coming, we've been more mindful than ever about where our money is going and working hard to stay on-budget.  By closely keeping track of everything we're getting a better idea on where everything is going and where we can shave off a few dollars.  With only one income and a lot of expenses (both expected and unexpected) it can make it very challenging to stay on-budget each month.   | This post contains affiliate links. |

Creating and Maintaining a Monthly Budget - FREE Customizable Excel Spreadsheet

Here I've shared a more simplified version of the spreadsheet we use (since we're self-employed we also need to set aside money for quarterly taxes and other expenses).  You can change the Expense titles in the left hand column to fit your needs, but I've tried to include all the basic expenses that most young adults will have.  

Next replace the monthly Income in the example with your own monthly income (I had to put in a number here as an example so the formulas wouldn't result in error).  Then go down the Budget column and fill in what you expect or budget your bills to be.  As your bills come in, put in these figures in the Actual Spent column.  All of the percentages and totals will auto-update as you fill in the chart.  

Over the course of the next few months, you'll see how your expectations (Budget) line up with reality (Actual Spent) and will be able to identify trends.  Maybe you spend more for Gas than you thought you did.. or maybe you realize that you spend too much on Entertainment and should put some of that towards other bills...?  Keeping track of where everything is going is very eye-opening and will help you stay ahead.  The most important thing is writing everything down and sticking to it!  

In the event the doing an Excel spreadsheet isn't your thing, there are also many great paper-based Budget Planners/Trackers you can buy out there! I haven't used it myself (yet), but I have heard great things in particular about this highly rated Budget Planner Notebook.


KEEP UP WITH BIRCH LANDING HOME
|  Etsy  |  Facebook  |  Instagram  |  Pinterest  |  Bloglovin'  |  Hometalk  |

Simple Chore List {Free Printable}

The easiest way to tackle household chores?  Get caught up and stay caught up. 

I’ve been able to stay on top of things (more or less) by making a simple chore list to follow during the week.  Once you get into the groove, it won’t take you much more than 20 minutes to accomplish most days’ chores.  

Simple everyday chore list to keep your home clean and organized - Free Printable

Monday – Laundry, Groceries
Usually I’ll throw a load of laundry in, then head to the grocery store.  By the time we get home, it’s time to switch loads. 

Tuesday – Bathrooms
Wipe down all surfaces, clean all the places no one ever likes cleaning, make sure there’s toilet paper stocked – you know, all that glamorous stuff. 

Wednesday – Kitchen
Wipe down the inside of the microwave, clean out the crumbs from the toaster, de-clutter the counter, make sure that last week’s leftovers have been thrown out or frozen (if it’s not too late). 

Thursday – Dust, Sweep + Mop Floors
Dust the TV and bookcases, sweep the kitchen and dining room and give it a quick mop. 

Friday – Vacuum, Water Houseplants
Give upstairs and downstairs a quick vacuum, water houseplants. 

Daily – Dishes, Go through mail
Staying on top of dishes and mail is key!  They tend to be the worst culprits for piling up fast and bringing you down.  I try not to go to bed with dirty dishes in the sink.

Obviously some days are busier than others and a particular day’s chores might get skipped.  Sometimes I’ll try to make them up the next day, other times I may just skip those chores entirely for that week - but trying to stick to this schedule as much as possible means that even when you skip something it’s not hard to pick up the slack the following day or week and catch back up.  

KEEP UP WITH BIRCH LANDING HOME
|  Etsy  |  Facebook  |  Instagram  |  Pinterest  |  Bloglovin'  |  Hometalk  |