Shop my Amazon Favorite Finds with Ease!

Amazon Influencers now have categories which makes browsing my Favorite Finds so much easier!  Check out my lists and let me know if you have any questions on the products - I have different lists for Home, Kitchen Favorites, DIY Supplies + Tools, Fashion + Beauty, Outdoors, and Baby + Kid Items. 
| This post contains affiliate links |

Shop Birch Landing Home's Amazon Favorites with Ease!

KEEP UP WITH BIRCH LANDING HOME
|  Etsy  |  Facebook  |  Instagram  |  Pinterest  |  Bloglovin'  |  Hometalk  |

Easy DIY Wooden Bed Risers

In our master bedroom our bed sits on a standard metal bed frame.  Not only were the legs still visible under the bedskirt, but the bed was about an inch too low to fit underbed storage containers!  Not being able to store much under the bed was a huge inconvenience and after tripping over these containers in our walk-in closet for far too long I decided to make my own bed risers and fix the issue once and for all. 
| This post contains affiliate links |

Easy DIY Bed Risers

Now this isn't exactly a glamorous or high-end project, but I think you'll agree that the Before and Afters speak for themselves - it's a huge improvement over what was there and helps fit more under the bed for critical storage.  

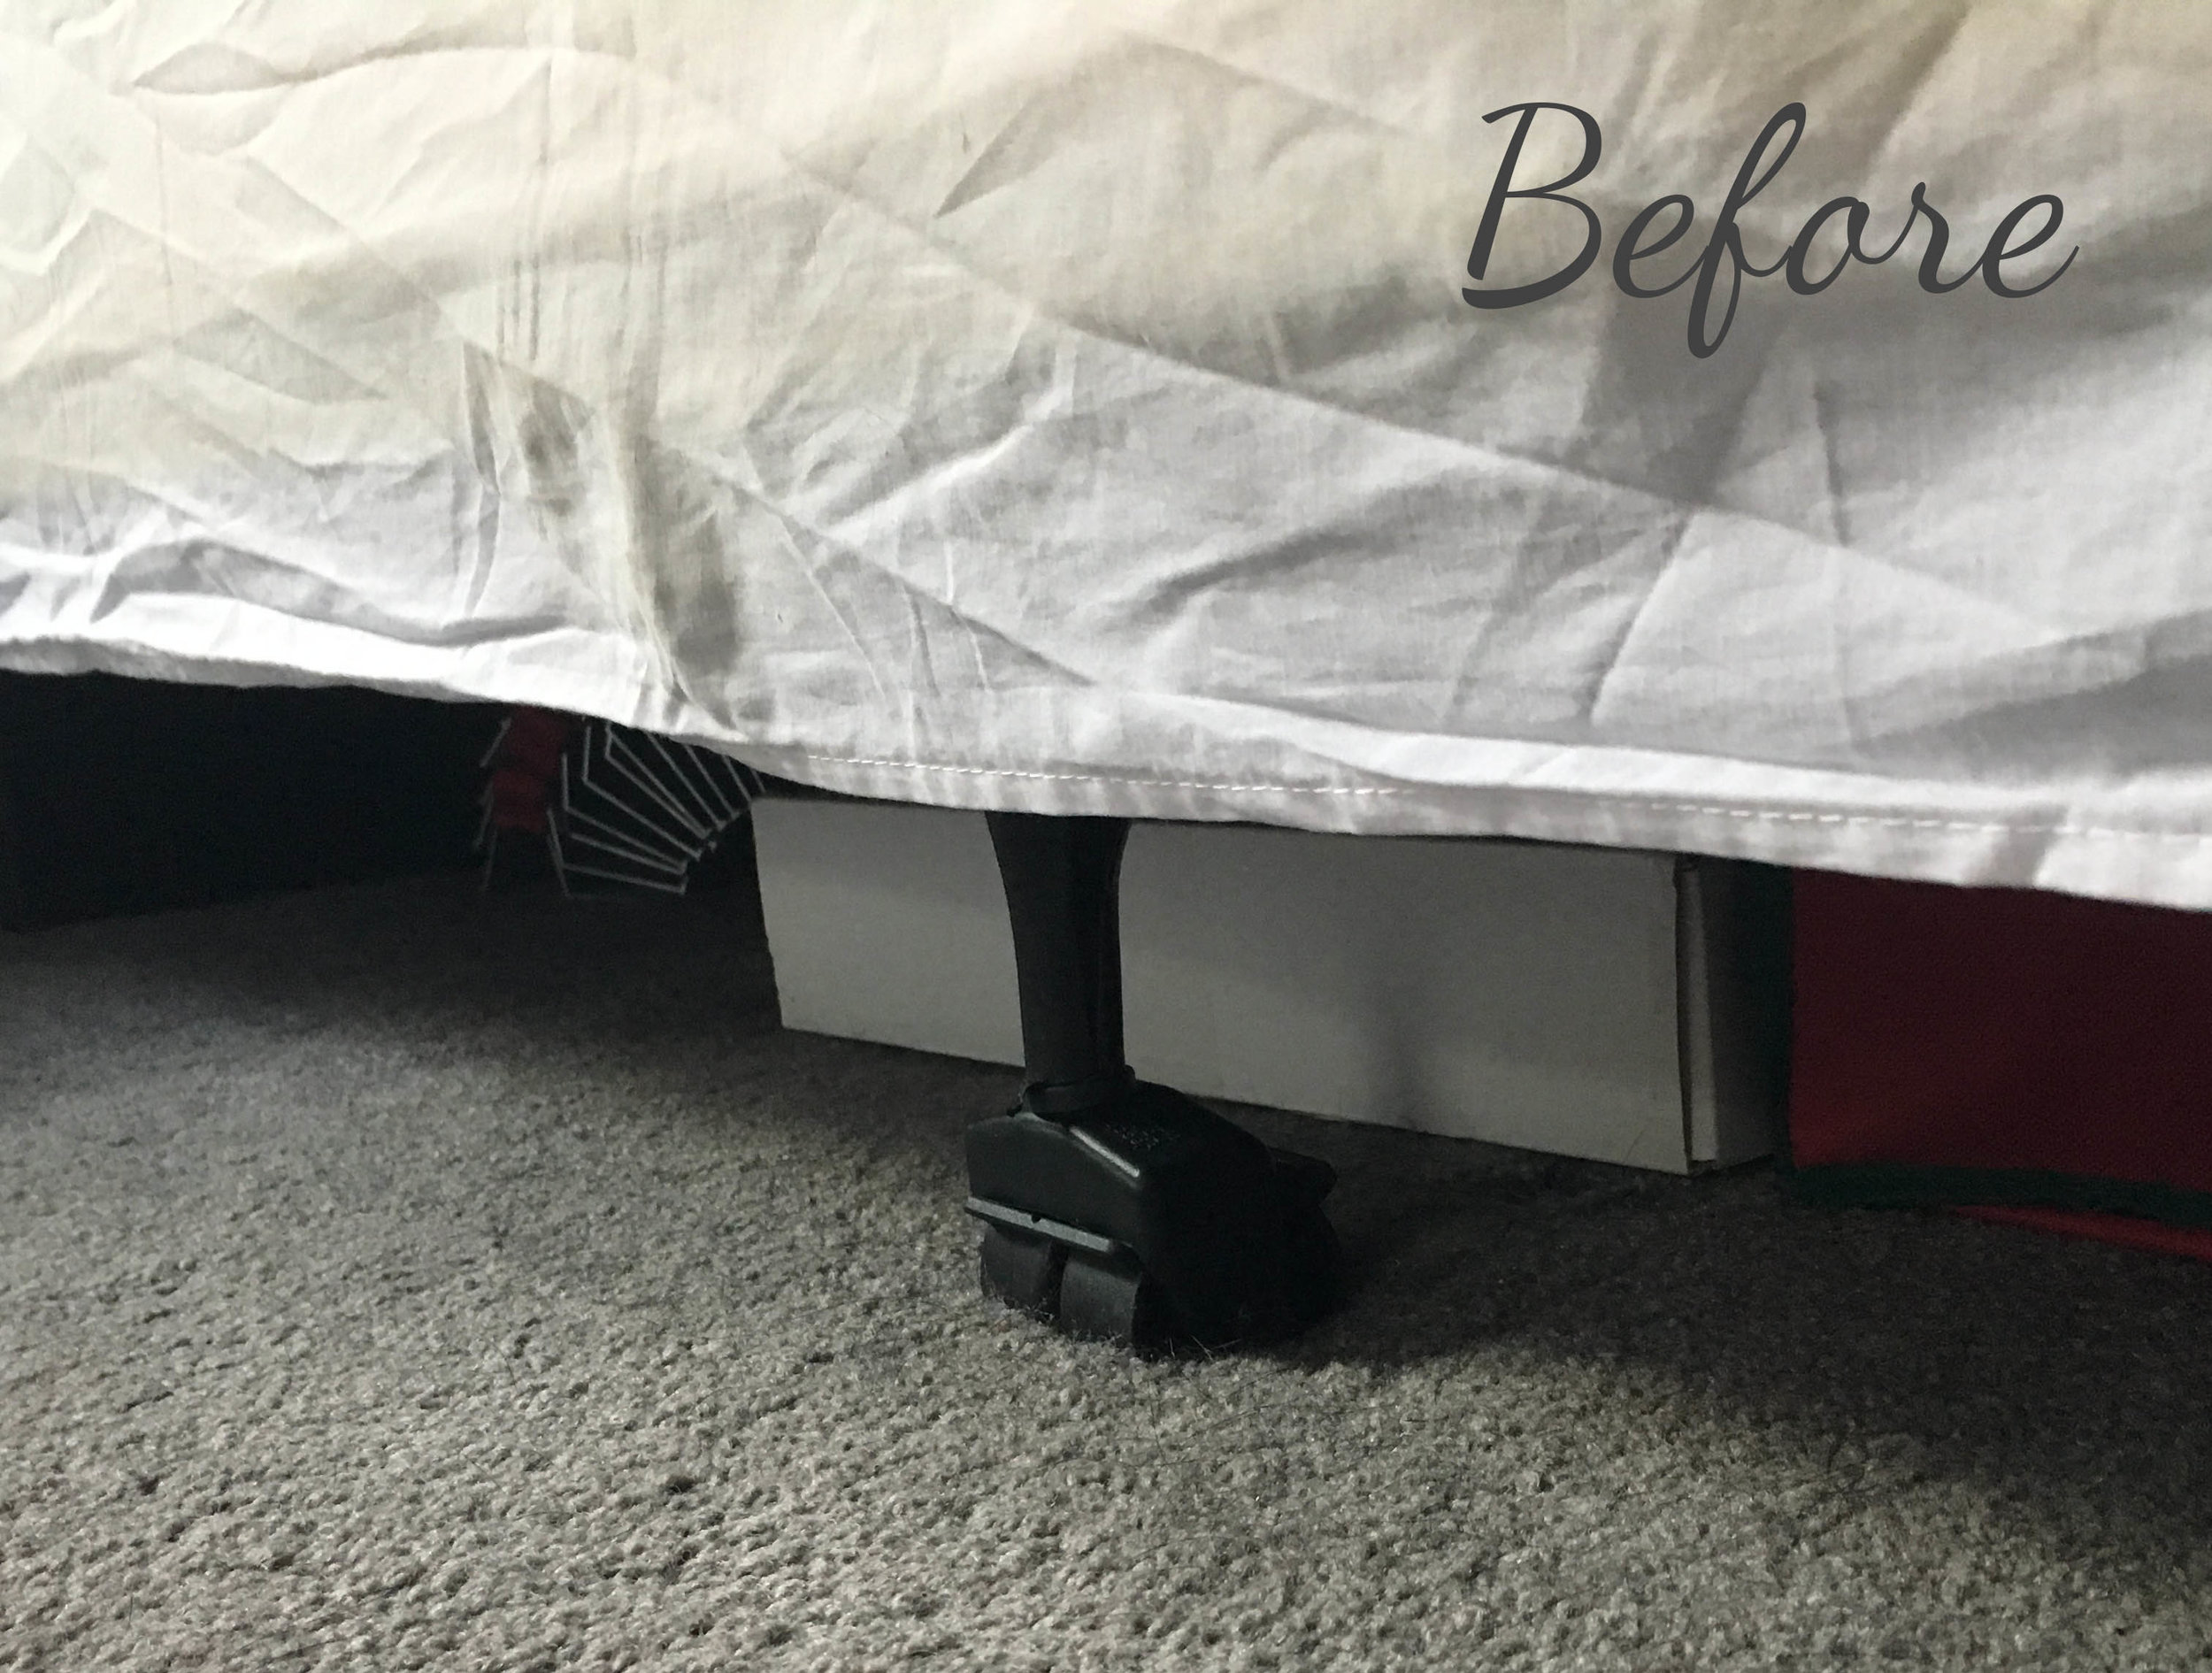
The wrinkly, too-short bedskirt shows the ugly metal legs and the limited storage underneath.

The wrinkly, too-short bedskirt shows the ugly metal legs and the limited storage underneath.

Materials:  

  • ruler
  • chop saw or handsaw
  • 2x4 lumber
  • 1x5 lumber (or whatever size wood will cover the legs of your bed + the thickness of the 2x4)
  • woodglue
  • screws
  • drill/screw gun
  • sandpaper
  • stain or paint

How-To:  

Working on the DIY Bed Risers

First measure the height of the legs of the bed (in our case the back side of the leg has a support bracket which is why you'll see the back side of our risers are slightly shorter) and add this height to 1.5 (the actual thickness of a 2x4).  This is the height your side boards will be for the bed riser.  For us it came to about 5 inches along the front three sides and 4 inches in the back.  

Next cut your 2x4 to size to fit comfortably under the legs of your bed.  Then cut all the side pieces to size, creating a box around the 2x4 base.  

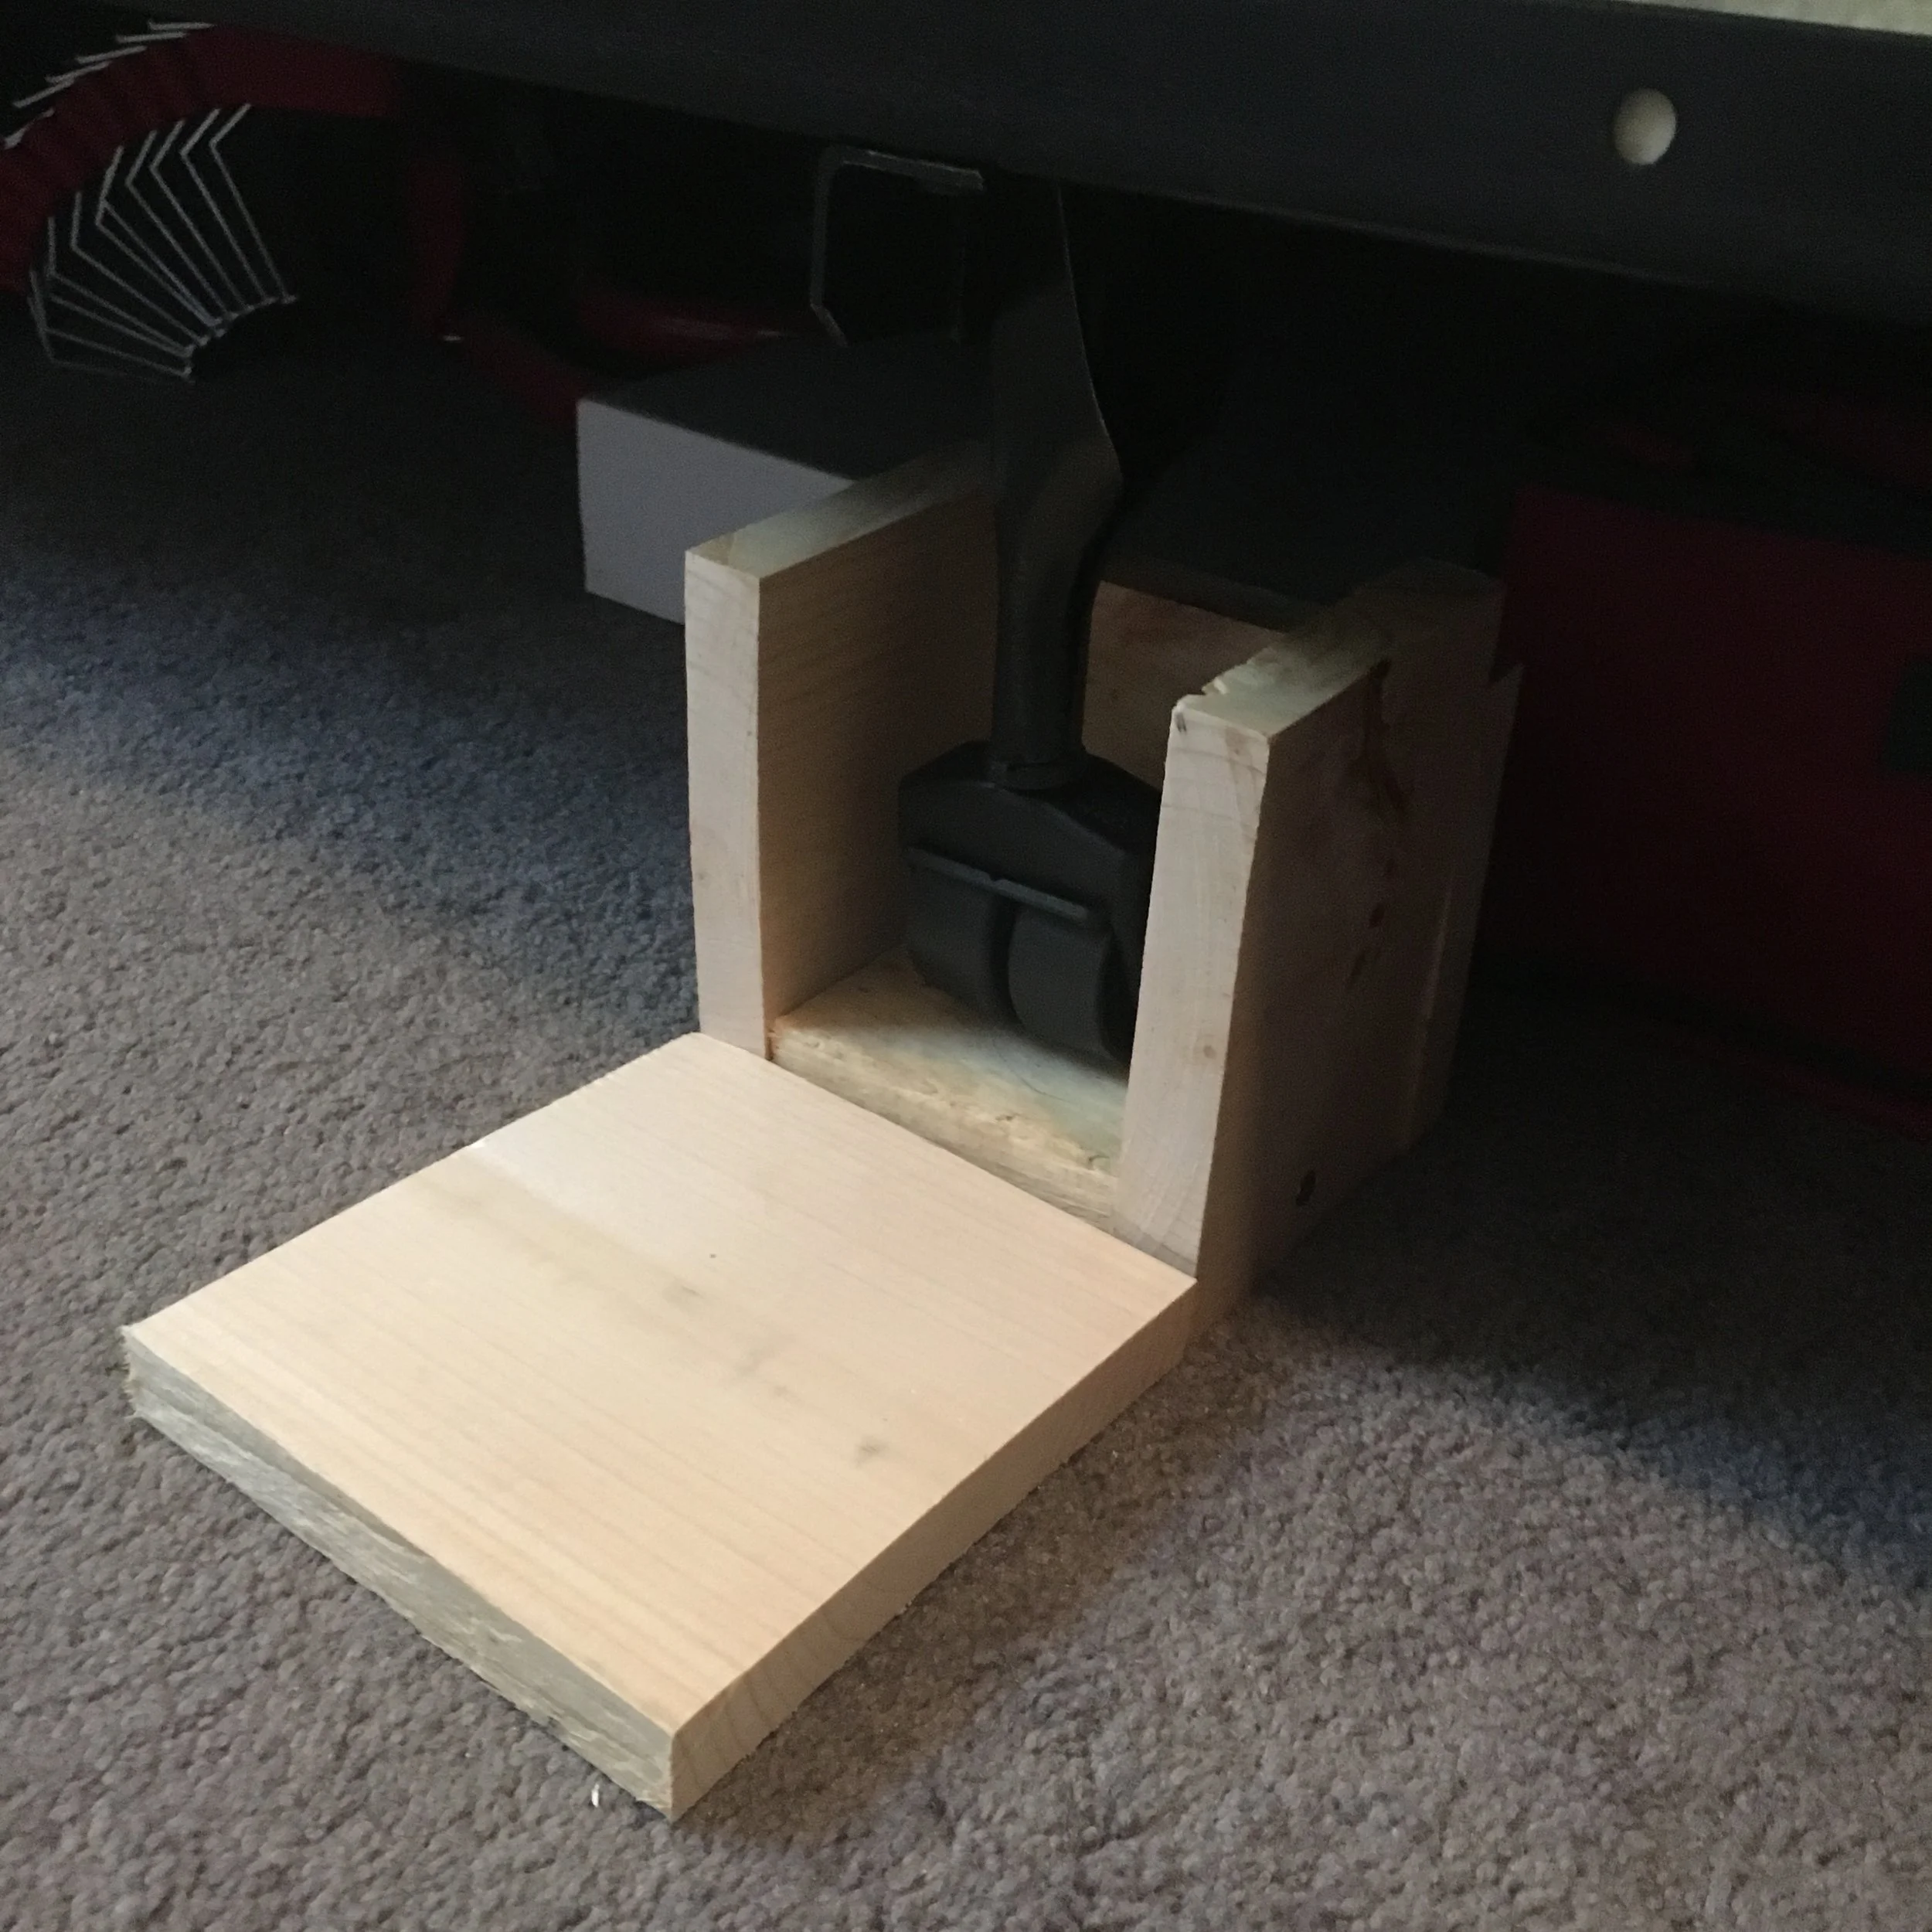
Before assembling, it's a good idea to lay it out under one of the legs of the bed to make sure everything fits properly (as you can see from the "cut-away" example I have below).  Here you can see how the leg sits on the 2x4 base with all the side pieces around it.  

DIY Bed Risers "Cut-Away" View

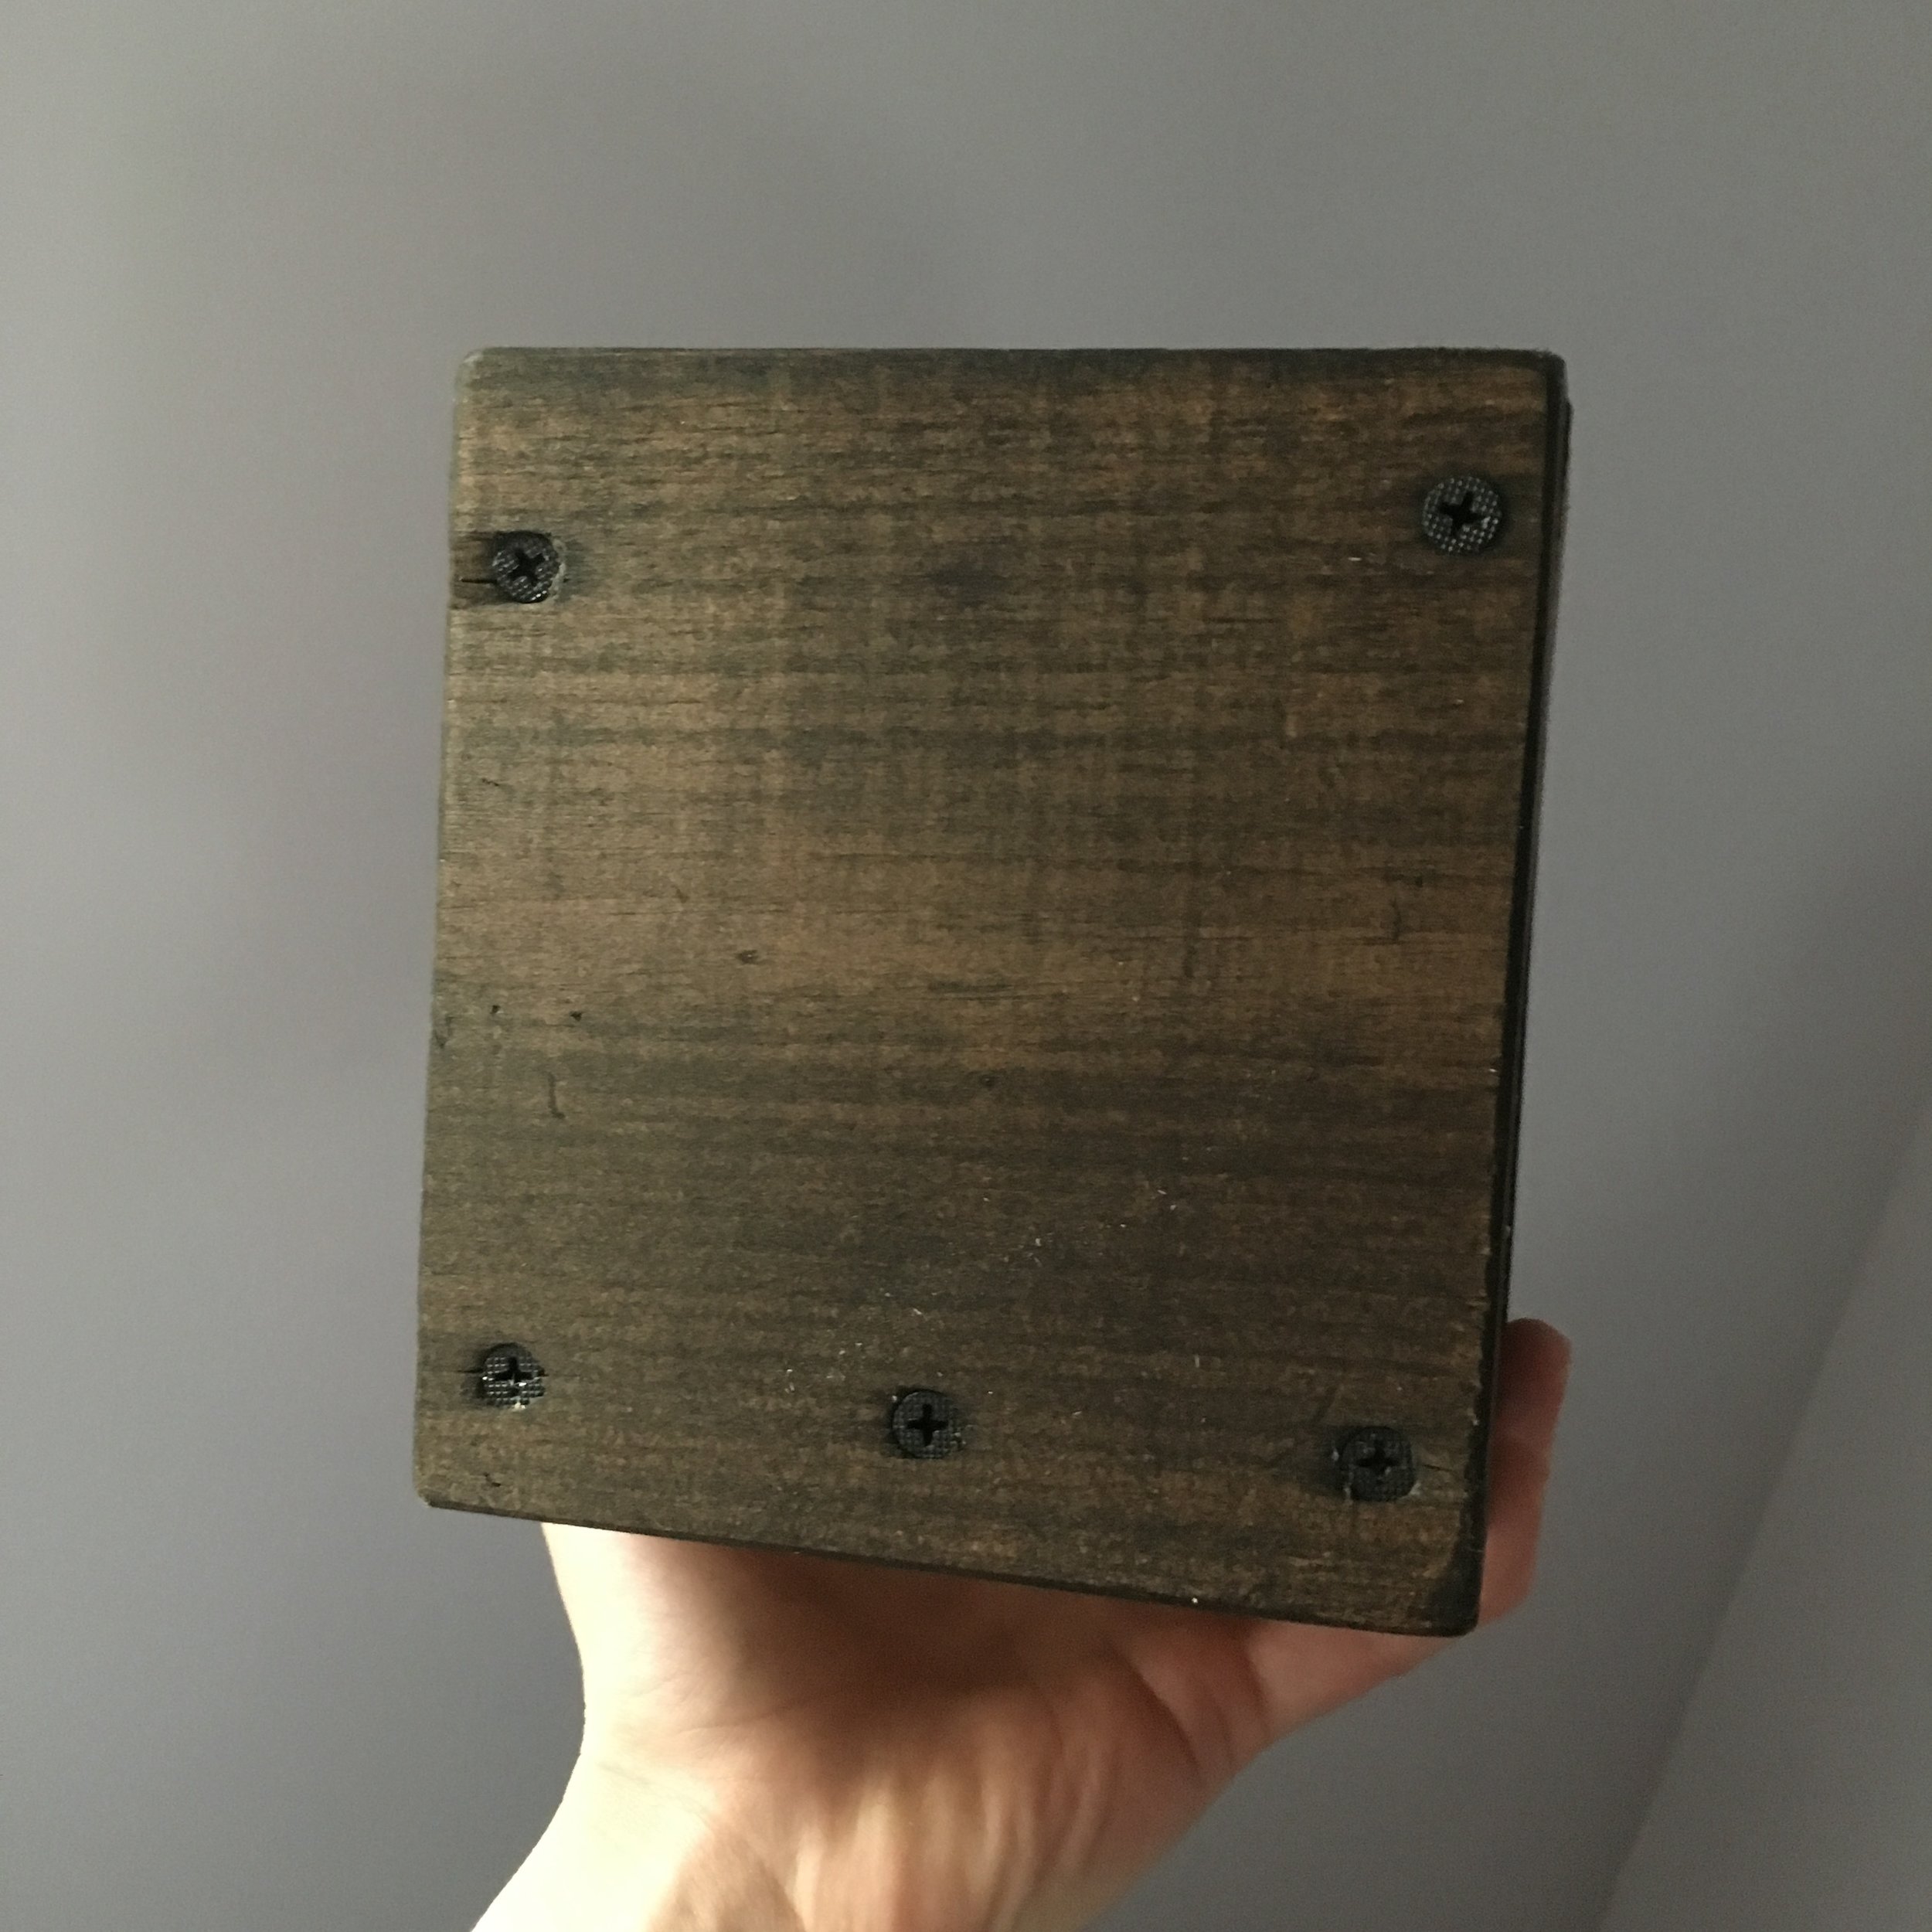
Once you have all your pieces cut to size, pre-drill, wood glue, and screw everything together.  We used black screws so they would blend in better with the dark stain we chose.  Make sure everything is attached sturdily then sand and stain/paint in the color of your choosing.  We went with a dark stain since the rest of our bedroom set is a darker wood.  

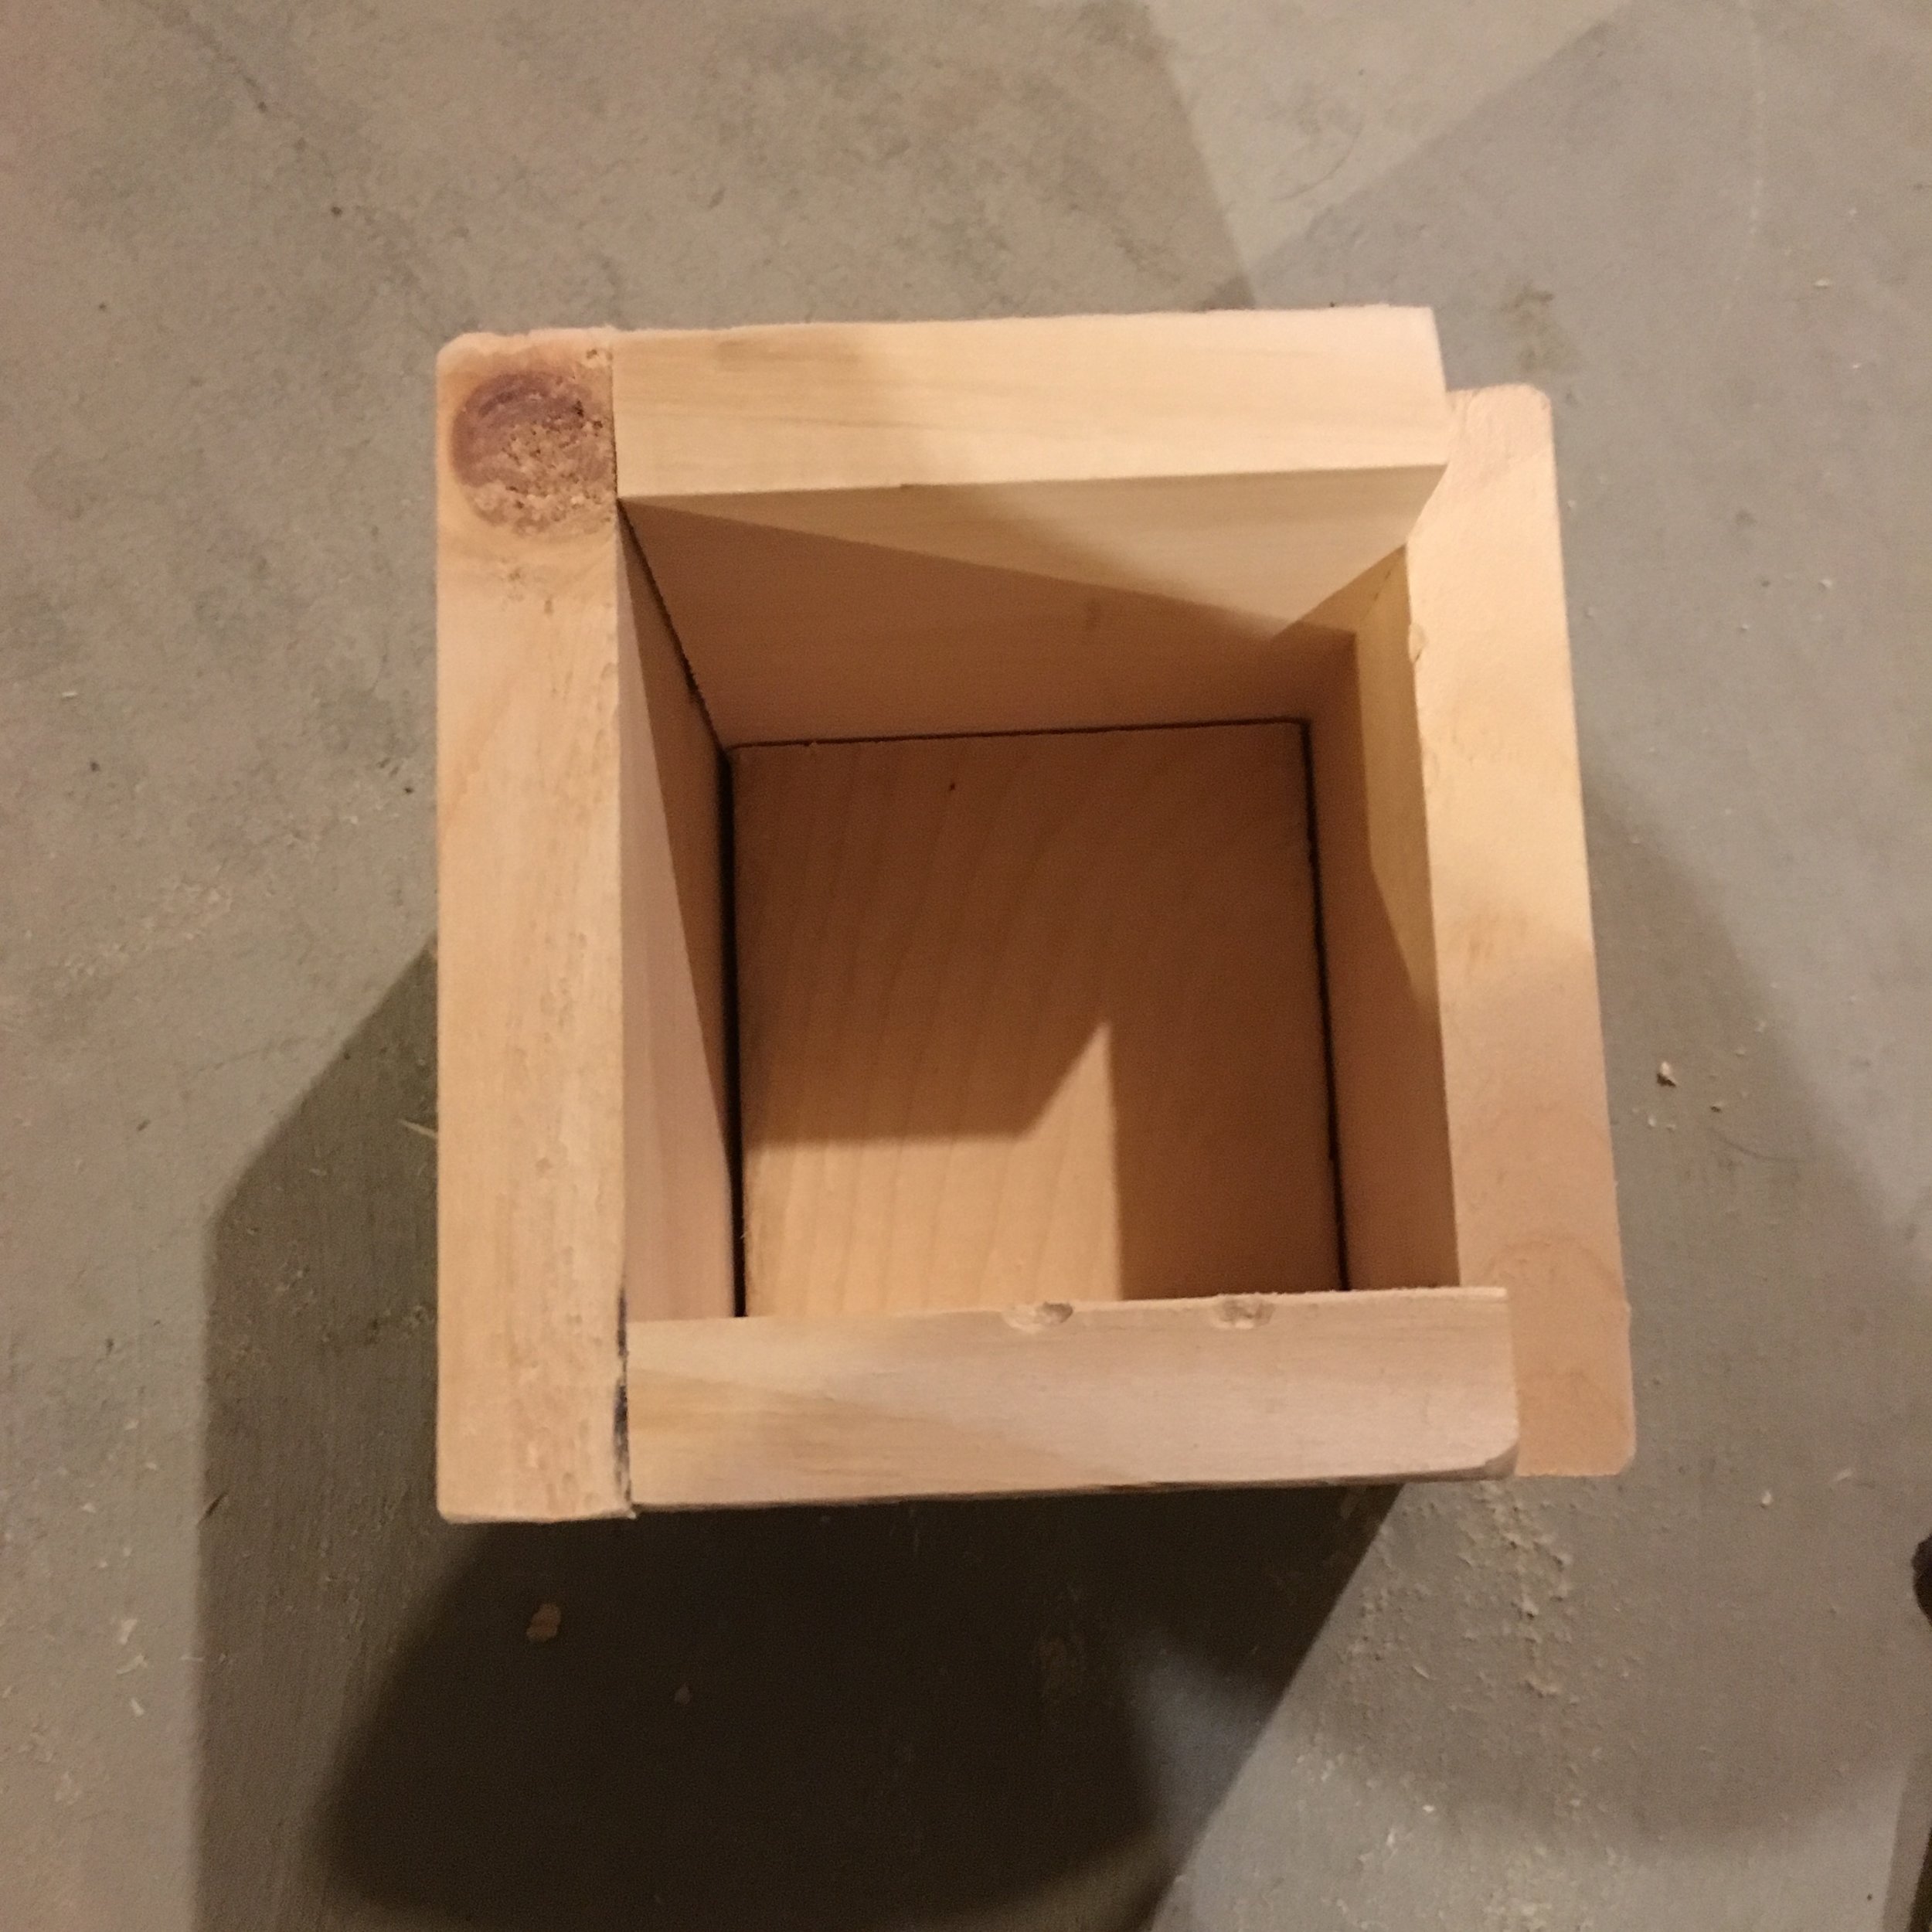
DIY Bed Riser built and ready for stain!
A finished riser.

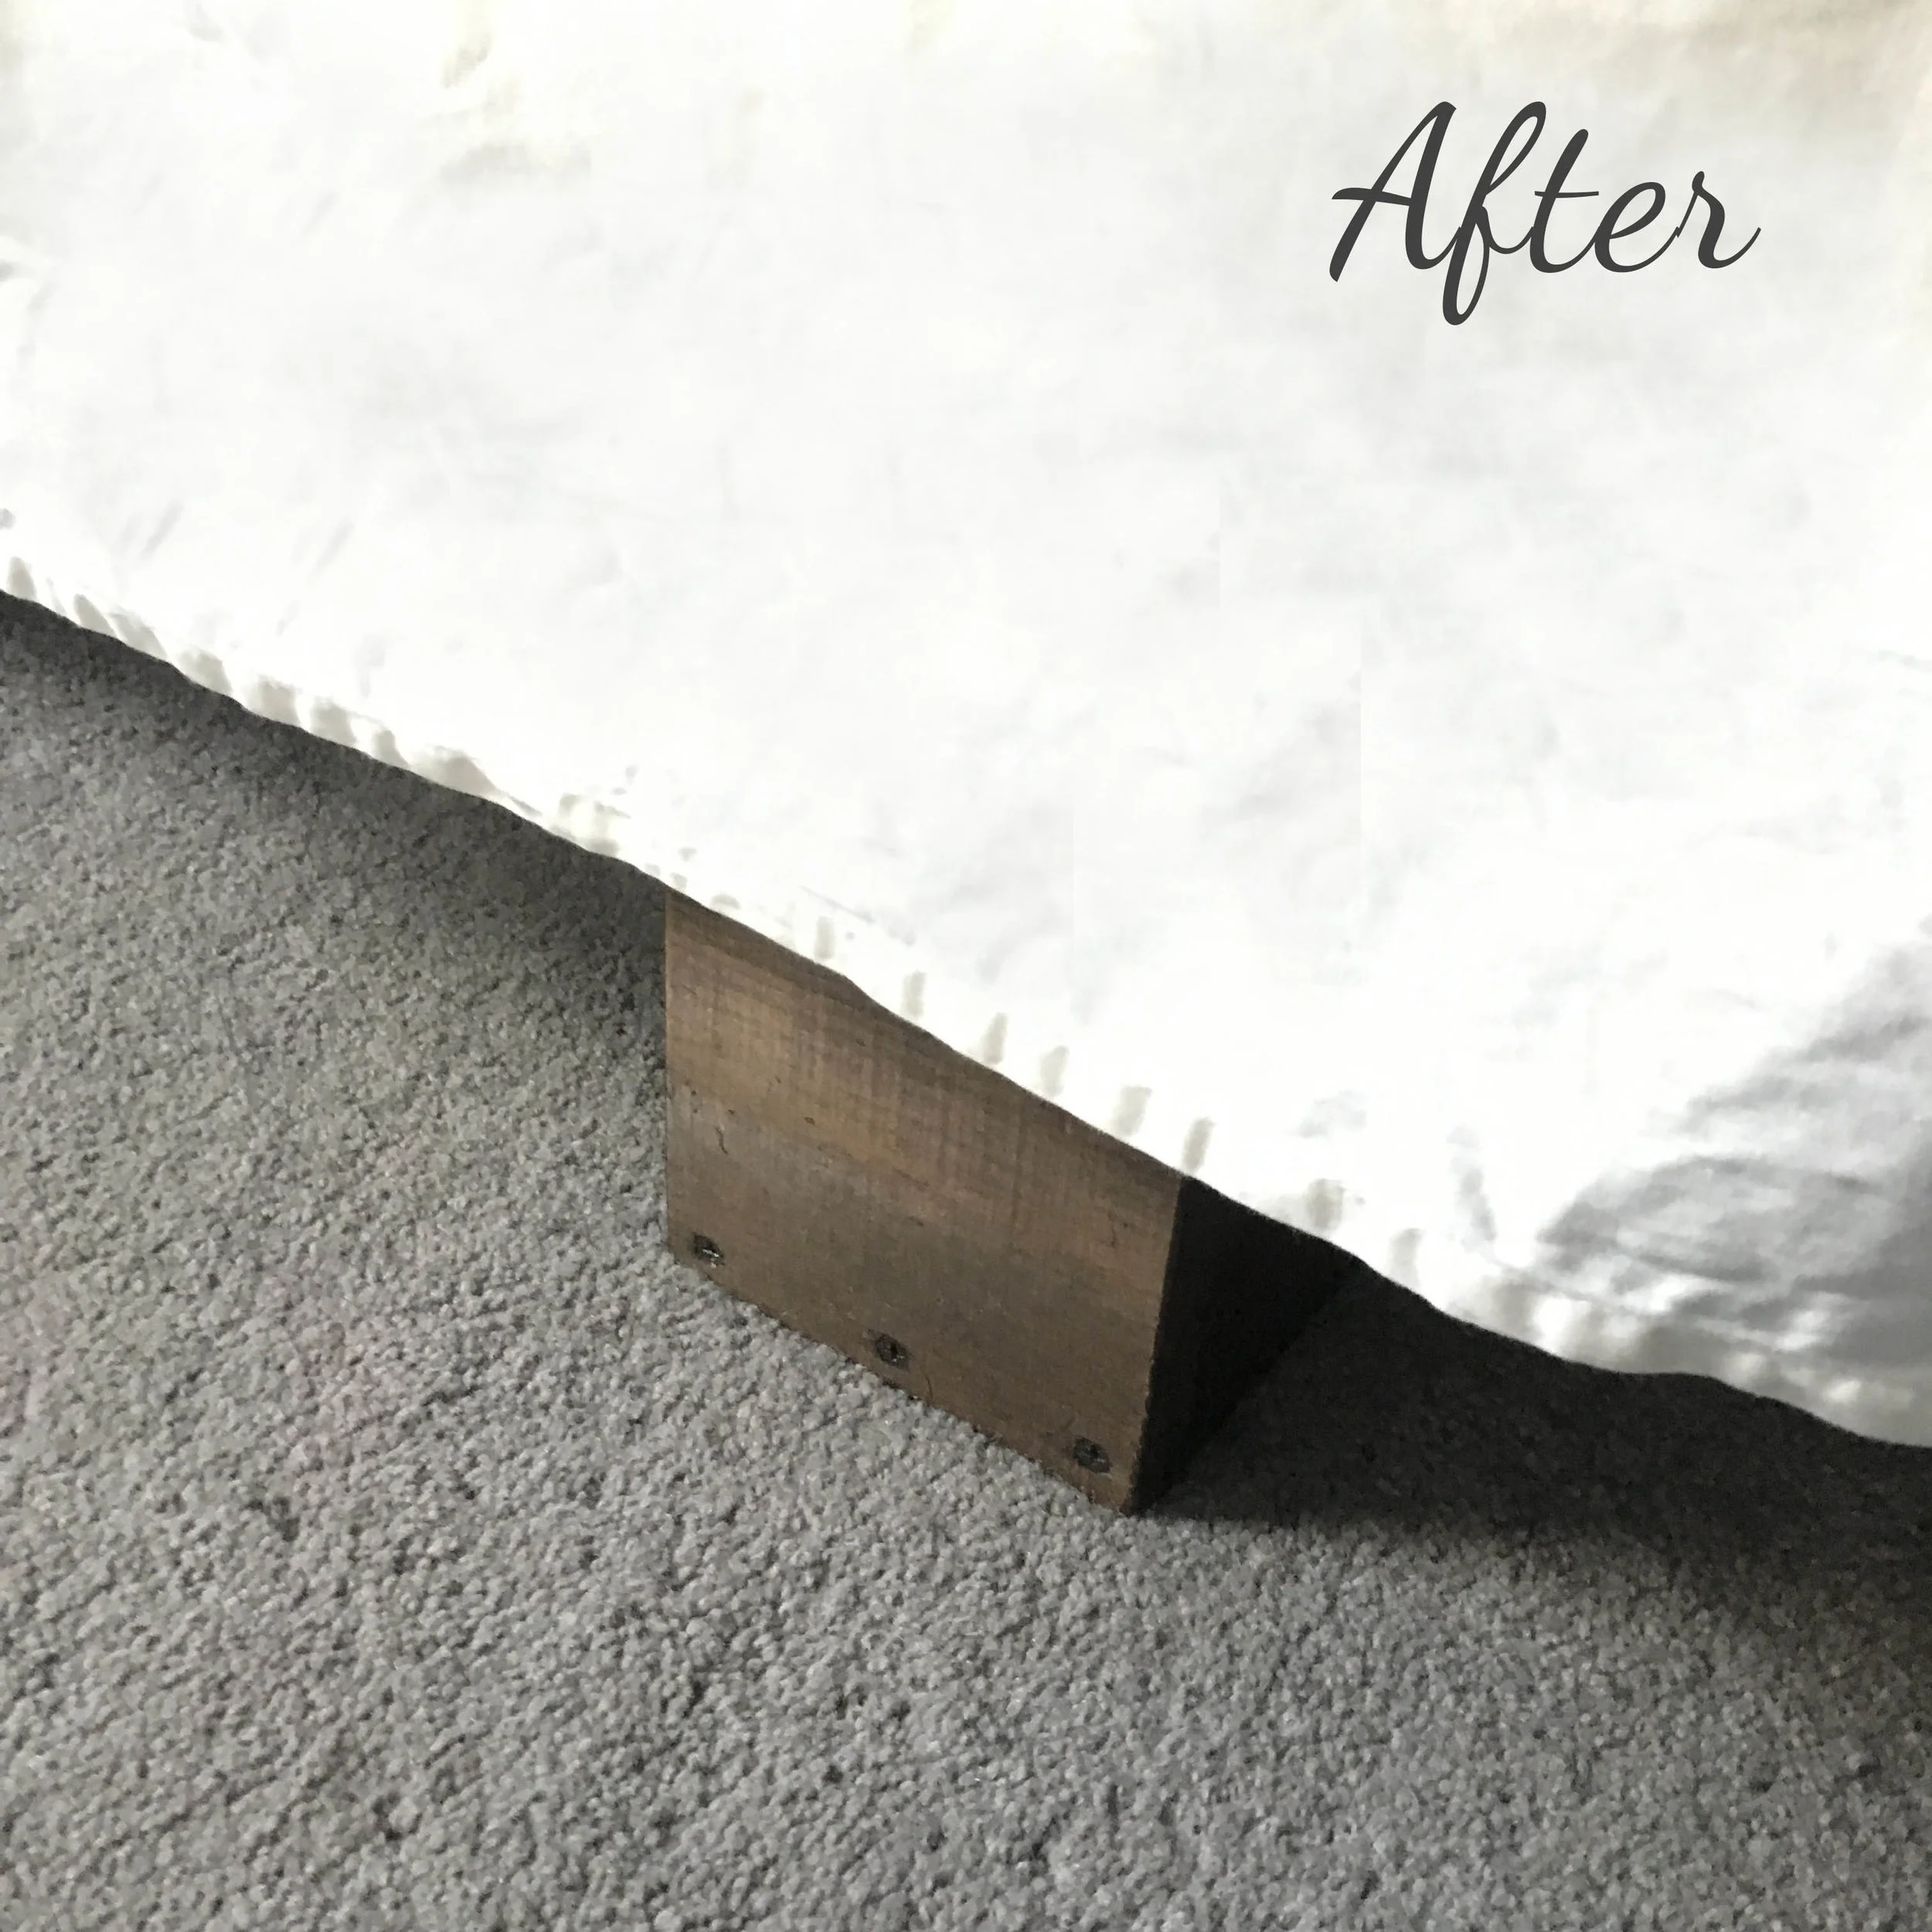
After everything was dry, I had my husband help me by picking up one corner of the bed at a time so I could place a riser under each leg.  I also purchased a longer bedskirt that better fit the new height of the bed.  These risers aren't the most beautiful DIY project but they're pretty un-noticeable with the longer bedskirt - and the best part?  Now I can finally fit the storage totes under our bed!  

Disclaimer:  Always make sure the risers you build are appropriate for your bed and your situation.  Make sure it's safe and sturdy! Use at your own risk.

DIY Bed Risers - After!


Related Posts:

KEEP UP WITH BIRCH LANDING HOME
|  Etsy  |  Facebook  |  Instagram  |  Pinterest  |  Bloglovin'  |  Hometalk  |

Goals for 2018

Every New Year, there's an inspiring urge to finally accomplish all that you've been meaning to do.  As someone who tends to get caught up in the everyday, I love this motivation to see the big picture and write down what I'd like to accomplish the coming year.  

Goals for 2018 - Birch Landing Home

First, lets look back at all the great things that 2017 brought! 

The biggest blessing of 2017 was definitely adding to our family with the birth of our second daughter at the end of the summer.  The pregnancy and new baby stage kept me pretty busy throughout the whole year, and so Birch Landing Home took a bit of a backseat for 2017.  Nevertheless, highlights for BLH this year have included being quoted in Parenting New Hampshire Magazine and adding another wholesale account to our roster.  I also got the opportunity to work with some of my favorite international brands including L.L. Bean, Nûby, and Safety 1st as well as many wonderful New England-based companies including Hills & Trails, Woodboogah, and Cobalt Sky Studio.  

Goals for 2018

I have a lot of professional and personal things I'd like to accomplish or improve for 2018 - here are some of them:  

Grow Birch Landing Home More

This past year, Birch Landing Home was put on the back burner while I focused on family.  Family always comes first, but this year I want to get back into the working groove and grow BLH more.  I have some great ideas for new products to add to the Etsy Shop and DIY projects to share on the blog.  I'd also love to do more work with both international brands and New England-based buisnesses. 
(I also have an incredibly exciting collaboration lined up for the spring that I can't wait to share with you all!)  

Get Back into Running

While I ran throughout my first pregnancy, this time around I just couldn't so I stopped running and haven't gotten back into it since.  I don't know if another Half is on the books for this year with the new baby, but I'd love to at least get back into a regular running routine and do a few fun 5Ks.  

Clean House

Going through the house and systematically purging everything in the beginning of the year is something I really look forward to.  It's so refreshing to go through everything and donate or sell whatever you haven't been using for the past year.  Now that we have two kids the amount of "stuff" has exploded and I'm looking forward to getting it under control.  

Make More Time for Family and Friends

We've been so busy with work and our own family we haven't had the chance to visit enough with family and close friends this past year.  We're way overdue to visit some great friends and you can never spend enough time with your family.  This is an important priority for us in the new year.  

Get Up Early

Getting up early before the rest of the house really helps me get a jump on my day.  This was something that had been part of my routine but has fallen by the wayside over the last few months.  There's just something so motivating about getting up before everyone else, enjoying a cup of coffee in the peace and quiet, planning out your day, and getting a jump start on your to-do list.  Days when I get up early are so much more productive and let me focus more on the kids and other important tasks the rest of the day.  

Get Outside More

I'm really looking forward to more hiking and camping trips with family and friends this year.  There have been a couple of hikes that have been on our "to-do list" forever and it's high time we finally do them!  There's nothing better than getting outside to recharge. 

Explore New England! 

One of our favorite things to do as a family is day trips and weekend trips around New England to explore all the great things this area has to offer.  Usually we do a couple trips every year and this year I'd love to do even more if we can - especially in Maine and Vermont.  I'd also like to share our knowledge and put together more New England Travel Guides for the blog.  

What are some of your goals for the New Year? 

Photo from Free Nature Stock

KEEP UP WITH BIRCH LANDING HOME
|  Etsy  |  Facebook  |  Instagram  |  Pinterest  |  Bloglovin'  |  Hometalk  |

New England Humidifier

I shared this photo on my Instagram Stories earlier and got so many comments I figured it was worth explaining!  Here in New England during winter, things get sooo dry indoors with the freezing cold temps outside and heat cranking inside - as a result your skin and throat really suffer, feeling constantly dry and scratchy.  | This post contains affiliate links |

New England Humidifier - a pot of water on the wood stove or radiator.

One solution is to get a humidifier to put some moisture back into the dry air. In fact we do have a cool mist humidifier upstairs that we run at night when it's particularly dry or we're sick, but otherwise you can't beat the price and efficiency of an old fashioned "New England Humidifier" - a.k.a. a pot of water on the wood stove or radiator.

It works by simply adding moisture into the air by letting the water evaporate.  It's most efficient when you put the pot of water on the heat source so it evaporates a bit quicker, but if you don't have a stove or radiator you can also leave the pot by a heating vent or just in the room with you.  If you do leave the pot on your stove or radiator, just make sure it doesn't go dry (you want to take it off when you leave the house too) otherwise you might end up with a scorched pot!  

Disclaimer:  Use this tip at your own risk.  

KEEP UP WITH BIRCH LANDING HOME
|  Etsy  |  Facebook  |  Instagram  |  Pinterest  |  Bloglovin'  |  Hometalk  |

Mom Hack: Creating a Nursing Nest

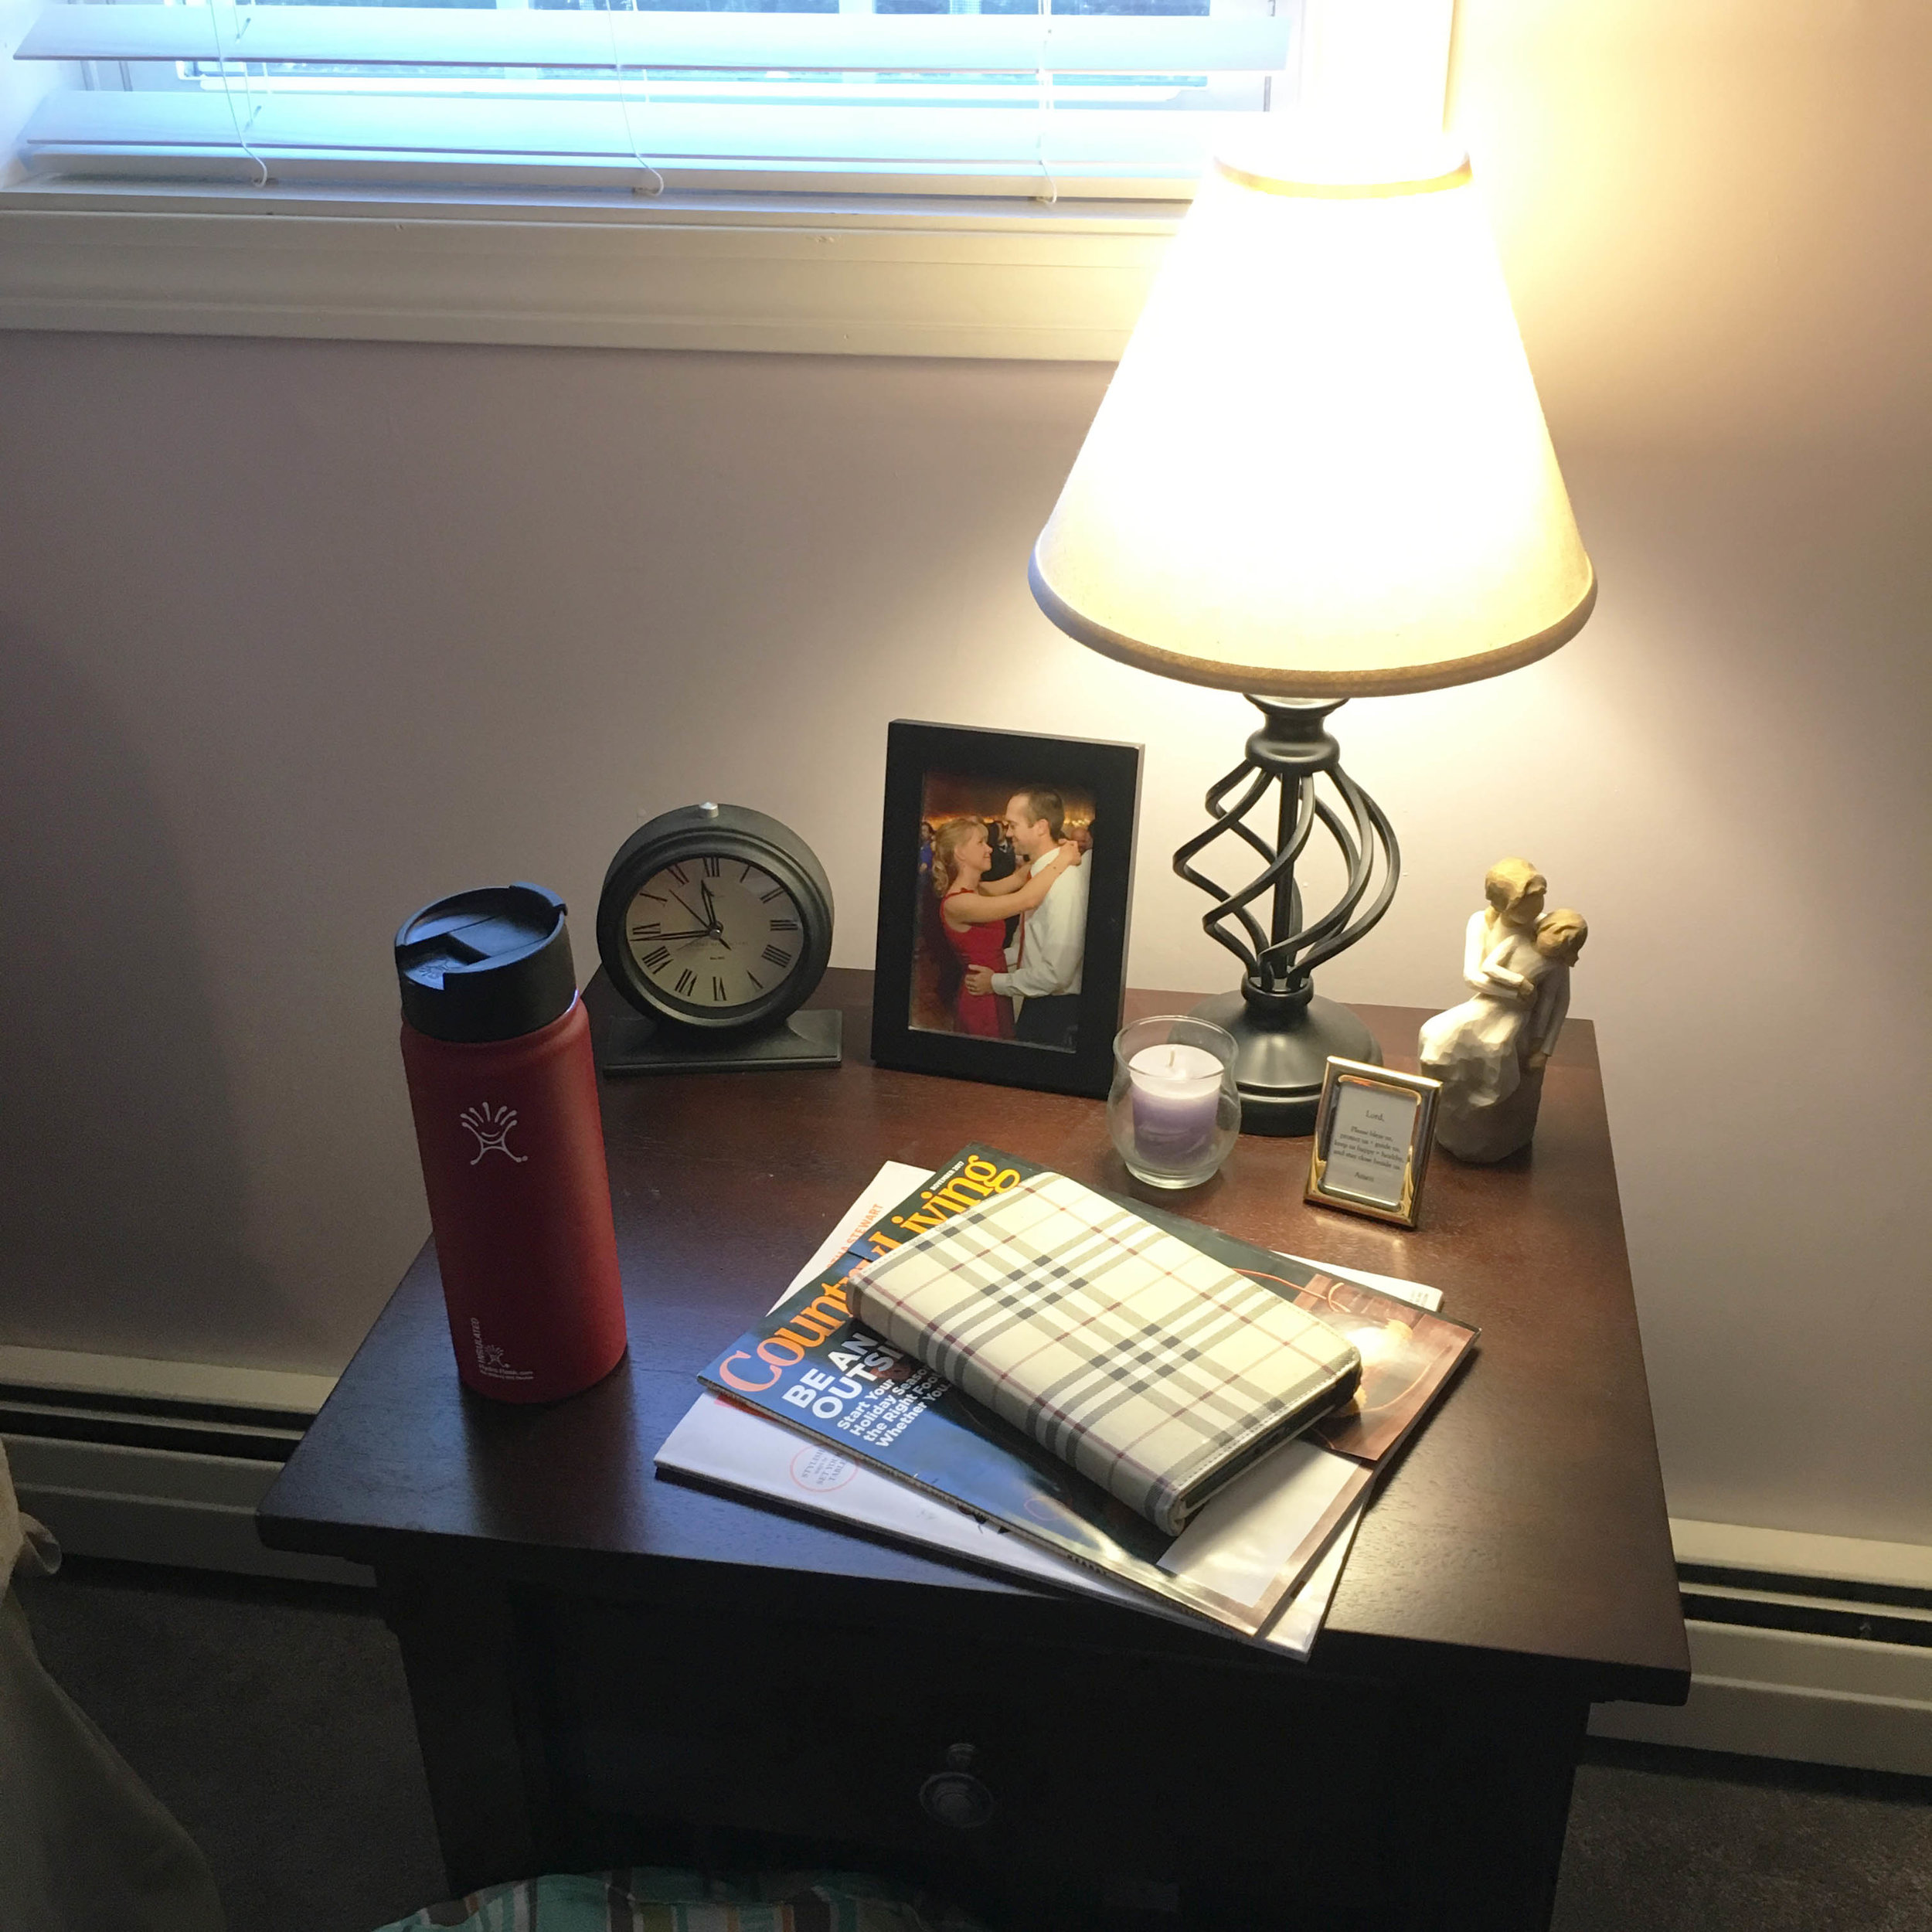
For those new mamas that breastfeed, it can be an exhausting and draining ordeal at the beginning.  Expectations are high but reality is that's it's often much harder than expected.  One way to make it easier on yourself is to set up a "nursing nest" to make those marathon nursing sessions at 2AM (and all other hours of the day and night) easier to handle.  | This post contains affiliate links |

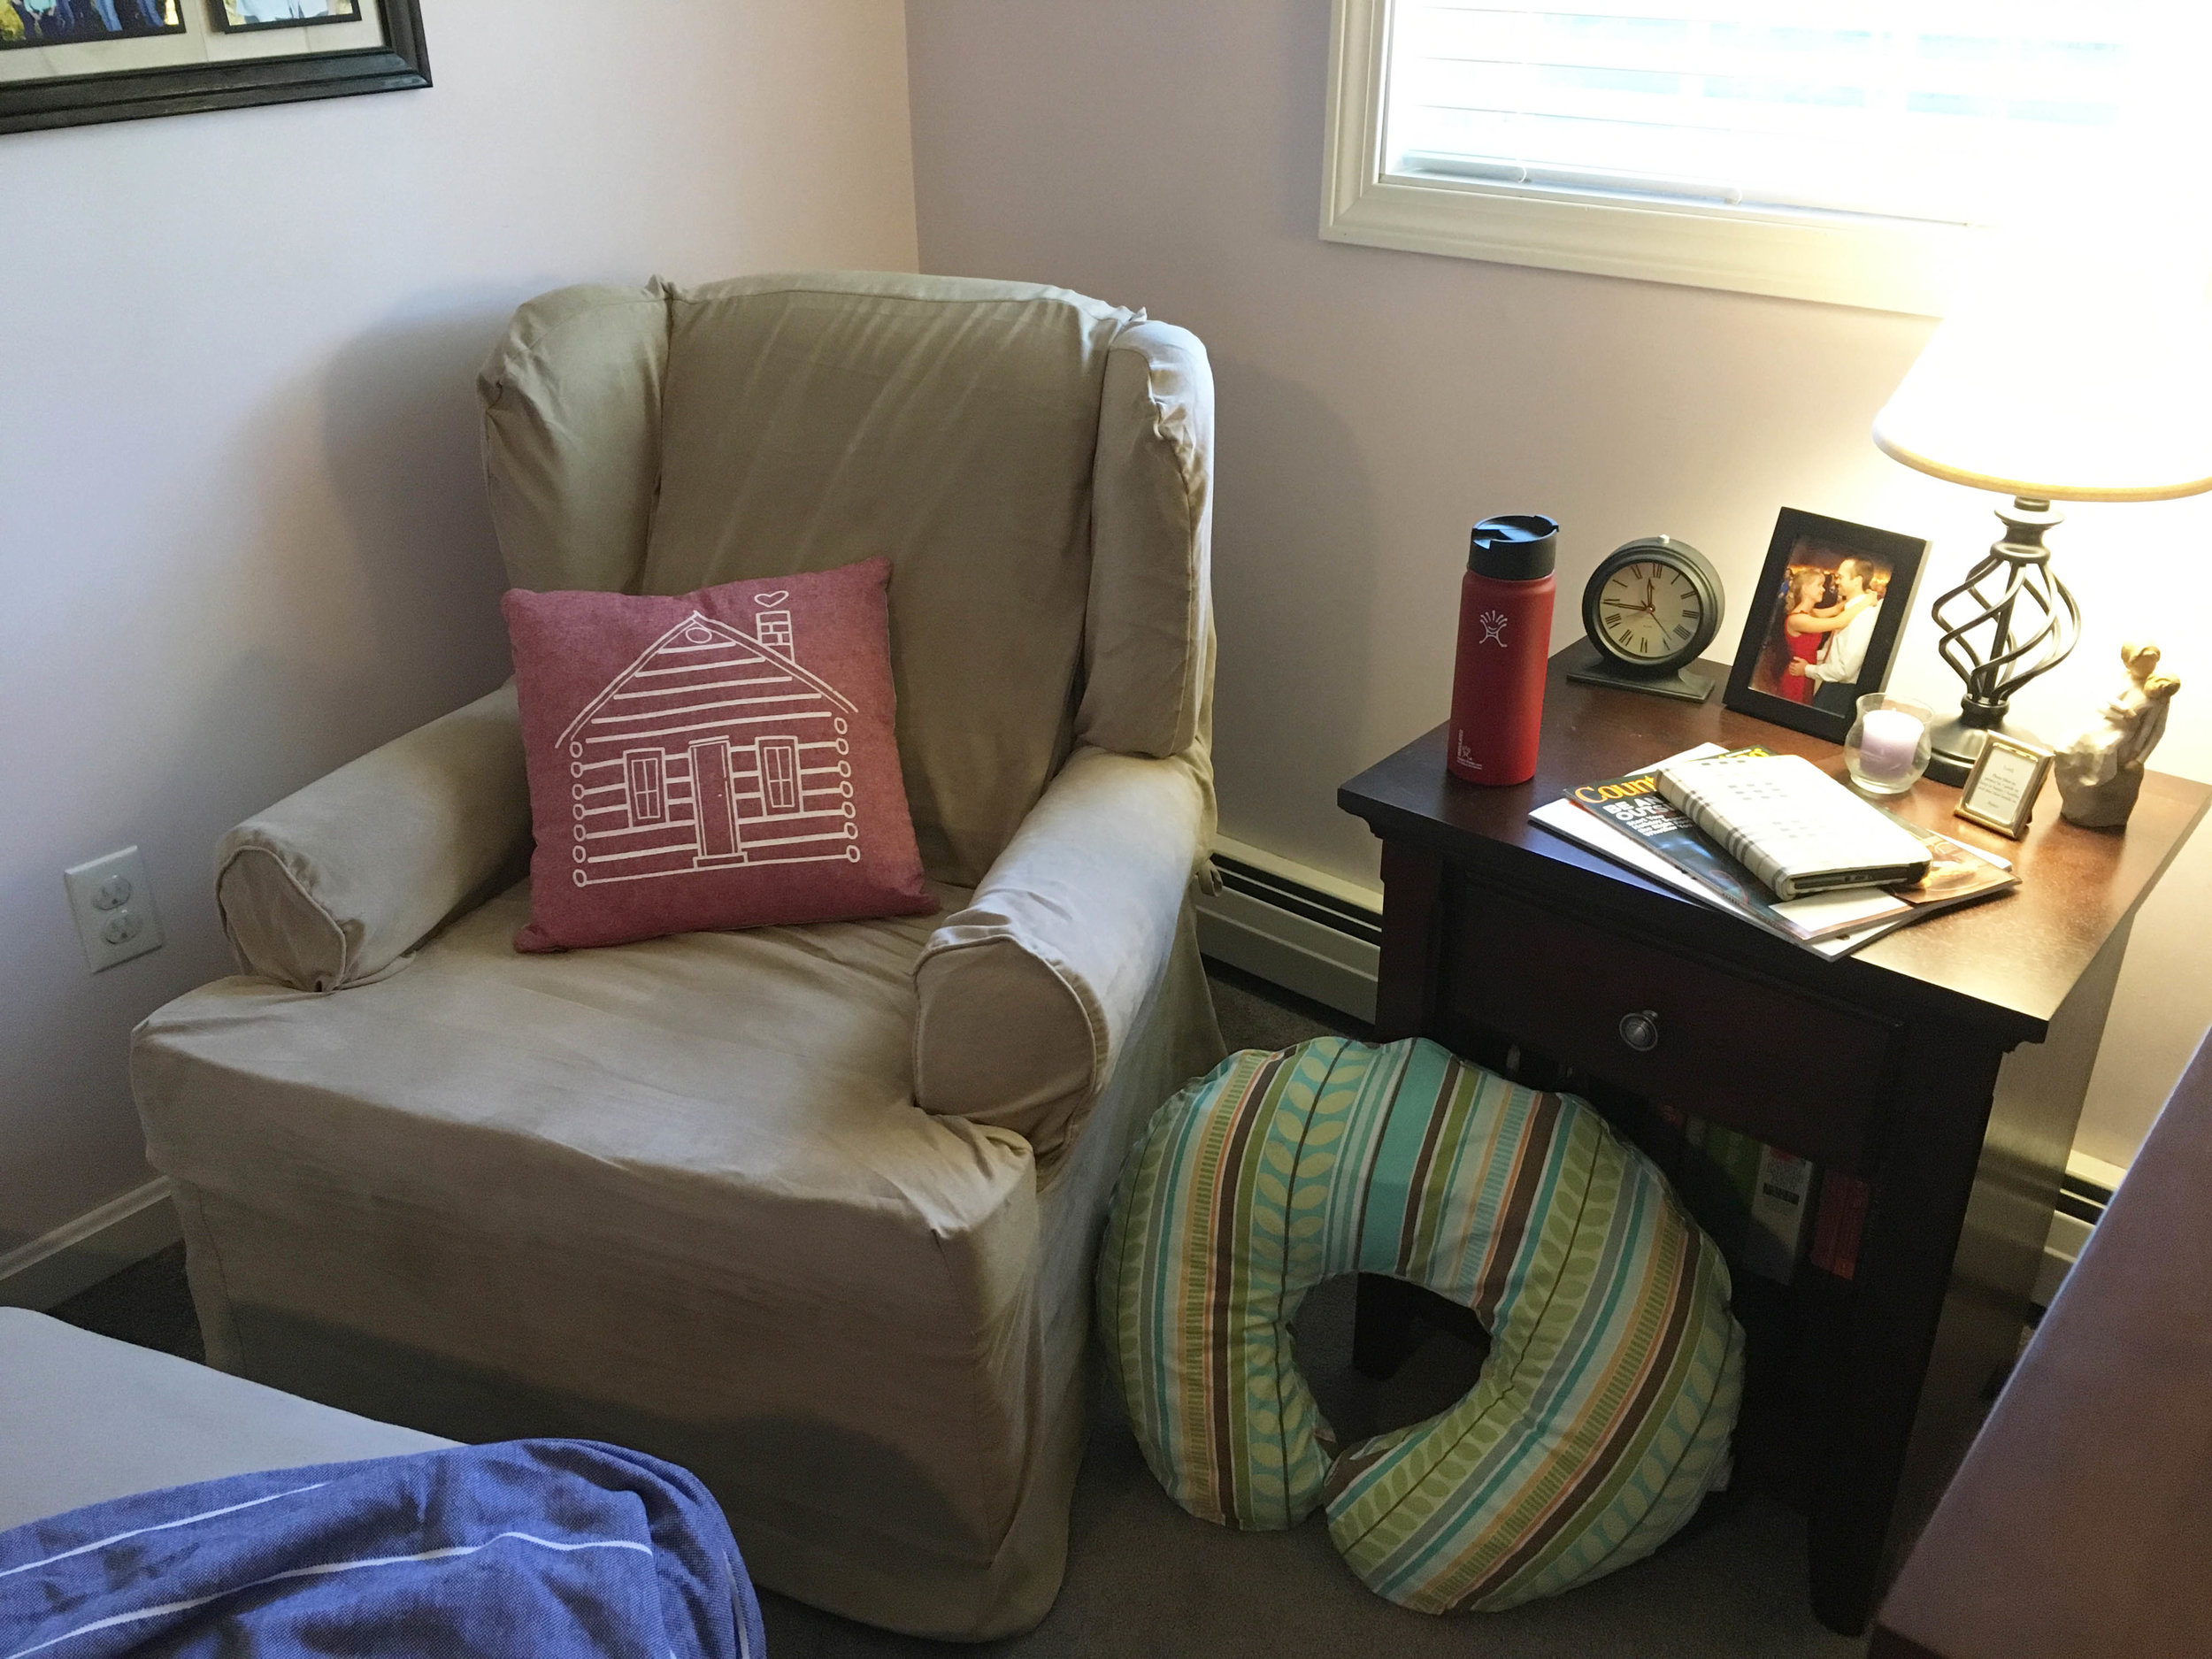
Mom Hack:  Creating a "Nursing Nest"

First you'll need to set up somewhere convenient and quiet.  I set up my "nest" in a corner of our master bedroom since our baby will be sleeping in a co-sleeper next to us and I wouldn't have to go far to nurse in the middle of the night. 

Then outfit this area with all that you need for nursing:

  • cozy rocking chair with footrest
  • side table within easy reach
  • nursing pillow
  • blanket
  • water bottle
  • extra pillow
  • snacks (mine are tucked away in the drawer)
  • clock
  • phone charger
  • lanolin cream
  • books, magazines, kindle
  • phone (watching Netflix on my phone was sometimes the only way I could keep myself awake)
Mom Hack:  Creating a Nursing Nest - set yourself up for success!

By setting yourself up to make it as easy as possible, you can help make those super-tough early weeks a bit more bearable.  Breastfeeding can be one of the most challenging - and rewarding - things you'll ever do.  Hang in there Mama - you got this!  

Mom Hack:  Creating a Nursing Nest

Log Cabin pillow c/o Hills & Trails

KEEP UP WITH BIRCH LANDING HOME
|  Etsy  |  Facebook  |  Instagram  |  Pinterest  |  Bloglovin'  |  Hometalk  |

New England Maker: Birch Landing Home

As you know by now, I love sharing about companies and products we love on my blog and our Instagram - and most especially those made right here in New England. I decided it would be so fun to highlight some of our local New England Makers regularly on my blog and thought I would kick off the series by sharing a little bit more about myself and Birch Landing Home by answering some frequently asked questions.

SnowflakeM.jpg

Birch Landing Home is best known for hand-etched wooden ornaments, garland, and other handmade crafts. I also run this blog where I mainly focus on New England lifestyle, motherhood, and budget-friendly DIY projects.

Tell me a little bit about yourself and your business.

My name is Sarah and I’m a wife, stay-at-home mom, and self-confessed Pinterest addict living in rural New England with our dog and chickens. I started Birch Landing Home a few years ago after our daughter was born because I was looking for a flexible, creative outlet to work from home while still being a stay-at-home mom. I’ve always loved making crafts and thought selling them on Etsy was a good start, I also thought it would be fun to document the little DIY projects I was doing around our home and so I started this blog also.

New England Maker:  Birch Landing Home

What does a typical day look like for you?

My #1 job is stay-at-home mom… so my priority is taking care of our daughter, our animals, and chores around our home. During nap time and after we put our daughter to bed for the day is when I get a chance to work on crafts for my Etsy shop and write articles for the blog. I’m thankful for the privilege to be a stay-at-home mom and the flexibility to be able to work on Birch Landing Home when I’m able to.

New England Maker:  Birch Landing Home

What’s your favorite part about owning your own company? And least favorite part?

My favorite part about running Birch Landing Home is the flexibility and adaptability… when I first started my Etsy shop I was making jewelry but then decided to go in a different direction and focus more on rustic-style crafts. It was great being able to change my focus like that and make Birch Landing Home what I wanted it to be.
My least favorite part is probably self-doubt… Every time I send out an order I worry if the customer/store will like it, what they will think of it, etc - I don’t want to disappoint anyone. Also, because I use a lot of natural materials there is quite a bit of variation in my work too and I worry people won’t appreciate that rustic aspect of it.

New England Maker:  Birch Landing Home

What has been the most exciting moment for Birch Landing Home since starting?

By far my most exciting moment for Birch Landing Home has been being featured in Martha Stewart Living Magazine as the Instagram Favorite for that month. I was so thrilled to be selected and featured - I have been reading Martha Stewart Living Magazine for years and have several of her craft and cookbooks. Such an honor!

New England Maker:  Birch Landing Home

What advice do you have for people just starting out?  

New England Maker:  Birch Landing Home

My advice for those who want to start a handmade business or blog is… just start! It’s easy to overthink everything, over plan, and obsess over details and never get anything in motion. In my opinion it’s better to get things started and then tweak and finalize things as you go. It’s also important to keep finances separate and keep track of all income/expenses for tax time.

What is your long-term goal?  Where do you see yourself in 5 years?

My long-term goal is to continue to grow my Etsy shop and blog. I would love to get more wholesale accounts for my crafts throughout New England, it’s so exciting to see my items in local shops. I also hope to continue to grow my blog following and hopefully get more opportunities to be featured in print. I’ve been lucky enough to be featured in a few print magazines so far (including Martha Stewart Living Magazine, Food Network Magazine, and New Hampshire Magazine), and I hope exciting features like that will continue in the future.

New England Maker:  Birch Landing Home

Why do you love sharing about New England Makers?  

I love sharing about New England Makers because I think there is so much talent in our area that deserves to be shown off. There are so many wonderful, hardworking, creative people who work in lots of different materials and styles. I always love discovering new-to-me businesses and sharing about them.

New England Maker:  Birch Landing Home

Keep Up with Birch Landing Home

Some photos and info updated 2021


DO YOU OWN A NEW ENGLAND-BASED BUSINESS AND WOULD LIKE TO BE FEATURED IN AN UPCOMING INTERVIEW?  OR WOULD YOU BE INTERESTED IN HAVING ME STYLE, REVIEW, AND FEATURE ONE OF YOUR PRODUCTS?  
Please drop me a note.  


More Interviews from New England Makers:


KEEP UP WITH BIRCH LANDING HOME
|  Etsy  |  Facebook  |  Instagram  |  Pinterest  |  Bloglovin'  |  Hometalk  |

Safeguarding Against TICKS

TICKS.  Just the word makes my skin crawl.  Living in the Northeast, we've always known to look out for them after spending time in the woods or tall, grassy fields but recently the amount of ticks has seemed to reach plague status.  We're now finding ticks places where they should just NOT be - including short trimmed lawns, sandy areas, even in our asphalt driveway.  There's more ticks than ever, with many of them likely carrying potentially debilitating diseases like Lyme.  Because of the great risk, we're not taking chances any more and have taken precautions to protect our yard and ourselves against ticks.  | This post contains affiliate links |

Safeguarding your yard, family, and pets against TICKS

DISCLAIMER:  I am not an expert or medical professional.  These are tips and information I've learned over the years living in a tick-prone area.  Always check with your own doctor, vet, and local experts for the best prevention and treatment plans for yourself and your family.

Safeguarding your Yard

Eliminate Tick Habitats  

Ticks like to hide and breed in brushy areas, leaf litter, log piles, dampness, etc.  It's important to eliminate these places.  Keep your lawn cut short, trim back bushes and over hanging tree branches to maximize sun exposure to your lawn, get rid of compost piles or move them as far away from your usable yard as possible.  Also make sure to thatch (rake and scrape) your entire lawn every spring - this will reduce the litter mat under your lawn.  

Deter Mice 

Believe it or not mice, and not necessarily deer, are one of the biggest culprits at carrying ticks and transmitting diseases carried by ticks. A single mouse can easily carry and feed hundreds of baby ticks on it's body. If you have mice in your yard and around your house, they are dropping ticks. To deter them eliminate brush and log piles and spray peppermint oil around sheds, decks, and other places they might nest or hide. Mice hate peppermint oil (they are very sensitive to smells) and will generally avoid the areas where it's been sprayed. Also, make sure to get rid of bird feeders in your yard since dropped bird seed with attract mice and other small rodents.

Get Guinea Hens or Chickens

Okay, so this tip certainly isn't for everyone - but guinea hens and chickens can be very effective at reducing the tick population in your yard.  As they free-range they forage for bugs, including ticks, and can eat a lot throughout the day.  Guinea hens are particularly known for their tick-eating abilities but can be harder to keep than chickens.  Make sure to do your homework and talk to your neighbors as a courtesy before getting guineas or chickens.  

Tick-Repelling Plants 

Ticks do not like certain plants - including lemongrass, lavender, sage, and mint.  Planting these can help keep ticks away, at least in the immediate area of the plant.  We make sure to include these in flowerbeds and planters around paths, our deck, and doorways to help deter ticks from hanging around these high-traffic areas.  

Tick Tubes

By selectively placing Tick Tubes around your property, you can help kill off the ticks that are hitching a ride on mice and other small rodents that may not have been deterred by the peppermint oil. Tick Tubes contain permethrin-soaked cotton and are placed in areas where these rodents frequent (brush piles, under decks/sheds, in stone walls, etc). Rodents take the cotton and use them in their nests. Permethrin will not hurt the rodents, but will kill the baby ticks riding on them.

Have Your Yard Sprayed

Last year was the first year we actually had our yard professionally sprayed - despite all our best efforts, the ticks in our area were just out of control.  We chose to have our yard sprayed with an all-natural spray option because we had chickens, a toddler, and a veggie garden.  We were very pleased with the results and only saw one or two ticks in our yard for the rest of the summer.  There are many spray options available out there - from all-natural to chemical-based.  There are pros and cons to every option, so it's important to discuss your concerns and situation to your pest-specialist when choosing a treatment plan.  

Despite our best efforts - short lawn, maximum sun exposure to the backyard, keeping chickens, etc. - there were still lots of ticks (as seen here on our daughter's playhouse). Soon after this we decided to have our yard professionally treated for t…

Despite our best efforts - short lawn, maximum sun exposure to the backyard, keeping chickens, etc. - there were still lots of ticks (as seen here on our daughter's playhouse). Soon after this we decided to have our yard professionally treated for ticks and it helped immensely.

Safeguarding your Family

Bug Spray

Whenever we spend time outside, we use bug spray each and every time. Typically we use an all-natural repellent, especially for our little one, but bug sprays containing DEET are supposed to be even more effective.

Permethrin-Treated Shoes and Clothing

Permethrin is supposed to be one of the best tick deterrents around (it's also what's used in Tick Tubes). By pre-treating your shoes and outer clothing with it, it can be very effective at keeping ticks off of you. We treat all of our shoes, yard work clothes, and hiking gear with permethrin. Check the label for exact instructions, but many permethrin treatments are good for several washes or 40 days so it's great for lasting protection. We've personally had the best luck with Sawyer Permethrin Spray.


Most Importantly:  Check for Ticks - Twice

The most important safety measure against ticks is always checking for ticks - at least twice.  Despite all your best efforts, yard treatments, and bug sprays, you can still pick up ticks.  For us, we've come up with our own protocol to thoroughly check for ticks whenever we come in from spending time outdoors.  We're lucky enough to have a bathroom/laundry room right by our back door, so as soon as we come in we stop in to put all the clothes we wore directly into the washing machine and shut the door (shoes are left in the garage and not brought into the house).  Then we thoroughly check for ticks - paying close attention to check those hard-to-see areas and scalp; a full-length mirror can be very helpful with this. Then, if possible, take a shower or bath next before getting dressed in fresh clothes.  Ticks won't drown but thoroughly washing right after you come in will hopefully rinse any missed un-attached ticks off of you.  Then that night before going to bed, make sure to do a second tick check just to confirm that nothing was missed earlier in the day.  

You might think this tick-checking protocol is a little overboard, but if you live in a tick-prone area (like the Northeast) it's unfortunately very necessary.  After following this protocol for two years now, we have had instances where we found dead ticks in our dryer lint trap (it's actually the high heat of the dryer that kills them - not the washing machine) and a live one on the shower wall once... these were ticks that were on us but were stopped by our thorough system.  

Safeguarding your Pets

Up-to-Date on Preventatives and Vaccines

Talk with your vet about the best tick preventative option (collars, topical, oral medication, etc) for your pets and make sure you keep on schedule with it, even during the winter months.  You might not think that ticks are out in the winter since they go dormant, but even a brief warm streak can bring them out.  

Check for Ticks

It's a very good idea to check your pets for ticks when bringing them in as well, since ticks can "ride in" on them. We have a black lab which is particularly tricky to check, so we make sure to keep a brush and a lint roller by the back door to check her before coming in. We stop her outside and brush out her coat, then use the lint roller to roll over her legs, underbelly, and snout to make sure no ticks are hitching a ride. We also vacuum carpets and her dog beds often to make sure none get dropped around the house in the event we miss one.

If you Find an Attached Tick

**Always call your doctor right away for the best advice for your situation**

If you find an attached tick, remove it carefully without squeezing it's body - you do not want it to potentially expel any more toxins into you. Tick Spoons can be particularly helpful in removing them; we also like Tick Keys which fit handily on your keychain so it's always with you. Then wash the area with antibacterial first aid wash and call your doctor immediately. The doctor will help determine whether you need to start medications right away or wait and see if symptoms develop.
Don't count on seeing the hallmark "bulls-eye rash" though - many people who contract Lyme will never get it. Make sure to keep the removed tick as well (you can stick it in an empty jar), and see about getting it tested right away for Lyme and other diseases. This will give you the quickest and most definitive answer since even if you did contract Lyme yourself from the tick you would not test positive for it for some time.


Related posts:  


DISCLAIMER:  I am NOT an expert or medical professional.  These are tips and information I've learned over the years living in a tick-prone area.  Always check with your own doctor, vet, and local experts for the best prevention and treatment plans for yourself and your family.  Discuss with your doctor ahead of time what to do in the event of a tick bite (and I hope you never need to use that information).  Stay vigilant and stay safe!  

KEEP UP WITH BIRCH LANDING HOME
|  Etsy  |  Facebook  |  Instagram  |  Pinterest  |  Bloglovin'  |  Hometalk  |